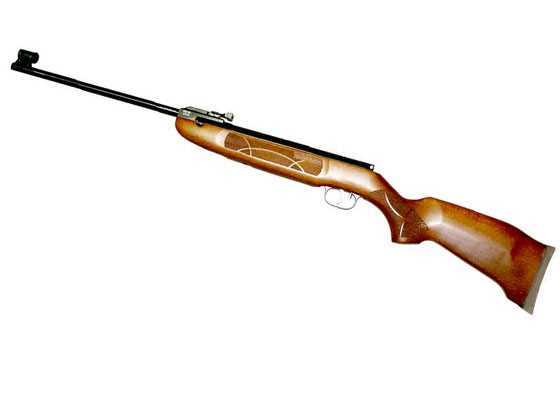
The HW 30S I am testing seems to be a new version.
This report covers:
- Removing the trigger
- The mainspring is lubricated
- Remove the Rekord
- The safety
- Factory lubrication?
- Clean off the grease
- Cock the trigger
- Assemble the rifle
- One last step — adjust the trigger
- The test
- Summary
Today I remove the Rekord trigger from my new HW 30S, to clean and adjust it. I have written a lot about the Rekord in the past, but rarely about one in a new airgun. My R1 was a new one I wrote a whole chapter about, but that was in the R1 book. So this report is special. To work on the trigger we have to remove it from the rifle. We start with a rifle that is uncocked.
Removing the trigger
First remove the barreled action from the stock. The forearm has a single screw on the bottom and the triggerguard has two screws.
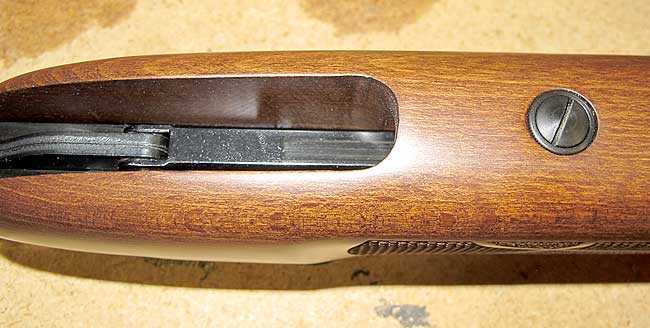
Remove the single screw from the bottom of the forearm.
Now remove both triggerguard screws. The front one is long and may be tight. The rear one screws into a nut that’s in the bottom of the trigger box and shouldn’t be too tight. The triggerguard is inlet tight inside the stock and may need persuasion to come out the first few times.
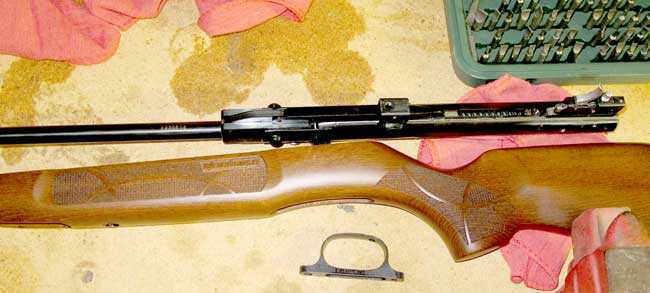
The barreled action and triggerguard come out of the stock.
The mainspring is lubricated
At this point you can see part of the mainspring through the cocking slot, and on this rifle I can see that the mainspring has been lubricated. It’s only lubed lightly and when I tune the rifle I will replace that grease, but it’s there. Not all spring guns are lubed at the factory.
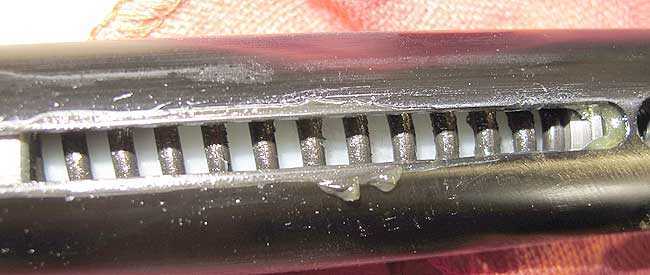
Through the cocking slot we can see that the mainspring has been lubricated at the factory.
Remove the Rekord
Now it’s time to remove the trigger. It’s held in by two pins that run across the spring tube. We will start by tapping the front pin out, left to right.
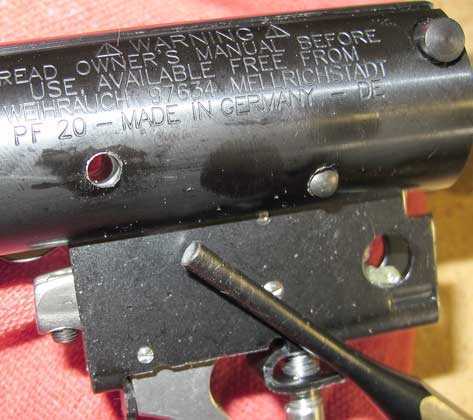
Tap the front pin out first, left to right.
Then tap the rear pin out, left to right. Now the Rekord trigger assembly will slide out of the end cap. On a new gun it will be tight. Take note that the two pins are the same diameter but different lengths. The long one goes in front.
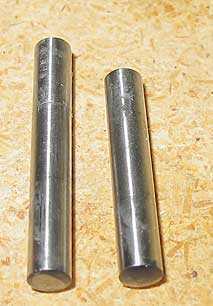
The longer pin goes in the front.
The safety
You’re not done. The safety is still inside the rifle. The safety is a pin that goes in the left side of the base block, which is where we removed the trigger. Just pull it out. At its small end, the one that’s inside the rifle, is a small coiled mainspring we don’t want to lose. It’s loose on the safety pin, but it’s tight enough to remain on if you are careful.
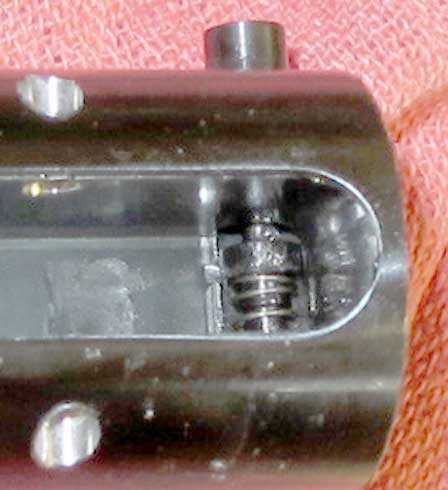
After the trigger assembly comes out, the safety is next.
Factory lubrication?
With the trigger out, look and see how it has been lubricated. I have seen a couple new ones that were swimming in grease. This one is clean and looks fine to me.
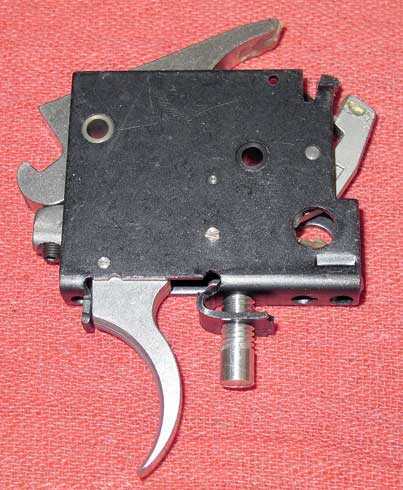
Rekord trigger from the HS 30S that’s being tested. This trigger is clean and not over lubricated.
Now let’s look at the graphic of the Rekord that’s in my R1 book. It shows screw 52b, which is Beeman’s designation. That screw adjusts the sear engagement and should never be adjusted unless you get an airgun that has been abused.
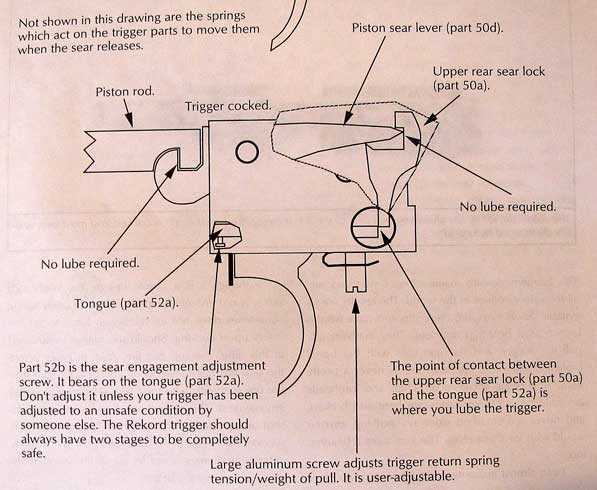
This is the picture that tells all. Lube the sear engagement where the drawing shows and I use moly grease for it. If you study the trigger parts in the drawing you will see that the sear does not, in fact, restrain the piston against the mainspring. The sear holds the lever that restrains the piston catch that restrains the piston/mainspring. By getting a series of levers involved, many dozens of pounds of force is reduced to ounces.
Clean off the grease
At this point, it’s time to clean off the grease from the trigger. This is where some airgunsmiths and hobbyists get anal and strip the trigger to pieces, then put everything into a sonic cleaner. You can do that, of course. But why? After you’re done you’re going to lubricate those parts with a light coat of grease again. Why not just leave well enough alone and leave the grease where it is? That’s especially true for a trigger that is lubricated as lightly as this one.
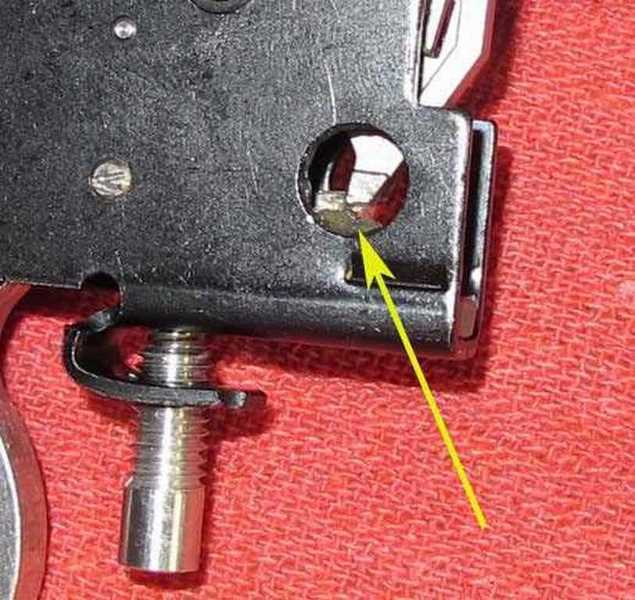
That is the only place you have to clean this trigger. Get rid of all the grease on both sides of the sear at the contact point (arrow). To do this the trigger has to be cocked.
No need to polish all the parts
Another fruitless endeavor is to polish all the mating surfaces of all the parts. Maybe it makes you feel better but it is fruitless work and wasted time — unless there is a real problem, which was undoubtedly caused by the last anal guy who had his mitts on the trigger parts. Let me tell you a story.
Rolls Royce once bought an automatic transmission from General Motors for their cars. Their engineers stripped the sample to pieces and found a piston whose finish was a little rough. So they carefully polished the part and then assembled the transmission. It didn’t work anymore. When they asked General Motors about it they were told that piston was supposed to be rough in order to function.
I’m not saying that the parts in a Record trigger have finishes that allow them to work, but I am telling you that they work just fine as designed and fabricated. If you just have to polish something, get a pair of black combat boots and go to town!
Cock the trigger
To clean the sear contact area, the trigger has to be cocked. Do that by pressing down on the back of the piston sear lever (part 50d) in the drawing.
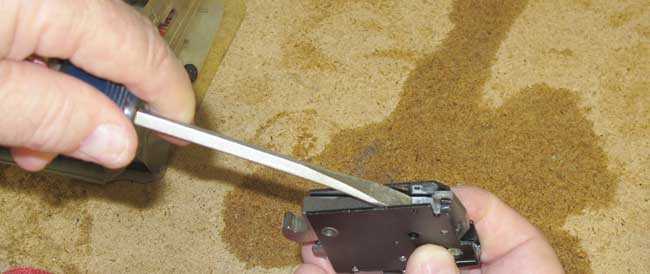
To cock the trigger, press down on the back of the piston sear lever (part 50d) with a screwdriver until the sear catches it.
When the sear is clean I fire the trigger, then coat the back of the tongue (part 52a) that is exposed in the viewing hole, with moly. You can use other greases if you prefer.
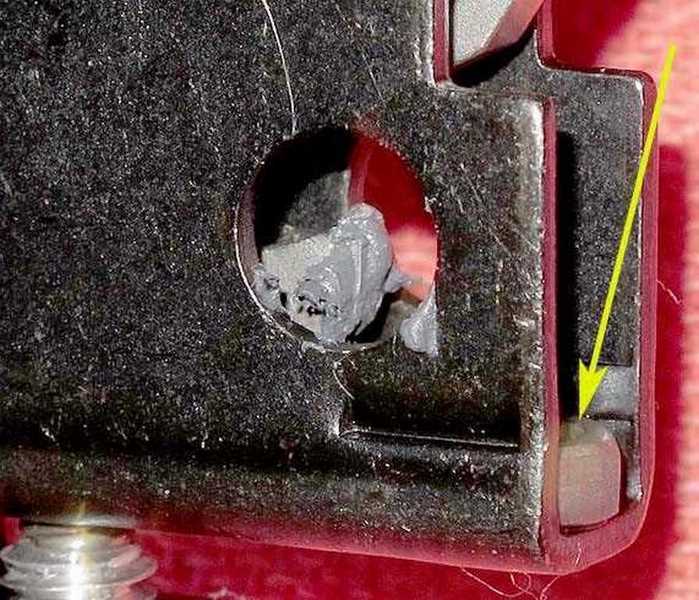
Here I have put moly grease on the rear of the tongue (part 52a). The arrow points to the tiny nut that holds the rear triggerguard screw.
That picture is an extreme enlargement. The actual amount of moly grease I used is miniscule. That grease will transfer to the bottom of the upper rear sear lock (part 50a) every time the trigger is cocked.
You are going to need the trigger cocked to assemble the rifle, so leave it cocked for now.
Assemble the rifle
Put the safety with spring back into its hole. Then install the cocked trigger assembly. I keep a finger pushing in on the safety button while assembling the trigger in the rifle. Once the trigger assembly is in the end cap, line up the front pin hole and slide the pin in. This takes some fiddling, so be patient. It will go. It might help to use a small pin punch from the opposite side to move the trigger assembly around until the hole aligns.
The reason the trigger is cocked all this time is twofold. First, if it isn’t part 50d will push it down so the pin holes don’t align and second, the safety cannot be installed unless part 50a is out of its way.
Now push the second (the rear) trigger pin in. Then pull the trigger and finish assembling the rifle.
One last step — adjust the trigger
Now to adjust the trigger. It is clean and properly lubricated. Loosen the rear trigger adjustment screw (the silver one hanging down behind the trigger blade) until you have a trigger pull you like. My advice is to try for a one-pound pull. Each trigger will be a little more or less sensitive and it’s up to you to make that call.
The test
In Part 2 I told you the two-stage Rekord trigger on this HW 30S had a first stage pull of 12 ounces and a stage two pull of 1 pound 15 ounces. After I cleaned, lubricated and adjusted the trigger stage one is now 6 ounces and stage two breaks at 12 ounces. Stage two is as crisp as a glass rod breaking. This is one of the nicest Rekord triggers I have ever worked on, and that may be because it is on a 30S and not an R9 or R1. I don’t know, but I really like the way this one came out.
The rifle, in contrast, now seems to fire a bit harsh. It’s probably because the trigger is so nice. But at the end of Part 2 I told you that the next step was to lube-tune the rifle before I mounted a scope and tested it for accuracy again. I believe I will check velocity before and after that lube tune, because we all wondered if my rifle wasn’t a bit slow in the Part 2 test from needing more of a break-in.
Summary
This series is going great. Sometimes I need to work on something that I know is going to work out right, and this HW 30S was just the ticket.


B.B.,
That last illustration sparked a “Dad” joke in my head: “So! There’s the nut behind the trigger!”
Seriously, seeing the rounded profile of the rear makes it seem hard to get a scope mount to properly grip so that it doesn’t move. Isn’t there anything on the surface to help stop the scope from moving.
Siraniko
Siraniko,
There are two large vertical holes in the end cap that the scope mount’s stop screw fits into. The scope won’t slip if it is mounted properly.
BB
BB
For a long time I figured the sear was the actual part that released the hammer or bolt and assumed it would be the part that retains the piston in an airgun?
I see now that it is a ‘sear lever’ here. Is it ‘the sear’ in a lever form or a ‘lever’ that assists the sear.
Generally speaking can a few levers, links and a lock be considered a sear ‘assembly’ or is it just the one part the manufacturer designates as ‘the sear’ and the rest are as you say just levers to change force and a lock.
When I retro fit my Winchester 1894 I removed a sear link the trigger directly pulled out from under the piston rod ( horrible ) and installed the old Daisy assembly that released a spring loaded hammer that struck the sear to disengage it. But I never really knew which part was officially the sear. The hammer release or piston release.
Can I also assume that trigger stages are designed to increase leverage at various points of the operation?
Bob,
German double-set triggers exist as 4-lever and 5-lever triggers. I suppose there is a better set of names for all the different parts, but I don’t know what it is. I used the names Beeman selected.
Yes, the trigger stages do increase leverage. There are other features in the trigger that I didn’t show or comment on.
BB
Boy there sure is a lot of information about tuning and servicing this trigger assembly out there. Found some good info at airguns.net and airgunstocks.com. I was simply looking for a complete parts illustration in a picture search and found links all over the place.
BB,
These are indeed wondrous little air rifles. I could not get the old Feinwerkbau rear aperture to stay on. Such a shame as it made shooting the 3/4″ spinner at 10 yards child’s play. Shootski suggested I use rosin in the slots. I may end up with an AirForce rear aperture and maybe a custom made stop pin for it.
I am certain my grandson would prefer I mount a scope, but I just do not see one on top of this sweet little gal. She needs a peep. I guess I will have to mount a scope on his Dad’s Diana 46E.
This is pure picky, but…
Misplaced comma
Assemble the rifle
…Once the trigger assembly is in the end cap(,) line(,) up the front pin hole…
RR,
Fixed it. Thanks,
BB
RidgeRunner,
My 30S has an old Walther biathlon diopter on it, fits perfectly. As Shootski recommends, a little bit of rosin works wonders! That sight hasn’t moved a lick in 07 yrs now.
BobF
BobF,
I am quite certain it works but first I have to find some rosin. With some thought, I am sure I will find something that works. I can still see me getting my hands on one of those AirForce apertures. They are so nice, and this little gal deserves something like it.
RidgeRunner,
If you have a store nearby that sells musical instruments that’s one source of rosin (used by violinists) other possible sources are hardware or electronic shops (used in soldering).
Siraniko
RR
I thought you were a bullet caster? That mixing flux used when heating or blending is usually rosin. If you have a gunsmith buddy nearby that does re-barreling he will have rosin on hand for his barrel clamps.
Just me, but I’d think twice before dropping big bucks on an air
force diopter sight. I have one on a Diana 48 and yes it works but #1 man is that thing big! #2 I personally think it’s butt-ugly compared to the older european style diopters. #3 The eye piece is made of plastic not steel. It took me 01 hr of hand work to get the fuzzies out of that little hole. It will work but I think it just wouldn’t look right parked on top of a petite HW30S! Just my opinion and we all know what they are worth.
Mine likes JSB EXACT RS. Cat food cans at 40-50 yds, no problem!!!!!!!
BobF
B.B.
In the close-up of the R-1 trigger, I see where it say NOT to put grease. I do not see where it say TO put grease?
-Y
Yogi,
Yeah, it isn’t that obvious, is it? Read the lower right paragraph that points to the same place I am showing you today.
BB
B.B.
What are your thoughts about using sewing machine or watch oil on the trigger parts? Also, what to do if you use Krytox for the compression tube/spring lube?
-Y
Yogi,
Sewing machine oil and watch oil are a little light for a trigger. Maybe RemOil?
I don’t understand the last thing about Krytox.
BB
I understand the moly and Krytox do not mix at all.
That contact together corrupts both of their abilities to properly lube your gun.. Maybe this is an Urban Myth?
-Y
Yogi,
In this past blog BB used Krytox. – Don
/blog/2019/04/tuning-bbs-diana-27-part-3/
Vaseline (especially the White Vaseline such as the one sold by Ballistol) work great, are cheap and non toxic.
RR
Why not do both? I go back and forth from a scope to aperture on my HW30S. It is a sure fire and fun way to convince your gran that one is as precise as the other out to 25 yards. Light conditions can favor a scope for me at 25 or more yards. I have used a Daisy Avanti aperture or a Williams peep at one time or other. They are not likely to gather dust from lack of use.
Gunfun1, you have done this too. What say you?
Deck
Deck
Yes I have and on a few different guns at that. And even threw on a red dot sight too to mix things up. And the open sights as well.
Fun stuff. 🙂
Deck,
The obvious answer is to simply have separate HW30S for the peep sight and the scope. Then maybe another with a red dot, and one more with the factory open sights.
Time spent mounting/remounting optics and sighting in a gun is better spent shooting at targets you mean to hit!
Nathan
Nathan
And you have 4 rifles to compete with each other!
Deck
Methinks before messing with the trigger on the HW95 which is supposed to be on the way, best to thoroughly try it out and leave well enough alone if satisfied with the trigger action, which is likely to be the case. FM is being chicken because he well remembers the nightmare scenario about 52 years ago, when he thought it was sooooo smart to completely disassemble the trigger mechanism on his Ruger 10/22 “for cleaning and lubrication.” Piece of cake to put the assembly back together again, thought the Fool Man…yeah, right! In a panic, he called one of his good, much more skilled in such matters friend who, upon seeing the jumbled collection of parts said something like, “what did you do!!” Don’t recall any expletives hurled, but he is a classy guy.
In those pre-internet days the only way to fix the mess ourselves was to find a printed parts diagram/schematic and based on that, give things a go and avoid paying a gunsmith dearly to fix the problem. Fortunately, a local gun shop provided us with an “exploded view” diagram at no charge. The kind employee said “bring us the rifle if you can’t fix it and we’ll be glad to do it; good luck!” Well, fortunately, after sweating some bullets, friend and FM managed to make things right. And the trigger actually worked! The trigger assembly has been left SEVERELY alone ever since except for some very light lubrication FROM OUTSIDE the housing.
Basil,
My mantra, completely!
BB
I can’t help but feel triggered by this blog.
But jokes aside, I really enjoy reading about my favorite air rifles. So thanks for that!
Hope you end up going for a vortek kit in this one. It changed my air gunning life.
best regards,
Carel
Carel,
Yes, I do have plans to install one of those Vortek kits towards the end of my testing.
BB
B.B.
The Vortek seal may be enough. The factory seal that came with my HWs seemed to drag a lot. The Vortek seals are shaped different and seem to be of a different material.
tt
BB,
Did you notice any signs of ‘galling’ on your 30S?
Fish,
I haven’t taken the 30S apart yet, so I haven’t seen any galling.
BB
I have never understood why Weihrauch can make a very good modular trigger. I bet you could even use it it other center latch piston airguns, not made by HW, with the proper machining to line it up!
Now we get to PeePee PCP’s and the biggest complaint is the poor trigger. Why can’t somebody make a good modular trigger that fits all/most/many/some PCP’s??
Boggles my mind!
-Yogi
Yogi,
“Now we get to PeePee PCP’s and the biggest complaint is the poor trigger. Why can’t somebody make a good modular trigger that fits all/most/many/some PCP’s??
Boggles my mind!”
I’m BAFFLED! Which PCPs are these bad triggers on? Marauders? Daystate? Thomas? USFT? Quackenbush? Anschutz? on and on and on. Those are PCP plinkers, FT, BR, Hunters, 10M only for trigger examples.
BAFFLED
shootski
Not one of those is a Price Point PCP! Maybe you are rich? Think $300>.
-Y
Yogi,
I must be slow today!
PeePee went right over my head…I’ll blame it on the effects of the PINK Moon!
shootski
Yogi,
I have a Gamo Urban PCP which is considered to be a PPPCP. With just a little work, the trigger on these PCPs can be made to be very nice, and in my opinion, nearly as good as some of the high end PCPs. My Urban’s trigger had a lot of creep from the factory. A slight modification made it into an excellent light trigger with no creep and a crisp break.
Geo
What about the Quattro triggers?
BB,
Have you owned a Anschutz 35 Magnum? I didn’t see any blogs about it when I did a search. The Anschutz 35 was a gun that frustrated me. It is a wonderfully made rifle and the trigger was adjustable but seemed to not stay in adjustment. It’s one of the rifles like the BSF 55 that doesn’t seem to get enough love due to trigger issues.
David Enoch
David,
I think I have owned one, but it wasn’t called an Anschutz 35. Mine was buzzy.
BB
David,
Was it a 320? Or a Crosman 3500?
BB