

The Gauntlet 2 precharged rifle from Umarex.
This report covers:
- Adjust the trigger
- Degas the rifle
- Remove the forearm
- Remove the air reservoir
- Stock off
- Oh, oh!
- Assembled the rifle again
- Summary
Today we adjust the Gauntlet 2 trigger. I said I would also test the shot count of the rifle from 3000 psi today but something prevented that.
Adjust the trigger
Step one — disassemble the rifle! No, It’s not quite as bad as that, but almost. To adjust the Gauntlet trigger the barreled action has to come out of the receiver. For that to happen the …
Let’s just get on with it and I’ll describe the process, start to finish. Step one is to remove the magazine and check the barrel for obstructions, because if there is a pellet stuck in the barrel it will be shot out in step two.
Degas the rifle
In step two you have to let out all the air from the reservoir. Therefore, it’s best to wait until the gun needs to be filled to adjust the trigger. The test rifle was ready to be filled so I lucked out.
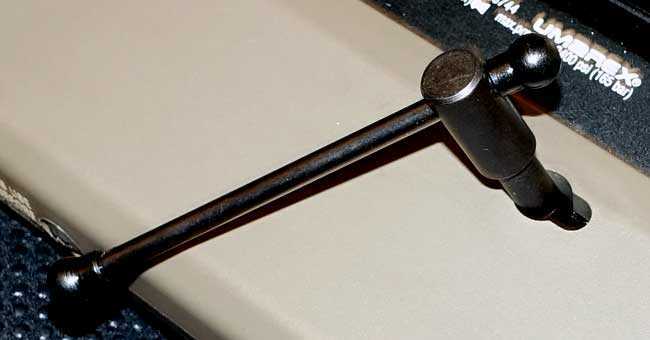
To degas you use the degasing tool that comes with the rifle.
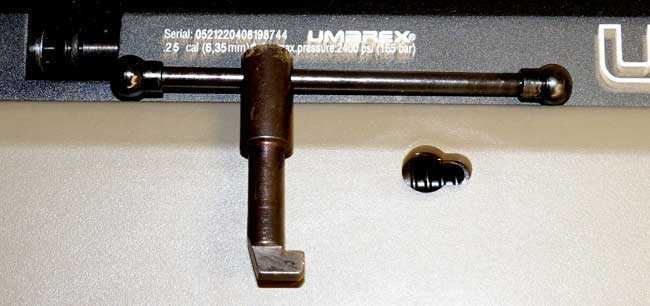
The degas tool comes with the rifle. Insert it into the hole on the left side of the stock.
Once the tool is inserted turn it clockwise until you encounter resistance. Then turn it just a bit more and you’ll hear air hiss out the muzzle. If there are any obstructions in the barrel they will be shot out by this air. A word of caution — this tool does not fit in the gun precisely. All it’s doing is levering open a valve against air pressure, so it may work best on a slant.
The degas tool is engaged with the valve and ready to open it. I noticed that the tool seemed to want to work on a slant like this.
All the air in the reservoir has to be exhausted, so be prepared. It takes a while. After all the air is out, cock and fire the rifle to remove any residual air that’s trapped inside the action. There wasn’t any in the test rifle.
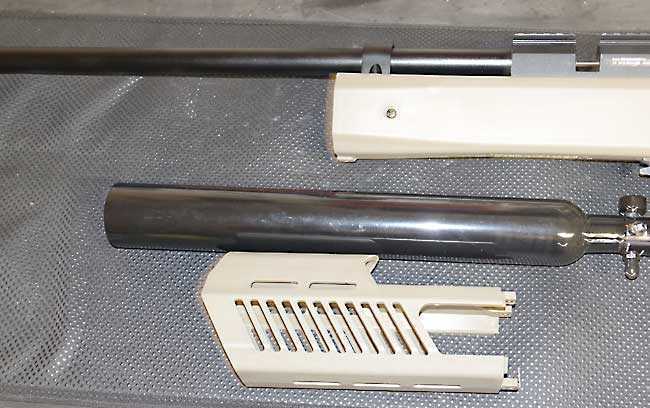
Remove the forearm
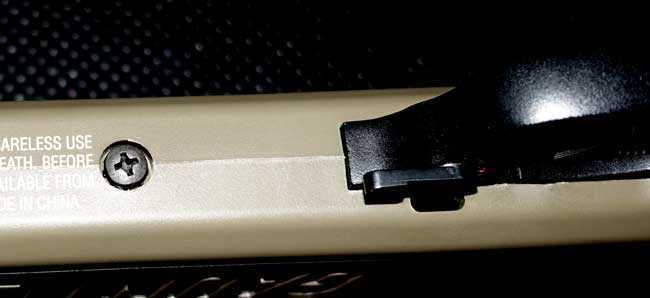
Now remove the short forearm so the air tank can come out. There are three 2mm screws holding the forearm on the rest of the stock.
11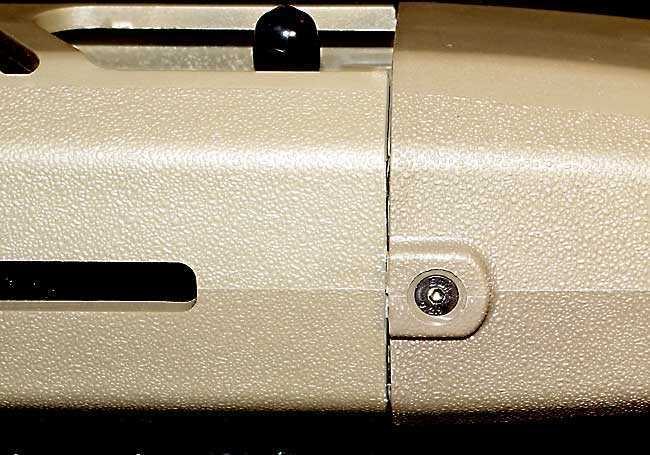
One screw is on the bottom of the forearm.
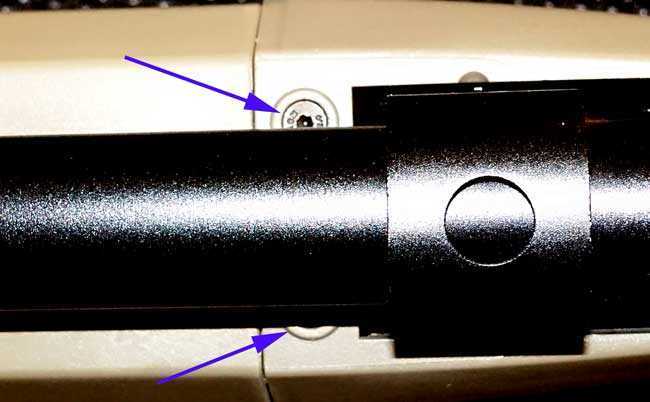
There are two forearm screws on the top of the gun, underneath the barrel shroud (arrows).
The photographs in the manual that tell you how to do this are small and difficult to see. And, in some of the photos, there are red arrows on a black background, which will not be visible to 14 percent of all males because of colorblindness. I found that using a magnifier on my smart phone was the way to both see the pictures and also read the very fine print.
In a case like this line drawings are better than dark pictures and yellow arrows instead of red would be easier to see against a dark background.
Once the three screws are out, the forearm slides off the rifle easily.
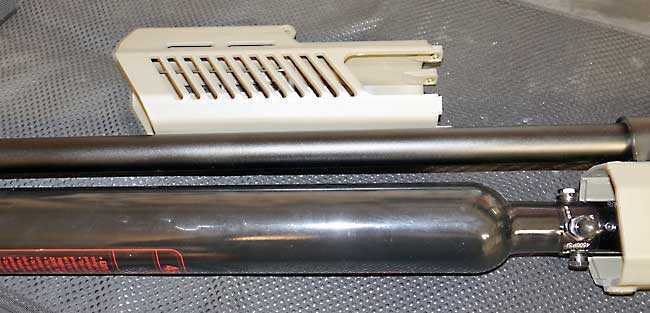
The forearm is off the rifle. Now the air reservoir can be unscrewed.
Remove the air reservoir
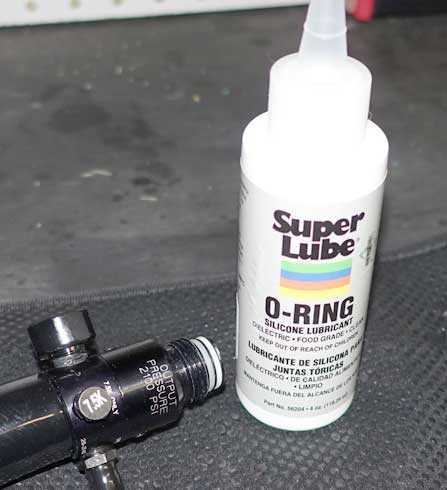
Remove the air reservoir by unscrewing it. I found the one on the test rifle was dry and sticking, so when I assembled it again I lubricated the o-rings and the sealing joint of the rifle action with silicone o-ring seal. Silicone chamber oil works, as well. The manual tells you to do this.
The air reservoir has been removed. Now the action can come out of the stock.
The manual tells you to remove the two screws on the sides of the stock, but you aren’t told to remove the bottom stock screw.
Until you remove the bottom stock screw the action won’t come out of the stock. The manual doesn’t mention this screw.

Stock off
Now, you rotate the safety lever straight up and down to clear the stock and gently separate the action. The trigger is now exposed and can now be adjusted.
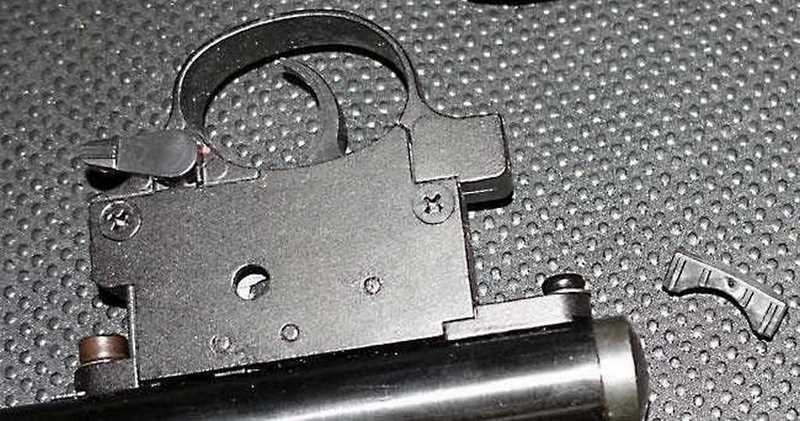
With the trigger exposed like this you can adjust it. The rubber piece on the right goes behind the action when it’s in the stock.

There are the three trigger adjustment screws at the back of the trigger box. The big 3mm screw on top adjusts the weight of the trigger pull. The 1.5mm screw in the middle adjusts the overtravel and the 1.5mm screw at the bottom adjusts the sear engagement.
I lightened the trigger pull a lot (2-3 full turns) and I adjusted the overtravel screw until the trigger just broke with no more movement. If you adjust that screw in slightly too much the trigger becomes harder to pull but the sear still breaks, so watch it. Leave the sear engagement screw alone until you understand how the trigger works.
I played with the adjustments for several minutes, cocking the bolt and making sure I had the trigger exactly where I wanted it. This Gauntlet 2 trigger is not as smooth as the vintage Crosman trigger that it was copied from. But I did find that lightening the pull was key to getting rid of most of the squishy-ness that I complained of in the last report.
Following this I assembled the rifle in the reverse order of disassembly. To this point in the report I had spent about 90 minutes, taking things slow and also taking pictures as I went.
When I screwed the air reservoir back into the action I lubricated the o-rings on the reservoir with silicone o-ring lube. The manual says to use RWS chamber lube, which is also good, but I had the o-ring lube on hand so I used it. It’s thicker and more of a professional product.
With the threads of the air reservoir lubed the reservoir screwed into the receiver much more easily than when it was removed.
Oh, oh!
Once the rifle was back together I cocked the bolt and tried the trigger. Nothing! The rifle would not fire. I spent several minutes trying to figure out what went wrong. Then it was obvious that I had to disassemble the rifle again to adjust the trigger to work.
This time even with the action out of the stock I could not get the trigger to release when the rifle was cocked, no matter what I did. So I removed the side cover of the trigger and inspected the parts inside.
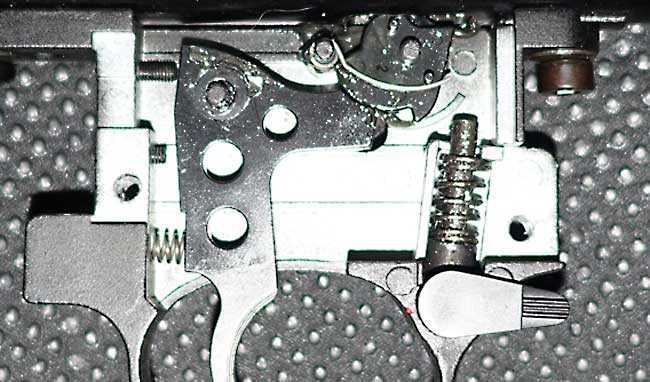
The inside of the Gauntlet 2 trigger.
I wish I could tell you what had happened to the trigger and why it wouldn’t fire, but I can’t. I made it fire by working the internal parts directly and after that it worked every time. There is a lot of grease inside, but I don’t think that was the problem. I think the hammer was caught by the sear and somehow jammed. Or maybe some of the parts are just rough. I did back the overtravel screw off a little more this time — just to make sure.
I just put the stock back on the barreled action and tried the trigger several more times. If it was going to fail again I wanted to be as close to disassembly as possible. But it never did.
Assembled the rifle again
Following this second adjustment I assembled the rifle again and tried the trigger several more times. It always worked. According to my trigger pull gauge the trigger now breaks very consistently at 2 lbs. 12 oz. I purposely did not look back and read where it broke in Part 2 until after measuring it this time. In Part 2 it broke at 3 lbs. 2 oz. So it is a little lighter than before but not that much. There is still some squishy-ness in the first stage, which stops at 2 lbs. 7 oz., but with care I can always find stage two. The first stage pull is smoothing out, the more it gets used.
So the Gauntlet trigger is adjustable, but it’s not as fine as we might hope. I do feel that it will break in to be smoother with time and use.
It took me another 30 minutes to work on the trigger the second time, so the grand total time spent working on the trigger was two hours.
Summary
Don’t get discouraged by what I’m telling you today. It isn’t as bad as it sounds. I’m just telling you everything that happened. The Gauntlet 2 is now ready for continued testing.
I think instead of a 3000 psi fill next time I will start testing the accuracy. Since the rifle had to be completely emptied of air to adjust the trigger filling it and firing it a lot seems like the best thing to do. After that I’ll test the shot count with 3,000 psi.


B.B.,
What kind of thread, diameter, size, male/female, paintball, other, on the bottle to receiver? Maybe a picture if you take it apart again please? Belay that picture request; just saw the picture with the O-Ring lube
In Summary second to last sentence:. “Since the rifle had to be completely emptied of air to adjust the trigger filling it and——firring (FIRING)——–it a lot seems like the best thing to do.”
shootski
shootski,
Fixed. Thanks,
BB
BB,
I think that trigger will just need to break in with use before it smoothens up. Maybe a change in the return spring? That’s a lot of grease in the area. I thought the trigger group was where a dry lubricant was best?
Siraniko
BB-
I am interested to see you using Super Lube silicone. There is a lot of uncertain chatter online about whether it is safe to use with HPA. If this product is safe to use with PCPs it would be a boon. Super Lube is inexpensive and easy to get.
ProfSteelToe,
I have been using dive/food grade Silicone grease and O-Ring Lubricant for decades on all of my PCP and HPA/G dive gear and do so without ANY concern as long as I check the SDS submission on the products I use. Here is why: “To comply with Class 0, the material must first conform to Class 1, but must also contain a coating that doesn’t add fuel to fires. Materials typically need at least one coat of an intumescent paint or varnish that swells or chars when exposed to heat and at least one coat of a flame paint finish.” It is hard to apply a coating to the Silicon grease or O-Ring Lube, LOL!
So the debates on the SAFETY of use of these products in/on PCP’s seems to always revolve around the NFPA 1 rating. WRONG understanding of NFPA Ratings and erroneous conclusions are the issue.
Now you know The Rest of The Story!
Let’s Go, BRANDON!
shootski
Shootski,
Exactly! I too have always used dive grease and pcp specified silicone. My real question is, how do I know if a particular silicone lube is safe to use with a pcp? Product A says “100% food grade silicone” and it is $8.99 for an 8oz bottle, PRODUCT B says “100% food grade silicone” but also says “pcp” on the label somewhere and is sold by the 1/4 teaspoon for $19.99? I don’t want to pay 500% markup on the same product. I also don’t want to blow up an air tank.
ProfSteelToe,
Let me spell it out without my Darksider Lingo. You need to get the SDS (Safety Data Sheet) for that specific product from the manufacturer’s web site. For instance the one for the O-Ring Lubricant in B.B.’s photograph: https://www.super-lube.com/o-ring-silicone-lubricant then click on the Safety Data Sheets. That and the information/guidance provided in my reply above above will tell you what you need and want to know.
Keep asking if it still isn’t clear; HPA and volatile materials is nothing to be ill informed about.
shootski
BB
Glad you finally showed a picture of the bottle out of the gun.
Now I see that the bottle screws in just like the Gen1 Gauntlet. And I see that it does have the regulator as part of the bottle. Also I see on the bottle that the regulator is set at 2100 psi.
So I now know that even my Air Venturi 13 cubic inch bottles will work. I have 5 of them set at different regulated pressures.
Also what would be nice is if I could get a couple of the Gen2 Gauntlet bottles since they are 4500 psi and regulate them down to whatever I want and use them on my other gun’s that use this type of bottle. It would be great on my Air Ordinance .22 SMG.
Oh and the trigger I see now from your pictures, the gen1 and 2 Gauntlet triggers are the same. And I have my trigger adjusted so nice you would swear it’s been replaced with a match grade trigger. And I never had the cover opened up on the trigger. It’s just like it was from the factory other than me adjusting it. It has a longer first stage pull with basically no resistance then a distinct stop for stage 2. Then it just needs a little pressure and the shot breaks and the trigger is a distinct stop right at that point. I’m actually kind of surprised how well the trigger adjusted out.
And that tumbler sear that rotates got out of sequence. That’s why your trigger wouldn’t work. If I remember right you just rotate it forward till you feel it click in place.
BB,
Well, I know GF1 swears by these air rifles, for myself I do not see one in my future. The G2 is much better looking, but it is just not for me.
I do like that trigger though. It has a lot of potential there. Once it gets a few miles on it and smooths out a bit, I can see where that trigger could be a real winner. I am very surprised we do not see that trigger assembly in more places than we do. It is so simple even the Chinese can get it right.
RR
The Gauntlets are basically a QB 79 I believe is the right model number but in my opinion better.
The reason being is the Gauntlets are the normal rear cock bolt and they have a very accurate shrouded barrel plus the regulated bottle that can be changed. And the nice ergonomic stocks.
I truly do love my gen 1 Gauntlet in .177 caliber. And I really have in my mind to get one of the gen 2’s in .25 caliber. I only have one .25 caliber air gun right now and that’s my Condor SS. And it is a great gun for sure but would like a nice reasonable priced regulated .25 caliber pcp. And from what I know and see so far I believe the .25 caliber gen 2 will be that gun.
GF1,
Yes, the Chinese copied the Crosman 160.
RR
Yep.
B.B.
Do people polish the sears of PCP triggers like they do with a full Springer tune?
2 hours for trigger adjustment???
Seems the Darkside=the Dumbside or the Delayside.
With a decent compressor it shouldn’t take more than 10 minutes to fill the onboard tank to 3,000psi.
-Y
Yogi,
Sure people polish not just the sears but all the contacting and moving parts in triggers of PCPs. Isw it necessary? Sometims, maybe. Usually not.
Readers have asked me to pump the rifle from the end of the fill to 3,000 psi. I have a compressor that will do it quickly, but they asked me to use a hand pump.
BB
BB
We , apparently, have some sadistic readers. Why would they want to subject you to all that effort? After all, the result is subjective and different for anyone who happens to pump by hand. What seems difficult for them may be easy for you and vice versa.
I suggest that you could use your time more constructively, So isn’t this why you bought the compressor? Maybe demonstrate that, instead and save the wear and tear on your body.
I say this as someone else quickly approaching the 3/4 century mark.
Ed
Ed,
I like you! 🙂
Maybe I’ll just get smart!
BB
BB
I’m thinking now days alot of people with pcp’s have got smart.
I bet there are more people pumping pcp’s with electric pumps than hand pumps.
I use to keep a hand pump around for back up just incase my electric pump failed or the electric went out. Now days I keep a extra electric pump around that will work off a 12 volt car battery or 110 volt.
Save your body and time. Use a electric pump. Heck what am I saying use your big hpa tank. You’ll have the gun filled in seconds with the tank and a little over a minute if you got the right electric pump.
Pcps are all about ease of shooting. So why hand pump if you don’t have to.
Yes. Spend the time you would have been pushing down on a pump to use those resistance bands and get your strength up for pistol shootin’!
Yogi,
The darkside is not the dumbside, but I have to agree that designing an airgun to have an adjustable trigger that requires basically taking the gun apart to perform an adjustment that one would reasonably expect most users to want to make is dumb. After all, if it is adjustable it would be reasonable to expect one to adjust it to either what they like, or if new to shooting to use that adjustment to find out what they like (which would involve multiple tests – not gonna happen here!).
All of my PCPs offer much more straightforward adjustments than this, and even though the adjustments are often easier with the stock off, the stocks can be removed in about a minute. This one certainly won’t be one I would want to acquire.
Alan
Seems like the lawyers weren’t keen on people adjusting the trigger on this. Seems like a lot of hassle to me
Ade C,
I don’t think that’s it. Like I said, I think it just needs to wear in.
BB
A little time consuming. But how many times will the action be removed, once, twice maybe. Unless the owner likes to fiddle with it. I don’t see a problem with it.
rk
I agree.
My SIL has the .25 and his Dad has the .22. Those rifles are very different. The 22 shoots 15.89 @ 1023fps ave, and gets great accuracy. It throws any heavier pellet all over the place. When he adjusted the trigger on his .22 he had the same result, it didn’t fire after installing the action in the stock, but removal and fiddling got it going fine since. The 25 otoh seems that the heavier the pellet, the better it shoots, preferring the JSB 33.95, pushing them at about 850fps.
There is a video from Airgun Depot that gives a good how to with the Gauntlet 1 and 2, since they seem to be the same, with adjustments and cautions. I used a ball tip Allen for the sear adjustments, much easier. On my G1 it had a very long sear engagement.
B.B. and readers who own a Gauntlet Gen. 1 or 2,
Is there a Plenum downstream of the reservoir? If not it might explain the greater precision of the .25 and the reported loss of precision after the .22 reaches a certain pellet weight. If it doesn’t have a Plenum it looks to be easy to add one between the regulator and the receiver. Will be interesting to see the groups with this and the other caliber examples.
This PCP airgun should see a great deal of tinkering and aftermarket add-ons potential to overcome the “dumbsiders”…LOL!
shootski
Shootski,
No idea on the plenum except you are told to cock and shoot the rifle after the reservoir is exhausted. That makes me think there is one.
BB
Don’t fill that thing with a hand pump! No one else is going to do it, at least not to 300 bar, so you shouldn’t have to either.
BB
Just wondering when you’re going to be casting your eye over the Umarex Model 29. I’m in the process of doing a review of the 5 and 6.5 inch 629’s for a UK magazine and I’m really impressed with the accuracy using pellets in the smoothbore barrel. Today I managed a group of 0.22 inches at 6 yards using double action!
I’d imagine the 8 inch barrel would be even better.
Ade C
Ade C,
We shall see.
BB
RidgeRunner,
How about that election!
Let’s Go Brandon!
shootski
Woohooo! LET’S GO BRANDON!
RidgeRunner,
I was smiling all day…not all too many others around here were…LOL!
LGB!
shootski
BB et al
I guess I’ll have to be the one to say something, as it would seem you have no problem with the “Lets Go Brandon” crowd. I find it offensive. I found Trump bashing offensive as well. This has been a place reasonably free from political bullcrap one sees too much of.
I will not make the ridiculous claim of not coming to this site,, as I will regardless. Just know that I am disappointed.
Ed
I tend to agree with Edlee. There are so many other outlets for political speech, and this blog has, for the most part, been a refuge from it. Airguns bring us together, let’s not let politics or other hot button issues of the day divide us. It’s your blog, B.B., but I think those were the ground rules established long ago. To be sure, as a gun blog, I am not surprised to hear about the Brandon thing here, especially in light of POTUS’s policies regarding guns, but the political discussion could quickly devolve, so I think it’s best to avoid it. My 2 cents.
RG
Thank you.
Ed
Ed,
I’m sorry. It seemed like such a petty thing I saw no problem.
From now on, no go.
BB
BB
I had been made aware of the connotation attached to the phrase and didn’t find it petty. Which is why I mentioned it. This is probably one of the only public forums of any kind that hasn’t been taken over by politics. I appreciate that. I may not be of the same political flavor as many here, and so accept that there will be a certain amount of allusion. Unfortunately, that phrase’s meaning goes past that by a large margin.
Thank you for your understanding.
Ed