

The HW 50S breakbarrel from Weihrauch.
This report covers:
- Vortek PG4 Steel
- Rekord
- The old parts
- Nailed together
- Clean the powerplant
- Install the new piston seal
- Grease the new mainspring
- Assemble the barrel
- End cap
- Four tabs in
- Install the trigger
- Into the stock
- Summary
Happy day after Thanksgiving. About two decades ago this day was called Black Friday, because it was supposed to be the day when retail outlets in the U.S. turned a profit for the first time that year. This year Black Friday started in September and now the marketers are looking for new adjectives to describe their sales. It seems when you use the word “amazing” all the time it loses some of its meaning.
Today I am going to install the Vortek tuneup kit for the HW 50S air rifle and see where it takes us. I have a lot to tell you so let’s get started.
Vortek PG4 Steel
All along I have been telling you that what I’m installing is a Vortek PG3 SHO kit, but it really isn’t. It’s a Vortek ProGuide4 Steel HO kit with Quad (4X) Guide Design. Pyramyd AIR doesn’t stock this kit yet, so I called Vortek and talked to Tom Gore about it. He told me it was an amazing kit (there’s that word again), which I expected him to say, but Tom’s kit for the HW 30S turned out quite well, so I had high hopes for this one. The HO in the name stands for high output, so this one can go as high as 12 foot-pounds. In part 2 we learned that the factory rifle was already putting out around 11+ foot-pounds, so the increase isn’t that much and I didn’t want it to be. What I was after was a smooth shooter.
Rekord
The first step was to clean and lubricate the Rekord trigger. I just used cotton swabs for this; I didn’t get crazy. After that I lubed the sear with moly grease. Then I tested the trigger.
Outside the rifle the stage two trigger pull seemed too heavy, so I lightened it with the big screw behind the trigger blade. Cocking and testing the trigger also gave the moly a chance to work into both sear surfaces. I must have cocked and fired the trigger 15-20 times as I adjusted the screw. When I finished the trigger was breaking much lighter than before. I will test it again when I test the velocity.
The old parts
On Wednesday you read about the removal of the old powerplant parts. Out of everything that was removed I will just use the piston with the new tune,
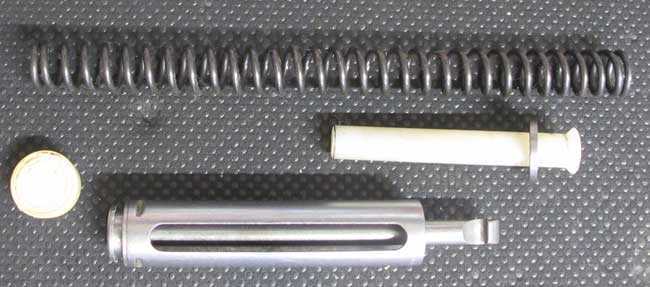
Of all these parts only the piston will be reused.
Everything but the piston comes in the kit. The new piston seal is not shown.
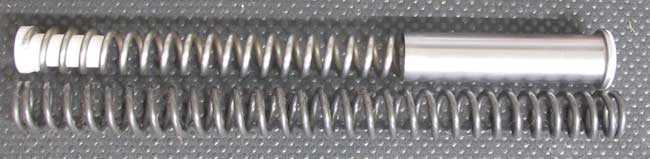
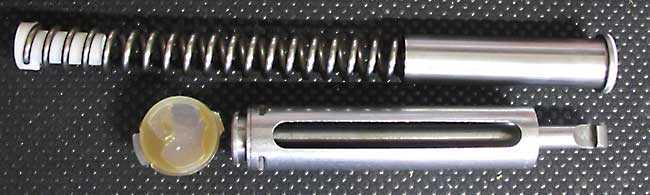
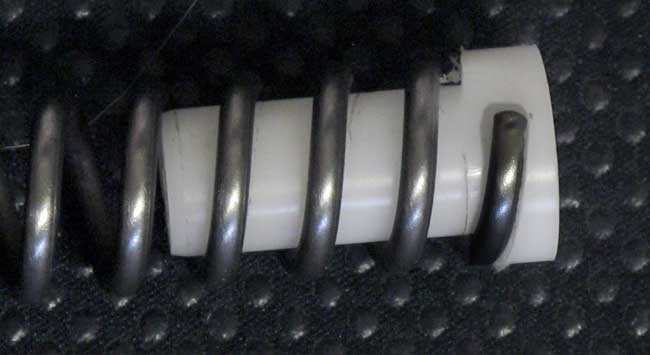
Just the factory spring by itself (bottom) is longer than the PG4 spring with its guide (right) and top hat.
No only is the PG4 spring shorter, it’s made from slightly thinner wire. It measures 0.119-inches in diameter, while the factory spring wire measures 0.122-inches.
Nailed together
I tried to remove the PG4 mainspring from the steel spring guide and noticed that it is nailed on. No amount of twisting could take those parts apart. There will be no vibration from loose tolerances in this tune!

Clean the powerplant
I looked into the spring tube with a strong light and there was next to no grease inside, so there was nothing to clean. Normally I would clean the inside, but this one was clean and dry.
Install the new piston seal
I snapped the new piston seal on the end of the piston. It seemed smaller than the factory seal, so I assume the parachute will expand rapidly to seal the compression chamber. We shall see.
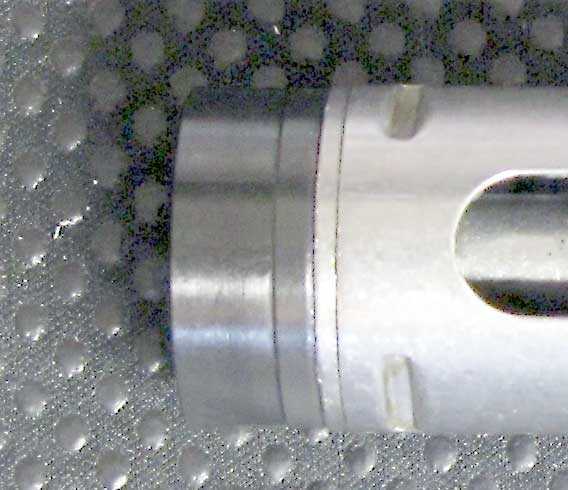
The new piston seal is the same size as the piston. It’s smaller than the factory seal.
The synthetic top hat of the new kit has three notches for the end of the mainspring to rest in. This determines how much preload the mainspring has. It came with the end in the lowest notch which is the least preload, and I left it there.
Three notches of different heights determine how much preload the mainspring is under. This notch is the lowest and softest.
Grease the new mainspring
In preparation for installation I applied a thin coat of the grease that came in the kit to the mainspring and piston seal, plus the rear of the piston body.
Assemble the barrel
Now the barrel goes back on the spring tube so the cocking link can be connected to the piston. Of all the steps in assembly, this one is the trickiest because many things have to happen at the same time. First the cocking end of the link that’s connected to the piston is lubed with moly grease. Then the link is is slid through the spring-loaded bridge on the underside of the spring tube, and that’s when I noticed something new. Weihrauch now puts a long synthetic bearing on the bottom of the link so it will slide over the spring tube smoothly. I hit that bearing with some moly, too.
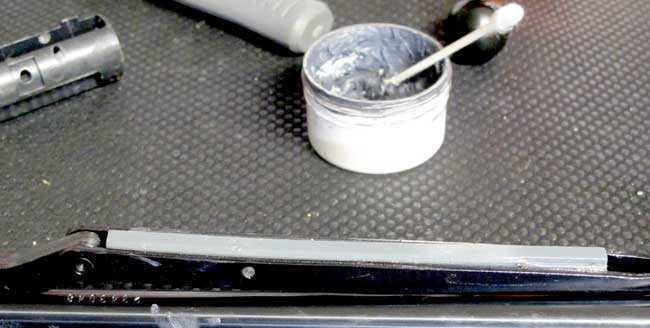
The long synthetic bearing on the bottom of the cocking link (bottom of this picture) gets a coat of moly grease.
Now slide the piston into the spring tube. You will find that with the new piston seal it slides in without any resistance.
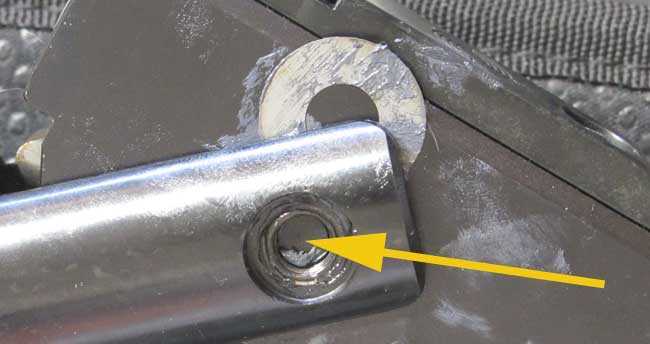
Once the cocking link is connected to the piston the barrel can go on the spring tube. There are two thin pivot washers, one on either side of the base block, and they must be lubed with moly and aligned so the pivot bolt will pass through. Aligning them used to be a problem for me until I learned to stick them down with grease. They are so thin you can push them into the gap between the base block and the action forks.
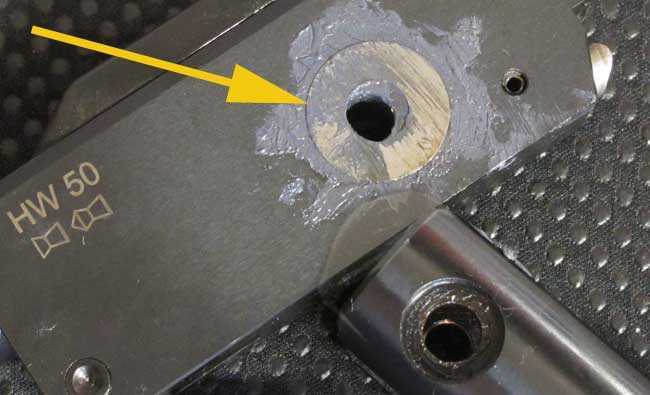
To hold that pivot washer (arrow) in place, coat both sides of the washer with moly grease. The washer then slides between the action fork and the base block as you align the pivot hole. It doesn’t have to line up perfectly.
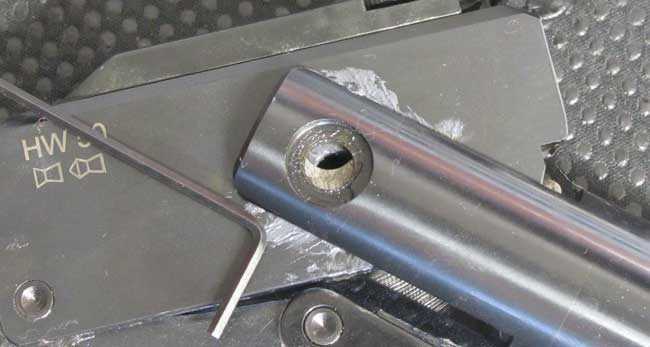
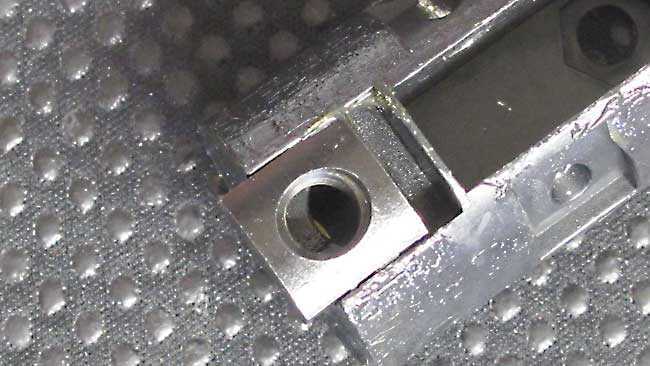
Just get the pivot washer aligned this close and you can stick a small Allen wrench through all the holes to align things perfectly. Once that is done the pivot bolt will slide right in the hole.
If this sounds complicated, that’s because it is, more or less. It takes some experience to get it to work right because you are trying to hold the base block in alignment with the hole in the action forks. And here is a tip — just worry about the left side of the spring tube for now. Get the pivot holes lined up, then slide the pivot washer in far enough in that you can get a small Allen wrench through to fully align it — see the picture. Then slide the pivot bolt in the hole and it will hold everything in place as you turn the spring tube over to work on the right side. But watch that pivot bolt, because it wants to slide back out of the hole!
Once the pivot bolt is through the left side of the gun, position the bolt tip (arrow) just below the hole on the right side, then push that side’s greased pivot washer into position and run the bolt through. The grease on the pivot washers allows them to slide sideways with ease.
Grease on both washers is the answer to many things. It holds them in place and also allows them to slide when you need them to.
End cap
Now the spring and guides, the rest of the PG4 kit, can be slid into the spring tube, because the next step will be to put the end cap back. Fortunately, putting the cap back is much easier than removing it the first time. However, there is something to watch for.
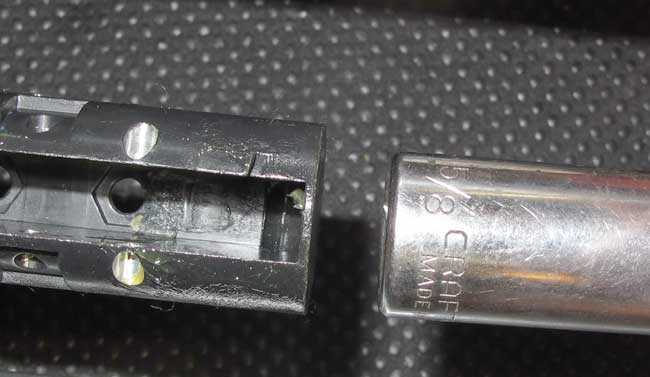
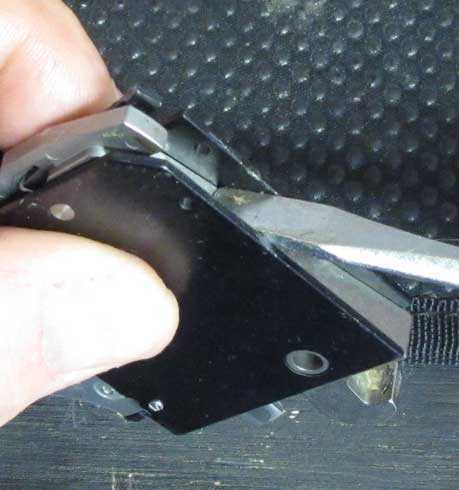
The end cap has a bushing that contains the threads for the front trigger guard screw — the long one. This bushing slid out of my end cap during disassembly. Make sure it is back in place before you install the end cap or that screw will have nothing to thread into.
Make sure this threaded bushing is back in the end cap before you install it.
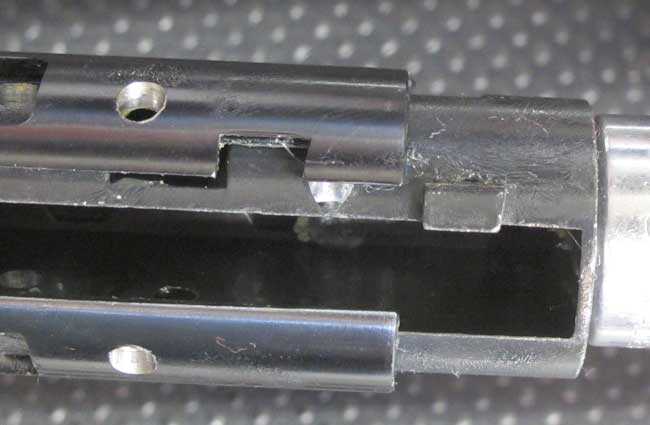
I put the barreled action back into the mainspring compressor and when I slide the end cap in I note that the PG4 spring and guides are a little less than a half inch shorter than the factory spring and guide.
With the mainspring compressor still set where the factory spring was fully relaxed, there is now this much more clearance. The PG4 kit is this much shorter.
Use the compressor to slide the end cap into the spring tube, making sure that flange that retains the cap is rotated clear of the spring tube. Otherwise the cap will jam on the flange.
Rotate the end cap to give the locking flange clearance.
Four tabs in
Once the end cap is locked in place by the flange you can replace the four tabs that were such a bother to remove. They now go in easily. Just position them over their holes and whack them with a rubber mallet. They are identical so it doesn’t matter which hole they came from. One whack seats them flush with the spring tube.
Install the trigger
There is a secret to installing the Rekord trigger. Cock it first. It can be installed uncocked but it will fight you to align the crosspin holes. Cock it and they align easily.
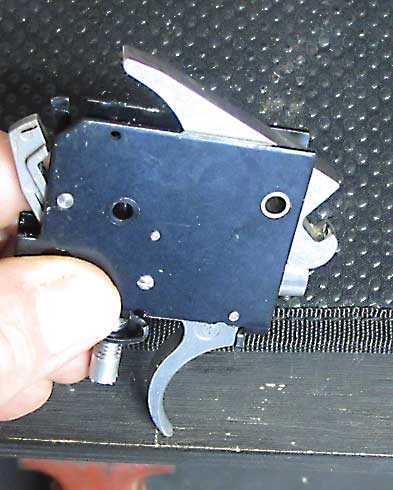
The Rekord is uncocked.
Push the rear of the spring hook down and the top of the sear will grab it.
Don’t overlook the safety button when you install the trigger!
Into the stock
With the barreled action together, install the rifle in the stock. Pull the trigger if it didn’t fire during installation and then cock the rifle. Be prepared to shoot it several times, to let the new parts get used to the rifle.
At this point I note that the rifle has no vibration, but it does have a powerful jolt when fired. I’ll watch that as the test continues.
Summary
This work took about 2-1/2-hours, start to finish, but there were a lot of pictures to take and that probably took half the time. I worked slowly and watched to make certain I wasn’t leaving anything out. Been there, done that, got the T-shirt and wore it out.
We are now ready for the next report, which will be a retest of velocity, cocking effort and the trigger pull.


Sorry everyone. I found this sitting in WordPress, scheduled to be published this morning at the correct time, but for some reason it never was.
BB
No worries, B.B.
I’m just happy to see that you are OK,
Looking forward to seeing how this kit performs,
dave
P.S. I especially like the part about using grease on those washers; I think that’s a trick I can use on some other washers on other things…ah, the cool tricks of the trade we learn here…thank you. 🙂
BB,
WordPress must have been in a stupor from the turkey yesterday. I had the impression this was .22 but upon review of the previous articles it turned out to be .177. Oh well the new pellet test will have to wait.
Siraniko
Just when you get used to a piece of technology it lets you down, LOL
BB,
That’s OK. I just went back to bed for a couple more hours.
When removing and installing the safety, you did not show us this. What exactly is involved in this step? I ask this as I have not had the pleasure of going inside a Weihrauch before, however if I can still find the resettable safety, I will be going in to install it in an HW30S.
Another question. Will the Weihrauch still function properly if you do not reinstall the safety?
Nailed together
I tried to remove the PG4 mainspring from the steel spring guide and noticed that is(it) is nailed on.
RR,
The safety comes out easily when the trigger assembly is removed. Usually you can just pull it straight out, or it may help to tip the rifle on its side.
When putting it back in, I press on the safety button until the two pins have been inserted. That keeps the safety out of the way of anything. If I have to change positions it’s okay to relaxe my finger on the safety, as long as I press it in again when dojng anything with the trigger.
BB
BB,
Will the air rifle function properly without the safety?
Nailed together
I tried to remove the PG4 mainspring from the steel spring guide and noticed that is(it) is nailed on.
RR,
I fixed the typo.
Yes, the rifle will function properly without the safety. But there will be no protection from the trigger releasing when it shouldn’t.
BB
Thanks for the details BB!
I’m taking notes 🙂
Retailers eh? I thought that “Black Friday” was from WW2 where an attack on a German destroyer went bad and there were high losses.
There’s still some WW2 expressions around. Like the one: “(I gave him) the whole 9 yards” refers to the length of a .50 caliber ammo belt.
Happy after Thanksgiving and happy Friday!
Hank
” ‘(I gave him) the whole 9 yards’ refers to the length of a .50 caliber ammo belt.”
Hank,
Wow! I did NOT know that; but I should have! It’s like people using the expression, “the writing is on the wall,” but they have no idea from where it came.
https://www.phrases.org.uk/meanings/the-writing-is-on-the-wall.html
Anyway, thanks for the cool history lesson. 🙂
Cheers,
dave
It probably is from WWII, but there are a number of competing origin stories about that one. Another one is that it refers to ordering a new suit from a tailer. The whole nine yards of fabric. There are some others, too.
Ooops, I should have posted a pic of Rembrandt’s 1635 painting, “Belshazzar’s Feast,” which shows him indulging in a drunken revelry and debasing sacred temple vessels by using them as wine goblets when a disembodied hand wrote “mene mene tekel upharsin” on the palace wall. 🙂
There was a Black Saturday, 13 June 1942, when the British lost close to 300 tanks at Knightsbridge in Lybia, during Rommel’s offensive to capture Tobruk.
FM,
I haven’t heard about that, thanks for the comment.
My WW2 interests are mainly in the air war and most specifically fighters. I fly (virtual) Spitfire and Messerschmitts in the winter. I just got a module for Tobruk.
Unrelated to these topics, but will BB be doing a follow-up accuracy assessment shooting the Seneca Eagle Claw in the future? The last installment left me somewhat hanging and I always use BB’s observations before I buy pellets.
I’ve just discovered the proper way to enjoy the PCP hobby and intend to be using a lot more pellets.
Best regards,
JH
Rocket Jane,
Hi! I just discovered that I haven’t done that test and the rifle is now in my office, scope mounted and ready for the first accuracy test. I’m sorry it went so long.
BB
BB,
Ha! I am not the only one who chastises you for not finishing reports. I wish my rememberer worked as good as hers though.
I received a Meopta Optika 5, 2-10X42 Wednesday, I have not mounted it yet, but it is a very sharp and clear optic. I looked at those for a bit after the write up here, they got hard to find quickly. I plan to use it on a Walther Dominator 1250 pcp, it has turned out to be quite the .177 slug shooter.
MMCM13,
I’m really interested in what you think. I already love this scope, but a second opinion is always welcome. And it doesn’t have to agree with me.
BB
MMCM13,
How do you like the Walther Dominator 1250? They are not common and you see very little about them on the web.
I picked one up for my son to use when he visits (got a super deal – new in the case, rifle, 6 magazines, 8-32×56 scope and bipod for $200). Found it to be too hot for regular pellets but it likes the heavier .177 JSB Monsters. Never thought about slugs, that makes sense as the 1250 has plenty of power and should do well with the LW barrel.
What slugs are you shooting? I’ll have to try them out.
Cheers!
Hank
Hank,
The Dominator shoots the NSA 12.5 grain NSA slugs @ ave of 875 FPS. I have tried the knockout slugs, 10.03 gr, they don’t shoot as well, pretty good, about 940 FPS. It shoots the NSA slugs better than any pellet I have tried. The best pellet is the JSB 10.34 iirc. Mine does not prefer the heavier JSB pellets for some reason. I ordered a single shot adapter from the UK for it as well, the slugs can be a pain from the magazines. On a day where I don’t have to deal with much wind, it is easy enough to put 4 out of 5 12.5 slugs on a 3” gong at 100 yds. I also find it is light enough that you have to pay attention to the hold to be consistent with it. I also got a good deal on mine, so I ordered the easy fill probe kit that I saw described in Hard Air magazine. Fortunately it is much easier to install now with the newer kit, although pretty pricey.
MMCM13,
Thanks for the reply! I checked my supplier and he is out the NSA slugs but I’ll watch for them.
I was looking for a better filling solution (don’t like unscrewing the tank) and saw the one you mentioned but the price put me off. I was thinking about making an adapter (with a foster fitting) that would fit in between the tank and the rifle. I may still get around to that. In the meantime, the 1250 gets quite a few shots on a 300 barr fill so it’s not really a problem.
Hank,
You might go to the source https://nielsenspecialtyammo.com/collections/177-caliber/products/12-5-gr-hp-fb-178-cal It seems that they have changed their manufacturing process but I am sure it is still worth a look.
Mike
Wonder how well these would work in the .177 Maximus? FM thinks they should work fine – guess could take a chance on ‘em and worst case scenario pass them on to someone else if the slugs don’t work out.
FM, you can order a sample pack for a reduced cost to try. I did that, ordered a full box after I found they shoot well in the Walther.
B.B.,
I of course eagerly await the performance evaluation.
Also, I did a word search to make certain. “TIAT” or “Tune-in-a-Tube” are nowhere to be found above. :^)
Michael
Michael,
That’s because I didn’t use any. 😉
BB
Too much turkey yesterday among everything else.
Still in hibernation today.
Gunfun1,
Has the turkey hibernation become the long-term type?
Will we not see or hear from you until the rodent, does or does not, see his/her shadow?
Say it isn’t so! Two fingers of good liquid fortitude helps; call me in the morning if you aren’t wide awake and shooting airguns!
shootski
Shootski
You know what happens when you eat to much turkey and pumpkin pie. Ole Gunfun1 goes into lay back mode.
Kids been staying over for the holiday and we been shooting and riding the 4 wheelers and such. They are out riding the go kart right now in the plowed corn field. I guess you can call it I’m the referee. And I thought ole Gunfun1 was crazy when I was a kid. 😉
But yep just been doing the family thing. 🙂
B.B.
Better late than never…
Thanks for such an excellent report! You nailed the assembly process perfectly.
Very curious to see that this rifle develops with the new Vortek ProGuide4 Steel HO kit with Quad (4X) Guide Design kit.
One HW 50S inn .177 with a HO PG2 kit shoots the JSB 8.44 at 790 fps. One other HW 50S in .177 with the OEM spring and custom tuner guides shoots the JSB 8.44 at 810 fps, and it is smoother too.
Wondering how this one will shoot?
-Yogi
“…HW 50S in .177 with the OEM spring and custom tuner guides shoots the JSB 8.44 at 810 fps, and it is smoother too.”
Yogi, I guess that’s one gun you never plan to sell; sweet! 🙂
B.B.,
Happy Day After!
Interested to see if this AMAZING product gets into retail sales…what ever happened to the adjustable gas spring?
Possible correction for photograph caption in– “Install the new piston seal”
“The new piston seal is the same size as the pistol (Piston). …”
shootski
shootski,
Yeah, I do that one a lot. Fixed it. Thanks,
BB
B.B.,
I think it makes clear that your subconscious is focusing on pistol shooting…even when you are busy doing other things! Eery little bit will help you get back into best form.
All the best!
Shootski
BB,
I am with shootski. I would like to see more adjustable gas springs. They are very hard to find / acquire any more. I think there are a lot of gas sproingers out there that could really benefit from an adjustable gas spring.
RidgeRunner,
I think it will take someone thinking “outside of the box (spring tube) to get there. I think making it adjustable AND a straight drop in replacement is just too hard on the engineering as well as on the gas spring.
Maybe someone will design a gas springer where the main gas chamber isn’t directly in the same location as the piston which seems to make the pressure change technically challenging; just maybe a larger pressure volume is a potential advantage that could be a secondary benefit for the gas spring.
Put on all your Thinking Hats and maybe someone will come up with the first really revolutionary springer advancement since coiled springs!
I hope some airgun designers feel challenged out there!
shootski