by Tom Gaylord
Writing as B.B. Pelletier
This is the next installment of a fictional guest report about a man teaching a woman how to shoot. Jill has advanced to handguns and today she begins shooting them.
Our writer is reader, Jack Cooper. Take it away, Jack.
Teach me to shoot
by Jack Cooper
This report covers:
- Trust the instructor
- Shooting position
- Start at 5 feet!
- The secrets
- Proof of the pudding
- You’re ready!
- Final talk
Jill was impatient during the week that followed our last training session. She was finally graduating to shooting handguns and was anxious to get right to it. That was what she had wanted me to teach her all along.
At the bible study on Wednesday she admitted that she was concerned about holding the pistols rigidly enough to hit the target. I told her we would be shooting from twice the distance as with the Daisy 499 (10 meters instead of 5) and suddenly all her cockiness drained away. She told me she had been trying to hold the two pistols I’d left with her on some targets, using the sight picture I showed her, and she saw that her hand wobbled all over the place. How would she ever be able to shoot with just one hand?
Trust the instructor
I told her not to worry. I would show her a stance that was so solid it would be next to impossible for her to ever miss the target. She said she wasn’t so sure, but I hadn’t let her down yet, so she trusted me.
You readers must think I am about to put everything we have accomplished thus far on the line. How, indeed, can a brand-new shooter learn to hold a target pistol in one hand so well that she could not miss a bullseye at 33 feet (10 meters)? I bet some of you have tried it and found it impossible to do every time. Well, I have a couple secrets that I’m going to teach to Jill. You watch what we do and if you can learn how to do this, you can become an accomplished one-hand target pistol shot, too!
She asked to start the training on Friday evening again, and this time I was all for it, because what I had to show her would take two full sessions. It was all about form, and she needed time to learn how to do it.
When Friday evening rolled around I had her start with the Crosman 2240 pistol. We would switch over to the Mark I Target pistol once she mastered the stance, grip and had some control over her breathing.
Shooting position
I placed a card table in front of the shooting position. The tin of pellets would be on this table and as you will see, the muzzle of the gun would also rest on it between shots.
Start at 5 feet!
I started her at 5 feet from the target, which was a 10-meter air rifle target. Yes, that’s correct — five FEET! She thought I was joking, but I wasn’t. I wanted her to begun at a distance at which she could not miss. I told her her shots would hit below the bull because we were so close, but we weren’t interested in where they landed just yet. We were only interested in how well she learned the few things I was about to show her.
I really didn’t show her anything new. I just reviewed the sight picture, showed her how to cock and load the pistol and then let her begin shooting. As you might guess, she did remarkably well at this distance. All her pellets went into the same small hole. And she was very upset about shooting so close! We had a little argument that only ended when I promised I was not patronizing her.
After about 15 shots from 5 feet I had her back up to 10 feet from the target. Though this was twice as far, it was still very close. “I cannot possibly miss the target at this distance,” she complained. I assured her I knew what I was doing and asked her to put 10 more shots into the target. She did so, begrudgingly.
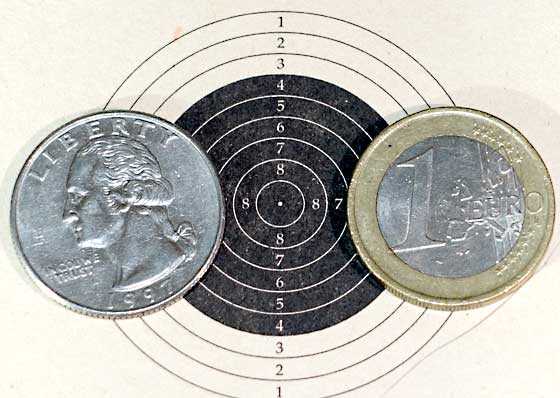
Then I backed her up to 20 feet from the target. The bullseye on a 10-meter rifle target we were using is a little larger than an American quarter or a one Euro coin, so I reminded her that I had promised she would be hitting that size target with a pistol. Well, at this distance things started looking different. Now she wasn’t so sure she could always hit the target.

Ten-meter air rifle bull is just a little larger than an American quarter (left) or a one Euro coin.
She took up a position and fired 5 shots at the bull. Her group was about two inches across, and was wider than it was tall. After the last shot she laid the pistol on the shooting table in front of her and said, “This is harder than it looks!”
And this is where I taught her the secrets of target shooting with a pistol.
“Okay, Jill, now you know what you’re up against. Shooting a pistol one-handed is much harder than shooting a long gun like the Daisy 499. But when you know a couple things, it gets much easier.
The secrets
I spent several minutes getting Jill into the proper shooting stance. Until now I had been allowing her to stand any way she wanted that felt comfortable. Now I showed her how to properly “address” the target with her body. This is the drill we see baseball pitchers going through on the mound before they start pitching. Wherever the feet are is where the ball will go.
Jill is right-handed, so she holds the gun in her right hand. I had her stand almost sideways to the target. Her right foot went down almost in line with the target and far enough back from the firing line that the muzzle of the pistol would not extend past the line when she shot. Her left foot was shoulder-width from her right foot (her shoulders — not mine). Her left foot was about a foot behind and just a little to the left of the right foot. A line from her to the target looked like this.
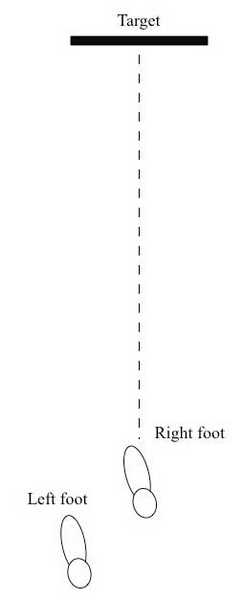
Addressing the target.
Once the front foot was planted like you see in the drawing, we moved her back (left) foot until her shooting arm was aligned with the target. We spent some time shifting that rear foot by small amounts until it was perfect.
Once I got her feet more or less where they needed to be, I told her to only move them when I told her. We weren’t done. Now I had her close her eyes and point at the target with the index finger of her gun hand. Then open her eyes and tell me which side of the bull her finger was on. As she continued to point we moved her rear foot in small amounts left and right to get the finger aligned with the bull.
Then I had her pick up the Crosman 2240 pistol. She rested the muzzle on the table in front of her while holding it in her shooting hand. Then I had her close her eyes again. Now, on my command she raised the pistol and pointed it at the target with her eyes closed. When she opened them I asked her to sight the pistol. Two things she noticed immediately. First, she wasn’t holding the pistol correctly to be able to see the sights, and when she adjusted her grip so she could see them the gun was off the target. It was close, but not quite on.
I had her keep pointing the pistol at the target and I had her point the toes of her rear foot either inward or outward until the sights were dead on the bull. She noticed as she did that both of her legs were getting tight at the knees, but she was not straining to make them that way. Her skeleton was tensioning her legs.
Moving the toes in small angles tensions the legs and also makes fine adjustments to the direction of the shooting arm. Move the rear foot first and only move the toes of the front foot if absolutely necessary.
When she was perfectly adjusted, I had her lay the pistol down on the table. I stepped in front of the table, in line with the target and had her point her shooting finger straight ahead. I moved until she was pointing at my right eye. Then I pushed her arm to my left and her right about 6-8-inches. When I let it go, it returned to point at my eye. I pushed it in the other direction and let go and it returned the same way. No matter how I moved her arm, it always returned to point at my right eye when I let go. The tension in her legs kept her pointing the right way. Jill was now in the perfect offhand shooting stance, and what’s more — she knew it! She saw that as long as she maintained this stance, she would always point to the center of the target.
I stepped back to her side and told her to relax her shooting arm, but to leave her feet where they were. Now I told her to close her eyes and raise her arm above level, then lower it until she thought she was pointing at the target. When she was done she opened her eyes and to her surprise, she was pointing straight at it. “Jill, as long as you don’t move your feet, you cannot miss the target, right or left. It makes no difference whether you are 5 feet away or 50 feet, you will always point at the target.”
She agreed with me. This was the most stable stance she had ever taken in her life. She knew she could not miss, left or right. “But what about up and down? I’m not Supergirl, you know. We have two very light pistols, but I still have to hold them at arms length, and that’s not easy.”
The second secret
Trust, me,” I said, “it will be in a minute. Here comes the second secret. Pick up the 2240 pistol and hold it comfortably in your right hand. Now extend your right arm straight and point the pistol about 3 feet above the target.” I was standing to her side as she did this. “Now roll your hand and arm (and the pistol) as far to the right as you can without hurting yourself — all the while keeping that arm extended.”
She did this and when I told her to relax the roll, her arm rolled back to the left and she immediately saw what had happened. Her elbow and wrist were locked! She was holding the pistol at arm’s length without using most of her strength. Her skeleton was doing a large part of the work.
“Oh my gosh! she exclaimed. I’m not holding the weight of the gun! It’s floating on the end of my arm!” That feeling lasted a few seconds more and then the weight began to make itself felt again. I told her that’s how the top shots do it, and if she could learn to do it she would become a great shot with a handgun.
Proof of the pudding
Now, I had her cock and load the pistol, then rest the muzzle on the shooting table. I said, “Now, raise the pistol to point three feet over the target, lock your elbow then lower the muzzle slowly until the sights are in perfect alignment with the bull. As you lower the pistol, slip your trigger finger around the trigger and start squeezing. If you take over 5 seconds to fire, release the trigger and lower the muzzle to rest on the table once again.”
She did this three times before firing her first shot, which was a 7, just below the center of the bull. Then she did the same thing 4 more times, only lowering the gun two times without shooting. When she finished, her 5-shot score looked like a 37, though all the pellet holes were touching, making it difficult to score. After that I had her lay the gun down and relax.
“Jill, you just put 5 shots into a nickel from 20 feet. You thought you might not hit the target, but instead you tore the bottom center out of the bull. How do you feel?”
“I’m flabbergasted! I had no idea this is what target shooters do. The way I was standing, it was hard not to hit the bull every time! Did you know I could do that? And why are these shots higher on the target than the ones I shot from closer?”
The shots were higher because we we shooting from farther back and the pellets were coming closer to the line of sight. When we got back to 10 meters, her shots would hit the center of a much larger bullseye. I told her I knew she was going to be a good shot, but in truth she surprised me.
Now I had her step away from the shooting table and loosen up. It is surprising how much tension this shooting position builds — especially when you aren’t used to it.
Next, we practiced getting into position several times. She quickly learned to first plant the feet, then point her finger at the target and adjust the rear foot. And finally to pick up the pistol and make those final tensioning corrections that put her directly on target.
Locking the elbow was foreign to her in the beginning, but once she caught on it became easier. Then I had her shoot another 5 shots at a fresh target. This time her group was bigger than before, but it was still credible. We did this four more times and I ended the session because she was tiring. But there was one more thing to do before we quit.
You’re ready!
I had her take both air pistols and the pellets back to the 10-meter mark in the hall we had made earlier. I carried the shooting table that would be in front of the firing position. We weren’t going to shoot from this distance this evening, but tomorrow night we would start from here.
I showed her the 10-meter pistol target whose bull is almost twice the size of the rifle target. When I put it on the target trap it actually looked bigger to her, even from this far back.
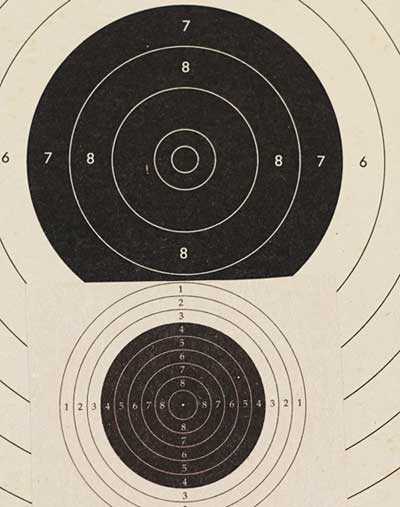
Ten-meter air pistol bull (top) is almost twice the size of the air rifle bull.
Final talk
Before we went to dinner I asked Jill to please refrain from shooting at the target with pellets until the next session. She could practice getting into position as much as she wanted, but I told her I wanted to be there when she fired her first shot at 10 meters. I told her to try both pistols if she had the time. That would make our next session go smoother.
There is a surprise coming, so stay tuned!

THANK YOU! Jack!! Very enjoyable! No doubt you’re very good! I like your writing style and how you are dealing the deck! Semper fi!
J.Lee,
You’re welcome. I don’t know if many people will realize it, but Jack just taught them how to shoot a handgun accurately with one hand. This is something most people never learn.
B.B.
Hi everybody…
Cool story about shooting. I don’t have a teacher but I recognized many of the elements from my own experience. In many cases I applied things you folks wrote to my own shooting, sometimes only realizing much later that they really work. In some cases, I have also learned by trial&error.
BB,
after struggling quite a bit with my HW45 at first, I think I can now say that I am making definite progress. And I am using the one-handed “Col. Bonsall” hold you described. It does work I think (which doesn’t mean that I am very good… but I see improvement).
Stephan
Stephan,
Good to hear from you today. This report was written for people like you who want to learn to shoot one-handed. The technique of rolling your arm to lock the elbow is one Col Bonsall taught me.
B.B.
Great Blog B.B.!!
I have always maintained that stance is the critical foundation for consistency (accuracy).
Doesen’t seem to matter what you are doing, archery, batting, bowling, golf, pistols, rifles, shotguns… without propper stance you will never do well.
Notes taken for pistol practice this weekend!
Thanks!
Hank
B.B.
I was just trying your instructions in my office (nobody else here yet to wonder what I am doing) and found it felt very strange to align above the POA then drop down to it.
I realized (funny how you do things out of habit and don’t think about it until you try to do it differently) that I shoot (bow, guns, slingshot) as I raise to the target. Going into stance, bringing the gun and shooting (usually) is one smooth movement and I rarely stop and aim. I tend to shoot quickly (you wouldn’t want one of those feral pop-cans to escape!! 🙂 ).
Should I work at aligning high and dropping down for pistol shooting or would it be best to follow my old habits? I am not doing formal target shooting.
Thanks,
Hank
Hank,
This procedure is very specific to target shooting. If you don’t plan on doing that, don’t do it. Doing one part of the procedure without the others will not give any advantage. It’s all or nothing.
Jack will explain to Jill that he has been showing her what is possible. He doesn’t expect her to ever use it. But when He demonstrates a two-handed defense stance, he expects her to follow it, because she was so successful with the one-hand stance. Also, if ever she is injured, it’s best to know how to shoot one-handed.
B.B.
Thanks B.B.
I think I will practice the formal target procedure even if it is just for the experience and understanding – just like Jack is doing for Jill. If it works out for me I just might do some proper 10 meter target shooting – I always like trying different things.
I am looking forward to the demonstration of two-handed defense stance.
Hank
B.B.,
Leave it to me to write something silly, but I cannot resist.
In an episode of The Honeymooners, Ralph reads instructions for hitting a tee shot to Ed Norton. Ralph reads, “First, address the ball.” Norton looks down at the golf ball, waves his hand, and cheerfully says, “Hello, ball!”
Michael
Michael,
“Norton — one of these days — Pow! Right over the moon!” 😉
B.B.
Great story so far, you are going to help lots of new shooters.
While you mention locking your elbow, and rolling your arm, there may be some people out there that may HEAR the term, but not know how to achieve either one without a more detailed explanation.
Keep up the good work!
As Vana2 said above there are many things that need a proper stance.
I know when my daughters shoot their bow and arrows they position theirselfs in a way to (lock) onto the target. Including comming down on the target with their pointing arm.
And that’s pretty much what I do when shooting a rifle in a standing position. And how I taught my daughters to shoot rifles. And that is even if we are plinking at spinners and such. You almost have to do that to hit your target when your standing. Especially with the weight of the rifle being involved.
And I have always said this. I’m not a pistol shooter but I do shoot pistols occasionally. And I will say that I am a one handed shooter. And how we practice we always act as if we have a holster for the pistol strapped at the side of or waist. So we kind of do a fast draw I guess you call it when we shoot. And yes we always position ourself to the target or spinner or such and practice drawing and pointing the gun while locking the whole body in position before we actually take a shot.
I tryed two hand pistol shooting but to me the body has to be positioned more exact if I’m saying it right. And for me anyway doing the one hand draw practice and then getting the other hand on the gun and getting the sight picture takes longer for two hands being involved. And again that’s me trying two hands.
But I do think that muscle memory comes into play also. Well probably the most on the fast draw we do. But then again the same when I shoot a rifle standing.
But then I wonder if I’m wrong to call it muscle memory too.
BB
Great as usual!
Speaking of accuracy, I’ve been putting a lot of time in with the machine rest for Crosman single-shot CO2 pistols. Here’s what I’ve learned so far:
1. They really shoot! The Custom Shop 2400kt is superb.
2. They shoot more accurately with 1min. Between shots than 30 sec. 2 minutes doesn’t improve.
3. Pellets must be loaded carefully to avoid skirt damage. (A special problem because of breech/barrel design) At the range hold barrel pointing straight down and gently tease pellet into rear of barrel before gently closing bolt. In the horizontal machine rest it’s more difficult. A short 1/8 inch wooden dowel helps.
4. Gaging pellet head size for uniformity may help. Some pellets like JSB 7.33 grain domes are very uniform and don’t need it (at least in batch I’m using).
(i would bet skirt distortion and varying pellet size are leading cause of uncalled fliers.)
5. Fire gun in rest by pressing very tip of trigger back while thumb pushes rear of grip forward to minimize disturbance and vibration
6. CO2 starts running low after 20-25 shots and accuracy can fall off without warning.
Using the rest has helped my offhand shooting.
I hope this is of interest. Cordially,
Fido3030
Fido3030
On the pellet loading. That is something I don’t like about that barrel, breech design that’s used on some of the Crosman/Benjamin guns.
You also have to watch so you don’t mess the head of the pellet up too when you load with that design.
And did you see that link I posted the other day from Hector Medina. He talks about the anatomy of the pellet and also how the head of the pellet kind of glides along the rifling and how those two things kind of affect each other. Then throw the skirt in.
He has pictures of pellets that have been soft recovered after firing them. It distinctly shows how the skirt and waste of the pellet is blown out or exspanded from the blast of air. And of course the pellets fired from pcp guns compared to most springers was blown out more.
So how hard or soft a pellet is can affect accuracy also. And add in head size to that and all the other variables. Bottom line what Hector mentions is try different pellets in your gun and see what results they produce. And always keep a open mind to try different types as they come to market.
But you have that set up now and all that’s left now is to try varius pellets with different head sizes. And depending on how hard the pellet is what type of skirt thickness you need. And then I should say also different head sizes for how hard the pellet is.
I myself like taking the hard pellets out of the equation. Then I try to take the thick skirts out of the equation on lower powered guns. Oh and on most guns you can feel how well the pellet engages the rifling when you load the pellet. But it’s hard to do on the Crosman guns that use that breech and barrel design that we are talking about.
Ain’t it funny how the more time you spend on something the deeper you can dig to find more things to affect end results.
Gunfun1
Yes! I hadn’t considered pellet hardness.
On the positive side, each variable we optimize means better accuracy. Up until the time we run out of lifetime or money.
Fido3030
Fido3030
I will try to just post the link about what happens to the pellet when it shoots. I copied the whole blog page the last time when I tryed to copy the one article.
http://www.ctcustomairguns.com/hectors-airgun-blog/at-the-moment-of-firing-and-fit-of-pellet-to-the-rifling
Gunfun1
Thanks!
Fido3030
Fido3030
No problem. I thought it was pretty interesting the first time I read it. Well I still think it is.
It sure makes you realize the pellet don’t come out of the barrel looking the same as when it went in.
Hi Fido3030, thanks for sharing this. I did have problems with pellets catching the transfer port after I modded my 2240 with the 10.1 LW barrel. Don’t know why it didn’t catch with the stock barrel. I wonder if it could be the difference between a .177 and .22 pellet size. The .177 pellets are now a bit finicky to set into the barrel.
Regards,
Peter
Peter
Hi Peter, Did you change the bolt from .22 to .177? That may help. I changed a 2240 to a LW Barrel also. Shorter pellets tend to nose dive while longer (heavier) pellets load more easily in mine., such as JSB 10.34 grain. Mine shoots very well once you get the pellet in undamaged. I like these Crosmen singleshots. Good luck!
Fido3030
Hi Fido3030, yes, changed it to an extended .177 bolt. Even with an extended bolt, yes, my wadcutters still gets caught in the transfer port. I try to load them with the pistol tilted back some. That appears to work. BTW, have you had your LW long? Is there a pellet it likes to shoot?
Thanks!
Peter
Peter
JSB 7.33 grain domes work well. Also falcon 7.33 and JSB 10.34 grain. These were suggested to me by members of the blog. Lots of great help here!
Fido3030
Hi Fido3030, yes, a great on-line community offering helpful tips for sure! BB runs a great blog! Thanks for your pellet recommendation. I have some JSB Exact 8.44 gr dome I can try. Will pick up some of the 7.33 gr as well. The JSBs are a nice pellet; very uniform and clean
Regards,
Peter
I’ve gotta give this a try!
BB, Redrafter, and everyone—–My Gletcher M1944 arrived Tuesday evening and here is my report– I opened the box and found a superb MN 44 replica. — trigger pull 3lbs on my RCBS gauge. No problems loading the co2 and the Avanti bb,s. Accuracy tests– 7 five round groups at 10 M, bag rest=6.2/16 av ( 3/8″), 6 five round groups at 10M, =9/16″ av. 3 fifteen round groups at 10 M, = 15/16″. I could not duplicate Redrafters off hand groups, even off a rest. But then, I am aiming a , rifle, whoops,, a gun with crude military open sights with 79 1/2 year old eyes, not to mention the rest of my body. Next the velocity tests– I wish that I had done them first. I bought an extra magazine with this gun and its velocity is greater than the original mag. My accuracy tests were done with both mags mixed together. Original mag–Avanti shot–=2– 5 round tests=425 fps and 424 fps. Spare mag =554 fps, 542 fps. The poi in the accuracy tests was the same. Now for my comments== I would have liked to have met with the engineers when they designed this gun–1 Skip the bayonet, save money and weight. The MN1938 that preceded the 1944 did not have a bayonet. Use a windage adjustable front sight like the original rifle. My 44 groups 3/4″ to the right and I am not sure of how I am going to correct this problem. Make the bb follower out of bright yellow or orange plastic instead of the current black one. The lock time is too slow. Use a more powerful spring. You will have to strengthen the co2 valve, but the gain in accuracy when shooting offhand will be worth it. The sling is horrible. I took a sling off one of my MN rifles and it is better than the one the gun comes with. Daisy zinc coated bb,s and copperheads shot so poorly, that I did not bother to test them. Gamo lead BB,s jammed the gun. Diana lead BB,s were too small and did not group well. Thats all for now. I will be happy to answer questions and listen to suggestions. Perhaps I will test each mag separately, but the gun shot so well even mixing the mags, that I will probably use it for plinking and not for paper target shooting. Ed
Hi BB, thanks for part 4, I’m really into this now….however, I’m having trouble understanding the second secret, rolling of the hand and arm. How do you lock your elbow and wrist? The notion of aiming with your eyes closed is very interesting. I need to practice this move! It’s like Zen archery where Zen masters nail targets in total darkness! So is this Zen airgunning? 🙂
Regards,
Peter
Peter,
Hold a pistol and roll your arm as far as it will go without hurting. Then relax. Your elbow is now locked. The wrist may not be, but with the right grip you can lock it. as well.
Next week I may show a little more.
B.B.
Hi BB, very excited to read Part 5! 🙂 Still trying to lock my wrist, but the gun is probably too front heavy. It’s the 2240 modded with the 10.1″ LW barrel. The gun tend to droop down and my wrist get tired REAL fast and I start to over compensate and the aim drifts into a circular pattern! …then I just blindly pull the trigger out of frustration. Any suggestions?
Regards,
Peter
peter,
Rolling the arm is the only thing you can do to lock the wrist. The 2240 grip may be too straight for your hand to allow locking the wrist. Different grips might help, but that’s too much trouble.
B.B
Hi BB, thanks for your suggestions. I actually found your series on shooting 10 meter pistols. Very nice read! I now understand the difference in grips for match pistols. They are, as you’ve pointed out, less straight and have a much more shallow angle. I can see how, with my elbow locked the wrist can drop down to its lowest point point, the pistol becomes level with your line of sight! Where as in the 2240, I have to lift the pistol with my wrist to level it out because of the steep grip angle! The gun is not front heavy, it’s actually the grip angle that’s too sharp! ….is that right?? 🙂
Regards,
Peter
Peter,
You got it. That’s why Jill can’t shoot quite as well with the 2240 as she would with a 10-meter pistol. But Jack doesn’t own one, I don’t think.
B.B.
ah, but BB does! 🙂
Peter,
Yes, but Jack told me he doesn’t want to borrow it, because he’s trying to keep this training real. Not many airgunners have access to guns like that.
B.B.
Sounds like our Bible student is losing a little focus. 🙂 Jill, just shoot with two hands . Heh heh. That’s a great explanation of the stance and sounds a lot like Jack Dempsey’s boxing stance down to pointing the toes in. But I still don’t see how pointing the gun high and rolling the arm sideways can offset gravity. I’ll have to experiment with this.
Matt61
Starting high and coming down on the target really works for one handed target shooting.
And if the shot doesn’t break in 4 or 5 seconds, it’s time to put the muzzle on the table, take a deep breath, and start over.
If you hold it longer than that and try to “force” the shot it’s not going to hit where you want it.
It’s totally different than any other type of shooting.
In a match, there’s no one shooting back so you have the luxury of taking the shot again if the first one wasn’t perfect, and didn’t break before fatigue set in.
When shooting, you focus on the front sight, and let the shot flow, if it doesn’t FEEL right, ground the gun, take a deep breath, clear your mind and do it again.
I know it sounds kinda zen-ish but it works.
45Bravo,
I can see that you understand. Good for you!
B.B.
Hi 45Bravo, yeah, the longer I try aiming the more my arm would get tired and yes, I do force my shot and no it doesn’t go anywhere close to where I want it! 🙂 ….that’s EXACTLY what happens! I will give your steps a try. Thanks so much….this is very helpful.
Regards,
Peter
I have always came down on the target when I shoot. Even when bench resting.
For me when I see the target appear. It’s time to focus my thought only on the target and aim point. And it’s just a matter of a second and I shoot.
The longer I hesitate to shoot the more my mind recognizes the movement that happens. And that movement always happens. Even when locked on. Then the shot becomes harder to make.
I always surprise people that I shoot with as to how fast I get on target and shoot. Not trying to brag. Just saying for me anyway the longer I wait generally means a worse shot for me.
I think the fast sight acquisition happened for me with all the rat and feild mice pesting we did as kids on the farm with the semi-auto .22 rimfire rifles. No time to carry a shooting stick around. You see them at anytime and anywhere. And they are there for only a split second.
But I sure do apply the body technique that BB is talking about. Woops I mean Jack is talking about even if I’m rifle shooting without a rest.
Shot guns even apply even when shooting moving targets other than leading the shot instead of comming down on the target.
Coming down on the target is why so many ranges have holes in the ceiling or baffles. If you ever get into a serious social event, a low shot in the ankle or knee is better than shooting over the head and missing. I like to come up on the target. This argument has been going on from the time when the bow and arrow were invented. I hope that some blogers with military , police and self defense experience will share their opinions with us. Ed
Ed
I tryed both ways. I myself have more successful hits when I start above the target and come down on it. Soon as I see the target I’m getting ready to pull the trigger. And that is mostly rifle shooting for me. I don’t shoot a pistol enough to hit as consistent as I do with a rifle to see results.
And my wife’s brother was a county Sheriff for probably 18 years. That’s who I grew up with hunting as a kid. Matter of fact that’s how I met and started dating my wife.
But we had that conversation before what was best or right or whatever you want to call it. And we both agreed that it depended on the situation and the type of gun that was being used. And what was easier to do for that particular situation.
So as it goes. There’s even variables to consider for doing a certain type of hold or technique. To follow doing some one way I think would be a mistake depending on the situation. Kind of like not trying different pellets in a gun.
So yes hope others will share. There is sure alot of information that could be posted right now through different links. I know there’s some good tactical websites out there.