by B.B. Pelletier
Plans and photos by Jim Contos
We all need something to shoot at, and I don’t mean targets. BB guns and pellet guns are great to shoot around the house as long as you’re stopping and capturing those projectiles safely. When I began shooting pellet guns in my apartment in Germany in the 1970s, I mounted a metal pellet trap similar to the Gamo cone pellet trap to the inside of a steel-sheathed front door. In two years of shooting thousands of shots at that small trap, I never missed it once, though today I would advocate a larger trap for a greater margin of safety. The steel sheathing on the door was my backup plan, but in retrospect, that was a bit risky.
I shot only lead pellets at that trap, which is important to know, because it’s not suited for steel BBs. Lead pellets deform and give up most of their energy when they hit a solid surface, while steel BBs rebound at nearly the same velocity at which they came in. A suitable trap for BBs would to slow them to a gradual stop without the risk of a rebound. While there are traps that are well-suited for BBs, perhaps the best trap is the one that works well for both BBs and pellets, and that’s the trap that’s packed with duct seal, like Air Venturi’s AGE Quiet Pellet Trap. Everything that hits the duct seal is caught and prevented from rebounding.
The cost of a quiet or silent pellet trap comes from two things. First, the duct seal in the trap is somewhat costly on its own, and second, of course, the labor to build the trap adds to that cost considerably. Before the commercial duct seal traps were available, I made my own silent pellet trap about 15 years ago. So far, it has stopped untold thousands of BBs, pellets and even the occasional .22 rimfire bullet.
Another feature of these traps is that after they get full of thousands of lead pellets they become extremely hard to penetrate and are then suitable to stop bullets with up to about 45 foot-pounds of energy. When new, the same traps are best held to no more than 30 foot-pounds if they have a metal backing and 15 foot-pounds if not. I’ve already destroyed a fine custom-made wooden trap because I shot too many 30 foot-pound shots to the same point of impact and blew through the wooden back of the trap.
Today, I’ll show you a pellet trap that you can make quickly at low cost from a PVC fixture and metal electrical junction box covers you buy at the local hardware store. Blog reader Jim Contos gave it to me a few weeks ago, along with the plans and the photographs you are about to see, at the 2011 Malvern [Arkansas] Airgun Extravaganza. Those of you who subscribed to my newsletter, The Airgun Letter, may remember Jim as the man who guided me through the trigger modification on my Beeman P1 in 1996.
Better than it sounds
This trap is more substantial than it sounds. When Jim described it to me at the show, I didn’t think much of it. But when he put one into my hands a few minutes later, everything suddenly cleared up. Although it’s made from a plastic PVC cap, it’s the eternal grade of PVC — the Schedule 40 stuff that takes a log time to degrade and can take all the smallbore airgun punishment you can dish out. When I tell you what Jim did to test one, I believe you’ll come to the same conclusion.
Materials
To make a trap like this you’ll need the following:
One 7-inch Schedule 40 White Cap PVC Socket Fitting (it’s really a little larger than 7 inches across)
Two 4-inch steel electrical junction box covers
Enough duct seal to suit yourself (around 6-8 lbs.)
Making the trap
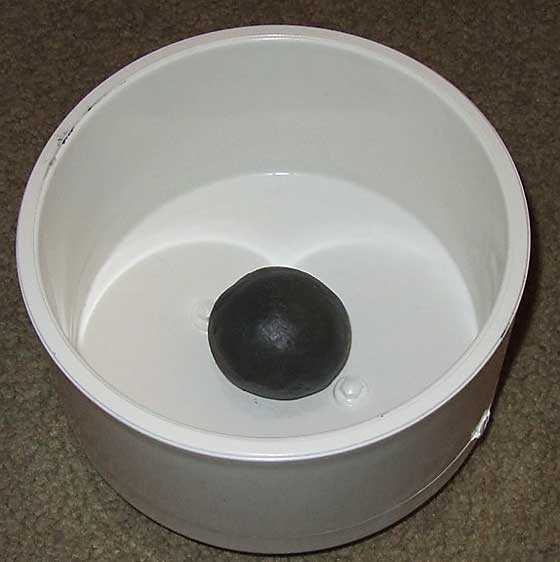
Step 1. Roll a quarter-stick of duct seal into a ball and place it in the center of the cap.

The first ball of duct seal goes into the cap.
Step 2. Press one of the two electrical junction box covers down on the duct seal, squashing it.

The first metal plate has been squashed down on the ball of duct seal.
Step 3. Place another ball of duct seal on top of the junction box cover.
Step 4. Place the second junction box cover on top of the new ball of duct seal and turn the cover 45 degrees from the one below so the two covers are offset the maximum amount.

A second ball of duct seal was placed on the first metal plate and squashed by the second plate. Notice the plates are offset as much as possible to cover the back of the trap better.
Step 5. Fill the cap with the rest of the duct seal, making a relatively smooth surface on top.
You’re finished. Attach a paper target directly to the duct seal in the trap with a push pin or other thumbtack-like object, and you’re ready to shoot.

It’s this easy to fix a target to the trap. Smudges on target are caused by the oil exuding from the duct seal. This target has been mounted for several weeks.
The cost of this trap will vary, depending on the cost of the materials. There have been numerous discussions on this blog about where to buy duct seal at the lowest price, and I’m quite sure this report will generate a new list for anyone who missed out on the others. I bought 18 lbs. of the stuff a couple years back and used half of it to refill my old homemade trap. It’s already in need of another refreshing.
I never bother cleaning my traps because it isn’t uncommon for me to shoot 500 to 1,000 pellets a week at it. Sometimes, when I’m testing BB submachine guns, I shoot that much in a few hours. I would constantly be cleaning the thing. Instead, I cover the face with cardboard and always place the trap inside a cardboard box that has low walls, to catch any pellets or BBs that happen to bounce out. After 10,000 pellets have impacted, there’s a wall of solid lead that’s far stronger than straight duct seal, but the downside is it crumbles more and can be a bit dirty. The box the trap sits in takes care of that.
Testing the homemade pellet trap
Jim said his trap could take 30 foot-pound hits all day long from the start. Those metal plates in the center will stop a lot, as we will shortly see. When he went home, he decided to test an older trap with a real acid test, just to be sure. He covered the older duct seal in the trap with a fresh coat of fresh duct seal and proceeded to shoot at it from six inches with a .45 caliber Sam Yang Big Bore 909! That’s a big bore air rifle that generates around 200 foot-pounds at the muzzle. Kids, don’t try this at home!
He pressurized the reservoir up to 3,000 psi, set the power on high and let fly with a 170-grain round nose bullet. The bullet penetrated three inches into the trap, hit the top steel plate and rebounded 1-1/2 inches.

A .45 caliber, 170-grain round nose bullet fired from a Sam Yang 909 penetrated three inches into the trap, then rebounded 1-1/2 inches off the top metal plate. The trap was unharmed.

Bullet on the left was removed from the trap after firing.
Jim told me he thought the trap might cost $15 to build. Even if it’s twice that much, it’s still a great savings. The whole project won’t take more than an hour from start to cleanup, and you’ll have a pellet trap you can use for decades to come. When the duct seal gets too loaded with pellets, just dig it out of the trap and replace it with fresh material. The metal plates you continue to use.
Now there are other ways to do the same thing. For example, you can just buy a larger metal junction box, pack it with duct seal and, presto, you’re done. But those larger boxes do cost more money, plus they hold more duct seal. This idea is one of the more economical ones that still offers great protection.

This is an excellent idea and even the beginning shooter should be able to shoot inside 7 inches bench rested. Offhand? – might want a bigger box. I have a 21″x18″x4″ wooden box that has one layer of 28 one pound pugs of duct seal. Cost me about $60 to build but the paneling behind it is worth a lot more. I don’t need that much any more, never did, really. Even the grand kids are better shooters than that, but wanted to be safe. Half that would have been sufficient.
I do dig out the pellets but I don’t shoot the quantities BB does. I usually dig them out after about 20 or so shots, now. At first, I let it go for a few hundred shots but it took too long to clean them out and too many of them were fused together from stacking. Plus it was boring as heck. I collect the pellets and melt them down into ingots. Some day I’ll make fishing jigs or .357 bullets out of the ingots.
-Chuck
American Airgunner tonight 8:30 eastern .
B.B.
My old pellet trap is about due for a retread. It has gotten hard and is starting to crumble.
When I first made it, I had to leave it laying down when not in use. The weight of the duct seal would slowly cause itself to sag and pull away from the box. It’s not as soft and sticky now.
I have small bits of duct seal and pellets all over the floor under the trap down in the basement.
twotalon
When I made mine I sized it to just under 11 x 17 inches. This lets me use the lids off copier paper boxes that I get from work on top of it as backer boards. Since the duct seal portion of the trap does not need to be that big, I used 2x4s for the top and bottom rails to reduce the amount of duct seal in it, and I also left a space at the bottom for pellets and debris to fall into. Works great for long range shooting to, as the duct seal area is about 10 x 12 inches. Added a “wedge” mount system on the back, made by simply cutting a 1×6 board at a 45 degree angle and using the pieces on the back of the trap and on whatever I choose to mount to. I can easily move it to different mounting points indoors and outside.
Alan in MI
Neat trap. I like it.
I was just thinking about C02 guns and the thought came to me about how well the E-Valve technology would work with C02. It would be able to sense the pressure and as the pressure goes up and down control the valve to give you consistent velocities. Since C02 has the ability to give so many more shots for the volume of it’s pressure chamber, this could be revolutionary.
David Enoch
Chuck
You mentioned a few days ago that you put a peep sight on your Bronco. What peep sight was that you used, and did it require any modifications to clear the stock?
BB
You failed to mention in this article that you absconded with one of Edith’s cookie sheets to build one of your pellet traps. That is something I am unlikely to forget, and don’t you think that Edith has forgotten. I just think of the dozens of cookies that went unbaked because of your thoughtlessness. For shame.
On the subject of pellet traps, my brother is a metal-worker and welded a trap for me from thick steel. It measures 14.5″ by 12″ and is not easy to carry around. To test it out, I fired two magazines from my Walther P22. Hardly a mark. Emboldened, I fired 3 shots from a 9mm Glock. Hmmm, very tiny dents. Best I don’t do that anymore. I have since coated the back with duct seal and nailed an old sweatshirt to the duct seal. I don’t have any idea how many pellets have been fired into it because I went to Georgia public schools, so I don’t count all that good.
SL,
And the purpose of the sweatshirt is…? The reason I ask is because when I hang my targets and press them to the duct seal they seem to stick, making a marginally solid surface.
I have the Gardner-Bender pugs which are dark grey like the ones in this article, and sticky. I, also, have Commander Iberville pugs that are tan colored, also sticky but not quite as malleable as the GB’s.
-Chuck
The purpose of the sweatshirt is to absorb some impact noise, and help reduce ricochets when shooting BBs. I use magnetic clips to hold my targets on the trap. I didn’t like that sweatshirt anyway.
SL,
I put the Beeman Aprerture Sport peep sight on. PA doesn’t sell them anymore. It is similar to the Williams that BB tested in his Bronco article. I did not have to make any modifications to compensate for droop. The sight does have a slight cant to it that I think is caused by a too thick claw that doesn’t slip completely into the very fine groove of the rifle rail. It may be the cant problem that is the reason PA discontinued it. If you’re lucky you might find one on another site. I did look around, myself, a bit but only found sites that showed it out of stock.
-Chuck
The Beeman peep sight is a Williams peep sight. Beeman never made anything. There is a high and a low version depending on your front sight height. The difference is the length of the slide. One is longer and I’ve noticed if you are buying a used one ,if it says Williams on the slide it is the longer one. The shorter ones I have had don’t have the makers name on the slide part. You can buy them right from Williams Gunsights direct, either size ht. Another peep sight is the N.E.C.G. receiver sight for grooved .22 receivers. It is a great peep sight ,but costs about $100 dollars. It is made of steel and is a very low profile sight. That’s interesting about the Bronco not having deep enough receiver grooves. Never had a problem on any of the Crosman Quest , R-series HW’s or any .22 rifles I’ve used those Williams sights on.
Robert,
The on I have has Beeman on it where you are seeing Williams. I must have the shorter version since I can correct for droop. It’s not the Bronco that’s at fault on the cant. The claw on the peep sight is too thick and won’t settle into the rail groove. I’m going to try to sharpen the claw when I can get to it.
-Chuck
Thank you Chuck and Robert.
Here is my 10m range using duct seal in my traps:
https://picasaweb.google.com/cjrley/DuctSeal?authkey=Gv1sRgCManvKqPo-PhjwE#
Double click on the first picture to enlarge it then click on the arrows at the top to go forth and back.
The first pic shows the PVC pipe I used to build the table.
The second pic shows the carpeting I place in front of the legs to prevent ricochets. Notice the carpeted plywood on the right side to catch pellet splatter from the metal squirrel. I also put extra pugs around the 2×4 frame of the large trap and the front edge of the table top to prevent ricochets. The center trap is a Gamo cone pellet trap. I use it for pistol practice. I’ve been using the Gamo trap a lot lately because I don’t have to dig pellets out of it.
The third pic shows what it looks like from behind the 10m line. Notice the cardboard cover over the TV screen on the right. A feeble attempt, but still, better than nothing.
The fourth pic is a shot of the ceiling directly above the Squirrel trap. This is evidence of pellets fragmenting and splattering into the ceiling tiles. Some of those marks contain actual lead fragments.
The following photo sequence shows the construction of the target table Slinging Lead was asking about.
https://picasaweb.google.com/cjrley/CJr1000TargetStand?authkey=Gv1sRgCOGwiMvV6aCILQ#
-Chuck
This trap is a nice idea if you don’t re-cycle the lead. If you hung a piece of carpet behind it you would catch the ones that miss the trap. Lowe’s sells a fold up sign frame and folding saw horses, that you could use for the carpet part of the backstop , or just make a simple wooden saw horse. That ‘s what I do, draping both sides and back with a piece of loose scrap carpet. A cheap clamp on painters light to illuminate the target completes the set-up. You can either have the saw horse facing you and shoot through the legs like in a tunnel. Or place sideways for a larger backstop.
B.B.
I don’t know for others, but I’d like to see your article on Mosin. After all it’s beautiful and it’s an “elder brother” to all precision rifles – most used, most kills, most time in action (designated sniper Mosin appeared in 1929 and are still in service in many branches of Russian military, of course with improved barrels, modded action and new scopes).
Some grave news – I’ve got to search for another makers for “duscombe”. Ones I have said they are afraid they cannot support needed production tolerances. Grrr…
duskwight
duskwight,
Sorry to hear about the loss of your production people, but it’s better to know about that before they spend your money and can’t deliver what you need. Maybe this is a blessing in disguise?
On my Mosin, I would really have to stretch to put it into this blog, and I’d rather not do that. But it is a rifle that deserves a report, as you say. There were almost 20 million model 91/30s made, for gosh sakes. That beats the M1 Garand, M1 Carbine, 1903 Springfield in all its forms and the 1917 Enfield rifle production put together. And the 91/30 was but one of the many different types of Mosin Nagant service rifles.
B.B.
BB
On the Rogue.
I am sure that the electronics make the gun much more efficient. I am not proposing a Rogue without electronics for as you say it won’t be a Rogue. It’s just that I have poor luck when switching from mechinical to electronic in any appliance I’ve had. Eg. My latest is an exercise bike. I have had a purely mechinical one for years, oh I have re attached a broken cable once or twice, repaired a pedel and so on my self without problems. I don’t know what got into me one day to buy an electronic magnetic resistance fancy one. It lasted about one year and there is nothing I can do to fix it. I am now using the old one again and the electrons is a clothes hanger! I have other egs. including my SUV. I always look at electronics as disposable. I have 2 rifles that were made in the 60’s and they still function. I guess it’s a trade off, high efficiency low life expectancy. All that been said i would still like a Rogue in .25!!
What this DIY trap really has going for it is portability. Mine must weigh 75 pounds. It would also rust over in less than a week. I might have to make one or two of these. Thanks for the article Jim.
I just realized there is one issue with using the duct seal. I set mine up indoors to practice for 10m competition. Yes, the targets stick nicely to the duct seal, but the competition requires wadcutters. When shooting from a P17 the pellets only go just past flush. So, if another pellet overlaps, it gets shoved to the side. I’m now looking at six pellets that are touching each other, and wondering what it would have looked like…
Looks like I need some sheets of cardboard in front of the duct seal to make this work.
I use cardboard in front of my duct seal whenever possible. It does help some. If that doesn’t work for you then try not being so accurate.
-Chuck
Chuck, it took me 5 days of P17 practice to do that, and besides, BB talks about his 1/4 inch groups of 8. I don’t think that would be possible if they didn’t overlap, and BB gives us some goals to reach. Anyhow, this is only 10m and I didn’t mention where the other two shots went:-)
Looks like I’ll try adding a wood frame, with a slot to hold a single piece of cardboard, offset from the duct seal by about 1/2 inch, and use push pins to hold the target.
Gerry,
I built a wood frame for my trap. I used 2 foot long 2×4’s for the frame and pegboard for the backing, and filled it with one layer of duct seal. I also covered the front edge of the frame and the front edge of the table it sits on with duct seal to prevent ricochets. I use a nail to to hold the cardboard and target right to the duct seal. Most of the time I don’t use cardboard backing. Only when I want to get more precise measurements. I have it leaning against a 3/4″ sheet of plywood. I do see evidence of penetration out the back of the trap and I think that’s from my .22 Marauder that keeps pounding the same hole all the time. I haven’t looked at the wall behind the plywood yet. Anybody know how to spot repair paneling? 🙂 I need a sheet of steel to put between the trap and the wall I think.
Here’s some pics of my range setup:
https://picasaweb.google.com/cjrley/DuctSeal?authkey=Gv1sRgCManvKqPo-PhjwE
The last pic is of my ceiling tiles above the squirrel target. Proof that pellets shatter when they hit steel.
-Chuck
I was unfamiliar with duct seal, not being a homeowner. The clerk at the hardware store was not, either! I found some in the heating section – that’s NOT what you want. Too soft and gooey. It’s electrical conduit/duct seal!
The store didn’t have the large PVC caps but a small one worked fine. Great post, B. B.! Thanks.
Andy
You find the Duct Seal in the Electrical dept of like Home Depot. I use a clip board like you use for 10 x 12 paper. I cut the center out to just under 8 1/2 x 11 and screwed it to my target box. Then clip a piece of cardboard and the target. Works good and you can move the target paper around some to have fresh cardboard behind it. I made my box out of 3/4 plywood the back is a piece of 1/4in Lexan and two layers of Duct Seal. It will stop .22LR and never gets to the back. I have a handle on top so I can move it around from inside to outdoors. When it gets heavy I then clean it. Have gotten just under 5lb of lead out of it.
Don
Good day all. One person mentioned that the duct seal sagged when sitting upright. I am getting ready fashion a box using duct seal and was wondering if I need to be able to lay the box on it’s back to prevent sagging? BB,how do you mount the pvc cap to prevent movement? I may have missed that from your article. Any ideas anyone has on builds I would be thankful,I’m kinda new to airgunning. Have a blessed day everyone.
Thanks
Thanks for the ideas guys. Please post any new ideas on bb targets,that prevent bounce back.
Good day all. I don’t think this went onto the post last time. I saw that one person had an issue with the duct seal sagging and drying out,do you really need to be able to lay it on it’s back to prevent this? Also BB how do you prevent the PVC cap from moving,do you mount it somehow. I may have missed that in your article. I am looking for any new ideas you guys have on targets,I am new to this sport and shoot in my basement with about 30 ish feet. Thnks guys and have a blessed day.
John
John,
That is a good question! I found a small cardboard box that just holds the bottom of the PVC cap. It’s a perfect fit and the cap remains stationary.
Also, there is no worry about duct seal f;owing or sagging. Yes, it does happen, but in my 20 years experience using it, it takes YEARS to make a noticeable difference. That’s because you are constantly shooting into the stuff where the bulge forms.
B.B.
John
Duct seal does that. You have to lay it down between shooting sessions. It dries out eventually and will stay put when left standing. Until then, it acts like a VERY thick liquid .
twotalon
I put rubber mulch in a cardboard box, pack it tight and tape it shut. I think it’s .8 cu ft for $7 at your local home improvement store. Then tape on my targets. I have 1000 FPS .177 airgun (about 17ft lbs) and doesn’t go through. I’ve tested as close as 5 yds. My box is about 7 inched deep. It’s lighter to carry around than a duct seal trap and there’s little to no chance of shooting the same hole through to the back like you can with duct seal since the mulch will shift slightly and it deflects each pellet differently.