by Tom Gaylord, a.k.a. B.B. Pelletier
Today, we have a guest blog from our blog’s master mechanic — Vince. For those who don’t know him yet, Vince is our “go-to” guy for fixing all sorts of strange vintage airguns, including my Falke 90 that I’ll tell you more about tomorrow. Not only does he fix airguns, he also tells great stories, so I’ll leave that to him.
If you’d like to write a guest post for this blog, please email us.
Take it away, Vince!
The Relum Telly: Part 1
by Vince
My new Relum Telly!
Like a bowl full of jelly,
You gimme an ache in my belly.
But at least you’re not smelly,
My new Relum Telly!
(And it’s all downhill from here.)
I was perusing the Gun Broker auctions for no particular (good) reason when I saw a listing for something called a “Relum Telly.” Thinking it sounded like some sort of early British video receiver, I couldn’t help but look it up and, well, in fairly short order, I wound up owning my first Hungarian air rifle. Hungarian! Old Europe! Old World craftsmanship! But wait! Post-war Hungary. Commies! Oppressed workers! Poor quality! WHAT exactly was I gonna find?
I was to find out soon enough, as the gun arrived a week after the auction ended. First order of business, of course, is the initial grand tour. It’s intact — sort of — let’s just say it’s been “rode hard and hung up wet.” All the pieces are there (including the sights, thank heaven!); and even though there’s a lot of superficial damage to the bluing, rust doesn’t seem to be a big problem. But let’s take a closer look, unravel the ravages of time and try to get a feel for what this rifle must have been like back when it was originally used to swell the coffers with capitalist cash.

You never know what you’ll get from an online auction. This Relum Telly came to me.
The rifle is virtually identical in size to a Diana 25, which places firmly in the medium-sized proletariat range of shooters. But (unusually for this period and demographic) the gun seems to be trying to lift itself a notch or two higher in some respects.
The most obvious thing I see is that pronounced, raised cheekpiece. It may seem like no big deal now; but back when this gun was new (1960’s?), manufacturers didn’t tend to do a lot of sculpting on their air rifle stocks. Look at a contemporary Diana 25, and you’ll see what I mean. To make sure the cheekpiece is noticed you’ll see a “Telly” inscribed into it.
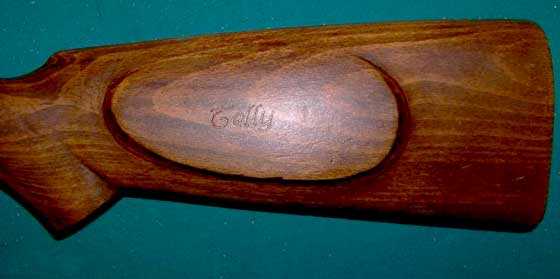
Not only is there a raised cheekpiece — they even thought enough of the gun to put the model name on it!
As we start looking more closely at the gun, I find that there IS something missing, at the bottom of the pistol grip.
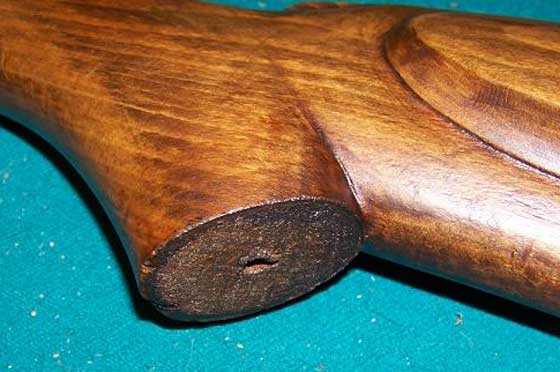
Yep — something’s missing.
The triggerguard (surrounding a trigger of an as-of-yet-unknown type) is held in place by a normal wood screw at the rear…and something kinda funky at the front.
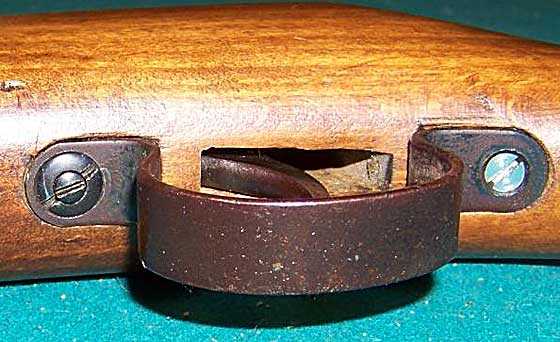
Funny way to do a lock screw, I thought. The triggerguard screw on the left has a locking screw in its center!
Anyway, moving to the breech, we see an integral sling mount, an articulated cocking link, a dovetail-mounted rear sight with elevation adjustment and a six-position locking-breech pivot bolt. That sling mount is positioned well. It’s so close to the pivot that there’s little chance that tugging on the sling will pop the action open (as it would on a Slavia 619 of the same period).
The front of the cocking link, if you notice, is also secured by a small machine screw. I DO notice something a bit curious, though — the cocking link seems to want to hang down from the action rather than sitting up tight. I wonder why that is?
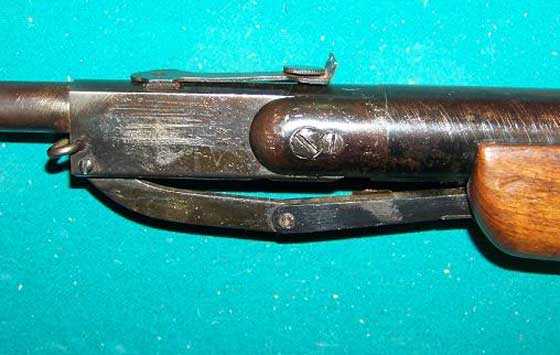
We see a lot of nice features in the breech area. But why does the cocking linkage hang down?
No matter! Continuing on with our tour — the front sight is also dovetail-mounted, and I imagine it had a hood around it at one point.
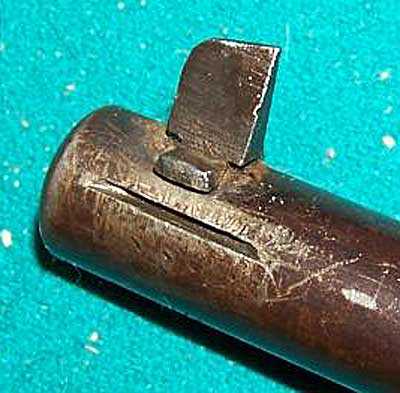
The front sight also sits in a dovetail. And the grooves in the barrel on either side are an indication there was once a hood over the sight.
So, we seem to have a fairly well thought out junior air rifle here. Since the Gun Broker listing stipulated that the gun “shot good,” the next logical step is, of course, to actually shoot it.
But obviously that’s wrong. It’s odd how we often take shortcuts in our use of language, with the result that our descriptions are technically inaccurate. As we all know, the next step is not to shoot the gun. The next step is to cock the gun — and what a formidable step it turned out to be!
The first attempt resulted in my giving up about 90% the way through the cocking stroke. Something was seriously wrong. The way the effort stacked up exponentially at the end of its travel, I first thought I had cocked it all the way and the sear simply didn’t catch. But that didn’t seem to be it. I tried again and got the barrel a little further back, but still no sear catching. Finally, with a rather Herculean effort (if I say so myself), I got the barrel all the way back and got it to latch. This little rifle required more than 60 lbs. of effort to cock!
Then, it’s pellet in, pull trigger, pellet hits trap. Rather anticlimactic, really. After all that effort, I was expecting at least a small mushroom cloud at the point of impact.
The worst part was the feel of the cocking stroke. It felt like metal-on-metal galling. In retrospect, I should have quit as soon as I noticed something wrong. Doesn’t matter now. I sure ain’t gonna try THAT again!
Apart comes the action. Immediately, I stumbled across problem No. 1: The front stock screws are stripped out.
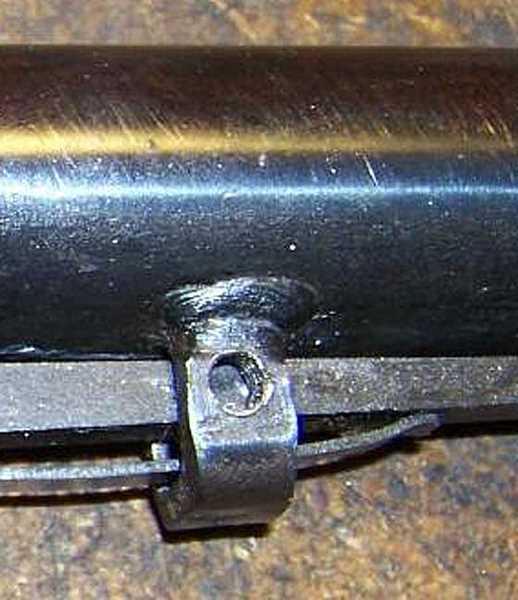
Great! Both front stock screw holes are stripped out.
Just great, but that’s the least of my problems right now. Why on Earth does a 6 foot-pound gun cock with over 60 lbs. of grunt? So, I pulled apart the action and found…a big, fat nothing. Piston looks fine. Tube looks fine. Springs look fine. Seal looks — wait! SPRINGS?
Yes, another Hungarian eccentricity. Mainspring-S — as in plural. And not counter-wound springs mounted end-to-end like in Wacky Wayne’s old BSA underlever (oh WHY did I let him have that back?), but concentric springs — still counter-wound. One was inside the other. Could they be binding? A quick reassembly with only the outer spring proves that they’re not. Cocking is nearly as bad. Side note: The outer spring wasn’t happy being cocked with the inner spring removed. Apparently, that inner spring (which contributes, maybe, 25% of the energy) works together with that outer spring, and they keep each other straight without a rear spring guide.
Well, now my attention turns to the cocking link. Could it be binding where it slides in the slot? There’s a lot of wear in the cocking slot area that leads me to believe it is.
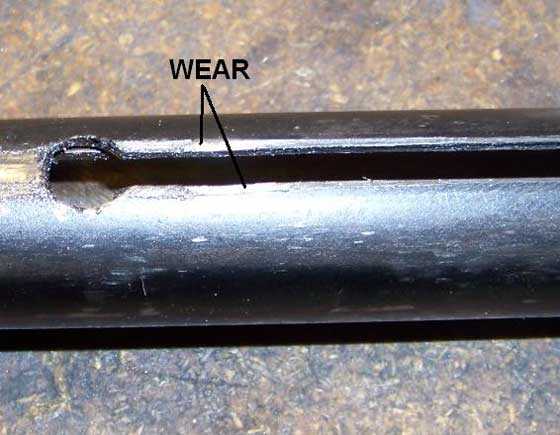
Heavy wear in the cocking slot of the spring tube.
I remember how the cocking link didn’t want to sit up tight against the spring tube. Upon closer inspection I find that it’s bent.
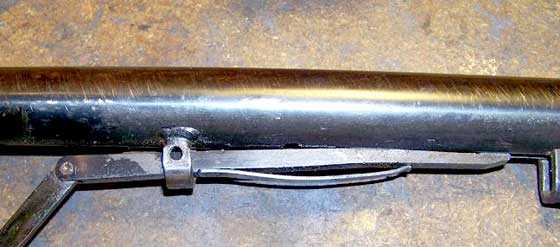
The cocking link is actually bent!
I straightened it, reinstalled it and — not much better.
I reconsider my probable causes and keep coming back to friction. A quick check on the scale shows that the effort to cock the gun is about 20 lbs. higher than the effort needed to merely hold the barrel in place. That’s a 20-lb. friction load — quite a bit — and a much more powerful Gamo 220 (which also has an articulated link) only has about a 5-lb. friction load.
Back to that cocking link. I noticed some wear. Because this linkage is articulated, the rear link that connects to the piston passes through a guide that’s attached to the spring tube. The link is sitting crooked in the guide and rubs up against the side of it when cocking the gun – THAT can’t be good!
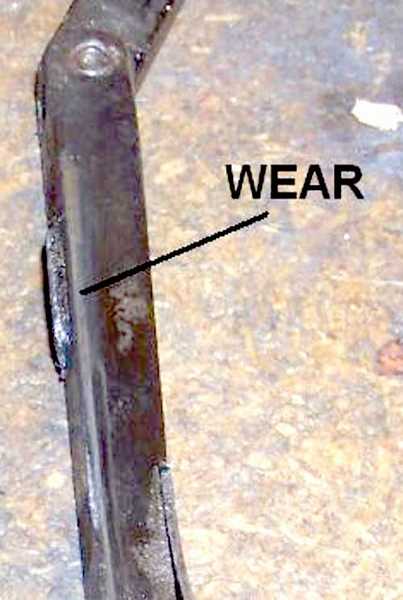
That shiny stripe is where the link has worn from rubbing against the guide.
I straightened it out, reinstalled it and — I can’t tell the difference.
At this point, I’m almost ready to believe that the gun is just jinxed. But upon closer inspection, I noticed this:
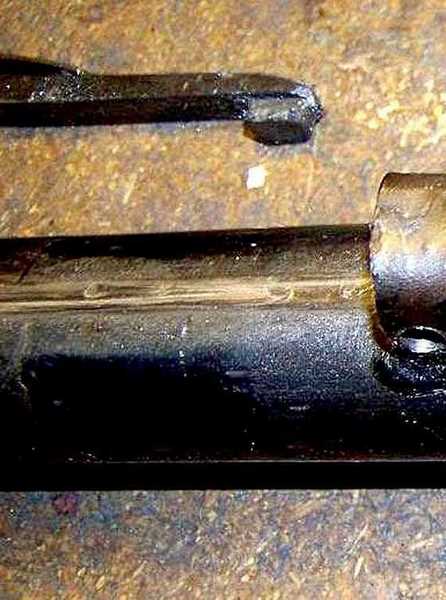
The cocking link has made a deep groove in the spring tube.
The thing about articulated links is that the rear link is pushed hard into the spring tube during cocking. There has to be some sort of nylon or Teflon pad, or a roller or SOMETHING to mitigate that friction. If friction is, indeed, mitigated, you don’t get galling like that. So, there’s something seriously wrong here.
In a moment, you’ll see the rubbing pad that the factory installed in the rear link. Could that be the problem? To find out, I did two things. First, I polished up the rubbing surface on the tube — but that one scratch was WAAAYYYY too deep to remove. The next picture is very revealing.
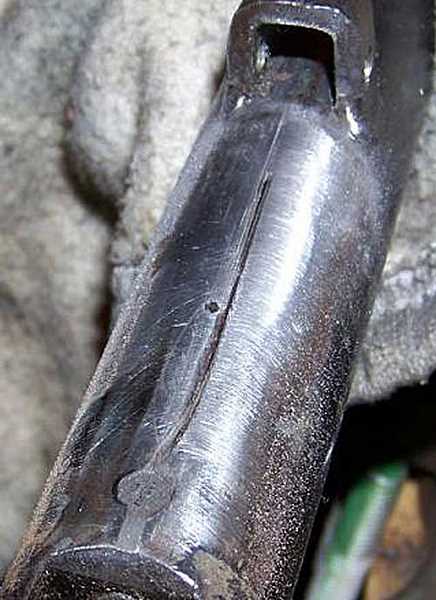
This picture shows how deep the scratch is. I polished the metal around it, but that scratch can’t be polished out. I know it looks like a folded metal tube, but it’s really solid. The cocking link has dug that deep trench through many cocking efforts.
Next, I popped out the rubbing pad that came with the gun and made a new one out of some nylon stock.
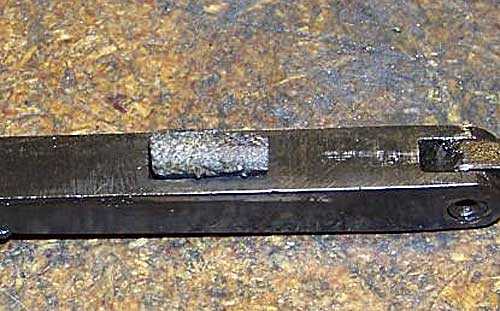
The anti-friction pad, or what I’m calling the rubbing pad, that came on the Telly is not very slick.
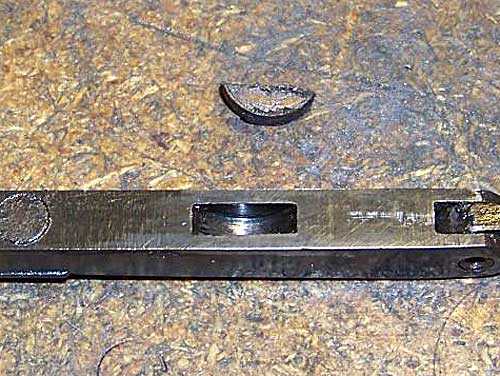
Here, I have popped out the old rubbing pad from the cocking link. The replacement has to fit in that cutout.
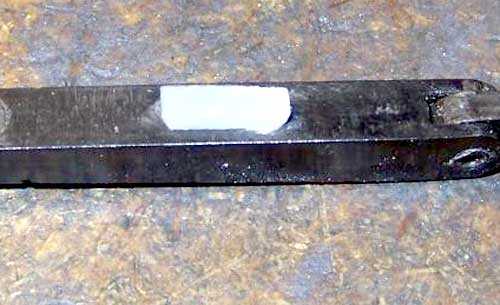
The replacement rubbing pad is made from nylon.
I can’t quite identify the original pad material, but it sure doesn’t seem all that slick. Put it all back together, and — success! Well, relatively speaking, anyway. The cocking effort is now just 45 lbs. instead of 60, and the static friction is down to about 8 lbs. That, I think, is probably about as good as it’s going to get. From what I can see, the link geometry just stinks and the mechanical advantage takes a nose-dive in the last part of the cocking stroke.
Next problem: Those stripped holes! My first inclination was to drill them oversize and install a threaded insert. But after checking the OD of inserts and the Heli-Coils that are available, I don’t think there’s enough meat to work with. That leaves me with one option: the cheapest but also the messiest — weld up the existing holes, grind down the welds, redrill, retap.
Despite the severe heat that this sort of welding puts into the work, I decide to weld up the holes with an oxy-acetelyne torch rather than a stick welder. I’ll spare you the ugly pictures — mainly because I forgot to take any. Once I got everything ready for redrilling, I installed the spring tube in the stock and used the existing screw holes in the stock as a drill guide.
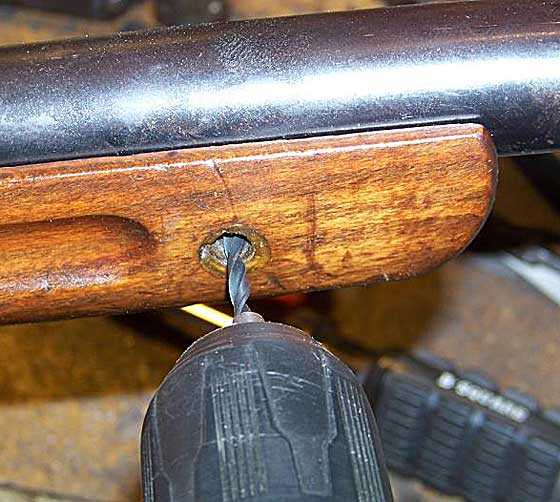
I used the stock screw holes as a guide for drilling the new holes, which will be threaded to receive the stock screws.
Soon, I had a pair of nicely aligned holes with good, clean threads that I can properly tighten up. Now that all the curveballs have been batted away — well, save one, but I’m not going there just yet — let’s poke around the rest of the gun.
Editor’s note
And that is where we’ll leave this report for today. The next installment will finish the story, and there are many more pictures to come. Thanks, Vince, for an insight into an airgun that many of us will never get to see.

Ah, a Relum Jelly (as they are sometimes called in the UK). Along with the Tornado reviewed by BB some time back, this is another classic! This one is in pretty bad condition, but they are decent is unassuming break barrels. The original manufacturer FEG (sadly no longer with us) made them to order for Relum (in the UK), Umarex, Grotthaus and other distributors all over Europe. There were a number of different types over the years, barrel lengths altered, air cylinders differed in lengths, cocking strokes varied, but of the numerous different types, including a repeater which Gamo copied for their repeating rifles, (they also copied the FEG/Relum ‘hurricane’ a pretty execrable underlever, side loader which was the model for the Gamo Center) and calibres, .22 and .177. The parts are interchangeable in virtually all models, which allows the afficianado to produce an almost endless series of ‘new’ models.
Still they compared pretty well to other rifles of the time. There was an adjustable trigger, they grew scope rails, and had a nice beech stock, this is an early one later on there was a blond beech stock with parallel grooves on the fore stock.
I’ll look at this review with interest. Thanks for dealing with this another blast form the past!
Vince,
What a timely article – I also bought a Telly off of Gunbroker two months ago. Mine seems to be in somewhat better shape but it is missing the inner spring and only produces about 350 fps with 8-grain pellets.
About the cocking link hanging down – the flat spring in the picture of the bent rod may be installed backwards. I have seen pictures of the Telly with this spring projecting from the front of the stock, holding the cocking link in a straight line. The parts diagram on the Chambers site also shows the flat spring pointing towards the muzzle.
Paul in Liberty County
That inner spring seems to be rather important – as I mentioned, mine did NOT like being cocked without it. When I get home I’ll post the spring dimensions, maybe a substitute can be found.
That’s part of the reason you’re only producing a little over 2 ft-lbs of energy. But it obviously isn’t the only reason.
Excellent report Vince! I know how much time and effort it takes to do just your reporting tour. Your efforts to make things mechanically right are the Jelly on the Telly.
-Chuckj
The rifle seems in bad shape but everything seems to be there.
Mine is like the one pictured on the Wikipedia page but the small inner screw on the trigger gard was lost to a bad gunsmith many years ago.
The small piece of metal on the cocking link was broken when I got the rifle, it still works fine.
They were sold in Sears stores in Canada if I’m not mistaken. Relums were made for Mr. Muller (Muller backwards = Relum) in England.
If I remember well another factory than FEG also made some rifle for Relum.
Apparently they’re a dime a dozen and can be found at garage sale for cheap but I have yet to find another one and some guys looking for parts are having a hard time to get parts.
To me they’re a bit like Slavias, simple, effective, accurate and built like tanks.
J-F
Dime a dozen… and this is the first time I’ve noticed one for sale! Never claimed to be terribly aware of stuff going on around me…
It shouldn’t be difficult to reproduce that small screw. I can post the dimensions and thread if you’d like…
I gave the rifle to the “gunsmith” because the larger screw had slowly stripped but also telling him I wanted to retain that smaller screw (because I knew what it was for but I don’t want to give out the punch)… he put the largest screw I’ve seen fitted on a rifle this size in my life… without the smaller screw or a provision for it of course.
My rifle is most probably older than I am. I was born in ’76 and the rifle probably dates back to the end of the 60’s to early 70’s it was well used for many years and probably have seen thousands of shots.
It only has one spring and I doubt it’s the original outer spring seeing how it’s cut.
It was a great blog (as usual) I can’t wait for part 2
J-F
Yes, there was a Czech break barrel, a Slavia, which was also badged as a Relum.
Ah so I wasn’t too far off when I said they reminded me of Slavias rifles!
J-F
Vince,
You just never cease to amaze me.
I’ve missed your great stories about fixing airguns. Thanks for this one.
kevin
Vince,
I, too, appreciate these blogs you do. They always give me great ideas of how to use an easily available part to replace something missing. I still remember the blog that you used the blade from a thin spackling or putty knife to replace a missing rear sight base that needed the spring tension. I also love reading Derrick’s fixes but with him, it’s “take a piece of flat stock / bar stock / threaded rod and chuck it up in the Taig lathe.” An hour of exquisite machining and he comes up with a part that looks like a factory original. I can’t do that but appreciate his work and knowledge as I appreciate your fixes and ideas which I probably couldn’t do, either.
Fred DPRoNJ
Vince,
Excellent article!
I really enjoyed reading it and see your fine pictures.
Looking forward to Part II.
Les
Vince,
This was great! I love to hear how others think when they’re fixing stuff since my thinking when fixing stuff is usually just string after string of 4 letter expletives and gets monotonous… Wonderful job and an interesting, not all that common gun you’re working on! Keep up the good work! Looking forward to part 2!
/Dave
Pa. Sam sent this to the wrong address, so I am posting it for him.
Would to know why the bb falls out of the barrel on my walther p 38.pyramyd zes they all do!! I sent it back looks like( leverright) were it is!!
Pa. Sam.
The BBs are held in the magazine by friction, alone. If you touch the top BB when loading the magazine, it will fall out the barrel. The rest of the BBs should not come out until they are shot out.
B.B.
Vince, gun poetry is not an easy or voluminous genre. Other samples are one from Emily Dickinson (speaking as a gun):
To foe of His – I’m deadly foe
None stir a second time
On whom I lay a Yellow eye
And an emphatic thumb.
And then there is a poem called Naming of Parts that is about my Enfield No. 4! It’s a poem from WWII with a refrain about “a part that we have not got” which refers to shortages of that period. Well, ain’t that the truth as I have struggled to get the gun in shape. Ammo is almost hear and the critical test will be on Saturday.
I’ve never heard of this rifle of yours which reminds me that there is a whole gun trade going on outside of the United States which I tend to forget. Weren’t you concerned at firing a rifle that was malfunctioning so badly? Duskwight tells me that if not for a small restraining device, the mainspring of a springer can pop out with skull-crushing force. That’s what I would picture with resistance like you had. And maybe I’ve found the answer. Perhaps this mechanism was designed by some relation to the designer of the Mosin-Nagant safety. Whoever described that safety as requiring a gorilla to operate is right, and the penalty for losing your grip is inadvertently discharging a 7.62X54R round which would be no joke. Best not to use the thing. I am in awe of what you can accomplish technically with these guns.
Victor, yes, I read about a comic book villain who said, “Panic is the sign of the immature mind.” Those comic book villains know a thing or two. TwoTalon, that’s an impressive performance for being drunk. You seem to have pretty much reproduced B.B.’s discovery of the artillery hold when as a last-ditch measure out of frustration, he held the R1 loosely and got great accuracy. But I thought you used pcps.
Matt61
Matt61,
I’ll add to your comment about how B.B. discovered the artillery hold, that he also discovered that some guns with heavy triggers require a faster squeeze. I learned that independently, and so when he mentioned that this worked with one particular rifle, I had a huge smile on my face. After everything that so many of us learn, there’s still room for a secret or two. But you know, it’s just as I use to teach engineers, that it was important to give each new problem its own due respect. This means don’t try to force some canned solution to every problem, which lots of engineers really do. Be a little creative, and you’ll find that the new problem at hand may have a more fitting solution. That’s why I am so optimistic in the face of adversity. It really is my nature. Unfortunately, too many are inclined to only want “the quick fix” (especially management types), whether shooting or solving problems. Some day I’ll tell a story about why being a genius can limit one’s ability to achieve great things. Discipline and hard work are what really makes the world go round. I learned this from the late and great mathematician at UC Irvine, Dr. Bruce Bennett who sadly died in 2003. Dr. Bennett taught more than just mathematics, he taught great insights that changed my life in a way that few others have. You can learn a little about Dr. Bennet here,
http://www.universityofcalifornia.edu/senate/inmemoriam/BruceMichaelBennett.htm
I’ll be glad to share a life changing discussion that I had over lunch with Dr. Bennet at my e-mail address, vector@collector.org.
Victor
The mainspring retainer is usually either a pin, a bolt, or some combination. Threaded endcaps and locking lugs are also known, but usually on older rifles. I’ve only seen one instance where the retainer was marginal, and that was on an Industry Brand B2 of about 8 years ago. That gun was a real POS, and on at least one example that pin (which also functioned as a trigger pivot) started bending, although it never did fail.
A older 1000fps Gamo has about 60-70 lbs of spring preload, and about 180-200lbs when cocked. I knew this gun had considerably less power, so the pressures were not going to be that high.
The main reason I forced the issue and shot the gun was that it had a 3-day inspection/return period. If the gun was non-functional I needed to find out before tearing it down. Once I managed to get it to fire I figured there was nothing horribly wrong with it.
Vince,
I learn so much from you! You provide so many valuable insights and fundamental understanding of things that I would otherwise have no path to. Thanks!
Victor
Vince,
Thanks for sharing, I too like your style.
Wow! this thing sounds like a total train wreck! This is part of the reason I really do not like old guns.
John,
Understand your reluctance about old airguns since they often have issues.
You’re missing out on an important, fun and high quality dimesion of airguns though when you drop these old girls off your radar.
Many of these issues can be addressed by you. IF you don’t have the time or don’t feel qualified then there are many qualified folks that can fix most issues.
Yes, shipping a gun both ways costs about $15.00-$20 each way.
The “fix” could be a little or a lot but the experience could be priceless. Reviving an old airgun, whether it’s the metal, wood or internals is a part of airgunning that’s very rewarding to me since I realize that many generations beyond me will “take up the airgun torch” for a vintage airgun and hopefully pass along the passion and appreciation of these engineering marvels that can outshoot most new airguns that will be in a landfill within 5 years.
kevin
I totally agree with you and there something to me anyways in shooting a pellet gun that’s older than I am.
It’s like driving an old car, it doesn’t have todays creature comfort but there’s a whole story behind that car or rifle. It’s been thru many things and experiences.
You’re saving that old piece of iron and making it yours for a few years then it’ll be on to someone else for other adventures.
J-F
I make custom airguns. That’s what I do for a living. I basically take a bit of this and a bit of that from older guns and make something new. The valves might be shot so I either buy new valves or try to recondition the old ones. I’ve had a customer that loved these old guns. He swore up and down on them until he was doing some heavy target practice and the thing would evperience metal fatigue and fall apart. I’d then get the wonderful task of trying to repair the pieces and make it fire again. On some of these old wrecks I would find they were plain old unrepairable. I would find the bodies too badly scored to be repaired, springs in several pieces and nothing I found would fit, he’d have a bent barrel ect. I finally made a policy of no old guns in my shop past a certain point. Especially no older crosman 1377’s medalist or crosman town and counrty. To repair them and upgrade them often cost more than the gun is worth. I consider those guns totaled.
New guns on the other hand, when properly maintained I find I rarely ever have to do more than tighten the screws on them. To me that is a better value. Of course my rifles are all bought with the intention that they will be working guns when I’m out in the field doing pest elimination, so I do have a need for reliability and power. Something I find lacking in older guns. I can’t be lining up a shot on a critter only to find out while doing so the spring has snapped into 3 pieces from metal fatigue. Then all I have left on me to finish the job is my pocket knife. But trying to run down a squirrel, jump on it, and stab it has never worked very well for me. For some reason they just climb a tree and laugh at the 223 pound maniac.
John,
I should have included Doug Phillips’ comment that the stock on this rifle has way too little wood for the mass of the action. He says he often encounters old guns like this one that have wood that is too thin in many places to ever withstand the ravages of much use.
B.B.
Hi Tom,
I’ve enjoyed your podcasts very much. I have listened to Issues #38 through #52 and would like to listen to the earlier ones too. Are Issues #1 – #37 archived or available somewhere? I haven’t been able to find them. Thanks!
-Andy
Andy,
The old podcasts are on Blogger, but I see those posts are offline. I’ve emailed Pyramyd Air’s IT department to see if we can post them on Airgun Academy (I have all the original files).
Edith
Thank you very much, Edith. I will watch for them to appear on the Airgun Academy site. I’ve admired your work for a long time, going back to the Airgun Letter days… and this blog is very well done. Hats off to you, Tom, and PA!
Sincerely,
Andy
That explains why all my wood stocked guns have nice thick stocks. The metal on metal scoring and metal fatigue that affects so many of these older guns is my biggest headache. I can replace metal with a welder but it’s a very tricky thing to do since you can also vaporize the metal you were trying to save. Ancient busted springs I find difficult to find replacements for as well as other parts that wear out and just plain break. I understand some people like these old guns, but they really don’t have a place in my armory of working guns. as in the field taking pests, not as in no longer functioning.
being a resident of the good old U of K i check out any skip or house hold throw aways i come across, you would not believe the useful things you find and as at the moment i’m building a better metal turnig lathe this can a goldmine sometimes. So a few years back i’m out mooching and low and behold i come across an air rifle, the stock was chipped and split and covered in cement and the barrel had been snapped shut on the trigger(slight bend to the barrel), the thread holding the stock to the trigger housing was stripped but the 2 side bolts and cups were fine.
YES it was a Relum Telly and i was impressed with the build quality of the action, i bodged the gun together by welding a thin tube to the trigger housing and cutting a new thread, i then built a new (cheap ply) stock for it in 2 halves side by side and let her shoot. I found it pretty acurate at 20 yards and after building a new breach seal for her (by now she had character) found she was firing between 7 too 8 f/lb. Of course the ply stock really buggers up her balance so now in disigning and buildin a fine beech stock for her(in 2 halves side by side of course) and plan machine new open sites for her also.
She is very well built and will make a splendid plinker and of course time in the shed is my time in nirvana, but that time is being cut because i just can’t put my new(old) Airarms 177 Shamal down. I wish you luck with your Relum and getting that cocking effort down, i find mine cocks a tad heavier than my meteor also she has a bit of a hair trigger and no safety but retensioning the trigger sping should help there. Hopefully i’ll do a full report in my own blog soon ‘the angry angry gun company'(you’ll find that
under britsh ironic humour), good luck my friend.
goatboy (tetley)
James Racho
I found a Relum Telly and had to make a new leather piston seal, what do you think the best thing(oil?) to treat it would be
James,
First of all, did you miss Part 2 of this report?
/blog/2012/12/the-relum-telly-part-2/
That tells you it has a leather piston seal, so household (petroleum) oil is find.
Second — welcome to the blog. Please join us on the current blog where you can ask any airgun questions you want:
/blog//
B.B.
So 3 in 1 oil would be fine thanks for the reply thought it would be better safe then sorry
Hi I fund my father old air gun and is the same model 🙂 I started fixing it but is missing parts like cocking link, lock-screw trigger adjustment screw, leather piston seal … but good thing is I have the tolls to fix it. I strip the metal from corrosion ,fix the wood in process of coloring whit wax, making the metal plate on the pistol grip and I’m gonna start on front and back sights.
But can you help me whit the dimensions for the cocking link and the trigger adjustment screw.
From the pic I have good idea what are they but I’m scared from making some damages that will destroy the project. This is wherry special gun for me it is the 1 gun I have shoot from and I whose shore that is lost in time, so any help is welcomed.
Best regards
Buka 78
buka 78,
This was a guest blog by Vince, who is one of our readers. I have asked him to answer you.
B.B.
I’ll try to get to it over the next few days.
Thanks for the help I will be whiting for Vince. If you are interested a can do story abut air gun shooting in Macedonia as a Thanks . Are u interested ?
Buka78,
Sure. Let’s see what you have. Contact me at blogger@pyramydair.com
B.B.
Sorry it took so long. Here’s the cocking link info:
1) FRONT LINK: Length (pin-to-pin): 63.5mm. Thickness: 4mm Height: 10mm
2) REAR LINK: Length (pin-to-cocking shoe):160mm Thickness: 8mm Height: Tapers from 9mm to 4.5mm
3) Rubbing block: Overall length: 14mm Location: 26mm behind pin.
Sorry it took so long. Here’s the cocking link info:
1) FRONT LINK: Length (pin-to-pin): 63.5mm. Thickness: 4mm Height: 10mm
2) REAR LINK: Length (pin-to-cocking shoe):160mm Thickness: 8mm Height: Tapers from 9mm to 4.5mm
3) Rubbing block: Overall length: 14mm Location: 26mm behind pin.
I think i have a relum telly that my grandfather owned i think its a 1950s version that he got when he was 14-15 years old sadly it does not work and i really wanna fix it
What exactly seems to be wrong with it?
Hi Vince and B.B. Only joined the forum in the last few days after going on line to try and identify an old and knocked around air rifle that my nephew in law found in his late fathers garage . The only thing on the rifle to identify it was a tiny badge on the butt which said Telly and gave the caliber 5.5 , going to the internet I found you guys, what luck!!, not only a wealth of expert advice but a blow by blow description of how to restore what I now know is a Relum Telly . Suitably inspired I volunteered to restore the rifle for my nephew , it is now apart, nearly all the defects that Vince found are in this rifle but thanks to what I learned from his restoration I am sure that it will live again. There is one question I have for you if i may the long flat spring on the rear cocking link does not appear to have been fitted to this model , instead there is an extra screw fitted to the cocking link guide ,this screw has the end turned down to a peg which I assume was used to locate another rubbing pad controlling the cocking link,s position in place of the long spring fitted to Vince,s rifle I would appreciate your thoughts on this. Again may I thank you and the forum for making your expertise available to us newbys Aye Yours Bill .M
Bill,
Thank you for this feedback. Vince and I live for moments like this! Isn’t it great when things work out?
Please tell us how the rifle performs when you can.
B.B.
Bill, I’m glad my horrible attempts at verse didn’t drive you away!
ANYway… that screw you refer to, how is it installed? What I mean is, how is it oriented? Does it point towards the spring tube (as do the trigger guard screws)? Does it look like it came that way from the factory, or does it appear that someone put that in later?
Also, how much clearance is there between the guide and the rear link when the link is held close to the spring tube?
Most guns I’ve worked on with 2-piece links have some sort of fixed guide for the rear link… either a plastic button on the old Gamo Delta or a roller on the Shadow’s. I suspect you are right, and that there was some sort of button or pad on it. Shouldn’t be hard to fabricate a new one, once the original shape is more or less figured out.
BTW… there is a Part 2, don’t know if you saw it…
/blog/2012/12/the-relum-telly-part-2/#comments
Great start to the rebuild article. Will look for the second one.
I have one of these from ‘77 or ‘78 with the horizontal grooves in the front of the stock, likely bought in Canada. I’ve plinked with it lightly all my life and it’s never complained. This article makes me want to strip it down and give it a good rebuild. It’s given me years of reliable service it’s the least I can do.
My stock bolts aren’t stripped but the bolts are gone. Does anyone know the original bolt size and thread? With the rail right behind the bolt thread it would be easy to get one too long.
einarsen,
Welcome to the blog. The man who wrote that report in 2012 no longer reads this blog, so he won’t see your comments. If you will come to the current blog and ask the readers many more of them will see your comment. Right now it’s you, me and only a couple other people.
/blog/
B.B.
einarsen,
Welcome too. If it were me, I would get a rough idea of the bolt size and head to the local Mom and Pop hardware store. There, you will often find drawers full of goodies. If you determine 1/4″ ish, coarse thread,… you can pick up a fine and coarse and some metric sizes that are close. Metrics often come in 3 thread pitches, with 2 pitches being the most common. I would guess that it would be metric. As for length,.. yes that would have to be right.
With the rifle assembled, you can measure the depth with something like a tooth pick and hold that to a ruler. Some rifles have cupped washers that the screw head will tighten against, so as not to tighten directly on the wood. That is a good thing to try for if you can get the parts. If you can not get the right length, go long and cut it with a Dremel or something or grind to length.
Trust me, those screws are key to accuracy. Even loose ones will severely impact accuracy. Those are a must fix. Accuracy will be greatly improved with them in.
Like B.B. said, come to the (current) blog and many will see your comment. Off topic is fine. I can see this by using the “Comments RSS” feed at the top right of the page. It shows all newer comments on any blog, no matter how old the blog is. Good luck on getting the screws. Also, doing a tune,.. if you decide to go that far. Welcome again.
Chris
Thanks, guys!
Just you, me, and Google here 🙂
Hello!
Just bought my first air rifle ( at the tender age of late 40’s ).
Made a new piston seal from scratch and fitted a breech seal.
Made a “scope rail” and it’s pretty darn cool.
The rail is bound and glued temporarily till I decided I am cool with it. So far so good.
Scope is a recycled unit that I found washed up on a beach at the local dump.
Shooting 6m indoors at 5mm dots. So so far it’s great fun.
Experimenting with inserting the pellets into the breech at various depth.
I can feel the pellet bind then come free when it hits the barrel proper.
and yes this does change where the pellet lands… placed at the very begining
of the breech = low and pushed into the rifling = high. So go figure.
Way more fun to be had.
And I have never seen a gun with a scope setup like this? Am I the first? ha ha ha.
( I’ll take 10% to license IP…)
Robert.
Robert,
Welcome to the blog.
B.B.