by Tom Gaylord
Writing as B.B. Pelletier

Mainspring compressor.
This report covers:
- Can you make a mainspring compressor?
- BSA Meteor
- Description
- Bridge
- Headstock
- Tailstock
- Legs
- General
Today I’m going to show you a mainspring compressor that I will use in tomorrow’s blog. I was asked this week by a new reader to show the tools needed to safely disassemble a spring-piston airgun. Here is the request.
Sir,
Great web sight! As a “newbee” to air rifles, I find it a wealth of info! Having a hard time trying to start a new post in the blog forum.. Specifically, I’m looking to find out if anyone makes proper tools for the correct disassembly of the Benjamin Trail NP XL 1500.. Looking for a proper end cap removal tool, and a spring compressor. I was an armorer for years in LE, with an incredible amount of proper tools for “firearms”. Just want to make sure that maybe there’s a place to purchase proper tools for air rifles out there.
Thanks…
samoneshotout
I didn’t answer him that gas springs, which the Crosman/Benjamin Nitrop Piston is, usually do not require mainspring compressors, because I knew this blog was forthcoming. I wanted to work it in, so I told him I would answer him in a blog later in the week.
The truth is, gas springs — and, yes, that is the correct generic name for all of them, be they Nitro Pistons, gas rams, gas struts or anything else — are usually under no preload when they are in the rifle. If there is any preload (spring under pressure when it is in the gun) the travel is no more than 1/2 inch or so. So usually you can just drift out the pin or remove the bolt that holds the end cap in the spring tube and the gas spring drops out as a unit. Don’t disassemble a gun unless you know for certain how it comes apart, but this is what you will usually find.
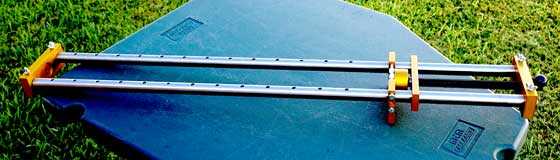
We are here today to learn about a mainspring compressor that can be used to disassemble almost any spring-piston airgun that has a conventional coiled steel mainspring. I have been using a compressor like this one for over a decade and in fact I helped with its development. This compressor was invented by B-Square, under the direction of the company owner, Dan Bechtel. I consulted with him during its development and the result was a tool that hundreds of airgunners now own. But to be honest, mainspring compressors are not very exciting, so airgunners tend not to buy them. They tell themselves that can make one if need be, and then I hear all the whining and crying when the day finally dawns that they really do need one.
Can you make a mainspring compressor?
Yes, you can make a mainspring compressor. In fact building a mainspring compressor is so easy that hundreds of them have been made by shooters over the years. Some guys have even made them for resale, but every one of those guys stopped when they discovered how poorly mainspring compressors sell. A mainspring compressor is like a good pair of pliers. When you need a pair almost nothing else will suffice, but when you don’t need them you never even think of them. No, I will go even farther. To a person about to disassemble a spring gun a mainspring compressor is like a bench vise. It is absolutely essential.
Don’t get me wrong — airguns can be disassembled without using a compressor. Some guns, like the Air Arms TX200 Mark III, are so easy to disassemble that a compressor is never used. But they are the exception. Most spring guns do require a compressor if you want to be safe and have no more than two hands.
BSA Meteor
Tomorrow I’m going to use this new compressor to disassemble my new BSA Meteor Mark I for you. This is so you can see what the innards look like before I start the Tune in a Tube test. That test will be followed by a real tune, so we can compare the results after each tune. If you want to know more about how a BSA Meteor comes apart, read the 9-part report.
Description
This new compressor is sold by Sun Optics. It is fully adjustable and is designed to disassemble the barreled actions of spring rifles and pistols that have been removed from the stock. The parts that contain the action (called the tailstock and the bridge) adjust up and down stainless steel tubes which is what all the holes are for. Sun Optics has even made some improvements over the compressor B-Square made. The B-Square compressor used steel conduit for the legs instead of tubing. The holes in the legs of the Sun Optics compressor are all chamfered for smoother adjustability. I noticed the difference right away.
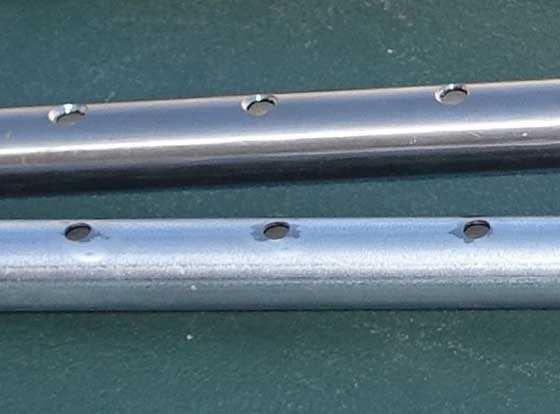
The new stainless steel tubes (top) have chamferred adjustment holes. I had to grind the burrs around the holes on the old compressor myself (bottom).
Bridge
The bridge is the part of the compressor that keepss the spring tube from flexing to one side when the mainspring is no longer trapped. This flexing is the second biggest problem you’ll have when you disassemble spring guns. Controlling the end cap is the only task that’s more important.
The bridge has screws that adjust to center the spring tube in line with both the headstock and the tailstock. That gives you the most working room around the barreled action.
On the old compressor the bolts on the bridge were all left raw. I protect the finish of my guns by wrapping the gun’s spring tube with a heavy leather belt that the screws cannot scratch through. The new compressor has plastic tips on each of these screws.
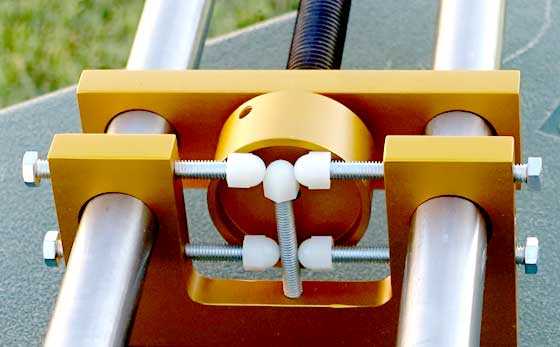
The tips of all the bridge adjustment bolts have plastic caps. No more leather belt to keep from scratching the spring tube!
Headstock
One feature of the original compressor that made it the best on the market is the rotating headstock. It allows you to rotate the barreled action from side to side while still maintaining pressure on the end cap and therefore on the mainspring. This allows the positioning of the tube so pins can be aligned and/or drifted out. This is the key to the compressor, because many spring gun actions are held together by pins. The new compressor headstock rotates in the same way as the old one.
The new compressor headstock also has a hole in the center for a pin to a part the old compressor didn’t have. It’s a pusher block that’s used to disassemble certain spring gun actions, notably BSAs. Unfortunately this block is slightly too wide to fit inside my Meteor spring tube, so I will have to use the plastic pusher block I made when I disassembled my other Meteor. But if I owned this compressor I could easily shave the new block down to fit.
I will also have to enlarge the hole in the headstock, because the pin in the pusher block is too large to fit. It does fit the hole in the tailstock, but I don’t know anyone who would use it that way.
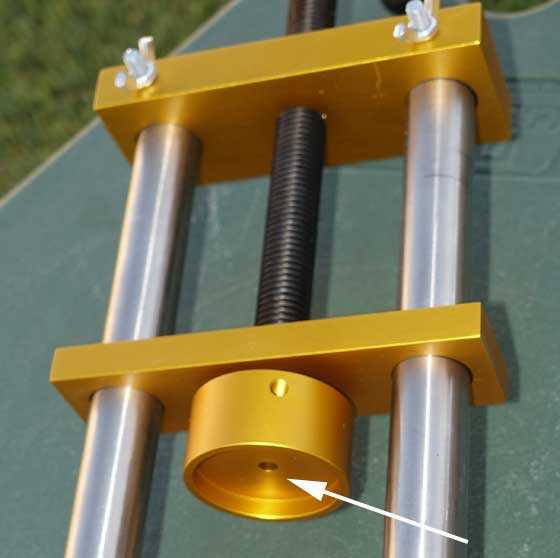
The headstock turns to allow access to different parts of the gun’s spring tube. This new headstock has a hole (arrow) for the pin of a new pusher block.
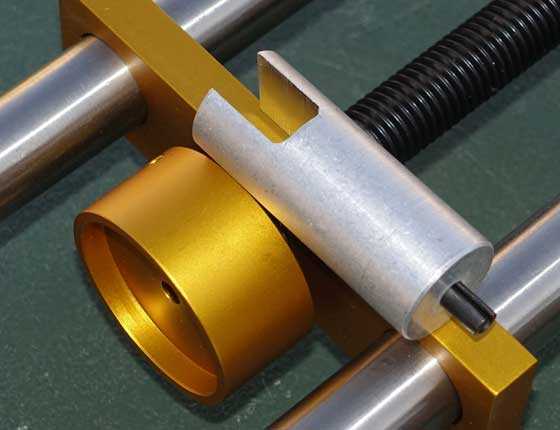
New aluminum pusher block comes with the new compressor. The pin at its base is too large to fit the hole in the headstock, so some drilling will be needed.
Tailstock
The tailstock is where the muzzle of the action rests. It adjusts along the two steel rods to fit the gun you are working on and give the headstock screw lots of room to travel. It also has a hole for the pusher block, though I cannot think of a reason to use it that way.
The new tailstock also lacks the raised bump the old tailstock had. That was inserted into the muzzle of the barrel, to keep it from walking when the action was under pressure.
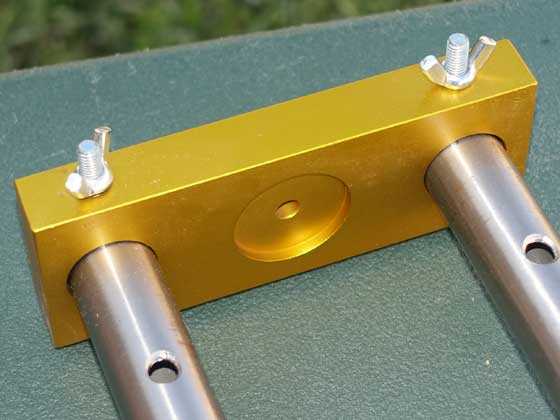
The tailstock adjusts for the length of the gun. Hole is for the pusher block pin, but I don’t know how it would be used on the tailstock. Gone is the raised bump the old compressor had to keep the barrel from walking.
Legs
The new compressor can work like the old one, or you have the option of installing 4 longer bolts that also serve as legs. Two fit the headstock and two fit the tailstock. The compressor then stands up away from the work table. This gives even more access to the spring tube.
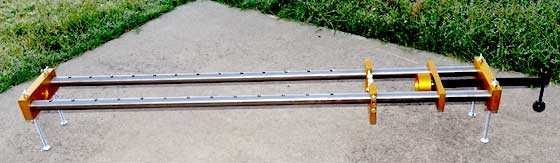
The longer bolts that serve as legs have been installed. See how they elevate the entire compressor?
General
The compressor comes with no instructions. Like a bench vise, you should know how to use it if you own it. That doesn’t mean you automatically have to know how to disassemble every spring gun mechanism. I doubt if anyone knows that. But spring guns belong to different groups that have similar features. With experience the worker learns what to do with any action to take it apart. The compressor is just a tool for a specific set of tasks within that body of work.
Is it “worth” it? This compressor retails for about $200. Is it worth the price? Pyramyd AIR does not carry the compressor at this time, so you will have to go directly to Sun Optics. Pyramyd AIR probably remembers how people complained about paying half the price of this one for the old compressor.
The thing is, if you work on a lot of spring guns a compressor of some sort is good to have. This is the best one I have seen, and I have seen dozens of different ones, besides designing and building one of my own that I documented in the R1 book.
For a few workers this compressor is worth the price. And you had better get one now, because who knows how long they will be available?
Tomorrow I’ll disassemble the BSA Meteor Mark I using this compressor. If anything stands out as I do that I will be sure to include it in the report for you.


The compressor is a nice piece of well thought out equipment.
Speaking of such being well thought out.
Tom, you said in yesterday’s blog, you built the rat like the one Pyramyd AIR had at the shoot.
You know Tyler P. probably put that together…
Need I say more?
(I just had to say that.)
I’m intrigued to see the innards of the Meteor, I’ve never owned a Mk1 but I’ve had a Mk2 and a couple of Mk3’s and I tuned one of those to a fairly snappy 9.3ft/lbs …a smooth 10ft/lbs has really piqued my interest 🙂
Dom,
That is my plan for tomorrow.
B.B.
That is a tidy looking unit.
I mucked about creating my version of the same before being shown the ideal piece of equipment that most basic workshop/shed has, the drill press.
In the vertical plane all work can be carried out far easier and more safely for yourself and your treasured(?) air rifle.
Slow_runner,
Welcome to the blog.
B.B.
BB,
Why not use the BSA block in the tailstock? Yes, the entire air rifle will be moving instead of just the “guts”, but the tips of the bridge bolts should allow such.
My thoughts would be to remove the barrel from the action if possible before using the compressor, most especially since most barrels on sproingers are not centered and that could incur a slight angular force which on a rifle with a weak lock up may cause it to open as the spring is being installed or removed. Am I overthinking it?
RR,
Because the mainspring would then come out opposite the screw handle. You would have rto work at both ends of the compressor to put a gun together. It’s not convenient.
You can’t remove the barrel before removing the mainspring on most guns. Not safely.
B.B.
BB
That is a nice compressor. I think I would like to get one to have around. That’s one of those tools that would pay for itself in a heart beat if a person had one.
By the way I don’t think you said how much they are or where you can get one. I tryed clicking on the picture but didn’t get a link. Would like to know though.
Gunfun1,
Second paragraph of the last section under General.
“Is it “worth” it? This compressor retails for about $200. Is it worth the price? Pyramyd AIR does not carry the compressor at this time, so you will have to go directly to Sun Optics.”
Siraniko
Siraniko,
Thank you.
B.B.
Siraniko
Ah yep I see it. Guess I overlooked it. Thanks.
GF1
The compressor is also available from OpticsPlanet for $205 plus free shipping!
Fishmonger
Thanks.
Very nice spring compressor and the price could easily be justified for a gun-smith. The gold anodized parts are a nice touch.
The old compressor mentioned looks to be functional but a bit rough – nothing that a bit of TLC couldn’t fix for half the price.
When I was doing a lot of work on air rifles I had made a compressor with a threaded rod and a couple of pieces of Dexion (slotted and holed angle iron used for making adjustable shelves) mounted on a 2×6 base. Head stock and tail stock were of wood with padded “U-bolts” for clamps. The main concerns are that the spring tube is held solidly and the movement of the head stock be constrained to be linear. Nothing more exciting than having a compressed spring get loose 🙂
I currently have a spring compressor made out of wood ad a threaded rod for my FWB124. The FWB124 has a very long spring! Since I made it specifically for one rifle and doesn’t need to be adjustable, it is pretty simple in design.
Not rocket-science to build a spring compressor – you just have to be aware that you are dealing with a lot of power. I don’t recommend that anybody try to disassemble an air rifle/pistol unless they really know what they are doing.
Vana2,
Got around to doing that “grain spread test” the other day with the M-rod. 8 shots that ranged from a light of 33.4, to a heavy of 34.4 grains. The test was at 70 yards. Nothing much to report. In fact, the first,… the lightest shot,…. landed the lowest. The rest were higher, going lower. Everything looked pretty much like an average group. Mmmm? I will re-visit.
Despite today’s dismal forecast, it did “perk up” for a few. Dusted off the LGU and TX. It had been awhile. Both shot fine. I was reminded VERY quickly of the advantage of a lighted reticle, the added advantage of a 30mm. tube and the advantage of a 56mm. objective. Not to mention the adjustable comb riser on the M-rod and the eye cup/bellows. Not having the eye cup was awful,.. as the light behind and to the side was quite bright. Something to consider if you have never played with one.
Chris,
I presume that you sized and maybe rolled the pellets as well as checking the weight. If groups remain average then there are other factors at play… harmonics maybe? The pellets swaging?
I gentleman I met years ago was a reloading fanatic (weighed every bullet, full sized every case etc. etc.) and he was shooting a custom cartridge he called a 22-3000 (30-06 case necked down to .22 caliber). He was pushing light weight jacketed bullets to mach-4 and was having problems with some of the bullets going wild – seems that a poorly swaged lead core could cause the bullet to go out of balance and cork-screw.
I got the UTG 3-12×44 will be mounting it on this weekend – think it will balance the TX200 nicely. Initial look is positive and I will be comparing it side-by-side to my 3-12×44 Hawke.
I picked up three nice curly maple stock billets so I am thinking of making a target stock for the HW100 and sporter stocks for the TX200 and FWB603 this winter. The FWB124 stock is in-process – promised her that she would be first 🙂
Will keep you posted.
Hank
Chris USA,
Thanks to the idea of placing a cap on top of the weighing scale. This seems to have increased the relative accuracy of the scale by spreading the weight over a larger surface area.
Weighing a random selection of 125 JSB Exact Jumbo Heavy .22 pellets yielded:
30 pellets weighing 18.0 grains individually but when weighed in batches of ten (10) yields 18.1 to 18.16 grains average.
95 pellets weighing 18.2 grains individually but when weighed in batches of ten (10) yields 18.2 grains each.
Thanks for the data you sent me. Now I can weigh our local pellets and report back with confidence regarding their weights.
Siraniko
Siraniko,
I am glad you have something that is working for you. I am not sure of your approach of weighing in batches of 10 though,…. unless you were just curious to see if the weight of 10 would average out.
For that sample size, I am surprised that you only had 18.0 and 18.2. That is pretty good I would say. Another check you can do is to save a pellet and use the same one to check on a different day. Most of mine will stay the same, but sometimes it may read +/- .1 grain.
The main reason I use the cap is to keep oils from my hand and pellets building up on the delicate scale platform. The (open when you squeeze) tweezers work nice too, if you can find a pair.
Chris
Hello I got one of these compressors…….love it….Sun Optics gets it to you very quickly
I’ve had my R1 apart several times all ready…..this tool makes it a lot easier.
How is the revision on the R1book comming ?
Is it unreasonable to try and tune my R1 to 800 fps with 14.3 crossmans in .22?
Zermat,
The R1 book revision is stuck. I was in the hospital 5 times this year and had 4 different operations. That set me way back. I’m catching up, but it’s slow going.
B.B.
This doesn’t sound as simple as yesterday’s mechanism. It is more reminiscent of my new Hornady case trimmer. with its multiple locking screws and various parts it claims to be able to adjust to very fine increments, but it seems to have baffled a number of customers.
Sirinako, thanks for your explanation of the rat target. As Mr. Spock says in Star Trek: “You are proceeding upon a false assumption. I have no ego to bruise.” My false assumption is that the target falls down when it apparently just rocks. That changes everything. It looks like the two paddles are connected so that hitting one will spin both. And I suppose the second outside paddle can be shot with less of a chance of rocking the target and slowing things down. It would seem that the rocking of the target would have pretty strict requirements for range and airgun power. But once you figured those out, you would get a lot of use.
There was no deformation of the primers for the steel cased ammo. My new plan is to start loading one round at a time without shooting any other ammunition beforehand. I’ll build up the number of rounds while successful and stop as soon as I get a jam.
Matt61
good thing I don’t own a spring rifle, I would have tried to open it with a steel pipe clamp and some plywood fixtures with a couple of holes, LOL. Apparently there is more than a few inches of spring pre-load, beyond the screw length of a pipe clamp.
I do have a crosman nitro piston rifle though.
I just got mine from CMC government supply for 145.00. Better hurry before they figure it out. Used it to tune my 34 last night.
“$160.65 Estimated Total “, includes shipping to GA. Not too shabby.