by Tom Gaylord
Writing as B.B. Pelletier
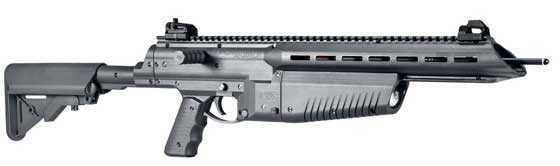
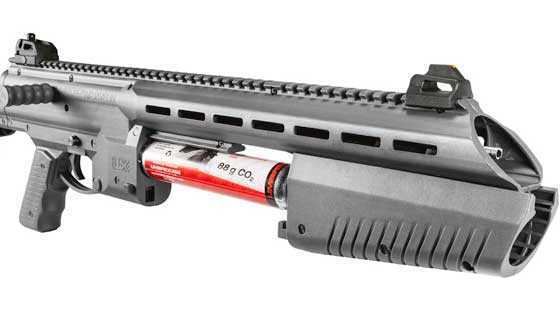
The Air Javelin from Umarex.
This report covers:
- However
- The “barrel”
- Not a toy!
- Sights
- Front sight
- Rear sight
- Adjust the stock
- Install the cocking handle
- Charging
- One fact to bear in mind
- Summary
At least one of you readers is really interested in the Umarex Air Javelin, just as I am, so today is Part 2. However, because this is an arrow launcher, this Part 2 will be a little different. I normally test velocity in Part 2, but the Air Javelin is better tested outdoors for that and today the temperature here in sunny Texas is 36 degrees, F. Yes, we have bright sunshine and the temp is supposed to rise to 62 late this afternoon, but my testing and photography work gets done in the morning, so the cold is hampering me.
However
That doesn’t mean I can’t shoot the Air Javelin (hereafter called the AJ) indoors. In fact, by shooting it indoors I will get a really good idea of how loud the report is. Remember that I could not hear it when I shot it at Industry Day at the Range in January. I’m making this report up as we go, so let’s get going!
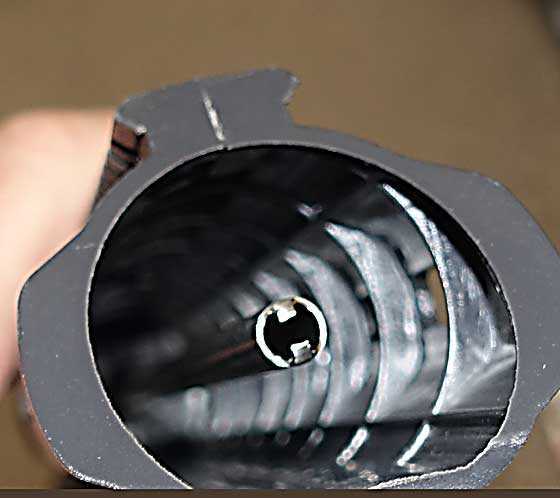
The “barrel”
Several readers were inventing new universes for the AJ to inhabit. Like, what if a pellet could also be loaded into the hollow air tube the arrow fits over? Let’s look at that now.

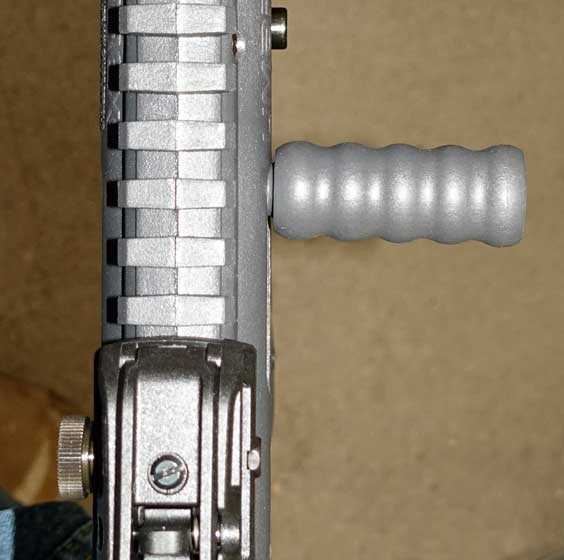
This is the hollow air tube the arrow fits over. The CO2 gas comes up that tube to propel the arrow.
The gas tube/barrel is permanently attached at its base to the source of CO2 gas. Of course it is not really permanent, but it cannot conveniently be removed to insert a pellet — even if it was the right size inside. While such a feature is possible and even has been done by other manufacturers — nobody on the planet right now other than Umarex is offering an arrow shooter like the AJ for only $169.99.
Not a toy!
The AJ comes with a hang tag on the triggerguard that tells you it is not a toy. Believe it! I just hope that new airgunners won’t look at the arrow velocities that are displayed on the box at just over 300 f.p.s. and think, no big deal. Because a 170-grain arrow traveling at that velocity can do serious damage to tissue, and can kill! I said in Part 1 that you could take a deer with the AJ if you keep the distance reasonable, and the under 60-yard distance that I stated is about where most bow hunters take deer. There are powerful crossbows that can reach out farther and I’m sure a skilled longbow shooter can also do it, but hunters should always try to take their shot as close as possible — and that goes for airgun and firearm hunters as well. Let’s give the AJ the respect it deserves.
Sights
The AJ comes with what firearms shooters call back-up iron sights, or BUIS for short. They are not really metallic; that’s just a name they are given. You readers know that BB likes shooting with non-optical sights, so I will test them first. Before testing with them, they must first be mounted.

Front sight
The front sight attaches via an Allen screw that’s screwed down onto the Picatinny rail. First you slide the front sight onto the rail, which is easy, because the fixed sight dovetail is larger than the dovetail on the Picatinny rail.
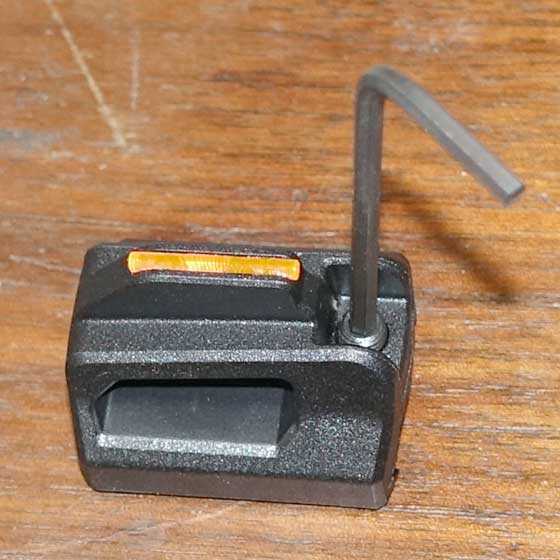
The front sight attaches with an Allen screw.
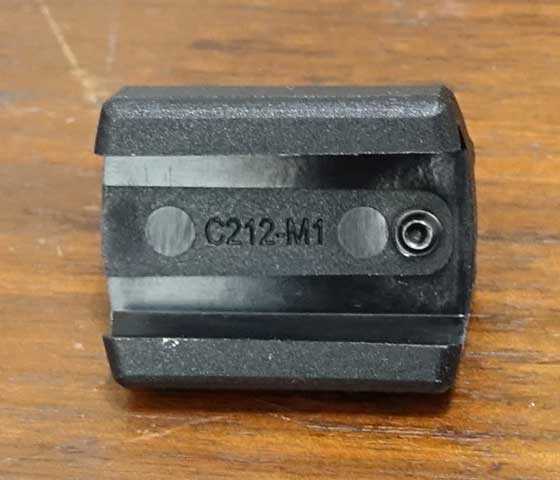
This is the underside of the front sight. On the right you can see the end of the Allen screw that presses against the Picatinny rail.
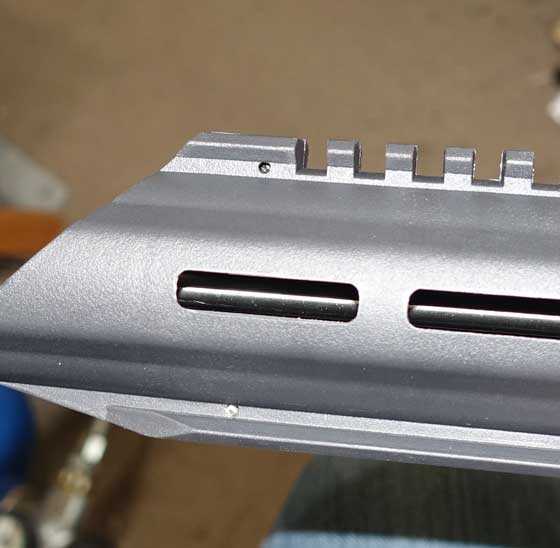
This is the front of the Picatinny rail where the front sight slips on the gun.
When the locking screw makes contact with the rail it pushes the dovetails on the bottom of the sight up to jam against the rail. It’s straightforward except for one detail. The screw has to make contact with the rail to do its job. Remember that a Picatinny rail has deep 5mm-wide slots spaced at regular intervals to hold accessories. The end of the Allen screw needs to press against one of the risers between the slots and not fall into a slot!
Here you see the front sight on the airgun. The Allen screw that is in the rear of the sight is aligned with and pressing against the first riser on the Picatinny rail. Note that the rear of the sight is slightly elevated. Positioning it like this aligns the front of the sight with the front of the rail.
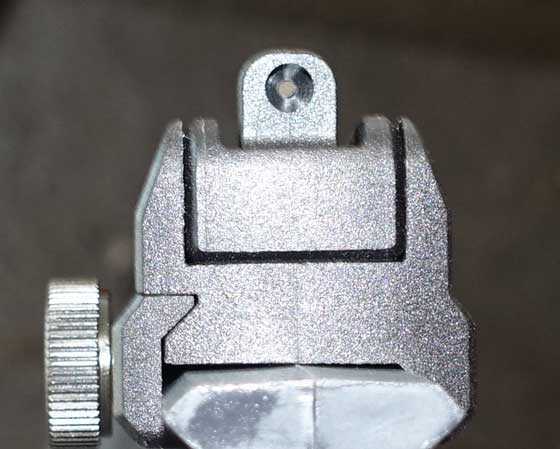
Rear sight
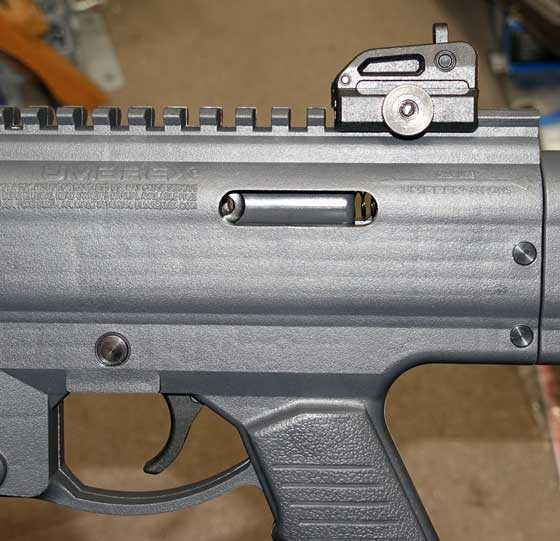
The rear sight attaches to the Picatinny rail and not to the long flat spot at the rear of the rail. The screw that tightens the movable jaw at the bottom of the rear sight base is also the crossbar that interlocks with a slot in the Picatinny rail.
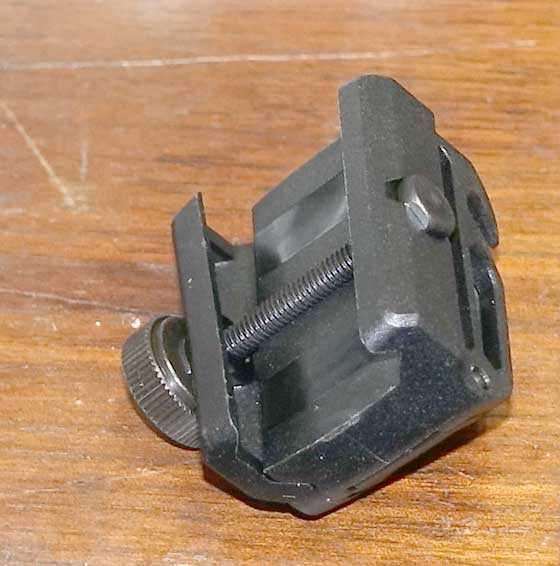
Here you see the cross screw that is under the rear sight. It draws the movable jaw tight and it also bears against a ridge in the Picatinny rail to keep the sight from moving.
The sight will not attach to the long flat spot at the rear of the rail because that cross screw gets in the way. But it will attach to the first slot in the rail, and since this is a peep sight we want it as close to our sighting eye as possible. So the last slot is where it goes.
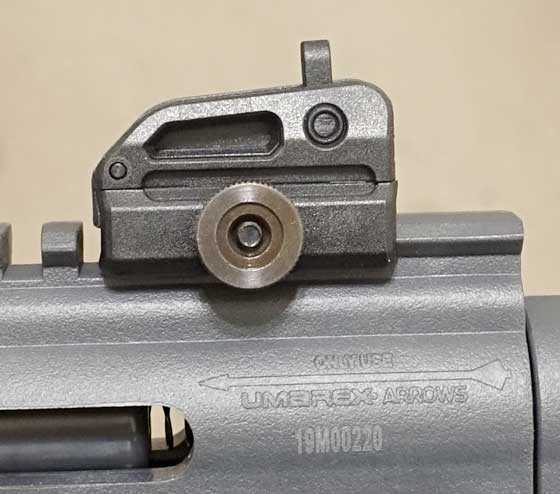
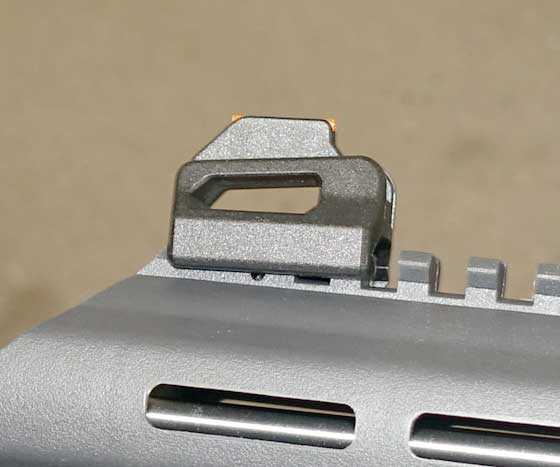
The rear sight is mounted with the cross screw passing through the first slot in the rail. This is as far back as the sight will go. The sight is tightened to the rail by that large knurled knob.
Adjust the stock
Once the rear sight is mounted you can adjust the stock. I told you in Part 1 that there are 5 stops in the stock, but this time I pulled the rear part of the stock off and saw there are actually 6 holes for locking it. The last hole for adjusting the stock as long as possible is very hard to feel when the pin clicks in.
I found that I needed the stock set in the first click back to see through the rear peep sight correctly. The length of pull is set at 14 inches on the nose. My sighting eye only sees a faint outline of the peep hole this way.
The peep hole is sized just right, from what I can tell so far.
Looking through the peep, the front sight looks huge! I can see that my traditional target-type sight picture will be no good. This sight screams center of mass. It’s like a non-optical dot sight — and a big one, at that!
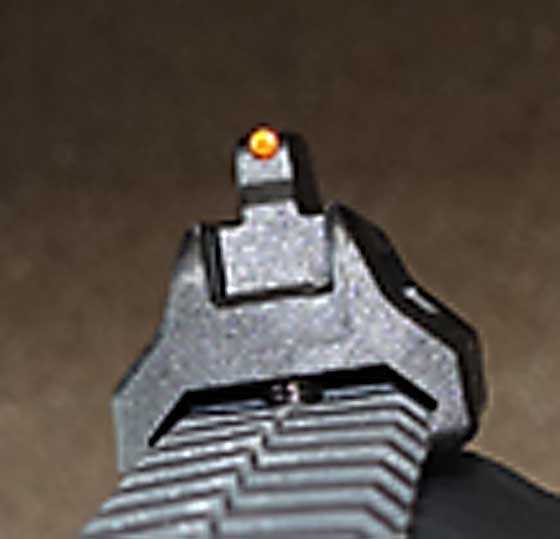
The orange fiberoptic up front looks as large as the side of a barn! I will have to abandon my target-type sight picture and shoot for the center of mass with this one!
Install the cocking handle
The AJ is ambidextrous. The cocking handle will go on either side of the rifle. For this feature Umarex gets the Golden BB award for innovation! Remember — this is a $170 arrow launcher! How easy it would have been for the designers to figure they had already given buyers enough, just by the low price. Many companies would do that, but Umarex saw a way to add functionality cheaply and they did! Go back to my, “What makes an airgun ‘good’?” report, because this is a shining example! This is how it is done.
I held the AJ to my shoulder and pantomimed operating it to decide that I wanted the cocking handle on the right side. It’s slightly easier for me to cock that way and, since I have to take the gun down from my shoulder to load an arrow anyway, it isn’t an inconvenience. If this was a pellet rifle, I might have chosen the other side.
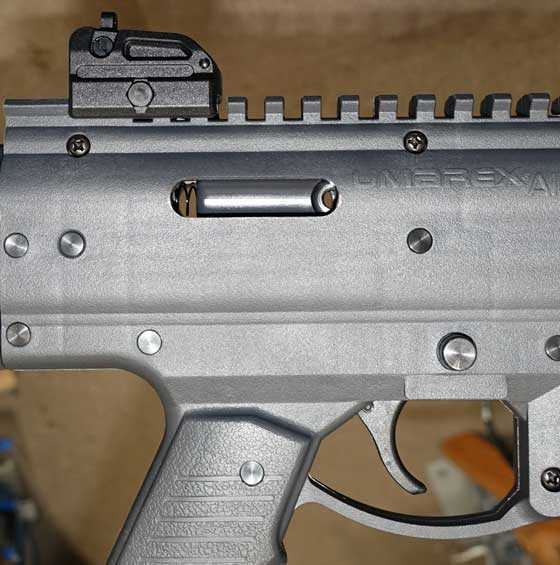
On the right side of the AJ receiver you see the bolt with the screw hole for the cocking knob half-hidden by the receiver. It’s on the right side of the long cocking slot.
Here is the view of the bolt from the left side of the receiver. Again the screw hole is half-hidden.
I used a ballpoint pen in the hole on the left side of the receiver to pull the bolt back so I could attach the handle on the right side. The spring tension is light and this is easy to do. Then screw the cocking handle all the way in. It has a shoulder that prevents the large handle from contacting the side of the cocking hole.
This top-down view shows what the cocking handle looks like when it’s attached.
Charging
I spent a lot of time today showing you the setup. The manual covers all the same areas, but the instructions fall short of the things I have shown and discussed. Now it’s time to charge the airgun with an 88-gram CO2 cartridge (which you all know can also be a 90-gram cartridge).
Start with an uncocked gun. The forearm is unlocked by a square pushbutton on the right side of the receiver. Then slide the forearm forward for clearance. I would put 5 drops of Crosman Pellgunoil into the place where the cartridge screws in every time I install a new cartridge.
Slide the forearm forward and screw the CO2 cartridge into the AJ. I recommend Crosman Pellgunoil on every cartridge.
One fact to bear in mind
Once the CO2 cartridge is installed and pierced there is no way to remove it without exhausting all the gas. The manual says to not store the gun with a cartridge installed. I don’t think they mean overnight, but if you are putting the gun away for a time, remove the cartridge.
The manual also says there may be some hissing and loss of gas as the cartridge is being screwed in. I experienced that. Once the cartridge stops turning freely, get set to screw it in as far as you can with a single turn of the hand. Even then you might have to get a second grasp to complete the motion. The gas will stop abruptly when the cartridge is sealed.
Would a shutoff valve at this location be desirable? Certainly. How would they do it? Given the way the AJ is designed at present, it wouldn’t be easy. Bear in mind that the design of the gun is for slimness and convenient handling., I think I will take that over saving some of the gas. Remember, there will not be that many shots, even from this giant cartridge.
The Crosman 1077 AirSource had a valve to stop the flow of gas from the 88-gram CO2 cartridge. See how clunky it was!
Summary
I spent my morning setting up the AJ to shoot. She’s now got sights, a cocking handle and is charged with CO2. It’s 12:30 p.m. and it’s still just 54 degrees outside. Next week, cold or not, I will shoot it for you. Time for me upload, edit and schedule this report.
This report will go differently than others have, because of what I’m testing. But we will still get to know the Air Javelin as well as we possibly can.

B.B.
That barrel looks like the one you described on April 1. The one that shoots the round discs…
-Y
BB,
So far, so good. Good also for the ambi cocking handle! Well done.
The tabs on the muzzle are obviously there to prevent from loading “stuff” in there,……….. but you have to wonder if the gas flow is going to get restricted and any fps was lost.
Looking forwards to the shooting,…………. Chris
The length of pull is set at 14 inches on the noise. (nose)
Chris USA,
B.B. didn’t measure the barrel length but it’s probably about 14 inches. By the time the arrow is released most of the CO2 has probably lost its oomph.
Siraniko
Siraniko,
Unless mistaken,….. like a PCP, SSP, MSP… the (full) pressure would be pushing the whole way (at least most of the way) before the valve would close. I would imagine, it is all in how the valve is built and what strength springs are used that allow the valve to close (stop the flow/push) below a certain pressure level in the barrel.
Chris
Chris,
I haven’t addressed that yet, but the box mentioned the valve twice as being extremely fast-acting. I will address that next time.
B.B.
Chris USA,
Theory: “…allow the valve to close (stop the flow/push) below a certain pressure level in the barrel.”
A spool valve or dump valve might do that…but a knock open valve closes due to the valve return spring and gas pressure in the valve/plenum/reservoir combining to overcome the Hammer/Hammerspring combination knock; not the residual pressure in the TP/barrel. That closing is the balanced valve Grail and it is typically extremely [think mSec. millisecond(s) 0.001 of a second ] short: https://hardairmagazine.com/ham-columns/pcp-airgun-internal-ballistics/ has graphs and more.
Just remember that in a knock open valve as the reservoir pressure drops the valve remains open longer…also called dwell time increase by some.
shootski
Shootski,
Thank you. That is one I had missed. Pretty clear. I like their technical articles. I was going to get all “technical” and such,… but was most certain that I would paint myself in a corner within 5 strokes or so,…. so I kept it general. 😉 Not something that I deal with on a daily basis.
Chris
Chris USA,
You are very welcome!
If a friend paints themself into a corner friends should open a window (of knowledge) to help them climb out. That’s a thing that should bring joy and better shooting to us all. We see that done almost every day on B.B.’s Blog…even when he goes on one of his RANTS.
But back to airgunning: Knowing how incredibly fast our pellets leave the barrel after the sear drops is a hard one for most shooters to get their head around. Getting that split second idea makes a huge difference in our understanding of what does and does not effect the first part of the shot cycle; arguably the most important part. After all, it’s ALL Downhill after that!
shootski
With a 14″ arrow over the 14″ barrel I’m sure the CO2 has lost it’s oomph. If the valve stays open until the arrow clears the “barrel” the AJ is only going to get a handfull of shots. BB mentioned up to 60 yds. for deer but I would cut that distance in half because of the light weight arrow. Now if it can launch a 300 gr. arrow somewhere around 250-275 fps. then
I would practice out to 60 yds.(maybe a shot or two at 100) if it’s accurate. At 170 bucks won’t pass this up.
Chris,
Got it. Thanks,
B.B.
“The tabs on the muzzle are obviously there to prevent from loading “stuff” in there”
Chris, that’s exactly what I thought; although I think it screams for someone to try this, hahaha! =)~
Dave,
If mine,…. that would be the (first) thing I would do! I was thinking some light lead shot with a wad stuffed in behind and ahead of the shot. Why? Just because (and) why not? 😉
Chris
Chris USA,
We’ll either have to ask B.B. to measure the internal diameter of the tube or wait for somebody to try this with one that they bought. You would be turning this into a muzzle loader.
Siraniko
Chris, Siraniko, yes, a muzzle-loader; exactly! This thing is just begging for that! =>
Siraniko
I was thinking bird shot in a patch pushed down the barrel and turn it into a air shot gun.
Saying that I would be interested in the gun then.
That would be pretty cool! =>
Dave
I’m looking into what I need to convert one to a regulated pcp bottle right now. When I get that done it will be a muzzle loaded air shot gun.
Everyone,
Muzzle-loading airguns are dangerous. Do you want me to explain why?
B.B.
BB,
Sure!,…. for those of us that may be less informed on the matter.
Chris
B.B.,
Agree with danger posed by muzzleloading. Consider that the gun is always charged, unless somebody makes it more complicated by making the air supply detachable. Then again that makes it work and takes all the fun out of it. That’s why I proposed putting a tap for loading or simply a cutout for the ball with a sleeve for the cover like in the Seneca.
Siraniko
Siraniko,
You almost have it. There is just one other thing nobody has mentioned.
B.B.
B.B.,
I hope you can elaborate on your next article what I missed. Automatic safety? The cost of production to make this idea real seems to put its cost up higher than the bean counters can stand.
Siraniko
B.B.,
Just the air blast itself, even at co2 pressure could easily split skin, in the face it could cause nasty eye damage. High pressure air is nothing to take lightly.
Mike
Thedavemyster,
I think that feature is required for the German market. It will be an unregulated “Toy” if it fires things OVER the barrel. It is a “Firearm” and heavily regulated if it can fires things OUT of a barrel. No gun laws make sense.
( I wonder if they lose the “This is not a toy !” warning on the outside of the German packaging?)
Half
Wow, that’s pretty interesting. =>
Super fun idea, but consider safety for a moment. By what process could you load this with complete assurance that no discharge could occur during loading? Loading a ball prior to screwing in the 88 gm cartridge would be safe (with precautions taken during charging). But after that? With all that Co2 sitting just behind the valve? I don’t see a way to load without putting fingers in front of a charged weapon which could conceivably discharge. You might say that un-cocked is perfectly safe, and perhaps it is… but it feels sketchy to me and less than 100% goof-up proof.
” I don’t see a way to load without putting fingers in front of a charged weapon which could conceivably discharge.”
Rillburgher,
You brought up a very good safety point here; it’s a tricky problem for sure, but I think there might be a way to do it (I’ll have to try and draw a picture of what I’m talking about =>):
1) Use your thumb and index finger to set a small patch over the “muzzle,” but without reaching in front of it.
2) Use your thumb and index finger to set a small lead ball on top of the patch, again without reaching in front of the muzzle.
3) Use your break-away “pull-rod” (instead of a ramrod; see pic below) to pull the ball to the bottom of the barrel.
Dave,
Oh my! You obviously have way too much time on your hands to have come up with (that), so quickly,…..
😉 ,…………Chris
Chris, you are SO right, hahaha! =>
Thedavemyster,
That drawing reminds me of the three tube optical illusion Mechanical Drawing Class project we all tried to layout at least once six decades ago. It goes nowhere very well, Lol!
shootski
Shootski, I know the drawing you mean, hahaha! Sorry, it’s crude and not to scale; I don’t like trying to draw with Paintbrush, but it’s all I have on this machine. =>
Dave,
No need to be sorry! I enjoyed that M.D. class along with the real hands on shop classes they used to have in Middle and High Schools! I think they could drop a bunch of the current brain washing classes and bring back classes that teach people how to make something real. Even if that included 3D Printing instead of say learning how to wire electric circuits, solder, cut metal with tin snips, and set up a lathe.
shootski
“…bring back classes that teach people how to make something real.”
Shootski,
Yes! Back in my days in middle school (7th & 8th grade), boys had to take “Shop Class,” which was basically drafting and wood-working (but not at the Vana2 [Hank] level =>); and girls had to take “Home Economics,” which was cooking and sewing. By the time my youngest brother got there 9 years later, both boys and girls had to take both; I thought that was pretty cool; everyone could actually make something…even dinner! But then, they dropped it all, which is sad. I’m with you: bring it all back! =>
Take care & have a blessed weekend,
dave
Dave
We had drafting and metal shop as well as woodworking shop back in 7th grade and up.
I took drafting and the metal shop class/machine shop class from 7th on up. It was probably my funnest class in school.
“my funnest class in school”
Yes, those were the good ol’ days, for sure! =>
Dave
There was only a few reasons I went to school back then. Learning wasn’t one. I mean heck I did good in school. I even graduated early.
But yep was very interested in shop class. And really did like drafting too. And I always been good at drawing. Cars in particular.
But ain’t going to lie. I was so happy the day I graduated. It was like freedom at last. 🙂
“I was so happy the day I graduated. It was like freedom at last.”
Roger that. =>
Dave
Yep.
B.B.,
Considering that you have used both the arrow in the barrel and arrow over the barrel, which is easier to use? Have you noticed which gives you better accuracy?
I envision somebody developing/reviving the tap loading method to allow pellet loading with probably an interchangeable barrel. An inline shut off valve could probably be made but it would lengthen the 88 gram cartridge making it protrude.
Siraniko
Siraniko,
I can’t say about the accuracy until I test this one. This is the first over-the-barrel type I have tested.
B.B.
B.B.,
You never got to shoot the Swivel AIRROW?
It had a system very similar to the UAJ.
shootski
shootski,
I did shoot the Swivel Airrow. I also shot the pellet rifle.
B.B.
Siranko,
The problem with inside the barrel arrows is they are fiddly because of the Fletching:
“Fletching is the fin-shaped aerodynamic stabilization device attached on arrows, crossbow bolts or darts, typically made from light, semi-flexible materials such as feathers. Each piece of such fin is a fletch, also known as a flight or feather. A fletcher is a person who attaches fletchings to the shaft of arrows.”. You get a twofer! Now you know how the family name of FLETCHER came to be. Probably made good money too!
To your continued good health, Salud!
shootski
Siraniko,
Interesting theory, most especially for me as I have a weakness for tap loaders. the tap would have to be part of the interchangeable barrel due to caliber changes and to insure proper alignment. A sliding cover type loading port built into the barrel such as is seen on some of the big bores should work nicely, depending on the design of the air rifle.
Tap loaders are found almost exclusively on sproingers. I say almost because someone will dig up a PCP that has one to help me look the fool. In fact, Dennis Quackenbush built a PCP with one. Back to the sproingers.
Use of the tap loader provides for a long transfer port from the compression chamber to the breech. Also, the diameter from at the very least the tap itself to the breech is equal to if not larger than the caliber of the projectile. The “long” length and large diameter of this transfer port allows the compressed air to start to expand and lose some of its very precious energy. This in turn reduces the FPE. With the same swept volume, a break barrel with a short transfer port will always be more powerful.
This has been the bane of many underlever sproingers. The Gamo CFX, Diana 46, Umarex Synergis to name a few. Air Arms and a few others overcame this issue with sliding compression chambers, but then the volume of the chamber is reduced and the air rifle is heavier.
There is a couple of other small issues with tap loaders. They tend to be very closely machined to the caliber being used. If the pellet has a slightly deformed skirt or becomes a little cockeyed when loading, it will hang and not drop in all the way. Then you will need a small “rod” to push it in the rest of the way.
Another issue is machined tolerances. They have to be close. This means skilled workers, expensive equipment, increased labor time, smaller profit margin.
Like I said, I really enjoy a well made tap loader, but you will never see many of them.
RidgeRunner,
Understand the need for tight tolerances. One can always dream.
Siraniko
RR,
Not to make you look bad, simply for your edification. The Crosman Model 73 CO2 gun is a tap loading pellet gun as well as a lever action BB gun. Crosman also made, for a short while, a tap loading pellet rifle called the Model 262. The tap is plastic and breaks pretty easily. It’s sort of a cool looking gun, IMO. I can still fire mine but the tap is broken at the hinge and it makes it sort of fiddly to load.
Stay separate and safe, Half
Interesting. The hammer appears to be positioned in line with the “barrel” spigot. I wonder what valve design is used in this gun.
B.B.
I think it’s a much nicer stock than you get on the Synergis for about the same money.
Mechanically, the Synergis is TIG welded construction, by humans, which costs allot.
Not spot welded, interestingly. I wonder about the joinery ‘under the hood’ on this one.
The Synergis does have a longer transfer tube, but the chrony says the spread is very tight.
Way to go Umarex.
$600.will get a Walther Reign, another plastic stocked beauty. Cant swing the Steyer semiauto bullpup,
yet.
Thanks for the peek!
Rob
So putting shot in the barrel is muzzle loading. But sliding an arrow over the barrel is not muzzle loading? I think it would be hard to argue that this is not a muzzle loaded gun. As the intended projectile goes on the muzzle.
Gerald
Gerald,
Who said the arrow is not dangerous, too? I haven’t covered that yet. But I see that I need to.
B.B.
BB,
So what you sayin’?,…… my 499 is a death trap too? 😉
Chris
Chris USA,
Chris!
You are going to shoot your eye out for certain!
Lol!
shootski
Chris,
Not at all. If I take the time to explain it, it becomes a blog.
B.B.
BB,
Obviously,… until a 499 is cocked,…. there is no “stored” energy,… therefore, nothing can be launched. Unlike a pneumatic storing air.
Chris
BB
Do you have to cock the Javelin before it can be fired the next time?
Or is it like a semi auto action. You load the arrow then fire. Then you can load a arrow and its ready to fire again without cocking a bolt or such?
I’m thinking the Javelin does not work that way. If it does you can shoot yourself with a arrow just as easy.
And why wait to write another report about muzzle loading guns and safety. Tell us now. You could save some innocent souls today if we can relate it to how the Javelin works.
Gunfun1,
Just like most bolt action rifles you do have to cock the action for each shot, here is a video and I am sure B.B. will cover all of these points and more.
https://www.youtube.com/watch?v=72S-DCdHA2g
On running it on HPA I am interested to see what you come up with, there is not a lot of clearance as the 88 gram cylinders are kinda narrow.
Mike
Mike
I can take the setup off of my Bear River 1000 semi auto pellet gun.
GF1,
As I recall that was a tethered setup, the other thing is the inner diameter of the “barrel”, will that be large enough for shotgun action? Guess you will have to see it to know and I think there should be a way to change out that air tube if it proves to be too small.
Mike
Mike
I order probably 2 years ago some Wingshot shot shells that was already filled with bird shot. I opened some up and poured them out on a plate. At the time I had a QB 78 I believe it was with a 13 cubic inch regulated HPA bottle on it. It was .177 caliber. It shot about 40 bird shot out at a out 20 yards going through one side of a aluminum can. Also same gun shot 5 steel bb’s through both sides of a aluminum can at 20 yards.
So I’m thinking the Javelin barrel size will be good. Plus I believe the Javelin has a fast slump valve. So that could help with birdshot too.
What comes to my mind though is if I use a regulated bottle on the Javelin with its fast dump valve the regulator might not flow fast enough to keep ahead of the fast dump valve.
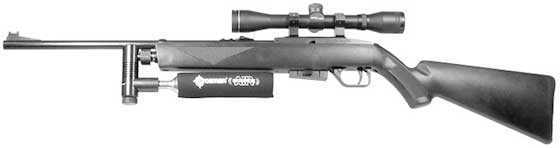
But yep here’s a picture of my mx1000.
GF1,
On diameter, a review on the PA site said that a 2016 aluminum arrow works for new arrows,……… so,….. I looked up what that diameter would be and found this. From this, you might get an idea of what the barrel ID might be.
https://www.google.com/search?client=firefox-b-1-d&ei=HsOZXr-yO8SztAb2_7rYAg&q=what+diameter+are+2016+alluminum+arrow+shafts&oq=what+diameter+are+2016+alluminum+arrow+shafts&gs_lcp=CgZwc3ktYWIQDDoECAAQRzoECCEQClDDMVidYWCnfWgAcAF4AYABwQWIAcYnkgENMC44LjUuMi4xLjEuMZgBAKABAaoBB2d3cy13aXo&sclient=psy-ab&ved=0ahUKEwi_ub3M2-_oAhXEGc0KHfa_DisQ4dUDCAs
Chris
Gunfun1,
I think I recall you talking about the Wingshot shells and the QB78, you posted a picture or perhaps a short video of shooting the can. I do not think you will have a problem with the fast dump as long as you have enough air between the regulator and valve, that could mean a longer feed hose, think plenum because there will not really be the possibility of a second shot without reloading.
Mike
Mike
Yep with the video.
And your probably right about the follow up shot with the valve. As long as that volume of air is there. Like you said just increase the length of the hose.
GF1,
From what I see, that sliding bottle cover shroud come right off (somehow) and looks to serve no other purpose. So, that would mean you could do reg, bottle set up.
Do you have an estimate of the barrel ID at this point?
Chris
Chris
Look at my reply to Mike.
And also look at Part 1 report on the Javelin. The HPA bottle won’t work. Not enough room. That’s why I did the mx1000 HPA bottle like I did.
GF1,
Got it. Yes, a diameter and length issue. Any length issue does look like it could be dealt with by removing the cover though.
Chris
Chris
Thanks for the link.
According to the link you posted the inside diameter of the arrow shaft should be a little over .300″. That’s basically a .30 caliber hole.
The problem is we still don’t know the inside diameter of the Javelin barrel. We only know right now that the Javelin barrels outside diameter has to be a little smaller diameter than the inside diameter of the arrow.
By looking at the picture of the muzzle end of the barrel in BB’s report that the Javelin barrel is thin walled. Just guessing the inside diameter of the Javelin barrel looks to be at least a .20 caliber or bigger hole. Probably not bigger than .25 caliber.
So If I shot bird shot out of a .177 barrel than should be able to do it out of the Javelin barrel. Ofcourse if it dumps enough air into the barrel.
Chris
If I do it like I did the mx1000 the cover can still go on the Javelin too.
Gunfun,
I wish you would do a guest blog on the MX 1000. Velocity (if you have a chrony), accuracy, trigger and all that good stuff. I haven’t been able to a review anywhere!
Brent
Brent
I have a chrony. When I get a chance I’ll chrony it for you.
And it’s got a pretty hard trigger pull. Accuracy is pretty good. It will shoot around a quarter size group at 35 yards. People say the 88 gram Co2 cartridges leak down. I converted mine to the tethered regulated HPA bottle and have no leak down problem. So not sure why that is with the Co2 cartridges. Oh and it’s a pretty solid gun. And it only comes with 1 clip but I called Bear River and bought a couple extra. They was only like 3 dollars a piece. And they are metal. That’s about all I can think of for now.
GF1,
The AJ must be cocked every time.
Given the problem people are having with this conundrum I guess I need to address it.
B.B.
BB
Sure. Definitely want to hear what you have to say about it.
Maybe you’ll change my mind and I won’t want one after all.
B.B.,
I’m certain RidgeRunner will address the gloweythingey up front…but that rear peep is SCREAMING for some Anshutz Sight Black!!!
Provided for the uninformed:
https://forums.1911forum.com/showthread.php?t=182983#/topics/182983
shootski
HI Tom,
About the M1 Carbine BB gun…has there been any talk about adding an elevation adjustment to the rear sight? I can’t understand why they would make this gun so realistic yet short-change us on the sight adjustment.
Any thoughts?
Regards,
—Joe on Maui
Joe,
I haven’t heard anything. I will ask around.
B.B.
BB
Just got mine last night and got the 12 gram adapter directly from Umarex this morning. Got about 10 good shots and 4 more weaker ones from the adaptor (40 degrees) so I feel like that was a good choice, as it saved the co2 when unscrewed from air bow.
Took the buttstock off and noticed you can store 4 of the 12 gram co2 cartridges under the 2 little removable covers under the stock tube. Didn’t know if that had been mentioned here
From 20 yards stuck the arrows into my 3d deer target about 4 inches.
Hopefully it warms up so I can get a better chance to really test it.
Ed,
Tomorrow.
B.B.
Looking forward to it, my brief try out today was fun but very informal. If you can get one of the umarex adapters, I would like to see some chrony data. This accessory really makes it a lot more economical to shoot, and seems really well made. I discovered the co2 storage by accident when I looked at the buttstock and wondered what those 2 little tabs were for. Would be handy for a day in the field.