
by Tom Gaylord
Writing as B.B. Pelletier
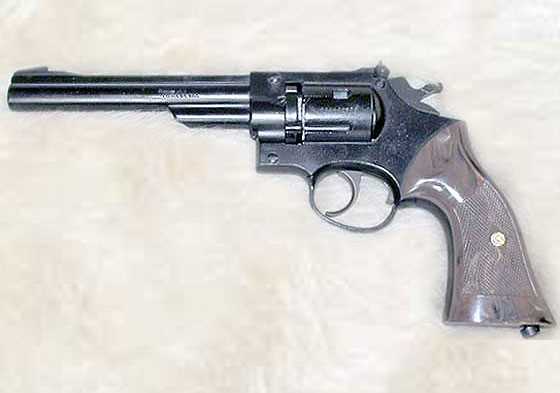
Crosman 38T.
Part 1
Part 2
Part 3
Grips & tips
Part 4
Today we have another guest blog by reader Ian McKee who we call 45Bravo. He shows us how to reseal a Crosman 38T revolver. The revolver he reseals is the same .22 that I am about to test for you and also the same gun whose grips he fixed for us, so I linked to all the previous Crosman 38T links, because this is a large series.
If you’d like to write a guest post for this blog, please email me at blogger@pyramydair.com.
Take it away, 45Bravo.
Resealing the Crosman 38T target revolver
Resealing the Crosman 38TThis report covers:
This report covers:
- Start
- Disassembly
- The seal kit
- The piercing assembly
- The tube assembly
- The valve group
- Assembly
- Hammer and trigger assembly
- The valve group
- The barrel and shroud
The 38T is a vintage all-metal (except the grips, rear sight, and the rotating pellet cylinder) CO2 replica revolver that closely mirrors the lines and grip of a 1980’s Smith & Wesson revolver.
In the firearm world, most revolvers are considered a simple design, and they do have relatively few parts. But when you make a airgun replica of a firearm, you have to work within the envelope (profile and dimensions) of the original.
That means you have to get creative with your engineering and layout as to where you can place your necessary components such as the CO2 cartridge, the valve, and the way to feed the intended projectiles. Typically, on a piece-by-piece count, an airgun will have more internal parts than its firearm twin. Today we look at such an animal.
I apologize in advance that it is a long blog, but there are a lot of steps to cover.
Start
Start by removing the grips, the right grip is held in place by 2 screws, the shorter one of the 2 goes in the top of the grip, the longer screw goes in the bottom. The left grip is held in place by a spring clip that attaches to the CO2 cartridge, so the grip will not stay in place unless a CO2 cartridge is in the gun. Remove the left grip, and then unscrew the CO2 cartridge piercing screw, and remove the cartridge.
TIP: I would suggest leaving a cartridge in the gun, but not pressed into the CO2 face seal. Just tight enough to hold the grip in place. You sometimes see these pistols listed for sale without the left grip as it has become lost over the years.
These grips are thin, and tend to break and crack around the alignment pins and also where the CO2 clip is attached. The gun I’m resealing had those issues, and the repair has been covered in the GRIPS & TIPS BLOG.
Disassembly
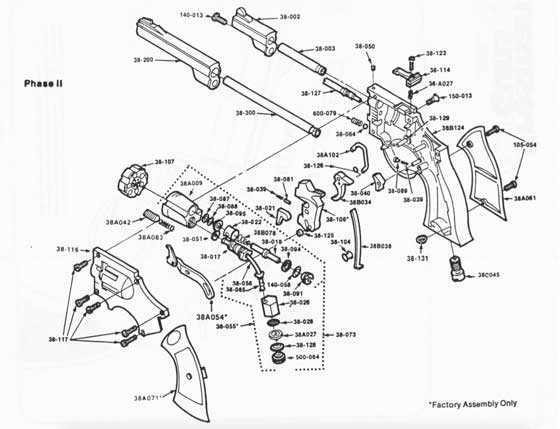
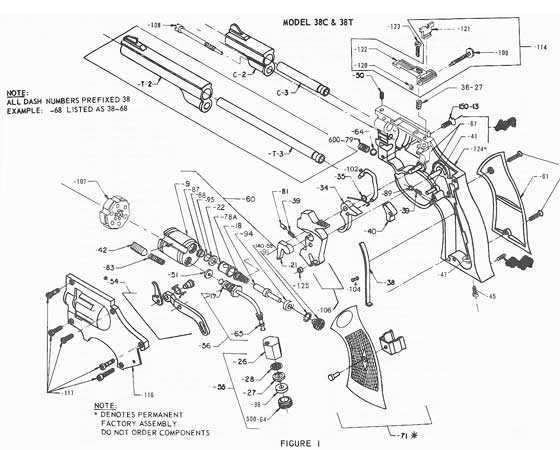
Included with this blog, are a few different exploded views of the pistol, please use them to guide you in removing the parts, which I will list as we go.
The above parts diagram is for a Phase II gun, which is what I am working on, so the part numbers will match. There are a few differences in this gun from a Phase I gun, but the differences are minor. I will include a Phase 1 parts diagram at the end of the blog for those that have the earlier gun. I believe the Phase 3 guns will have the same parts as the Phase 2 guns.
Start by loosening the rear sight elevation screw 2 turns to relieve tension.
Remove the outer barrel shroud by removing the single screw that is under the barrel in the end of ejector shroud (140-013), then with a slight wiggle, slide the outer shroud off of the barrel.
There are 5 screws on the left side of the gun, that hold the cover in place. They are all the same length, and it does not matter which hole they go into when the gun is assembled.
Slowly lift the left side cover, there is only 1 spring that will want to pop out (38A083), and it is the spring that pushes the sliding loading gate into its forward position. The spring is relatively weak, and not under much tension.
Here are your thousand words.
Remove the sliding pellet loader (38A042) and spring (38A083) from its tray.
Using tweezers, remove the sear spring (38-039) and spring guide (38-089) that is behind the sear (38-040) near the rear of the trigger.
Next, remove the detent ball (38-064) and spring (600-079) that are in the front of the gun, right below the base pin that the pellet cylinder rotates on.
Remove the hammer spring (38-B038). It is a long flat spring that goes from the bottom of the grip to the hammer. Use needle-nosed pliers to remove this spring by lifting the bottom straight up out of its resting place. It is not under much tension.
Depending on which phase your pistol is, there MAY be a small ball detent that is under the rear sight elevation screw, be careful not to lose it if yours has one. You may remove the rear sight and spring now, but it is not necessary for the reseal, or you may cover it with masking tape to hold it in place while working on the gun — your choice.
You will see a large flat lever assembly (38A054) that goes from the trigger to the front of the gun. On the right side is a small roller (38-125) that is in a raceway, remove this roller.
Congratulations! You have now removed all of the springy bits that are likely to take flight easily.
Place your hand over the exposed components, turn the revolver over and remove the valve body screw (150-013) from the false “cylinder” on the right side of the gun.
Turn the gun back over, unscrew the base pin (38-127) on which the cylinder rotates.
Now remove the pellet cylinder (38-107), the entire valve assembly (38-073), and lever assembly (32A054) all at the same time and set them aside.
The lever assembly (38A054) is factory assembled with special jigs to assure proper timing and should not be disassembled.
Remove the trigger (38B034), the trigger spring (38-126), and the transfer bar (38A102).
Remove the hammer (38-106) and hammer pawl (38-021) that pivots inside the hammer, carefully remove the pawl spring (38-039 and guide (38-081).
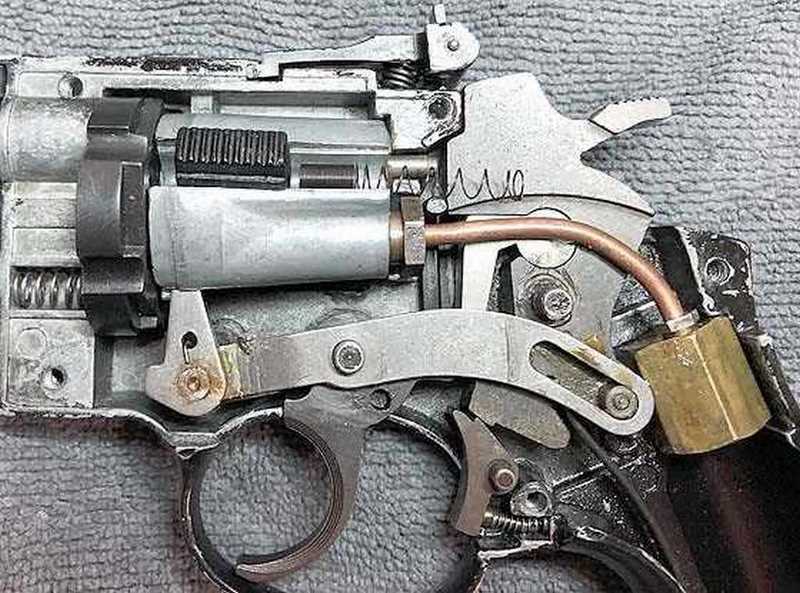
Now for the reason we are here. This airgun leaks and we need to stop that foolishness.

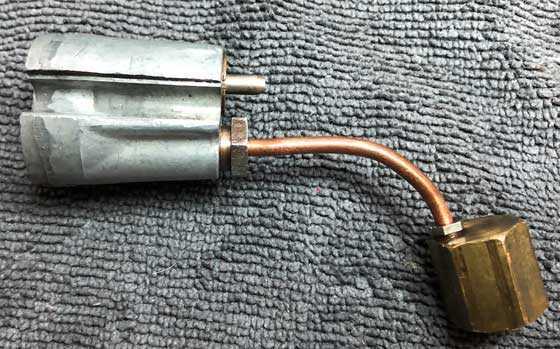
The diagram shows the valve is broken down in 3 sub-assemblies, 55 (the piercing assembly), 56 (the tube assembly), and 60 (the valve assembly).
TIP: The factory service manual says not to separate the 3 assemblies unless absolutely necessary, but since you will be replacing a seal on each end of the tube, you have to separate them. It is also better to take them apart so you do not inadvertently bend the tube.
(I tried it their way first, and DID accidentally bend the tube, and had to correct that problem when putting it back together).
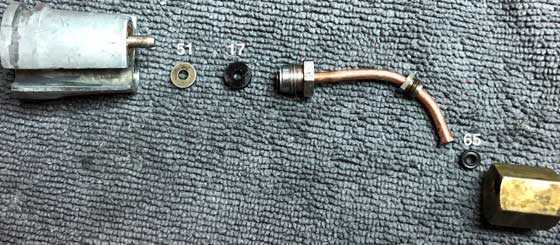
Using 2 small adjustable wrenches, unscrew the copper connector tube and piercing assembly from the valve body, being careful not to bend or break the tube assembly.
A small metal washer (part 51 in the diagram) may come out with the tube assembly, but that is ok, just make sure it goes back in first.
Then using the same 2 small wrenches, unscrew the piercing assembly from the tube assembly. Do not disassemble the tube assembly itself unless it is absolutely necessary, as it is flared on each end.
The seal kit
The seal kit Tom ordered for this pistol came with all the parts necessary to reseal the pistol including a small bottle of lubricant I will call Pellgunoil. It is a very complete kit, and the seals are very good quality compared to others that are sold online.
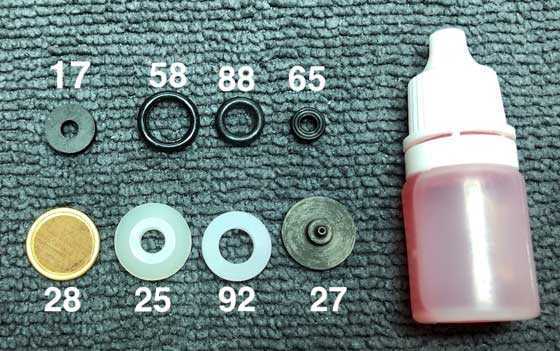
I have labeled the parts to match the part numbers shown in the diagram.

The piercing assembly

The piercing assembly.
Using a wide blade screwdriver, or a spanner wrench, unscrew the guide collar (24), end seal (25), piercing pin (27), and piercing screen (28) from the piercing block.
Clean the assembly with alcohol and a Q-tip. Using the new parts from the reseal kit, lubricate them with the Pellgunoil, or your choice of lube, and reassemble in reverse order and set aside.
The tube assembly
Tube assembly.
Remove the old small seal (part 65) and lube the new seal and carefully put it over the flared end of the copper tube.
Remove the old larger seal, (part 17) and lube the new one and carefully put it onto the other end of the tube. Set it aside.
The valve group
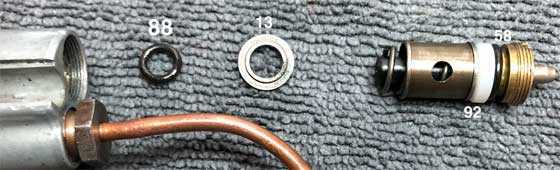
Using a spanner wrench, or needle nosed pliers, or a wide blade screwdriver modified for this purpose, remove valve seat (91), being careful to keep finger or thumb pressure on as it is under spring tension.
Remove the valve components gently using a dental pick to remove the inner parts.
Pay special attention to the parts orientation as they come out.
Clean the assembly with alcohol, let it dry, and then lube the parts as you reassemble.
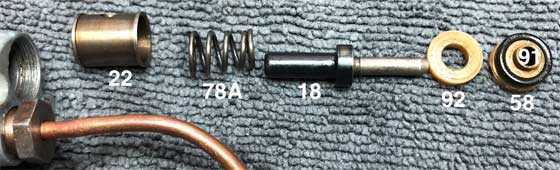
Main valve order 1.
Lay the cylinder (part 9) large end down on a rag or towel, lube the parts with the Pellgunoil as you assemble them.
The o-ring (part 88) goes in first, valve washer (part 13) goes in with the small lip down toward the o-ring, and the flat side up toward the valve spring.
The valve spring (78A) is tapered, and the large end goes in first.
Start stacking the components in order, 22, 78A, 18, 92, install the oring (part 58) on part 91.
Main valve order 2.
Being careful not to cross-thread the top valve seat (91), tighten until contact is made with the valve washer. Then tighten 1/8 – 1/4 turn more. This will squeeze the o-ring a little to make it seal against the valve body.
Assembly
Now we are ready to put it all back together.
Hammer and trigger assembly
Wherever there is metal-to-metal contact, lube lightly with moly lube or your choice of lubricant.
TIP: The key word is LIGHTLY, since the speed the hammer falls does have a direct effect on the velocity, and excess lube could slow the hammer fall.
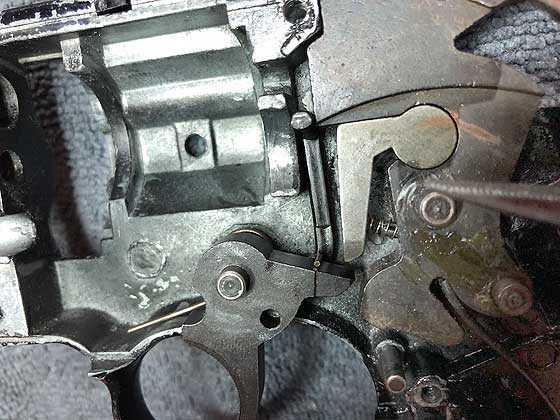
Install the hammer pawl (38-021) into the hammer (38-106), and the guide pin (38-081) and spring (38-039), and the small bushing (38-125), and place the hammer on the hammer pivot pin.
Insert the flat hammer spring (38B038) into the lower part of the frame, and into the hammer.
Install the transfer bar (38A102), trigger spring (38-126) and trigger (38B034) onto the trigger pivot pin. The transfer bar goes into the smaller of the 2 holes in the trigger.
The trigger spring goes over the trigger pin, the short leg sits on top of the trigger, the long leg rest on the lower part of the frame as shown in the photo.
Trigger and hammer assembled.
The valve group
Carefully screw the tube bushing into the piercing block, taking care not to damage the new seal. But do not tighten it yet.
Insert the metal washer 51 into the valve, and screw the other end of the tube assembly into the valve taking care not to damage that new seal. Again, do not tighten this end yet either.
The valve group — assembly 38-073.
As one complete unit, install the cylinder (38-107) (the plastic part that holds the pellets), the valve group (38-073) (the valve, tube and piercing block, and the lever assembly (38A054) (the long silver bar with the spring loaded hook on one end.)
NOTE: the piercing block fits into a matching recess on the right side of the frame, the gas tube should be in the position farthest from the hammer.
Carefully holding everything in position with the palm of your hand, install the valve body screw (150-013) that holds the valve to the right side of the frame.
Install the cylinder base pin (38-127).
Check that the gas tube is not rubbing on the hammer, and then tighten both ends of the gas tube. Check the clearance again.
Install the ball detent (38-064) and spring (600-079) into the front of the cylinder, and the sear (38-040) on its pivot pin below the hammer, then install the sear spring (38-090) and plunger (38-089).
As it sits, the springy things should not want to fly out.
Double check the bushing on the hammer/lever assembly is in place, the cylinder ball detent and spring are in place, and the sear spring/plunger are in place as indicated by the arrows in the photo below.
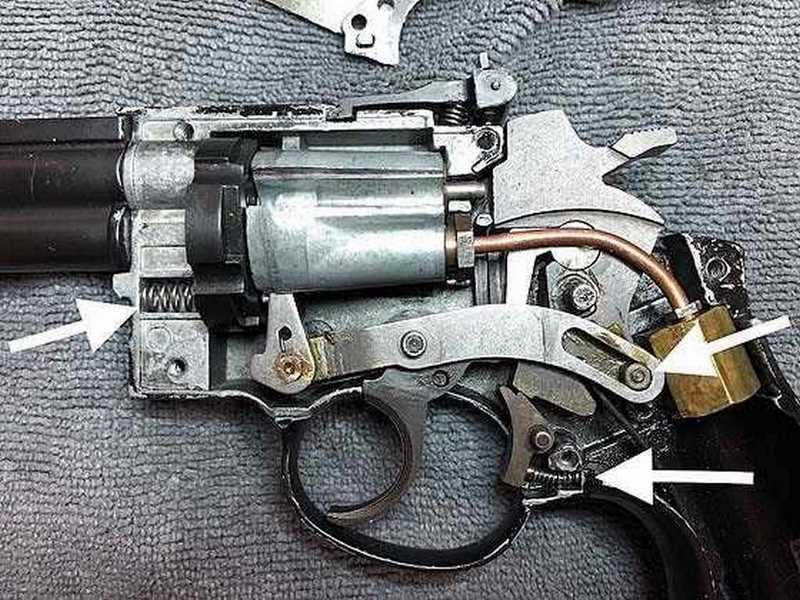
The springs have been installed (arrows).
Place the pellet loader (part# 38-42) in the loading tray of the main valve body with the rounded or tapered end toward the pellet cylinder.
We will install the loader spring after the side cover is installed.
Install the side cover with the 5 screws, they are all the same, so it does not matter where they go.
Double check the trigger and hammer function in both single action and double action to ensure there is no binding.
At this stage of assembly, if it is binding, the tube is probably rubbing on the hammer, or you forgot to tighten the valve body screw on the right side of the gun (part# 150-013).
The barrel and shroud
If you took the barrel off, look for the mark the set screw left on the barrel, and install it with that mark aligned with the set screw, insert a 0.004 feeler gauge or shim between the barrel and cylinder, and tighten the set screw (part#38-050).
Install the spring (38A083) for the pellet loader in the grove with the end that is tightly coiled toward the back of the gun, and using tweezers or a similar tool, put the front of the spring under the rear of the loader.
Install the outer barrel with screw (140-013).
Install the right grip panel with the 2 screws.
Hopefully, you have no leftover parts.
Now you can function test the gun again, checking that everything moves freely. Install a fresh CO2 cartridge, and check for leaks.
Here is the Phase 1 parts diagram I promised.
ONE FINAL TIP: The manual suggests using a coin to tighten the piercing screw, because a screwdriver could provide too much leverage and may possibly damage the gun.
If you are into revolvers you should have one of these very neat replicas in your collection.
Thank you,
Stay safe.
Ian


Wow! I think this is a first. The blog has been up for 5 hours and no comments.
BB
BB,
That is because everyone is STILL reading it! 😉
Chris
Chris,
Yeah — it is a biggie! 🙂
BB
You think it’s a long read now?
You should have seen the first draft….
Again I apologize for the length.
The hard part is trying to cover everything that is necessary, but not writing a novel.
The factory service manuals are written for people that work on guns every day, so they can say “remove part 600-348” they don’t go into detail by saying to remove that part, you first have to remove 14 screws, 3 springs, and click your heels together 3 times while saying “there’s no place like home.”
I try to write these articles geared for the average person that may have never even peeked inside of an airgun.
And making sure I include steps where I had problems, so they don’t make the same mistake I did.
Then condense it down to where it still makes sense for the reader.
Depending on the gun, it may take me a few hours to photograph and reseal it.
The writing and revisions may take days.
I love writing these articles, and hope I have given many people the confidence to take the leap and have been able to repair and enjoy their vintage airguns.
Ian.
Ian,
The sheer # of (all) the parts are incredible.
It begs the question/observation,… of something being overly complicated.
I think all too often engineers start out with a 3 part assy. and by the time they are done,.. it is a 15 part assy.. Not very often do they back up and start fresh,… or ask “How can we keep part #’s/complexity to a minimum and still have it function as needed?”.
I have tried the “clicking the heels 3 times” thing before. It has never worked! 🙁
Again,.. fine work.
Chris
From having worked on many airguns over the years.
The lawyers get into the triggers,
The bean counters get into the parts count.
Over a few generations of a guns production run, they tend to actually reduce the parts count over time.
They seem to over engineer the valves at first, then later decide to go with a thicker piece of plastic and take out 2 metal washers.
Ian.
Hi Ian,
Great article I used it to reseal my two 38Ts. The first one went together perfectly it’s the .22 caliber model. The second, .177, has been a can of worms from the get-go. I finally got it back together. It was a mess, whoever owned it before me stripped parts, put it together wrong, etc. It holds CO2 perfectly but won’t shoot when fired. I put it together exactly like the first gun but when cocked, trigger pulled I get zero CO2 coming out the barrel. Have you ever heard of this?
Sincerely,
Ed Musick
Ian,
Wow! Excellent job all the way through. You deserve some sort of award for all that.
Chris
Ian,
Thank you for this very comprehensive guide to the inside of this pistol. How long before a reseal is usually required?
Siraniko
On this design, the gland seals on either end of the copper tube are captive, so as long as the rubber stays soft, it can be decades.
And if they are leaking, you first try tightening the connection that compresses the gland seal, squeezing it a little, thereby making it seal better.
The part that tend to need replacing most is the co2 face seal in the piercing assembly.
And that is from being stored with a cartridge compressing the face seal. Deforming it permanently over time.
Also, the brass debris screen in the piercing assembly should be cleaned or replaced if replacing the face seal.
Notice the debris that was in the screen in today’s gun.
Ian
.
Bravo,
would you say the debris is from dust/dirt getting blow in when inserting a C02 Cart or from the C02 cart itself (dirty gas)?
Doc
Normally I would say it is just particles of trash dirt and other stuff that’s made its way into the piercing area but, these particles pretty large, and were all attracted By a magnet.
So they are a ferrous metal, I don’t THINK a company would be selling CO2 cartridges for a very long if they were using co2 that had not passed through at least 1 filter, as the particles with eventually start to build up and interfere with the production process overtime.
Not to mention the customer complaints.
While I do believe some companies take more care in their co2 production than others
I personally think they are mostly pieces of the seals for the many co2 cartridges that were sheared off when the cartridges were pierced.
I also work on and have been into airsoft for many years, their “green gas” that they use as a liquid propellant comes in pressurized cans of various weights in fluid oz/grams.
The cans are filled with a fiber filter that acts as a last particulate filtering process before use.
Bravo,
I was just wondering as one company claims (or used to) that their gas is cleaner than others. In fact they used to show a Crosman cart. cut open and it was dirty looking. I never knew if it was true or not. Their Carts cost more than Crosman though and I’ve used Crosman most my teen-adult life with no problems. When I was a kid I used Daisy (Jet) C02’s.
Doc
That marketing idea seems familiar but I don’t remember the company.
But when I saw it, I wondered how they cut the cartridges open lengthways and not contaminate the insides with debris.
And then I just wrote it off to marketing.
I have used crosman most of my life.
I used Daisy some but not very often.
I order 8 gram cartridges in bulk for vintage guns from redrock.
But for the last couple of years I have been using monarch cartridges, 50 count for $14.99
Best price I have found.
Before the pandemic hit, I bought a several hundred.
Just like powder burner ammo, buy it when you see it.
Ian.
Bravo,
If I recall it was Umarex that used to show that. But I could be wrong.
Doc
45Bravo,
I read the whole Guest Blog last night!
Wonderfully done!
I would have posted right then but didn’t want to set the tone of the responses. I think most of us are still in awe of your effort; I know I am!
Thank you,
shootski
Ian
Thank you for your blogs. I enjoy it when we discover the inner workings and repairs of airguns and your photos are outstanding. Well done.
A while back Winchester issued a highly modified, lawyered up version, of the Daisy “Spitten Image” 1894 Lever Action BB Rifle with a ‘simulated’ wood stock. The “Winchester 1894”. I got it and it was horrible to shoot so I decided to use some of its parts to repair my old Daisy.
The only thing they had in common, for the most part, was being made in the same place. Instead I retro fit Daisy parts (had parts guns) into the Winchester for a very nice looking reproduction with the same operation as the original 60’s version. I also had to do many modifications. For example the hammer no longer released the piston or even went into the receiver to operate anything. It was just for looks and had no real hammer spring or anyplace to mount one. It was also the safety at half cock but they installed a trigger block button to replace that.
I considered doing a guest blog on it but after considering the amount of work it involved, taking it all apart again and all, I put it off and developed a new respect for BB and you as well now.
The rifle was short lived and discontinued. No big surprise there. So, I decided to forget it. No one else would be doing it. However I really enjoyed the challenge. At best it would just be another airgun story.
I love analytical challenges, and I suspect you and many others here do as well.
Probably why I enjoyed my job as an aircraft troubleshooter so much. And the company certainly picked up on that. They would plan to send me a problem aircraft over the weekend to fix. Something like an intermittent “Engine Fire Light” in the cockpit. That must have been fun for pilots. Or fuel gages that went to ‘0’ … sometimes!
First you have to try to recreate the problem to find out what was wrong if it did not exist when it landed. And then fix it, after everybody else tried and gave up. The good old days !
Bob M
Bob M,
“Something like an intermittent “Engine Fire Light” in the cockpit. That must have been fun for pilots.”
That depends on if the Aircraft Logbook already had an entry about the gripe; if it (the logbook) did you hecked for secondaries then either unscrewed that pesky light or asked your copilot or Flight Engineer do it. In multi place aircraft you might set a firewatch on that engine.
Write another Logbook gripe on return.
Or fuel gages that went to ‘0’ … sometimes!” Only a problem if you had a leak. LOL! That’s what fuel flow gages are for! You did dip the tank on preflight and keep at least a mental fuel consumption log every 15 minutes?
Now, new pilots these days probably would cx@p their panties and then declare an EMERGENCY!
shootski
Shootski
I agree with you. Pilots have alternate ways to deal with problems in the air and yes a good pilot would figure it out. Even if it was signed off as “Replaced the upper fire detection loop, checks good IAW …” as this one was, frequently. The problem was in the connector on the pylon.
With 4 flights a day it may not have occurred frequently enough to be in the old log book.
On the ground we can’t just sign stuff off as “Well you can still land with three main tires” or “Just unscrew the bulb”. These are hard to find troubling problems, especially if they don’t exist at the moment. We can’t avoid repairing it. Unless of course it’s a deferrable item IAW the MEL.
I actually had a pilot ask me if I could just disconnect the plug to the helicopter gearbox chip detector. The ships mission is useless without it. ( Anti-Sub ) “Sorry you will have to remove the bulb and take your chances. The gears are coming apart and I must follow the procedures in the book. ‘You’ can explain it to the FAA inspectors after you crash…. into that cold, deep, blue water. Point gets made.
It’s been quite a while since I have sat at the controls of a plane, (I think my last time was about 1991, in a 210 turbo centurion).
but with all of the electronics used in planes now, and new models going to a “glass cockpit” and pilots having secondary electronic navigation aids independent of the ones built into the aircraft, do they even teach dead reckoning in flight school anymore?
45Bravo,
They do!
https://www.aopa.org/news-and-media/all-news/2016/march/flight-training-magazine/technique-pilotage-and-dead-reckoning
And the US Navy has increased the emphasis on basic Navigator skills for boat drivers as well as Airedales after a few recent unfortunate incidents.
Also something I learned for some specialized high altitude missions has seen a recent comeback:
https://www.npr.org/2016/02/22/467210492/u-s-navy-brings-back-navigation-by-the-stars-for-officers
Pilotage never went away because of Sandblower Missions : ) RidgeRunner (doubt you knew this about the Spad!) this ones fo you too:
https://www.history.navy.mil/content/history/museums/nnam/explore/collections/aircraft/a/a-1h-skyraider0.html
shootski
Ian,
Thank you for the tour. Though I myself am not into CO2, I do like seeing the innards and learning how they work.
Ian, I am certain you know so you should not read this blurb of mine any further.
Ian stated that everyone who enjoys revolvers should have a 38T. The funny part to me is most who own “semi automatic” CO2 guns, actually own double action revolvers. Even the Daisy Powerline 45 with the stick magazine I have is a DA revolver.
RR, I must beg to differ. I just bought a replica Sig Sauer M17 SEMI automatic and now you are trying to tell me it is really a revolver? Yes.
Let me ask you this question. How is the next projectile advanced to battery, during recoil from the shot or during the squeezing of the trigger?
Yes, I am just being a “wise guy”.
OK Wise Guy, can they make a semi CO2? They have, at least with bbs. To the best of my knowledge, they do not have the pellet thing worked out yet. The “action” will become far more complicated and very likely be a gas hog. That Sig Suaer ammo belt thingy is probably what they need to work with. If they could marry that up with the Huben K1…
RR
So where do you put the SAM with a ‘spring loaded’ magazine and a blow back ‘retracting’ bolt that pushes a pellet into the barrel for the next shot? ;(
Bob M,
Why the retracting bolt? The Sig, the SMG22, the Huben K1 and the LGS SK-19 all use the magazine as the chamber.
Another question is, why does it have to look like something it is not? Why not build it to look like something off of the Star Wars set? Fitting everything into a replica of a handgun is very restrictive. It is difficult to improve on efficiency, etc. when it all has to fit inside of a replica handgun. That is why so many of them are almost identical inside. If you take away those restrictions, the engineering, efficiency, appearance, etc. can advance. I have seen a Huben K1 made into a pistol. It is awesome!
Picture a CO2 pistol that you insert one or two CO2 cartridges under the barrel. The “magazine” is a Sig style belt setup that holds 30 or more pellets. The CO2 that you would waste on a simulated blowback system provides additional propulsion and maybe assists in the advancement of the belt. With the 2 CO2 cartridges you might get 2 full magazines with a respectable punch. Top it with a dot sight and I will take it.
Bob M,
I just figured out what you were talking about. In the trash?
One thing, it is not a Marauder, but TCFKAC has always had a problem with reusing names. Lazy marketeers I guess.
Sorry, but I personally have no use for it either.
Ian,
Yes, wise guy, the Crosman 451 is semiautomatic. It fires from a turret cylinder so perhaps you would call it a semiautomatic revolver like the Webley Fosbury, but it does function semiautomatically. The Crosman 600 is a second semiauto pellet gun and the Crosman NightStalker is a third.
BB
BB,
I too have seen true semi air pistols and rifles. The majority of replicas are reskinned revolvers.
RidgeRunner,
Revolver, Chain Gun, or Belt Fed…all are ways to go?
Or even a Gatling Gun!
shootski
Shootski,
I have seen bb gatling guns at airgun shows before. I have also seen a bb mini gun.
A belt fed double action revolver…
Nothing new.
It was new in the 1860’s…
One of my favorite YouTube channels.
Ian..
https://www.youtube.com/watch?v=SgghWnZgJd0
Ian,
Thanks! I used to check him out a lot, but it has been some time.
Shootski
Do you honestly believe there are people who purchase airguns and keep them ‘NIB’ just to resell them for profit at some future date? There are far better ways to to invest your money.
The NIB condition is a collectors thing. Just like a PR70 First Day of Issue coin. A rare and desirable condition.
The fact that it ‘May’ go up in value over time as it becomes rare and desirable to collectors is just a side benefit to help justify the amount of money we keep shelling out to add to our collections. And you can’t take it with you when you die so you will most likely sell them off before you do.
I for one do shoot and I do collect. Two different fields of air gunning.
For example, I have over 20 Colt SAA pistols in my collection. Mostly in pairs but I have one of each type from the original Marshals to the NRA editions as well as fully engraved and gold plated ones. They are all NIB … except for the two refurbished ones I got to manhandle and shoot. Now I may be a little extravagant because sometimes I buy two of the same airgun. One to shoot and one to collect.
Why wait for them to become rare and sought after when you can get them new?… and at a discounted sale price. And I have many that you will never be able to buy, or find again. I can always shoot one any time I want and remove it from the NIB status. Does a 10 for 10 P/A deal void the NIB? Debatable but not all of them come in vacuum sealed packaging. I would like to know if a NIB airgun actually works before I purchased one so the term is a little fuzzy there. Tested but not used may be more appropriate. TBNU ?
I don’t use my BU Morgan silver dollars either 😉
Bob M
Bob M,
So what are you doing with the Morgans? You are spending extra money for them. They are just sitting there, likely increasing in value. What are you doing with all of those NIB air pistols? Are you likely to sell them at some future date for less than what you paid?
There are indeed people who buy NIB for future resale at a higher price. I have a used 1959 Daisy Model 99 that I paid $35 for. I have seen one NIB at an airgun show for $175. As far as I am concerned, for $140, he can keep the box.
I remember when I started looking for a R7 / HW30 for my grandson. I came across a well used R7 (lots of dings and scratches) at an airgun show. The dude would not come down below $400 because it said Santa Rosa on the side of the action. As far as I know, he probably still owns it.
A year later I bought an used HW30S that looked to be brand new, with the original box and papers for $200. I no longer have the box and papers, but my grandson has a real nice shooting HW30S.
RR
Now that guy actually lost money If he would have invested that $ in the stock market in ’59. Sounds like people are trying to sell to collectors not shooters. If an old airgun still functions as a new one then why not ask for an equivalent price?
I think a lot of new old airguns were just set aside for some reason or another. Mother may have confiscated it and hid it. Did he have 10 of those NIB Daisy Model 99’s for sale?
Now that R7 was not a NIB thing but a supply and demand thing.
If you just want to have the gun to shoot why not just get a new one? I believe a lot of gun shows are geared up for collectors. Speculators, profiteers and salesmen take advantage of it to some extent and push for higher prices.
BOb M,
Santa Rosa was the first Beeman store. Basically he wanted $300 for the name.
There are some screaming deals at airgun shows if you know what you are looking for and have cash in hand. Yes, there are a lot of collectors at these shows, but there are some people who want to sell. I have picked up some nice deals at these events, plus saw a lot of history there.
RR
Oh I see what you are getting at all right and it is unfair in a way. It’s just the way of the world. People charge more for high demand items as long as people will pay for it.
Knowing what you want and what it goes for is certainly the key to a good deal at any swap meet. And if you are willing to play the waiting game the prices may drop as the day goes on but you may lose it to someone else first.
I would rather get a collectable before they become one and go up in price and if you snooze you can lose out altogether. Glad I got a wire stock replica when I did. They discontinue and disappear for many years. I’ll keep them as long as I can. I may even give some away in the end. Already have to nephews and a friend.
Bob M,
That is another thing about buying collectables. That wire stock replica was overly expensive to begin with. That is why I never bought one in the first place. Now that everyone has them they are trying to sell them at ridiculously high prices. I can buy an original for what one of the replicas cost these days.
If someone is willing to pay more for something than I am, well I guess they have more money to throw away than I do.
RR,
Too expensive???!!! Before Daisy brought that one out a guy was selling non-working replicas for $400!
BB
BB,
Really? It is amazing what people will buy.
RR,
If he wanted that much for the Santa Rosa name, I wonder what he would have tacked on to my FWB127 that was imported to San Anselmo.
LMo
LMo,
Oh, I reckon at least $500.
Bob M,
I know for a fact that people bought on speculation for resale, something like SCALPING tickets! Later after Dennis was swamped and changed to scheduled production those folks who spent hours calling in (some even enlisting family and friends to telephone) to get on The List. When his phone exchange revolted about the volume of calls (no doubt his wonderful wife also) Dennis in the end went with a mail in drawing system! His may have been a Special Case. He had the demand to charge 3 to 4+ times his asking price but could not bring himself to raise prices or hire employees to increase production.
shootski
OK Guys
Money in no way plays a part in motivating a true collector. Assuming it’s within your budget in the first place. Hording and scalping is an entirely different thing where making money is the only motivation.
It’s an unfortunate side effect when something is in high demand from the get go.
I do not intend to make money on resales and actually may be losing money on some. The old supply and demand thing will determine that.
The process of acquiring and possessing something you desire is a satisfying natural human behavior.
I don’t spend extra money on collectables. I spend excess money on them. I have too much cash and need hard assets and it helps a lot to be able to be into collecting. They go hand in hand. I moved passed getting what I need to getting what I want a while back. Fortunately I am satisfied with a simple lifestyle. Unfortunately it causes it to pile up. I do other silly things like give my daughters new SUV’s too.
People are always trying to be on the best side of a sales deal for themselves, so why would airguns be any different? I just don’t think a true collector is motivated solely for making money. Preserving it may play a part for some. People collect useless stuff all the time. Speculators don’t,
Bob,
🙂 Good for you. I am happy for ya’. Truly.
Chris
By the way,… I am up for “adoption”,………. 😉 LOL!!!
Chris
I have an old ‘Shipmate’ with signs of Dementia ahead of ya. Looking into power of attorney now.
Glad he is not into guns. Might have a place for slave labor though! Being an airgunner would give you extra points. 🙂
Bob,
Mmmmm?,….. Cali., good weather, forest fires, high cost of living, govt. control VS “indentured servitude”,………… let me get back to you on that,……… 😉
Chris
Come to think of it,…. that sounds a bit like “Uncle Joe’s” plan,………. 🙁
Hey,… at least I am # 2 on the list! 😉
Ian,
This is a very timely and relevant, well-written article. No apology required – unless the procedures described had not been clearly spelled out. Even this dummy might take a shot at rebuilding his 38T after digesting these instructions, possibly with the assistance of a couple YouTube videos; however, glad to have had it renewed by the expert and hopefully by the time it does need work again, FM will be doing target practice up in the clouds – assuming that’s allowed on the Other Side. Do believe it might be a good idea to purchase a quality reseal kit just in case they become scarce; did the one you used come directly from Crosman/Velocity?
Good tip about using a coin to tighten the cylinder-piercing screw; that should help prevent damage to the screw slot. FM will also remember to loosen things up when the CO2 cylinder is empty.
Well I finally realized why I have read the blog throughout the years.
Its definitely fun to read the posts. Guess I should of done this long ago. Kick back and read the posts and take in all the funny replies and such instead of trying to comment and understand and make something out of it all.
At least we learn by the comments is the best I can say.
Definitely a weekend to remember for me. And I’m not even talking about the blog yet but it is reconized.
Long live the blog. 🙂
Gunfun1,
You be CHILLIN’ in the spring time weather ;^)
Playing with the grandson and shootin’ up a storm.
Keep it up!
shootski
Shootski
Had to put a roof on the house last week and trying to get the pool done right now still. Haven’t been shooting as much right now but managing to get some in.
GF1,
You do the roof yourself or have it done? I would have to have it done,… as the knees are not so good anymore. Steel or asphalt shingle? Most people seem to be doing steel for re-do’s and new builds around here.
Chris
Chris
My oldest daughters husbands friends done it. They are roofers and Mexican I will add. They was very fast. Only had one roof on the house but they did a complete tear off and installed new metal gutter guards. Done in 8 hours and used shingles. Steel shingles made no sense to me. I won’t live that long to justify the cost. But got it done cheap and had a beer and BBQ party afterwards.
Next mission me and my oldest daughter and her husband and my younger daughter will be getting the pool done this weekend. A lot of work right now but will be worth it in the end.
GF1,
Sounds good. I was talking about the new, colored standing seam roof they have now,.. not steel shingles. I have never heard of steel shingles, but I suppose they might make them. I think the standing seam is more expensive, but a guy at work said he got his done for the same price, so I don’t know.
Have fun with the pool. You will enjoy it when it is super hot out. Sounds like an in ground from the way you are talking. Even the above ground pools can be a chore.
Chris
Chris
Above ground is a chore and a inground more so. Yes it’s inground. Took care of a inground when I was in high school and for a year or so after I got out of school at a local motel. Worked maintenance there. That was a exciting job. 😉 😉 That’s when me and my wife was going together. I can not bring that job up to her till this day. That’s one of the reasons I ended up with my machine shop job. Hmm maybe the women really do know what’s best. 🙂 Or maybe not. 😉
GF1,
Ha-ha! 😉 Well,… as long as it makes the family happy and gets used enough to justify the work and expense, then I suppose it is worth it.
Chris
Chris
Right. 🙂
Have pool, will let it travel to you Gunfun1…wire FM in FL – or email. It came with the house. The women liked it; FM did not – but alas, he became The Unwilling Pool Boy. Mrs FM won’t let me fill it in.
FM
You sound like Gunfun1. I told my wife the same thing that I wanted to fill it in and put a above ground pool there. She wouldn’t talk to me for a week after I said that. (Most peaceful week I had in a long time.) 🙂
But yep when looked at the house the cool factor was there when we pulled down the driveway and seen the pool. Then the reality set in and ole Gunfun1 started seeing all those dollar signs flashing in front of his eyes. It was done too late because the wife and daughters got sight of the pool. Gunfun1 was doomed from then on. No turning back after that.
What we do for our family.
Awesome job, 45Bravo!
If I had read this before I sent my two Crosman 38T .22 caliber leakers in for repair, I think I could have managed to fix them myself with the detailed instructions you have here.
Oh well, I’m sure I’ll get a chance to use this info in the future; again, great job!
Take care,
dave
Ian,
Cool post! Nice! Exploded diagrams and laid out parts are awesome. A magnet with the screen to pick up all the ferrous material would be good !?! Great to see the trigger set up! ( Ah ha …) ooh so that’s how it works. Very informative post. Post was not too long! Thank you! Robert.
I agree this was a very informative post about an unusual air pistol. I got some new seals off eBay, and with this information I might attempt to re-seal the (22 caliber) 38T I recently bought, but the amount of parts involved is a little bit intimidating…so we shall see. (Pretty sure it was made in 1969 based on date of original documents and the Fairfield address on the box, etc).
Thanks again Ian for your excellent post on this oldie but goodie air pistol.
Random,
Please let us know how it goes?
BB
Great article and exactly what I need to install a reseal kit on a 38C. While this one is a .177, I’ve also 3D printed a new cylinder in .22 caliber and have a rifle barrel to match that is going to visit the lathe, cut to length, and turned down to .373 OD to make this a kind of dual-caliber setup.
Just picked up a freebie Crosman .177 38t phase 2. Looking to get a seal kit, is it possible to tell me where the seal kit that you used was purchased? Also need the plastic cylinder, would you know of anybody that has one?. Thank you.
Hoot,
Look on eBay.
BB
That’s what I thought, I see a seal kit with the same oil bottle. Thank you