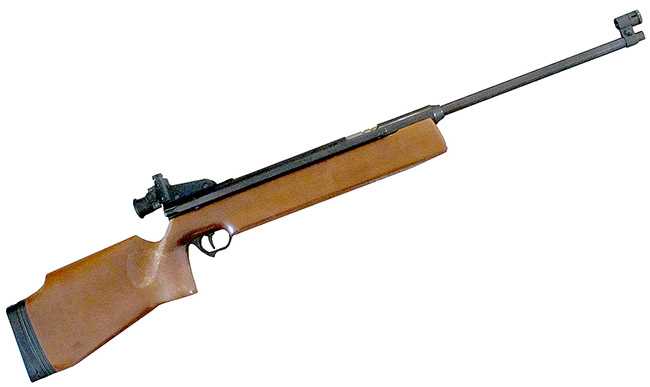

Haenel 312.
This report covers:
- Step 1 stock off
- Step 2 remove the rear sight and remove the lever pin
- Step 3 remove the block the sidelever pivots in
- Step 4 remove trigger
- Step 5 remove end cap
- Step 6 remove the bolt that holds the base block/anti-beartrap slide
- Step 7 remove the mainspring
- Step 8 remove the sliding compression chamber and the piston
- That’s it
Today I disassemble the Haenel 312. It’s an unusual airgun, for sure!
Step 1 stock off
First remove the stock. That’s two large screws and the front trigger guard screw.
Step 2 remove the rear sight and remove the lever pin
The rear sight has to come off to access a pin that has to be removed. After the sight is off you can see one end of the pin in the rear sight mount. This pin is what the sidelever rotates on, so I will call it the lever pin.
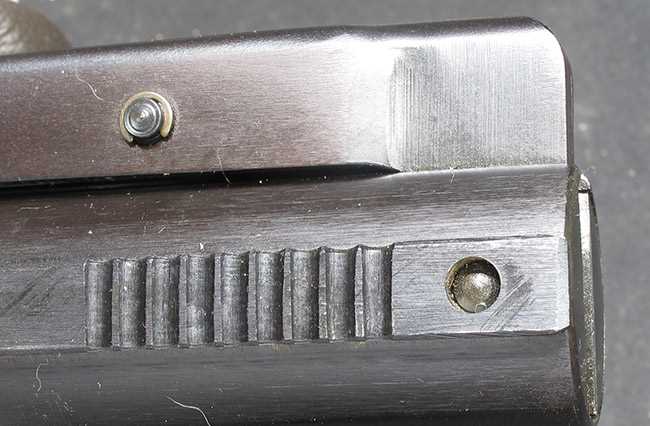
The head of the lever pin can be seen when the rear sight is removed.
The underside of the action shows the other end of the pin.
I thought the pin would be under tension with the lever closed, so I opened it without cocking the action. It turned out that was unnecessary. I will say that the pin was very tight in its hole. It felt like it was under tension, but it wasn’t — just tight.
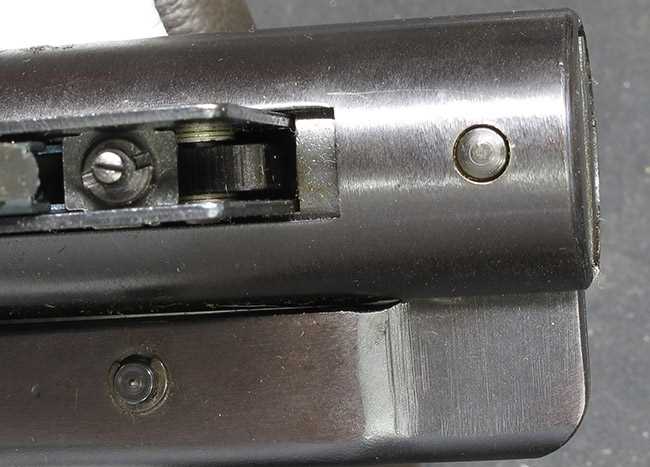
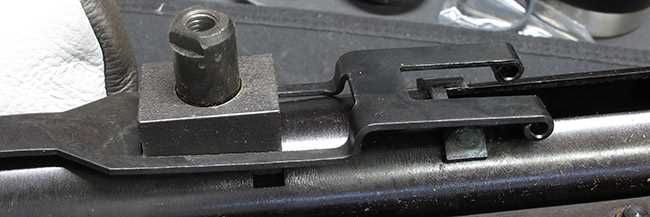
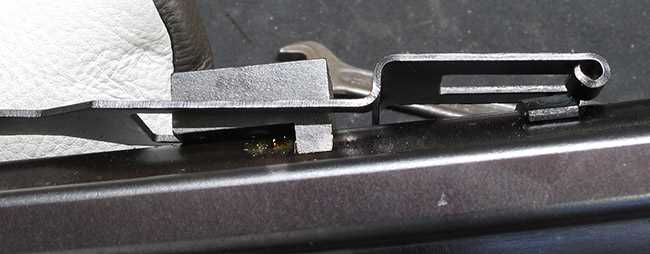
Step 3 remove the block the sidelever pivots in
Once the lever pin is out you can remove the metal block the sidelever pivots in. It is not under tension. In fact, to push it out just slide the trigger mechanism backwards.
Once the pin is out the block slides out. It is not under tension.
The lever block is out. The deep slots in the end of the block are to receive the trigger housing.
The other end of the sidelever is connected to the sliding compression chamber and can’t be removed at this time.
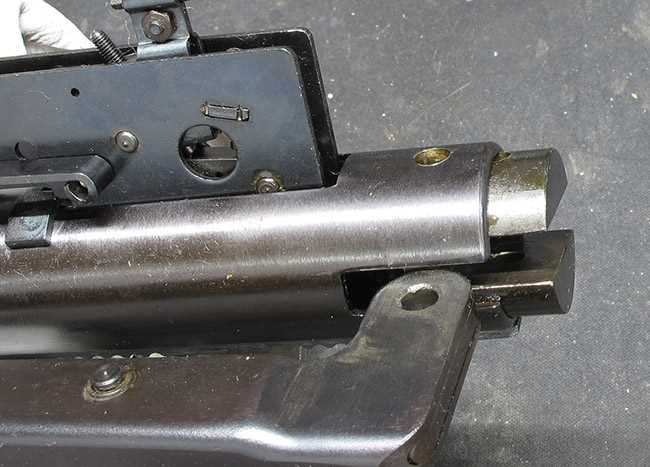
Step 4 remove trigger
The trigger assembly is connected to the anti-beartrap slide by a pin. When the rifle is cocked that pin moves back to block in its oval hole the trigger until the sidelever is returned to the resting position. That pin must be removed to remove the trigger assembly.
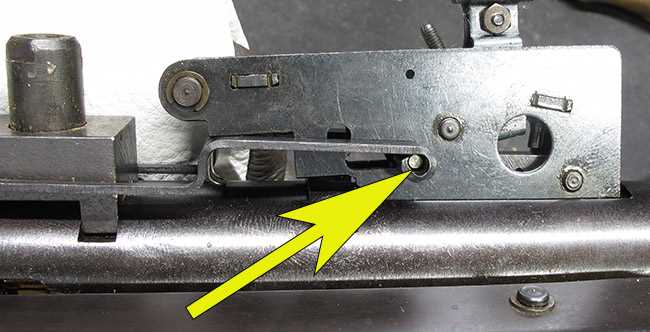
To remove the trigger assembly from the action, the anti-beartrap pin (arrow) must be removed. Drift it out.
There is one more step to removing the trigger mechanism. A spring in front that pushes down on the anti-beartrap slide is holding it and its tension must be relaxed.
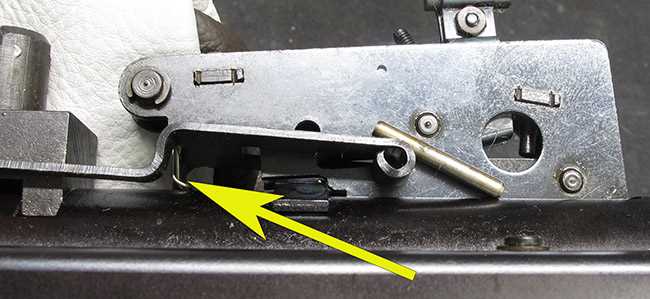
The trigger pin is out but the anti-beartrap spring in front of the assembly (arrow) still holds it in the action.
Here’s another view of the spring (arrow) that pushes down on the anti-beartrap slide. Relax the spring tension and the trigger assembly can be removed.
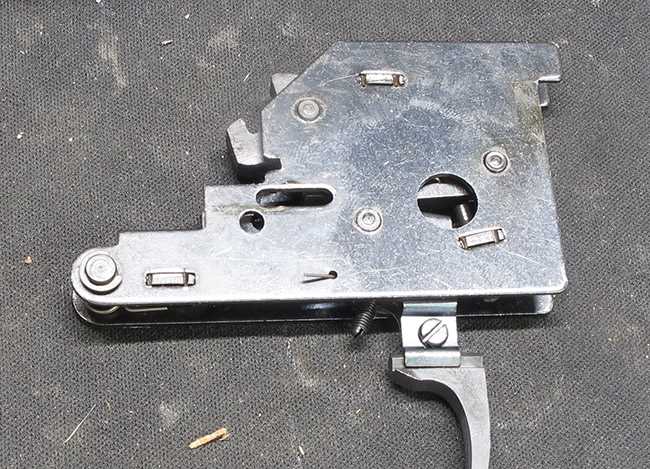
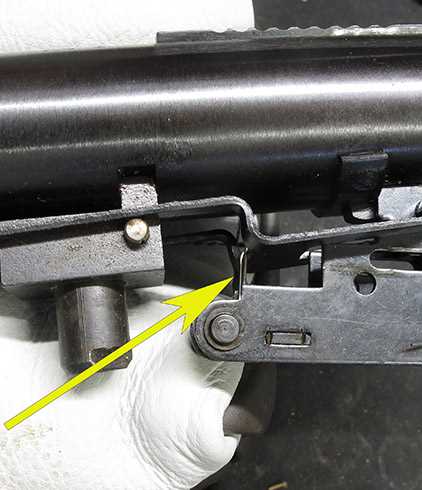
The trigger assembly.

Step 5 remove end cap
Now we get to the powerplant where the mainspring and piston live. There is what I will call an end cap in the 312, but it’s buried deep inside the spring tube — ahead of the trigger assembly. The mainspring is under some pretension, but not a lot. However I recommend a spring compressor for disassembly. And you will need a deep pusher rod to get inside the spring tube and contact the back of the end cap.
Step 6 remove the bolt that holds the base block/anti-beartrap slide
This step is a little tricky. You unscrew the bolt that holds what I am calling the base block, but nothing happens. The bolt comes out and the block remains in place. Look at the side of the block and you will see that it is keyed to hold the end cap in the spring tube.
With a 9mm wrench remove the bolt that passes through that block that I am calling the base block. The bolt will come out and the block won’t move. Notice that the block also serves as a guide for the anti-beartrap slide.
I have lightened the base block keyway so you can see how it holds the end cap in the spring tube against some spring tension. To remove this block put pressure on the rear of the end cap and pull it out from the spring tube.
The end cap slides out of the spring tube. That flat channel on what looks in this view like the top of the end cap is where the base block was holding it. The little lever on the lower side is the ratchet pawl and the wire spring sticking out next to the short spring guide is the end of the ratchet pawl spring. This entire assembly is steel. The brass-looking parts are just dried oil.
Step 7 remove the mainspring
With the end cap out the mainspring will now slide out of the action freely. The spring in this rifle looks reasonably good and fresh. It’s a stout spring, which is where the cocking effort comes from. It’s lightly coated with a dark smelly grease.
A custom spring might make the rifle easier to cock and also might take away some of the vibration. I won’t do that just yet, but it is a thought.
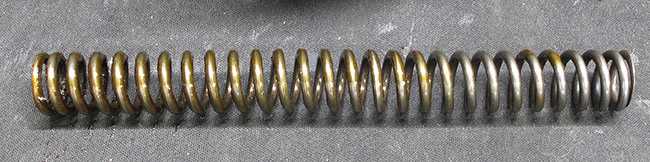
The mainspring is reasonably straight with no collapsed coils. A replacement might not look any better. But a custom spring might change the rifle’s performance for the better.
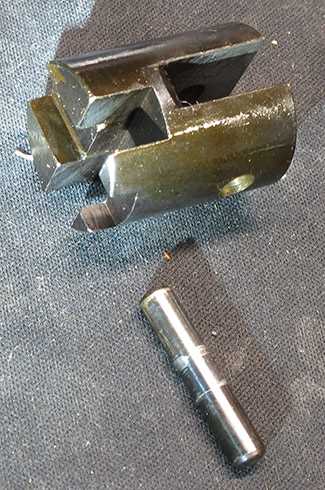
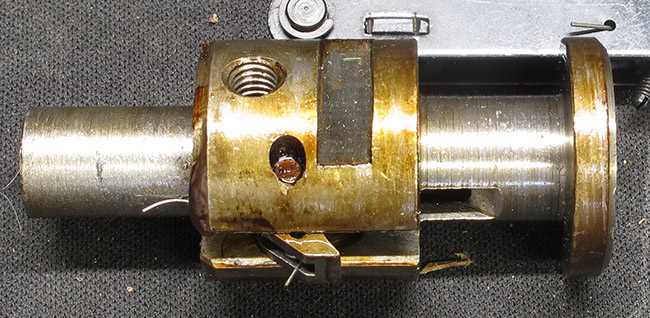
Step 8 remove the sliding compression chamber and the piston
At this point the sliding compression chamber can be removed, along with the piston. The sidelever will help slide the compression chamber back and the piston will come with it. You will see a larger hole in the cocking slot where the sidelever can be disconnected from the sliding compression chamber. Then the sliding chamber and piston will slide out of the spring tube.
Slide the end of the sidelever back to the large hole and it will come away from the sliding compression chamber.
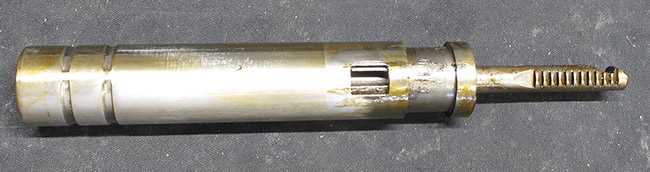
There is the sliding compression chamber with the piston still inside. That square notch in the chamber is where the sidelever connects. You can also see the ratchet notches on the piston rod.
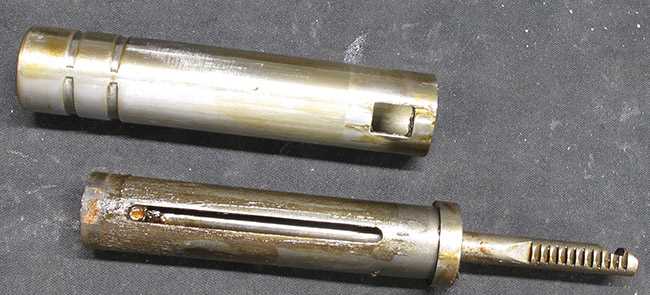
The piston is out of the compression chamber.
And the piston seal is indeed leather, as I suspected and reader Paul in Liberty County confirmed. This one seems to be in good condition so I will leave it alone.
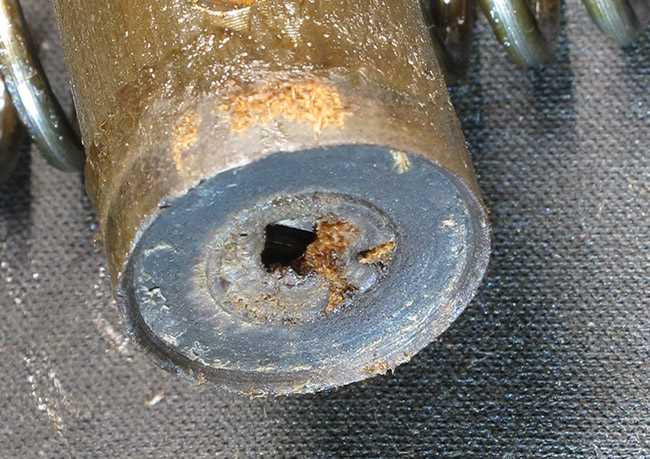
The piston seal is indeed leather.
That’s it
Well, she’s apart as far as I’m going to go. That’s all for today. In the next report I’ll describe assembling the powerplant and tell you what I did as I went. Stay tuned!


Hi everybody,
very interesting. Some aspects look similar to the FWB300S, some are very different. So the piston is part of the ratchet/anti-beartrap mechanism here…
The trigger mechanism looks fairly complex and well-made. Not totally unlike a Rekord at the first glance. Interesting that it doesn’t work better. Maybe reliability and durability were the top priorities and they sacrificed everything else for that.
It looks somewhat adjustable. Maybe some cleaning, relubrication and adjustment could improve it.
Stephan
Leather piston seal… still working… amazing.
Tomek,
Quite a few of the old gals here at RidgeRunner’s Home For Wayward Airguns have leather piston seals. I think some of them are originals, which means they are quite old. With proper care they will last a very long time.
The problem with leather piston seals arises when you get into the higher velocities. Usually, they are preserved with oil, which will encourage dieseling and likely detonation. Not good. Bad,
The biggest issue with leather piston seals though is out of ignorance, the owner will let the leather piston seal dry out. Then it will get hard, break and crumble.
I have to agree with Stephan. With a little cleaning, proper lubing and adjustment, that trigger may turn out to be quite surprising.
Thanks for the peek behind the curtain.
BB,
How was the fit of the spring relative to the compression chamber? Will you be shimming with beer can (or any other thin material) or just depend on TIAT?
Maybe you could experiment with the trigger while it is out of the gun to find out how to adjust it?
Siraniko
Siraniko,
Now, now. You are trying to have me get ahead of myself! 🙂
BB
BB,
Of course he is. “The Godfather” has taught most of us that TIAT works wonders on spring vibration.
TIAT is the cat’s meow.
Deck
Grammer?
Step 5 remove end cap
,,,However I recommend a spring compressor for disassembly. And(, as) you will need a deep pusher rod to get inside the spring tube and contact the back of the end cap.
RR,
Nope. It’s good as written.
BB
BB-
Off Topic- Are you planning to attend the NRA Show in Houston later this month?
Paco,
Why? Will you be there?
BB
I’m afraid not. How I wish I could attend. Too far for this one and also trying to nail down some health issues, re treatment. Hoping for a good word on the 14th.
Looks to be a good one, The Show, post Covid. Different flavor than SHOT Show, but still a great testament to our Bill of Rights and the shooting community.
Hi, First time poster here. I’m enjoying this series. I bought a 312 from an ad in Shotgun News back in the late 80’s or early 90’s. The ad was from a pawn shop in Charleston, SC. First real airgun. Still shooting it today. A little off topic, but I found a Gedaco/Hy Score model 807/Diana 27 that has a groove on the breech face. The groove runs from the chamber through the leather seal towards the bottom of the barrel. Air is venting there when I shot it. Has anyone ever seen anything like that ? Its almost like someone filed it there. I’m trying to figure out to attach pictues. Hopefully can attach them later.
fishoot,
Welcome to the blog.
Diana 27s are not supposed to have grooves like that.
BB
B.B.
This seems more complex than needed. Maybe all side cockers are that way?
-Y
Yogi,
This certainly isn’t an airgun I would recommend rebuilding to a first-timer.
BB
Wow, that’s an interesting tear down.
It definitely needed its own blog entry…
Ian
This is definitely one of the most interesting springers that you’ve covered–at least to me. That spring guide on the end cap looks like its a fraction of the length it could be. Years ago, when I overhauled my Haenel 303-Super, I found that it’s guide was also really short–and way too small in diameter. Making and fitting a longer, larger diameter guide seemed helpful dealing with spring vibration. It looks like the trigger units might be interchangeable between the 312 and the 303. They look awfully similar–except your 312’s trigger has fore and aft adjustment. You should be able to get a clean break from it. On my 303, the front screw adjusted the first stage travel, the rear screw set the amount of sear engagement.
Looking at part one again, I wondered if the 312 butt pad was also adjustable for LOP. It looks like you can remove sections to make it shorter. The curved, up/down adjustment looks like an old Wegu pad.
Pictures of the model 27 breech face groove I mentioned earlier. Any ideas about what to do about the situation ? Thanks
I’m just throwing out an idea, so the rest of you can feel free to poke holes in it, but the breech seal looks damaged as well. Perhaps replace the seal with one that sits a hair proud of the breech face and see if the gun works? I’m thinking of the seal like on my Beeman R7 which has a rounder shape….
Roamin,
And maybe fill the rest of the notch with JB Weld? That could work. Fishhoot, why not try that? Make a breech seal from leather for this rifle. What a cool project. If it works — wow!
BB
fishoot,
That is intentional damage and the gun will not work that way. The barrel assembly needs to be replaced.
Don’t throw the rifle away, it’s good for parts if nothing else.
BB
That groove might be welded and reshaped into a breech again. It’s a lot of work because the breech seal groove needs to be recut.
BB
B.B.,
What on Earth would be behind someone doing that intentionally? BUBA Engineering?
With my limited understanding of spring piston guns it would seem that the result of that cut on the shot cycle would be similar to shooting blanks even with a pellet loaded into what is left of the breech. How much damage is to be found inside the compression chamber and the piston?
At least it is not a Magnum springer!
shootski
Shootski,
That was my thought as well, looking around the interwebs I was unable to find a Diana 27 barrel breach unit. Guess the answer is to find another 27 that has other problems.
Who in the heck would file out the breach like that?
Mike
Mike in Atl,
Probabaly someone with an axe to grind?
Siraniko
Roamin, Great idea…. I’ll get started as soon as I can. I’ll take pictures as I go and post them . I can’t imagine why anyone would go to this much trouble, unless they were trying to lower the power. The 27 is not real powerful anyway, so why bother ? In any case, I’ll get at it and see how it goes. Thanks to BB and everyone for responding !