Today reader RidgeRunner continues his a blog series on his experiences with the Crosman 150 air pistol. Today he starts to repair the 150 pistol I sent him. If you’d like to write a guest post for this blog, please email me at blogger@pyramydair.com.
Take it away, RidgeRunner
RidgeRunner’s Crosman 150 – Part One
by RidgeRunner
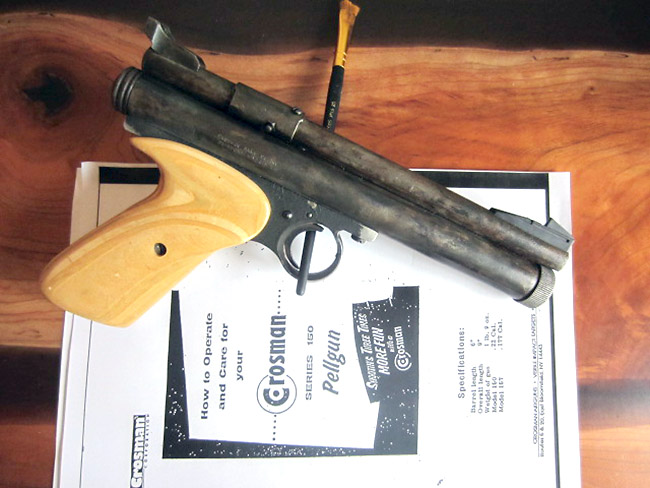
The Crosman 150 I will be sealing.
This report covers:
- Thanks
- On with the show
- Chamber
- Removing the valve assembly
- The reseal
- Assembly
- Summary
Thanks
First thing I would like to do is thank BB for not only sending me this 150, but for being such a wonderful inspiration for so many of us and for his personal support for RRHFWA, which would not even exist if it were not for him.
Next, I would like to thank Derrick of Another Airgun Blog for writing and photographing his experience with resealing his 150. It was most certainly a big help to me.
I would also like to thank Dennis Baker and his gang for putting together so many seal kits, one of which I used on this air pistol.
I’m about to start.
On with the show
The very first thing I did was unscrew the front gas tube plug and remove the wonderful one-piece laminated wood grips by removing the two screws holding them to the frame and sliding them backwards. Many of the Crosman 150s that I have seen have two plastic slab grips — one on each side, but this one has some real nice grips. I may do something with them at a later date, but not right now.
The next thing I did was remove the screw holding on the rear sight. It also held the rear of the barrel to the gas tube, retained the rear barrel plug and also held the hammer/striker in.
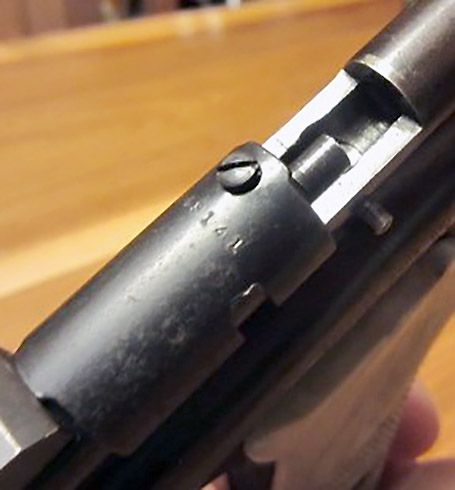
This 150 has a breech cover that slides back to pull the bolt back for loading a pellet.
Next I removed the small screw from the breech cover. This allowed the cover to slide off of the rear of the barrel and also allowed the bolt to slide out of the back of the barrel.
For my next trick, I removed the screw holding the front sight to the barrel. The front sight on this 150 is plastic, but the one on Quinn’s is metal. I may have to look for one of those. [Editor’s note: The metal sight is original to the gun. The plastic sight is a replacement Crosman made in latter years.]
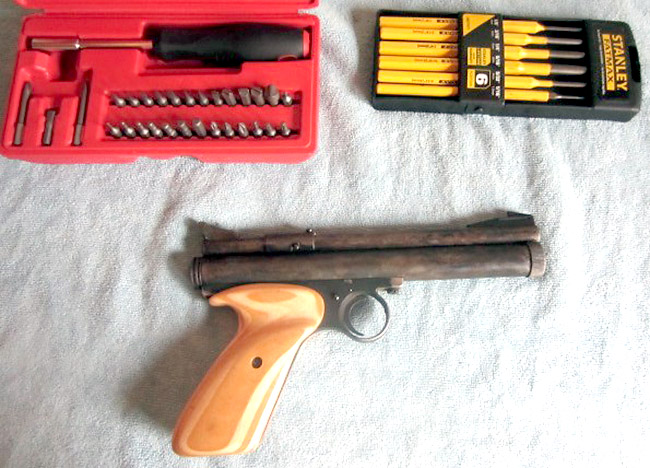
After starting this is what I had.
Now that the bolt is out of the way, I can access the screw that is still holding the barrel onto the gas tube. With this screw removed, the barrel just falls off of the gas tube, revealing the transfer port and its gasket.
The next thing I do is remove the two screws holding the grip frame and trigger assembly to the gas tube. They also just drop away now. All this leaves is the valve assembly and the stop block still in the gas tube. This is also where it got a little tricky.
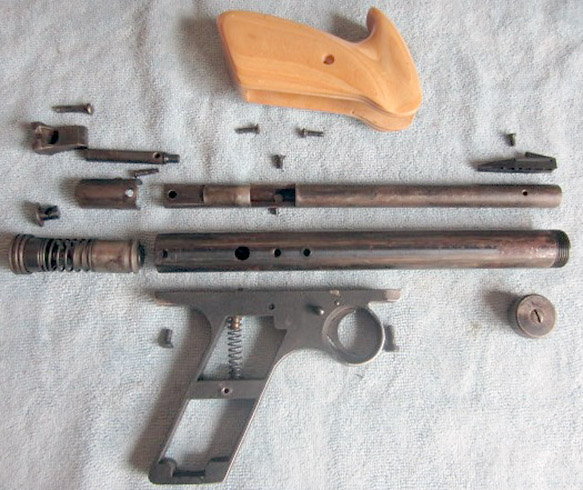
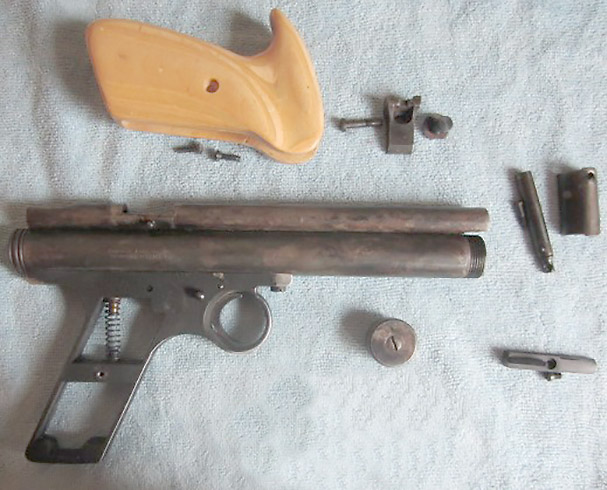
Everything except the valve assembly and stop block are now out.
Removing the valve assembly
I took a long, hard look at Derrick’s blog to determine just how he removed the valve assembly from this tube. How did he get the valve stem out of the way to remove the stop block pin? In his blog he took a long, thin pin and pushed on the valve stem with it and then knocked the stop block pin out. Well, I took my small pin punch, but no matter how hard I pushed, the valve stem would not get out of my way.
What I did not realize is when Derrick pushed on the valve stem, his valve assembly slid forward. This one did not. I then took my rubber mallet and hammered on the punch until the valve assembly did slide forward enough to allow me to remove the stop block pin. After that the stop block just slid right out of the back of the gas tube and allowing me to use a larger punch to push the valve assembly out of the front of the gas tube.
Once this was accomplished, it was a simple matter of unscrewing the back of the valve assembly to get it apart and start resealing.
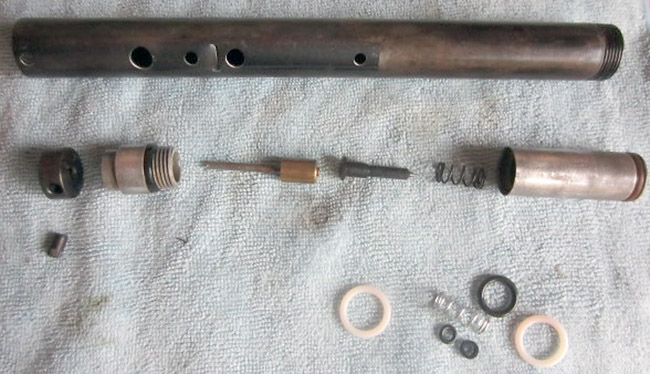
The valve disassembled.
The reseal
In the kit I purchased from Dennis and the gang were two white o-rings, a small black o-ring, a large black o-ring, a soft black transfer port gasket, a new spring and a new valve stem.
The white o-rings go — one on the screw-on cap and the other on the front of the valve assembly. The large black o-ring goes on the inside of the back of the valve assembly. You can probably figure out where the valve stem and the spring go. If these give you any trouble, you had better not be doing this.
The small black o-ring goes on the bolt and you can probably figure out where the transfer port gasket goes.

Assembly
Now it’s time to put it all back together. Really, it is not that bad. The first thing you should do is clean the gas tube. Mine was pretty cruddy. That may be why the valve assembly did not just slide out.
After cleaning, I inserted the stop block and pin. Next thing I did was push the valve assembly in place, making sure the threaded hole in it lined up with the screw hole for the grip assembly screw. From here on out reassembly is just the reverse of taking this apart. Even I could do it.
Summary
This took a lot longer for you to read about than for me to do it. Next time around I will shoot this thing across my chronograph and see how fast it is.

Great report RR,
Thank you.
I seem to be backwards from you.
It usually takes me longer to do something than it takes everyone to read it……
Again thanks!
Ian,
This thing just came apart. I had to slow myself down to take some pictures. These things are easy to work on.
RidgeRunner,
What very simple setup for a very simple little pistol. Is the transfer port gasket one piece or is there a metal component? I believe that is the part where most people usually use a 1/4 inch silicone tube if the original transfer port gasket was not available.
Siraniko
Siraniko,
The transfer port is just the black rubber gasket. All it needs to do is seal the gap between the barrel and the body tube. I did not measure the outer diameter of the gasket, but a short piece of soft tube would do just fine for the transfer port. The transfer port gasket was just a little longer than the thickness of an o-ring that could possibly been used.
R.R.
Boy once disassembled, it sure was “Cruddy”. Even after cleaning it looks pretty rusty. Any thoughts on re-blueing the metal works?
-Yogi
Yogi,
You should have seen inside the body tube. As for the outside, it is not hurting anything but I am considering taking it back apart and sanding it a bit and then trying to reblue it some. Now that I am retired, I no longer have access to the bead blaster at work.
Nicely done. I wonder who made those grips? They look good!
I would assume that Crosman did. They are right nice. I am thinking of lightly sanding them to remove the shiny finish and staining them a little darker.
RR,
They are RB grips that are no longer made. They are worth more than the pistol.
BB
Shame about Ralph Brown?. Keith stepped up shortly thereafter but I don’t know if he’s still doing Crosman grips?
http://www.airgunartisans.com/AA%20Keiths%20Grips.htm
Steve Corcoran is still making grips. I have a nice set of walnut target grips on my 2240.
B.B.,
Almost anything that RB grips are on is worth less than the grips he crafted!
shootski
BB,
Well, maybe I will not redo them.
Ralph was a great guy. Many of his grips were available with no finish. I don’t think he’d mind you sprucing them up to your liking.
Well, it is like this. If someone had just got to have these as they are, they had better speak up quick.
Ask one of your non-retired buddies to do it for you. Sounds like a 6-pack should be the reward.
-Y
Yogi,
I walked away from there and that is it.
Yes, it is a good Idea to place removed parts on a clean surface just as they would be in a diagram and in the proper orientation for assembly. It’s amazing how fast you can forget where things go, and which way they go back together when you get interrupted.
If I remember correctly, I removed an air transfer port when I installed a steel breach on a Crosman and it looked like it fit right side up and upside down? Had to take apart another one to verify the correct installation.
I simply did not pay attention when I removed it.
Bob M,
It does happen. I was fortunate that this was pretty simple, but paying close attention to how the valve is put together was a most worthy bit of effort.
Been there! Any more I take pictures with my phone to show myself where everything went. I don’t have a memory anymore, I just have batteries!
Motorman
Eastern MO
Ridgerunner, once disassembled, what did you clean the parts with? Thanks and thanks for the blog. I have a Crosman 111 and 112 that need similar attention. Can’t wait for the next installment!
RG,
I used a little Balistol and a good bit of rubbing with a cloth on the parts to clean them. You really need to get to those Crosmans. Keep the camera handy and write down you experiences with them. Inquiring minds want to know.
Thanks for another well done report. There is a lot of satisfaction to be had in restoring vintage items. This particular one appears to be doable for most of us. But we might not know that without reports like this one. Looking forward to the next report on this gun.
These “old gals” are really simple to work on and also really well made. You almost have to try to mess these things up. I guess it is possible, but I am no rocket scientist. If I can do it, just about anyone can.
By the way, BB already has the next report on this particular gun.
RidgeRunner,
Well done BZ
On Part 2 are you going to do a shooting report?
What does the bore look like?
shootski
PS: TETRA makes some products that you may want to look at. But Balistol is excellent if that’s what you got.
PPS: please don’t refinish your RB Grips.
shootski,
I will be doing some velocity testing in Part 2. I forgot to bring a screwdriver to adjust the sights when I took it to the range, so you will have to wait for a Part 3 to see how she groups.
The bore looked nice. The body tube was kind of cruddy inside. Now that I know a little bit more about the grips, I doubt I will be refinishing them.
RidgeRunner,
It was interesting to see all the complaints when Crosman went away from charging the tube and going straight into the valve body. The downside of that change made sense in that it was the better heat sink of filling the tube. Of course the CO2 in the tube causes lots of corrosion potentially.
I would guess that more liberal use than even the Godfather Of Airguns® would recommend of Pellgunoil or similar would decrease the corrosion potential.
shootski
Congratulations!
Even back in the `80’s the 150 was a desirable pistol.
My grand father kept one in his tackle box.
It’s the pistol that got me started on my airgun journey. It would fit in my back pocket. And it has a gratifying report!
I do prefer the 2nd version with the one piece barrel and breech, much easier to insert the pellet.
Breeze,
I am not sure which version I have, but I sure do like it. I have to admit this is the first CO2 pistol I have enjoyed fooling with. I may have to find me some more of these “old gals” to rebuild and pop off a bit.
You have version two! Earlier ones had a 2 piece breech and barrel.
There was a nice chrome one with black grips for sale late last year for $150.
Collecting 150’s is hot.
Breeze,
That is all nice to know. I just might wait to work on those grips until after the NC show.
Thanks RR, nice write up!
Like the grip. Was thinking of making something like that to dress up my PP750 which has the standard flat slabs on it.
Always like to peek inside. This makes me want to look at the Crosman 130 that is in (severe) need of some TLC.
Happy Monday!
Hank
Go for it! It will have to be in real bad shape to not be rebuildable.
“…the Crosman 130 that is in (severe) need of some TLC.”
Hank,
I’ve had two of those so far, and I could see getting another one.
They may not be super-powerful, but they can be pretty darn accurate little shooters! 🙂
Good luck with it, & happy shooting,
dave
RidgeRunner,
You have probably found this already: https://www.jgairguns.biz/150-and-157-c-78_89_123/?sort=20a&show_all=1
Just in case you haven’t.
shootski
shootski,
I do frequently like to see what is there, but I did not in this particular instance. Thanks.
RoadRunner,
“If these give you any trouble, you had better not be doing this.”
RR, you just described me precisely! ;^) Just the same, I read this report eagerly.
Michael
Michael,
Ah, c’mon dude. If I can do it, so can you.
RidgeRunner,
Hmmm. Well . . . I have a Palmer Cap’Chur Red’s Special, which is essentially a Crosman 160 modded to .50. The action of the 160/180 is similar to that of the 150/157. So . . . My Red’s Special has two CO2 Powerlets lodged into the gas tube. It could probably also use a reseal.
Maybe I will chance it.
Michael
Michael,
I most definitely would. They are built to stand a good bit of punishment. You can probably get it up and running a lot easier than you think.
Michael,
Warm up the gas tube the Powerlets (assumption on my part is that they are empty) that are stuck inside of with a heatgun (hairdryer) they may come out with a tap. If not, gel super glue blob on the end of a metal rod to Powerlet let cure pull out. Long drill and tap/screw pull out.
Disassembly may be necessary but it looks like you could get far enough to knock them out with a dowel.
RidgeRunner or Tom can tell you if that will work better than me…i have only done something similar (Super Glue trick) on a guys 22XX.
shootski
shootski,
Both CO2 powerlets might be full. I might try drops of Kroil and let it stand on its end for a couple days.
I need to look at it from the end of the tube to remind myself of whether or not the powerlet facing muzzle-ward is pierced. If it is, then the inner one likely is, too. It has been in the dead airgun corner of my basement for six or seven years.
Michael
I have at least 1 Crosman 150. It has left handed wooden grips on it. I am not sure if they were made by RB or someone else. At one time, I bought a rough Ted Williams version of the 150 that has the rail above the barrel. That particular 150 was probably the most accurate pistol I had that wasn’t a match gun or highly modified like my LD. Some people say the Ted Williams version has a better barrel, but others say it was the same barrel as the standard 150. All I know is that particular 150 was more accurate for me than any other I have shot.
My problem with the 150 is how loud it is. It is too loud to shoot at my place.
If you like the Crosman 150, Ron Robinson has written extensively about them in one or two of his books.
David Enoch
DavidEnoch,
The 150 does have a rather loud report. So does the 22xx but at least you have the room up front to put a silencer on it.
At my place I could blast away with a .30-06 and would not likely raise eyebrows.
Everyone should listen to what Ron Robinson has to say. Like him, hate him he has first hand knowledge that must be payed attention to.
RidgeRunner,
Great job on the report!
This pistol looks a lot easier to rebuild than the vintage Crosman 357
(that I managed to dork up, and had to send it to Rick at Precision Pellet to “get it right” =>).
Perhaps even I could do it. 😉
Looking forward to seeing how she shoots,
dave
Anyone that went to SHOT Show have an opinion on this AirForce introduction?
Here it is
Kevin,
The RAW field target pistol is dominating in the pistol division of field target in just the few months it’s been available.
BB
Motorman and everyone else.
One more thing. An outstanding suggestion from Shootski a while back.
Anytime you disassemble something with small springs, do it inside a clear plastic bag to avoid removing your shoes and moving your furniture around looking for it after it flies off in an unknown direction.
Bob,
I remember that tip now that you’ve reminded us. Thank you.
Michael
Just had an odd occurrence. My last post had posted, and it was still inside the blue comment box waiting to be posted?
Bob M,
My comment boxes are black bordered!
Never seen a blue border.
Have had Blue Nose after first trip to Andøya.
It was COLD and DARK and wicked slick on the 20-50cm thick ice on the ramp.
I don’t think they do Blue Nose paint and Certificates for Ohio even if it is cold there occasionally; especially for guys in a Levis jacket.
shootski
PS: YOU might like this! https://challengecoinnation.com/collections/patches/products/gid-maintainer-nation-pvc-patch
Shootski,
Almost forgot, I keep a black background with white print to reduce my exposure to blue light. Probably why my comment box is blue. Links are yellow.
Just noticed a noteworthy comment.
“If you think it’s expensive to hire a quality AIRCRAFT MECHANIC just wait till you hire a crappy one”. 😉
Challange coins and such must have come out after I retired in 1987 at 40.
Funny, patches reminded me of a Weekend Warrior who, through his special welding talent and civilian work with the government, managed to enlist in the Reserves, bypass any boot camp and start out as an E6.
He had absolutely no idea how the Navy or aircraft functioned, rules and regulations. He came to weekend drills with civilian shoes and belt and had an aviator’s leather jacket totally covered with patches from various Squadrons and duty stations way back to Vietnam days. He was never at any of them, let alone on active duty. He must have had a very high-ranking friend. He was promoted to CPO first time up without time in grade?
Best I could make out he must have been an undercover agent? Our aircraft did fly internationally.