by B.B. Pelletier

David Lurch Primary New York City gallery gun.
You readers have been very patient waiting for the next installment on this report! For that, I thank you. This project is taking a long time because it isn’t on the front burner (it probably isn’t even on the stove!) and because this is the kind of project in which you must “make haste slowly.”
Last time, I described the gun (it’s a smoothbore, so it’s not a rifle) and told you some of the general, as well as some specific, history of this particular example. Today, I want to honor Mr. Duskwight, our Muscovite blog reader who’s actively building a recoilless spring-piston rifle of his own design! Duskwight became fascinated with the performance of the Whiscombe air rifle and decided he could build one. Many of us have said similar things, but in this case the conviction remained even after he sobered up; and he’s spent many long months and a LOT of money making his dream come true.
By watching what happened to him, we’ve learned just how difficult and risky it is to build something from scratch. You don’t just tackle the technical job with all its intricacies and challenges. You also take on the entire socio-economic profile of your society, enduring substandard work, business failures, technical incompetence and on and on.
What I’ll show you today has one additional complexity added to the story. The builders didn’t have access to modern machine tools! Most of what you are going to see was made with files and hand labor. The metal hardening was done using a forge and eyeball, carefully judging the state of the metal by its color. If anything had to be timed, they did it with a pocketwatch instead of a digital timer linked to a time standard.
And the design came from someone’s head! There probably were no drawings in the “factory,” which was really just a quiet workshop. If they required anything to go by, there were possibly pattern parts that journeymen makers copied. While it’s true that what you are going to see is very simplistic, don’t make the mistake of thinking that it’s simple to do! Each part has to fit, and each part has a specific job to do if the whole item is to work as intended.
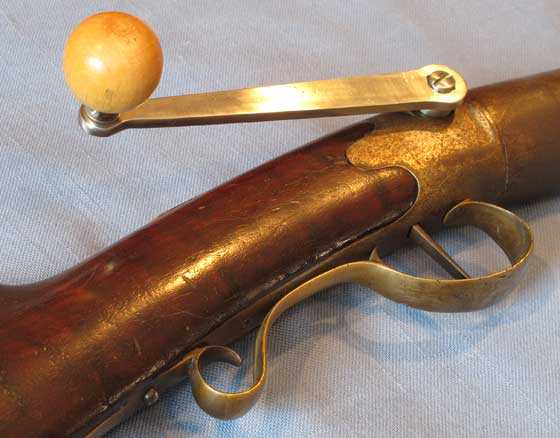
Enough talk, let’s see what this baby looks like. The first thing I will show is the new crank that Dennis Quackenbush made for the rifle.
Like the gun itself, this crank looks deceptively simple. It’s just a gear and a handle to turn it. Yes, but that gear isn’t as simple as it appears. Dennis has made cranks like this before, so he thought this one would be straightforward. He asked me for the width of the hole the gear fits into, as well as the width of a second hole on the inside of the gun that serves as a bearing for the crank once it’s inserted. I gave him those two dimensions, and within a month he sent me a pinion gear with instructions to try to fit it to the rack gear inside the gun.
I did, and it was a no-go. Dennis thought it would simply be a case of cutting a new gear that had more teeth; in his experience, these gears had one of only two different numbers of teeth on the pinion gear. Unfortunately, that wasn’t it, either! We were stumped. He had to see the gun.
We met at this year’s LASSO shoot, and he got the chance to examine the gun. When he did, he discovered that the rack gear in my gun is different from any other he’s seen. Apparently, David Lurch, who made the gun, had a better idea. He filed the rack gear teeth on a bias; as the crank is turned, the handle is also pulled tight against the mechanism because of the angle of the meshing teeth. A straight-cut gear cannot mesh with teeth cut on a bias, even when the number of teeth are the same because they aren’t set at the correct angle.
This time, Dennis took the gun home with him so he could cut the new pinion gear to the corresponding angle. He delivered the new crank assembly at the Malvern airgun show, and as you can see, it fits perfectly. He intentionally did not harden the new pinion gear because he wanted it to be the sacrificial part on the gun. The gun’s rack gear is hardened. If anything fails in operation, it’ll be this gear, which can always be remade. But he didn’t stop there.

The crank Dennis made fits the gallery gun very well. It’s still shiny, but I will take care of that with a browned finish later.

The crank turns the pinion gear, which engages the rack gear attached to the piston, withdrawing it as the springs are compressed.
Dennis contacted collector Larry Hannusch, who was kind enough to disassemble one of his Primary New York City gallery dart guns and remove the double volute spring mechanism so Dennis could have a look at it. Larry had seen my gallery gun at the Malvern airgun show the year before and was quite taken by it — as most collectors are. It’s not that this is an especially beautiful example, or that it’s extremely rare. It’s just that each one of these guns was made by hand, so every one is a collection unto itself. Just as Duskwight will be forever proud of all the effort he puts into his new rifle, so we can appreciate all the labor and skill that went into making one of these dart guns in the 1860s.
Larry brought the spring mechanism from his gallery gun and Dennis took measurements. He plans on making a new double-volute mainspring assembly for my gun. This will be the first time he’s made one of these springs; and to my knowledge, it hasn’t been done in recent times. It’s very possible that someone has made one and just not written about it, of course; but as far as I know, this will be the first time a double-volute mainspring has been made and documented in modern times. The documentation is important. How are we going to know about these old dart guns if we can’t test them? And nobody seems to be writing about them, so I guess I’m going to be the first one.
Last year at Malvern, Larry Hannusch showed me how to disassemble my gun. It proved about as easy as disassembling a Garand, but I had shied away from trying because of the age of the airgun. I really thought the gun would be fragile. But after seeing how things go together and how robust the parts are, I have confidence that I can work on this gun just as easily as I would a modern spring rifle.
A gallery gun works just like any other spring-piston airgun. The piston is driven forward by springs, rapidly compressing air in front of it that pushes the dart out the barrel. The big difference in this Lurch gallery gun is that the piston is very large (over 1.5-inches in diameter), and the piston stroke is quite long (about three inches). Those volute springs I thought were so fragile are probably far more robust than coiled steel wire springs. Seeing them up close and examining their potential travel gave me a new appreciation for the ingenuity of these old gun makers.

This is a gallery gun piston with its two volute springs and a spring guide that you cannot see. Notice that this piston seal doesn’t look like mine, which you’ll soon see. Mine is a replacement that needs to be trimmed.

The rear spring has been removed, and you can now see the spring guide that sits between both springs. Notice the piston rod is the rack gear that the crank works with to cock the gun.

Here you see how a volute spring works. It’s a coiled steel bar that’s pulled into this cone shape before hardening. It’s incredibly strong, plus it has a huge length of travel before becoming fully compressed.

This is the piston assembly with springs and spring guide. The tiny notch seen on the side of the piston rod opposite the rack gear teeth is the sear notch, properly called the “bent” at the point in time this gun was made. That’s what the trigger holds onto!
Are you enjoying this so far? Well, there’s more to come. Now, I’ll disassemble my gallery gun and show you the parts we’ve been talking about.

The compression chamber simply unscrews from the action of the gun. There’s no fastener holding the two assemblies together other than the threads seen here. You can actually see the color-hardening of the piston rod that has the rack gear teeth, but I’ll show it closer.

The rear screw is removed from the triggerguard, which is then unscrewed from the action. The front of the hand-filed brass guard is a screw!

Two screws are removed, and the wooden butt is separated from the action. You can see the rear of the piston rod in this view.

In this view, you can see the entire piston rod. The sear notch is also visible, opposite the rack gear teeth. Each gear tooth was filed by hand. Notice how much excess leather hangs down from the piston head.

The piston rod was hardened to a medium blue, which is pretty hard! The excess leather on the seal really stands out.

Here you can see that the gear teeth were cut on a bias to pull the cocking crank tight into the gun when it’s wound.

The side of the brass triggerguard still shows the marks of the maker’s file that shaped the piece to fit the gun after it was cast.
Well, that’s what the inside of a 150-year-old handmade airgun looks like. Dennis is going to make a pair of volute springs for me, but in the meantime I may try to get the gun operational with a coiled steel spring. It won’t be ideal, but it may provide me with a platform for testing the darts that I’m going to have to make.
The caliber appears to be exactly .25, as a .256 bullet will stop after entering the breech. So, I may be able to find large .25-caliber pellets that fit, and there may even be a .25-caliber dart I can find.
The bore is pretty ugly from the neglect of more than a century, so that will be my next task. I don’t know when I will return to this airgun again, but you can rest assured that it’s in the queue.
I found my silver dime!
In other news, my silver dime has returned! It was hidden under a Post-It note on a desk I’d used temporarily when changing computers several weeks ago. So, you will be seeing silver soon.


Hello B.B. and Fellow Airgun Enthusiasts. It is quite simply blogs such as this that put you firmly in the vanguard of airgun information. Reading through this episode, one can’t help but come to the conclusion, we are in a way, a poorer bunch for relying on c.n.c. and other computer aided devises that make our world a so-called “better place”. My Grandfather was an amateur machinist, who would relish taking on almost any task. Limited only by the size and quality of his tools. There are people on this blog who remind me of my Grandfather. Duskwight comes immediately to mind, His tenacity in forging ahead despite a bureaucracy that would drive most Westerners to drink many times, inspired me to make a spring compressor, and make an attempt at repair . Political borders and Nationalities become meaningless when we read of Duskwight’s overcoming hurdles. Indeed, he becomes “One of Us”. A member of an airgun fraternity. We need these reminders of our past, B.B., If only to show us how we got to these technological wonders some of us are privileged to shoot. It is good to be humbled by rifles such as your Ballard, that can shoot a 100 yard group as good as most target models of today. And Duskwight’s home made spring gun. Evan if designed after an existing model, it will still be unique.
Cheers— Titus
Patient? I had forgotten all about it. But now you have gone and stirred that pile up and nothing will do but to give us “the rest of the story”. While you are at it, you can update us on the progress with the one that has the sliding bar magazine.
RR,
Ah, the pogostick gun, you mean? I call it a harmonica gun, but most folks like that name pogostick.
Vince has the gun, and he has been going through some difficult times lately, so I don’t want to bother him with trivial stuff. We are in contact and when the time is right he will show us what he has done.
And remember, it was never a given that he would be able to make it work. It was just a hope.
B.B.
I also like blogs such as this one, and the ones like the recent one on the TS-45 Chinese sidelever, as well as the blogs by Vince. I enjoy,and learn the most from those, and more importantly,I stay inspired and motivated not give up on my projects. Most of them are not gun related either, but the motivation is similar. There is something about the satisfaction of taking what most say is a piece of junk and making it work again . I also like the hunt for the tools (and repairing those) and the quest for more information that each one of these inspires.
Robert,
I like these kind of reports, too. What I don’t learn from doing the tests, I learn from the comments readers like you leave. This morning, for example, Roachcreek shared some of his big bore experience with me and inspired me to refine my testing of the Quackenbush .308.
I have a BUNCH of surprises coming very soon! The first one will be tomorrow. And the Nelson Lewis gun (not tomorrow, but soon) will be one of them, since I have now shot it for the first time.
Boy, do I have a great job!
B.B.
and we are all happy that the silver dime has re-surfaced!
Fred DPRoNJ
Well, I am full of admiration for anyone who can do technical work like this or even understand what is going on. That volute spring looks pretty weird. I have this idea that if you were to push down on the apex to flatten the spring that it wouldn’t collapse straight, but I suppose the gun has ways of correcting for that.
Duskwight, I’m losing the forest for the trees. How about a quick blurb on the principle behind your gun that makes it recoiless? I have a pretty good idea of what causes recoil in the standard spring set-up, so it should be possible in principle to understand how this recoil might be removed.
PeteZ, thanks for the first-class review of battleship guns at the highest level. It seems like flechette ammo has been tried for all classes of guns but has never caught on. I believe there was even a movement to replace standard rifle ammo with flechettes (around the time of the AR-15 design but it never went anywhere. As another idea, I understand that the Japanese realized that their super-battleship Yamato with its 18 inch guns was vulnerable to air attack. So, they created some sort of anti-aircraft munition for the big guns that would create an enormous shell burst in the air, but they would pretty much ruin the barrels for regular ammo. I don’t know if they ever had chance to try their new ammo. Yes, those battleships are amazing. My guide on the U.S.S. Missouri said that it was built to outrun and outgun anything afloat. I understand that the U.S.S. Iowa sailing along the California coast to its final home at 6 knots was capable of doing 38 knots at full power which I consider astounding. I had thought that the concept of the “fast battleship” was unworkable. Apparently in the era of the Dreadnoughts before WWI, navies experimented with the “fast armored cruisers,” but these turned out to be failures. Fast enough to catch anything but not armored enough for heavy engagement, these ships would “lock in a deadly embrace” and blow each other up. But certain advances in materials in the interim made possible real fast battleships like the Iowa class. For all their capabilities, though, I believe they were ultimately unsuccessful at blasting the Japanese out of their fortifications in the Pacific.
In other news, the story about the Florida cannibal is certainly evidence in favor of concealed carry. The word is that the policeman had to shoot the guy four times to stop him (and the policeman is now a basket case after what he witnessed)! But the story goes deeper. What made the cannibal insanely violent was a new drug called “bath salts.” It seems in many cases to slip inside the law because it lacks many of the illegal drugs, but the problem is that nobody really knows what’s in there. Some speculations have claimed the stuff comes from China!
Matt61
Matt,
The spring guide and piston rod is what keeps the springs straight in this rig. Take a look at the spring I scragged for you a while back. It tried to pretzel, but the threaded rod kept it straight.
/blog/2012/03/resizing-a-mainspring/
B.B.
Hello to all,,, How do i talk to the person that owns the gallery dart gun ,, we have one it the shop that the owner wants fixed and it needs a lot of parts. would love to get some sizes …
Staleys,
Welcdome to the blog.
I’m the owner. My name is Tom Gaylord, but I write the blog under the name B.B. Pelletier.
These guns are mot made by machine, so measurements do not transfer. Each one is an individual.
B.B.
Staleys,
Welcome to the blog.
I’m the owner. My name is Tom Gaylord, but I write the blog under the name B.B. Pelletier.
These guns are mot made by machine, so measurements do not transfer. Each one is an individual.
B.B.
We no that they are hand made and that each peace is its own ,, but if we had some idea of the size of the parts we need to make it could save some time.
Staleys,
Which parts are you interested in?
B.B.
what is missing is the piston rod, the piston,the crank,the springs,the spring guide. if we had the width of the spring and thickness ,, the dispense center to center of the teeth on the rod we can see the bias of the teeth.that would be a good start.the piston rod looks like brass in some of the pics and steel in others.we would like to put this back as it was if it can be done.
to let you know who we are ,, this is staley and sons gun repair in waldoboro maine , we started doing gun repairs over 48 years ago thanks for the help,,,, sonny
Sonny,
I was afraid of that. I can’t tell you those things. Each of these guns is different. The springs, for example, are made from flat spring stock that’s wound in a coil then heated and d3formed into a cone seen here. Double the length of the cone determines the length of the piston rod. It will be 3.5-5 inches long or so, depending on the length of the piston stroke you are after.
The grears vary as well. My crank was made by a master toolmaker — Dennis Quackenbush — who cut several gears before determining which tooth number and pitch fit the gear rack on the piston rod. Since you are making the rod, all of that will be up to you.
B.B.
would you have any idea what this guns are worth ,,,, i am thinking the guy is going to spend a lot more than the value here.
Staleys,
My gun pictured here is worth about $450. His, which is missing so many parts, may be worth $250. Fixed up it might be worth $600, but no more because of all the restoration.
A fine original specimen would bring $800-1000, depending on condition and decoration.
B.B.
thanks for the info ,,, sonny
Hi!
I just pick up a air dart gun with no crank handle and no trigger guard, not worried about the guard so much but the crank to pull back the piston. How would i go about having one made by the gentleman you had one made by. And what did you find out what it shoots for ammo? Hope this reaches you well and to hear from you soon.
Thank you.
Matt,
It’s piece of cake – forces of recoil from 2 counteracting spring-piston systems eliminating each other inside the same compressible volume. Just dig into B.B.’s posts on Whiscombe 😉
duskwight
Matt61,
Flechette payloads often “fail” on sheer humanitarian grounds. The victims usually suffer great pain. The US tried some 155mm flechette rounds where the darts were made of X-ray–transparent plastic, so the docs couldn’t find them in the body. Ultimately the idea was pretty revolting, and that played a role in their downfall.
I was looking at 16″ ammunition built for or tried in the rifles on the Iowa-class BBs. I turns out we also had some anti-aircraft projectiles. I really don’t know how well they worked, nor what was the lethal mechanism against aircraft; if anybody does know, speak up!
The concept of a fast battleship was clearly workable during WW2 if you had the US production base and engineering skills. The problem with the BB is that it became a technological dead end as soon as we really knew how to build them correctly. Yes, you could build them, but their guns were out-ranged by a fighter launched from a jeep carrier. A dive bomber could hit their decks from close range and with great precision; at full range the 16″ guns only hit a BB-sized target a few per cent of the time. And nuclear weapons made all surface combatants vulnerable. Plus you had to bring so many ships into the battlewagon’s group that a nuke would inflict wholly unacceptable losses (see Bikini Shot Baker results). And a real drawback is the astounding crew sizes needed since everything was hand cranked, aimed, and often powered. Design life for a big gun was only about 300 rounds, or rather less than a tin of pellets. I don’t know if any of the Iowa class carried spare barrels and could rig them at sea.
They are sleek, graceful, gorgeous, and I love them. But… I don’t think the 10″ thick anti-torpedo belts would have hacked it against a modern torpedo. The Wisconsin was in dry dock in Louisiana when I was a reservist, and one of the best days I ever had was starting at the keel and climbing up all the way to the armored conning tower high above the bridge. About 18″ thick steel, if my memory isn’t giving out; you looked through slits in the armor and hoped you could see through the battle smoke.
The Marines really loved them, because every time a BB pulled up to the ‘Nam coastline all the action moved 20 miles inland ASAP; Marine Corps fire support and cruise missile launching were the last BB roles; SLCMs can now go from any ship, and the Marines lost the battle to put the FMC 155mm gun on a new generation of destroyers/”cruisers”/etc.
One last note: When an Iowa-class fired a full 9-gun broadside, the pressure pulse to unprotected spaces on the main deck exceeded five pounds per square inch. For calibration, that’s Nagasaki at maybe half a mile.
pete
Hi B.B.
Off topic, but I just bought a Marauder Pistol w/magazine. Is there any way to have fixed sights on the gun with the magazine in place rather than using a scope and rings? Does anyone make fixed sights that clear the magazine?
Thanks for your help
Jeff,
I’m sure the gun could be adapted for open sights, but to my knowledge, nobody has done it yet. I supposed the extreme accuracy mitigates against using sights that could not take full advantage of the pistol’s potential.
The rear sight would grab the scope rail, so the tricky part would be finding a way to attach a front sight. Getting above the magazine shouldn’t be a problem.
B.B.
Jeff,
you can get some rather in-expensive red dot sights on the PA website and the cost would rival a decent set of fixed sights. Many of us “older” shooters find these easier to use than iron sights, much to our dismay I might add. Perhaps you should keep that in mind, as well?
Fred DPRoNJ
I was thinking about using a laser as a sight. Centerpoint is coming out with a green one for longer range shooting. Does anyone know if it is made for an 11mm rail?
B.B.
You really make me blush. I’m just a lazy guy with hands set for mouse and, maybe, a little bit of woodwork, with money and oppressive personality to make other guys to turn my crazy fantasies . I don’t make it, I just pay and assemble it. If I could just show you all what real masters do with their own hands – I think RWS, AA and HW engineers will ask for their last smokes and say “Fire!” 🙂
The gun is really amazing. And that self-holding cog… Yummy, that’s true XIX century thinking – by man for man, a piece of XIX century’s phylosophy to its last bit.
An artefact of times when the technology itself was different. Lots of casting, smithing, softer steel, lots of brass, lower speeds, lesser loads, on-copper nickeling. No milling or “energy” welding, no complex alloys, no plastics, yet it still is very well and thoroughly made and made to last at least for thousand years. Completely another way of thinking – people just didn’t think – “Oh Lord, I need a cog… I must look for some workshop with milling machine fitted with dividing head”, they just took a sheet of paper, calculated that cog and made that with file. Most times – no worse than CNC machines. And, of course, solidity – for me XIX century is solidity first. Just imagine – I’ve read that Maxim gun could spray out 30000 rounds per day (provided with enough water, spare barrels to spread wear and load and rounds of course) and repeat that for a week!
I once repaired an old German, I believe M.A.N., airgun, it resembles that gun very much – same twin volute spring, cylinder shape, same piston, same triggerworks, tilt barrel, however with 30-30 style cocking lever. Guess the shape was very common of that time. Maaaaan…. it had brass-lined octagonal steel barrel with brass post! Inside parts were hammered and then shaped by the file. It emanated History and it felt like it was made to measure for my hands. Alas, nobody makes them these days.
Almost no measuring tools, but a diamond eye and golden hands. By the way, I was lucky to see myself and learn an old way of timing for hardening parts – people used Lord’s prayer – it allows to measure time quite precise as everybody knows it, so when read in relatively calm tempo the time can be measured by words. E.g. for an axe – “hallowed be Thy _name_” is the time to dip the blade into oil/water mixture, “trespasses” means only axe head is above and “Amen!” means a complete sink.
duskwight
BB,
This goes into the top 10 for me. Hand work is a great teacher. Except for high-end European and some later American stuff (inspired by a fascination with British sporting rifles mostly), when you take them apart, you see that they knew exactly what was visible and exactly what needed to be polished to function and did not waste time on the rest!
One quibble: The rod was not “hardened to a medium blue”. If carbon steel, it was presumably hardened when quenched and the the temper was then drawn to medium blue by heating it, trading hardness for toughness essentially — too hard and the gear teeth would break even if they didn’t wear! Blue is around medium hardness in general. Here is a handy chart:
http://www.anvilfire.com/FAQ-article.php?bodyName=/FAQs/temper_colors.htm&titleName=Temper%20Colors%20:%20anvilfire.com
Of course, we have no idea what steel it is or it could even be case-hardened iron or mild steel :)! I actually think it was steel and tempered with a torch because the color is uniform except at the top edge where the colors run the spectrum towards cooler
Hi B.B.,
This is a repeat of an earlier question. Do you know if Center point optics new green laser coming out in June will fit on the 11mm rails of a marauder pistol?
Thanks,
Jeff
Jeff,
I don’t know that it will, but why would you mount a laser on the 11mm rail of any gun? That is the scope rail. The laser isn’t a sight and will get in the way of sighting the gun.
Did you perhaps mean the Picatinny rail that’s located UNDER the gun, at the front? It isn’t an 11mm rail, but that would be the place to mount a laser. And since Leapers often uses Weaver mounts that are compatible with Picatinny rails, the laser will fit there.
B.B.
Hi B.B.
There is no rail on the Marauder pistol on it’s underside. I wanted to use the laser for close quarters pest control (25 Feet) since fixed sights would be obstructed by the magazine. I do not want to put a scope or red dot on it. Will the laser work? What about the new green laser from Centerpoint about to come out? Will it fit on the 11mm scope rail?
Jeff,
My mistake! I thought the new Marauder Woods Walker had a rail underneath, but I see that it doesn’t.
Aas for the Leapers, I have no technical data about a new green laser, so I don’t know if it attaches to an 11 rail. Their current UTG laser has Weaver mounts, so you would need an 11mm to Weaver adapter.
B.B.
You will be testing 11mm to weaver mounts that don’t increase the height of the rail. You said that in your 2012 shot shot post.
Just dropping in
Had an engineergasm
Out.
BB Pelletier, is there anyway to get a pic of the inside where the trigger and the cams to lock in the rack, how it releases? And what are the size of the volute springs? Trying to get my Lurch number 5 back up and shooting. Thank you.
Eugene S
Eugene,
I shall look but I don’t want to disassemble this oldie.
As for the volute springs, Select 1/2-inch spring steel strapping and start winding it tightly. It will form a volute spring on its own. Put the largest spring you can fit inside the gun and remember, there are two springs — small end to small end.
BB