by Tom Gaylord
Writing as B.B. Pelletier
Today’s report contains special instructions for the disassembly of a Feinwerkbau 150 air rifle — for those few places where it departs from the FWB 300 instructions presented in Parts 1 and 2. It was translated and written for us by reader CptKlotz.
If you’d like to write a guest post for this blog, please email me.
Over to you, CptKlotz.
This report covers:
- Additional information for disassembling FWB 150 rifles
Trigger blade
Ratchet unit
Powerplant disassembly — potential danger!
Procedure
This article was originally published on the German co2air forums (www.co2air.de). It was created by the users Pellet (original text guide), Paramags (additional information and FWB150 details ) and boerni (photos and forum post). They kindly gave me permission to translate their guide so people who can’t read German can use it as well. The original forum post can be found here.
Translation by Stephan Szlosze (CptKlotz). Any text in italics is a comment from the translator.
Disclaimer: If you decide to work on your gun, you do so at your own risk. Neither Pyramyd AIR, co2air.de, the authors or I will accept any responsibility for injury or damage to you, your rifle or your equipment. Please read the guide carefully and proceed with caution.
Additional information for disassembling FWB 150 rifles
The action of the FWB 150 rifle is almost identical to that of the 300/300S. Still, there are some crucial differences that need to be kept in mind.
Steps 1 through 8 of the FWB300 guide apply to the 150 as well. The following steps are different and will be explained here.
Trigger blade
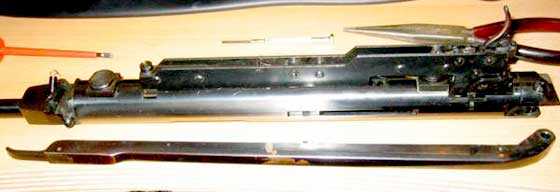
Removing the 150’s trigger blade is not as easy as it is on the newer models. This is not a problem, though, since removing it is not required for disassembly. When removing the trigger/ratchet unit, make sure the screwdriver’s blade is exactly the right size. On the old models, these screws are extremely tight and it is very easy to damage the screw’s head.

The cocking lever should be unlatched to make it easier to remove the screw.
First to come off is the cocking lever. Unlatch it before trying to remove the pivot, as that takes the tension off the screw.
Ratchet unit
Next to come off is the ratchet unit that contains the trigger mechanism. The ratchet unit prevents the sliding compression chamber from closing before the action is cocked. It interfaces with the piston so it can hold it in position before the sear has been set.
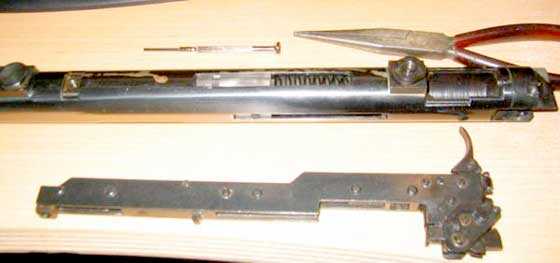
The ratchet unit that contains the trigger mechanism is off the gun.
Now that the ratchet unit is off the rifle, you can use the opportunity to clean and lubricate it.
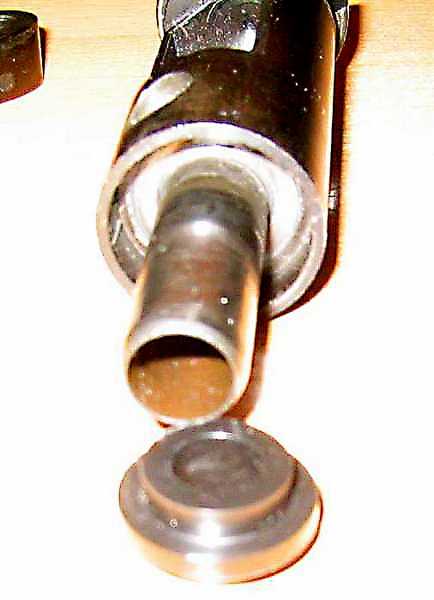
Important: When you reassemble the rifle, make sure the ratchet unit is making proper contact with the piston’s notch.
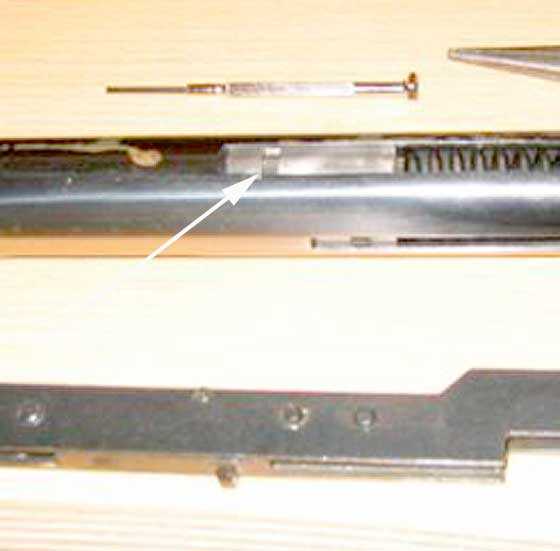
The ratchet unit (below) has a metal tab that engages the piston notch (arrow). Make sure they go together correctly when the gun is assembled.
Powerplant disassembly — potential danger!
Now we come to the most significant difference between the FWB 150 and the FWB 300. The FWB 150 does not have an anti-beartrap device like the 300. This means there is no leaf spring and no pin to secure the powerplant. This makes removing the parts of the powerplant much harder! It is almost impossible to safely do so without the help of a second person!
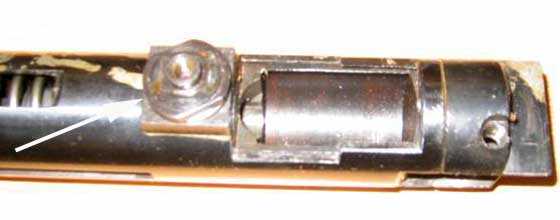
The 150 action has no anti-beartrap device. The 17mm screw (arrow) is all that holds the powerplant together. When it comes out, the parts want to fly apart under spring tension.
Procedure
One person should press the action against the floor with the muzzle pointing up. The second person uses the 17mm wrench to carefully remove the screw that holds the powerplant together. Once it comes out the spring is only held in place by muscle power bearing down on the gun! Release the pressure slowly to let the powerplant components slide out of the action.

The screw has been removed (upper left) and the mainspring is relaxed.
Important: When assembling the action, the second person has to make sure the end cap is aligned properly with the action. Otherwise, the threads can be damaged when reinserting the screw. Again, do not attempt to do this by yourself. It is very difficult to install the parts correctly while working against the power of the mainspring.
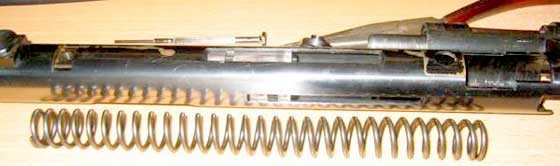
An original FWB 150 mainspring looks like this.
If your rifle is still in its original state, you will find a single spring.
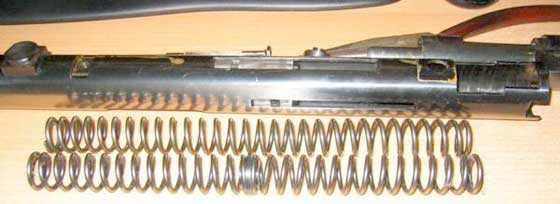
The 150 spring (above) compared to the 300 spring.
The spring for the 150 is not available anymore, but it is possible to use the dual mainsprings of the 300. You will, however, have to remove the linking piece (the solid piece in the center of the 300 spring that holds the two smaller springs together) as it will not fit over the spring guide inside the end cap, thus making cocking the rifle impossible.
Since the springs will always be under preload, they will work fine without the linking piece.
The spring guide on the FWB 150 end cap is too large to fit over the FWB 300 spring connector. Just leave it out and everything will fit fine.
[Editor’s note: I’ve owned both a FWB 300S and a FWB 150. At first they seemed very similar, other than the 150 stock being shaped more like a sporter stock than a target stock. But comparing them side by side, it becomes clear what a vast improvement the 300 is! It’s smoother, has less felt recoil/vibration and has a much better trigger than the 150, in my opinion. Since I am more of a shooter than a collector, I sold my 150 and kept the 300S. I’m just telling you this to let you know that these two very similar target rifles do have some significant performance differences.
My thanks to Stephan Szlosze for his diligent work in assembling this three-part report.]

Had a slight mishap today. It was time to tighten up the Impact, not sure I’ve ever gotten it right yet because the barrel has never stayed put after cocking so I cocked it before pulling the stock and left the safety on … For a while. The muzzle was about1′ from my face when it discharged.SMP. 🙂
Reb,
Carefull there bud ! We wanna’ keep you around. Being too tired is not good,..as well as not being “too” anything else. Take break, read the blog, make some targets, wait till next day, etc., etc. Anything, but putting Part A (Rifle) together with Part B (Pellet).
Damage from a dry fire can be fixed, you on the other hand,….be carefull !
I guess the best thing that happened is it wasn’t loaded but holding the muzzle is what kept it at arm’s length and pointed away from me.
Reb,
Yea,.. not loaded is good…as ol’ Clint E. said,…” A man has to know his limitations”…..I push mine, but I do it very carefully.
Or at the very least, put as many odds in my favour as I can.
Reb,
Please be careful! If you aren’t sure about how an airgun’s action works — and this one is complicated — it’s best left alone.
B.B.
It stays put now and there’s a reason why I didn’t want to really crank down on it because getting the barrel cracked open is harder, I’ve got Rem-oil soaking into the joint if it doesn’t react soon I’ll have to loosen it back up to prevent premature wear.
Reb
You don’t have to have the gun cocked and barrel in the open position to tighten the pivot screw.
You tighten the screw with the barrel closed and gun uncocked and then cock it, load and test for the barrel to remain in the position its left at while closing it to shoot the gun and repeat tightening the screw and cocking and shooting until it is the correct tension is achieved.
You are very lucky you did not get hurt or damage the gun or barrel. Got to be careful bro as we want to hear how much fun and enjoyment you will have at the Texas air gun show so stay safe and uninjured so you can make it there.
BD
I knew I couldn’t cock it without the stock so I tried it like this so I could check drag for it’s full range.
The action was closed and the safety was on until I pushed it in with the chair arm.
Reb
Ok at least the barrel was not open when it fired as that’s what I thought by your post was that the barrel was open when it fired so just a dry fire with barrel closed which is not good by no means but at least it did not slam the barrel shut and possibly if not definitely bending it.
It is very difficult to cock one out of the stock for sure so I understand what you were trying to do but for safeties sake and your health please take the extra time to remove and install in the stock after each adjustment so as not to hurt yourself or your new gun. I know its a pain and time consuming but you don’t have to tighten the stock screws super tight until you have the pivot adjustment right but just snug them enough to hold the action securely to test with and then when its right I remove and apply a drop of blue Loctite to the screws and install and tighten properly.
BD
Reb, You okay? You ever sleep? Seems we keep around the same hours? I get in trouble occasionally myself with these airguns etc.! Semper fi!
Nothing a shower and change of clothes didn’t fix.
I remember setting the rear of the action on the chair arm(note this is where the slide in to release safety is located) and it slipping off while I held the muzzle, I guess the trigger caught the arm when I instinctively retrieved it. First dryfire this gun’s seen but apparently my second today. While shooting the Regal today I had a round that was extremely loud with no obvious impact.
I recalled the pellets feeling like it fell right in place, looked all over the floor searching for a stray pellet but couldn’t find one.
Made sure I could see daylight through the bore, let it rest for a few then finished up.
CptKlotz, I salute you!
Job well done….
-Y
Ck
Thanks for part 3. I have not owned a 150. I was interested in knowing the difference of the two models.
Hello everyone,
Well I have worked on a great many feinwerkbau rifles already and there is a good way of opening it up without a second person.
Working on airguns you always need a couple of cleaning rags and I have amassed a whole bin of them, like large old towels and bedlinen. What I always do is stick the end of the action where the spring and parts pop out in a bundle of rags.
When you twist the nut and the parts jump out they get slowed down by the rags and do not get damaged 😉
Carel
While your method of releasing the spring tension and capturing the guns internals is a safe and easy method to use the one thing you risk by doing it that way is damage to the retaining screw/bolt/studs threads and/or the threads in the trigger/ spring retaining piece so that when reassembling the gun you can have the threads become cross threaded or damaged so that they will not start smoothly and require further work performed to reassemble the gun easily and correctly.
I have worked on many air guns my self as well and have found that there are threaded parts that the manufacture uses a uncommon or proprietary thread size and pitch that if damaged it is some times impossible to acquire the correct tap or die to clean and repair the damaged threads easily or economically as there are taps and dies I have needed that cost more then the gun itself just to repair the damaged thread from releasing the load on the screw or nut without the tension being relieved properly.
BD
Hi folks,
as long as the information helps as many people as possible, I’m happy. I guess so are the original creators 🙂
BB, thanks for adding all the additional information. You practically wrote half of the report yourself…
I didn’t know the 150 was this different. I always thought the 300 and 300S only had minor detail improvements. I certainly wouldn’t have expected the trigger to be better on the 300.
Stephan
By the way, I just noticed that I had a perfect picture of the ratchet unit and where it has to interface with the piston right there before my eyes 🙂
The second and third pictures from the top show everything you need to see (and BB has even edited the third to make it clearer).
I still don’t understand how you can even get this wrong during disassembly. Is it even possible to install the ratchet unit when the tab is not in the right place?
Stephan
If it can be done wrong it will be.
Stephan,
I told you – I’ve seen not one and not two 300’s with the same scratch. And I had to unjam one, stuck in that position and brought to me. So it can be done.
That’s a bad side of “Be your own gunsmith” rule: it’s waay hard being a gunsmith with fork.ini, spoon.ini and mouse.ini drivers in “Hands” folder and no learn_watch_remember_think.dll in “System” 🙂
Sometimes people ruin really nice airguns with their lack of competence. A friend of mine, who is a professional arigun repairman and a good shooter himself runs a topic named “Freak Show” on one of local forums. It’s dedicated to ways people “repair” “hotrod” or “tune” their airguns into oblivion, with photos, of course.
He says – the problem is that most times hundreds of people destroy their guns in a minimal number of ways. Well, there are “talents”, but most times it is a combination of same old 2-3 mistakes. Each and every of them can be avoided by spending 15 minutes on dedicated forums and reading things diagonally. There are even “Don’t-s Lists” almost on every airgun forum, but people still think that they can bend the laws of physics.
duskwight
Ck
If you don’t have the piston cylinder slid forward all the way like say after a pellet is loaded and the cocking arm is home. Or if you don’t have the rachet slide with the notch positioned in the right place to match the cylinder notch.
The trigger assembly can be attached to the gun with the ratchet and cylinder not lined up. The first time you cock the gun the cylinder will pull over the top of the ratchet. Not good at all when that happens. Could even break the little end piece off the cocking arm that goes in the cylinder. Or break the cylinder where the cocking arm attaches.
You guys are probably right… It’s Murphy’s Law 🙂
I am currently working in a computer store / repair shop. The things people will do to their machines are incredible.
One lady poured coffee with milk over her laptop and only stopped using it when “the keyboard felt strange and stopped working”. The thought that electronics and liquids don’t mix didn’t cross her mind…
One kid did a two-week internship at our store and after that he thought he could now build computers with a friend. They bought the wrong parts, assembled them the wrong way, even bending the CPU’s pins in the process. We fixed their mess and the total cost was € 200,- more than what they would have paid if we had built the machine in the first place. Two months later, they came back and they had again messed with the CPU, *again* bending the pins. I could fix it again and they had to pay € 80,- for the repair.
These are only two stories but stuff like this happens all the time, often turning a € 20,- problem into a € 200 repair. I guess I shouldn’t complain 🙂
Stephan
CPT
I saw the same thing in the auto/motorcycle repair business when people would try to fix something themselves and get in way over their heads.
The independent shop I started at in the 70s had a sign on the wall stating the following
Labor rates = 28 dollars per hour
If you watch while being repaired = 28 dollars per hour.
If you offer suggestions or help = 40 dollars per hour
If you worked on it first =70 dollars per hour
If its in pieces or boxes = 100 dollars per hour
This was back in the late seventies so as you can see the labor rates were much cheaper back then but we still got cars in pieces with trunks full of boxes of parts that the owners tried to fix first and as you say took a 28 dollar job and made it a 100 plus dollar job.
The sign did make most people realize its cheaper to pay us first than try it your self and pay us second.
BD
Are those 28 dollars while watching the same 28 dollars or an additional 28 dollars? It should be the latter because there’s nothing more annoying than customers watching while you fix things, especially if they won’t shut up and offer all kinds of information they think is relevant.
In fact, suggestions should cost an extra 56 dollars…
Ck
Ain’t that the truth. They call you to fix it but tell you how your going to do it.
It’s like why are you here in the first place then. If you know what to do show me.
CP
Its just the same 28 bucks but the customer was outside the shops work bay watching from 20 feet away and not over my shoulder as if they started watching over my shoulder that was considered offering suggestions or help and then yes it went up to 40 per hour. I agree with you as it should have went up the 56 bucks but the owner made the rules and he did enforce them so I did not have many over the shoulder mechanics helping me fix their cars.
I would actually go smoke a cigarette or to the bathroom when they came up that close watching and if they did not take the hint then I just let the owner know and he took it from there as he was at the shop every day so he handled the customers so we could do our work unimpeded or disturbed allowing us to fix it right the first time since we did not get paid the second time.
BD
Stephan,
Reading to your story – it’s either the world is crooked or modern generations have mutated. I may be an oddball, since I build and tune my own computers since I was 15 and that was in Slot A times, but – how?
In my world CPU pins just cannot be bent, as the system is 101% foolproof: CPU can be inserted into socket _only_ one way, there’s a “golden corner”, in fact it just falls down into unlocked socket by itself when set the proper way. Any other slot/socket is foolproof too.
You say it was 2 week internship. But I learned how to physically assemble machine and calculate power demand in some hours simply by watching my guru’s work, asking some questions, a tad of thinking and just following that foolproof system. And if a m/b is marked “for Socket AM-3+” I doubt if any sane person would try putting “Socket 1150” stone into it. That’s simply out of logic! Same goes for any other part – it’s marked or simply made incompatible.
I wonder what happened to kids’ heads these days 🙁
duskwight
After looking at today’s blog I am appreciative that my problems are so small. The new Nitro Piston is still great. Now, however, I have a Jam Spring/Alive Jam problem. The barrel breaks open quite easily. I have researched this and found guides complete with photographs. I suppose seals may be next, so if I order anything I will order things I might not need just yet but surely will. ~ken
Ken, I didn’t quite understand
Do you mean the guns action is opening on firing?
Reb, so far it has not opened on firing, but it opens when I set the rifle on the rest. I can open the action with my little finger, whereas before I broke it open with a bump of my hand on the muzzle break. I researched this and the most likely culprit is the spring that pushes the Alive Jam into the detent. I can’t make this stuff up, must be a highly specialized vocabulary. So, my Jam session is falling apart, and my Alive Jam is now the Grateful Dead and I am heading for detent(ion). I can tell I am not sleeping well.
If it isn’t breaking any rules I can point you to the page with the most info (you have to log in to see the photos).
http://www.gatewaytoairguns.org/GTA/index.php?topic=72662.0
Ken
I have another Crosman Chinese rifle that does the same thing . All I have to do is flip the barrel closed and it will fall right back down .
Bad spring . Have not fixed it (Storm XT) . Not in a hurry to get a bunch of moly on me for a gun that I don’t use.
twotalon
Twotalon, mine hasn’t gotten to that point yet. I do want to shoot this rifle so I will have to get my hands dirty. ~ken
Ken
Have you tryed spraying a little WD40 on the chisel then opening and closing the barrel.
I had that happen to one of my break barrels before. Once it started working and latching up hard again I put some grease on the chisel and it stayed working fine.
Not to say that’s it but worth a try first instead of having to take it apart.
Let me know if you try.
Gunfun1, thank you. I don’t want to take the rifle apart if I don’t need to. I will certainly try loosening and lubricating the locking mechanism. ~ken
Ken
Try GF1s solution of some penetrating oil as the alive jam as you call it on my titans has very little to no lube whatsoever from the factory and will tend to accumulate dirt and corrosion which does not allow them to fully return to the extended position and provide a good lock up when closed.
If that does not work then remove as shown on the GTA and cutting the slot that the bushing retains it with to allow for more travel outward in the locked direction by about a 1/16 of an inch with the extra spring or just a single heavier spring will indeed increase the lockup detent pressure. I would take the alive jam apart and take the factory spring to an Ace hardware and find a spring the same OD diameter as the factory one only with heavier wire diameter or a longer length or both preferably and install it as there will be no wait for part from crosman and you can buy a couple for future use and if you get the right size and strength spring it will be back to the slap open gun you first had.
BD
Buldawg76, thank you. I am glad I read Gunfun1’s advice before I started taking things apart. And I will follow your advice regarding the spring. I will avoid cutting the Alive Jam is I don’t have to. ~ken
Ken
Always glad to help and I have three NP crosmans with one 177 and two 22 titans so I have had them all apart and tuned to shoot as best they can for what they are and made them much nicer guns than they were originally from crosman but that why I buy used cheapo and rebuild or repair myself and end up with a better gun for less than the cost of new.
Its just the way I have always done with whatever I own and has worked for me well so far.
BD
Ken,
While I do not know much about gas pistons, it sounds as if it is stuck in the compressed “stage”. Maybe go the spring route, if it is an option. They either break or they don’t. “Jam Spring/Alive Jam” sounds like a new age rock concert !……. 😉
It sounds like Crosman tried to get fancy there.
Reb, someone got fancy. If I didn’t have the PDF of the exploded view and parts list I wouldn’t have known what these terms meant. ~ken
Chris USA
I think it means that the spring behind the chisel detent has collapsed.
Or grit getting in the chisel detent.
Gunfun1, I will try the wd40 route and if I can’t get a better lock I will have a look inside at the spring and replace it if necessary. I have gotten some good advice on this and it is appreciated. ~ken
Ken
Ok update us on what comes about.
You know how things mechanical go you think its one thing then it turns out to be something else.
Hope you get it fixed easily.
Chris, the gas piston is great. The Jam Spring and Alive Jam are what Crosman calls the parts that hold the barrel in the locked position for shooting. I believe this will be an easily fixed issue. ~ken
Ken,
Yea, after the replies came in I saw that I was “off base”. Some “wierd” terms for sure. I would have had expected better from an airgun manufactuer. Sounds like some Chinese to English translation going on if you ask me. Think of assy. instructions for stuff you have put together in your life….yea,…kind of like that ! Chris
After looking again at my Regal I’d be willing to bet it’s crud or corrosion.