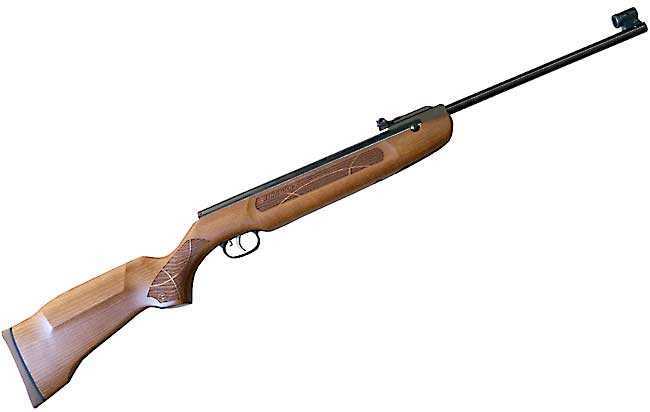
The HW 50S breakbarrel from Weihrauch.
Part 1
Part 2
Part 3
Part 4
Part 5
Part 6
This report covers:
- The 25mm piston seal
- Disassembly
- The safety
- The 4 tabs
- Removing the pivot bolt
- One more thing about the barrel
- New piston seal
- Tighter fit
- New top hat/spring guide
- Summary
Well, well. The day you waited for has finally arrived. Today I replace the 25mm piston seal in the HW 50S with a 26mm seal. But first — don’tcha wanna know how that 25mm seal got into the kit?
The 25mm piston seal
Tom Gore called me about a different subject right after I finished changing the seals in this rifle, and we talked about that. He told me that the older HW 50S rifles had a 25mm compression tube, which many of us knew. So he got requests for a PG3 SHO (and later the PG4) with a 25mm seal. He made up some kits in response to those requests. That was what I got. If anything his labeling needs to be sorted out, but the 25mm seal was also correct for the 50S. Just not for mine. Now let’s look at the seal replacement.
Disassembly
Since the piston has to come out to replace the seal, this will be a full disassembly. I won’t go into all of it, because I showed you that in Part 5. However there were some questions that I hope to answer today.
The safety
There were a couple questions about the safety. First, what does it look like in the rifle after the Rekord trigger has been removed? And next, what do you do with the safety when the trigger goes back in the rifle?
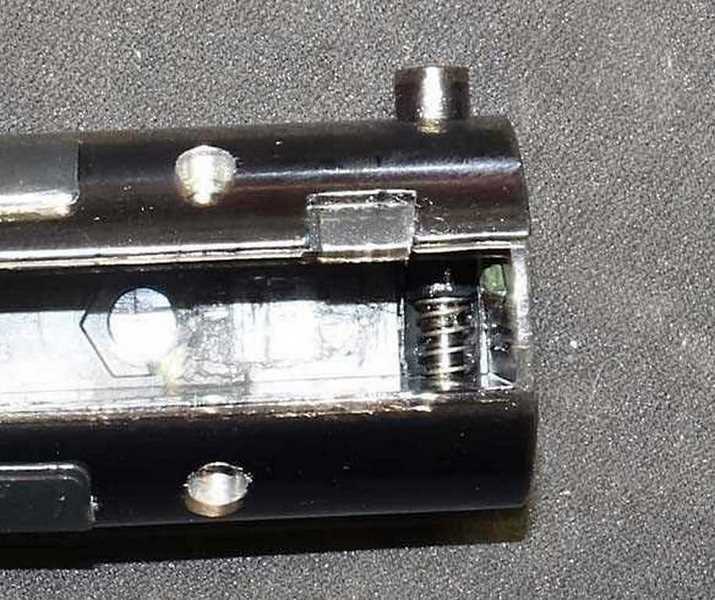
The Rekord trigger has been removed. The safety is a spring-loaded cross pin that sits in the end cap.
My rifle is so new that I had to drift the safety out with a thin pin punch. In most Weihrauch rifles they just fall out on their own. When you put the Rekord back into the rifle you have to press in on the large side of the safety (which presses against the coiled spring you see here) to get clearance for the Rekord pin holes to align. And remember, it’s easier to align the pin holes if you cock the trigger before installing it. Once one trigger pin is in (always the rear pin, in my case) you can let go of the safety and the trigger will hold it.
The 4 tabs
Before the end cap comes out the four tabs have to be removed. You will remember that the first time they were in there very tight and took a long time to come out. This time they were much looser and came out fairly easily. I did have to put a small amount of tension on the end cap to remove one of them, but I got the job done in just a few minutes rather than spending much longer.
Removing the pivot bolt
The barrel has to come off the spring tube so the cocking link can be disengaged from the piston. That has to happen for the piston to come out of the rifle. The pivot bolt is what holds the barrel on the spring tube.
Weihrauch rifles are so easy to disassemble, and the pivot bolt is a snap to remove. However, there is one trick. If you break the barrel open, the detent doesn’t put tension on the bolt and once the bolt is loose it comes out right away.
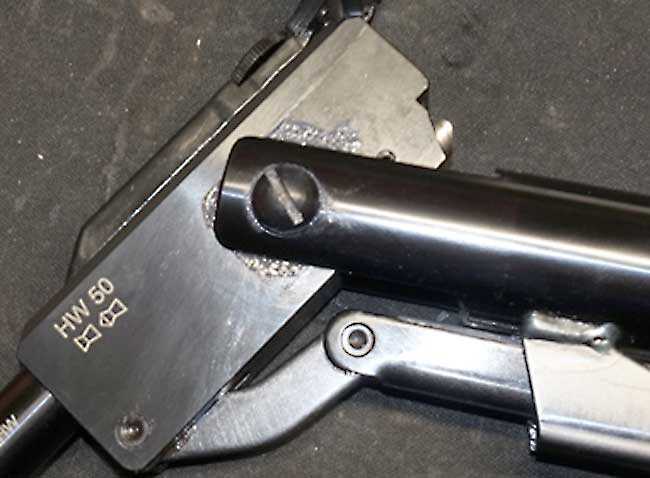
To remove the pivot bolt it helps to break the barrel open like this.
The reason the barrel has to come off the spring tube is so the flared end of the cocking link can be removed from the enlarged hole in the bottom of the spring tube. It’s at the forward end of the cocking slot. You don’t have to move the barrel very far for this, and the less it’s moved the easier the gun goes together when you’re ready.
One more thing about the barrel
Remember that trick I told you of using grease to hold the thin pivot washers in place on the base block? Well if you are careful when separating the barrel from the fork of the spring tube, they stay in place. I didn’t have to do anything to the washers after installing the newly sealed piston except a slight alignment before the pivot bolt dropped through the base block.
New piston seal
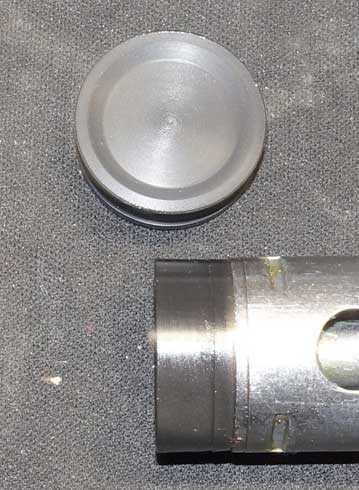
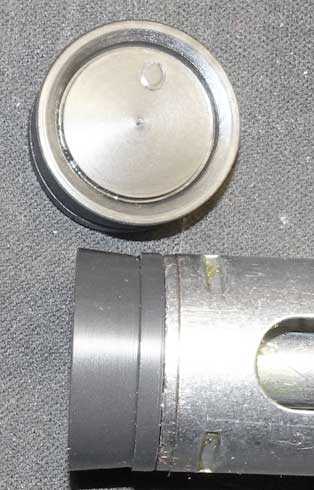
Let’s now look at the new 26mm piston seal. There is a way to tell it from the 25mm seal. The 25mm seal has a groove cut into its top face and the 26mm seal does not.
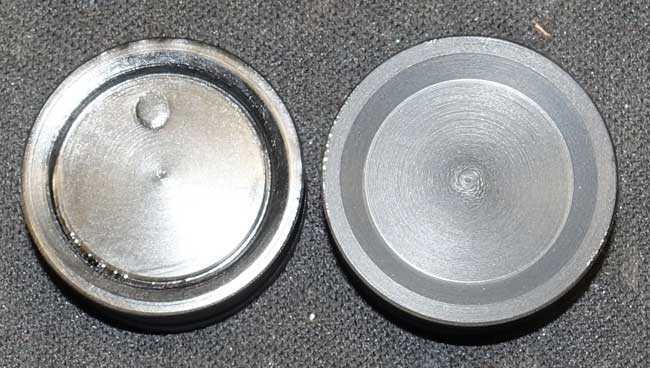
The 25mm piston seal on the left has a groove cut into its face. The 26mm seal has no groove. You can also see the imprint of the air transfer port on the 25mm seal.
At least one reader asked me whether the air transfer port left an impression on the 25mm piston seal. As you can see, it did.
Here the old 25mm seal is still on the piston. You can see that it slightly smaller than the body of the piston.
Removing the old piston seal
In my experience the Vortek seals can be hard to remove when they are new. It’s one of those jobs that takes three hands. But this time I found a trick. After squeezing the seal with pliers to get an opening under the seal for a screwdriver blade (which was the job that took three hands), I put the seal (with the piston still attached) into a small vise with smooth jaws. I was able to squeeze the old seal enough to get a screwdriver blade into where it joins the piston. I did this twice before the seal came off. You may not see a slot for the screwdriver blade, but as long as the seal is under pressure you will be able to slip the blade under.
Putting the new seal on is a matter of positioning it on top of the piston and then pressing down on the piston hard until the seal slips over the edge of the piston and grabs. I use a flat door jamb and press against it with all my weight. The seal is tough, but with enough force it can be overcome.
The new seal is on the piston and you can see that it’s larger than the piston.
Tighter fit
I lubed the new seal and the rear of the piston with the grease that came in the kit, then I inserted the piston into the spring tube. Last time with the small seal the piston slipped right in under its own weight. This time the fit was tight — as it should be. I used a rod to push it all the way forward, keeping the cocking slot aligned with the slot in the spring tube. With the piston all the way forward the barrel can now be attached to the spring tube.
New top hat/spring guide
One thing I didn’t see in the original kit I got from Vortek was the new top hat assembly that is the forward spring guide. The success of the PG4 SHO kit is due to dampening vibration, which is done with parts that have no tolerance. They are tight! The forward spring guide is an example of that and I want to show you the new one that now comes with the kit. Remember — I got a kit than was made up for the old HW 50S that had a 25mm compression cylinder. It was made up some time ago and still had the forward spring guide from the older PG3 kits.
Tom Gore sent me a new forward spring guide assembly so I could show it to you, and I decided to install it. The new forward spring guide is an assembly that allows the user some leeway to tune his rifle for power. Let’s look at it and I will describe it to you.
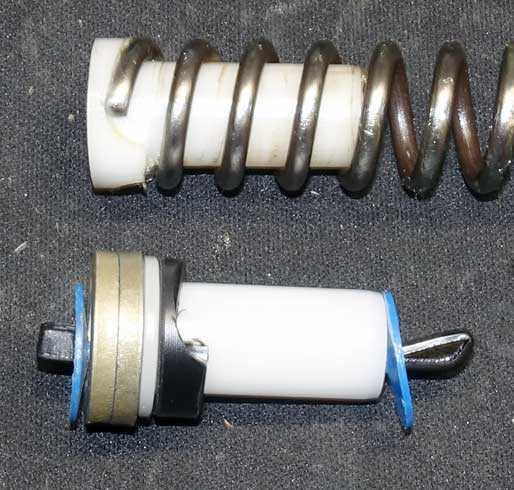
The older forward spring guide is at the top. The new PG4 assembly (held together by a plastic cotter pin and two blue plastic washers that aren’t part of the assembly) consists of a white guide, a black rotation ring that captures the end of the mainspring and two thick steel washers.
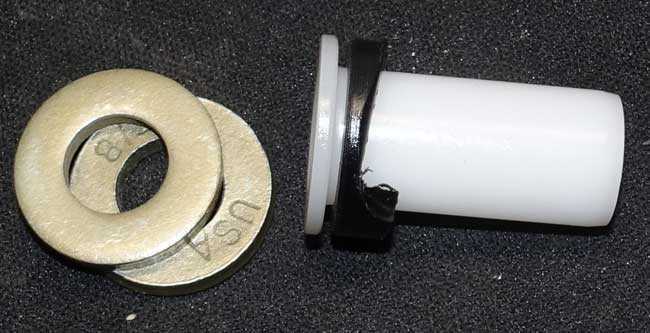
Here is the new forward spring guide apart.
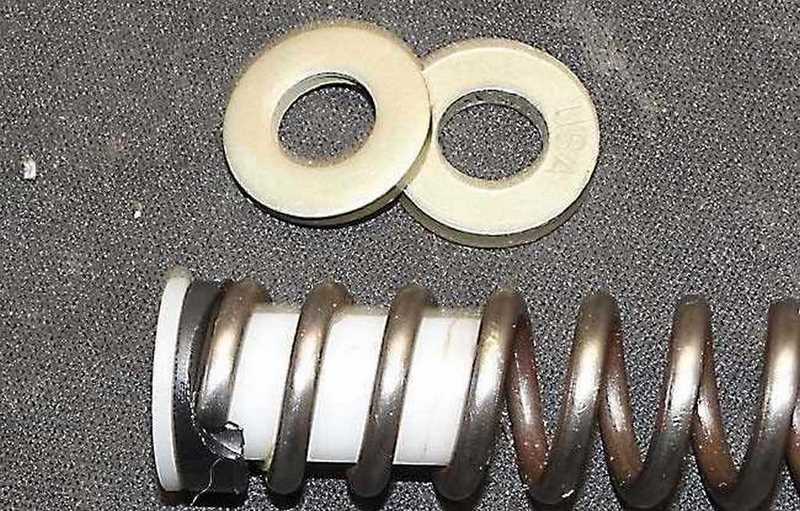
The new forward spring guide is in the mainspring, ready for installation.
The washers are to allow the user to tune his rifle. Tom Gore tells me that with both washers installed (ahead of the spring guide) the rifle will approach 12 foot-pounds. I decided to install one of the two washers with the new guide.
Getting the old guide off the mainspring was a bit of a chore, because like all the other parts in this kit there is literally no tolerance. I use a flat-bladed screwdriver through the mainspring coils to lever the guide forward. Once it has moved a little you can grab it and pull it out. The new white guide with the black rotation ring goes into the spring. I lubed it with grease and, although it didn’t slip right in, it did go into the spring in less than a minute.
I had to relubricate the mainspring and rear spring guide, because at this point most of the grease I had put there last time had worn off through handling. I decided to use one of the two washers with the new forward spring guide for no particular reason, so I lubed it with grease and put it on the flat end of the new spring guide, then I slid the assembly into the gun and prepared to close the spring tube.
The rest of the assembly went smoothly and the rifle was back in its stock and ready to roll. Naturally I fired the rifle several times to make sure the new seal was doing its job.
Summary
This completes the swapping of the piston seals. I’m now ready to test the rifle’s velocity again. Tomorrow.


BB,
I do wonder if the washer in the front or the rear of the spring actually make a difference. I would think that the washer being in front would increase the weight of the piston and if placed in the rear would increase the tension but not add any weight to the piston.
Siraniko
PS: Section The safety 2nd paragraph 4th sentence, “And remember, it’s easioer (easier) to align the pin holes if you cock the trigger before installing it.”
Siraniko,
I fixed the typo.
As for the washer, if it is in the piston it adds to the weight of the piston and thus will shoot heavier pellets with a little more power.
And there is no way I’m going to try to remove the mainspring from the rear guide. It is just on there too tight!
BB
BB,
Understood. Which means Tom Gore seems to favor the heavier piston for heavy pellets. Somebody could probably tune this for heavy pellets if one were so inclined.
Siraniko
Siraniko,
Tom is just offering the shooter the ability to tune his kit. After tomorrow’s test I will see if I like it this way.
BB
Thanks Mr. Wizard for letting us see behind the curtain again. I have some 2240 parts on the way. I am going to upgrade the receiver block and I might hack the barrel down some. Now if I can find a cheap pistol scope.
Removing the old piston seal
Last sentence; first paragraph; last word. … you will be able to slip the blade (s)under.
RR,
Fixed it. Thanks,
BB
RR
I like the reticle in the pistol scope that used to be sold by Crosman Custom. It’s a Center Point that sold for 20 bucks. Have tried to order more but they are not up and running.
Deck
B.B.
Yeah, the second time is a breeze. While you had the safety out, did you clean the burrs and relube the safety. Makes a big difference. For those that hate the Weihrauch safety, you know you can remove it entirely and still have a functioning rifle.
-Y
Yogi,
I should have cleaned up the burrs but I didn’t. As a result, the safety is still working harder than it should. Lazy BB! Bad BB!
Yes, I know the rifle will function without the safety, but I want to leave it alone.
BB
BB, the HW50 seems like a ‘tweener’ gun, more power than a 10m rifle, less than a full power R1.
I dont know what is easier, cocking the action 60-70 times for a target session using theHW50 or using a floor pump once to fill a pcp to shoot at the same power level. I got 81 shots from 498 to 522 back down to 500 from the little Bandit pistol, using HN match@8. grns. I have maxed out the hammer spring, looking for a slightly heavier gauge wire size, and the perfect pellet!
Thank you for the peek inside one of my favorite brands. MM’s matter.
Rob
BB,
The kits are (can be) crazy tight,… from what I saw with my TX200 III I had. I always wondered how much fps is being held back by that tight of tolerance,… even if lubed well. Plus,… the spring OD (and ID) getting bigger and smaller when/when not compressed. Many factors combined with variable tolerances. Nice kits with a drop in fit. 🙂
Good day all,………… Chris
Chris
I used one of the kits in my .177 caliber Tx 200 I had. It seemed to be better than the factory tune. But my tune worked the best.
B.B. and Readership (especially you dyed-in-the-wool Coil Springer types)
shootski is beginning to comprehend why an INTERESTING airgun like the SIG ASP20 didn’t really catch on! I went back to Part 1 and this quote provided total enlightenment on the illness::
“I bought this one because I plan to modify it, just like I did with the 30S. And, after a first very buzzy shot, I’m so glad that I will. The 30S has turned into a delightful tackdriver that I plan to test for you at 50 yards. And, after feeling the mainspring buzz of this rifle, I can’t wait to get inside! Right now I’m guessing the mainspring is bent (canted) even more than the spring in the 30SD was.
For those readers who just can’t believe that a Weihrauch can come out of the box needing some work, here’s another one. We will find out why it buzzes, though I’m suspecting a bent mainspring like we found on the 30S. This one seems to buzz a lot more, so I will be very curious to see what we find.”
From your DarkSider trying to help cure this NASTY affliction!
shootski
PS: both my .177 and .22 GAS SPRING SIG ASP20’s continue to shoot lights out!
Just like they did right out of the box; almost as good as my PCPs!
Shootski,
I can’t remember if I asked you before so I’ll ask again. What magic pellet does your 22 like now that you’ve had some time to really play with it?
BobF
BobF,
I’m still working on finding the Perfect pellet, hard to do with crazy shortages, but for right now I mostly shoot the AA 5.51 Diabolo Field 16gr and the 5.52 FX 15.89gr domes. I haven’t reached any conclusions other than that I want to try the H&N Baracuda 18 and some other slightly heavier pellets.
So far the SIG ASP rifles have been just for FUN and learning about gas springers.
Most of my attention of late has been on the Quackenbush .410 Camp & Garden Shot Pistol. As I have said before I have little experience with small bore scatterguns; only lots and lots of 12 gauge and some 10 gauge. I have been digging hard on getting the most out of the power burning loading recipes and the.410 short barrel pistol stuff. I’m dissatisfied with the attitudes of shotgun writers toward the small bores. I think it is just like the attitude of some about Big Bore Airguns…they never last long because they just don’t GET IT! As RidgeRunner so often states, “Power means nothing if you can’t hit what you aim at!”. I”m forever in trouble with the range for cutting up targets and backers (littering the range) with my shotguns…can’t wait to get the .410 reloading supplies so I can litter the range with my Shot Pistol!
shootski
Shootski,
I also started with the heavier AA and JSB’s but ended up shooting the JSB 14.3’s. Man does my ASP really like them! As a side note, squirrels, rabbits and other assorted critters really don’t like when the ASP goes outside for a stroll.
Have to heartily concur with your thoughts on small bore shotgun attitudes. Growing up I was lucky enough to live on a 500 acre fruit farm that my Grandfather had purchased to pursue his favorite outdoor passion, bird hunting. The farm was yearly stocked with pheasant and quail. 02 large ponds were put in for the ducks and geese, and also some very large bass and crappies. Heck, he even put in a trap and skeet range. This was during the late 50’s 60’s and early 70’s. During that time till his passing in 74 the only shotgun I ever saw him use was an old 42 Winchester in 410. Ducks, geese, pheasants, quail, grouse, woodcock, crows, blackbirds, it didn’t matter. When he pulled the trigger things came tumbling out of the sky. It wasn’t till I was older that I came to realize 1. How lucky I was to be able to grow up on that farm with him as my Grandfather! 2. He was awful good with that shotgun!
3. Practice does make perfect!
BobF
BobF,
I’m fairly certain I have some light(er) JSB and other brand .22 pellets. I will give them a try for sure. It will be interesting to see if they go transonic.
You were lucky to have so many years with your Grandfather. I lost all of four of mine in WW-Part 2 before I was born. They were all in Yugoslavia and as Royalists were never on the RIGHT side of things once the fighting began. Longest peace and greatest prosperity that area has ever seen was under the King. And, for all of the ethnic groups!
I always feel at home on ranches and farms even thought I was raised as a big city kid…who lived on the creeks and rivers as well as in Pennypack and Fairmont Parks for most of my misspent youth
shootski
Shootski,
WW-Part 2 finished unhinging the planet and it ain’t been right since, in many places. We are blessed to be here, still free to pursue life, liberty and happiness.
“Getting the old guide off the mainspring was a bit of a chore, because like all the other parts in this kit there is literally no tolerance.” Might it be easier if you inserted say, a wooden dowel from the other end of the spring and pushed against the guide to move it enough so you can grip it? Beware: FM probably does not know what he’s talking about, being he’s never gotten an old guide off any airgun mainspring.
FM
It actually helps to turn the spring like your loosening a bolt. That kind of releases pressure on the spring. So you can pull while your unscrewing the spring to get it off.
Not to say it will work in this case but has worked for me in the past.