
by Tom Gaylord, a.k.a. B.B. Pelletier
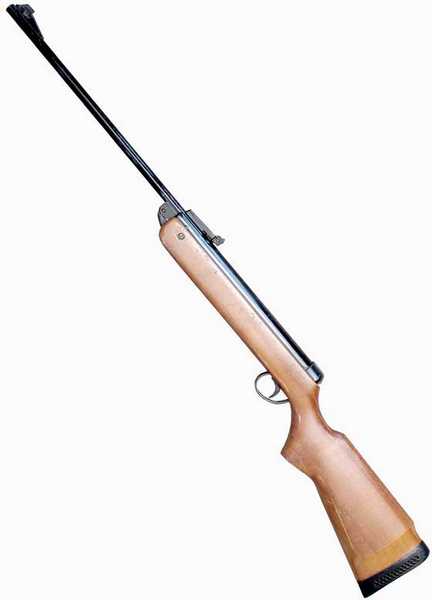
My rifle is actually a BSA Super Meteor.
It would be an understatement to say there was a lot of interest in the BSA Super Meteor I got at the Roanoke airgun show. And in the discussion that followed, I learned a lot about this rifle that is now in its seventh design iteration.
First of all, the experts agree that the Meteors — Marks I and II and possibly the Mark III — are the best ones. Certainly, both I and II are. My Mark IV, on the other hand, is characteristic of BSA’s lowest days, when quality went out the window — at least to hear some readers tell it.
I don’t have a Mark I or II to compare with, so all my observations have to be based on this one gun. When I tried to fire it for the first time, it sounded horrible — as if it was broken.
Well, it turns out that it was broken! Today, I’ll show you the step-by-step process of disassembling this air rifle, and I’ll finish the story tomorrow with the damage I found and what I intend doing about it.
I’ve never liked disassembling BSA and Webley spring rifles because of how they go together. I suppose that if I did it all the time, it would seem simple; but compared to a Weihrauch, Air Arms or even a Diana, these two brands seem to be harder to separate. They seem to be designed for production — not for maintenance. At least, that’s my impression.
Having said that, however, I was surprised how easily this rifle did come apart. It was very straightforward and never gave me a bit of trouble. Like I said — I don’t have as much experience disassembling BSAs or Webleys.
All my photography today was done with a flash, so please excuse the poor exposures of some of the parts. I’ve made sure you can see what’s important, and I’ll direct your attention to it in the text…but these are not as good as my normal photos.
Step 1. Remove the stock
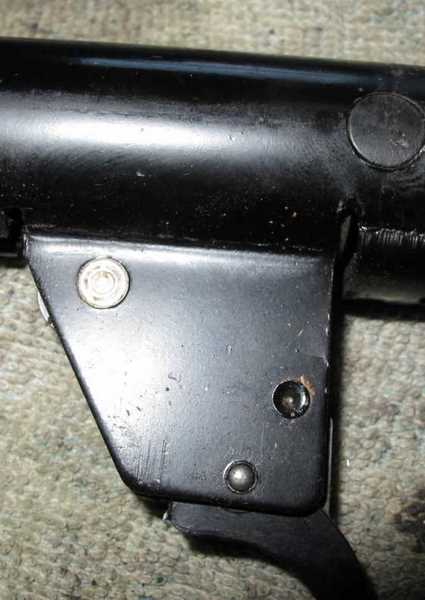
The stock comes off with two screws on the forearm and one on the triggerguard. Once out of the stock, it was easy to see why the forearm screws had pulled apart the action forks. They’re screwed directly into them instead of being attached farther back on the spring tube. This is a weakness in the design. Also, each screw was missing a stock spacer that keeps it from pulling on the action forks.

The forearm screws attach directly to the action forks. When they’re screwed tight, they tend to pull the forks apart — especially when they’re missing their spacers. Note the barrel pivot pin above the flange with the threaded hole.
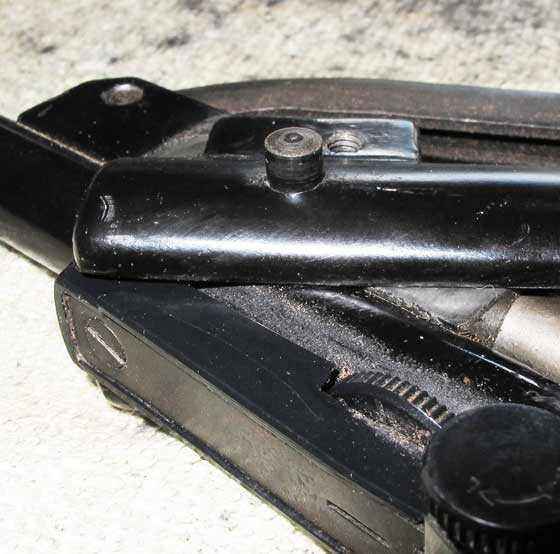
When I removed the stock, I could finally see the trigger adjustment screw. It obviously adjusts the sear contact area, so be very careful when you adjust it!
With the action out of the stock, you gain access to the trigger adjustment screw.
Step 2. Remove the trigger parts
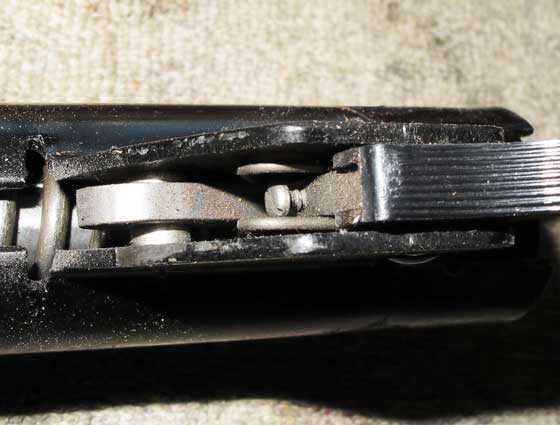
In the Meteor, the trigger housing is welded to the spring tube. So, it stays on the rifle, but the trigger parts have to come out to remove the piston, which is held by the sear on its side, rather than with a center rod. The trigger parts are held inside the housing by 2 pins, although it looks like 3 pins at first. One of those pins is a rivet and does not come out of the gun.
Trigger parts are held in by only 2 pins. The small pin above the curved trigger blade is pushed out from left to right, releasing the blade; then, the large silver pin at the top left is pushed out to release the rest of the trigger parts. The rivet at the right side of the housing stays where it is.
Normally, when faced with pins like these, I get a pin punch set, but I found that the trigger blade pin was loose enough to remove with just finger pressure, alone, and the large silver pin came out by pushing on it with a combination of my finger and a ballpoint pen! The large silver pin in my rifle appears to be a captive pin that remains with the trigger housing. The trigger was completely dry, which surprised me because it came apart so easily.
You have to take the trigger parts out because they’re being pushed up by the trigger spring to block the piston. The trigger pushes on the sear, which bears on the edge of the piston, so it has to be removed to allow the piston to clear the spring tube.
Once the large silver pin is removed, you can pull the trigger parts out of the housing. They consist of the trigger blade and the sear, plus a bent spring that puts upward pressure on the sear when the parts are pinned inside the trigger housing. The trigger blade contains the adjustment screw plus nylon bearings on both sides to keep it from wobbling when installed. It’s more sophisticated than it looks from the outside of the gun. Also, I can tell by the minimal wear patterns that both the trigger blade and the sear are at least surface-hardened. My guess is that they’re case-hardened.
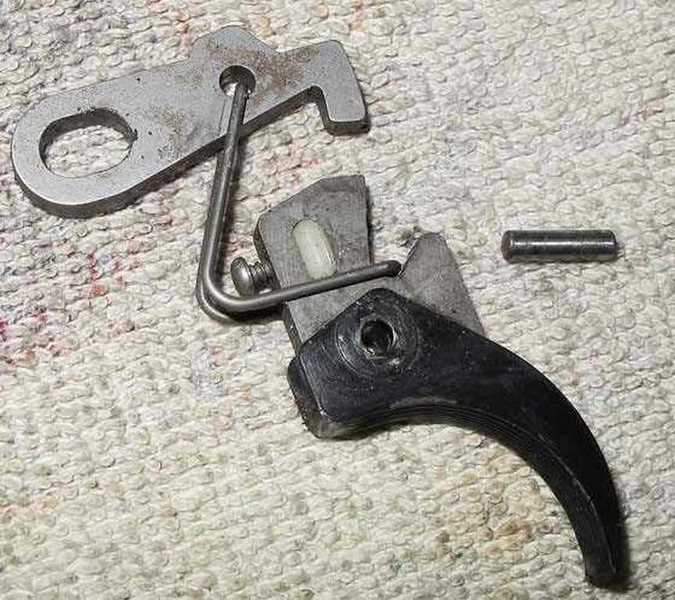
The trigger parts consist of the sear, trigger blade and trigger spring. The pin shown here is the same one that was removed to take the trigger blade from the housing. The white oval on the trigger is a nylon bearing that takes up any side-to-side wobble, plus it helps hold the adjustment screw in place.
Here’s the trigger housing with the parts removed. The large silver pin appears to be captive in my rifle. You can also see the rivet that never comes out. Notice how dry the mainspring is!
I noticed how very dry all the parts were. I was beginning to suspect that this gun had never been apart since it left the factory. Of course, without a complete disassembly, it was impossible to tell for sure; but I would have expected to find some lubrication on some parts. At this point, there was no lubrication on anything, and all the of the parts were dry, dusty and lightly corroded.
Step 3. Remove the mainspring retention pin and the mainspring
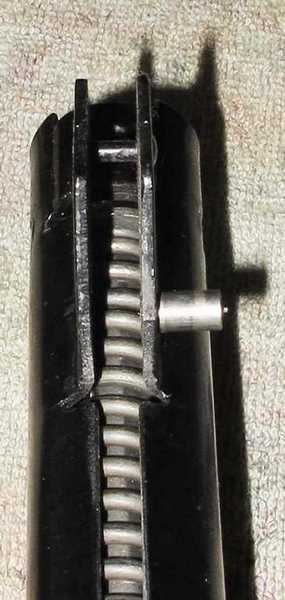
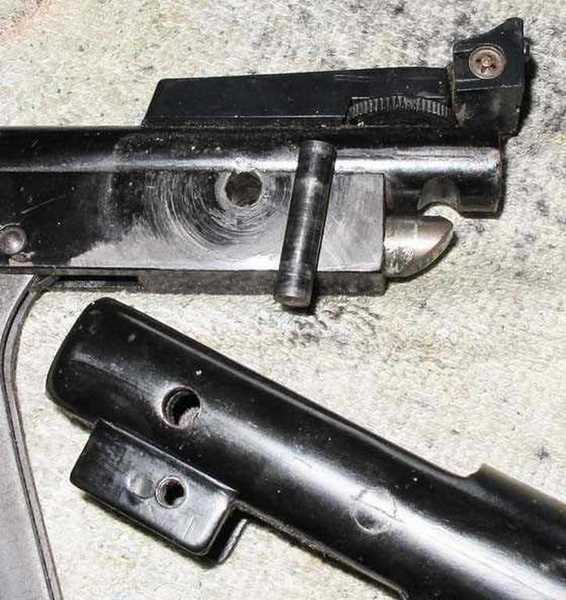
Step 3 is where you can make a very big mistake. With many airguns, the one or two cross pins on the side of the spring tube hold the mainspring and its guide in the rifle. The Meteor has a single pin, but it isn’t held in the rifle in the same way that other cross pins are held. Instead, this single pin is keyed to the spring guide. If you try to drive it out with a pin punch, you’ll ruin the pin and probably ruin the spring tube as well.
Here you can see the mainspring retention pin. Its function is similar to all retention pins in other spring-piston air rifles, but this one has a secret. It’s keyed into the spring guide. Until you take tension off the spring, this pin cannot be taken out of the rifle. If you try to take it out with a pin punch before taking tension off the mainspring, you can damage parts.
To get the pin out, you must take spring tension off it by pressing the mainspring in and away from the pin, then press the pin out of the gun from left to right. It will press out with finger pressure just as easily as the trigger pins did, once the spring tension is taken off. You need to make a special tool to take off the spring tension. I was able to make this tool with a part I bought at a local hardware store for less than 60 cents.
The tool does not have to be strong. It only has to put about 90 to 110 lbs. of force on the spring guide. I had my choice of steel, aluminum or plastic parts to work with, and I chose plastic so it would be easier to work. I bought a 4-inch PVC pipe riser made for a yard sprinkler system. I knew this would be easy to work with a Dremel tool. I brought it home, measured the work to be done and made the cuts on the pipe with an abrasive wheel. The total work time was about 20 minutes. I now had a tool that would span the cross pin and push on the base of the mainspring guide.
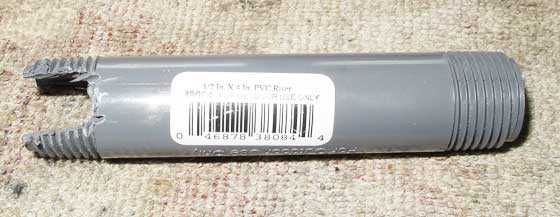
In about 20 minutes, I made a tool from a 4-inch sprinkler PVC pipe. It isn’t beautiful, but it worked the first time and looks like it’ll hold up for dozens more jobs like this.
I’d intended to use the spring compressor with this tool; but after I saw how easily it worked, I decided I could use it outside the compressor. All I did was put the tool around the pin and pressed down on the barreled action, taking all the spring tension off the pin. It was then very easy to press the pin out of the gun with just my finger.
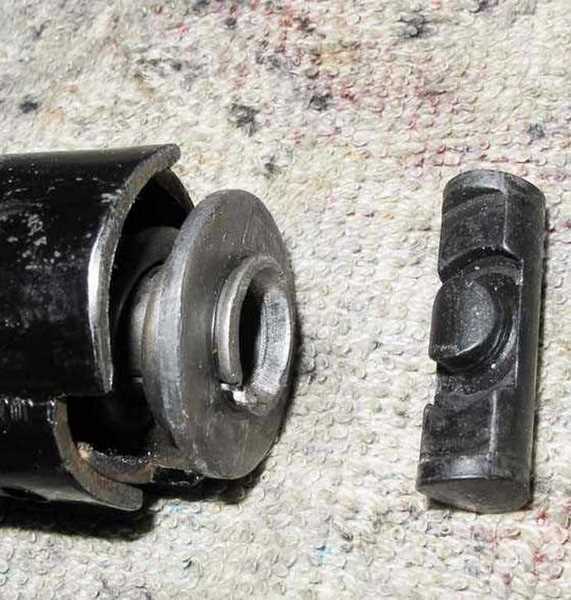
Here you can see how the cross pin is retained by the base of the spring guide. You can also see the small amount of tension that’s on the mainspring of this rifle when the pin is installed. It was easy to take the cross pin out and take the tension off the mainspring without a compressor.
Then, I could remove the mainspring and spring guide from the rifle. Once they were out, I saw there was no lubrication on any of these parts, nor was there any on the inside of the rifle. I was pretty certain at this point that the rifle had never been apart; or, if it had, that someone had intentionally dried off every part before assembly.
The mainspring looks pretty good. I rolled it on the table and couldn’t see any significant canting. I believe I’ll use this mainspring when the rifle’s rebuilt.

The mainspring looks pretty good, but it’s bone dry.
Step 4. Remove the barrel
It was time to take out the piston. On this gun, the piston is connected to the cocking linkage in such a way that the barrel has to first be removed from the spring tube to disengage the cocking linkage from the side of the piston. The Meteor has a pin (instead of a bolt) as a barrel pivot. Like all the other pins on this rifle, this pin was only tight enough to hold the parts in position. I could move it with my finger. I broke the barrel open to take all tension off the pin (from the detent), then pushed it out from left to the right.
The barrel pivot pin has been started by finger pressure, alone. No pin in this rifle has needed a pin punch for removal. To get the pin all the way out requires a push from a screwdriver.
With the pin out, the barrel pulls away from the spring tube, and the cocking link can be removed from the piston. The piston can now be removed from the rifle.
Step 5. Remove the piston
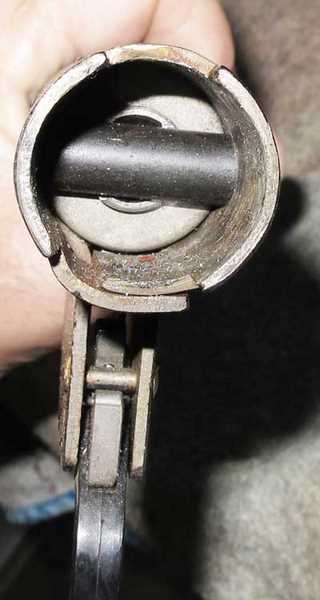
Once the cocking link is out of the piston, it’s time to slide the piston out of the spring tube. Everything was so dry on this rifle that the piston had to be coaxed out of the gun by levering it with screwdrivers through the cocking slot. When it was out of the gun, I discovered that the piston head wasn’t attached! It’s still inside the tube at this point! No wonder the gun fired so violently!
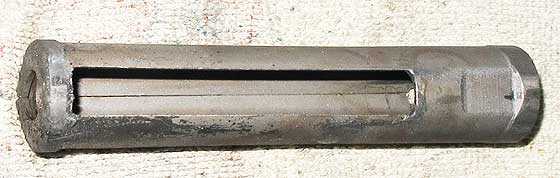
The piston is missing its head. It passes through the hole on the end of the piston and is held in place by a circlip, which is missing.
The damage
That would normally be all you have to do to strip a Meteor, but I still have to get the piston head out of the gun. I suspect it’s going to tell me a lot about why the gun failed like it did.
This is turning into a long report, so I’ll finish it tomorrow.

“Then, I was could remove the mainspring and spring guide from the rifle.”
The word ‘was’ does not belong in this sentence.
Fixed. Thanks! Edith
Hello B.B. and fellow airguners
It looks as though BSA went for simplicity when they assembled their spring guns. Although almost everything about this gun looks to be basic, you have shown us a few places where caution needs to be exercised. I like these old rifles as they were made before plastics became popular. Because they were made of steel, and wood, they are still quite popular today, and have stood the test of time. There seems to be a few airguns made today that have a limited life span, and that is a shame. This is a direct result of the throw away society we live in. We seem to believe it’s o.k. to settle for second rate goods if we are able to replace it with the latest model in 4 or 5 years. My Dad’s generation didn’t tolerate this thinking. If the quality was shabby, there was no sale. I remember you tested the BSA Supersport a while back, and I was wondering if the Supersport is put together the same way as your Meteor? I am curios as I have a chance at purchasing a BSA Supersport in .177 cal.
Ciao Titus
Titus,
While there are similarities, I think the Supersport I tested is more like the Meteor Mark VII, which has a Gamo trigger. BSA has done a lot of updating in the past 20 years.
So, no, I don’t think the Supersport is like the Meteor
B.B.
Is it only me, or is that piston among the ugliest things they have ever seen? It truly makes me cringe.
The only thing that could account for the abhorrent quality of this rifle is a conspiracy of vindictive hatred for the consumer on the part of both BSA’s designers, and their blind arthritic hamfisted assemblers who were on strike half the time. This thing is made in Birmingham England for God’s sake! Not some backwater in China with no electricity! I own a couple, maybe a few, airguns made in China. None are so poorly constructed.
BB Pelletier, if you can get this abomination to shoot with any semblance of decency it will be a testament to your willpower and perseverance, but will say nothing about the intrinsic qualities of this tragic air rifle.
One more thing, did the fellow who sold you this rifle divulge that it would not shoot?
SL,
Regarding whether the rifle would shoot or not, I didn’t ask. I assumed it would. And the guy I got it from probably didn’t know, either. He goes through a lot of airguns and I’m sure he doesn’t shoot each one.
B.B.
SL,
My sentiments exactly. I have had four different Chinese springer air pistols and two Chinese springer air rifles, and the quality of the metal work and finish on the metal of the Chinese air guns is in a much higher league than the British made BSA that I have.
The finish on the metal on my Meteor is simply cheap black paint which is now half flaked off. Where it has flaked off the bare metal underneath looks suspiciously like pot metal, not steel. I suspect a thin steel barrel is inside a pot metal sleeve.
The wood the Chinese used was horrible, as was the finish they put on it. Still, the poly finish is durable.The BSA’s wood is OK — beech — but nothing special.
Michael
Another very good article, BB! And no problems with the photos: they were good enough. Looking forward to seeing the rest of this beast’s guts, and your fixes!
Barrika,
The rest of the story comes tomorrow.
B.B.
B.B.,
I purchased a Meteor, MK-who-knows (it has a CC serial number prefix). Its fore stock screws are separate from the barrel fork screw, and I have been able to tighten them snug. I bought it from a nationally well-known and respected airgun person/dealer (often recommended here on this forum) who advertised it as “recently rebuilt” by him/them.
I unpacked it and looked it over, and it looked OK. After a few weeks I actually tried it out and was disappointed that the trigger requires a slight push back into place after it is fired, or the sear will not engage. The trigger itself is heavy and single-stage as well. But the biggest shock was that it bucked and cracked when fired as though it were a Gamo Extreme something. I did not chrony it, but the results through a thick phone book showed it has modest power, maybe four or five foot pounds or so.
I was trusting and naive enough that it was some time before I noticed that it lacked any sort of breech seal. The recessed ring for the seal around the breech hole is as bare as Mother Hubbard’s cupboard. That and the malfunctioning trigger have me wondering what sort of “rebuild” the big time dealer had done. I can only imagine, given its firing behavior — harsh and loud even for a gun with no breech seal (!!) — that it has no functioning piston seal in it, either.
Anyway, by the time I noticed these deficits, the transaction had taken place a few months earlier, and now it has been almost 15 months since I bought it online. Depressed, I did not contact the dealer as so much time had passed and instead put it behind a bunch of other airguns I hope to someday open up and learn to repair airguns with.
Long story short: automatically trust no dealers regardless of reputation; fully test your purchase within minutes of its delivery, and BSAs after the 1950s are garbage. Before the 1950s? Well, why would I risk finding out?
Michael
Michael,
I am sorry for your experience, but please understand that I was not hoodwinked in this transaction. I don’t think the seller had ever tested the gun before he sold it. No claims were made. I just bought it believing it was okay. Now that I know BSA Meteors, I won’t do that again.
I’m actually glad this happened, because I would have resisted diving into this rifle if there was no reason to. But now I have to, and I have learned so much in just a few days!
B.B.
Michael,
By the way, your rifle is a BDSA Cadet Major, made from 1955 to 1957. That’s what the CC prefix indicates.
B.B.
B.B.,
Milne is a Meteor, I misread the serial number with my glasses off. It starts with NG.
I understand that you acquired your BSA as a project. Mine was advertised as recently rebuilt, although the trigger doesn’t return, there is no breech seal, and I suspect it has no functioning piston seal, either. Some rebuild.
Unlike yours, mine has separate screws for tightening the barrel fork.
Michael
All you guys who are disappointed in the meteors:
They need to be set up correctly, with fresh seals and a fresh buffer, and they need good spring guides.
My love for the meteor lies in its simplicity:
-its ment to be cheap, so everyone can afford one.
-its meant to be able to give decent accuracy at medium range, group close to an inch at 25 meters are definately possible.
-its meant to be medium power, enough to dispacth small pests(where legal), but still not a big heavy gun.
-Its meant to be simple, so everyone with a minimum of technical skills can service their own gun.
-And despite all this, it still has the correct size for a normal grown person to shoot it comfortably.
It isnt meant to be a match gun, and it isnt meant to be a powermonster, and it isnt meant to be a beautiful gun of polished ble steel.
BB: tried sending you an e-mail, but it just gives me an error reply?
Dag,
I agree with you on the BSA. It certainly has been an easy rifle to work on. I still like working on Weihrauchs and Air Arms guns more than BSA’s, but I’m no longer afraid to pull one apart.
As for the email address, just click on this link:
blogger@pyramydair.com
B.B.
Dag,
That email address was mistakenly deleted by Google mail. Pyramyd Air’s IT team has recreated that email address. Please try sending an email again.
Thanks,
Edith
Thank you!
I went through on the third attempt!
B.B.
I hope you tell us how you get the front of the piston out of the tube.
twotalon
My recommendation would be a new (clean) bamboo skewer through the exposed transfer port.That should move it back far enough for coaxing via the cocking slot.Maybe have some long hemostats on “standby”.I’m pretty sure BB is already done though.Them skewers can be really handy to have around……and extra cheap too.
Frank…
Maybe use them under the fingernails of the seller before you buy to get the truth about the gun ?
twotalon
ROFL……!
Frank…
We have ways of making you talk . (speak with a German accent)
twotalon
Frank,
I use those bamboo shish-ka-bob skewers to put marshmallows on for backyard plinking! Nothing sends a marshmallow flying off of the tip of one of those like a CPL at 600-700 fps!
Michael
You marshmallow killa! I like the Neco wafers from the candy aisle too.I’m going to steal your idea though,thanks!
Frank…
Marshmallows are good coon and possum bait. The cheese balls you can get in the big plastic jugs are too, but they ain’t worth a hoot for plinking.
twotalon
Maybe the possum would taste better stuffed with cheese balls……I never could make much of a possum dish.As far as ‘coons go……I already have a hat.Made fantastic venison Jambalaya last night though.The roast was given to me frozen,but once thawed it looked like sashimi grade tuna.I was really tempted to do a bit raw with egg yolk & herbs,but I’ll hold off for a fresh personal harvest.
Frank
Did somebody try to slide you a piece of week old roadkill?
twotalon
No,a nice roast came from a friend who wanted it cooked by yours truly.For him I made really great venison / fatty beef burgers.(he is dentally challenged).As I described above,it was gorgeous meat once thawed.However,I do not do raw protiens unless I am positive of the source & history.Based on muscle development this roast was from a smallish doe…….delightful in a pressure cooked rice Jambalaya and very tender.I’ll never eat roadpie from a warm state!
Frank..
Ever try ribs ?
Been too long, but pressure cook them until the meat is about to fall off the bone. Then put them on a broiling pan and baste with KC Masterpiece original and broil them with some big chunks of potato.
Turn and baste the ribs a few times, and look for the potatoes to start browning along the edges.
You can suck the meat off the bone. Any mild sweet BBQ sauce will work.
twotalon
The best venison I’ve had were the venison steaks my uncle would thaw out at Christmas when we would visit. Also, he would have a butcher smoke up half of it as jerky so it could last for months. Man, that wa the best jerky I’ve ever had.
I also had venison chili once that was absolutely incredible. The meat wasn’t ground but was in small cubes. Oh, man.
I did eat roadkill once, when I was a kid. Driving home from work one afternoon my dad hit a pheasant as it ran right out in front of the car. Parts of its head were spattered on the front license plate. My dad pulled over, saw that the bird’s carcass was perfectly intact, and chucked it in the trunk. My mom made him clean it in the garage, and he roasted it himself. My recollection was that it didn’t take long at all to roast, as it still was pretty fresh when it reached the oven ;^D. It was tasty, but it was a tough old bird, frankly, and we didn’t have much gravy to put on it, just a bit of melted butter.
I also remember eating bluegills not ten minutes after catching them at my grandparents’ summer cottage. Catch a half dozen, clean ’em right there on the dock, and fry ’em on a pan over the grill. From lake to stomach in no time at all!
Good times.
Michael
“Ever try ribs?” ……when I read that I started literally laughing out loud! Fred Flintstone could build a palace just from this year’s bones.You see,I devised a way to eat them for free.I buy two full racks for about 15$.I have a whole list of folks that will gladly spend 20$ for one rack ready to eat.My best testimonial is a former SEAL who goes about 345lbs.He says “best ribs he’s EVER ate”The inside of my modest smoker is almost glued shut just from smoke residue.I dry rub,smoke 3 hrs while the exess fat renders…..then foil wrap and cook about 1.5 hrs.Then I glaze with sauce and grill over low flames another hour.I like pressure cooking but I lose some of the meat’s flavor so in decent weather I have to grill!
Frank..
Thin thread down there.
I was talking about Bambi ribs. Were you ?
twotalon
No,I lateralled over to pork.I’ll try that when I get some Bambi……this year deer are legal with air over .30 cal in Alabama so it should be a done deal.
Done deal IF my health holds out.
Frank..
I think a lot of people miss out on the ribs. They usually have anything that does not qualify as a steak or roast stripped down and made into burgers or sausage.
Have to agree with Michael too. Nothing like fresh in the frying pan for good eating.
I do deer steaks in a covered skillet. A bit of water, some chopped onion, and some brown sugar. Some big chunks of potato too. Slow simmer. When done, I let it boil dry and brown a bit. Served with a bit of the KC I spoke of.
We need a weekend blog on wild game cooking. Don’t know if I want to hear about B.B.’s armadillo on a half shell.
twotalon
TT,
Yes, I will.
B.B.
Back in my mid 20’s I was working construction at a house in Florida….where I spotted an intriguing looking air pistol in a box of stuff.I possessed the embers then of airgunitis and they began growing brighter…..so I inquired about it to the homeowner.They were empty nest parents and knew nothing about it.It was a BSA .22 Scorpion pistol and although I was more than willing to buy it from them,they very generously gave it to me at the end of the day.It was,in fact the very first “modern” adult quality springer I ever owned.Sadly I knew nothing of the unique needs of a springer and I eventually lost all interest in it because it shot like it had a mind of it’s own! I eventually lost track of it.If only I had known more then…..I’m certain it would still be “around”.LOL (but it still kept the embers glowing until the fire became an inferno a few years back!)
The Scorpion was a dream pistol when it was fist released. A beast of a gun to shoot correctly, it is basically a junior sized rifle in a pistol stock. I never really got the hang of them, but for power it could not be bettered (and one of only three British break barrel air pistols ever made).
Thanks for enabling Oliver! I guess now that I’m near broke maybe I’ll seek one in a trade.I remember clearly that the .22 punched clean holes @ 25yds through an aluminum awning……I just had no clue how to shoot it any better back then.Heck,before BB’s advice I couldn’t get my P1 to group either.
Do gas piston airguns need the same amount of attention to how you hold it like the springers.they say there is less vibration so does that mean that they arent quite as hold sensitive because I want something a bit easier to shoot and when I am hunting I don’t want to have to focus so much on holding it perfect.
Cole,
Gas spring guns need the same hold as steel spring guns. They also have to be held very loose or they can sting your cheek when they fire.
B.B.
I’d expect linear forces to be similar.
Spring however may add in a rotary torque — as the spring extends it also “unwinds”. That’s going to try to spin the piston one way, and rotate the action/stock the other. You’d need a dual-spring arrangement, with one spring counter-wound, so that the torques cancel out…
B.B.,
On your Meteor and mine there is a very small fastener — perhaps a tiny Allen screw or merely a bolt — on the extension of the trigger that interacts with the sear. I am not referring to the screw that attaches the stock, and I am not referring to the screw that is between the spring and the trigger. It is just barely visible in your seventh picture above.
I would like to cure my Meteor of it’s requirement that the shooter push the trigger forward to engage the sear. When my Meteor is uncocked, the trigger simply flops around. When I try to cock it, the sear will not catch unless I manually push the trigger forward.
Would either that screw or the large slotted screw in front of / above the trigger, as in shown picture five, cure this problem?
Michael
Michael,
That is not a screw. It is the tip of the adjustment screw shown in the other picture. Screw the adjustment screw in and that tip emerges on the other side. If it hangs up on the spring or sear, it could cause trouble.
The solution would be to back out the adjustment screw like mine is — so the tip is flush.
B.B.
My two fears of disassembling are (1) never being able to put it back together again and (2) damaging something irreversibly in the process.
Here’s another example to add to our list of fictional errors and absurdities about guns. In one of the Jason Bourne novels, a woman who is a “mole” in the American government (who has sold out to terrorists) packs a J-frame SW revolver. And she makes sure to practice with it once every single month…
Matt61
Matt, I’m missing something here but then, I was never a big student of the alphabet designations that S & W uses. I googled the J frame and see that it’s a small frame with a shrouded hammer in various calibers – .22 to whatever. Can you lead me by the hand and tell me what you’re referring to?
Actually anyone will do. Sorry to be so dense.
Fred DPRoNJ
B.B.,
My state just banned lead ammo for hunting. Last I read, lead-free pellets were considered unsuitable for hunting for reasons of accuracy and energy. Is this still the case? Do you have a blog post on lead-free pellets for small game hunting and pest control?
Bob in CA
BobinCA,
I read that this morning. However, I also read this:
http://gov.ca.gov/docs/AB_711_2013_Signing_Message.pdf
Edith
Bob in CA,
Pellet guns don’t seem to be part of this new law. And the law won’t go into effect right away. My wife, Edith read the law.
As far as I know, a pellet gun is still okay for hunting pests and turkey.
Edith, can you tell us more?
As for lead-free hunting pellets, look at Baracuda Green in all calibers.
B.B.
Thanks, Edith and B.B.
It looks like the state’s in no hurry to implement this law.
I’d read, years ago, a blog post by Stephen Archer on the subject of lead free pellets. He had nothing good to say about them at the time. That’s why I was concerned. I’m glad to know that at least one variety, Baracuda Green, performs well.
Bob,
Lead-free pellets are something I keep a watch on. If I get wind of something significant, I will test them and write it up.
B.B.
The heaviest non-lead, non-plastic saboted pellet Pyramydair carries is the Gamo PBA Bullet, .22 Cal, 14.4 Grains.
Prometheus has a brand of non-lead, tin-based hunting pellets called Dynamic. They are available in .177, ,20, and .22, and one of their .22 models, Dynamic TM 2, weighs in at 17 grains.
Michael
Something I noticed in your blog today is the spring at rest is under very little compression. The spring in my 1906 BSA is under very little compression. The spring in the TX 200 is the same. Is this indicative of British sproingers? Why does everybody else compress their springs so much, especially when it can be shown it is not required for proper performance? I know, I know, the more compression, the more potential energy, but a properly balanced system does not need much. Just laziness or more likely unwillingness to spend money on research. Throw something together and get it out the door as cheaply as possible and brag about how powerful it is.
BB- I am new to your blog. I was reading your archive blogs, and read your 2011 Diana 60 (hy score 810) article. I compared my hs 810, and it has a barrel lock. The markings are HY-SCORE air rifle MOD.SM 810. The date is 08 69 and the serial # is 681980. Is this an experimental rifle, or did Diana make some m 60,s with a barrel lock? Does this affect its value compared to a m60 without the lock? Where can I get a replacement rubber buttplate? Mine is starting to breakdown.
Welcome to the blog. I am afraid I cannot help you with your question, but if you post it again today, others may notice it and give you a response.
zimbabwaeed,
The Hy Score 810 is a Diana 65. The models 65 and 66 have barrel locks. They are built heavier than the model 60.
For replacement parts you’ll have to frequent dealers in new old stock parts. You may not find one, so start thinking about replacing with an alternative buttplate. There are several like Morgan that are adjustable, though they are metal and not rubber.
B.B.
Fred DPRoNJ. I own a J frame S&W .32. It is an alumimium frame and very light, as a result to shoot it accurately you need lots of practice. That mole practiced more than I do LOL!
For some reason laws get pushed and implemented in California then tend to spread across the U.S.
I hope that somebody out there is rethinking alternate types of material for projectiles.
Depleted uranium?
I guess lead fishing weights will be next.
BB- I tried your E mail, but my response did not go through. I saw a Hy-Score SM 810 on another gun blog (May 18,2008 ). It is identical to my rifle, including the barrel lock. They called it a Diana 65. This probably means that Diana made two almost identical air rifles (except for the barrel lock).Hy-Score marked them with the # 810. The D60 was marked 810S, and the D65 was 810SM. Which is more common? Thanks for your answer(s Ed.
zimbabwaeed,
I already answered your earlier comment (above) about this and did tell you that your rifle is a Diana 65. Since you missed that you also missed the fact that you probably won’t be able to find a replacement rubber buttplate. But a Morgan buttplate should fit fine with the proper fitting.
The Diana 60 is probably the more common rifle, just because it was less expensive. Some target shooters thought that a breakbarrel rifle had to have a barrel lock to be accurate, but that has since been disproved.
B.B.