by Tom Gaylord
Writing as B.B. Pelletier
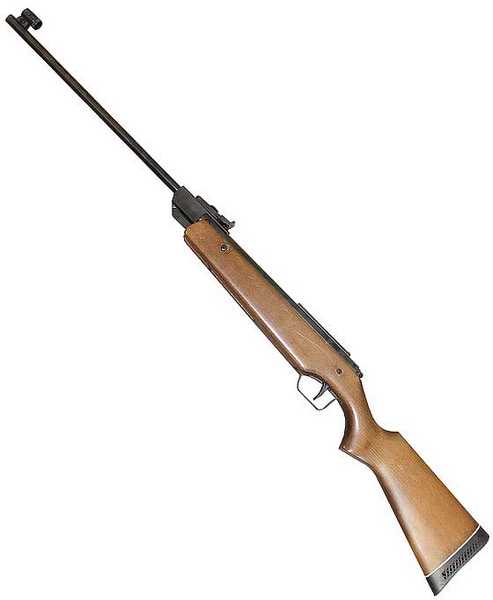
Diana 45 is a large breakbarrel spring rifle.
This report covers:
• Remove the stock
• Action out!
• Action in mainspring compressor
• Trigger assembly is free
• Spring bent!
• Gun is dry
• The rest of the powerplant
• Last word
I’m changing things for this report just a bit. In part 3, I told you that I would do a 25-yard accuracy test next. I’ve decided to forego that step and start working on the tuneup, instead. Today, I’ll show how to disassemble a Diana 45. Make certain the rifle is uncocked before you begin. Do not disassemble a gun if you’re not 100% certain you can put it back together again in safe working condition!
Remove the stock
The first step in any air rifle tuneup is usually removal of the stock; but with the Diana 45, there’s a twist. The stock doesn’t come off like any other breakbarrel stock I know of. Remember, Diana renamed an upgraded version of their model 34 to be the new model 45 when the older model became obsolete. Here, we’re looking at the original Diana 45, so these instructions belong only to this rifle.
To remove the stock, you usually remove 2 screws from the forearm and one or two screws from the triggerguard. Not so with the 45. The forearm screws do come out, but the 45 has a crosspin through the stock that passes through the trigger assembly. It has to be drifted (pressed) out to take the barreled action out of the stock.

On the Diana 45, both the front and rear triggerguard screws are simply wood screws. Leave them in the stock.
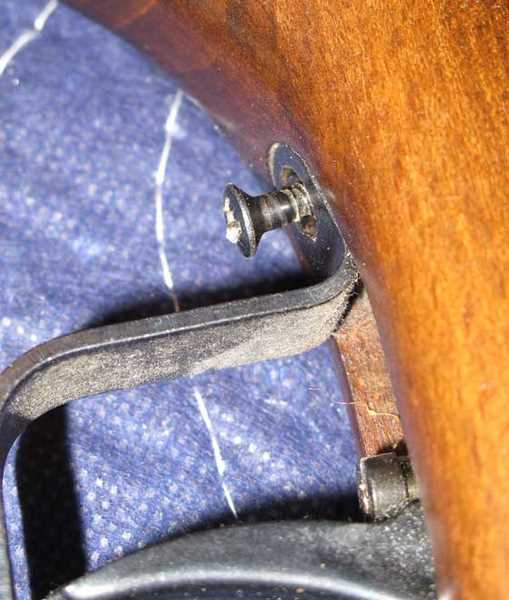
On either side of the 45’s stock there’s a round, black bushing holding the crosspin. It always looked like a pair of Allen screws to me, but it’s just a metal bushing that holds a crosspin. This pin must be drifted out, left to right, to remove the barreled action from the stock
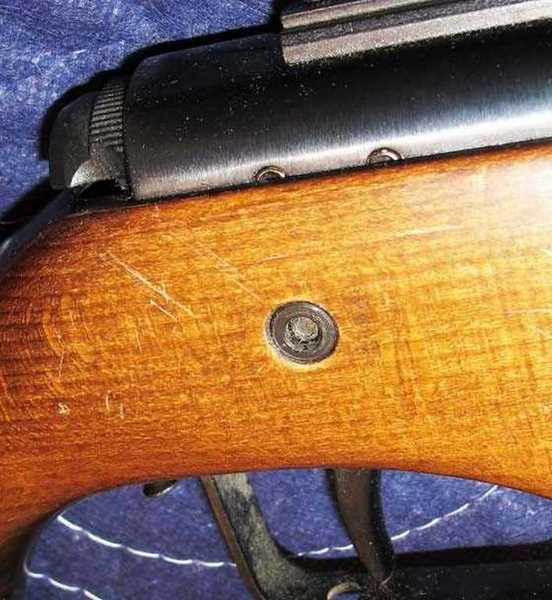
A metal bushing on either side of the stock holds the crosspin that passes through the trigger assembly. The pin must be drifted out.
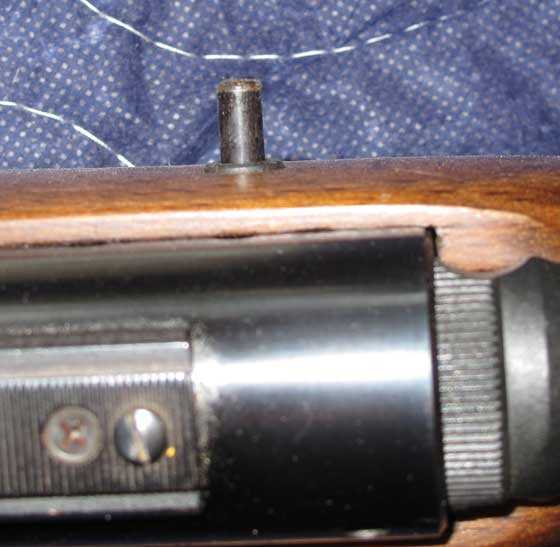
The stock’s crosspin comes out easily with a few taps from the hammer.
Action out!
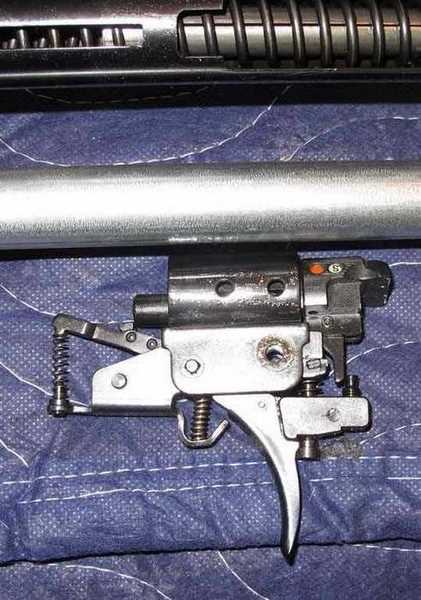
Now, the action comes out of the stock. At this time, you’ll see that the trigger is modular instead of the swarm of individual parts Diana used in the model 27/35 ball-bearing triggers.
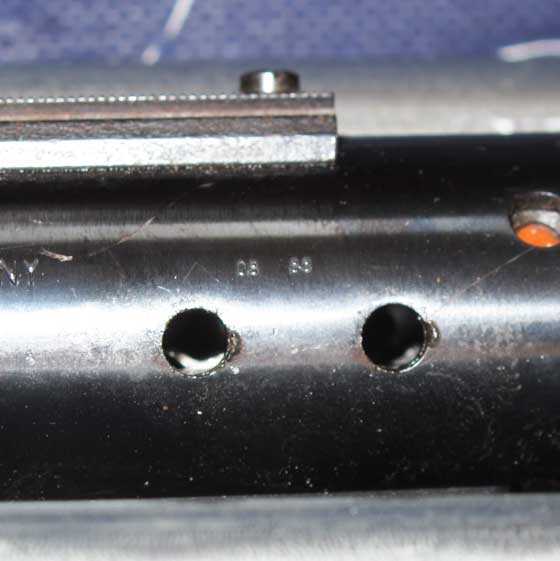
When the action is out, you can look at the trigger housing and see the hole where the crosspin passed through. That will have to be aligned properly when the rifle is installed back into the stock.
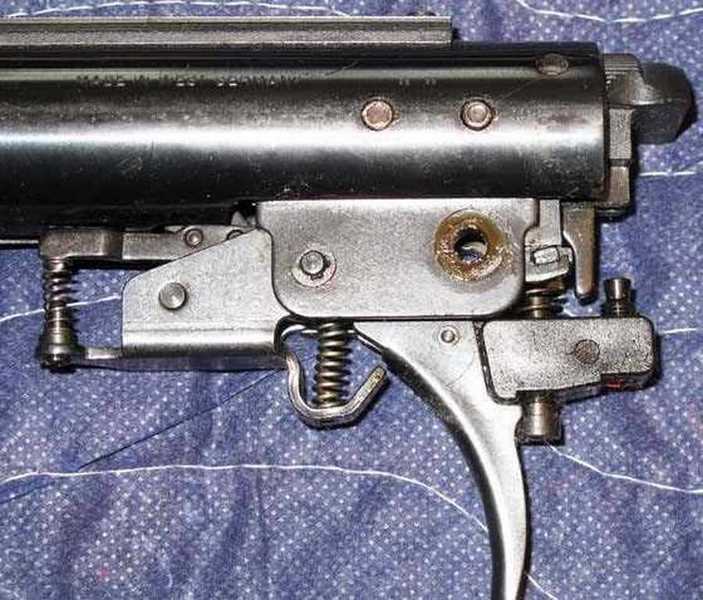
That’s the hole through the trigger housing that the stock crosspin passed through.Don’t confuse that pin with the 2 action crosspins that hold the action together in the spring tube. Both of them can be seen in this photo above the trigger assembly.
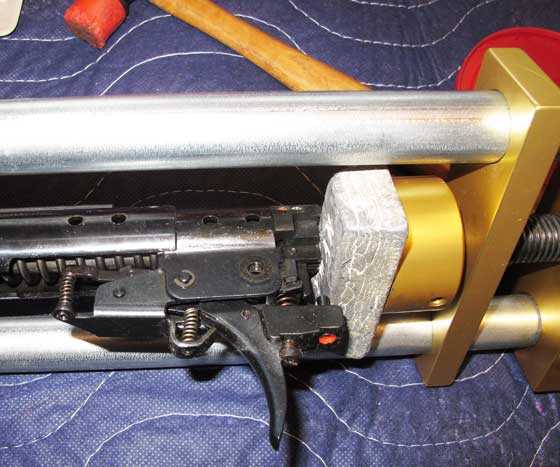
Action in mainspring compressor
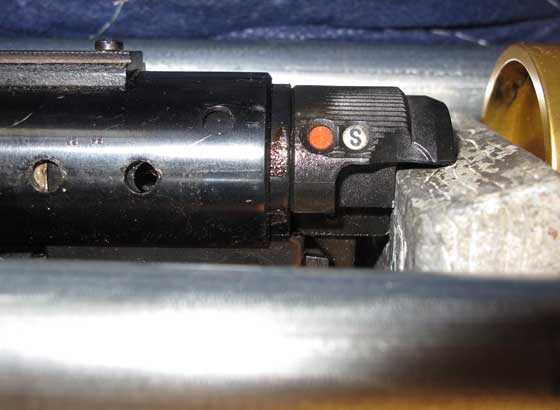
Next, the barreled action is put into the mainspring compressor. With the compressor’s screw, tension is put on the back of the safety slide, pushing the trigger housing slightly forward (into the spring tube). This takes the mainspring tension off the parts that hold the action together.
You can see a lead block I used in the compressor to make contact with the back of the safety. Putting some tension on the safety slide relaxes the mainspring tension on the 2 Diana crosspins that hold the action inside the spring tube. First drift out the front pin and then the rear pin. If you have enough tension on the safety slide, both pins will almost fall out of the spring tube.
Both action crosspins have been punched out of the spring tube. With just the right tension on the safety slide, they almost fall out on their own!
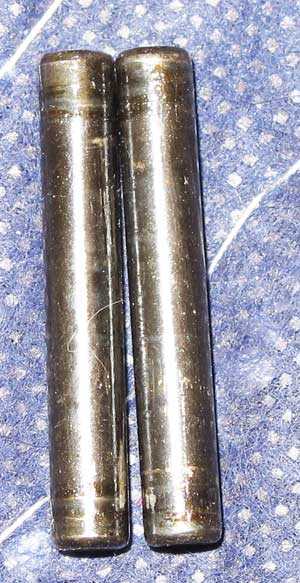
The action crosspins look identical, but I try to keep them in their original holes. Pin on the left goes in the front hole.
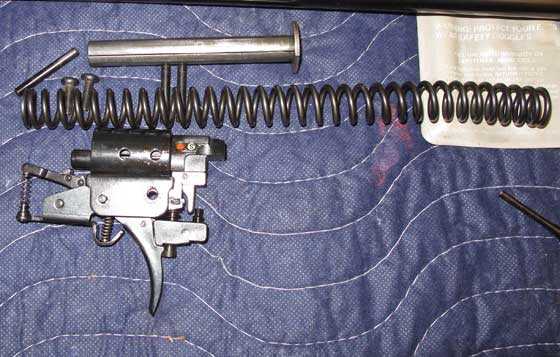
Trigger assembly is free
Once the action crosspins are out, the trigger assembly is free to move and come out of the spring tube. It’s what holds the mainspring in the spring tube. Just relax tension on the compressor, and the mainspring starts pushing the trigger assembly out of the tube.
The trigger assembly is backing out of the gun. This photo shows the lead block that’s pushing against the safety slide to hold the gun together now that the crosspins are out.
Here you see the mainspring almost completely relaxed. It has another half-inch to go before being completely relaxed. This shot shows more of the mainspring compressor that’s holding the action together.
Once the mainspring is relaxed you can take the entire barreled action out of the compressor. The trigger assembly is now out of the gun, and its beartrap device spring relaxes. You can see that in the next photo.
The trigger is out of the gun. You can see the unitized construction. On the left of the trigger unit you can see the beartrap lever sticking up and the spring that powers it.
Once the trigger unit is out of the tube, the mainspring and spring guide can be seen. They now pull straight out of the gun.
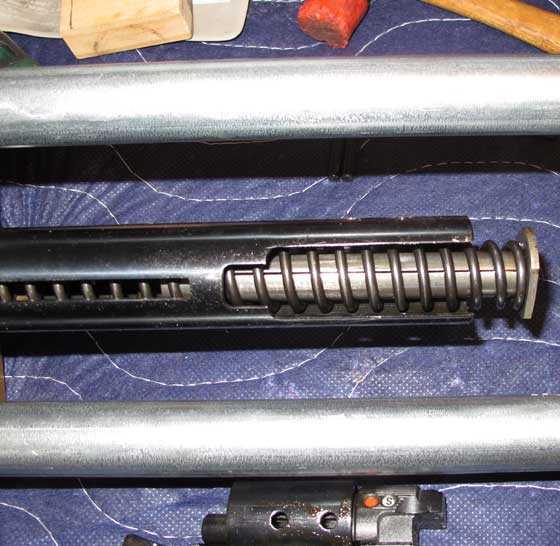
There’s the rear of the mainspring and the spring guide. They pull out of the gun at this point.
Spring bent!
Once it was outside the rifle, I examined the mainspring. It looked pretty good until I noticed a bend at one end. That was the end that was on the spring guide. That small bend is where most of the painful vibration came from.
There’s nothing that can be done about a mainspring that fails this way. It failed from time, nothing else. It was just under compression (preload) too long, and the fibers in the steel failed. What I’m saying is that nobody did anything wrong for this to happen. It just did.
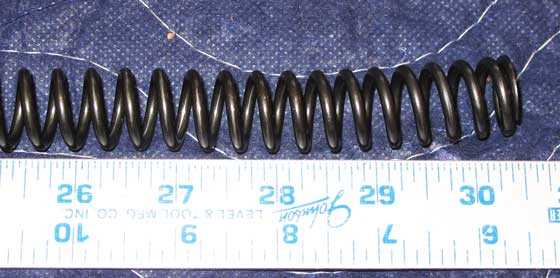
The bulk of the mainspring is straight. Only the last 2 inches bend. But that’s enough to cause painful vibration when the gun fires.
Gun is dry
The other comment I’ll make at this point is how dry the powerplant is. I found the sticky residue of dried-out oil on some of the parts, but most of the parts were bone-dry. That’s not good. While it doesn’t cause the vibration the owner complained about, it also doesn’t help the gun in any way. When I reassemble the powerplant, I’ll be sure to lubricate every part with the proper lube to keep things running well for decades.
The mainspring is dry, the spring guide (silver part above the spring) is dry and the trigger is dry.
The rest of the powerplant
Based on what I’ve seen up to this point, I don’t think this air rifle was ever taken apart. I think it’s just the way it left the factory back in 1988. Yes, the light oils have evaporated and turned to varnish, but that’s all that’s changed.
The next step in the disassembly is to remove the piston, which I was certain would be completely dry and probably also look like new. To remove it means separating the barrel from the spring tube, and then there’s a trick to removing the barrel as well as removing the Diana 45 piston from the gun. There are many more pictures coming in the rest of the disassembly, which I’ll do tomorrow.
Last word
The Diana 45 turns out to be more complex than some other breakbarrel spring rifles. I think taking one apart is a job left to experienced people, so don’t start on yours unless you understand everything I’m saying here. This is not the gun to learn on. Tomorrow, you’ll see more of why that’s true.


I’m biting my nails? Been waiting for this for some time! I have a lot to prove to myself when it comes to to tuning air guns! The last class that I wanted to to enroll in was $3500.00! Plus certain tools and misc. expenses? For a five day class! Couple hours each day? Been out of them for over 35 years? Built a collection and walked away! Now interest is eating my lunch! Never had much problem with powder shooters! BUT! Airguns are huge in my life! Thank you for your free education! Semper fi!
For that kind of money you could buy a lot of cheap chinese springers to tune and ruin them all. If you manage not to ruin some you could even sell them to fund further adventures in tuning. Then once you are comfortable move from the clones over to the originals.
BB
That is a very interesting way that Diana holds the rear of the action in the stock and I guess the pin is somewhat of a interference fit in the two bushing in the stock to keep it from sliding out during the vibrations of shooting.
It reminds me of the 54 air king I built about a year ago for my friend at the CMP range here in town.
I now have a 1988 model 48 that is in like new condition that shoot very strong and has just some slight spring noise when fired and it will eventually get a tune job and a vortek kit put in it but right now I am in the process of determining if and how much barrel droop it has in order to get the correct mount to compensate for it as I had mounted a scope on it and began sighting it in when it was grouping very well but just about 1/2 high of the bulls and the last little bit of scope adjustment put it in the floating erector tube flyers range of sighting dilemma so I know it has droop just not how much till I can sight at thirty yards and measure how low the pellet hits since I optically centered the scope with a mirror so that it is in the middle of it adjustment range.
I hope to get that done tomorrow so that I know which mount to get to correct for its droop.
It has a T01 trigger and I did the mod to the trigger of cutting about 1/16 inch off the first stage thread seat on the trigger to allow for more adjustment of the stages and it made a world of difference in its feel and actually has two distinct stages now with a much lighter and crisper feel for the second stage release. I will polish it parts when I do the tune and put the kit in it so it will be even smoother still.
BD
Buldawg76,
Which scope mounts do you use to compensate for barrel droop? Also, any brand suggestions for scopes that have a wide latitude of elevation adjustment?
Thanks!
I don’t know what BD uses, but PA carries several rings and mounts that are adjustable and some that have a certain amount of droop compensation built in. I personally like these two.
/product/hawke-sport-optics-1-pc-elevation-adapter-3-8-to-weaver-rail?a=4163
/product/hawke-sport-optics-9mm-11mm-dovetail-to-weaver-rail-7-2?a=5065
These allow me to use Weaver/Picatinny rings and are adjustable to however much you need, they grip very nicely and also have a stop pin.
Also, FX manufactures a set of adjustable rings that are supposed to be excellent.
Most adjustable mounts and/or rings can be right pricey, but the good ones are worth the investment.
RR
I am hoping to find a fixed mount to correct for the droop as I don’t want the scope mounted any higher than absolutely necessary above the action. If I got the two mounts you link to it would require me to also buy low mounts to keep the scope as low as possible so that is why I would prefer to use a fixed mount that attaches directly to the raised dovetail instead of having a mount in between the scope mounts and the guns dovetail.
It all depends on how much I need to correct for as to which way I go as I want the scope to be in the middle of it adjustment range when mounted.
BD
BD,
What you will find is the droop mounts are likely higher than these two mounts. You may have to go with the adjustable rings.
RR
I have looked at several mounts and the one you linked to appear to be as low if not may be lower than the medium mount that my scope is mounted with right now I just am trying to stay with a one piece mount or ones that fit on the raised dovetail of the 48 rather than clamping those mounts to the dovetail and then a scope mount to them .
Have you used them or laid eyes on them because the reviews seemed to be mixed as to them staying in place or holding there adjustment well as some have had no issues and others say that they will not stay in place or hold an adjustment. I am wondering if they have stop screws and if they can be adjusted without removing the scope to do so.
I did shoot the 48 today at thirty yards with the scope centered and with JSB 10.34s it hits around 5.5 inches low and with 10.5 Cps it was about 6.5 inches low but it was quite windy so the ranges could be of just slightly.
If I use the formula of total inches of distance from target multiplied by the amount of correction I come up with a correction amount of .005 to .006 thousands of an inch.
( 30 yards = 90 feet = 1080 inches x .005 inches = 5.4 inches of correction ) or ( 30 yards = 90 feet = 1080 inches x .006 inches = 6.48 inches of correction ) so I only need a shim of .0055 inches to put me right in the middle of center of correction.
BD
Hiveseeker
I have not shot the 48 yet to know which mount I will need at this point because it all depends on the amount of droop the gun has as to which mount I need to correct for the droop.
I am not aware of any scopes that necessarily have more elevation adjustment than others but I do know that most scopes do not have enough to compensate for the amount of droop the early RWS guns have and that is why I need to shoot it with the scope centered to determine droop on order to get a mount that will put the scope in the center of it elevation adjustment.
I had mounted a scope and was getting it sighted when it got to upper end of adjustment and started shooting everywhere due to the erector tube bring barely secured by the spring tension for the elevation range,
BD
RidgeRunner and Buldawg76,
Thanks for sharing your expertise! I’ve got a couple guns that are at the upper limit of scope adjustment range and have been considering various fixes. Your experience appreciated!
Hiveseeker
I shot the 48 today with the scope centered and it has between 5.5 to 7 inches of droop at 30 yards depending on which pellet was shot. I shot JSB 10.34s that hit at the 5.5 to 6 inch area and CP 10.5s that hit between the 6 and 7 inch low area on my cardboard target that I drew a magic marker line the full length of the cardboard that was about two feet long and 1 1/2 feet wide. The line was drawn vertically down the center of the cardboard then I drew another line about 6 inches from the top of the cardboard horizontally across the cardboard and placed an X at the intersection of the two lines as my aim point and then shot at the X and measured how low the two groups of five pellets of each type hit below the POA and that is how you measure for barrel droop.
So by taking the distance from the target in inches which in the case of 30 yards is 1080 inches and multiply it by the amount of correction needed to achieve the required correction I came up with a amount of .0058 inches of difference between the front and rear mounts. I just plugged in thousands of an inch numbers until it came up with the amount of 5.5 to 6.25 inches of droop that I measured by shooting. Here is the formula I used in numbers 30 yards = 90 feet= 1080 inches X .0058 inches = 6.264 inches which is right at the middle of my two groups of pellet POIs so I need to shim the rear of the scope either .005 or ,006 thousands of an inch to get me very close to dead center on the elevation for my POA to match my POI.
This will keep the scope close to the center of it elevation adjustment and prevent the flyers I had due to the erector tube being floated in the scope.
BD
To be honest 3 or 4 shims of black electrical insulation tape would probably deal with that
Dom
I agree that several layer of electrical tape would likely deal with that but I have some .005″ brass shim stock on hand that would also work and will not compress as the tape would and over time the tape could crush more or work it way loose as well. The shim stock would be more likely to stay in place and will not compress so that I have to guess and the number of layers needed to make the correction, but the .005″ shim stock with one layer of electrical tape or the plastic bandage tape I use to put in the scope rings for some added grip would work to give me the .00625″ I need that would put it smack dab in the middle of the droop range of compensation that would be required.
I just don’t really care to shim as it puts undue stress on the scope tube even at only 5 to 6 thousands of an inch it is still causing flex in the tube so it would be my last resort as I don’t care to damage a 200 dollar scope because I shimmed rather than buy the correct mount for the compensation needed.
BD
Aah, I do a little trick, I wrap the scope in the front mount, twice round, then adhere a few one inch lengths to the bottom of the rear before wrapping that twice round, but yes, if you can afford the mounts get those.
Dom
I use the plastic bandage tape under and over my scopes by cutting a piece just the size of the semi circle of the mount bottom and the caps and adhere to the mount instead of the scope so it lets the scope move easily when you are adjusting for eye relief and reticle alignment but when the caps are tightened it hold the scopes firmly in place with just a little shock absorption as well. I don’t want any glue residue on my scopes so that is why I put it in the mount if they don’t already have the black tape in them when you get them new.
I may try the shim but I have a friend that has a RWS drooper mount he is going to let me try so I know if it corrects the droop or over corrects as it is .025 inches of correction and is made by RWS for their guns.
BD
I’ve been lucky, my 52 doesn’t seem to have any droop, in fact when I fitted the new Nikko 4-12 x 50AO it was only about 3″ off bull at 35 yards
Buldawg
Yep I think I would get there early.
Dom
How did you determine you didn’t have droop?
Was your reticle centered before you shot?
It has plenty of adjustment in both directions, they are normally middle-ish from out of the box
Droop is only a problem if it takes you towards the end of adjustment at the ranges you shoot at
Or, in other words, if I don’t notice the droop problem, then I haven’t got a droop problem 🙂
Gunfun
I met with Loren and got his RWS mount to see how it works on my 48 and he has bought a FWB sporter that he just got today and he had it with him so I got to shoot it some and it has not had any adjustments done to it at all. It had no spring buzz or twang like the one BB reviewed and the trigger is perfect right out of the box, its recoil is just so light and smooth that it would be easy to shoot FT with it and it looks very nice and finely crafted.
He had another friend there with him that had a Benjamin trail NP in 177 and I shot it several times and it is another Vitamin in a synthetic thumb hole stock and makes me wish I had not pissed the guy on armslist off so that I would of gotten the 22 trail NP. He also had a Hatsan striker edge in 25 cal and got to shot it as well and it is a very low recoiling gun just about like the benjis that you and me have so that may be on my radar in the future. I am going to do some research on it to see just what others say.
I got the Mrod sighting checked and am ready for tomorrows FT match so we will see how I do this time as its at least going to be above freezing for the start of the match for once and should be in the 60s by the end of the shooting. I am still unsteady even with the new shooting bag with the Mrod so I guess I will have to get a good gun shooting rest to do my sighting with so the gun will be held steady in position on target as I can get groups with the Mrod but not well enough to be exactly sure were the pellet is hitting unless I shoot 5 pellets and change targets and adjust that way but I got started late today and ran out of daylight. I will get there early and recheck at the sight in range to be certain.
BD
Dom
So you did center the scope to check first.
And don’t take for granite that they are centered out of the box.
So then what makes you notice the droop problem then.
That the turrets are getting close to bottoming out?
You have to know where they are first to determine that.
Right?
Well, my Remington Express has droop that is still 4″ off the target all the way out, so has a few shims in it to get the scope a dozen turns in (shoots to the left too, but another story….that ends with the words “don’t buy one”)
The Diana I fitted it, it was firing about 3″ high and about half inch left at 20 yards, I pulled the windage in but as I leave my 177 full power rifles at 35 yards I waited until I got to the range and wound the pellets down on to target (approx 4 turns)
So it’s middle-ish
To be honest, it’s been zeroed there for 10 months and will likely remain there for the next ten years, I learn the mil dots at different ranges.
Not a big fiddler really, truth is it remains on 8x mag most of the time too.
I can give you a half inch group at any range up to 50 yards so I’m not noticing any problems with my method, came third last Sunday in the Spring class HFT 🙂
Dom
It sounds like you got one that was built on a Wednesday instead of a Monday or Friday. At least here in the US of A it is a trend that if it was built on a Monday it will have issues because all the workers are still hung over from the weekend and if it was built on a Friday it will have issues because all the workers are thinking about what plans they have for the weekend.
So it needs to be built on a Tuesday thru Thursday to be a issue free product. LOL
I wish mine was in that range but even 5.5 to 7 inches is not as bad as some. I got my buddies RWS .025 drooper mount to try and see how much of correction it makes but I think I am going to find that it hits way high which is not all bad as at least adjusting down does let the erector tube float since it is applying more pressure to the spring instead of less. If it hits to high then I will most likely get the BKL .007 inch drooper mount.
BD
Dom
Sounds more like the scopes not mounted right to me.
The Remington?, that scopes been on and off a dozen times, and now has been changed for my old Tasco and mounts, still terrible.
However, the barrel pin is the same as this 45, and the holes are misaligned, a pigs butt to get the barrel back on after I lube tuned it, I think that is where the problem lies.
Dom
Ok that makes sense about why the scopes so far out of adjustment.
Yes, a vice and a bit of “romancing” with a big hide hammer is on the horizon 🙂
Dom
Whatever works.
😉
I’ll bet that pin going through the stock sure adds to the rigidity of the design.
Reb
I don’t know if it would any better than screws thru the trigger guard or not as it would depend on how tight it fits in the stock bushings and the thru hole of the trigger housing as well.
The problem I see with the cross pin and bushings is if it is took in and out very much it will eventually loosen and cause movement in the stock whereas screws can always be tightened so my self would prefer screws over the cross pin.
BD
A lot of well used 45’s wear an Allen bolt through there, it doesn’t seem to effect all of them but on some the pin quietly slides out and hides in the grass.
Dom
I figured that the cross pin would eventually loosen and get replaced by a bolt as it seems to be a less than ideal way to secure the rear of the action in a stock.
BD
Buldawg
So did you ever get to shoot to see how much droop your 48 has? And centering the turrets first did tell a story didn’t it.
Also remember when we was talking about that optical centering the turrets that you noticed something I never played attension to before.
You were able to tell that the optics of the Hawke scope was better than the other scope you had.
Man my phone still auto corrects.
Suppose to say. something I never (payed) attension to before.
Gunfun
I just got done shooting the 48 for droop correction and see the reply to RR above as it has the correction amount I need to get it in the center.
Yea when I centered the turrets optically after the gun was shooting nothing but flyers I found that the horizontal turret was at it end of adjustment and floating the reticle and was the cause of the flyers. I used the mirror trick to center the reticles in less than a minute per scope and the reticles are perfectly centered and I centered two of my Hawke scopes and the one Hammers scope that was on the B40 that will now get the new Hawke scope when it gets here.
When using the mirror to center the reticles I could see a definite difference in the clarity and resolution between the Hawke scopes and the Hammers scope as it was much easier to see the ghost reticle in the Hawke scopes than it was in the Hammers scope.
BD
Buldawg
Now that your getting all these little tricks done your gonna tear’m up at that field target match Saturday.
🙂
Gunfun
I am hoping it all helps to make me a better shooter and every little trick makes a big difference in the long run.
BD
Buldawg
You got it.
I also have one of these 45s, i bought it 2nd hand a couple years ago. It looked like it had never been used and the gun shoots smooth and accurately barely any twang. Velocity in the low 800s. I like it more than the 2 fwb124s i had so i sent those down the road!
Boy that spring sure did bend.
Could it be from to much spring preload. It just seems to me that the spring would work better in the gun with zero preload. I believe it helps numerous ways.
And BB I just know you been waiting for me to say that. But really. What does the extra preload accomplish anyway that a lot of the spring gun manufacturers do. Maybe there is no right or wrong answer to that question. But why put something under extra stress if its not needed.
I too await BBs answer to the spring load, but if I am not mistaken it is because it must have some force against the piston when fully extended because of the compressed air that will be pushing back against it as it is going through the firing cycle. Less rebound will reduce the firing cycle time and also transfer more force to the pellet. If your spring is strong enough, you can get away with little or no preload, however the cocking may be more difficult and/or the firing cycle may be a little more harsh.
Gas springs do not require preload, but my brief experience with one was most unsatisfactory. My CFX would literally slap me side the head every time I pulled the trigger. I for one am not convinced that is the way to go unless I have one that I can tune. That might work.
Gunfun
I agree with you, that’s where a length of stroke comes to play. A TX200 has the perfect ratio length of stroke to length of spring. Every action is different so everything comes into play.
I guess what I said is that preload is needed to insure the spring will be compressed to max operational level if too much space left in spring after cocking than energy is left over.
That raises a question. Do those springs that come with custom tune kits have the same pre load?
I doubt the manufacturers of aftermarket tune kits with their own springs consider much the original manufacturer’s preload but rather cut them to a length they deem proper for the application.
Chris in Ct
After I tuned my TX with a Vortek kit I actually have a 1/2″ of movement. It will slide back and forth that much before the cocking lever starts compressing the spring.
I even used the 12 fpe Vortek kit that uses a seeker spring. The gun shoots just as fast as it did from the factory and with less recoil and less cocking effort. I can cock my TX by just using my pointing finger. I bet other peoples TX’s are that easy to cock.
So that’s my whole question about preload. Why stress out the components if you can still have a gun that shoots the same fps with less recoil, less cocking effort,less pressure on the trigger locking mechsnism,less blow by on the compression seal and less pressure on the cocking linkage.
2nd paragraph should say.
I even use the Vortek kit that uses a (lighter) spring.
Gunfun1
I know what you mean I have a RWS93 that has play before the linkage contacts piston.
Chris in Ct
And I’m willing to bet your 93 has a calm recoil.
Gunfun.
Yes it does..
Chris in Ct
I was pretty sure that was going to be your answer.
🙂
That’ probably why I could load my Slavia 618 without having to cock it and it was smoooth.
Chris in CT
I don’t know about all spring guns but I can tell you that my B40 guns stock spring is about 1/2 inch longer and is bigger in the ID and OD than the Vortek kit spring that was put in the gun and there is night and day difference in the shot cycle and felt recoil between the two and that is even after I cut the stock spring shorter by 1 1/4 inches to give it zero preload.
The Vortek spring has just a slight bump as compared to the stock springs much heavier felt recoil and the fps is very close to the same between the two so I believe it all is based on the spring used as to it wire diameter and number of coils wound in its length as to how it performs in a gun.
BD
GF1,
RidgeRunner got it right. It prevent piston bounce and also cancels vibration faster — until is bends like this one.
B.B.
BB
I have to disagree. Sorry. We have to many high stress spring applications at work that actually use free play to dampen the shock after the piston contacts the stop.
I would say the spring bending is from that extra amount of spring not being supported by the spring house before it starts to compress.
Lay your spring guide next to the spring and look where the bend starts and then tell me what you think.
Should say spring guide. But spring house would be a true name for it also no that I think about it.
Oh I see you did above. Looks like whole lot of unsupported spring to me.
GF1,
The part of the spring that bent is the part that was on the spring guide all the time. And, yes, it is cvalled a spring guide by everyone.
B.B.
BB
The straight part was in the piston “aka spring house” similar effect as the to the kit Gunfun1 put on his TX but his houses the opposite end of spring. Gunfun1 is correct the 45’s spring bent on guide side. And that was the weakest link..
Something else to think about, when the spring is compressed it opens its coils up making it looser on the guide and tighter in piston.
BB
So there you go. That’s what I mean. If there wasn’t all that excess spring it probably would not of bent like that.
Take a ball point own spring and support half of the legnth with your fingers then press down on the end of the spring. It will try to bend over until you finally support all or most of the spring when it compresses.
Two things can be done. Shorten the spring or support more of the spring.
In the case of our air guns we have only so much room as far as legnth is concerned. So we can add only so much additional support or we have to shorten the legnth of the spring.
Ball point pen spring.
The problem with shortening the spring is that you will lose power. Prove it to yourself. Take a Wang Po Industries sproinger. Shoot it across a chrony. Now shorten the spring to where you have almost no preload. Shoot it across a chrony. I am willing to bet some pretty serious money you will see a quite noticeable decrease in power.
Almost every sproinger will behave in such a manner unless it is over sproinged in the first place. Air Arms gets away with it because they designed it that way from the beginning.
As far as keeping the spring from bending, it is going to happen. You have to allow room for the compressed diameter of the spring. You might be able to sleeve the rear portion of the compression tube to the diameter of compressed spring and help some, but the spring is going to bend at a weak metallurgical point as it ages no matter what. It may be totally supported inside and out, but once the support is removed the bend will show. It will help, but it will still happen.
RR
Your not reading what I said. And you must of forgot about the 300s.
I shortened the spring on the TX and the 300s and used a lighter spring and the velocity of not guns recorded higher fps readings after I did the tunes and cut the springs.
Ask Buldawg what happened with his B40 when he cut the spring.
Two distinct things.
Less recoil.
More fps.
Sorry I’m only stating facts that I know happened on 3 guns.
I think its your turn to try. Don’t you have another 300s. 😉
Should say used a lighter spring and the velocity of (both) guns recorded higher fps readings.
LOL! Yes, but it has the two stock springs. I do not see me cutting them, however, if I think I am going to hang on to it I might get a new spring and try it. Of course, then I will have to buy a chrony.
RR
You know they offer a single spring also for the FWB 300s don’t you.
Which spring do you think would make the gun have less reaction in multiple ways.
The single spring or the dual springs with the derlin spacer in the middle.
The dual spring setup. One has a left twist and the other has a right twist. The idea is to counter the torque of the springs unwinding when fired.
The reason that yours has a single spring is one of the springs was broken and I installed the replacement spring offered by ARH.
RR
Your totally right about the dual springs.
But your also totally wrong about something else.
That FWB 300s I got from you does have the double coil springs that are wound in opposite directions.
Matter of fact a I was very happy it had that option.
Are you thinking of something else by chance?
No, I guess I did send that one to you.
I really need to start working on this other one.
RR
You really do need to get that 300 done.
I absalutly love shooting that one I got from you. They are cool guns.
RR
The main point is that the spring is compressed to its max, take that same spring and see if all the coils are compressed to max if not them put in spacer washers so they are, and the power will rise pack to same power as long spring. Its not the length of spring but the rate it of speed it returns to its relaxed state. look at some examples of Diana 48 compare to HW80, the 48 shorter spring produces more power. Ok maybe that wasn’t a good example but ill leave it to see if somebody with knowledge commit.
RR
I will have to agree with GF1 on the spring issue as I got my B40 used with both a Vortek 12 FPE kit in it as well as the OE spring, guide and top hat. The kit by the way is the exact same kit that Vortek sells for the TX 200 so they fit both guns as a B40 is a poor mans TX.
I put the OE spring in and chronyed the gun and with it in stock configuration and recorded a fps of 707 with JSB 10.34s, then I cut the stock spring by 1 1/4 inches to give a zero preload when assembled and it still chronyed a fps of 710 with the JSBs and the recoil was cut in half over the stock setup.
Then I put the Vortek kit back in it as it was setup from the seller as I received it and recorded a fps of 727 with even less recoil than the zero preload OE setup. Then I took the spring out of the rear guide and removed the two nylon washer and one rubber washer from inside of the guide between the spring and the rear of the guide. I then put the spring back in the rear guide with no spacers of any kind and the Vortek top hat is 9/16 of an inch long past where it fits inside the spring so I made a new top that is only 1/16 inch more than the spring itself and installed one rubber washer on the rod of the piston between the piston and the spring top hat I made so when assembled it has only 1/2 inch of preload and it recorded a fps of 735 with just a very slight bump when shot and not any real recoil to be enough to even cause the gun to move in my hands so it is a very mellow spring gun with as close to a PCP shooting quality as I could ask for.
I am not going to cut the Vortek spring as GF1 has done on his to have actual free play until I get the droop checked so I can be sure it going to be accurate in its grouping without running out of scope elevation adjustment as I did at first.
BD
BB.
I agree with Gunfun1 his TX200 has extra loose fitting spring compare to stock and has less felt recoil than original tighter fitting spring. It matter if the company engineers did their home work. No wonder Diana did away with the 45.
I wonder if that was the secret tune done to the Gamo Hunter Extreme, two delrin spring guides one at each end inside spring and delrin sleeve guide over the spring.
Chris in Ct
That blog that BB did about that gun is the whole reason that got me going on trying to get as close to a zero recoil spring gun as possible.
I wanted a light cocking effort and recoil and still maintain the same fps or in my case of the TX more fps.
But I did use some rubber bumpers and flat steel washers in front of the coil spring closest to the piston head plus the 1/2″ free play.
I wonder if anyone’s ever tried a silk sleeve? I’m sure it wouldn’t be as durable as Delrin but just curious.
Yeah, Bummer the guy left us hangin’ on that one. At least we know someone can do it. Sounds like Gunfun’s getting close now.
Reb
Closer then you could imagine.
😉
One of these days we’ll have to see that in an exploded schematic format so I’ll feel confident that I know what’s going to happen when what gets done.
Reb
I drew a picture and texted it to Buldawg a while back.
I know I don’t have the picture anymore and I know my TX ain’t comming apart right now. Its staying as is. I hate taking the action out of a stock after I get it working and sighted in with my yardages and scope centering.
But I will draw another picture and post it. Won’t be able to post it till after I get home tonight though.
Will that do?
I was in bed so I missed Buldawg’s call but it can wait til I’m rested up in the morning. Thanks!
Reb
No problem. I emailed you and Buldawg the picture I drew.
My phone was dying at work and I forgot my charger so I asked Buldawg to call you if he had time.
So you got it now and you can see what you think.
I wasn’t meaning right now but I’ll check it out.
Thanks!
Reb
No problem.
Thanks B.B.,
I am looking forward to the next report. So far it looks pretty easy to me, after I build a spring compressor first. This is what I have to learn on. My other springer’s are a RWS Diana 52 (dressed up 48) of 1990 vintage that has a very solid and strong shot cycle and an IZH 61 that is only a couple years old. Please share your source for parts. I hope that you convert it to a synthetic piston seal.
Tabrown,
I will not be converting the piston to use a synthetic seal, as the leather seal is perfect. It will last for the next 50 years if cared for.
B.B.
I know I felt more comfortable leaving the leather seal in my QB-36!
I love these classic rifle tear downs. Just like the whole Diana 27 series. You promised us you would come back to that Diana 27 sometime. So maybe I can give you an excuse to do another classic diana blog.
Looks like the same action as the Model 50. I have taken one of those apart and they really are a bit of a pain. I never got mine as smooth shooting as I wanted it. Mainly because I did not want to take it apart again..
How much slop is there between the spring and the guide? I believe these are such vibromatics because the spring has so much wiggle room. A tighter fitting spring and ideally a well fitting top-hat or shim in the piston should be able to do something about that. Where is the piston anyway?
I bet you are going to spend a whole chapter on that in the next blog!
Carel,
I plan to discuss the rest of the powerplant in tomorrow’s blog. That’s when I will tell about the tolerances.
B.B.
Edith, did he clean the kitchen table?
Fred_BR,
Yes 🙂
Edith
Thanks B.B am anxious to tune mine up to deaden the vibe. appreciate the tutorial. Seeing it come apart makes me glad I haven’t opened it yet. There is an absence of tune ‘kits’ so I am awaiting what can be done before I start. This does make me appreciate a Weihrach rifle more as they seem easy to access.
This post was caught in the spam filter and eliminated.
Hello BB and the group. I am quite envious of your gun smiting skills. When I was a little kid, my Dad would take me out to the county dump. There he would shoot ground squirrels and rats with a 22. While he was doing that, I was busy scrounging for stuff to “take it apart” We would come home I would have stuff like broken clocks, old radios, about anything that had parts to be taken apart. I never really learned , even after 77 years on this planet, how to put the stuff back together ! Now in the age of digital cameras at least can have a photographic record of how the stuff was assembled.
BB and Edith can you tell me why there is no longer closed captioning on the air gun reviews ? That was a feature I sure liked .
One more question. Starting to get a small collection of action pistols. Have not figured away to display them. I have noticed Paul in his reviews sometimes show a rack to display them. Does Pyramid Air sell anything like that ? Keep up the good work, I sure enjoy the blog. Harvey
Capello’s airgun videos never had closed captions.
Edith
Edith here is the link for his non blowback review of the Legends P08. At the bottom of the screen you can click on the little box labeled CC and you have closed captioning. I miss that feature . Best wishes
Harvey
/product/legends-parabellum-p-08-co2-pistol?m=3151
Harvey,
Thanks. I’ve forwarded screenshots of this to our marketing department. Let’s see if we can get that back.
Edith
Thank you very much. Edith. Keep up the good work
Best regards to you and Tom
Harvey
He must be talking about the link BB puts on his photos of items he reviews here, when you click on the photo it will pull up PA site if item is still available for purchase.
I had to laugh at the “taking things apart and not being able to put them back together”! Can relate!
Been there, done that – got in trouble but learned a lot so it was worth it!
I was very young and got a hold of some of my Father’s screwdrivers and started a screw collection in an egg carton. There was a whole series of events with chairs collapsing, handles coming off, doors off their hinges etc. Fortunately I was not strong enough to remove all the screws I found. I remember my Father spending the morning going around the house with my screw collection carton looking to match the screws to things that might fall apart.
I got a couple of old alarm clocks and a set of jewellers screwdrivers as a birthday gift that year.
The urge to see how things are made is still strong. Fortunately I am pretty good are reassembling things now (digital cameras are great for that!).
Vana2,
Awesome story. Thanks for sharing that. I did something similar with my first 20″ bike. Got it for Christmas, Ohio winter, rode it a few times, used Dad’s tools and soon tore it 100% down. Yes, got it all back together and working fine. I do not remember much help. I think my parents wanted to see if I could do it. I was 8 or very near that. 🙂
Later, I got into mowers. Amazing how many I got free and with a little TLC, got em’ running and resold them. Some, even to the very same people that gave them to me in the first place!
So yeah, I can relate to screw, nut, bolt, etc. “collections”.
Harvey,
I can’t comment on the Airgun Reporter reviews, as they are done by Paul Capello.
No, Pyramyd AIR doesn’t sell display racks for handguns. Paul is a carpenter and makes a lot of the stuff you see in his reviews. You might want to do a search on the internet for pistol display racks and see what you find.
B.B.
StevenG -Your right! Indeed I have purchased many chinese springer airguns etc.! Some were very good ones! Also many BB-Pellet airguns pistols, rifles etc.! As a young boy I started braking everything down to see how it works? Mechanical etc., my first airgun was a brake down tear apart Daisy BB rifle in 1950! My first BB airgun to shoot, my first pellet airgun was Benjamin multi pump rifle and my first to own was a brake barrel Beeman air rifle made in Germany! Semper fi!
Met my new doctor today and we got some X-rays of my lower spine and hips. Next appointment in 14 days so I guess we’ll see what our options are then But my neurosurgeon say I need to be physically active so I need to get over that hurdle.
Nice job with the rifle. I fall considerably short of the 100% confidence threshold for disassembly. 🙂
Matt61
When are we seeing the next part?
I got a 45 in a trade. it wouldn’t catch n lock the spring.opened it up and the spring guide where its flat and rests on the trigged housing was wore and was turned keeping it from letting the trigger group latch.trip to my mig welder and built it up and a little fileing cured it .but it had a nasty twang as the guide is very loose in the spring.next job is build a new guide with a snug fit.
When mine was apart the leather seal was well lubricated and looks like it will last longer than me.
Robert,
I have the parts to finish the tune. It just takes a lot of time to do, so I was waiting for the right day to do it.
Soon.
B.B.
Thanks bb, was just curious.I’m looking to get some more delron and making a snug fitting guide soon.my spring is straight so I’m hoping I can tame it down soon
Thanks BB for valuable information.
Well, my first gun to try servicing my self was the mod 45. It was tricky to compress and nail yet joyfull!
The problem I have is the saftey thing that is attached to finger trigger. As I shoot it moves/slips away from the trigger causing gun safety to fail.
Is there any thing I can do to have this problem solved.
Regards,
BoAziz,
Welcome to the blog.
From your description I can’t envision what is happening. But it sounds like the safety is installed incorrectly.
B.B.