by Tom Gaylord
Writing as B.B. Pelletier

BSF S54 Match air rifle
This report covers:
- Rear sight adjustment
- Accuracy testing
- First group
- Group two
- Group three
- Conclusion and a shocker
Today, we start examining the accuracy of the BSF S54 Match rifle I’ve been testing for you. As you’ll remember, this rifle has already surprised me by being a lot more powerful than I expected. Many years ago, I owned a .22-caliber S54 that had target sights. I don’t think it was the Match model, but the action was the same as this one, except for the caliber. That gun wasn’t nearly as powerful as this one, which is what lead me to underestimate what this one would do. Apparently, I have an almost-new rifle whose action hasn’t even been broken-in yet.
Rear sight adjustment
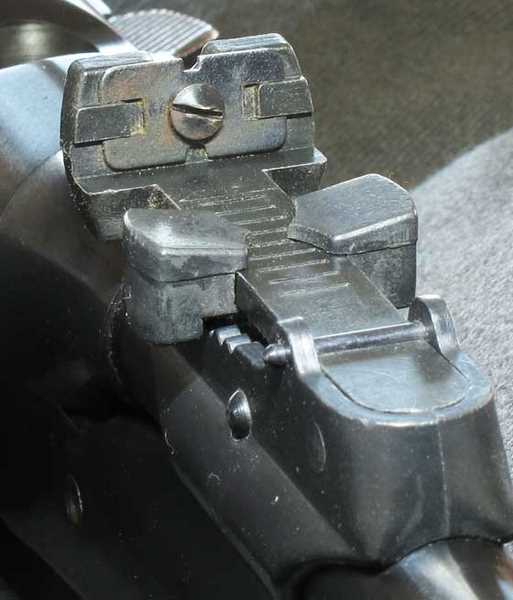
I was asked by a reader if the sporting rear sight is adjustable; and, of course, it is. But the adjustment for windage is a crude one. You loosen a screw that holds the rear notch blade and slide the blade sideways in its holder. While the amount of movement doesn’t look like much, the rifle is remarkably well-centered as it comes to you, so this adjustment really does work. It’s just a clunky method that’s imprecise to do.

The rear sight adjusts for windage by loosening the screw and sliding the plate with the notch to one side or the other. It’s imprecise, but does work well with the rifle. Notice that there’s a v-notch on the bottom of the plate.
The rear sight is at the end of a long leaf. Elevation is adjusted by a sliding bar on an inclined ramp. I found the steps too large for precise adjustments on targets at 10 meters, but of course this sight isn’t intended for targets. It’s a sporting sight that was just put on the S54 Match out of long-standing convention. The peep sight that my rifle lacks is the real rear sight meant for this rifle.
I tell you this because you will see by the targets that I could not get my groups centered. Of course, I spent only a few minutes adjusting the rear sight. With more time spent, I’m sure I could have gotten things closer to the center of the bull.
Accuracy testing
I had absolutely no idea of which pellet to use in this rifle, so I started with what I knew — which is the fact that this rifle is a taploader and will probably do best shooting pellets with thinner skirts. The skirts need to be expanded by the air blast to seal most of the air behind the pellet, and the loading tap creates a challenge in that respect. If the pellet was already inside the bore when the gun fired, things would be different, but it’s starting its flight inside a tapered loading tap and has to jump from there into the rifling. It’s pretty important to seal as much air behind the pellet as possible so the velocity is both stable and respectable. I’ve found that the RWS Superpoint pellet works well in this capacity.
I decided to start by shooting with the rifle rested directly on a sandbag, because that position is more stable than holding it with the artillery hold. The S54 is still a fairly weak spring powerplant whose firing cycle is pretty smooth, so there was a good chance I would get away with it. After getting okay results on the first target, I stuck with that method throughout the test.
I shot at 10-meter air rifle targets at a distance of 10 meters, so that was very familiar. The S54 has a post-and-bead front sight that isn’t conducive to shooting paper targets, but I used a 6 o’clock hold anyway and it seemed to work. More on that in a bit, but first I need to tell you that I put transparent packing tape on the backs of the targets to get good holes and learned that it doesn’t work as good as just shooting the plain target. One of my first Superpoints landed below the tape and cut a nice hole, while the other 9 landed where the tape was and were less well formed. I’m not going to tape these targets anymore, because the results just don’t warrant it.
First group
The first shot hit the target at the correct height but left of center. I didn’t adjust the sights, but after the first 3 shots I checked the target again and saw that the pellets were all going to the same place. Then I settled in and finished the first 10-shot group. Ten Superpoints went into 0.838 inches at 10 meters. I didn’t know if that was good or bad for this rifle, but at least they all went to the same place.
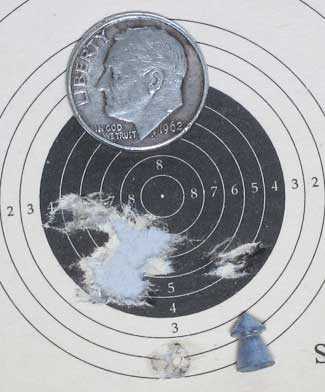
Ten RWS Superpoints went into this 0.838-inch group at 10 meters. The one shot in the white below the bull missed the tape backing and cut cleaner than all the other pellets.
I decided to leave the sights where they were for the time being. Since I was on target with the Superpoints, I figured the next pellet would be okay, as well.
Group two
The second group was shot with RWS Hobby pellets. They tended to go to almost the same place as the Superpoints, but were just slightly lower on the paper. Ten pellets went into a 0.408-inch group at 10 meters. That was a lot better than the first group and more like what I was hoping for. And these were just Hobby pellets!
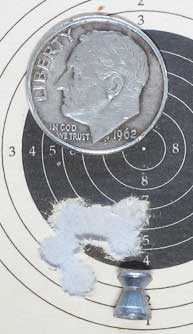
Ten RWS Hobbys went into 0.408 inches between centers at 10 meters. This is a much better group.
After this group I adjusted the rear sight both to the right and higher. Then, I shot a confirmation shot that showed the pellet striking the target higher and too far to the right. I left the sight adjusted this way.
Group three
For the final group, I selected the H&N Finale Match Pistol pellet. These come in different head sizes, and the tin label said the heads are 4.50mm. Ten pellets landed in a group that measured 0.528 inches between centers. One pellet did not land in the main group, and it made a slightly oblong hole, which leads me to think these pellets are not flying straight on their axes.
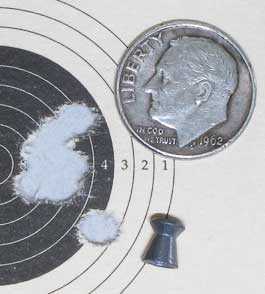
Ten H&N Finale Match Pistol pellets went into 0.528 inches between centers at 10 meters. Notice that lone hole on the bottom right seems a bit oblong. This might not be the right pellet for the rifle.
Conclusion and a shocker
I was finished with this test at this point. As I was putting away the rifle, I happened to touch the front sight and noticed that the entire sight is loose! Then, I remembered why I got rid of the other BSF S54 rifle that I’d owned many years ago. The sights on this rifle are not designed to hold still. They’re the worst kind of sights to put on a target gun. Not only are they difficult to change (I’m referring to the front sight), they can never be fully solid as designed. The sight base is held on the gun by a straight cross pin, and the hood is held on by a second cross pin. The result is a wobbly sight. It’s possible to upset the pins to lock down the front sight; but that involves damaging the pins or the sight parts, and most collectors do not want to do that. I certainly don’t!
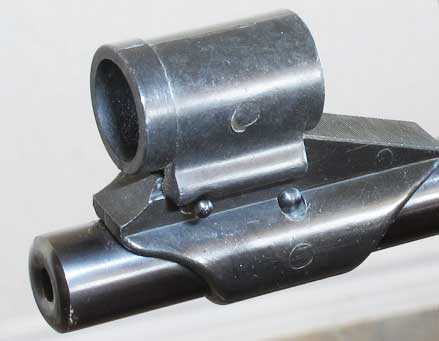
The front sight is held by a single cross pin that’s impossible to stabilize without damaging the sight or pin.
I then remembered that the sporting rear sight on my .22-caliber S54 was also loose. So, I checked this one and, sure enough, the rear sight sleeve that wraps around the barrel is a little loose on this gun, as well. It’s also held on by a cross pin. Even when brand new, it cannot be as tight as it needs to be.
The BSF S54 is a nice vintage air rifle that can look like a target rifle all it wants. In reality, the design of the sights makes it useless for real target shooting. It never was a contender — even back in the 1950s and ’60s when competitors were rifles like the Walther LG55 and the HW55. BSF put a peep sight the size of a satellite dish on a gun that’s a plinker at best.
That said, I’m keeping the rifle for its historical value. We’ll see it in another test when I mount a quality dot sight that bypasses both the front and rear sights and gives us a better picture of what this vintage springer can really do.

BB– A few drops of Loctite or crazy glue would remove the wobble from the sights without harming the finish. You might have to use a de-greaser if there is any oil under the sight bases before using the loc tite . I have a #4 Lee Enfield that would loose its accuracy when the loose handguard would move forward and touch the front sight base. A few drops of Birchwood Casey tru oil glued the handguard in place and solved the problem. I used the same method on Moisin Nagant rifles with loose barrel bands. Capillary action gets the “glue” where it is needed, and a good wipe removes any that shows. Gentle heat from a hair dryer makes removal (if needed) easy. Ed
I’ve used heat shrink tubing with great success on these old girls sights.
Kevin
Kevin,
Do you shrink the tubing over the entire front site and then trim away what you don’t want?
Tabrown,
I cut a slot for the sight before shrinking the heat shrink tubing with a hair dryer.
kevin
B.B.,
Glad to see you got to break ‘er in a bit. The “tap” still facinates me. Hard to believe any rifle would ever be sold with “loose” sights of any type. Interesting.
On the tape,..I tried the clear packing tape both behind and on top of the bull. I too, was not impressed. I would not even know where to start measuring on that first group. Odd as it sounds, I found that the clear tape has the ability to shatter or crack. I use it at work and instead of cutting it I just poke it with a ball point pen. It instantly breaks.
Since you use official targets only, and given their “special” paper, no tape is probably better. For the rest of us that shoot homemade paper targets, duct tape on the back works really well. 0 tearing w/good paper and a backer.
Chris, USA
I agree. Duct tape definitely acts different than packing tape.
The duct tape kind of asorbs around the pellet. Kind of like them orange self healing targets.
BB,
OK, here we go. Everyone is going to spend the weekend listing their suggestions for tightening the sights. Well, here’s mine. Don’t bother. You will never be happy with the results. Those sights are going to fester in your mind from now on. The best thing to do is just get rid of it. Just box it up, send it to me and I’ll pay you what you have in it. ,)
Well played, Sir…
RR, I think we should not try to solve the rifle’s issue. It is not feasible… it is the way the rifle was designed in the first place. So, BB, you have nothing else to do with it… Send it to me and I will relieve you from having such a bad rifle in your collection! 🙂
The design appears to be intended for taper reamed holes with corresponding tapered pins. Somewhere along the manufacturing process, they decided to forego that extra step and settled on straight pins. BB, you could finish the process for minimal cost and (I think) not affect the collectors value. Wobbly sights are just a source of disappointment. Quick and dirty solution remains LocTite or VibraTite.
Yep, tapered pins in tapered holes would work. Like a wedge snd a strongback. Like an AR15- best of all, it could be done with no one the wiser.
The way B.B. wrote also works. Peen the ends of the pins like rivet heads. Like an AK front sight.
Pretty rifle though.
I see it has a scope base 🙂
Loose sights,…..I would think that the newer products that you use to hang stuff on walls would be ideal.
A stiff type putty or tape, cuttable, self forming, sticky, removeable. A type of mastic product I would presume.
BB.
I bought A Walther Terrus. You did a nice job describing it. Seems very well made.
So far, I have shot it five times–and at 10 yards the hole is little larger than a single pellet.
My problem, there is always one, is that the fifth shot dieseled and the noise was louder than a .22 firearm. Or, at least it seemed that way in my apartment kitchen. My question to you and everyone is can I just shoot it until it cleans itself, or do I actually need to clean it? If I need to clean it, is it only the barrel or some other party of the rifle?
Normally, I would just shoot it out but it is such a nice rifle that I don’t want to mess it up.
Thanks for any help.
Rob
Hi Rob,
Your instincts are correct. Just shoot it out.
Bruce
Rob,
Just keep shooting it.
No harm done.
B.B.
The weight of the pellet should have an impact on severity, find out which shoots best, heavy or light and break it in with something the gun has a lesser objection to.
Robert Beeman told us 40 years ago to use lock tight.
B.B.,
As I have aged, like most folks I have begun to “lose sight,” but a “loose sight” on an air rifle? Sacrilege!
Michael
It shot really well with loose sights. I would probably remove the original pins and replace with larger ones and loctite. It’s a very nice old rifle.
Mike
B.B.
I, like everyone else do not believe that the sights on this rifle were loose from the factory, that is not German quality!
My theory is that the sights had been removed at some point in time because the rear sporting sight could have interfered with the sight picture when the rear receiver sight was installed.
I believe that PacoinOhio is correct in that a tapered pin was used in the assembly and if installed incorrectly from the wrong side will not seat properly, letting the sights to roll slightly on the axis of the barrel. From the pictures in part 1, it appears to me that the rear sight is slightly canted to the left and the front sight pin is definitely not centered which could be an indication that a tapered pin, once again, was installed from the wrong side.
Suggestion, carefully examine the ends of the front sight pin and look for any deformation on the radiused ends, excessive force would have been required to drive a tapered pin in from the wrong side, if installed properly, one or two light taps is all that would be required to seat or remove it.
This problem could be easily corrected by reaming the holes a few thousandths of an inch oversize with a tapered reamer and fitting new pins. The most difficult part of the job would be forming the radius on the ends of the new pins. Cheap and easy fix, degrease and lock- tite, may still require pin removal to do a thorough job.
What is the diameter of the end of the front sight pin which protrudes out to the right, does it appear to be tapered?
Bugbuster
B.B.
Here is my method of adjusting “slider” rear sights (either blade or “peep”).
1) Figure out which way the sight needs to move; let’s look at the RWS Hobby group, and say it needs to go to the right.
2) Get out your vernier caliper (mine is old; has no dial =>) and measure the distance from the left side of the sight base to the left side of the moveable blade.
3) Set your caliper for 0.005″ more than what you just measured and lock it.
4) Loosen the screw so that the sight blade just moves; check by moving it to the left a bit.
5) Now use your caliper to push it to the right exactly 5 thousandths of an inch more than it was when you started.
6) Shoot, then repeat as necessary.
I’ve sighted in air rifles, .22s, and my .30-30 this way; it’s a precision way of adjusting a non-precision sight. =D
If you want to get fancy; you can make “x” divided by your sight span (in inches) and set that equal to how far you need to move your group divided by your target distance (again, all in inches) in order to try and get it on the first try.
Good shooting to you; it may not be a target rifle, but she’s still a pretty sweet gun!
take care & God bless,
dave
B.B.,
I’m going to jump on the bandwagon with everyone else and say that tapered pins are the way to go with your front sight. That way you could put a peep sight on it and do the best the rifle can do without optics.
If the pins on the rifle now are not tapered but the rest of the parts are then the fix is fairly straightforward; new correct fitting pins.
If however the other parts are not already tapered then more work would be involved that might, as you say, hurt the collector value. However, if tapered pins are all it needs then just save the pins that came with the rifle and put them back in if you sell it.
Of course the decision is yours, all in how much you enjoy the shooting experience as a whole. But then your decision might be different if those darn sights weren’t loose….. Decisions, Decisions!
David H
The tater wagon just rolled back through! Looks like we’re getting rained out for another weekend. 🙁
BB,
Take some thin plastic and use it to shim the sights. You can cut it so it does not show.
RR,
There is nothing to shim. The sights are wiggling because the pins don’t fit their holes perfectly.
Tapered pins only work when the holes are also tapered. In straight holes they only contact at one point along their axis. The holes are typically reamed to very precise size for the pins to fit.
B.B.
I kind of forget taper reamer numbers, but I think a 3/0 would be about the right size. Pins are available in different lengths and then trimmed to fit. If you can accurately measure your existing pins, that will give you your starting point as far as diameter. If you don’t want to invest in a reamer and pins, check local machine shops or gunsmiths. Seems like a keeper, but the sights should be right. And tight.
BB: maybe those sight pins could be knurled a wee bit to tighten , precise is always tight or right. Kinda like in my business where straight is not necessarily plumb or level, or right as to apperance. As someone else said , you’ve got a real nice vintage rifle that shoots better than most, even with loose sights.
Robert,
Yeah, I thought about knurling the pins. The problem is — this is a pristine old rifle, and knurling would change that. If I swapped other pins that were knurled, they would score the inside of the pin holes in the parts, again ruining the pristine condition.
Since this will never be a true 10-meter target rifle, I think I will just leave it as it is.
B.B.
I guess finding the right pellet won’t be much of an issue then. 🙂
For all of you sproinger shooters out there.
https://www.youtube.com/watch?v=v63d8PsklN0
RR,
Very nice little “ditty”. Worth the 3 minutes to watch. Thanks.
Speaking of screws,…last time I had the TX down and was tightening the forend screws,..the screws “squeaked” on the final turn as they contacted the wood. I rubbed some candle wax on the underside of the screw heads,….problem solved. It allowed me to get the proper “feel” for tightness without the friction of the wood interfearing with the “feel”.
Shoot-N-See targets,…..Anyone else see a recent episode of American Airgunner where they showed how to make one ?
Take neon colored poster board, cover the (entire) colored side with clear shipping tape. Next, use black spray paint and paint over the tape 100%. Apply whatever bullseye on the (dry) painted side that you want. Stickers ?
The whole concept here is that the paint will not really stick to the tape. When the pellet hits, the paint shatters and breaks away from the tape,…..(larger) than the hole than the pellet creates,…thus,…exposing the brightly colored poster board around the pellet hole. Cool !
Chris,
I made up a set of these homemade targets and they work well. I was able to buy 300 neon 3×5 cards for a dollar from a local office supply that was going out of business. After the black paint dried, I put a contrasting bull on it by using acrylic paint with a small fan brush. Just twirl the brush around and you will have an almost perfect circle (with a little practice).
Jim
Anyone,
I’m looking for a good article about the artillery hold that I can send to someone. I found this one :
/article/The_artillery_hold_June_2009/63
But the video won’t play for me there or on YouTube. It starts to play but then freezes.
Any help appreciated,
Mark N
Mark,
Your Flash player app may need to be updated. Flash gets updated every couple weeks and older versions will freeze like you describe.
B.B.
A while back I promised to do a spring twist test. For you “springer” tuners out there,…just how much spring twist are you trying to cancel with washers and lubes ????
Test “subject” was a stock TX200III stock spring with front spring guide and top hat, 3/8″ all-thread with Torrington bearings on each end, and a vice. Checked at 1,2,3 and 4″ compressions both on the way down and on the way up.
Any guesses? At 4″ compression,….a 1/2 turn ?, a full turn ?, 2 full turns ? ……..
( Torrington bearings are a washer like bearing with needle bearings in a “cage” that are arrainged in a “starburst” pattern. Hardened races, or “washers” are on each side of the bearing. )
Chris
Chris, USA
I will take a stab at it and say 1 turn for every two inches of spring compression .
of course that all depends on the number of coils per inch and length of the spring but one in a stock TX would be 2 turns at 4 inches of compression.
BD
BD,
Thanks for the reply,…pretty dead here for a “weekender”….just tryin’ to stir it up a bit. 😉
Not to keep you “hanging”, well,…yea I am,… 😉 I will check back in the AM and post results. Want to see what all you “night owls” come up with for an answer.
Good test, used a protractor to gauge degrees of rotation. Confident in results.
The whole point of the test was to measure the amount of (stored energy) IF the spring was (not) allowed to twist freely. Thus, adding more vibration/upset to the shot cycle when that stored twist energy is released. Maybe a Torrington at each end ? Mmmmmm ?
Chris
Chris,USa
You have access to Torrington bearings that size readily available as it would most likely work at the front of the spring inside the piston where the spring is free to turn and if you use the stock rear guide in the TX it would work at the rear as well.
if you are using the Vortek rear guides then I do not believe it would be of benefit there as the spring is not free enough to rotate in the Vortek guide without some resistance from the tight fit of the guides.
Also Torrington bearings need a very smooth and flat surface to rotate on so unless the inside of the piston is machined smooth and/or flat they may not work so well .
I also wonder how they would hold up to the shocks applied to the springs during the firing cycle. I have used and worked with Torrington bearings in Automatic trannies for years and actually if the trans is labeled heavy duty or towing package is part of the option list on GM vehicles at least then the trans has Torrington bearings throughout the trans in place of the bronze/copper or plastic bushing/bearings setups, but they are only subject to rotational loads not forward and rearward thrust loading such as in a spring gun so unsure as to how they would hold up for the long term.
It would be interesting to find out.
BD
BD,
Good morning,….you are right on all your points. I ordered a HO kit, so she will be coming back down in the near future. The current tune has a Torrington in the piston end now. It was a perfect drop in fit, as it fit over the latch rod loose and the piston ID loose as well. It’s like it was made for it. Loose, but perfect. We’ll see if there was any damage when it comes back down. I will try the HO kit stock first.
As for spring twist,…1″=10 degrees, 2″=20, 3″=32 and 4″=32. Much less than I had expected. I tried it with 1 bearing and no guides at first. While it should have worked,1 end free, it barely showed any twist at all. Spring “bowing, twist, spiral, S” showed up within the 1st inch of compression pretty bad. Thus, going to 2 bearings, guide and top hat. I do not know if there are any springers without a front guide. If so, that spring is doing all kinds of bad stuff when it’s compressed.
You are right about the Vortek outer tube being too tight on the spring OD. Any rotation would be/is forced back to the face of the trigger housing. Vortek said they can make a custom outer tube, but their “spindle time” was booked 5-6 months out. Increase in tube OD may not allow the outer tube to enter the piston though. Will check next time down. Might have to play with the spring OD instead. One thing I did not check was spring OD expansion under compression. That would factor in a whole new set of problems with any tube mods.
As for checking the degree of rotation with a protractor,…I put 1″ pieces of twist-tie between the spring and the guide and top hat,..and lined them up. Looking down from the top, it was easy to compare the 2 ties in relationship to one another with a protractor.
That’s the test. I hope it answered the spring twist question. Not even 1/8 of a turn/twist. Or,…am I the only one asking these sort of questions ? …….. 🙁
Have a good one. Supposed to be descent today, so maybe some 25 and 50yd. “play”.
Chris
Chris, USA
Look at your 3″ and 4″ readings.
They are both at 32. What do you think that means?
Interested in what you think.
GF,
Well,..not sure. The coils still had about 1/16″ between them @ 4″,.. so,… it had more to go.
I do not know, but perhaps the spring maxed out on it’s ability to apply pressure at 3″. One would think that the more compression, the more pressure….but perhaps not. Either way, it appeared to stop rotating at 3″ compression.
It would be great to have the Cupple brothers, Vortek, weigh in on rotation.
We talked before on spring length and pre-load. Stock, the TX had 1 1/16″ preload. With the “modified” Vortek 12fpe kit and a 1″ spring cut, the fps dropped about 100 fps with the same pellet. BUT,…the rifle shot much smoother and groups did improve in general.
What are your thoughts on why the spring no longer seemed to rotate after 3″ compression?
Also, would you not have expected more rotation to occur ? I would have guessed a full turn,..BD guessed 2 full turns. I did not know, so that’s why I tested it.
( As a side note, I re-did the test this AM to be sure there was not “missed” rotation in my set-up. Marked all pieces with a marker. No “slippage”. All rotation went straight to the bearings. )
Chris
Chris, USA
My guess would of been a half turn if you had one end if the spring locked in position so only the other end of the spring moved rotation wise.
And that is my exact thought as to why you got 32 at 3″ and 4″ of spring compression. The spring had the ability to compress more but no more power would be made past 3″.
That’s why I believe that over preloading spring does nothing but make your gun harder to cock and a harsher shot cycle.
The right amount of spring compression is needed to make the piston stroke be efficient. To much is a waist of energy and not enough is not allowing the spring to work at its full efficiency.
That’s like when I tuned the Tx and the Hatsan 200s carbine. I messed with different spring lengths and preloads till I came up with the same fps but with a smooth shot cycle.
Everything has a balance of what works best for a given situation. The problem is figuring out what that combination is.
Edith help.
My phone is saying them cuss words again.
Can you please edit it to say. Harsher (shot) cycle.
And the letter u should be a capital I.
Sorry.
Edith
No place to respond to you below.
Thanks for fixing my comment. And Chris, USA made a response to me and his comment vaporized or something.
But thanks again.
GF,
Replied, but no post. Will wait and see if it shows. Chris
Chris, USA
I checked earlier but wasn’t up yet.
Would think it would be there by now. Maybe lost in never never land.
Maybe you should try again
GF1,
Nothing’s hanging around the spam folder. If you’re missing a comment, then it’s vaporized.
Edith
GF,
That darned ol’ smart phone,…..he-he-he,….. 😉
Good advice, and tried and tested. My pre-load went from 1 1/16 stock preload to 1/16 preload with the mods. Fps dropped around 100, but smoother. You say play with preload and spring length and still get the same fps ? Well, that did not work for me.
Cutting the spring more will result in freeplay,…. and shimming for pre-load would be a reversal of what I did with cutting the spring in the first place.
Unless I am missing a basic concept of smoother while still keeping fps ????
Chris
Chris, USA
It’s all about cutting the spring and shimming back up to hit the right preload where the spring is efficient.
Remember your experiment with the rotation from 3″-4″.
I’m willing to bet that the velocity would not change with that particular spring if you had that one inch of spring there or not there.
So my process is cut spring a little more than what’s needed and shim up to get enough power of that spring. What I’m saying is once you hit a certain preload on that spring when you test fire the gun the velocity will not change. The spring has made all it can in a given area of piston movement.
See what happens with a short stroke piston verses a long stroke piston in a spring gun. To me a short stroke spring gun is harder to tune. That spring pressure has to be more on the money with the short stroke gun to get power and a nice shot cycle. Also with a short stroke gun you get that spring stacking when you cock the gun. It gets progressively harder to cock the farther the cocking lever moves. A long stroke spring gun usually doesn’t have that spring stack feeling. But the cocking leverage design could also play a effect on the cocking.
But I myself prefer the long stroke guns because then I can have a slower piston speed. Which means easier to adjust power and have a nice shot cycle and a easier cocking gun.
So playing with spring pressure is a big deal in a spring gun. And I don’t believe there is rule to follow if what could work or not work. You just have to try different set ups with the gun you have in front of you. And test with the pellet that preformed the best before you start tuning.
GF,
See bottom of blog, no more room. Chris
Correction on the above,…The Cupple bros. make the pelletgage, Vortek makes springs and tune kits. I meant Vortek only.
BD,
Re-read your comment,…the bearings would no way work at the stock guide end. The piston ID and latch rod OD are ideal. Dimensions at the guide end are all wrong. Inside the bottom of the Vortek tube would be a place to use one. At last tune time, I only had 1 bearing. I’m still pretty sure that it won’t work there either,….it would, but a bearing with diff. dimensions would be required.
As for the bearing requiring smooth surfaces to ride on,…it comes with 2 matched hardened races, or washers, if you will. It’s a 3pc. matched set.
Chris
Chris,USA
That’s what I was meaning by having a bearing at the rear of the spring inside the guides as it would not work well if at all, but if you used the stock inner steel guide with a bearing between the stock inner guide and the spring it would work.
I was not aware you had hardened races in a three pieces matched set and by chance where did you find the right size sets. I used to race RC cars and we used a similar setup for the rear differential action for being able to corner but apply positraction in a straight by putting power to both rear wheels and could vary the amount of slippage by adjusting the tension on the bearing held between the hardened races with a threaded shaft and a spring. The bearings we used were a caged ball bearing between two hardened races and the more spring tension you applied the less slippage you would have coming out of the turns but to much and you would spin out easier so it was a fine line depending on the track surface and tire compounds.
I would be interested in where you found those Matched bearing sets to fit the TX .
I also agree with GF1 that once a spring has compressed so far there is a point of diminished return that does no good to go past that point as it return no more energy or performance and is why the rotation was no different between 3 and 4 inches.
I was off by a mile LOL.
BD
BD,
I get them at work. They go into a rivnut gun in the nose cone. The rivnut is a barrel shaped nut, that when put through a hole in sheet metal, is collapsed or squished. The rivnut gun does that. By the way, for that application, the bearings do take a bit of a pounding.
The company that makes the guns is called Sherex. The bearing that fits a TX, or a 3/8″ rivnut gun, is a bs-37. I would call or look them up.
Your right, a T at the guide end would work as well. McMaster Carr has a lot of stuff. Maybe get your hands on an older catalog or maybe they will send you one. I am sure they are on line as well. You would love the catalog !
Chris
Chris,USA
You are up late or just getting up for work. I am very familiar with rivnuts and have the tool for the 5/16 x 18 rivnuts as well as some of the nuts left as I used them to install in the bed rail on my 86 GMC truck to hold the camper top on and did not want to have to hold a nut when removing and installing the camper top.
There is no way you could sneak one more out of work if that s where you got for me. I will look them up but am not sure if they sell in small quantities to individuals or is that where you found yours.
I have an account with McMaster Carr so if you know they have them then I can source them there so just let me know if you got your from work or bought it from Sherex and if they sell to individuals. or email me if you prefer.
BD
Chris,USA
I just checked the Sherex site and the number BS-37 does not pull up any products so I am missing something or will call them in the morning when they open as it is already morning LOL.
BD
BD,
See what they say when you call. If all else fails, or it is too costly, let me know.
Yeah, got ’em at work. And yea, up early for work.
Chris
B.B.,
Not familiar with the rear sight,..it appears that it just “picks up”, the slide is moved, and the sight is “rested”. The weight of the slide,.. and the sight itself, seem to be the only thing that positions/holds the sight on the notches.
Unless,… there is some sort of spring somewhere that is applying downward pressure ?
Thanks, Chris
Chris–yes, there is a tensioning spring under the front end of the rear sight that holds it snugly into the “sawtooth” adjustment notches.
This style of sight is quite common on both firearms and airguns of the pre-war and early post-war period.
Here’s a similar sight on a 1950’s Diana 27. The slider is crimped slightly for a snug fit to the blade, and that plus the spring tension are sufficient to hold everything quite firmly in place without any notches in the base.
http://img.photobucket.com/albums/v734/kyofu2/D27-1/27-1breech.jpg
MDriskill,
Thank you for your time and the link. I hope to advertise in the local paper for old air guns and see what turns up. Your input, as well as B.B.’s, will help me out when I do.
Thanks, Chris
Chris,
Every leaf-type rear sight has a spring holding it down. They have been making them that way since the mid 1800s. Gravity, alone, would not work.
B.B;
BB, again I’ve enjoyed reading about this classic rifle! Thanks for another great write-up.
What a discouraging issue with the front sight! Without seeing the gun in person, I wonder if it would be possible to either:
A) shim the sight slighty, so that the cross-pin holes in the sight are a couple thousandths off-center from the corresponding recess in the barrel, and thus make the pin fit more tightly, or
B) make a slightly larger-diameter new pin from brass or aluminum, that would fit more snugly without damaging anything?
Interestingly, earlier model 54’s had a quite different front sight that was screwed directly to the barrel. This is a photo of the 54 Bayern I used to own–compare to your photo above:
http://img.photobucket.com/albums/v734/kyofu2/bsf%2054/pict0103.jpg
The cast front sight on your 54 Match must have been rather new technology for BSF at the time, and I guess those gents didn’t quite have the hang of the fine points yet!
And please add my name to the list of concerned friends willing to relieve you of the burden of ownership of it! 🙂
Mike,
Thanks for that pic. The last S54 I owned had the same pins attaching both the front and rear sights, but that was so long ago that I had to experience it all over again. I never knew that was a different arrangement like the one you showed.
The shimming idea is probably the best to correct this situation without damaging the rifle. If I planned to shoot this one a lot I would probably do it, but I don’t. I’ll keep the S54 as an example, just as I keep my S70 as another example of the state of spring gun technology in the 1970s.
I will say that experiencing this particular gun has changed my opinion of S54s overall. My first rifle left me with the impression they were weak sisters, but this one has shown me that isn’t the case. And this one’s trigger adjusts nicely. Every other BSF I have owned with this trigger has become unsafe if I tried adjusting it lighter.
If you hear of a rear peep sight coming up for sale, please keep me in mind? If I could snag one, then I might be inclined to shim the pins up front.
I still plan to mount a scope to please everyone, but that is the last test I plan on conducting unless something else comes along.
B.B.
BB–one more note on sights, then I will stop harrassing you! 🙂
I mentioned previously that Air Rifle Headquarters offered a custom-made Williams variant intended specifically for BSF’s. It was their model “ARH 623” and here it is:
http://img.photobucket.com/albums/v734/kyofu2/fe0fdedc18b2be9b1b332d0c5c411a67_zpsm9sxls5g.jpg
Now, about the OEM diopter sight. First, another shot of my former, earlier-variant 54 Bayern:
http://img.photobucket.com/albums/v734/kyofu2/bsf%2054/pict0115.jpg
Compared to later BSF’s like yours, note that the scope rail on this gun is much shorter, and much lower. The rail is actually LOWER than the rear receiver cap. This is why the diopter’s base is so ridiculously long: in order to mount it, the REAR face of its dovetail must slide onto the FRONT of the receiver rail, while simultaneously keeping the rear of the diopter behind the receiver cap! Not the best-thought-out detail I’ve ever seen, LOL!
The point of which is, if you just want to try your 54 with a diopter sight, you don’t necessarily need the rare original. I believe I’m correct in saying that the rail on your gun is taller than the receiver cap, so you should be able to use any diopter with the same dovetail size.
The dovetail spacing on my ARH 623 looks exactly the same as Walther and Feinwerkbau sights, so you could give those a try.
Mike,
You are not bothering me!
Thanks for that photo. I actually own that sight!!! It’s mounted on my BSF S70. You can see it in this report:
/blog/2011/05/bsf-s70-part-1/
I have been thinking that an FWB sight might work. Then I would have to shim the front sight.
By the way, Mike, are you planning to come to the Texas airgun show on August 29? If you do, I’ll be sure to bring this rifle for you to see and shoot.
B.B.
BB, thanks for the link! Another lovely old BSF and the sight looks a treat on it. I’ve owned a couple of the “ARH 623’s” for years but never had another gun to fit them to.
As much as I’d like to, it’s unlikely I’ll make the Texas trip this year, so don’t pack the lovely old 54 on my account!
What is the difference between the beeman R9 and the R9 elite?
Jsmith,
The R9 Elite comes with a 4-12X40 scope mounted and a free 10-for-$10 test.
B.B.
B.B. And all,
I need some help, please. A while back, I installed a metal breach on my Crosman 1377. No problems. Today I installed an 18″ barrel, a shoulder stock, and a fatty forearm. Now I’m having trouble chambering pellets. Wadcutters are a no go. Domes can be cambered by pressing down on the skirt as inserting the pellet. The pellets are catching on something. My first thought was that the transfer port was reinstalled up side down but it was installed correctly. My next thought is that the barrel is not mating correctly.
Any suggestions?
Jim
Jim
Does the breech you are useing have that flat head screw right before were the pellet loads into the barrel?
If its that breech I load the pellet in the opening with the barrel of the gun pointing straight down. Then close the bolt slowly. You shouldn’t feel the pellet hit anything if you do it that way.
Pretty sure the pellet is snagging that hole fr the screw.
I like the breech that has the screw location moved back under the bolt. That way it’s a smooth transition to the barrel. Crosman sales both styles. The problem is some of the main air tubes that the breech bolts to is drilled and tapped in both locations and some aren’t for the two different styles breeches that are available. So you have to see what you have and modify to get the breech installed that has the screw under the bolt.
Jim
Also yomay have the barrel to far forward or backwards in the breech. The bolt may not be pushing the pellet in right.
Or the lead of the barrel may be different allowing the pellet to catch the lead of the barrel when loading.
GF,
The breach is the one from PA. It has the .05 hex head screw that is visable just ahead of the bolt when the bolt is all the way back. The steel breach has been on for several months and I never had a problem with loading.
To me it seems like it has to be the barrel. I’ll uninstall and reinstall it to se if that helps.
Thanks for the suggestion,
Jim
Jim
Yep no problem.
And what I do when I change the barrels on them guns with the steel breech. I turn the breech up side down then center the barrel transfer port hole in the bottom of the barrel to the center of the hole in the bottom of the breech. Then tighten the set screw to hold the barrel in place. Then I assemble the breech and barrel to the main body air tube.
See if that helps. But let me know what you find out so I can remember the next time I have a problem.
Will do. Thanks,
Jim
Jim
Yep let me know how it goes.
Put it up for auction. I need a nice 54 for my BSF collection !!
Gunfun1,
Cut spring beyond ideal,… and shim back to ideal,…..got it. Interesting,…will have to give that one some thought.
Sounds like a lot of chrony testing, mods., testing, mods., repeat……cool.
As for long strokers,…how do you know whats a long stroker and what is a short stroker ? Info. not readily available I would think ? What do you consider long and what is short? (Measurements)
What you got planned for the LGU after the swap-out? Gonna’ “fine tune” it? Does it tear down like a TX ?
Thinking about one, as you might know. Plus, the TX has me “spoiled” on easy tear down. 🙂
Chris
Chris, USA
I think I had my Tx together and apart 5 times before I got it how I wanted it. And I know 3 times on the Hatsan 200s carbine underlever. Maybe even 4 times before it was how I wanted it.
The LGU hasn’t been touched and is not going to be touched from the way it came from the factory. It’s a shooter as shipped from the factory. And no. Havent even looked into how that one comes apart. They have that gun right.
Usually but not always on the long stroke verses a short stroke is the cocking arm will travel a lot farther on the long stroke gun. And of course when you take them apart you will know because you can measure how far the piston moves from at rest position before the guns cocked to how far it has moved after its cocked.
Gf,
Sorry on the LGU. Got it confused with the other recent one. You do “switch ’em up” pretty often. 😉
Thanks for all the info. and insight,…..later,….Chris
Chris, USA
No need to say sorry. And the LGU is just a nice gun and I’m not going to compared to. It is a nice gun in its own way.
And which one of the recent guns are you talking about. The one I just got (the Hatsan underlever) or the one that’s ordered and not here yet?
😉
GF,
Yea, the Hatsan. The one you put a stock TX spring in along with one of these spacers I sent.
Not sure what that spacer material is. Hopefully it holds up to a springer.
Chris
Chris, USA
I been shooting the heck out of the Hatsan and so far so good.
🙂
Chris, USA
Another way to tell a long stroke gun from a short stroke one is the piston diameter as a long stroke will tend to have a smaller ( 25mm ) diameter seal versus a larger (28mm ) seal for the short stroke guns. It is not a hard set rule but is just another way to use to help with determining one from the other.
BD
I guess I’m a glutton for punishment but after watching DVD’ for a couple months I tried some rabbit ears and realized I need a digital converter with my old set so I now own a smart TV to go along with the smartphone… HELP!
Reb
You know why they are called Smart don’t you.
Its so our govt can spy on you easier since if it is plugged in to power at your house it can be turned on remotely when desired by anyone with the skill and computer knowledge to do so which our govt most certainly has the ability to do so, if it has a built in camera on your TV then you may be on Candid camera and not even know it.
My PC has a built in camera with a piece of tape over it so aint nobody going to watch me unless I want them to and my smart phone has its location services turned off so Apple and big brother cannot keep tabs on me or where I have been .
BD
My brothers wife always had a bandaid over her camera lens. But no camera lens on the TV.
Reb
If it is labeled as a Smart TV then it can be used to watch you in your own home without your knowing it is happening as the word “SMART” means more than the average person realizes.
I have a friend that was a computer programmer and computer forensic researcher for the good ole Big brother for 40 years and the stuff he has told me that Big brother has been building and using to spy on us for 20 plus years would boggle the mind as I know it did mine. He emphasized the term SMART to mean more than being intuitive and easy to use and capable of countless methods of data streaming and Wi Fi conveniences of watching movies or social media and what ever else they market them being able to do.
There is a multitude of other less known or publicized operations that can be manipulated for them to do and /or be used to watch or record your every action every day you have one in your home.
I have no SMART TVs or any other device other than my Iphone and as I said it has had all location and tracking services disabled on it by him and I do not do any social media of any kind whatsoever and never will. So if you are not willing to talk face to face, on the phone or text and email then you will not communicate with me. I also know that the only truly private communication is still good ole face to face in a outside rural environment. Phone conversations, texts and emails are all recorded and stored by Big brother forever regardless of what anyone will tell you otherwise so BIG brother is always watching except in the woods.
BD
BD,
Got a few words for all that,….none of which can be published here. 😉
Chris
Chris, USA
They good or bad words as I know I am a paranoid untrusting of any govt or authority that sees fit to change laws and override or use executive orders illegally for that which those powers were not intended.
I am thick skinned and if you need to vent then just email me your thoughts and words as I feel like I feel and no one or no powers that be will change that.
I have lived long enough to see freedoms that my father and his father have given their life for so that we could be the nation we once were but those days are long gone and my grandkids will never know the freedoms I enjoyed as a kid or the freedoms my father and grandfather enjoyed.
This country is nowhere near the country I grew up in and the problem I see is the younger generations can and do not know the freedoms they have never had nor ever will and that is what makes me mad and sad at the same time as it is not the world I had envisioned leaving to my kids and grandkids by any means at all.
We are all entitled to our opinions but then that is one freedom that is on the brink of being taken away as well along with our second amendment rights to boot.
BD
B.B., (or anyone),
What reliable, but reasonably priced scale do you use / recommend for weighing pellets? I picked up a Hornady GS 1500 yesterday, not realizing it only weighs to tenths of a grain, not hundredths. I paid $36 for it at a big box sporting goods store. (turns out it’s $10 less via Amazon Prime) I don’t see any scales on PA’s site.
Also, thank you B.B., for making me spend more money! Ha! I picked up a pellet gage, after reading your reviews — and after thinking, “why would I spend that much for that!?” I was chatting with one of the guys on PA’s live chat, asking a couple questions about the spread I was getting when sorting Beeman Crow Magnum .22s. He said, “since you’re going to all the trouble to sort sizes, you might as well weigh them too.” So, off to the store to buy I scale.
Thank you.
Jim M.
Jim,
Tenths is what all powder scales measure to. Going to hundredths makes it a laboratory scale and you can add a couple zeros to the price. You got a very good buy.
B.B.
Edith — this is a test post. I tried to post a question just a little while ago, and I think it disappeared completely. Just checking to see if it did, or if it’s just waiting to be approved.
Thank you.
Jim M.
Jim,
It was in the spam folder. I approved it.
Edith
Thank you! Have a great evening.
Jim M.
B.B.,
Could you recommend a reliable, and reasonably priced scale for pellet weighing / sorting? I picked up a Hornady GS-1500 yesterday, not realizing until I got it home that it only weighs to tenths of a grain, not hundredths. Or is that “good enough”?
Now that you are sorting some pellets by head size, and then weight, do you just run through each batch to see which size gives what kind of performance? I’m trying to narrow down why my HW 90 .22 is so finicky. It likes Beeman Crow Magnums, 18.21gr. I started sorting a tin of those, and am getting head sizes of 5.55, 5.56, and 5.57. I weighed some of the 5.57s and out of about 25 pellets, got a range of 18.1 to 18.4 grains. Does that seem “normal”? Would you really suggest I’m going to need to dial it all the way down to that level of selection, to potentially have a dozen different pellet size/weights out of one tin like that?
Thank you.
Jim M.
PS. This is my second try at posting this question. The first one seems to have disappeared. I waited a few, then sent the message directed to Mrs. Gaylord. When that posted immediately, thought I’d try this one again.
Jim M,
Yea, those results seem pretty normal. I got a MTM Case-Gard Ds-750. Works fine. 10ths. of a grain are plenty.
If you could do 100ths., you would have more like 40 instead of 4. Scales can be finicky as well. A calibration weight is good too. Mine came with one but cheaper ones do not. Let it “warm up”, I put mine on a mouse pad, and breezes or drafts can affect it. Yea, as I said, finicky.
Good luck with your endevour there. It is a lot of work. I use calipers for head sort. I think what you will find in general is that some weights and head sizes will group better than others. Have not done either in a while. You have to ask yourself, can I shoot well enough, steady, for me to see the differences ? Good days and bad days. Even so, do it enough, shoot enough, and you will see trends develope. Then of course the data, charts, graphs, etc. if you take it that far. An entire hobby in and of itself.
Oh yea,..don’t forget to get a chrony. Hey, you have gone this far, right ? And, they can be “finicky “too.
Don’t ask me how I know all this,…… 😉
Chris
Chris,
Thank you. That makes sense — about the 10ths vs 100ths. That would drive me crazy! The scale I bought did come with a calibration weight, so that’s a good thing.
I did already buy a chrony — this blog has led to me spending way to much! Ha! I have only tried it once though, indoors, and couldn’t get it set up right. I think, after reading more on here, I was probably too close to it. I’ll have to get it outdoors soon.
I appreciate the info. Have a great day.
Jim M.
Jim M.,
Indoors is fine and more controlled. Flourescent lights are a no-no. Turn them off. Halogen ok but LEDS are questionable. Incadecent fine.
Read up on past blogs on chronys. BB uses a 500 watt Halogen work lamp pointed at ceiling. It works. I got one. No rods and sky screeen needed, although just the rods help to line up things better. Depending on what your shooting, too close can cause issues as well.
Good luck, Chris
Jim,
I answered your question the first time you posted it. One answer per question, please.
Remember where you ask your questions.
It’s several posts above this one.
B.B.
B.B.,
Yes — sorry for the double post. I re-posted the question because the first one disappeared, then I found out the first one had hit the spam folder. Edith fixed, but I had jumped the gun with my second post.
Thank you.
Jim M.
To: Mrs.Gaylord, Thank you for getting back with me on my posting problem! My desk top has IP problem! I be on other computer for awhile! Semper fi!
Bob posted this, but apparently it never got through:
Easy fix for the loose sight: Green Loctite. It’s super thin, and aggressively wicks into the tiniest crack. When out of contact with air and in contact with metal, it cures to a hard plastic. Any excess on the sight or barrel won’t cure, so can be wiped off after an hour of curing.
B.B.
Bob,
Thanks for that tip.
B.B.