by Tom Gaylord
Writing as B.B. Pelletier
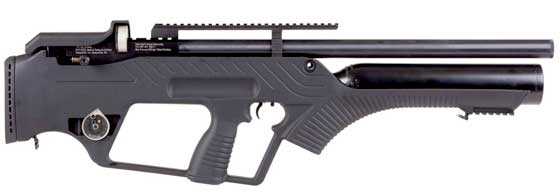
Hatsan Bullmaster semiautomatic bullpup PCP.
This report covers:
- Mounting the rings
- Problem
- Enter BKL
- Two strap rings
- More to mounting a scope
- Shim the rear mount
- Position and level the scope
- Adjust the eyepiece
- Thickness of the reticle lines
- Is this scope clear?
- Scope mounted — what’s next?
- Summary
Today is Part 3 of my report on the new Hatsan Bullmaster precharged pneumatic airgun, but you may recall that I introduced two new products in Part 2 — the new UTG 3-12X32 AO Bug Buster scope and some UTG Accu-Sync scope rings that are so new they aren’t even on the Pyramyd AIR website yet. Normally in Part 3 I start testing the accuracy of the airgun under review, but today I’m going to discuss mounting this new scope and getting the rifle set up to test. With all the new readers that have joined us over the past several months it seems like the right thing to do. Let’s get started.
Mounting the rings
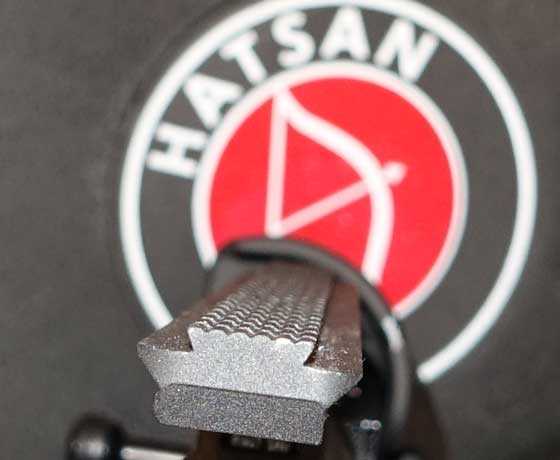
Step one will be to mount these new rings on the rifle. Hatsan has made this very easy by providing a scope base that accepts both 11mm airgun scope rings and Picatinney/Weaver rings. The Accu-Sync rings I’m mounting have Picatinney bases, so they should be easy to mount — except for one thing. Bug Buster scopes have very short tubes that the rings attach to, so the position of the rings, fore and aft, is critical. Picatinney bases have cross slots that can cause a problem for fore and aft positioning. Let’s see how this goes.
Problem
Right away there was a problem. The UTG rings have lugs that are 5.02mm wide, which should fit into the cross slots of a MIL-STD (military standard) 1913 Picatinney (STANAG 2324) rail system. The bases on the test Bullmaster have cross slots that are 4.86 mm wide, which is undersized for the lugs of a Picatinney mount. Picatinney cross slots are a minimum of 5.23mm wide. So, even though it looks right, the base on the BullMaster I’m testing does not meet the MIL STD and cannot accept the UTG Accu-Sync MIL STD rings. Boy — am I glad I decided to report this for you! Weaver rings that have 3.5mm lugs will fit on the Bullmaster rail fine, but not Picatinney rings.
Enter BKL
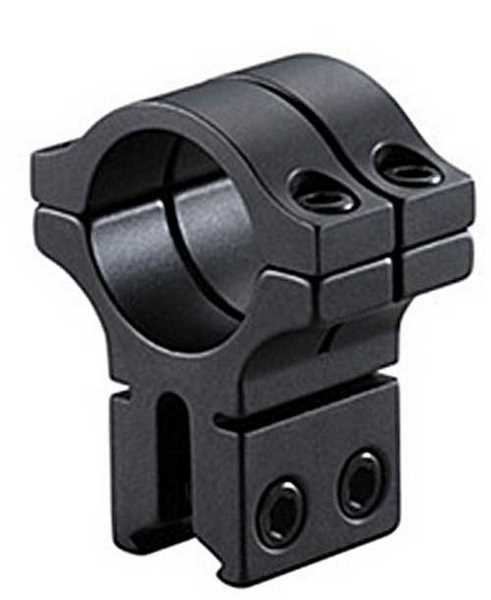
The Bug Buster scope came with medium height rings of its own that I could have used, but because this is a bullpup, high rings are better. When something like this happens I reach for some high BKL scope rings that attach to an 11mm scope base by clamping pressure, alone. Fortunately the BullMaster also has a dovetail that’s 11.57mm wide.
The 11mm scope rail dovetail on top came into play because the cross slots in the rail below are not cut to the MIL STD.
I selected BKL 263 MB 2-piece high scope rings for this job. Whenever you mount a compact scope, and especially when it’s a Bug Buster, you can only use 2-piece rings because the positioning of each ring is so critical. One-piece rings are a fixed distance apart, and it’s usually a distance that does not coincide with your needs. Because of the Bug Buster scope’s short tube on either side of the turret, the rings have very little fore and aft leeway.
Two strap rings
BKL did something clever with the top strap of the ring. Instead of making it a wide single strap, they put two separate straps on top of each ring. This is clever because it releases you from the need to torque the strap screws in a certain pattern to keep from putting uneven torque on the scope tube.

As you can see, the BKL scope straps are separate, even though they are on the same ring. This decreases the importance of torquing each strap the same, though you do still want to be close.
More to mounting a scope
There is more to mounting a scope than just putting it securely on the rifle. The eyepiece needs to be located at the correct distance from your sighting eye. On many spring rifles Bug Busters are hard to position correctly, but the Bullmaster has a long scope base that makes it easy to find the right place.
Shim the rear mount
Whenever I mount a scope on any air rifle I have never shot before, I always put a shim under the scope — on the bottom saddle of the rear ring. That little bit of shimming tilts the scope slightly down in front and usually compensates for any droop the rifle may have. I use a piece of expired credit card, which is a thicker piece of plastic than what you get from a 2-liter soda bottle. Don’t use two of these credit card shims; one should be plenty. If you need more than that, shimming is not the answer. You need an adjustable scope mount.
Position and level the scope
Positioning means to place the scope far enough from your sighting eye that the image looks full and clear to you. Leveling means the reticle lines are level with the gun. There is just one problem with that. There is no way to tell when a rifle is level, because level has no concrete meaning. The best you can hope for it to adjust the scope so that when you hold the rifle the reticle lines appear level. If they don’t, they will bother you as you shoot. The gun will be just as accurate, but when you adjust for windage, the strike of the round will also move up and down as it goes left and right. And when you adjust the elevation the round will also wander left and right. This is why some rifles shoot a little to the right at 20 yards and a little to the left at 40 yards.
Some shooters get anal over “leveling” their scopes. They hang plumb lines at 50 yards and adjust the scope in the rings until the vertical reticle is parallel to the line. I used to do that, until I realized that it doesn’t make any difference.
You can worry about leveling as much or as little as you want. At the end of everything you must be satisfied that the scope is mounted correctly.
Adjust the eyepiece
After I get the scope positioned and leveled, I adjust the eyepiece so both reticle lines appear as one solid line. That will make your parallax adjustment come out as close to the yardage indicated on the AO scale as possible. If you don’t do it the indicated yardage can be off by 20 yards. That defeats the rangefinding capability of your AO scope. Of course a 12 power scope really isn’t an effective rangefinder, but having the reticle lines solid also makes aiming easier.

The new Bug Buster scope compliments the small size of the BullMaster.
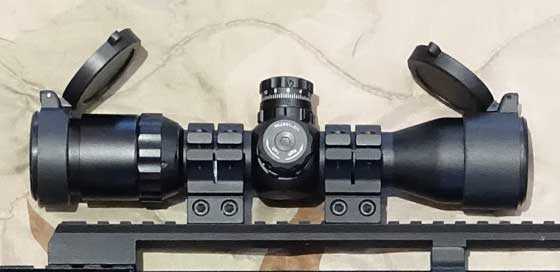
This closeup shows just how short the Bug Buster scope tube is. Once the scope is in the rings there is almost no room to move the scope fore and aft.
Thickness of the reticle lines
Bug Buster scopes in the past have had very thick reticle lines. In the scope I am testing the lines are medium width. They are thick enough to pick up easily in the woods, but too thick for shooting quarter-inch groups at 100 yards.
The Bug Buster reticle is a duplex pattern, meaning the lines are thick at the edges and fine in the center. This is what a hunter wants, because the thick lines point to where the thin lines are, and in deep woods that’s what you want. The thin lines have mil dots that are spaced one mil apart, if you are into rangefinding with the angular measurements they provide. I use them as alternate aim points when shooting at different distances, which is fairly common.
Is this scope clear?
A reader commented that he didn’t think a 32mm objective is large enough for 12 power magnification, and the scope will not be bright as a result. I could tell you that it looks bright to me, but that’s just the other side of a subjective argument that can’t be proved either way. I think I need to get to the range and see how it performs on 50-yard targets to have a better way of evaluating the brightness. At my range the 50-yard targets are often dim and hard to see in the early morning, so this should be an acid test.
Scope mounted — what’s next?
After I mount a scope I like to check the rifle for zero at 12 feet on a target. I can tell from where the first pellet strikes the target if I will be on target at 25 yards for the accuracy test. My plan is to begin shooting with the H&N Baracuda pellets Hatsan sent with the rifle, so that’s what I will use for this.
The first shot landed at the right height but over to the right. I adjusted the scope and shot two hit to the left. So I dialed the scope back halfway and the third shot landed close enough to the center that I can accept it. A shots from 18 yards put a pellet about 5 inches higher than the aim point. That’s on paper at 25 yards in three shots (plus a check shot).
Summary
When I started today’s report I didn’t know how much material there would be, but it turned out for the best. I got to walk you thorough the process of getting a rifle ready for an accuracy test. And, because of the problem I had mounting the scope rings, there was even more to cover than I thought. The rifle is now ready to shoot for accuracy and I will do that tomorrow.


An excellent reminder of all of the things that scope mounting can entail.
Having a .25 M-rod, I wanted a 4-16 x 56 UTG scope. I had a magazine to clear and eye relief to maintain. I wanted the objective bell close to the barrel. I did not want rings higher than needed. I also wanted the rings to be well centered on the scope tube.
Solution? I got on the UTG site and did a full size drawing of the scope. They have all of that info.. Next, on a piece of card board, I made a full size drawing of the top side of the M-rod. I now had 2 things that I could move independently.
Keeping the objective low gave me ring height. Again, back to the UTG site for specifics. Now, fore and aft? Based on 3 other rifles, I determined where the ocular lens needed to be from the butt. As it turned out, I needed 1 regular ring and one with about a 1″ offset.
The point? I ordered everything with confidence and when it all arrived, it all fit together just like my paper mock up exercise. Perfectly. Well worth the homework.
Chris,
Now that is anal. It works though.
RR,
I will take that as a compliment,… I think? 😉 All in all, I might of had a couple of hours in it. I had the rifle first, before the scope and rings. I wanted to be sure and not waste money. I was very pleased with myself when it all went together exactly as predicted.
Chris,
LOL!
After mounting scopes on my Tomahawk and Diana 46 where I needed to compensate for geegobs of droop, I picked these up to mount this scope on my HM1000X.
/product/utg-4-16×56-bubble-leveler-ao-rifle-scope-swat-ao-ez-tap-illuminated?a=7683
/product/sportsmatch-30mm-rings-fully-adjustable-high-11mm-dovetail?a=4353
These mounts are awesome and well worth the extra they cost.
RidgeRunner
I use Sportsmatch scope rings on all my scoped rifles. They have never let me down, including the adjustable pair of high scope rings featured in your comment. Although only available in 1inch, not 30mm, the fully adjustable one piece mount by Sportsmatch, the AOP55, offers all the adjustment of the 2 piece mount, but at less then half the price. It merely lacks the freedom of placement that 2 piece mounts offer.
By the way, is your Tomahawk made by the now defunct English Webley airguns, or is it made in Turkey? I’ve read a number of pros, and cons concerning quality control with the Turkish made Tomahawks. Might I coax a brief comment from you concerning your experiences with your Tomahawk? I think the Tomahawk was one of the nicest looking airguns you could buy. A beautiful walnut stock, and the positive “click” steel on steel makes when you lock up the barrel. Everything a diehard airgunner looks for, and demands in a spring piston airgun.
Ciao
Titus
Titus
Love your comments.
Titus,
My Tomahawk was made by Hatsan. If I am not mistaken, it is a model 95. It has a very nice walnut stock and has a superb Quatro trigger. It did indeed have several quality control issues though. I was able to correct most of them myself such as burrs on the top of the barrel block. The others do not affect performance, so I just overlook them.
If I had paid what Pyramyd AIR was asking, I would have immediately sent it back, but I bought it from another well known airgun company that offered it bundled with a nice Hawke Optics scope which made the rifle almost free.
It is a decent shooting sproinger. I am planning on tearing into it this winter to try various type tunes on it to see what I can do with it. At the price I paid I can afford to spend a bit on it and if I really mess things up I am not out much and will have learned a considerable bit in the process.
A quick recheck of records shows the rings to be BKL’s. In my opinion, low, med. and high are very poor substitutes for the exact measurement for top of rail to bottom of ring height. My prior orders showed rings ordered that did not work, or at least were not ideal. Wasted money. Not everyone has a bunch of different rings laying around to just play with and see what will work. Sadly, I am one of those that now has a rather sizeable collection of rings that were not ideal at the time for whatever reason.
Chris,
What a great idea!
B.B.
B.B.,
Thank you. I have my moments,… rare, but I do get them on occasion. Yes, it is all good as long as you can get your hands on the scope dimension specifics and ring dimension specifics. That is a plus to a discerning air gunner.
Something that I discovered while doing that exercise is that the higher the power,.. the only thing that really changes much is the length of the front bell. All other dimensions stayed the same or changed very little. I thought that was interesting.
Chris
Chris,
Had to laugh at the cardboard models – I have a box of them that I made for checking interference between fixed and moving parts.
For checking swing and movement of pieces the stem of a pop-rivet mounted on a small plywood base makes a great pivot-point. I just tape them down to the bench so I can adjust the pivot-point location as needed them measure the locations when all is good. Some times I scale up the parts to be able to see interferences better.
Anal? Maybe. But I have saved many hours and $$$ by printing off a picture, gluing it to cardboard and cutting it out to be used as a template.
Cheers!
Hank
Chris,
That’s usin’ the ol’ noggin! Just curious why it’s important to have rings centered on the scope tube. On springers I try to have the front bell and turret against the front and rear ring, respectively, just to keep it from creeping. On other guns I just try to have them spread out on the tube as far as possible. I figure a bump to the left or right at either end of the scope would be less likely to torque the scope out of position. All of this is second to correct eye relief.
Halfstep,
To me, it just looks better. My set up was new, so after I figured where the eye relief should be,.. that placed the scope on the gun at a theoretical fixed position. Having the rings being in a predicted center also gave me the ability to move the scope within the rings and not have to move the rings too, should I need to.
Not having the scope or rings at the time, I was just trying to stack all of the odds in my favor so that when I did get everything, that everything would work.
Done well, the scope should not slip. It is almost a non-issue with PCP’s. On springers, I like P/W mounts if I can use them and then there is always the stop pin in the rear ring on 11mm rails. I would never attempt to stop any slippage by using the scope as some sort of stop point.
Chris,
I like symmetry as well and your setup would appeal to my eye more, but, as I said, I thought my setup might be stronger. And it IS just a feeling. I don’t have proof one way or the other and have never read about where to put the rings on a non-springer. With a magnum springer, on the other hand, I feel sure that I’ve read here on more than one occasion that the turret and end bell should be used, whenever possible, to prevent the scope from creeping through the rings. B.B., can you weigh in on this?
Halfstep,
Perhaps you are right, but I have never heard that. 11mm rings with a stop will hold a lot. 4 screws per ring up top instead of 2 and 2 on the bottom instead of 1. BKL’s have to be spread apart to even get them on in most cases. So, you have a bunch more clamping pressure, going in,… plus what you can add with the screws. In my opinion, Benjamin has much better 11 mm rails than say my TX or LGU. The rails are deeper/taller. That is about my take on the subject. I would try to avoid using the scope as any type of slippage stop though.
A dab of liquid white out at suspect areas will tell you too if you have any slippage. It is better to know than to guess.
Halfstep
Agree with you that scope ring location on the scope tubes is important.
BB,
I do like the compactness of the Bug Buster line. I would really like to see them go to a finer glass etched reticle though. Of course it has to be kept in mind this is not a target scope, but is intended for hunting. If you are typically shooting at over 100 yards you are going to want a lot more power than the Bug Buster has.
Since this turned into a scope related article, I will share a few other tips. I bought one of these to mount on the 4-16×56 UTG on the M-rod with a RAI stock kit and 6 position adj. butt,….
/product/utg-rubber-scope-eyeshade-for-36-40-41-5-43mm-eyepiece?a=5118
Keep in mind, you have to adjust the fore and aft first for correct eye relief. At that point you have a fixed distance between your eye and the ocular lens. Shoulder the rifle (repeatedly), taking breaks and doing it some more until the sight picture is perfect every time.
The rubber is too stiff for easy compression. It was also too long for what I needed, (that now fixed distance). I ended up with 3 of the 5 bellows. The eye cup had to be trimmed to fit the eye socket and facial contour. I VERY carefully trimmed as needed over a couple of hours, taking breaks. In the end, it is a 100% perfect fit to my eye/face. Very nice for allowing the pupil to be open fully and allowing the best site picture. It looks good, mounted great and is made for UTG scopes.
Chris USA
Thank you, I’ve been wondering about the eye cups I see people using on their scopes, I thought it was to eliminate glare, but helping to open the pupil fully is something I hadn’t considered.
Coduece,
When I looked around, I did not find much. Plus, will they fit the wide variety of scopes out there? If they could be found, I would stick to eye cups sold by scope makers. When I got it, I was just out to try the whole concept. Anything to reduce that open air/light to the eye is going to help. If you can “snuggle” up into/against it, all the better.
It works very well. So much so that I wish all my rifles had it. I will most likely never do anything else on the other rifles though. It was quite the chore just to do the one, but well worth it. They are worth considering.
We have people here that are in competition, so maybe they can link/recommend some products.
Should say shooting (around) sundown.
Not (towards) sundown.
Coduece
I got Chris thinking about the eye cup.
We talked about eyes dilating. I don’t wear a hat much. But I do wear one when I shoot. I pull the cap down to meet the scope plus I will tilt it to one side or the other depending on which way the sun is coming from. And if it’s a bright sun shiny day and I have no shade to sit in and shoot from I definitely wear sun glasses too.
And another thing which in my case I can’t do because of how my shooting are faces. Is try to shoot with the sun at your back. That makes a big difference when shooting outside.
Saying that shooting towards sundown usually gives me my best group’s.
Chris USA,
Thanks! Being fairly new to this sport, I have not seen this before. I tend to always question whether or not some of my shooting error is the result of slight differences in eye placement relative to scope center line. Also, in my set-up, I shoot toward the east-north-east early in the morning, so depending on time of day and time of year, I can get a lot of glare. I’ll certainly look into this cup idea!
Thanks,
Dennis
Dennis,
I have the same issues at times. A summer day, mid day, (full) clouds will give the best light. Late afternoon can be good too. Glare at the ocular is bad and this will eliminate that. Plus, your eye will dilate better. The “quality” of the light between you and the target and what is entering the scope is critical too. Too bright is not good. Low light and morning haze is not good either. But hey,.. we just do what we got to do and do the best we can with the conditions at the time. So yes, the light you are shooting in will make a world of difference.
I have cussed a scope in the AM and later in the day it will be the best thing ever. Light.
Dennis
Maybe Chris let us know this about the eye cup he’s using. But most I have seen and heard about are not overly stiff.
In other words. They can collapse as you position your eye to them. So saying that maybe not 100% repeatable on eye relief but better than nothing.
Chris an GunFun,
Thanks for the advice!
Dennis
GF1,
Yup, too stiff. They could have cut the material thickness in half. Assuming that one can position themselves in the same spot every time, the ideal set up is one that fits perfectly, without having to press into it. Combine that with an adjustable comb and you have a near fool proof repeatability method.
I would bet that even with a super soft and flexible one, I would still modify it in some way. (Like DUH!,.. who did not see that coming?) 😉 Like I said, the (ideal) eye relief is a fixed distance. Being able to put your face/eye to that same point every time is nice. They eye cup further aids in that.
Chris
I like the idea of the eye cup.
But I think one should practice shouldering the gun to get proper eye placement.
What I’m getting at that should be the first thing you should do when you mount a scope and you are leveling it. That way it fits your shoulder and your hold and natural face position. You shouldn’t be moving your head around to get your eye location for your scope.
What I do when I’m mounting my scope is I have it on the gun with the ring caps snug enough to hold the scope in place but I can use some pressure to rotate or slide the scope forward or backwards.
What I do is shoulder the gun and rest my cheek naturally on the comb. But here’s the trick I do it with my eyes closed. When I open my eyes the scope picture should just pop right into veiw. If not I move the scope forward or backwards to make that happen naturally. Then I level the scope.
After I shoulder the gun about 5 or so times with my eyes closed and opening them and the scope picture naturally pops in veiw then I tighten the scope caps up.
Oh and forgot I already have the scope rings positioned and tight on the dovetails. That’s the very first step before I begin the positioning process.
GF,
Thanks for this description. I had read this kind of information before but had let it slip from my consciousness. Sound like I need to step back a bit and check the positioning of my scope!
Dennis
Dennis
All good. And the main thing is too be aware of that when you pick up any gun to shoot with a scope on it.
GF1,
That is what I said higher up, but in a bit more of a condensed manner. I did leave out the eye closing bit, which is important, and is good conformation that you have it right. For sure take your time on that step and step away a few times to let the eyes rest and then repeat.
Chris
Yep. 🙂
Chris USA,
Thanks for sharing that Information! What do you do if you wear glasses, either sun or script?
Also, on many scopes the amount of eye relief changes with the level of magnification. If I am not mistaken, usually the higher magnification has less eye relief…
-Y
Yogi
Interesting about eye relief and magnification.
For some reason I haven’t noticed that.
Yogi,
I do wear glasses, (scrip), but for close up only. My distance vision is fine. The scope seems to make up for any close up issues, but not sure how. I do not wear glasses of any sort to shoot. I shoot by myself, but would be more inclined to wear something if I was shooting around other people. I trust me, not them. As for magnification, I find it much harder to find that sweet spot at higher magnifications. Not so much eye relief, but rather the exact alignment of the eye to the tube/lens. That is what is less forgiving, or so it seems to me.
Also, many ranges require eye protection on the range…..
-Y
Dennis
Oh and I would say the comb off the stock would help position line of sight better than the eye cup. The eye cup may help but the comb probably does most of the work.
I would say the biggest benefit of they eye cup is glare reduction and to help keep your eyes dilated.
GF1,
A comb, even an adjustable one (which I love) is often of little help for front to rear positioning as there are no well defined “memory” points. There is those stick on felt and silicone cabinet door bumpers that stick on. Something like would be ideal.
Chris
Then you need to take a step back on your other guns you have scoped without the eye cup and do the shouldering of the gun closing and opening your eyes.
Trust me that natural positioning of your cheek and putting the gun to your shoulder is very important.
Your shoulder acts as the forward backwards stop location for your cheek position.
You should not move your head forward or backwards or left or right after you shoulder the gun. If you are you don’t have your scope hight and location positioned right.
Trust me when you get it exactly right your scope picture will pop in place with no head movement. And that will make you a better shooter.
GF1,
Yup, the TX200 and LGU and the Maximus are all set up that way. So is the M-rod. Shooting in a T-shirt and shooting with a coat on will affect length of pull LOP and eye relief too. It is just something that you have to deal with,.. but be aware that it will be different and harder (not as easy).
Chris
I just checked the difference with my t-shirt verses my thick lined and quilted jacket.
I still had good eye relief without repositioning my head forward or backwards.
Here’s a little trick for that. Once you find the right forward backwards location of the scope sight picture by shouldering the gun with your eyes open and closed and you have that postioned figured out. Just move the scope back towards your eye about a 1/8″ or so. That is what I do also. I forgot to mention that cause I have done so many scopes over the years that it’s just a natural part of the steps I do.
But yep if you got the scope right on the edge of being in on the rearward location of the sight that will cause a problem and make you have to shift your head forward.
My Savage 93 is right now on the edge of being like that and I don’t like it. The problem is they have two predrilled and tapped locations for scope adapters for the scope rings. And I have my Hawke scope on it but the back of the front objective bell is right up against the scope ring. So really I need a longer scope tube for that gun. Here’s a picture of the 93 and you can see what I mean.
GF1,
The scope looks to be right for the rifle, if not a bit big. I can see the ring placement constraints. What does that magazine hold,… b.b.’s? It looks under proportioned to the rest of the rifle,…. 😉 Just funnin’ ya’. 🙂
Nothing worse than rail constraints or tube/ring constraints. People do not appreciate/realize that until they find themselves in that rather sticky wicket.
What is a “wicket” anyways? Why would it be sticky? I think that it is an English game. Horses, long sticks with baskets affixed to their ends, balls on the ground,… or something to that effect. Pay me no mind,… my mind works in mysterious ways.
That’s a good thing,… right???? 🙁
Chris
You know what gets me all the time.
I think I’m doing something right or the best I think I can. Then all of a sudden I find something I have overlooked.
Something as a scope that looks so simple and just sets on top of a gun could have so many issues with setting them up properly.
Heck look at those simple little regulators we just installed in our Maximus’ we have. Who would of thought how many times they would need adjusted to get them (tuned) right. Notice I said tuned. 😉
Chris
Scope size to gun is not what I’m talking about.
The Hawke scope like I have on the Savage is a medium length scope.
What I mean is a longer scope would give more room to move the scope forward or backwards.
That’s like the Bugbuster scopes. They are short scopes. So the scope tubes are not that long. That makes it harder to position eye relief. That’s like BB putting the Bugbuster on this bullpup he’s testing. I don’t think it’s the right scope for the gun.
Here look at my old FWB 300. It’s got a Bugbuster scope on it. You can see how short the scope tubes are.
GF1,
Yes, yes, yes,… longer scope tubes fore and aft of the turret are super nice. Again, people do not appreciate that until they,… do.
Chris
Ok I thought you missed that when you said the scope size looked right for the gun.
There alot of factors that have to be thought about when choosing a scope and rings that’s for sure.
And then thinking again about my comment I made about BB using the Bugbuster on this bullpup he’s testing. It is probably ok on it. But with a Weaver style or Picatinny style mount your more constricted to scope position verses a dovetail style mount.
But a longer scope would probably help make things simpler on the bullpup.
Chris USA,
A wicket is like home plate in baseball but for cricket. It is comprised of 2 vertical posts and a stick which is laid across the top. the idea is to knock the horizontal stick off. If you hit a vertical post and the stick stays on it is called sticky-FYI.
-Y
Yogi,
And now we know,.. “The Rest Of The Story”. Thank you.
BB,
Did you ever get to shoot the Diana 240 Classic scoped at 25yds? I’ve been wanting to order one. However, horror stories about inaccuracy concern me.
Tom K.
TJKing,
I did. Here is the whole story:
/blog/2017/06/diana-240-classic-part-4/
B.B.
BB,
Thank you.
Happy Thanksgiving to you sir.
Tom K
BB,
Was the HW55 a competitive Olympic 10 meter rifle. The one that you’ve been testing doesn’t seem to have the accuracy for that unless they were shooting much bigger groups back then. By the way, a tune in the tube has turned that worn Diana 25 that I bought into a real smooth shooter. It was really dry.
Brent
Brent,
The Olympics didn’t start air rifle competition until the 1980s — way after the HW55 had left the scene.
The 55 was used in national (German) and international competition in the 1960s, but it was already out-classed by the FWB 300.
B.B.
I use Leapers scopes for everything including my Anschutz target rifle, and they all work great. Accuracy test on Thanksgiving? Why not? I once gave a traditional Thanksgiving a try at an uncle’s place. We ate a big meal followed by three football games in a row, and I felt ill at the end of it.
Silver Eagle, why was the electronic ignition banned from competition? It must have been successful. At least that proves that lock time is a significant factor.
ChrisUSA, I was thinking of BIL’s comment that good old boys would shoot the tigers for their skins. I’m sure there are polite hunters and unpolite hunters as with everything else. But it wouldn’t matter since my plan would be to surround the tigers with portable fencing with one-way gates just for the pigs. The problem with high-end clients is it would cost a lot of money to attract them, and they have places to go and things to do. Once the novelty wore off, they wouldn’t come back. Tigers, on the other hand, live to hunt. While one tiger might kill at a slower rate than a human hunter, that’s all the tigers have to do. Besides, it’s not about one tiger. The idea is to enlarge the species by enabling them to create more tigers. It’s just a version of introducing one species to control another which has been done before. Biology says that the tiger population would increase until the pigs are brought into balance, and you can skim off extra tigers to export back to Asia.
Matt61
Matt61,
I can clearly see that you (and I?) have clearly put entirely too much thought into this whole tiger/wild pig control issue! 😉
Chris
When the pigs come knocking, people will wish they had listened to us. But you’re right. It’s time to go back to exhorting airgun manufacturers to make a version of the IZH 61. A guaranteed market success.
Matt61
Just as in the book and movie Jurassic Park, what happens when your pet tigers escape from their cages? They are not going to want to chase feral hogs all over the place when they are hungry but will instead go for the easier targets. Goodbye cattle, sheep, goats, dogs, and lastly humans. Now the politicians and others will get very unhappy and the lawyers will be looking to take you to court and get as much money from you as possible to pay for the damages because you came up with the idea. My friend, I would retract your idea quickly so as to save yourself a lot of grief and possible financial burdens in the future. Not only will the farmers be unhappy, but I am sure there are some people who will want to “represent” the pigs and will want to sue you also for cruelty.
BIL
Or maybe the Tigers will kill in a different order.
Maybe the humans will be the easiest target for them.
I think people forget how fragile human life really is.
Chris
Any targets from the Maximus with the regulator install yet?
GF1,
None yet. Like I said, I will not dishonor it by shooting it indoors at 41′. 25,30,50 yards will be it. I will have to plug in Chairgun to see a new zero based on new fps.. I will do it. Of course as winter wears on, all of the guns will be shot indoors. I at least like to get the parts moving once in awhile. Kind of like a second car. Not good if you do not take them out once in awhile. Or is that a wife?,… I forget. 😉
Chris
I thought you said you looked back through your notes and found you did test your Maximus at 41′. Pretty sure you said that the other day.
GF1,
I (do) have 41′ notes/targets. They were all 3 shots into a clover followed by 7 more through the same 3 holes. That is (not) a good test/comparison (at all) in my book. 25-50 yards will show any improvements.
Chris
Well you done dishonored your Maximus already then didn’t you.
I wonder if it forgave you yet. It might not never shoot as good of a group as you want after that. How could you. 😉
GF1,
Hey man!,… It was winter when I got it! I had to shoot it somewhere! It became pretty clear, pretty quickly, that the Maximus was not meant for short range shooting. It was begging for me to “stretch it’s legs”,.. as you like to say. 1 holer’s get boring pretty quick.
Chris
Yep one holers are boring after a while.
But it sure is nice when you get a gun that will do it repeatedly.
🙂
Matt61
Jurassic Park keeps coming to mind for some reason.
🙂
You’re right. One thing that is much clearer in the book than in the movie is that the whole idea is a demonstration of chaos theory in science. It was the signature of Michael Crichton to take a legitimate scientific theory and play with it in fictional form. The chaos theory he used says that some systems are so complex as to be utterly unpredictable beyond a certain point. The weather is the classic example wherein a butterfly that waves its wings in China cause cause a thunderstorm in Michigan. In the story, the scientists try to recreate dinosaurs while restricting them, but in fact, they have unleashed completely unknown forces that they cannot control, specifically that the dinosaurs are much smarter and more powerful than anyone had supposed. The first book ends with a neighboring country subjecting the dinosaur island to a saturation bombing akin to what it took to eliminate feral pigs from an island.
So, Michael Crichton would find all sorts of things wrong with the tiger plan and the one-way gates for the pigs, no doubt in a very entertaining way.
Matt61
Matt61
Excellent info about the Jurassic Park subject. I never knew that’s where the movie stemmed from.
But yes. If you upset the balance of nature. The outcome could just be a surprise. And more than likely in a bad way.
I did enjoy reading and thinking about your comment. And oh so true.
Matt61
I’m going to reply here to you cause I remember you having trigger problems with your 1077.
I’m switching my Wild Fire back to a PCP from the 1077 Co2 tube I put in it back when I sold my Shoebox compressor.
I took some pictures changing it back.
This first picture is when I opened it up. The red line with the dot is for you. There is a little flap that goes there with a spring and a little position rod. That will cause the trigger to jam if the plastic breaks in the place it goes in the receiver. Plus it slows the action down if your rapid firing. Don’t ask how I know this. 🙂
But definitely more reliable and faster firing with those parts out of the gun.
Here’s the picture and then I’ll post a series of pictures changing the tube.
Next picture with Co2 tube out.
Last picture with PCP tube back in and greased up with my secret lube. (and as I stated before, no secret lube) just white lithium grease.
Pretty simple actually. But hope it will help if anyone is interested in swapping components one way or the other and making their 1077 or Wild Fire shoot faster.
Oh and Halfstep this picture is for you.
Yes I have the little push bushing removed. It seems to be more distinct when the trigger is pulled and the shot goes off with it removed.
GF1 ,
If you leave the flap and pin in, will it still fire with the little push bushing removed? It seems like it might not push it out of the way of the hammer. And isn’t that bushing primarily a friction roller to help the seer disengage?
Halfstep
Yep the gun will still fire either way.
What happens when you remove that little roller is the sear actually pushes the hammer harder. The reason is exactly like you said. Now there’s more resistance before the sear can slip over the pin when it pushes the hammer back.
So by removing that little bushing you can pick up velocity too.
Right now my Wild Fire after switching it back to pcp is operating at 1200 psi down to 700 psi. I’m getting 5 magazine’s at 675 fps with the JSB 10.34’s I actually did the fill and chrony testing yesterday. Oh and only a 35 fps spread for my shot string. So more efficient than what the Wild Fire comes from the factory.
Halfstep
And I said the wrong pellets.
That was with the Daisy 7.9 wadcutters.
Not the JSB 10.34’s. I’m so use to using the 10.34’s all the time I forget to say the Daisy wadcutters on some of my other guns.
GF1,
I think that flap and pin thing is a safety feature to block the hammer from hitting the valve stem if the gun is dropped. The trigger has to be pulled to get it out of the way of the hammer.( sort of a reverse transfer bar safety in a Ruger Single Six) I don’t know if removing it would be a good idea.
Halfstep
It’s actually a antibounce system. It helps keep the hammer from bouncing off the valve. It’s good for slow shooting maybe. But definitely slows the gun down with it in place when rapid firing. And velocity stays more consistent when rapid firing or normal slow firing with it removed.
And thinking about what you said even with that flap and spring in place the gun could still possibly fire if dropped hard enough. That flap doesn’t block the hammer it just keeps the hammer from bouncing.
Halfstep
Been shooting the heck out of the WildFire yesterday and today.
Definitely super fast on the trigger pull and smooth as can be now.
And I keep forgetting to mention. Deep seating the pellets have been giving me higher velocity and shot count.
I use a Bic pen with the blue cap on to deep seat the pellets after hand loading.
And one reminder. Don’t forget to shorten the trigger return spring behind the trigger. That is what gives higher velocity and a smoother trigger also. I cut it so it’s at a legnth so it fits right in the spring cavity.
Here’s a picture so you can see what I mean.
GF1,
You said higher velocity with the shorter spring. I thought the idea was to get lower velocity, more shots on lower fill pressure.
Halfstep
It was a combination of things that raised velocity with a fair shot count.
The shorter trigger return spring does help the sear stay on the pin longer as well as removing the bushing on the pin. Plus a bit lighter trigger pull.
The higher velocity also came from the lower fill pressure I’m using. And I also stretched the the hammer spring a little to get the velocity and shot count with the lower operating pressure. Not the trigger return spring.
You can see the hammer spring in the pictures. It runs horizontal at the bottom of the hammer.
I don’t think I mentioned stretching the hammer spring this time. But pretty sure I did in the past.
So see what I mean. It was a combination of things to get it to shoot how I wanted.
GF1,
This is what I’m referring to from April of this year.
“Well it was still raining here this morning but stopped a bit ago. So decided to try something with the Wildfire. Something in particular with the trigger pull. Found something interesting with the trigger return spring. First off it is heavy. Second thing the hammer spring is kind of a medium weight spring. I didn’t want to mess with the hammer spring cause I thought it might change velocity and fill pressure if I lightened it. Although a lower fill pressure wouldn’t bother me as long as velocity stayed fairly close to what it is and still got my four 12 shot clips on a fill. Well here’s the interesting find. The trigger return spring also controls the sear arm for how far back the hammer swings. In other words lighten the spring and the hammer doesn’t swing back as far. More trigger return spring pressure and the hammer swings back farther. But here’s another interesting thing. With less trigger return spring pressure the gun wants to work at a lower fill pressure. Right now I have the trigger return spring set for a 1400 psi fill. I can fill to 2000 psi still and just to mention with no leak down out the transfer port to the barrel. But what does happen is the gun is basically in partial valve lock around 1500 and up psi. Real slow velocity basically. But right now I have probably around a 2-1/2 pound trigger pull verses around 9 pounds from the factory. And now my working pressure is 1400 psi down to around 900 psi. And that just so happens to be what my 1077 liked when I converted it to a PCP. Now I just need to see if I get a slow leak down overnight. Not that what I did would cause that. That from what I see would happen with the o-ring on each side of the tube they use that transfers air up to the actual valve that the hammer hits and sends the air to the barrel. Anyway I can pull the trigger with the gun at my side almost like I’m bump firing a semi-auto rimfire rifle. In other words if I time my trigger pulls out with the right rhythm it sounds almost like a automatic firing. Can’t rely on the recoil the rimfire has so the rhythm is what’s important. So for me anyway I like the gun better this way. And the trigger is actually better now than the 1077’s I had. And now it would be a more friendly gun for hand pumping. So multiple benefits this way.”
Halfstep
Yep the only thing I said back then is it might change velocity if I mess with the hammer spring.
And I said that it wouldn’t bother me if I still got the 4 mags on a fill.
Well from my response here I’m getting good results now with the things I done to the WildFire.
You should give it a try and see for yourself. Or have you gave up on your WildFire.
Halfstep
And I see what you mean now.
Yes I did phrase that wrong.
“The shorter trigger return spring does help the sear stay on the pin longer as well as removing the bushing on the pin. Plus a bit lighter trigger pull.”
Should say.
The shorter trigger return spring does give a lighter pull. Yes that doesn’t put as much pressure on the sear and the pin. But with the bushing removed the sear will push back the hammer farther.
GF1,
So, if I got this right, I can shorten the trigger return spring and the trigger will be lighter and the sear will release sooner, giving a lower velocity. If I also remove the little bushing on the hammer, then the trigger will still be light but the sear will stay engaged longer ,making the velocity higher.
No, I haven’t given up on the Wildfire. I had to put two replacement valves in the Wildfire that I kept.( The one I had to keep because I took it apart and voided the warranty) The second replacement worked but I still have a leak that bleeds it down in about a week. In Sept. I got a coupon from Air Gun Depot and they had a sale and I was able to get a second Wildfire for $116 to my door, so now I have two again and no problems so far from the new one. ( I’m knocking on wood right now 🙂 )
I had to send my Diana stormrider back because the guts blew out of the silencer after about 250 rounds. The replacement gun did fine for about 500 rounds except it wasn’t proving to be very accurate. Well about a week ago IT blew the guts out of the silencer. I decided to just shake all the bits out of it and used needle-nosed pliers to remove what wouldn’t shake out. I didn’t think that the thing was doing much silencing anyway and I didn’t want to fool with another return if I didn’t need to. Anyway, it seemed to shoot those pellets better afterwards so I guess they were nicking the baffles all along and I didn’t know it. So now I have been busy trying different pellets in it.
My daughter gave me a Pelletgage for my birthday in Oct so I’m measuring and sorting by head size. At full effective pressure of about 170 bar (around 900fps) the stormrider seems to need pellets close to 5.55mm. It could probably use even bigger but I’m not finding many that are even a true 5.55mm. Smaller heads do OK at around 800fps and lower. I still have a lot more testing to do ,but right now it sort of looks like the barrel diameter is so large that the rifling doesn’t engage well at high velocities on small diameter pellets. It’s all good though. This is stuff that I can work on in the house when the weather is bad. Tues I’m going to my brother’s place to shoot my new .380 and I’m going to try B.B.s hold on my Colt .45 ACP. It’s supposed to be mid 60s.
Halfstep
Yep on the WildFire trigger return spring and the bushing.
And glad you got a good WildFire finally.
And wow now issues with the stormrider. And yep it sounds like the pellets we’re probably clipping the shroud. You will have to give a update on how it shoots when you spend some more time with it.
And interested in how your pistol shooting goes too. Sounds like you will be busy for a while. 🙂
Should of said hammer spring runs horizontal (above) the hammer. Not below.
Guess I should of looked at the picture before I replied. Just thought about it for some reason.
Let me try this one more time.
The hammer spring runs horizontal above the sear. Not the hammer.
Brain isn’t engaged today for some reason.
Oh and should of mentioned on the Crosman 1077 drawing it’s item 3, 4, 5 and 25 that I removed.