by Tom Gaylord
Writing as B.B. Pelletier

Beeman QB Chief precharged pneumatic air rifle.
This report covers:
- Remove the stock
- The stock comes off
- The trigger housing
- Now to adjust the trigger
- Trigger stop screw
- Trigger pull adjustment
- Put the action into the stock
- Installing the safety lever
- Summary
Today I will discuss adjusting the trigger in the Beeman QB Chief precharged pneumatic air rifle. I promised you a tutorial on the trigger and this is it.
Remove the stock
The first step to adjusting the trigger is to take the barreled action out of the stock. On this rifle that isn’t as straightforward as it sounds. There is just a single Phillips screw holding the action in the stock, and I trust you can all deal with it. But the safety lever on the right side of the triggerguard has to also be removed for the stock to slip off the triggerguard.
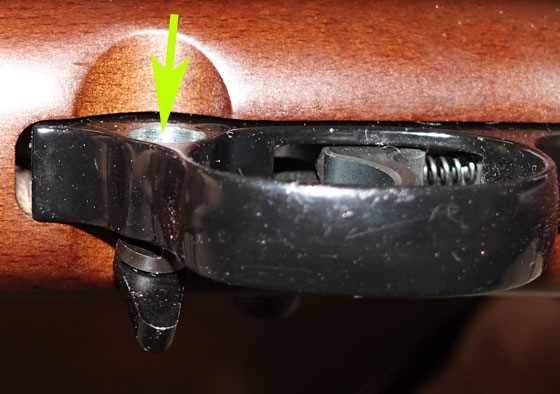
First uncock the rifle. To remove the safety, point the safety lever straight down and push the safety from the opposite side of the triggerguard. The large round surface on that side makes pushing it out with just a finger possible, though I get it started, then use a punch to get it all the way out.

The safety is pushed out (arrow) from the opposite side of the triggerguard. I push it this far with my finger and use a punch to take it all the way out.
The safety lever pushes out of the triggerguard.
The stock comes off
Once the safety is out and the stock screw is removed, the barreled action lifts out of the stock. Set the stock aside and turn your attention to the trigger housing.
The trigger housing
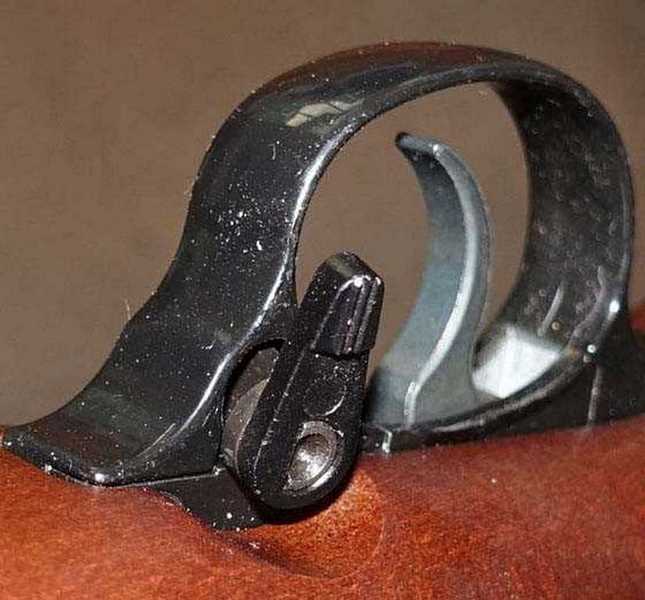
The trigger housing of this trigger is built to hold the operating trigger parts in place when the sideplate is removed. Back in the Crosman days when this trigger first saw the light of day that wasn’t quite as true. Some trigger were okay with their sideplates off while others wanted to dump their parts when the sideplate came off. The one on the test rifle worked fine with the sideplate off, which allows you to adjust the trigger easily.
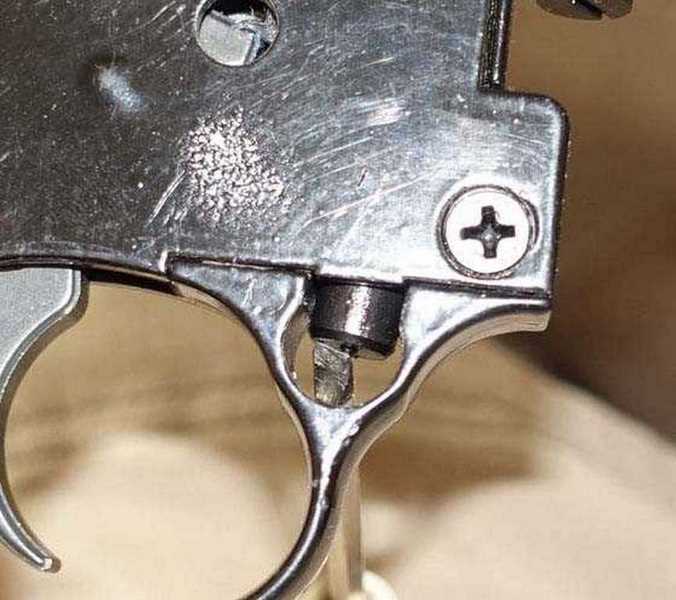
Remove the two Phillitps screws from the sideplate, then pry the cover off. Notice the safety follower has been pushed to the bottom of the safety hole in the triggerguard.
With the sideplate off you can see the inside of the trigger.
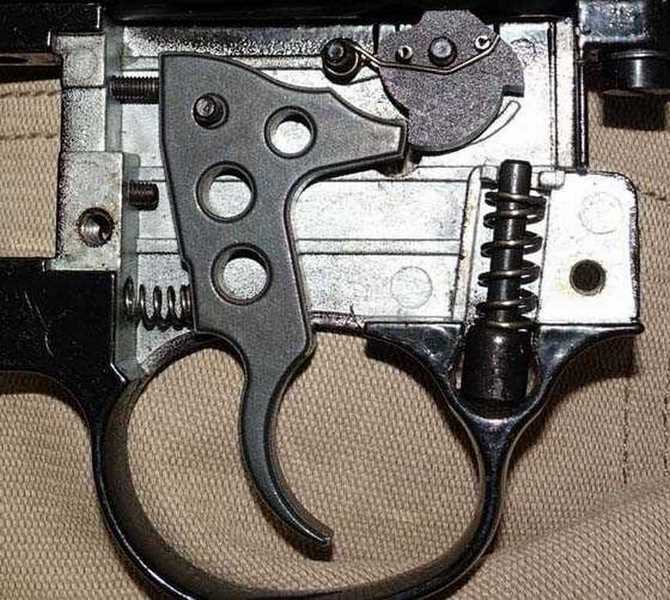
With the sideplate removed, all the trigger parts are exposed. The gun is uncocked at this time, but it looks the same when the trigger is cocked, because the trigger and sear are in the same place.
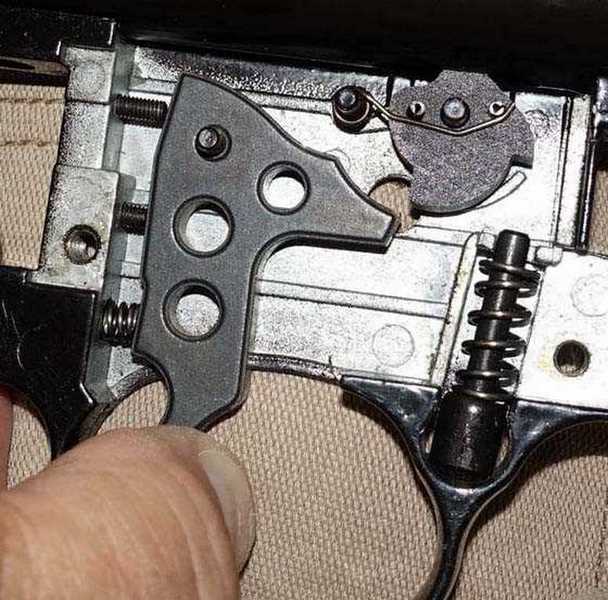
I’m pulling the trigger back so you can see where it contacts the round sear above it. That hole behind the sear allows you to adjust the sear contact without removing the sideplate.
Now to adjust the trigger
The first step to trigger adjustment is the cock the action. When you do the trigger and sear will be in full contact.
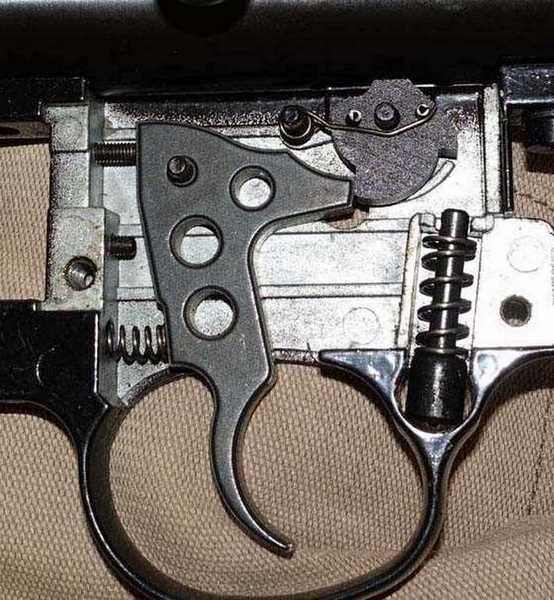
In this picture the action is cocked. It doesn’t look much different than two pictures back. But this time the sear is holding the striker that is under spring tension. The small screw at the top left, behind the trigger blade, adjusts the sear contact area. This picture shows too much sear engagement. Turning the 1.5mm Allen adjustment screw in will lower the trigger on the sear and reduce the contact area.
That picture shows everything you need to know about trigger adjustment. This is a positive sear engagement trigger, and adjusting it lighter means reducing the area of contact between the trigger and sear. The trigger return spring pushing the bottom rear of the trigger keeps the trigger raised so it will contact the sear. Don’t fool around with that spring, because it is needed for safe operation.
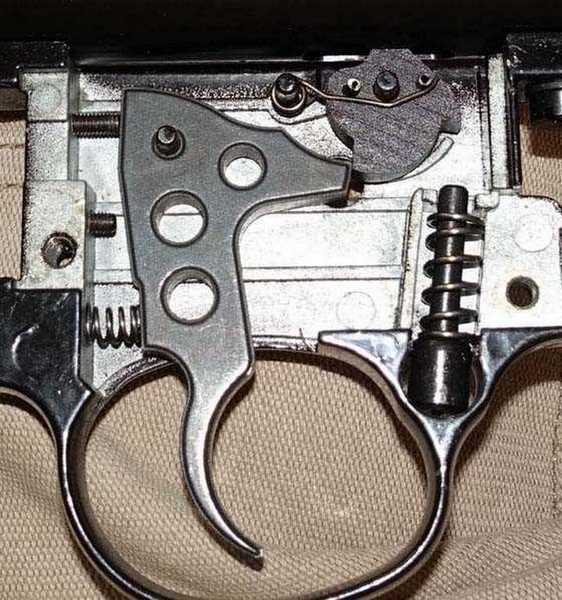
I have adjusted the trigger/sear engagement to a safe level that will feel better than what was before. Where do you suppose the moly grease goes?
I only had to turn the 1.5mm Allen adjustment screw in a little to get the engagement I wanted. Some blue Locktite on the screw threads will ensure the screw stays put. If you want to use some Moly grease, put very little on the areas of the trigger and sear that come together when the rifle is cocked. It will be spread around as the gun is used.
I bump-checked the trigger for safety (cocked the action and tried to bump it into firing) and when I was satisfied it was safe I lubed the contact point with moly grease and adjusted the trigger stop screw.
Trigger stop screw
The trigger stop screw stops the trigger blade moving after the gun is fired. This gives an additional feeling of crispness to the trigger. Only finer triggers have this adjustment. In this unit it is the lower adjustment screw seen in all the photos.
In the pictures above the trigger stop is not set correctly. It’s too far back. Like the sear engagement, this screw only had to be turned a little for a perfect stop. Go too far and the gun will not fire, because the trigger can’t move far enough back to release the sear. So test it often and set it on the slightly loose side. Like the sear engagement adjustment screw, this one could use a little blue Locktite on the threads.
In this picture the trigger stop screw at the bottom is adjusted correctly. The difference from this to what it was before adjustment isn’t much!
Trigger pull adjustment
There is one more adjustment. The trigger return spring has a screw adjustment that lightens the trigger pull a little. A slotted screw in the back of the triggerguard can be turned in or out to change this pull slightly. It’s right behind and in line with the spring. I like a positive return spring for the security it affords. The trigger is always going to catch the sear, if the return spring has good tension. I said earlier not to fool with that spring and now I’m telling you to leave the adjustment screw alone, as well.
Put the action into the stock
At this point the trigger is fully adjusted. Drop the barreled action into the stock and tighten the stock screw. Then install the safety lever.
Installing the safety lever
With a small screwdriver blade, push the safety plunger up out of the way, coming from the opposite side of the gun (the left side) as you simultaneously press the safety lever in on the right. The safety lever should be pointing down as this is done. The safety lever will catch the plunger and hold it in place, so you can reposition the screwdriver to push the plunger up more forcefully. At some point the safety will have clearance and you can push it back into the triggerguard easily. It takes longer to explain than to do.
To install the safety use a small screwdriver from behind and push the safety plunger up out of the way. I’m showing it without the stock for clarity, but the action would be in the stock when this is done.
Summary
There you have every step in the adjustment of the trigger on a Beeman QB Chief PCP. It’s not very difficult and the result is a very nice single stage trigger pull.
One final word. Though this trigger is a modern refinement of the Crosman 160 trigger, the 160 does have small differences. The modern trigger is easier to adjust and also easier to test after adjustment. I tell you this in case you try to step backwards and adjust a Crosman trigger with these instructions. It can be done, but that trigger isn’t as refined and easy to test as this one.


B.B.,
I’m a bit leery on reducing sear contact and placing molybdenum grease at the same time. I would rather place some moly grease first and use it for some time before making any adjustment on the sear. Then again that’s just me having experienced a stupident discharge from an overzealous trigger adjustment.
Siraniko
PS: Fig. 4. Remove the two Phillitps (Phillips) screws from the sideplate, then pry the cover off.
Siraniko,
I would do both at the same time myself. I would want the bump test to include all of the adjustment and lube effects. If anything, the moly should deter/prolong any premature sear wear.
Chris
Chris
I asked BB on yesterday’s blog about what scope that Ton was using on his Texan SS.
I searched it and found this link. Since you got your high tech Daystate on the way maybe you might be interested in this scope. It’s got Wi-Fi and is HD.
Check out the video of the night vision video the scope is taking of the hogs. And check out the distance it’s registering on the left of the scope view of the video. 200 yards.
If I had a extra $700 laying around right now this scope would be going on my Condor SS. I love the scope.
https://www.atncorp.com/x-sight4k-pro-day-night-rifle-scope-5-20x
GF1,
Saved link. Will check out later.
Chris
Make sure you watch the video’s. Check out the real time scope view data.
The scope view shows what direction your pointing in real time and and incline angle, range your shooting at and wind direction and more.
If I had the extra money right now I would have one of those scopes. That’s right up my alley if you know what I mean.
B.B.,
Very nice! It reminds me of the Maximus trigger group with many similarities, but not quite the same.
It would be nice if all trigger groups would be so easy to adjust and access. While not bad, the Maximus parts did not want lay in place very well. They did lay, but things would/could pop out with slight movement.
Plus, I had to add two 5/8″ x 4-40 screws (the 2 on the left), tweak the sear spring and swap the trigger return spring for a lighter one. Whereas, all of your screws were already there. On the 2 screws, the holes were already there and the screws screwed right in real nice.
Lube was similar. Moly on metal to metal, white lithium for anything plastic to metal and silicone grease for anything plastic to plastic.
Very similar though and I could be in and out in under 5 minutes easy.
Good Day to you and to all,…. Chris
Chris
I don’t use moly. I use white lithium on my sears and other metal parts. It stays in place and is pretty slick from what I have seen.
Chris,
I follow the same lubrication policy as you… Moly on metal to metal, white lithium for anything plastic to metal and silicone grease for anything plastic to plastic.
h
Hank and Chris
Have you guys tryed the white lithium on metal to metal. And plastic to plastic.
I have white lithium on my WildFire/1077 which is plastic to plastic as well as metal to metal and plastic to metal. Also used all lithium on my Marauder’s I have had and so on with other guns.
Why don’t you us it that way? And by now you all know I walk to a different drum beat. What do they call that. Eccentric?
Anyway you get my point. If you are just following the same old rules maybe it’s time to step out of the box. 🙂
Hi GF1,
I like White Lithium grease, use it a lot but there are others I prefer for specific applications.
“Lithium greases” use lithium soap (a derivative of the metal: lithium) as as a base to mix other “ingredients” (like molybdenum or PTFE) because it has excellent properties (adheres to metal well, non-corrosive, good at high temperatures and pressures etc.). Lots of different flavors out there.
“Moly” grease and oil contains molybdenum disulfide which has a particular affinity for metal. The molecule to bonds directly to the metal parts forming a surface for the lubricant to work on. Effectively you end up with a metal/moly/grease/moly/metal low friction profile. Guess that it is similar to the way an inter-metallic alloy forms at the junction when you solder copper wires. I don’t use moly on metal parts until they have “lapped” themselves because it will interfere with the parts wearing in properly.
Similarly, I prefer silicone or PTFE lubricants for plastics because they seem to play better together on a molecular level (lithium is better with metal).
Guess I have a fetish for adhesives and lubricants – I have shelves loaded with products, each with specific uses. …Five different CA glues, eight different epoxy resins, probably a dozen different purpose oils… you get the idea.
I wander in and out of the “box” all the time – don’t know if I am eccentric or just peculiar 🙂
h
Hank
I have used molybdenum disulfide in car and motorcycle engines as well as RC airplanes.
Moly bonds with heat. Probably not as well in or Sears on a trigger.
And lithium will keep getting slikwr to the touch the more you rub it beetween your fingers.
I used litium on the spring and trigger on my FWB 300and it’s still in place. And it’s been a couple years or so since I did it. Even still has the o-ring as the piston seal instead if the cast iron ring.
But you know what. You still never said what guns you have tryed lithium grease on metal to metal.
I would like to know the differences you seen between the two. Long term or short term.
GF1,
I use the white lithium on my FWB 100, 300 and 603. My FWB 124 has a moly lub treatment.
Never done a formal side by side test of moly to another lubricant. Hard to tell with lots of things but with a fishing reel where you turn the handle and can fee the gears I have noticed that they run smooth and quiet with moly all summer long. I will clean/relube a reel with white lithium and see if I notice any difference.
I saw a report where they tested moly on the huge earth-moving equipment during the construction of the James Bay hydro dam in Quebec. They had a control group and a test group of new equipment. The test group had all of the engine components brushed with moly before assembly. After the project, all of the test engines were disassembled and were found to still be within original engine specs while the control group showed substantial wear (as expected).
h
Hank
If you do your fishing reel with the lithium I definitely want to hear about that.
GF1,
I keep several identical rods rigged with lures that run at different depths when I am fishing.
I will take two of them and relub one with a fresh moly and the other with white lithium.
Won’t identify which is which so it will be a blind test to see if one grease is noticeably better that the other.
I am curious myself. Will let you know.
Hank
Ok good. I will be waiting. Thanks.
Vana,
If you don’t follow him already, the YouTube creator at this link, https://www.youtube.com/watch?v=XObmZIbHOzY , “Project Farm”, does a lot of practical experiments with CA glues, epoxies, lubricants, additives,etc that you may find interesting and fun to watch, if you, indeed, have a fetish for such stuff, as I do.
Half
Thanks Halfstep!
I’ll check the Project Farm!
h
GF1,
Not sure,.. but you may still be “in the box”. I believe that B.B. recommended what I said and Hank seems to be VERY well researched. Just sayin’. 😉 Hank did recommend going with stock lube for awhile and then hit the moly,.. as he said that the moly may interfere with natural break in and polishing phase. That is assuming that further polishing needs done in the first place.
Chris
All I can say is try the white lithium grease and see for yourself. It works.
Chris U,
I have already bought the trigger parts to convert the Fortitude to a two stage trigger, oh and a scope and mounts. I keep telling myself I am going to wait and see how it does before I get one.
Not sure where you are on your scope research. I do not want to influence you, but here is how I see three different scopes.
UTG good scope for the money on features and clarity is very good.
Hawk does a better job of holding POA with changes of power and parralax adjustment.
Leopold does not need to settle in after adjusting the windage and elevation and does even better at holding POA.
These are scopes that I have more than three of so I can compare. There are many other makes of scope that may be even better.
This is my best scope:
/product/hawke-sport-optics-6-24×56-ao-sidewinder-30-sf-rifle-scope-glass?a=5021
It is not first focal plane. For your gun I would go to someting even better.
Just my two cents for you to consider.
Don
Don,
Thank you. I will take all of the advice I can get. Notes made and link saved. Thanks! 🙂
Chris U,
I forgot to mention the reticle on the scope I linked to has windage marks. They are geat especilly if you get a range shot first. I was setting the bottom right windage dot at the top of some clay piegeons last week at my cabin and hitting better than 50%. The wind was gusting over 20 mph.
I know you been shooting in the wind. The windage marks are a real plus. I would have loved this scope when I was shooting ground squirrels for farmers. Large holdover in the wind is difficult.
Don
Don,
Thank you. I do shoot in the wind at times,… but the 30-100 yards that is heavily wooded subdues that quite a bit in the Summer. I have only recently tried some windage hold offs and the results were very good. Windage marks are of high interest at this time. Plus,… the 0-30 is like a canyon of trees,… so that is not bad either. I can hear wind, but do not see it or feel it in direct comparison to the hearing.
Hey,… if I can knock a 3-4″ group down to 1-2″ at 100,…. I am a very happy camper!
Hank’s (Vana2) windage flags work great. While not exact science,… it does give the awareness of presence of wind. Plus,.. I am (just) starting to play with higher magnifications. Only a 16 to date.
Thanks again,… Chris
Chris
If you check out the video’s on that scope I think it will let’s say…open your eyes.
You like your wind flags. Well that scope shows that real time right on your scope among other things.
I know like you said on the Texan SS report. It’s work night for you. But when you check it out let me know. And I’ll be at work tonight but I’ll have my phone so I’ll see your post. 🙂
I have to say from owning my QB79 and Gauntlet that they both have a better trigger than a Discovery or Maximus trigger that I have also owned.
And yes work can be done to the Discovery/Maximus trigger. But the the QB series guns as well as the Gauntlet already have everything in place. Leave as is or adjust no adding screws or bending springs.
BB,
This is really a very nice trigger assembly. That is why it has stood the test of time. Even a trigger snob such as myself can admire this design. The only way to be simpler is for the trigger to also be the sear.
BB,
Thanks for this tutorial. It looks like the same set up that is in the Gauntlet. I am shooting my Gauntlet as it came out of the box. I find that I can pull the trigger half way through its travel before I realize I’m doing it. I may add a drop of lube through the sear peek hole. A couple hundred more break in shots first.
You gave no mention of lubrication at the trigger pivot pin. Would it matter there?
Gerald
Gerald,
Not very much on this design.
B.B.
Gerald
And how is your Gauntlet doing? And I forgot. What caliber did you get? Sorry about forgetting what caliber.
Redrafter
How’s your Chief been doing? Haven’t heard from you in awhile. Or maybe I missed your comments lately.
GF1,
No problem, I have the Gauntlet in .177, bought the bundle with pellets and ‘rat on a stick’. I put a Nikon 3-9 scope I had on it. I would not recommend the scope as it is not clear at high magnification. For this purpose it is ok. The pellets in the bundle work best of what I have. I can do a whole magazine on the rat target at 35 yards with no misses. Not as well with Daisy wadcutters and they are fiddly to load. There is transition into the breech they get caught on. I may remedy that when it bothers me more. There is no other reason to tear it down for a while.
Gerald
Gerald
My .177 Gauntlet doesn’t get fed Daisy wadcutters. It’s a cheap gun that acts like a Ferrari. It knows how to shoot so I keep it happy and feed it good. You know what I mean.
And wadcutter pellets are notorious for that feed problem. That flat nose doesn’t give the guide in like a domed pellet does.
And from what I seen out of my gun the rat target would be toast. The reason I say is the Gauntlet I have is stupid accurate. It goes where I point it even all the way out at 60-70 yards.
I have been seriously thinking about going to the Texas air gun show with it and shooting a field target match. It’s just to reliable in hitting no matter when I pixj it up to shoot it.
I could post a target paper that I have shot at the last 3 days and circle the Gauntlet groups shot at 50 yards and you would know it was from the same gun. It’s such a round group it ain’t funny. And it does it over and over.
Oh and yes I’m using my favorite JSB exact heavy pellets that I have used over the years with great results. The 10.34’s.
And not trying to take away from your reply. Just say’n ya know.
GF1,
Thank’s for the affirmation, we both think it’s the cat’s meow. I will add those JSB pellets to my next order when I get more of the AA’s that came in the bundle.
Gerald
Gerald
Yep you got it. The cat’s meow. 🙂
And did you get the Air Arms 8 grain pellets or 10 grain pellets in the deal? I will get the Air Arms 10 grain if Pyramyd AIR is out of the JSB 10 grain pellets.
GF1,
They are the 8 grain.
So your getting the 10.34’s in JSB’s or AirArms 10 grain on your next order right?
GF1,
Well as the fourth tin is always free it would be wise to get one of each if all are in stock.
Gerald
Gerald
Yep why not.
Ok I had to do this.
And instead of me saying what group the gun shot I’ll just list the 3 guns I shot out at 50 yards the last 3 days.
And there is a story behind the group’s too.
I will usually shoot each gun I’m shooting that day at a target and a 10 shot group. Why? That way I know where that gun is shooting that day. Then it’s fun time after that. You all know me. It’s accurate plinking time after that. 🙂 And no. No .25 Condor SS targets. I do that gun a bit different. I pick a spot in the field to shoot at then see how it’s hitting. And that spot I pick is usually a minimum of 100 yards out. So basically the Condor SS gets plinked with at 100 yards+. And yes I do occasionally shoot some 50 yard groups with it.
But here is a picture of my target from the last 3 days. Top row is day 1, 2, 3 of one gun left to right. Next row is another gun day 1, 2, 3 left to right. Then the bottom row is the 3rd gun day 1, 2, 3 left to right. And here is the guns.
Maximus.22 caliber. Gauntlet .177 caliber and FWB 300 .177 caliber.
Tell me which gun shot what row across. Remember I said my Gauntlet is a shooter. Well and so are the others.
Gauntlet top
FWB middle
Maximus bottom
Don
Yep and surprised nobody brought up that the FWB 300 has the peep sight on it and shot those groups at 50 yards. Well it don’t no more. I actually have it scoped again.
And here’s the reason behind that. I’m actually going to put a scope back on the HW30s and take the peep sight off too. But the reason is I do pest birds with the 300 and the HW30s.
The peep is hard to get on the bird fast enough. Hard to locate the bird in higher grass and especially if they are in a tree.
But I have to say the peep sights are accurate for sure. It’s just they won’t work for what I need right now. And I might try them on a 1322 with a long barrel and the 1399 stock. And might try them on the Maximus I have. But I got to figure out a front sight for those two guns if I try the peeps on them.
GF1,
I will post a picture of my peeps on the Crosman 101 soon with the peep and globe sight on the Maximus barrel. I have not shot it yet I will try to put a report together tomorrow. The sight radius is enormas I have high expectations even with my poor eye sight. The globe sight just came in from PA this pm.
I am not sure the Maximus barrel will like all the weight past the end of the barrel. It may need some micro adjustments.
Don
Don
I think you will be happy with the peeps. They do make for some accurate shooting.
And interested in how your front sight does. I may do the same to my Maximus and try the peep sight on it.
I have a question for the Maximus owners out there.
Is the reservoir and valve / striker assembly in a one piece tube or can the reservoir be “removed”?
RR,
I dont have a Maximus but I do have the tube, long story. It is all one long tube, not separate.
Don
Don,
LOL! I’ll try to remember that you have one. I may be wanting it in the future.
Thanks guys.
RR
Like Benji-Don said. The Maximus is one piece too.
B.B.,
Your reviews are exactly what I need to know when even thinking about purchasing an air rifle. This latest part of the Beeman QB trigger adjustment is worth … well worth a lot.
~ken
Well,… I got it. The Daystate Serie Rosso Red Wolf in .25. One word. Perfection. Feels great. Points like a dream. Engineering at it’s best. Only a “somewhat” quick look over, but that is the first impression. And,… not even the first adjustment has been made yet.
More this weekend. How’s that for a “cliff hanger”? 😉
Chris
Cool. Did you check out the video’s of that link I posted about the scope Ton uses on his Texan SS.
I bet the high tech would compliment your new gun nice.
Chris,
Best wishes for a pinwheel shooter!
Enjoy every shot like the first!
May the beauty give you many reliable hours of joy on TARGET!
shootski
Shootski,
Thank you. I will be taking my time getting to know her. 😉 Still have to scope her yet though. Plus, some good shooting bags. By the time I get it set and familiar with it all,… it may be a month or two.
How you going to shoot it without optics? Rob your Marauder?
You could practice your hip shots. I forgot how you showed me how to put a smilley face,,imoji on here
Don
Benji-Don,
Smiley face is space colon dash close parenthesis.
With spaces it doesn’t make much sense.
: – )
Without spaces
🙂
Siraniko
You don’t even need the dash… : ) 🙂
Chris,
You are one lucky guy. I bet you can’t wait to get her out on the range to shoot?
Looking forward to your reports on her. You are making the rest of us envious of you!
Are you going to mount one of the scopes you have on another gun on it. I am sure
you won’t be able to wait until you make the choice of a specific scope for her. It will
probably be difficult to go back and shoot your other airguns after shooting this beauty.
Fun, fun, fun 🙂
Geo,
Thank you. The best scope I have is on the M-rod. 4-16×56 UTG. I will be getting another scope. Thinking of something in the 24-32 max. mag. range, whatever brand.
What is odd,… I have seen this come in at 8-8.5# (in high power = longer barrel) and the TX200 was 8.5# I do believe, but they feel nothing alike. The Red Wolf feels like the Maximus, which is only 5.5# I do believe. (both,…un-scoped) Like I said to Shootski, I will be taking my taking my time getting to know her.
Will keep all posted,.. as time progresses.