by Tom Gaylord
Writing as B.B. Pelletier
Today’s report is one you readers have been asking for, for a while. Reader Vana2, whose name is Hank, tells us how to make a wood stock.
If you’d like to write a guest post for this blog, please email me.
And now, take it away, Hank.

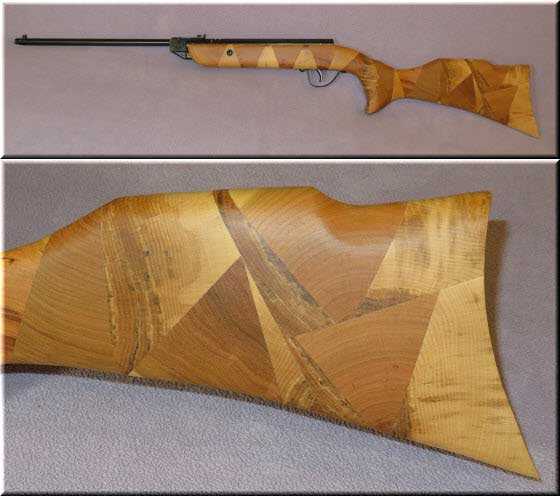
This is my original 55 year old Slavia 618 in its new “firewood” stock. I made this one in a “camo” style, using cherry and maple blocks in a random arrangement of the pieces.
This report covers:
- Why am I writing this blog?
- Why make a custom stock?
- Do you need to work on your stock?
- What can we customize?
- This is where a Try-Gun stock comes in
- Overview
- The material of choice: spruce
- So, what is involved in making a stock?
- Selecting the wood
- Some suggestions for finding the best board
- About knots and drying checks
- A comment on lumber yard etiquette…
- Summary
Why am I writing this blog?
Last April I discussed modifying my FX stock with blog reader Gunfun1, and he was dubious of my plans of taking a rasp to an expensive walnut stock. I have made a number of stocks and didn’t think that it was a big deal so I made the needed adjustment and showed him this picture.
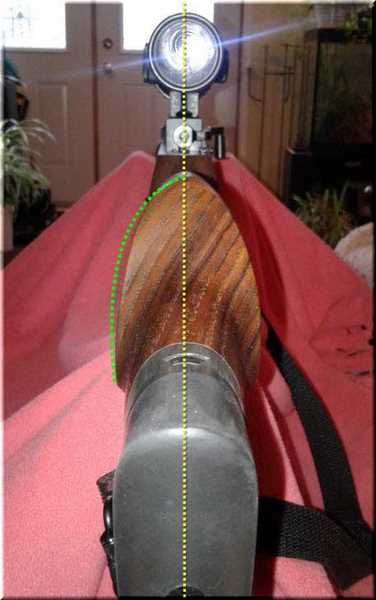
This is the mod that started this blog. Here you can see where I removed about ¼ inch of wood from the left side of the FX stock adjusting my cheek-weld to get proper alignment between my eye and the scope reticule.
When he commented that most people would be uncomfortable with the idea, I got to thinking about writing a blog about stocks. I figured that if a person was familiar with the process of making their own stock then they would also be comfortable modifying one.
In this blog, I would like to share some of my ideas on how to make an inexpensive stock using basic tools. I will be introducing a “Try-Gun” stock made from spruce, followed with a hardwood stock made from firewood. Rather than just demonstrating how I make a specific stock I will be mixing my own theories in with the actual parts where I cut wood.
This blog is for the people who have thought about making a stock but don’t know where to start, and for people who need to modify a factory stock to make it fit better but doesn’t know how to proceed. I’ll discuss the materials, the approaches and explain any technical bits so that all will be comfortable with the whole exercise.
Why make a custom stock?
Why make a custom stock? Well, I could sum that up in one word: ACCURACY. To me, accuracy is consistency and in the airgun world I believe that a major component of consistency is the ability to mount the rifle such that the shooter is properly aligned with the sights and has the same stable contact/weld with the stock each time.
Do you need to work on your stock?
Whether you need to work on your stock depends on how well it fits. For hunting, the key to fast and consistent shooting is a rifle that comes to the shoulder and cheek-welds in a smooth motion. For target shooting, the rifle should comfortably and positively settle in the same way for each shot. In both cases, your eye should be aligned with the sights without having to wiggle around or cant your head. If you are taller/shorter than average or need a left-hand stock you might want to modify your stock or make a new one from scratch.
In addition to fitting properly, a stock should also be suitable for your shooting style and application. For small game hunting, pesting and plinking, where fast shooting at mobile targets is required, I prefer an angled grip (similar to what you see on a shotgun) and a gun that balances slightly forward of the trigger guard — right where I have my hand when carrying it. For target shooting I like a more vertical grip on a heavier stock that is balanced to be a bit more muzzle heavy.
What can we customize?
There’s quite a list… the height and angle of the butt; the length of pull; the height and shape of the cheek-piece; the angle, size and shape of the grip and the overall balance. With all these considerations, designing a stock that fits properly can be a daunting task — especially if you are not sure what would work best for you.
This is where a Try-Gun stock comes in
A Try-Gun stock is made up of components that can be adjusted to come up with a suitable configuration. The stock consists of four separate components: the forend; the grip, the cheek piece and the butt. The advantage of this approach is twofold; you can experiment with different shapes and styles of the components (like grips with different angles) and if a component does not come out right, you can trash it and make another without having to make a whole new stock.
Overview
It’s not difficult to make a custom stock. Common tools and basic wood working skills are all that are required. The only power tool needed for this project is a table saw (and the knowledge of how to use it safely). Other power tools would be useful but you can get by without them. For the general shaping, I like an 8 or 10 inch (smooth) cabinet rasp and follow up the rasping with a wood (bastard cut) file for leveling and smoothing. Good quality sandpaper in various grits is needed for final shaping and finishing up.

I made this custom stock for my Hammerli AR20 from scraps of yew and maple left over from other projects. It doesn’t need any adjustable features because, like a tailored suit, it is made to fit.
The material of choice — spruce
Spruce construction lumber is an ideal material to learn with — it’s readily available, easy to work and cheap. You can make a fully functional, good looking stock from spruce and graduate to working with hardwoods later. The best way to learn is from direct experience; with spruce you can forge ahead, bash out a couple of tries and learn a heck of a lot for a couple of bucks invested. A stained and finely finished spruce stock often displays a figure as good as or better than many hardwoods and is lighter to boot.
So, what is involved in making a stock?
The stock needs to be laid out (designed) on a piece of cardboard to gather all the information into one place. Later, the information will be transferred to wood as needed. The cavity for the receiver and clearance for the trigger (etc.) are cut out, then the overall form of the stock is cut followed by general shaping and fitting. The rough stock should be tested and adjusted as needed then finished as desired. Before making a hardwood version I’ll use the rough stock on the gun for a while to see if there are any further adjustments needed.
Selecting the wood
I thought it would be useful to have a brief discussion about the grain of the wood because it does affect the stock. There are a number of species of trees that are harvested and sold under the description of spruce construction lumber. While there will be some differences between species, trees of the same species can have a lot of variation in their growth depending on the environment they grew in. It’s best to spend some time looking at the end-grain before selecting a board.
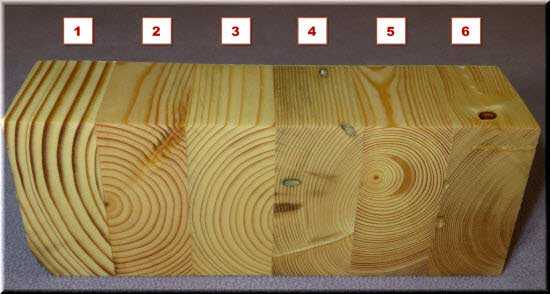
This glued-up block shows the early and late growth rings of several samples of spruce lumber.
Spruce with thick (hard, dark) early growth rings and wide soft (pithy) late growth rings like #1 (above) are not suitable for this type of wood working. The early growth rings are tough enough to cause drill bits to deflect and the late rings will tear out rather than cut smooth when being shaped. This wood often has a lot of internal stress and is unstable when cut. The dramatic grain patterns are good looking but it’s best to avoid these boards.
Samples # 2 and #3 are marginal. The early growth rings are fine but the late rings are a bit wide and likely to be soft. Nothing wrong with using boards like this for learning to make stocks and they can be quite serviceable if you fortify the late growth with a good soaking of thinned urethane. One option with this wood is to do a good (final) sanding with steel wool to remove some of the softer growth and leave the harder rings standing proud. This gives an interesting “rippled” finish on the stock which can be quite pleasing.
Samples #4 and #5 are typical of the better boards you might find. Expect that three to five percent of the boards in a stack of lumber may be of this quality.
Sample #6 is an exceptional example of fine, tight rings and will rival some hardwoods for density. The tree that this piece was cut from probably grew slowly, in a poor soil, low water shaded environment. You won’t find this quality of grain often (especially if I saw it first) but it would be well worth taking home for special projects.
Some suggestions for finding the best board
The ideal piece of lumber will have closely spaced rings that have a reasonable balance of early and late growth. Lumber cut from the outer parts of a large tree usually has a better grain pattern and fewer knots. Look over the wider boards (2×8, 2×10 or 2×12) as the extra width gives you more latitude in choosing how to cut out your stock.
About knots and drying checks
Wood is a natural material and is bound to have some flaws. I used to look at them as imperfections but now consider them to be “character marks” and no longer worry about them. Knots are not an issue and can add a lot of nice figure to the stock. Small, tight knots are easy to deal with and larger loose or flawed knots can be locked down with some cyanoacrylate adhesive (“CA” or Super Glue; Krazy Glue) and filled. Checks (drying cracks) and resin pockets can be dealt with by packing with fine sawdust and adding a drop of CA.
A comment on lumber yard etiquette…
If you want to be able to select your own lumber be sure to dress appropriately (work boots and gloves are recommended). If you show up in shorts and sandals expect to be refused permission to search and get the, “Our insurance doesn’t allow customers in the yard” line.
For best relations with the people working in the lumber yard, stay out of their way, don’t make extra work for them and be sure to leave the lumber stacked neatly.
I get along great with the guys at the local mill; they know that I am on the look-out for special boards and will often put them aside for me.
Summary
As you can see there are many benefits to making or customizing your rifle stock. It can be done with common tools and readily available materials. All you need is to become familiar with the steps and get some experience. I’ll address that in the parts that follow.


Hank/Vana2,
Thanks for the introduction to making a stock. Hopefully I will get the courage and guidance to make changes in my own stock to make it fit properly for me. I’ll be waiting for the rest of this series. Will you be addressing also how to laminate wood to make a suitable blank? I live in a country where the harvesting of wood is strictly regulated and I plan to use wood scraps (several 4 foot lengths of 1 1/2×2 or 2×2) glued together to make my initial Try-Gun stock.
B.B.,
Errata: This report covers: Section: Why make a custom (a) stock?
Siraniko
Siraniko,
Fixed. Thank you,
B.B.
Siraniko
The whole point to this series is to push you beyond wanting to make a stock to actually doing it – I hope I am successful with doing that for (to?) you.
The Try-Gun stock and the firewood stock are based on working with small conveniently sized pieces and building the stock as you go. Working on a full sizes blank presents additional challenges and is best left until you have more experience.
Working with “scraps” is fine, I’ll talk about gluing them up later in the series.
Hank
Hank/Vana2,
Thanks! Looking forward to the rest of the series.
Siraniko
It is always nice to discover something you never knew you wanted. This series certainly qualifies.
Seantheaussie
Hope you enjoy it!
H
Hank
Definitely good info. Now I see why you think it’s no big deal to start working on high dollar gun stocks. You know what your doing. In other words you been there done that as the saying goes.
I remember some time back you showed me the stock you made for your Hammerli. And that Slavia stock is way cool.
Definitely looking forward to more parts of this blog. I redone one of my FWB 300 stocks I got from RidgeRunner. It turned out nice with just a oil stain finnish. And I have another 300 also that I got from RidgeRunner sometime back. I’m trying to find time to do it this winter. So maybe I’ll now wait to see more of your reports. Would like to try some custom fitting the 300 to me this time around.
Hope you got Part 2 underway. 🙂
GF1,
Hank has sent all 4 parts and I am going to publish them one per week.
B.B.
BB
Good and thanks for letting us know. Looking forward to the reports.
Hank,
A very nicely done intro.. Looking forwards to more for sure! Like me,.. I think that the first look at the AR20 stock will blow most people’s minds. It is still tuff to get my head wrapped around it. I already learned a bunch of new stuff in this first installment. Nice job on the pics too.
Good Day to one and all,…. Chris
Thanks Chris!
H
Hank,
Nice write up. Over the years I too have modified quite a few stocks and grips to fit me. I can understand some people’s concern about “messing up”, but your learning approach is a good idea.
RR,
I have always “modified to fit” where necessary as well. As you know the improvements gained are well worth it!
H
Hank,
I still love what you did with that Hammerli stock and the firewood stock is so cool.
A pox on you! Now I will have to get me some glue and some more clamps and…
😉
Hank
That is one heck of a Hammerli stock. For some reason I get the feeling a tiny Japanese air plant should be sitting there someplace on the end.
Reminds me I never got around to reshaping my two $10. China made S1 break barrel pistols … the ones varnished with a house paint brush ! Always wanted to clean them up and paint them black but after seeing the SIG black stain is looking good. Looks like they used old pallet wood to make them.
Speaking of stocks I decided to file down an annoying pointed section of my composite FX Independence grip area that bothered the web of my hand when all of a sudden I realized the stock was not solid but foam filled. Fortunately it is very hard and dense. I sanded it with 600 grit and a ‘fingernail burnishing’ to finish it off and it made a world of difference for comfort.
Do you use open grit sand paper or closed to finish sand.
Sooo, when do you get to fabricating sheet metal parts for AR types and Kral Puncher Armour wannabe’s. 🙂
Bob M
Bob,
I use the open grit sandpaper and check it frequently to be sure that it is not clogged. Find that it is well worth the money to get good quality paper.
I do a lot of metal-working Bob, got a lathe/mill combination machine when I retired and there is already quite a list of projects planned for it.
H
Hank,
Open grit/closed grit???? Please show/explain. I have seen drywall sanding screen, paper backed sand paper and cloth backed sandpaper,…. that is it. Have I missed something?
Chris
Chris,
“Closed grit” sandpaper has 100% of the backing covered with grid and the “open grit” sandpaper has less of the surface covered so that it doesn’t clog so quickly.
The open grit is typical on the coarser sandpapers that are best used for shaping, blending and removing tool marks. The finer grits are closed grit.
With all sanding, use a light pressure and let the grits do their job. Too much pressure just strips the grit from the backing and embeds them into the wood.
H
Hank,
So what is the “grid” made of? A loose woven cloth? A tighter woven cloth? Does it resemble drywall joint sanding screen? The drywall joint sanding screen seems to be a grid of fiber that has grit bonded to the fiber. It works well and sheds any buildup, pretty well. If I re-call, both sides seem to be of equal abrasiveness. Sorry,… I am not familiar with the visual differences between the two types, (closed/open). Paper backed is junk from my experience.
Chris
Chris,
Would it help if I said “open coat” and “closed coat”? Many people refer to it that way.
The open coat sand paper is just that – a paper backing coated with an adhesive and covered with the abrasive medium.
The paper backed stuff comes in a range of qualities from junk to excellent – and priced accordingly.
The drywall joint sanding screens are excellent for their purpose. Think I have some left over from the basement renovation project in the garage. Now I am curious on how well it would work on wood. Will try it out.
H
Hank,
My Grandpa was and my Dad is of the frugal variety,… so that explains the cheap paper type. After entering the work force,.. I found sticky back grinding disc and emery cloth, typically used in the metal and welding trades to far superior. The emery cloth is typically 2″ wide and does have a cloth back.
I would think that drywall joint sanding screen should work very well and less prone to clogging.
Chris
Hank,
Thanks for taking the time to do this!
I am a firm believer that most airgun stocks do not fit properly. One size does NOT fit all.
I have bought a semi-custom stock, have a fully custom stock in the works and refinished a standard airgun stock.
The thought of the inletting scares the bejesus out of me! I will be watching this closely.
Again, thanks for the effort,
-Yogi
Yogi,
I didn’t get into inletting, relief carving, checkering and texturing in this series as I wanted to focus on the stock itself. They would need a series on their own.
One advantage of the approach I use is that you could inlet the piece you wanted without affecting the other parts of the stock – makes it less scary to try doing it 🙂
Like anything, practice on scraps until you have the confidence and experience to tackle a “real” job”. Go slow and have fun!
H
Hank,
Excellent work. I am always in awe of folks who can work with wood. I am clumsy at best. At my worst, with sharp tools in hand, I am downright hazardous.
Again, you have my admiration.
Michael
Michael,
Thank you!
I work with a lot materials but really like wood – the grain makes every piece so unique.
I consider myself to be an average wood worker – definitely not “cabinet maker” skill level!! I have done enough wood working that my mistakes are much less noticeable than when I first started making sawdust. Guess that I have found most of the ways of NOT doing it.
I really believe that anyone can make a stock with basic tools. Try it 🙂 …Take your time, learn from your mistakes, have realistic expectations and most importantly – have fun!
H
Hank,
My brother-in-law actually is a Master Cabinet Maker. He makes custom armoires that sell for $30,000 or more. I plan to save the pics of that first stock to show him. He loves creative wood marquetry.
I especially like the 618 because of the artistic way you used contrasting shapes, shades, colors, and especially contrasting grains. It really is a work of art in that respect. If you were to make a large rectangle with those aesthetic properties, it could be hung on a wall and stand on its own as a mosaic. The other stock is fancier in contours and is beautiful, but that Slavia stock is so beautiful it has me coming back to it multiple times.
Michael
I am glad that you like the firewood stock Michael.
It’ an easy construction that allows for a great deal of creativity. Lots of applications – a friend asked if I would make him a firewood style living-room table, think I talked him into making one himself.
There are a couple of things to consider for this style of stock and I cover them in the last part of the series.
H
Hank,
Thanks for bringing and sharing your woodworking experience with us. I have done some minor wood work – knife handles, stock refinishing – but I always stopped short of starting a new stock for fear of doing more damage than good. I have an old rifle that badly deserves a new one one so this time it will happen – I will be following this series with much interest.
Henry
Henry,
The best way to get over the fear is to jump in and make a stock (or two or three 🙂 )
Hope to see you posting pictures of your old rifle with it’s new stock!
H
I promise I will. Thanks Hank! Henry
Hank,
Thanks for this very informative series. I will absorb as much of the information presented as I can. In the past I have made a pair of grips for a pistol and found it not too hard once you decide to try it.
Gerald
Gerald,
You were absolutely right when you said – “and found it not too hard once you decide to try it.”
I cover a lot of details in this series, some of it is a bit technical and I hope that my explanations are clear enough. To help, I will be available to answer any questions.
H
The Slavia stock is awesome Hank. So is the stock made from cutoffs.
I once made a stock out of Bubinga for my R10, but, after a few years, it broke at the wrist.
The verticle grip style needs the grain the right way i think. Are grip panels sand blasted
for texture? Looking forward to your series, nice work. Rob
1stblue
Yup, the stock is made from pieces sliced off the log just like a load of bread.
You have to be extra careful with the grain direction in places where a lot of leverage can be inadvertently applied against it – like the wrist area.
The Slavia 618 is a light “youth gun”. To get the balance right on the full sized stock I needed to thin it more than I would have preferred. I ended up re-cutting one of the joints and adding a pair of 3″ screws to reinforce that area just to be on the safe side.
I didn’t put any texturing on the stock Rob, wanted to keep things focused. When I texture or checker it is usually for decoration, I find that a fitted stock does not “need” the texture for grip as it sits in the hand well without it.
H
Wow! I’ve already learned something. What to look for in selecting wood. My old shop teacher, Mr. Bovsun, never covered this. At least as far as I can remember going back some 50 years ago. I’m the wood worker that measures twice, cuts three times then gets a new piece of wood so I’m very much looking forward to this series of articles.
Fred formerly of the DPRoNJ now Happily in GA
Fred,
Glad to have shown you something new!
I make wood bows and arrows. As a bowyer, you learn learn a lot about selecting wood and watching the grain real quick!
The bow will explode into splinters when you draw it if you don’t – don’t ask me how I know this LOL!
H
Hank,
That Hammerli AR20 stock is amazing!
You’ve got a serious skill set! =>
Looking forward to the rest,
dave
Ands I guess this report answers the question.
Q: “What do our friends up in The Great White North do during their long winters?”
A: They make custom rifle stocks…at least that’s what the ones with the mad wood-working skills do…cool. =>
…and slingshots and tie flies and wish for spring LOL!
H
“…and slingshots…”
Looking forward to posting a pic (with attribution) of that here! =>
Hank,
Your report came out great. You are a master with wood beautiful work.
I have started laying out the stock for my new Crosman 1322. The stock itself will be a laminate of three pieces of old wood from some drawers I replaced a while back. The stock will be solid, the gun can use some weight. The big issue is going to be a solid and strong attachment. I am going to modify the trigger frame. Not sure how yet even the original pistol grips are not well attached. Maybe a through bolt from the butt of the stock will be the way to go. The Crosman stocks are not attached solid and they are very small.
/product/crosman-1399-custom-shoulder-stock-fits-many-crosman-pistols?a=198
I will post a picture, if I am not too embarrassed, once it comes together.
I have some ideas of what I want the forend/pump handle to be. It should be a little easier.
Thanks,
Don
Don
Remember that pumper I made from a Discovery and 1377.
I guess sooner or later a person goes there. Stock altering I guess I’ll call it in this case.
Definitely liked how this gun came out.
https://www.youtube.com/watch?v=E2g7QSCknKI
GF1,
Yep, I remember that gun, it came out real nice. A friend of mine ended up with my last 1322 conversion. So I wanted to make a new one and see if I can improve on the last one. The accuracy will be hard to beat though. I have the P-Rod trigger parts in this one, so far it looks like it may be accurate. I already have a Maximus Hunter barrel on it.
Don
Don
Thanks.
And yep the Prod 2 stage trigger parts make for a nice trigger.
Benji-don,
Thank you for the compliment and thank you for the proof-reading you did! Much appreciated!
Don’t know that the grip frame for the 1322 looks like but I did one of those pistol-stocks for a friend while ago. Ended up reinforcing the frame with a piece of 1/4″ thick aluminum (screwed and epoxied inside the frame) and mounting the stock on that.
I followed the link to the PA site – that stock design would look real nice if it was laminated, might be tempted into getting a 1322 for myself – would make a good companion for my Crosman 101!
I’ll be waiting to see your stock Don! Good luck with it!
H
Hank,
So far I have the center piece and one side of the stock rough cut. It is going to be funktion over form and I an very challenged artistically so we will see. The block of aluminum may work out. The frame does not provide much to bolt the stock to.
Thanks,
Don
Hank
I was joking about fabricating metal stocks but apparently you are well equipped to handle that too. I am envious now. I have been looking into merging metal airsoft stocks with airguns to get what I wanted but so far have not found easy solutions. Other than the RAI chassis that is perfect for the Marauder.
Slowly but surely manufacturers are offering “Black Rifles” like the Armada and Evanix Snipers and such so my desire to modify is waning. Except for my Evanix full auto Speed, the ultimate high dollar plinker. Why they put it in a wood hunting rifle stock is beyond me. Who needs a full auto hunter?
It belongs in something that looks like an M240 Machine Gun and I may make a wood filler to fit one, one day.
True the bull pups were there but they are nothing like a full-sized, full-auto, high powered accurate pellet MG for total target destruction fun. Not exactly what the general public or banners would be overjoyed to see. Aficionados’ only !
Appreciate the blog,
Bob M
Hank,
Also of interest/inquiry,….. the use of glues and wood fillers,….
From my limited experience, glue and fillers will often (not) accept stain and such the same as the rest of the wood. Gluing a joint is one thing, but what if that glue “soaks” into the final surface wood? Will that not change the way the wood takes a stain?
Chris
Vana2,
Great blog! Looking forward to the series.
I really enjoyed your style of presenting the process of a complicated art form Hank. All the while making it accessable to even someone who has never taken rasp to wood. Although I have not yet made a stock or grip from scratch; I have taken rasp to wood often making a grip or stock work for me I have also used large quantities of putty to make target pistol grips and target rifles fit (FUNCTIONALLY) like a glove.
I know you mostly recommend using hand tools some of your readers are going to make use of power tools; a short section on wood dust inhalation safety might be in order. I for one would be interested in your take on that subject.
Thank you again for all the work it took to get this series of blogs done so well!
Looking forward to studying all of them.
shootski
Thank you and you are welcome shootski!
The making of the two stocks were the easiest and fastest part of writing this series! I enjoyed the project though and hope I can encourage people to try making their own.
Like you, I can’t stress the benefits of a proper fit enough. It’s fun to fit a stock for a friend and watch their initial horror of rasping their stock change to surprise and they find the rifle suddenly pointing where they are looking – all by its self. LOL!
Agreed, power tools will make the shaping faster but they to require a lot of skill to control them. One second lapse of concentration can result in WAY to much wood removed.
Think its best stick with the hand tools when starting out – things happen in a slower and much more controlled manner.
I have to make the assumption that the power tool owners and users have read the cautions and know the safety requirements for the tools they use.
You are right though, the tool manuals don’t mention that the dust from some woods can toxic or cause allergic reactions. I might do some research on that and make a chart to share.
These are awesome if you want to remove wood in a hurry…
http://www.leevalley.com/en/wood/page.aspx?p=71098&cat=1,130,43409,43424
H
Vana2,
Nice! Glad you have that resource Hank.
I have been dealing with this company: http://katools.com since my days in LA as a US NAVY flight instructor in North Florida.
LA actually stands for Lower Alabama since that part of Florida is so different from farther South.
They have a disk that has holes in it and SURPRISE allows you to see through the disk as you work! Well okay, I’m easily impressed ;^ ) they have lots of other cool tools some of which I use to prepare the bases on my skis as well as work metal and wood.
shootski
Thanks for the link shootski! …Filed for future reference.
“my days in LA as a US NAVY flight instructor “!!! Cool! Would love to talk with you about your experiences.
My father was a was a flight engineer on Lockheed Super Constellations and a pilot on Vickers Viscounts.
Did a fair amount of flying in my younger days. These days I fly WW2 piston engine fighters on a very realistic simulator.
H
Hank,
The Lockeed Constellation has always been one of my favorite large aircraft. If it had not been for the turbo Jet Age intruding on it the turboprop version would have been fantastic and way more efficient. I have logged about 30 hours in Connies: Supper G and EC-121. I also have about 5,000+ hours in another Lockeed (new) Electra variant the EP-3E. WWII fighters are fun aircraft. I started Instructing in T-28 B and C models. Here is a link to Charlie: http://www.airbum.com/pireps/PirepT-28C.html The guy does the Trojan justice but it seems he never got to shift into High Blower or see the performance boost of leaded 115/145 Avgas (purple dynamite)…sad! I also got to fly a two seater Bearcat and P-51. Some others were: S-2, EA-3B, ES-3A, RA-5C, RF-8, F-14 and TR-2.
shootski
Shootski,
My real-world flying experience is very tame by comparison to yours – I have flown some of the single and twin engine Cessnas and Pipers. Have a couple of hours on a Citabria with a friend who is an aerobatics instructor… not much power but a whole lot of fun!
In the winter I fly the latest version of IL2 …the “suspension of disbelief” is very strong in this program.
Hank
Hank,
Anything that flys is fun in my book!
The Citabria doesn’t need much umpf to do what it does best.
I shared a Piper J3 Float before I got the taxpayers to fund my grins.
At this point my dream is to get enough scratch together to long-term lease or buy a soarplane.
Gliders for me are the fine airguns of flight.
shootski
shootski,
I’ll second that – if it flies its fun! For years I had dreams of owning a BD-5 – considered it to be the equivalent of a motorcycle with wings.
I made a hang-glider way back when I was still “invulnerable”. My first rule of hang-gliding was: “don’t glide higher than you are willing to fall” LOL!
Being an avid fisherman, I have a strong appreciation for float-planes. Got quite a few hours yoke-time on a Cessna 180 with floats.
Had unlimited access to a Link Trainer, it never (really) left the ground but it was easy to imagine that you were on an IFR flight at night. Fun stuff!
Hank
Vana2,
And don’t forget a BD5J, Lol! Either of those would be lots of fun!
I remember Link Trainers! I think I “crashed” more than one of those!
I was part of a study on Post Simulator Session Sickness when it became an observer problem once we found the full view/full motion simulators; I was one of the lucky few that never got sick…being really stubborn I guess helped. The problem seems to have resolved itself as the simulators got more and more realistic.
If your Dad is still with us ask him about shifting those Connie compound turbochargers!!! I think it will bring back a floor of memories for him….
shootski
Shootski,
Ahh… the venerable Tora-Tora as we called them for to their similarity to the Japanese Zero in WW2. Very good for counter insurgency use. Our soldiers would have their morale raised when they heard them coming in before they went in themselves.
Unfortunately we lost most of them decades ago during a coup attempt.
Siraniko
Siraniko,
Yes, the R-1820 engine sounds like a Maytag washing machine when you dive at flight idle and then go to full power to exit. Of course the speed brake has a unique sound when deployed all it’s own. I was fortunate to be allowed to attend a hand to hand and edged weapons school in the early seventies in your lovely country.
Grateful always for that superbly taught skill set!
shootski
I liked the article just one thing the author mentioned the only large tool you need is a table saw. I am by no means a professional wood worker or cabinet maker though i have owned and worked with table saw, planer, wood lathe, joiner, scroll saw and well just about every hand tool and i believe even though i have not made a rifle stock if i were restricted to a single power tool or saw i would pick a good 16″ band saw as with the proper support tables and re-sawing fences and jigs i know you can mill down large lumber or even a section of a rough cut tree into manageable chunks and even a large deal of the shaping. Sure having a table saw is a good enough tool and i do have one, but if i could have one tool for a job like this my choice would be.
I miss having my band saw can you tell?
Mike Ogden,
Band saws are fantastic power tools!
But angle grinders, with these disks Hank and I have pointed out, are going to save you lots of tedious work over more hours…just my opinion.
By the way is Ogden a family name or as in; Mike in Ogden?
shootski
Hi Mike,
I wasn’t limiting power tools but suggesting that anyone with access to a table saw was good to go.
Agree totally – a band-saw is a must-have for a serious wood working shop. Mine is a robust 3/4 hp 14″ but I would like to upgrade to a 2 hp 16″ re-saw machine. Being a bowyer, I frequently convert trees into lumber.
Hank
Hello all.
I posted over on the CF-X thread and Mr Pelletier pointed out this thread over here and so I just got all mixed up and decided to thrown in my picture ( I only get one per post I thinks thats across the board… anyhow…ahem.)
So I made a stab at making a stock out of scrap wood floating around in the garage. Spended waaaaaaay to much time over thinking it. ( I never think that is time wasted in my mind ). Then I made another stab at the same design but tried to refine it, and I guess I did. Yes. Oh heck I know it’s not CNC milled ply OR a block of rock wood sanded down over the decades with a file made from ore I dug out with my bare hands. Actually that does some kind of neat. I digress. Sorry.
I read the opener of this thread. about the rasp and the stock and taking a bit off. I whole heatedly agree. Getting that cheek weld you want rather than what who ever made the stock wanted to give you is an act of due diligence. It’s responsibility. 10/10 would do it myself if I had such a situation. : – )
Over here is the side on picture of the MK II stock :
/blog/2006/02/gamo-cf-x-field-test/#comment-441627
I am a rank amateur! The front screws on the 45 angle just bent my mind. ( had to come up with an alternative plan that was less mind bend and more about mind over matter… ( I think that scans ok…))
Oh shucks I am rambling again.
Great thread! Will read the rest ASAP.
Here is another picture. The little shelf is my hand rest. It’s pretty cool.
Had to search around the wood pile to make up a sheet of ply 29mm thick. It was a struggle. I won. The longerons are some random tree material stuff. Bolts and so on pinched of deconstructed furniture.
I could go on. ( I stop on request…)
And it fits. Like a glove. : – ) I guess that is the bottom line.
and G’day from New Zealand.
R.A.
Robert,
Good job!. Now remember, there are 6 parts to this blog. each one of them has great information. The index is on Part 6, but to get here you must already know that.
I hope you enjoy the blog.
B.B.
Thanks B.B. : – )
More rasping, added a bit more to the right side of the grip to fatten it out a bit. and built up a really huge foregrip which unbolts. The grip rest is great for a relaxed grip with hand weight pulling down. Very comfy.
And thank you Hank! Great information!
R.A.
You are welcome Robert!
Glad that you are making you own stock!
Cheers!
Hank