by Tom Gaylord
Writing as B.B. Pelletier

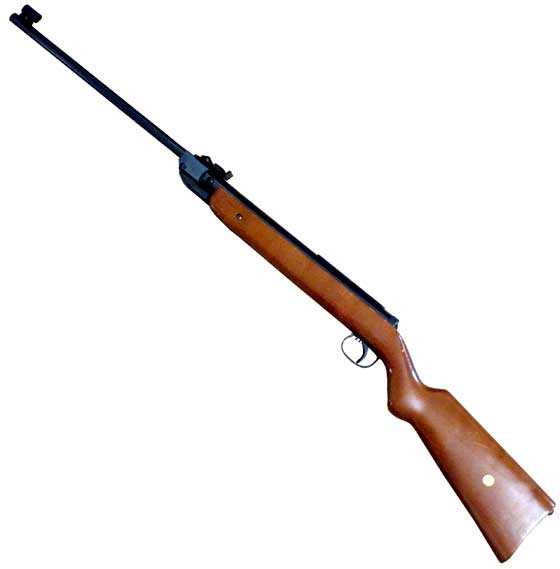
Michael’s Winchester 427 is a Diana model 27 by another name. The rifle pictured is my Hy Score 807/Diana 27
This report covers:
- Michael’s Diana 27
- Out of the box
- Flat breech seal
- No baseline test
- Onward Through The Fog
- Remove the action from the stock
- Action into the compressor
- Remove the piston
- Disassembly complete
- List of jobs
- Summary
Michael’s Diana 27
Some time back, reader Michael mentioned some problems he was having with his new/old Winchester 427, which is a Diana 27 by another name. I offered to tune it for him because it’s been some time since I have been inside a 27. There are many new readers who are not aware of this wonderful air rifle, and I thought it was time they learned about it.
Diana made the model 27 for a great many years after WW II, and they made them for a number of other companies, as well. The guns were made in both .177 and .22, but Winchester and Hy Score only ordered them in .22 caliber, so a 427 and an 807 are always .22.
Out of the box
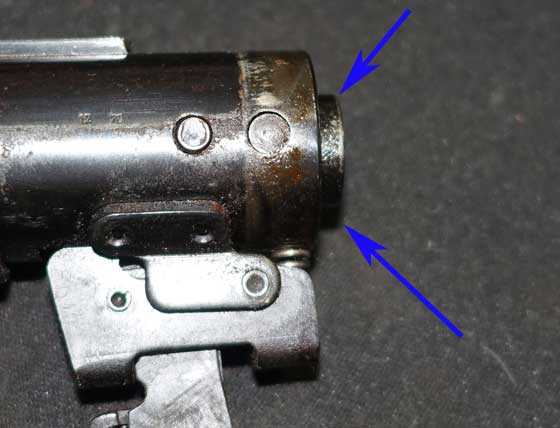
When I unpacked the gun it looked pretty good, so I gave it a thorough once-over. The metal was lightly speckled with surface rust, but it wasn’t too bad. The rear sight was missing its rear mounting screw, which allowed it to move side to side and also up and down, and the spring that keeps tension on the rear sight leaf is not installed properly. There is a spring stuffed inside the sight, but it isn’t in the right place and it doesn’t look like the correct spring. Also the windage adjustment screw that should be fastened to the sight by a small circlip is wired in place, instead.
The barrel pivot bolt should have a locking screw to hold it in place. Also the rubber bumper that goes on the butt to keep the rifle from slipping on the floor is missing.
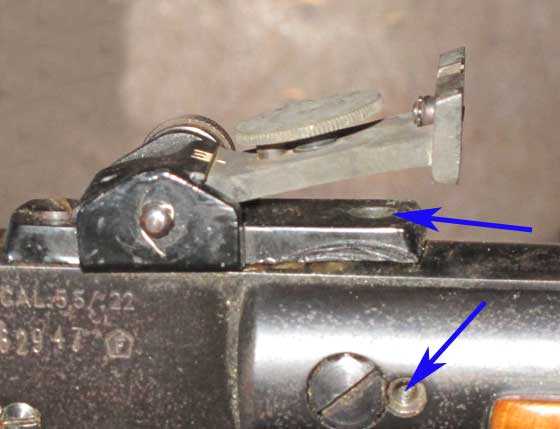
The rear sight is missing the back anchor screw (arrow) and a spring that goes up front is not mounted correctly. The barrel pivot locking screw is also missing (arrow).
Flat breech seal
The last thing I’ll note is the breech seal. On this rifle it’s quite flat and lifeless. It seems to be a synthetic seal and I will probably replace it with a leather seal that is longer-lasting and seals better.
The breech seal is very flat and lifeless.
No baseline test
I had hoped to baseline the velocity of the rifle today before I started the work, but it detonated on the first shot and I decided not to. It vibrated and sounded like a dry-fire, which I will guess is mostly due to a large loss of air at the breech. I don’t want to shoot it in this condition.
Going inside
If you want to learn to rebuild spring piston airguns, this one isn’t the place to start. The trigger is quite complex until you understand how it works. When you do understand that the rifle becomes simple to work on. You will need a mainspring compressor for this gun.
Remove the action from the stock
The first step is to remove the barreled action from the stock. That’s two stock screws on the forearm and the forward triggerguard screw. Once the action is out, the sheetmetal end cap slides off and the rifle is ready for the compressor.
Action into the compressor
Now the action goes into the compressor and comes apart. The trigger parts are first to leave the spring tube.
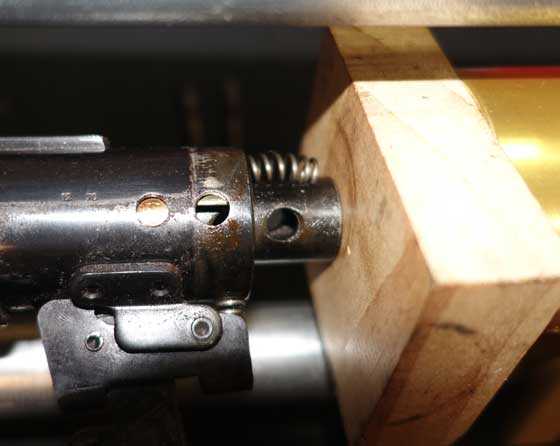
With the end cap off you can see the second cross pin that holds the action together. You can also see some of the 48-year-old oil that has hardened into varnish and is holding things together.
The action is ready to go into the compressor. When it does, the compressor will press on the inner trigger cage (two arrows) until the tension on the two pins is released. They will practically fall out of the gun at that point.
The two pins have been pushed out and the tension of the compressor is relaxing. The black tube with the small coiled spring on top is the inner trigger cage. It’s where the ball bearings live.
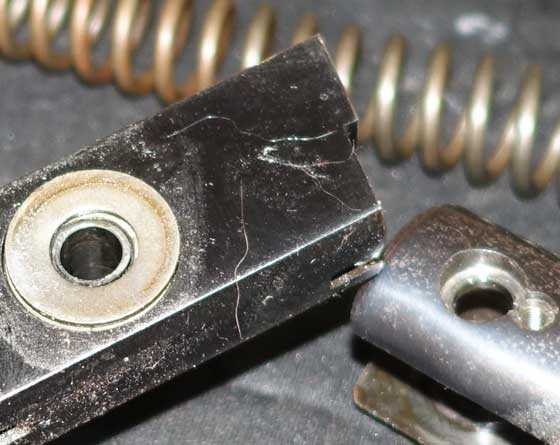
Here, with all the tension off the mainspring, you see both the inner and outer cages of the trigger. The outer cage (silver) presses the balls back into the inner cage. When the gun is cocked, they are pushed into the groove at the base of the piston rod to grab the piston at the rear of its travel.
With the trigger parts out the mainspring and spring guide come next.
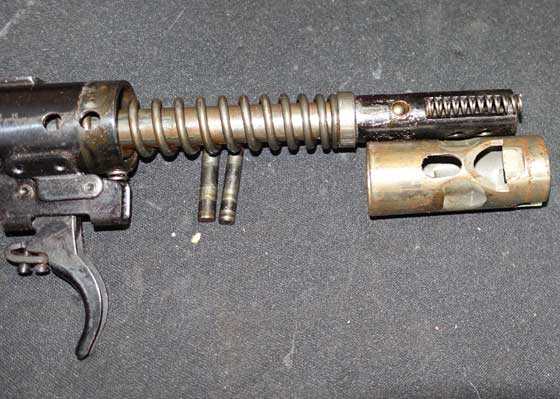
The mainspring and guide will slide out. This one is bone dry! You can also see the outer trigger cage (silver) and the inner cage (black) with one of the balls still inside. The outer cage has ramps on the inside that push the balls through the inner cage and into the groove at the base of the piston. The small coiled spring moves the outer cage when the trigger blade releases it, allowing the balls to move out of the groove in the piston rod base.
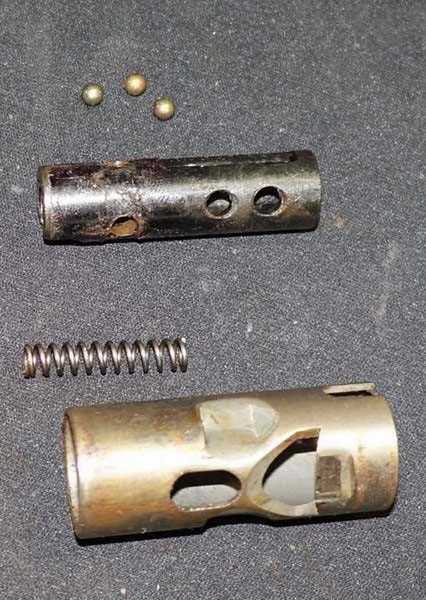
These are the key parts to the Diana ball bearing trigger. There are other external parts like the trigger blade, but these are the parts that make the trigger work so well.
Remove the piston
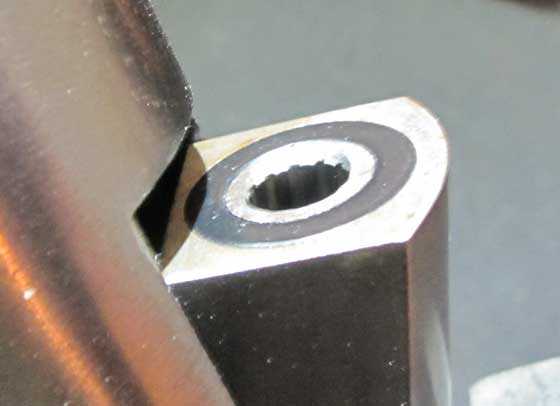
The next step is to remove the piston, but it is held captive by the cocking linkage, so the barrel has to come out of the action fork. The pivot bolt is removed for this. Now, the Diana has two asymmetrical washers — one on either side of the base block that holds the barrel breech. Make sure you get the order of these correct for when it’s assembly time. The dished washer goes on the left side, and what looks like a flat washer until you remove it, goes on the right.
When the barrel comes out of the action fork the washers can be see on each side. The cocking link will also disengage from the piston, so it can be removed.
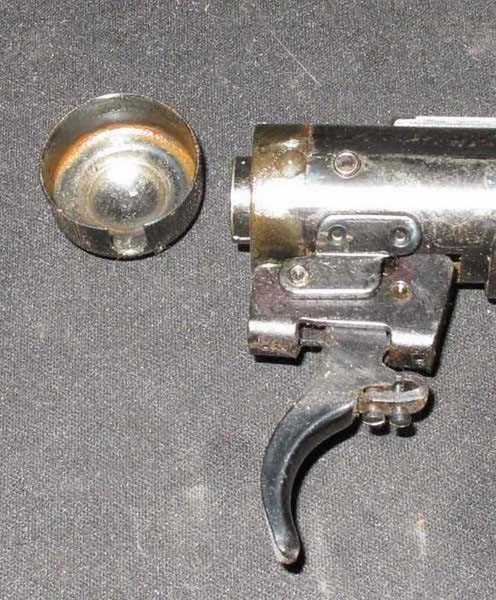
The piston will slide out the rear of the spring tube now. You will have to pull the trigger to get the piston past it.
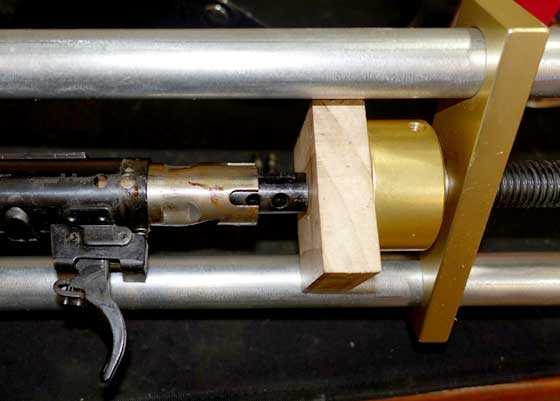
This piston was horribly rusty! It’s the worst I have seen. The inside of the spring tube is also rusty. That will have to be dealt with!

The piston is the rustiest one I have ever seen!
Disassembly complete
This is as far as we need to go, but I need to do something about that rust! I put the piston into a container and poured in Kroil (penetrating oil) to soak into the piston seal screw for a week or so. I need to say something to you now. Some people use WD-40 as a penetrating oil. It works okay on car parts but isn’t so good on the smaller parts that are found in an airgun. It dries and leaves a yellow varnish on everything it touches. So, don’t use it for jobs like these.
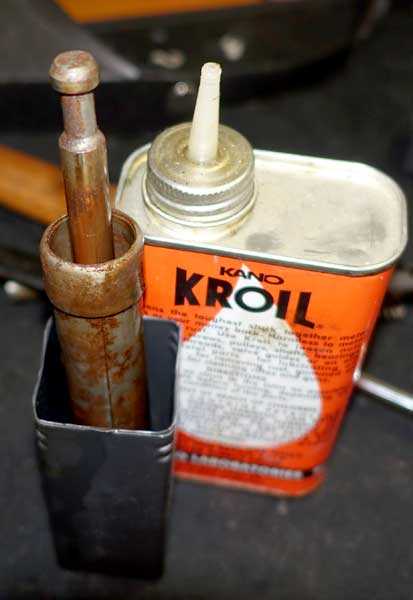
The piston seal is marinating in Kroil for a while. This box has a top to keep the oil from evaporating.
I also put Ballistol liberally on both the barrel and spring tube, where they will marinate for a week or more. And I hosed down the inside of the spring tube with it, as well. In a week or so I hope to tackle all that rust with steel wool, and the Ballistol should have loosened it.
List of jobs
There are a lot of little jobs in this overhaul. Michael sent a new mainspring and piston seal with the gun.
Remove the rust
The parts like the piston and compression chamber need to be cleaned, inside and out.
Remove the old piston seal
The seal is held on with a screw that hasn’t been moved in 48 years. With the rust that’s on the other parts we know this screw is rusted tight.
Install new mainspring and piston seal
Make and install new leather breech seal
Replace pivot bolt locking screw
Repair rear sight
Get a new screw for the rear base of the sight and install the spring so the sight leaf doesn’t flop. Replace the small circlip on the windage screw if I can find the right one.
Lubricate rifle
The new piston seal needs to be soaked in oil for several days before installation. I will use Tune in a Tube (TIAT) grease on the mainspring as well as the spring guide and piston rod — sparingly because this isn’t a powerful gun. I will also used it in the trigger assembly to hold the balls in place while I assemble the rifle. The cocking link will get moly where it connects to the piston and also on the pivot bolt and both side of both washers.
Summary
This overhaul will be more involved than I have done in the past on a 27 because there are a number of things to address. Cleaning the parts will be a major task, but once that is done this will be a Diana 27 once again.


Good morning Tom.
A small correction for you “Remove the piston” The next step is to remove the pistol” and “The pistol will slide out the rear of the spring tube now.”
Bruce
Bruce,
Got it. Thanks,
B.B.
Michael,
Nice of you to send to B.B. your 427. That way we can see how a barn find air rifle can be rejuvenated.
B.B.,
I noted that you are planning to soak the piston in Kroil for a week, while the the barrel and spring tube marinate in Ballistol. Is one better than the other for penetrating the rust?
Siraniko
PS: Section: Remove the old piston seal Last sentence: With the rust that’s on the other parts we know thi s (this) screw is rusted tight.
Siraniko,
Got it. Thanks!
B.B.
B.B.
Thanks for a part by part break down. At some point in this series, please explain how that trigger works.
I am surprised that neither the breech seal or piston seal are leather. Any chance that you will be reblueing parts as needed? Where are you going to get a new barrel pivot bolt as well as the sight parts?
-Y
Yogim
The piston seal is leather. The breech seal is not.
As for all the parts, I will do the best I can.
B.B.
BB,
Thanks! I have been wanting to know how that trigger works. Pictures are indeed worth a thousand words.
B.B.,
Looking forwards to see the Ol’ Gal restored back to life. I forget the history/find/how acquired part. It for sure has been neglected. The butt pad/plate would be a nice addition to the restoration as well,.. if available.
Good Day to one and all,….. Chris
Chris,
A 27 has no buttpad. It has a round rubber bumper that keeps the gun from sliding. Maybe next time I can show a picture.
B.B.
B.B.,
As it is a small bumper, one could call it a “round, rubber, baby bumper.” Put it on a baby buggy, and it becomes a “round, rubber, baby buggy bumper.” :^)
Hey, that still would be easier to say than “perambulator.”
Michael
BB,
Dangit! Now you done gone and done it! Now I am wanting to find a nice, old airgun that is in need of a lot of TLC to bring it back to life. I really enjoyed bringing my 1906 BSA back up to snuff and fixing the Webley. I see all those rusty innards and I want to see what I can do with it. I guess I am just going to have to set up a shop.
RidgeRunner,
I have a beat-up, beat-down Meteor that is probably much worse inside than this Diana. It for sure looks much worse on the outside. The complex trigger on this Diana 27 was what kept me from opening it up (never done it before), but I’ve been planning to use the old Meteor as a first time air rifle project. It needs a new piston seal, new breech seal, and a trigger return spring. Oh, and it cocks as though it were lubed with playground sand.
Michael
Michael,
LOL! That sounds like a really good one to start with.
That is another nice thing about these old airguns. Many of them are made of machined steel and are difficult to mess up too bad. Once you fix them up, with a little TLC they go on for another hundred years.
GF1,
Knowing how you feel about these, I thought you might want to see this.
https://hardairmagazine.com/reviews/umarex-gauntlet-25-caliber-pcp-air-rifle/
RR
Thanks for the link. Looks like a pretty positive review to me.
Now I just got to figure out how to come up with some extra money. Got Christmas getting going on now.
But I do want one. Even though I got my .25 Condor SS that is really on the game. I just like what the Gauntlet offers.
GF1,
Did you notice this in the ham report, “Umarex USA tells HAM that this barrel band will be offered as a low cost upgrade to existing owners of .177 and .22 caliber guns for – probably – a limited time. Look out for this to be announced before mid-year 2019.”
Interesting, and it looks like it does have a (rubber?) spacer inside.
Mike
Mike
Yep I did see that. I read the review a couple times actually just to make sure I didn’t miss anything.
Makes me wonder if I should get one of the barrel bands for my .177 Gauntlet. My Gauntlet is very accurate. I hate to mess with it. I have to say I’m leaving well enough alone. No barrel band for me.
GF1,
I would think if you do not have to send it in to have the upgrade done and the band is not expensive then it might be worth a try. If it does not help accuracy, take it off and you back where you were.
Of course if you get the Gauntlet 25 you will get the barrel band anyway, then you can test with and without and let us know if it helps.
It looks to me that the band mounts to the bottle block, are there screw holes there on your .177?
Mike
Mike
Yep my .177 has the holes in the bottle block.
And nope not trying it on my .177 Gauntlet. Yes it’s that accurate right now. I’m not taking the chance of screwing it up. And you know me. I’m a modder. So if I’m not chancing it that should say something about how good my Gauntlet shoots.
Now on the other hand if I got the .25 Gauntlet and it was not as accurate as I believe it should be out of the box with the barrel band. Then yes I would take the barrel band off to see if it would help accuracy.
So saying that. I won’t try something on a gun that’s already accurate for sure.
GF1,
On the one hand I do not see where trying the band would cause irreversible damage.
On the other hand I see what you are saying, if it aint broke, don’t fix it.
Good point.
Mike
Mike
Yep.
Michael, thank you very much for sending this gun to B.B.
This report has already been very informative. =>
B.B., I know you have described before how this trigger works,
but pic #9 (12-17-18-09-Diana-27-trigger-parts) is really helping the jello in my brain to grasp it.
I’m really impressed with the person who came up with this trigger design!
Looking forward to the rest of this report,
and wishing a great day to all,
dave
Dave,
I think it might be time for me to draw the trigger and show how it works.
B.B.
That would be awesome and very much appreciated by me (and by others, too, I’m sure!); thank you. =>
Dave,
i don’t know the name of the designer, but the patent is held by one R. Goldberg & Co., Peoria, IL.
Michael
Thanks, Michael; that’s a cool design; I would have made sure to patent it, too.
And you are surely going to have one awesome gun once B.B. is done with it! =>
take care,
dave
B.B.
I’m looking forward to the rest of this report – like to look inside and see how things are made!
Oh, if you are looking for a circlip check the 4th dimension… think that is where they all disappear to LOL!
Happy Monday!
Hank
Hank
I hear they have a overabundance right now.
They say you can almost get anything there. As long as you figure out how to contact them. 😉
B.B.,
Thanks so much for doing this. I knew when I first shot it that it just wasn’t right. It chronied low and wasn’t the calm, smooth plinker a 27 should be.
When I saw that picture of the rusty piston, I almost spilled my coffee! That looks as rusty as it would be on the roof of a barn for all that time instead of inside a compression chamber.
I wonder if a halved rubber ball might work on the butt. I hadn’t even noticed that the bumper was missing.
Siraniko calls this broken down air rifle a “barn find,” but I’m afraid it was an internet sale find, and not that inexpensive of a one, either. From the pictures it looked good. The wood is decent, and I had been looking for one for years, so by the time I saw this, I had to buy it.
I do feel badly that cleaning up the rust will be such a hassle for you, but the “after” pictures will look great compared with the “before” pics.
Thanks very much again for doing this. I agree with the others here that this should be one instructive series.
Michael
Michael,
Yes I do recall you mentioning that you made the purchase through the internet somewhere among the comments the past few months ago. The internal condition is consistent with something neglected and found in said barn and given a quick wipe down with oil bringing its external form to a better appearance for a quick sale. I bet this will be like an heirloom after B.B. has been through with it.
Siraniko
Michael,
I predict you’re going to really enjoy this little rifle when it returns. The diana model 27 is the complete spring gun package IMHO.
You don’t have to fabricate or re-invent the missing “pimple on the butt” of your 427. They’re still made. A good hardware store will have them complete with the impregnated nail that allows it to be hammered into the hole in your buttstock. If you can’t find the hole, pre-drill a hole one size smaller than the nail that comes molded into the new pimple. When googling or shopping in your hardware store you’re looking for RUBBER HALF ROUNDS. See here:
http://www.acmerubber.com/round.htm
Kevin,
I learn new stuff here all the time.
I have never heard of “RUBBER HALF ROUNDS” before.
Thank you for sharing that! =>
take care,
dave
Kevin,
Yes, thanks.
B.B.
Kevin,
Now I have a little jingle for my Diana: “It’s got pimples on it, but it is nice!” ;^) It is also pictured in the lower right corner below (click to enlarge).
Michael
Minor coincidence… I was just trying to figger out if I wanted to keep or sell my own 427. I’ll probably hang on to it for now.
As I recall, the breech seal on these things can be replaced by a later Diana O-ring (essentially a #109, if memory serves). Those hold up well under the pressures of a 34 or 350, a 27 ought to be duck-soup for it.
The rust inside the piston is gonna be tough to remove. Is sandblasting the inside of is a stupid idea?
Vince?
Welcome (back?) to the blog.
Steel wool will do the inside of the compression chamber very well. I think bead blasting might be too aggressive, except with baking soda.
B.B.
BB,
I enjoyed the post. I haven’t been inside a 27 in a few years either. For a period of time I could put them together in my sleep. Those are tricky little trigger assemblies. I remember that I put twist ties around the little spring that lays on top of the two sliding assemblies to keep the spring down flat as I press the assembly back into the receiver. I would appreciate you showing how you make your leather seals again. I kind of remember what you do but I could use a refresher course, or a link to the old post.
Have a great week,
David Enoch
DavidEnoch,
Here you go: /blog/2007/12/how-to-make-a-leather-piston-seal/
Siraniko
Thank you.
David
David,
It took long enough.
/blog/2009/03/diana-27-part-6/
B.B.
David,
That process sounds about as complicated as shifting a Model T. :^)
Michael
Ahh, Hyscore!! One of my favorite importers. Good on you to restore this rifle to its former glory. I don’t have a Hyscore 807, yet 🙂
Have you ever done a blog about the history of Hyscore BB? I’d love to know more in depth about the who, why, when, and how?
Looking forward to the finished 807, keep up the great job Sir.
B.B.,
Do you ever use a rust remover like naval jelly on rusted gun parts? I have used rust remover quite a bit, but not on gun parts. I would think it would work well.
Don
Don,
I don’t use rust remover on guns. I use Ballistol and steel wool.
B.B.
B.B.
I think this is only the second time I have seen you work on a blogger’s airgun, the first being my Diana RWS 34P. Great job of explaining the disassembly and very nice pictures to go along with the explanations. I like it and look forward to the rebuild and assembly. Kind of surprised that you are intending to replace the breech seal with a leather seal, and that leather seals better and lasts longer. My thought was that an o-ring would be better.
Agree that WD-40 is a very poor penetrant, and an even worse lubricant. The only good use I have found for it is to remove tar spots from the car. I once thought it to be a good rust preventative too, but found that it’s not good for that either. And yes, it gets gummy and sticky after it’s been on something for a while. Never ever use it on a gun.
Proof reading: paragraph “Remove the piston”
The next step is to remove the pistol (piston)
one on either side of the base block that hols (holds)
George,
Go it. Thanks,
B.B.
Geo
I would say WD-40 would be good for hinge points then on spring guns and pump guns since it does like you say.
I think you meant to say NOT on spring guns and pump guns?
It is a very poor lubricant and so not good on hinges either. I lubed some squeaky hinges with WD-40 and it quieted them right down…for a few days. Then they began squeaking again. It just has poor lubricity qualities. Like I said…good for removing tar from sheet metal.
Geo
Nope I meant what I said.
I’m not trying to eliminate a squek. I want something to stay in the place I’m lubing. If it turns into a waxy grease then it’s going to retain that barrier on whwre I put it.
Used on different things for years with no problems.
I use bronze 0000 bronze wool for window cleaning, it lasts longer, doesn’t leave steel wool on the sills, etc. wont rust.
It might be ok on sensitive finishes like blueing?
Best, Rob
1stblue,
I was going to post the very same suggestion to swap out the steel wool with Bronze or SS to B.B.!
Some of the non abrasive plastic pad pot scrubbers work well depending the glass age/composition and the same consideration on metals. The Germans have a number of eraser (much like art erasers) that work well around the house (wallpaper/woodwork/painted surfaces,) n the shop (metal corrosion removal/plastic polishing) and the garage for plastic headlights and lots more.
In the USA Cratex Abrasives is a source for rubberized polishing rods, blocks and sticks.
shootski
Shootski,
Luthiers use erasers such as those to polish nickel alloy fret wire on guitar fingerboards.
Michael
Micheal,
Yes!
Other musical instrument makers use them too. I often frequented shops in South Philadelphia back in my Sax, Clarinet and Flute days. They would do the final spot polishing with them before applying the clear laquer finish.
Wish I still had my Selmer Bari!
shootski
Also, the only way to fanatically improve a good springer like a Diana 27 is ergonomics, so, a scaled up P1 would be awesome, for xmas maybe?. Way too much for me to do. Thank you for the lesson,
Rob
B.B.,
T.W. Chambers has complete exploded diagrams available on line GOOGLE) as well as some parts for Diana 27.
Probably no need to get out your drafting board :^)
Shootski
I want to give a shout out to Mike in Atl. Thanks again for recommending the RSSpreview reader add-on for my Firefox. Now that it has been updatef to show the correct time stamp it’s as good as, or better, than the reader Mozilla abandoned. It’s working great for me. Thanks again.
Geo
Geo,
Thanks for the shout out, glad you like the reader.
As for your 140, it looks like parts are not available through Crosman, but you can get the diagrams here;
https://support.crosman.com/hc/en-us/articles/203543150-140-Owner-s-Manual-EVP-1954-1968-
Mike
I can remember having a High Score pellet gun back when I was in my pre-teens. As I recall it was not very accurate and after missing too many sparrows, I moved on to a Crosman 140 muti-pump. Now that was an accurate pellet gun, which I still own. My ex-brother-in-law broke the pivot pin for me and put it back in the gun cabinet without my knowing…grrrr. Someday I’ll have to get her repaired. I believe I bought that Crosman back in the late 50s.
Geo,
Here is a disassembly of a Crosman 140 if the pivot pin you speak of is the one I think it is, it is just a roll pin.
http://anotherairgunblog.blogspot.com/2010/02/crosman-model-140-disassembly-part-1.html
http://anotherairgunblog.blogspot.com/2010/02/crosman-model-140-disassembly-part-2.html
Mike
Hi Mike,
Thanks for the links. I will check them out. My Crosman multi-pump is actually a model “147”. I think the only difference is the “147” is a .177, and the “140” is .22. Here is a picture of the broken pin. It is not a simple roll pin. As you can see part of the pin is still in the hole.
Geo
Geo,
When you said pivot pin I thought of the pump arm pivot, I can see in the picture that simple roll pin.
Your broken part looks to be some type of rivet, and with the limited clearance into the pump tube that does make it difficult for a simple repair.
Would be nice to get it shooting again.
Mike
BB, I
Any chance you have a flex-hone to hit the inside of that spring tube? Would probably get all that rust out in less than a minute.
Derrick,
Haven’t got one.
B.B.
A three shoe hone used for rebuilding brake calipers works well to cleanup/smooth inside tube, fairly cheap too.
Here is a YouTube channel I follow that’s called “Project Farm”. He does comparisons of many kinds of products used in a garage or workshop. His approach is always well thought out and relevant in the real world. Here is some tests of penetrating oils and rust removers.
https://www.youtube.com/watch?v=6-MC_ZEXQbw
https://www.youtube.com/watch?v=xUEob2oAKVs
Half,
I’m subscribed to Project Farm – he does do some practical comparisons… and some weird ones eh.
Vana2,
First let me say thanks for sharing your stock building experience with us. That Hammerli stock has to be the coolest thing I’ve ever seen on a rifle. It makes it look almost like a musical instrument. A harp or something like that. The heads up on picking lumber will be useful to many, for certain. I am going to be doing some rasping on my Benji 392 and it may endup requiring a stock replacement, so I will be watching your future installations to this series.
As for Project Farm, I think what I like just as much as the product compares is the way he satisfies the itch if he is just curious about something. For instance, “We know an engine will run with only Motor Honey Oil Additive in the crankcase but what about ACTUAL honey. Let’s see!!!” Gotta love it!
Half
BB, Michael—I have some questions regarding my Milbro-Diana 27 ( .177 cal). It is different from all the Diana 27,s that I have seen . Serial no 771. No rubber bumper or hole for same. The stock is longer, it extends past and covers the barrel pivot screw. It is drilled and tapped for 2 screws and marked for scope . Most important, the aluminium trigger has no holes or screws. I got it 4 @ years ago, and when I took it out of the stock, the trigger looked like a non adjustable , direct action trigger. The trigger in the diagram you sent also looks like a no ball direct action trigger. Now for my question–Do I have an early Milbro, possibly assembled from parts originally made in Germany ? ——Thank you—–Ed
Ed,
There were two triggers for the Diana 25 that I know of. One was not adjustable, like yours. The other was the ball bearing trigger seen with this rifle.
Milbro made their Dianas from the German plans, so maybe they made both triggers and also put them on the 27. That;’s as much as I know.
B.,B.,
Ah what a fine surprise to read this blog post! Thanks Tom. I’m really interested in the ball trigger and the breech seal. The first D27 I bought was in .177 and a Milbro type. It doesn’t have the ball trigger, but a basic single stage. One can shoot it well though. I’d not hesitate to open that one up with my self-made compressor. Then I bought a couple of 27s in .22, one of which is a Gecado. These have the ball trigger and I admit that I’m a bit psyched out by it. I want to open them, but need to know how. They require a good service. The other thing I really must do is change the breech seals. It’s the angle on the face of the breech block that causes me trouble. One edge of the leather washer (made only after lots of messing about with punches, a knife and patience) gets nicked when the gun is closed. Grr, I can’t get the hang of it. So this blog series is just what I need! Btw, you’ve already demonstrated one important technique – patience and waiting. I would have attacked the rust straight away, but you’re letting it soak first, which is a much smarter way to go about it!
Chuckglider,
I’m going to do my best to show how this trigger works. I hope to do it on Friday.
B.B.
Chuckglider,,
Don’t worry about the breech angle. Leather will conform to it. I’ll show how to make a breech seal.
B.B.
BB— thanks to Chuckglider we can now be certain that Milbro did put non ball direct action triggers on some of their 27,s. ——Chuckglider, what is the serial # of your Milbro ? Is the 3 digit # of my rifle a clue as to when Milbro used non ball trigger,s ? BB–Is there any way to find out the serial #,s that Milbro used so that we can date their guns ?—-Ed
Diana’s ball bearing trigger works very much like some fuzes of mines / grenades work. Striker retained by ball bearings which are retained by a moving collar.
BB I have followed this rebuild with great interest.I bought my first Winchester 427 in 1973 when I was still in high school.That rifle was so accurate I had no problem shooting Cicadas out of the trees.I unwisely allowed a friend to borrow it and he agreed it was the most accurate pellet gun he had ever fired.In fact he liked it so much I haven’t seen it in since.Fast Forward to 2020 and I Found another one in a garage sale and snapped it up.I have encountered a few problems. The first being the plastic rear sight was broken and I bought a new beautiful steel rear sight unit from Chambers.Other than having to shorten the mounting screws the install went easily.I have one question regarding the trigger adjustment.After loosening the front trigger lock screw and then seating the back screw all the way down then unscrewing two turns to test which direction do you turn to lighten the break clockwise in or back out? Thanks for all the info you have provided it has been priceless.Best to all Hoot
Hoot,
It’s in
/blog/2017/09/the-diana-27-part-2/
How to adjust the ball bearing trigger
This is where I earn my pay. For years I struggled trying to adjust several Diana 27 and 35 ball bearing triggers. Then someone gave me an owner’s manual and I learned the secret.
Here are simple instructions for adjusting the vintage Diana 25/27/35/50 ball bearing triggers that have two screws. The front screw is just a lock screw. Loosen it, and then screw the rear screw in as far as it will go (that’s clockwise). Then, turn it back out two full turns and try cocking the rifle. Be careful not to let go of the barrel, because some guns may be adjusted to the razor’s edge this way. If yours is and you need a little more sear engagement, try turning the screw in or out just a quarter turn until the sear holds well. Next, tighten the front screw, and the job is done. You’ll have a long first stage followed by a definite stop and crisp stage-two break when the gun fires. You only have to experience one of these triggers adjusted correctly to know how nice they all are.
What can’t be controlled is the length of the first stage. It has to be long, if you want that crisp second-stage release. I don’t mind that one bit, though it is different than the trigger on any other airgun I can think of.
B.B.