by Tom Gaylord
Writing as B.B. Pelletier

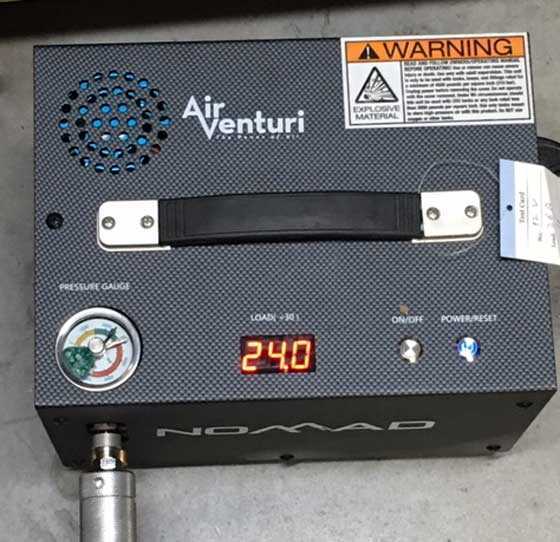
Air Venturi Nomad II air compressor.
This report covers:
- AirForce Extra Air Tank
- Time test
- Two tests
- Test one
- Filling the tank
- Dumped the air
- Fill from a car battery
- Thank you — battery makers
- Second fill
- Summary
Today I will test the Air Venturi Nomad II air compressor for you. In Part 1 I filled a BSA R10 Black Wrap rifle from empty in about 8 minutes. That gun takes a 232 bar fill, which is 3,365 psi. Today I will do something different.
AirForce Extra Air Tank
I chose an AirForce Extra Air Tank as my test tank for today’s work. The current tanks on AirForce airguns do not have to be taken off the guns to be filled, but the older-style tanks did. I’m doing this for the convenience of not needing to find a place to rest a whole airgun.
I used the tank from my 2001 AirForce TalonSS. That tank had been holding 3,000 psi for at least the past 5 years and was still completely full, so I had to attach an old-style refill adaptor to exhaust all the air. To do that I put three pennies into the adaptor before attaching the tank. The pennies push the valve cap down as the tank and adaptor are screwed together, to release the air in the same way the gun’s striker does it, only the pennies hold the valve open as long as you desire. In this case it was until the tank was empty.
The AirForce tank has an internal volume of 490cc. It is filled to 3,000 psi. Emptying a full tank this way takes about 4-5 minutes. The tank becomes very cold as it empties. After you think it is empty and you have removed the refill adaptor, you have to press in on the valve several more times to get all the air out. If you can’t depress the “top hat” then the reservoir is not empty, because the valve return spring has less than about 20 lbs. of force. It should push in easily.
Time test
Today I am filling this 490 cc tank from empty to 3000 psi. Pyramyd AIR says to expect the compressor to fill the tank in about 17 minutes this way. But each compressor will be a little different, plus the shutoff settings I set may differ slightly from those set by Pyramyd AIR. This isn’t a light switch with an on-off reaction. This compressor is like a garden hose, and you have to decide when enough is enough.
Two tests
That being said, I am about to conduct two tests and I will use the same tank for both of them. So that part won’t change. The place I set the compressor to shut off (it shuts off automatically when it gets to the place that has been set) will also stay the same.
What will change is how I power the compressor. In the first test the compressor will be plugged into a 110 volt AC wall socket. In test 2 the compressor will be connected to my truck’s battery. I will time both fills so we can make a comparison.
Test one
In the first test I used the compressor in my garage, where the temperature was 18 degrees, Celsius, according to my Air Venturi HPA air compressor that has a thermometer built in and is always operational (the unit has been unplugged for about a month). That temperature converts to 64.4 degrees, Fahrenheit.
I connected the tank, closed the compressor’s hose bleed valve and checked its water bleed valve underneath the unit, and then switched the compressor on. I would like to tell you how loud this compressor is, but decibels mean very little to most people, plus I don’t have a calibrated sound meter. So, what common thing is there to compare it with? Washing machines, dishwashers and microwave ovens used to be good for noise comparisons, but in the past several years they have all become extremely silent. The closest thing I can think of is one of the electric paint can shakers you see at hardware stores. The Nomad II makes a repetitive sound like them, but it is much slower and quieter.
Filling the tank
It took 4 minutes 10 seconds for the tank’s pressure to build to 1,000 psi. It took 9 minutes 35 seconds for the pressure to build to 2,000 psi and it took 14 minutes 34 seconds for the compressor to shut off at 3,000 psi. When the compressor stopped, the cooling air that was still blowing out of the metal cabinet was not warm.

The little Nomad II compressor is happily perking along on my garage floor.
Dumped the air
The air tank was full again, so I dumped it in the same way as at the beginning. Once again it took 4-5 minutes to completely empty.
Fill from a car battery
The next test was to fill the same tank to the same pressure using a car battery to power the compressor. For this I had to break out the battery cables that came with the compressor. I showed you all the accessories that came with the Nomad II in Part 1, but let’s take a better look at the battery cables now.
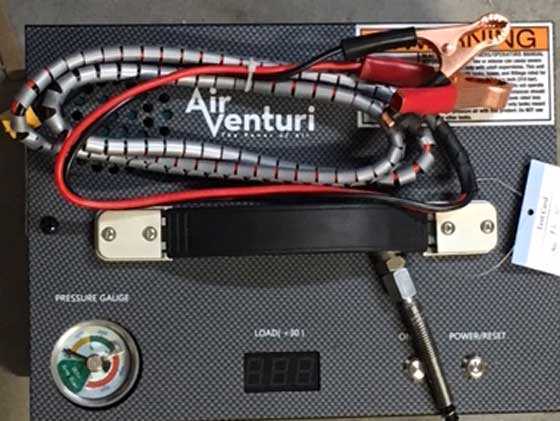
Here are the battery cables that came with the compressor. There are two clamps — one red the other black. These cables end in an electrical fitting that plugs into the base of the compressor on the same side as the AC power cord. The electrical plug only fits one way, to keep the current flowing in the right direction.
Thank you — battery makers
Okay, guys, here is a little rant from a dinosaur. When I was young and starting to drive we had to check the water in our car battery every week. Right now some of you young pups are saying, “Water? Since when does water go into a car battery?” Yeah, yeah, yeah…
Okay, batteries don’t get filled with water anymore. I know that. I get it. I haven’t actually LOOKED at my truck’s battery in — ever!
But here is the point. Back when the internet ran on kerosene and car batteries actually needed water, the batteries were also marked clearly as to which terminal was positive. We needed that because we were always connecting something to them — jumper cables, a trickle charger… Guess what? They aren’t marked on the top anymore! At least the one in my truck isn’t. And the terminals are the same size, so don’t lecture me on how car batteries are supposed to be made with different-sized terminals and you can tell from that.
The thing is — you have to connect the color-coded compressor clamps to the correct terminals or — oh, oh! Now, some of you are about to tell me that my car battery is supposed to be color-coded as to which is the positive terminal. Well, guess what? It is. It’s the RED one!!!!!!!!! Now, see if you can remember what kind of color-blindness I have. Oh, that’s right. BB is red-green colorblind! And, guess what shade of red the engineer with perfect color vision who designed the rubber cover for the positive battery terminal in my truck chose? Heck, it doesn’t matter. One red is as good as another, right?
So I’m standing there, looking at the BLACK rubber cover on my truck’s battery terminal, wondering whether it is really black or actually dark red. Why couldn’t the battery maker have just put a plus sign somewhere on that battery, so I would have known which terminal it was? “Oh, BB, they did. They put it on the side of the battery, not on the top.” Well, great. Too bad I didn’t buy the truck with the mirrors on the inside of the engine compartment, so I could see the back of my battery!
Fortunately, I reasoned that if “they” (“they” are everyone who is not “us”) were going to mark a battery terminal, it would be the positive one, so what I was seeing as a black rubber terminal cover was/is probably red. With that logic as my guide I connected both clamps to the battery terminals, then the other end of the cable was plugged into the compressor, powering it on. It was already connected to the air tank and all the exhaust valves were closed, so when I pushed the buttons to start it working, everything was fine.
Second fill
The temperature outside was 64 degrees, Fahrenheit. The pressure in the tank reached 1000 psi in 4 minutes and 10 seconds. It reached 2000 psi in 9 minutes and 24 seconds and the compressor shut off at 14 minutes and 14 seconds. So this fill went slightly faster than the first one on house current. In other words, the Nomad II works as advertised when powered by a car battery. When the compressor stopped, the cooling air that was still blowing out was slightly warm.
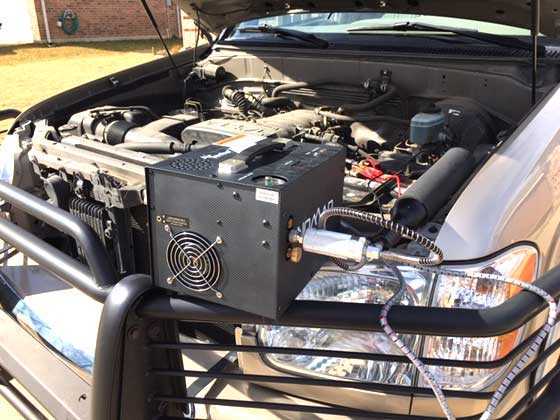
The Nomad II compressor is running happily, powered by my truck battery. The air tank is laying to the right of it — on top of some other stuff under the hood.
I forgot to bring my notepad out with the compressor, and I didn’t want to leave the compressor running unattended, so I wrote the times on the back of my hand. Ah — the good old days!
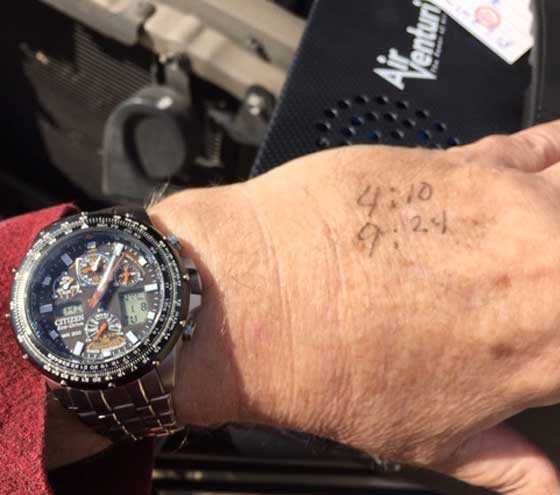
It’s nice to have time on my hands!
Summary
Okay, guys, I have now used the Nomad II three times. The total run time on this unit is on the order of 38 minutes. There is no way I will be able to give you any data about the longevity, but are there other things I need to test? And, please don’t tell me you want me to test it on a Triumph Spitfire that’s parked on a 60 percent slope, or in a condemned warehouse whose electrical power I first must restore.
Aww — BB. You are spoiling the fun!

B.B.
Do you know the amperage draw of this Dark Side Device? DSD for future reference!
-Y
PS when switching from 12 volts to 120 volts, any switches need to be switched?
What about 220?
Yogi,
DSD? Great! Another one to add to our list! DSD, RRHFWA, TCFKAC… HAHAHAHAHAHAHAHAHAHA!!!!
Yogi,
No switches to throw. The different plug into the machine takes care of everything.
I had the machine on two different 15 amp circuits — one with an extension cord with it’s own fast-blow circuit and no problem.
B.B.
When connecting to the 12v power source, are you following the vehicle manufacturer’s instructions for safety? Are there any instructions?
I’m reminded of some battery accidents of yesteryear, and a recent arc I caused by accidental touch to the wrong polarity of a lithium ion aircraft cell.
Jumpstarting correctly takes a series of steps. Maybe a checklist would help with products like this compressor.
rpmdouble,
Welcome to the blog.
The instructions are in the manual that’s online at PA. There is nothing left out. Read the manual if you want to know.
Scroll to the bottom of the home page and click on the Manuals link. Then select Air Venturi Accessories and got to the Nomad II.
B.B.
The manual you reference says at page 7:
“1) Using the included jumper cables, connect the red clamp to the positive post on the battery. Then connect the black clamp to the negative post on the battery (fig. 1).”
The owners manual for a 2017 Mazda CX-5 cautions in the use of jumper cables:
“Connect the negative cable to a good ground point away from the battery: Connecting the end of the second jumper cable to the negative (-) terminal of the (discharged) battery is dangerous. A spark could cause the gas around the battery to explode and injure someone.”
There are many 12 v accessories with jumper cables. I would follow the vehicle maker’s guidance.
I believe connecting the compressor with the power switch “off” to the battery should not present a problem with sparking. It would be the same as connecting a battery charger, making sure the power is not connected to the charger before making the battery connections.
Yes, jumping the newer cars with expensive onboard computers and electronics can potentially damage things if not done correctly. The auto manuals will all tell you to make the last connection with the jumper cable to a ground on the car with the dead battery…NOT on the battery post. Battery gases are extremely explosive. Ask me how I know. And whatever you do, don’t reverse the polarity. Bad things will likely happen if you do. Always best to power off all electronics, like radios and such, before attempting to jump start a car too.
Interesting comment that B.B. made regarding the + and – markings on the battery. I have never noticed that. Being marked on the side of the battery would stem from most batteries being side terminal, though some cars, especially imports, are using top posts again. The positive post is normally a larger diameter than the negative post.
It used to be no problem “jumping” dead batteries with jumper cables. Now all cars have to many elections connected, jumping a car battery now with the high draw can really mess up, alarm systems, rear view cameras, infotainment systems, etal….
Only safe way to do it is to take the good battery out of the car and then jump the dead one. PITA!
-Y
B.B.,
Nice testing. It seems on par with my Shoebox on noise and fill. The paint shaker comparison is a fare assessment. I use mine to top off the small Guppy tank and then fill guns from the tank. My California Air shop compressor is 65 decibels if I recall and can run and I do not have to turn up the TV. (The shop compressor is required to act as the 1st stage for the Shoebox’s stage 2 and 3, for those not familiar.)
Nice brush/deer guard on the truck! 🙂
Good Day to one and all,….. Chris
Chris,
I got the truck from my brother-in-law, Bob, who writes on here. It’s a pip! The brush guard is dented from when Bob was fascinated by the backup camera and hit a light pole going forward.
B.B.
BB
I thought the back up camera’s only work when a vehicle is in reverse?
GF1,
You’re right! How could he have done that?
B.B.
BB
Don’t ask me. I’m afraid that’s one of them strange phenomenons we will will never know about.
And that’s all ok. 😉
Gunfun1 and B.B.,
That’s his story and he’s sticking with it. 🙂
Siraniko
B.B.
I guess that my red-green deficiency is not as severe as yours or my car battery terminals are a much lighter shade of red. I’ve found that on most vehicles the manufacturer puts a protective cover on the positive terminal and leaves the black (ground) exposed. Of course both of our vehicles are 15 years old, so things may have changed a bit since then.
Thinking about your blog on training vs equipment. I’ve found that there is a “sweet spot” for most things. That spot will vary by personality and task. In most cases mine is determined mostly by the depth of my pockets. In another life I was messing about with bicycles. A road bike is an assemblage of components, the best that one can afford component by component. Is derailleur more important than brakes, is frame more critical than rims and tires and so on. After a certain level of component quality is a achieved, one is buying lightness. Lighter bikes allow one to go faster, farther or climb better. The cost of buying lightness increases almost exponentially after some point. Each gram lighter costs ever more money. Carbon fiber frames arrived after I lost interest but the first of those on the scene cost in the multiple thousands of dollars. The combination of lightness and strength is expensive.
In my case the sweet spot, is good but not best. I’m a tool user. I want a tool that will work well, be dependable, and achieve the desired result. My table saw is not a cabinet saw. It’s an older Craftsman with a full cast iron table, belt drive and a router extension. I upgraded some components, a linked leather drive belt and a vibration damper on the blade. I can adjust the rip fence to get square. I’ll never be a skilled cabinet maker, but the kid furniture that I’ve made for our grandchildren has been appreciated by child and parent.
I’m in awe of Half Step. What a scientist in his own right! I benefit from his persistence and sharing of tables and results. I’ll never even come close that him. I really want one dependable airgun that will handle pests humanely. And get some Grand child time too. That’s my tool.
It seems that since I’ve been obsessing about chipmunks in our gardens a couple of feral cats may have taken care of the problem. Oh well, I started on the path, I will keep on until I find my sweet spot rifle.
Good Day to all
Dan
Dan,
For years now I have “heard” the ravings of the HW30 and its bigger brother the HW50. This Christmas I picked up an HW30 for my 10 year old grandson. Wow!
RidgeRunner,
Wow!? Please do tell. I’d like to hear your thoughts on it.
Doc
Doc,
To start with, the quality is most definitely top shelf. The wood and steel is nicely finished and you can feel that this air rifle is made to last. With proper care this is one that can be past down for generations.
The cocking is easy, smooth and quiet. The shot cycle is also smooth and quiet with a solid thump. Of course the trigger is one of the best in the world.
As for accuracy, I have not had much chance to really try it out, but at 10 yards you had to try to miss. It also does not seem to be hold sensitive.
Power wise it is pretty low. It is well suited to plinking and small pest control. Gunfun1 has killed several squirrels with his, though I would prefer a little more power for hunting.
This air rifle receives the coveted RRR award and will become a permanent resident at RRHFWA.
RidgeRunner,
Wow, good review. Glad to hear it. I wonder if the HW50 shoots as well as all claim the HW30 does without any being anymore sensitive with it being a little more powerful.
Thanks again for the review
Doc
Doc,
I have heard or seen only good concerning the HW50. It is my intention to one day have one.
I tell you what. Go ahead and get one. If you do not like it, I know of a good home for it. 😉
GrandpaDan,
Thanks for the shoutout! What I do is not hard or that scientific, for that matter. It just takes time and I’m willing to waste as much of it as I can to keep those Honey Do flavored Round Tuits at bay as long as possible. I am equally grateful that there are fellas like you that get some use from it ( It’s easier when I can say, ” But Honey, look how many of my guys are waiting for me to finish this test!”) and that BB offers a place to share this sort of stuff. None of this would be possible without his support of us.
Half
Half,
“BB offers a place to share this sort of stuff. None of this would be possible without his support of us.”
I’ll second that – thanks to B.B. and Pyramyd AIR for this blog and the tolerance when we use it as a chat-room!
Hank
Totally in agreement with both of you…THANK YOU B.B. and Pyramyd AIR 🙂
Halfstep,
The difference with fooling around and scientific exploration is the fact that you are recording the results.
Siraniko
And one really should proof read before posting…
Dan
GD,
Fix it now. You have 30 minutes with the new edit feature right below your post. It works awesome and is used frequently by me,………
Chris
B.B.
Are you following lubrication requirements, or are you going to run it until it fries ?
tt
TT,
This compressor is not even close to needing the lube. That’s why I told you how long it has been operated.
I would never knowingly fry a piece of equipment.
B.B.
B.B.
Wanted to make sure.
There are a lot of people who refuse to read instructions and ruin things . Then they blame the equipment for being poor quality. Wonder how many returns P.A. gets because of things like this ??
By the way, I saw the color blindness problem coming as soon as you mentioned the RED cover.
Knew a couple of guys who were color blind . One was in electronics. That didn’t work out so well.
I also straightened out a Heathkit Ham rig for a guy who had the same problem. Wrong resistor in the wrong place.
tt
BB,
Is there anyway to exhaust the air from the bottle fast enough to see a vapor cloud if there is water in the bottle. Perhaps, position the bottle with the neck down, as well. I’m very curious about how effective the built in water and oil removal systems are on all of these new home compressors. I don’t feel like the sellers should say they are effective, then turn around and try to sell you an expensive additional filter that will REALLY work. I don’t know if you’ll have the compressor until summer but if you could do the same test during a humid period it would be enlightening, I feel, provided you can devise a test, as I described, in the first place.
Half
Half
You want a high speed dump. Plenty of people have had them happen unintentionally with AF rifles. About the second or third time it happens, it fries the valve.
tt
Half,
I have seen no water vapor from the tank. The compressor had a little when I purged the line.
I am not as worried about water in the reservoir as other folks, because I have tested it and know that it gets blown back out of the gun. Read this:
/blog/2017/03/do-pressure-vessels-become-unsafe-over-time/
B.B.
BB
The Hatsan bullmaster manual say’s don’t allow moisture to get in the gun.
And also they say don’t oil the barrel.
Maybe they are being extra cautious and trying to tell people quote “the right way” to take care of the gun?
B.B.,
I agree on your take on the water/rust issue. Oil is the key. On some old guns that were not oiled regularly, at least I think that was the case I see some rust and no oil. On guns I have kept oiled regularly I have not seen rust to be an issue, even when there is moisture in the reservoir. Based on your advice I oil my guns internals with a drop or two before each use.
Silicon oil for the pcps and springers, and Crosman Pellgun oil for the pumpers. I also lube my pellets with FP-10.
Don
BB,
I don’t know how I missed that report. I may have read it then forgot. THAT is totally plausible! At any rate, it tells me all I need to know, so never mind.
Half
BB,
Just for the record, and I speak from personal experience, Maintenance Free batteries are, more correctly, Low Maintenance. They cook off their water at a slower rate so they don’t require the constant care that the batteries of old needed but they do need to be checked every six months or so if you want to get the most life from them, especially in a hot environment like Texas. I’ve seen my own, as well as many friends’ batteries dry up and fail prematurely because distilled water wasn’t added periodically over the battery’s life.
Half
Halfstep,
The battery warranty goes out the window if you have to remove the sticker covering the caps to top up with water though in my case.
Siraniko
Siraniko,
That’s a new one on me. What brand of battery voids your warranty for adding water to the cells? I will avoid that one.
Half
Half,
It’s a local brand in the Philippines that unfortunately covers the plugs with a huge sticker.
Siraniko
B.B.
Thanks for making the compressor work. I am still waiting for my bottle at the shop, nobody wants to work
anymore. The grey area btween springers and PCPs is getting wider, with all the associated stuff that goes with PCP’S. I have three now, but the virtue of the constraint of a spring becomes more clear to me. A springer gives me time to fix and mess with the PCP’s I guess. Rob
Looking at the oil/water separator, I notice that I had mine backwards all along! I purchased mine online, but had it the other way. For mine, first in line was the porous soft sponge disc, then the long cylinder cotton tampon. Is this correct? What is the correct way for optimal air dryness? Or which way is backward? Is turning left, right?
saxpride,
Welcome to the blog.
Not a clue. Have you read your manual? If you don’t have one PA has one online.
B.B.
I really want this compressor, right now all I have is a Benjamin and air venturi g6 hand pump. They work, but around 2,500 psi I can’t pump any more. I’m too small and light, and no matter how hard I press down or lay across the handles it just doesn’t move any more.
Drucocu,
I too am a lightweight guy, at about 135 pounds soaking wet, and at about 2500 psi I cannot “pump” the pump either. What I do is push the handle down till my arms are straight and then release my knees and just drop my weight onto the handle, this allows me to easily get to 3000 psi.
Read over here B.B.’s account of hand pumping; /blog/2005/03/should-you-buy-a-hand-pump-for-your-airgun/
I would love this compressor as well, but right now not in the budget.
Mike
I read that when I got my pump, but I only weigh 110 pounds. At a certain point it just doesn’t feel like I can make it move anymore, maybe I just need to get the technique right.
Drucocu,
Being 230# and 6′ 4″,… and,.. never having a hand pump,… I can (not) relate. I would however have to be inclined to go for an automatic pump in (your) case. Even if it is direct to gun (bypass the tank/save $) which is not all that uncommon anymore. GF1 does his that way. Direct to gun.
Best wishes,…. Chris
Drucocu,
At 110 lbs, you need a compressor. Someone posted here a lever system that he mounted his pump in and that looked like it would take a lot of the work out of pumping, on the other hand if you had a backpack and stuffed about 40 pounds of sand in it you would weigh 150 and that would enable you to get it pumped up.
Mike
Mike,
Even at 230,…. I (would) do a leveraged system. I like to work smarter, not harder. Shooting should be enjoyable and relaxing. Unless,…. you are into all that work. Which,.. by all means,… more power to ya’. 😉
Chris
Chris,
I do not think you would have much trouble with a hand pump, at just 135 lbs it is not really that bad, of course I am filling a small tank to 3000psi.
That said, when I can get the money in place I most definitely will get a compressor, it is the only way to go on the dark side.
Mike
A few days ago I finally picked up my new shooting glasses.Today the sun came out and I had a couple of Airguns I wanted to check out with the new glasses. The Shooting glasses were set up so I could get a good focus on the front sight and also see the target well. And Doc spent quite a bit of time trying to get the best setup for my astigmatism. He set the glasses up for either my left eye or my right eye. I am right handed and left eye dominate.
I took my Crosman 101 with the rear peep sight and the globe front sight. I can see the sights and the target better than ever. I also have a Chaser carbine that I made a peep sight for. I can see it’s front post great.
I set up my target at 25 yards and expected some great groups. No such thing happened it just was not my day. I tried shooting with both my new shooting glasses and my old distance glasses. The groups were so bad I could not make any comparisons. I could not shoot well enough to show any difference between the targets shot with the shooting glasses and with my original glasses. None of the groups were close to what I am used to. I also grabbed my IZH 36M and could not hit the target, so it is me not the gun. I also tried the 46M both right and left handed, not better either way.
I will give an update again when I get some more definitive results. Maybe the pot of coffee I drank this morning did not help. I do think the shooting glasses will help.
Don
Don,
🙂 We all have those kind of days. Yea,… too much coffee is not good. But,… like you, I like to be fully alert and sharp at the same time. You mentioned seeing the sights better,… and that can not be a bad thing.
Shootski also mentioned the importance of relaxing before the shot,.. recently. True. B.B too.
I do find that I need to be in the mood, fresh and alert, no “things” pending,. ease in, set up, take my time, relax,…. no rush. That is when I do my best. On that,….. I do suppose that makes me an AWFUL candidate for ever competing. 🙁
Keep us posted. I may need to look into something like that myself, though I do not shoot opens. I do not shoot with glasses (any) with using a scope. I do suppose though, that eventually,… I will need correction for even using a scope. Perhaps not? My distance vision is near perfect, but need glasses to read. “Aged” 58 years,…. but not so sure that is a good thing,.. like a fine wine or spirit. ?
Like I said,…. keep us posted when you get out again,……… Chris
Chris U,
You are absolutely correct. I did feel rushed today and it got worse as I went along. I hope it does not carry over to bowling tonight. We are in first place and going against the inlaws team in second place. The good news is, it is only bowling and not a true sport. At least that is what I am telling myself.
Don,
On what works,… and what does not,…. I worked on my “fundamentals” last Fall and reviewed some links that Shootski posted. One topic,.. was “tone”,… if I recall correct. Tone?,… you ask? From what I gather,…. as your cross hairs are “bobbling about”,.. (the less, the better),… you let off the shot when the cross hairs “tell you” to shoot by hearing an “imaginary tone”.
B.S.? Well,.. the more I tried it, the more it really seemed to work. It takes practice like anything and starts to become instinctual after a bit. It was late in the Fall and I look forwards to trying it again in the Spring. 23F in Ohio now,…. so I have plenty of time to ponder my next move.
For what it’s worth,…… Chris
Chris USA,
shootski not believe in B.S.!
He also not blow smoke up your Banyarol!
I’m glad that it may work for you. Now if it would just stop while I’m driving and texting…
Oh! That’s my lane keeper in the new car! Drove my 1994 SAAB 9000 AERO the other day and I didn’t hear it!!!
Back when I first was learning to fly they still had A-N Radio Ranges. It was an early radio navigation system that broadcast the Morse A ( • – ) on one lobe and N (- •) on the other lobe. That binary broadcast gave you a steady tone when you were on the Centerline moving between two Radio Ranges when flying on instruments in the clouds!
That’s why I tried the “Tone” method of shooting and didn’t automatically think it was B.S. like so much advice on the internet and blogs unfortunately is.
shootski
Shootski,
🙂 I do appreciate the good advice/suggestions and no B.S. approach. I do try, but not nearly enough. Yes,… I think it (TONE) will work for me,…. among the many other things that I need to learn/relearn/do/try correctly.
Skiing the Blue Ridge ehh? You have mentioned skiing many times in the past. 70’s age, as I recall? You seem to have lived/(live) quite the exceptional life. More the exception, than the rule compared to us mere mortals. 😉 The conversation that you and Vana2 (Hank) were having the other day on flying and planes was quite fascinating and vast. Far above my head, but fascinating none the less.
All in all, I suppose we all have “fascinating” lives in our own, special way. Some really stand out though. Those are the folks that I try to keep my eye on as they surely must have something to pass on. 😉
Chris
Shootski,
Banyarol? Corrupted American Italian for bathtub? Why would anyone want to blow smoke that way? 😉
Siraniko
Siraniko,
Someone told me a long time ago that was, anal pore, in the Catania area of Sicily!
Go figure!
shootski
BB,
You don’t have to test-run the compressor with a Triumph Spitfire parked on a 60 deg slope; send me one and will be glad to test it using the Group 26 12V battery in my ’74 MGB. 😉
B.B.
How can I connect the detachable air reservoir tube from my Steyr LG 100 to my Nomad II?
Slash 8
Slash 8,
Not a clue.
What sort of connection does your Steyr tank have? You have to be specific because I don’t have these things memorized.
B.B.
BB
A safe way to check for positive is to connect the compressor Negative lead to a metal bracket on the engine. Connect to one of the battery terminals. This way you can’t do reverse hookup (unless of course you have an old positive ground truck 🙂
Hopefully someone will help me with this, and I’ll discover if I’m a flaming idiot or if something really is up – I have a Nomad II and a Hammerli AP 20 Pro, with the Walther LG type air cylinders, which need to be removed in order to fill. I can successfully top up any of my three cylinders using a hand pump – attach the adapters to the pump, close the valve, and screw in the fitting to the cylinder until it pressures the hose, and I start pumping. All good. I try the same thing, topping up a cylinder, say from 100 bar to the limit 200 bar, with my Nomad – same procedure – attach the adapters, close the valve, screw in the fitting, pressure the hose, and then turn on the compressor. And, it runs for about five seconds and shuts off. Every time. I’m only able to fill these cylinders by letting all the air escape and filling from empty. What am I doing wrong?
Wade,
I forwarded your comment to Pyramyd AIR. I don’t know what’s wrong but hopefully they will.
By the way, the best way7 to post a comment is on the current day. That way a quarter million people will ,see it.
BB
Wade,
Here is what Pyramyd AIR said.
The issue is that he is backfilling the unit before starting it, which causes some initial strain on the system that causes the shut down. What he might try (and this should solve it) is to start the unit before piercing the cylinder.
So start the unit, let it run for a few seconds with the bleed valve on the unit open. Once it begins running, pierce the valve on the air tank and close the bleed valve (in that order) and the unit should run okay from there. Just want to avoid having the unit starting with pressure in the system, it doesn’t like that.
I hope this helps,
BB