by Tom Gaylord
Writing as B.B. Pelletier
Today’s report is written by blog reader New To Old Guns. We met at this year’s Pyramyd AIR Cup, where he showed me the items you are about to see. I was impressed, and so was Val Gamerman, the president of Pyramyd AIR. He gave his inventions to Val to take back to his office to evaluate, and he and I had already decided that a guest blog would be the right thing for everyone else. So, here we go!
If you’d like to write a guest post for this blog, please email me.
And now, over to you, New To Old Guns.
3D printing to the rescue!
This report covers:
- The Sumatra magazine, the start of it all.
- What is plastic printing?
- How does the printer print?
- Early success: the clip holder
- Iteration is what makes this great!
- Follow on success: belt and gun mounts for the clip holders
- The power of 3D printing
- Other resolved issues with the Sumatra
- Summary
The Sumatra magazine, the start of it all.
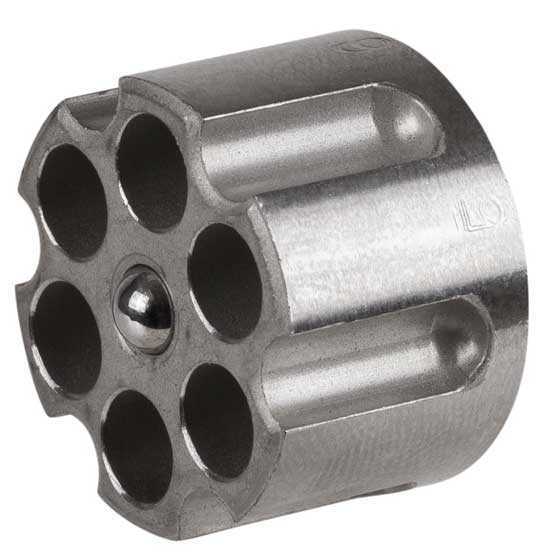
Around 2003, I purchased the Sumatra 2500. It was a beast of a gun compared to anything I’d owned before. I was immediately smitten. But, it wasn’t long after opening the box and starting to use it, I found the first design choice I disagreed with. The clip is little more than a cylinder with 6 slightly tapered tubes and a pair of spring-loaded bearings front and rear providing centering force. There is nothing holding the pellets in the clip! That’s great, in that there is nothing to deform the pellets as they’re loaded and shot, but not so great because you can’t preload clips for field carry. The pellets just fall right out of the clip!

The clip.
To make matters worse, the muzzle of the gun has to be pointed upwards when loading, so the pellets don’t drop out of the clip then either. But, when the muzzle is upwards, the cocking lever can easily fall from being fully open, and it needs to be fully open to load the clip. The only mode the gun made sense was shooting with a bipod, either from a bench of the ground. Then the bipod would keep the muzzle up a little, and left you with enough hands to load the clip and keep the lever fully open.
That was how I used and enjoyed the gun, usually shooting prone off a bipod. It was a very deliberate, time-consuming affair, taking the 6 shots, open the ammo tin, reload the clip, close the tin, reload the gun, continue. There isn’t really anything wrong with that, but sometimes you just want to have fun banging away, and this was clearly not the gun for those times. If only there was something the loaded clip could be put into, to keep the pellets in!
What is plastic printing?
Plastic printing is a system where an electronically described part is built up out of thin layers of extruded plastic. The parts can be modeled using traditional CAD (Computer Aided Design) software, or with more modern but functionally limited software specifically written for 3D printing. Once the part is modeled, the output is handed off to a piece of software called a “slicer”. It does exactly that, reducing the part into layers of predetermined thickness. Have you ever seen a hard boiled egg slicer, a frame with an array of wires? Think of that, but on its side. And the output is the sliced egg, still all stacked so it still looks like a whole egg. The slicer output file is what is sent to the printer.
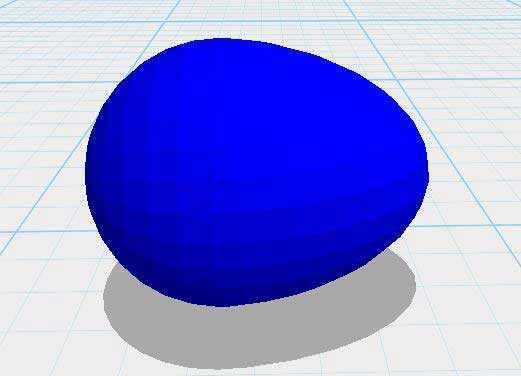
A model egg.
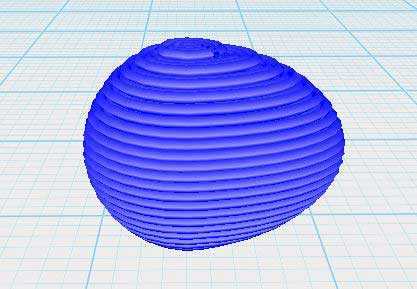
A sliced model egg.
The printer itself is little more than a heated extruder head that is movable in 3D space. It receives a steady supply of room temperature plastic filament from a spool and extrudes it out of a very small nozzle. To put some numbers to it, the filament supply is commonly about 1.75mm in diameter, and in my case the nozzle diameter is 0.4mm. That’s quite a bit of reducing!
The extruded head heats the plastic to its melting temperature (that depends on the plastic type, but it’s usually over 205 degrees celsius or 401 degrees F.), and uses the pressure of the fed plastic to push the melted plastic out the nozzle. It can be printed (deposited?) in layer heights ranging from 0.1mm to 0.4mm on my machine, with a default at 0.2mm. That’s 0.0079-inches!
How does the printer print?
Imagine that the object you’re printing is a pyramid, 5 cm tall (that’s almost 2 inches) , 5 cm on each side, and your slicer program is set to make 0.2mm layers. The base layer the printer will print will be a 5x5x0.2mm square (well, technically, a cube). As the print continues, it lays down the next layer of extruded plastic on top of the first. This square will be a little less than 5×5, and now your part is 0.4mm tall. And so the process goes, laying down layer after layer. This part would take 125 successively smaller layers to print.
Early success: the clip holder
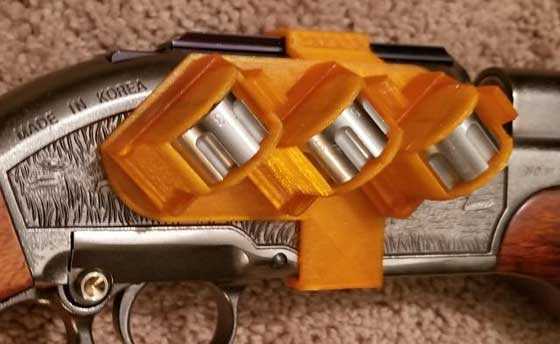
The first problem I set out to address was the clip holder. I had in mind a part where one edge copied the outline of the gun where the clip loads, so the pellets wouldn’t have any spaces to fall out. There would also be an internal track that the clip’s bearings would ride in to keep the clip centered. To keep the clip in the holder, I planned a pair of depressions that were deeper than the track, that the bearings would center in. I enlisted the help of a machinist cousin, and in a couple of hours, we had a model. Once my printer arrived, the real fun began!
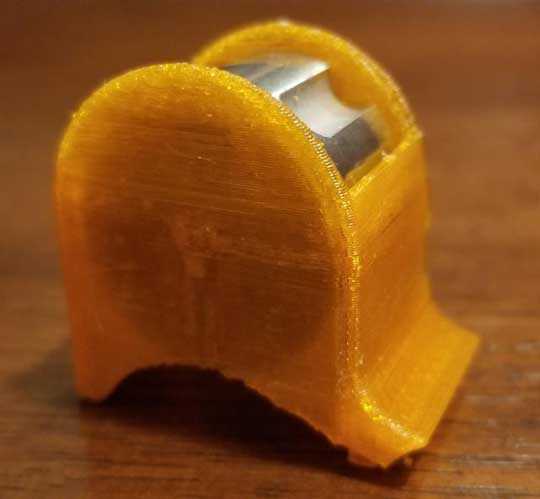
The clip is in the printed holder.
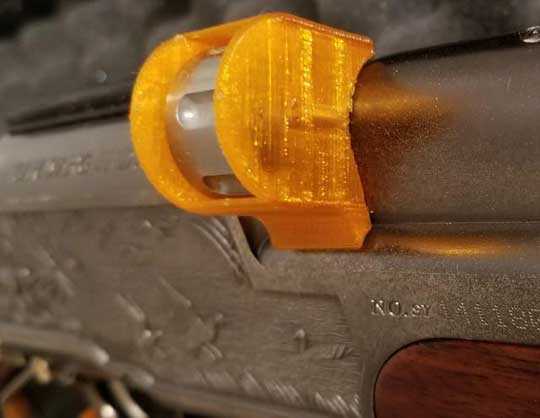
The holder has been mated to the Sumatra, for loading.
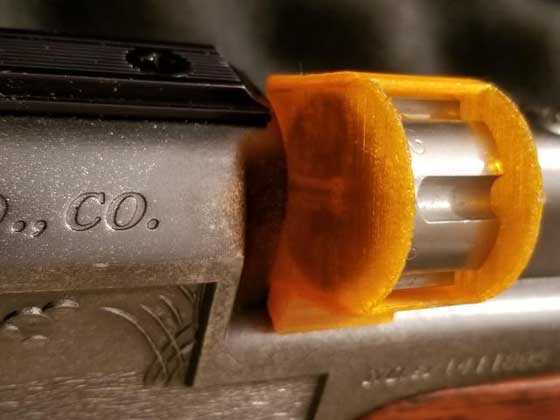
A second view of the clip holder, and how it mates to the gun, preventing pellets from falling out during loading. Just push the clip through the holder and into the Sumatra’s receiver!
Iteration is what makes this process great!
I started using the first prototype, and quickly realized that it could easily be improved on. Adding a lip that would engage the loading slot of the gun would cut down on having to really be attentive when alining the loader with the loading port. An edit to the model added that lip, and now loading became just a wiggle of the holder to make sure the lip was engaged, and a push on the clip. It’s better already!
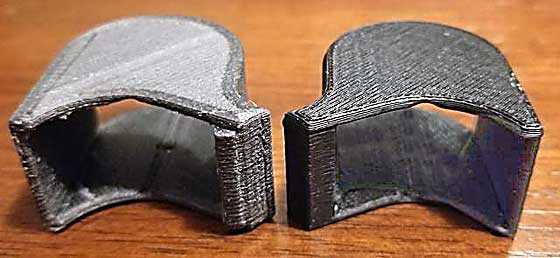
Here is a side-by-side comparison that shows the added lip.
Follow on success: belt and gun mounts for the clip holders
I printed out a few of the loaders and headed out to the field. It was a little like having a different gun! I could pop the empty mag out, get a loaded holder from my pocket, and load up just like I’d wished. And it could be done with the muzzle pointing downward, which was much more natural. But again, by actually using the parts I’d made, the next iteration became obvious. Why keep fishing into my pocket, when I could make a belt holder for the loaders? So I figured out a tray to capture the clip holder, and tinkered with making various types of belt holders. One holder was intended to be carried on the front or side of my hip, and the other for further around my back. Now I could head out with ammo for 36 shots, ready to go!
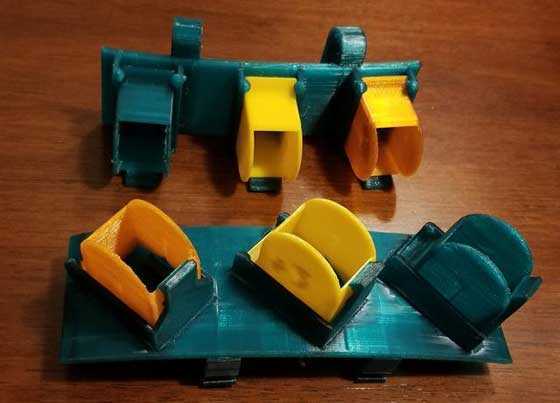
The two belt carry designs. The trays are angled on the one intended to be worn on your side, to allow for a comfortable wrist angle. That made a huge difference!
But then came the next question — why reach all the way down to my belt at all, as opposed to keeping the clips on the gun itself? So, I tinkered up and printed couple of refining iterations of gun mounted clip holders. And finally I had what I considered to be a really good product. 18 shots, and my hand never had to move more than a couple of inches from the gun.
Here is the “final” side holder. Final, for now…
The power of 3D printing
And this all illustrates the real power of 3D printing. The cycle between imagining a solution to a problem and actually having it in your hand has been greatly reduced. And if you find a problem or improvement to your solution, trying the fix is just a model edit and print away. I don’t know how I would have crafted the parts before this technology became available.
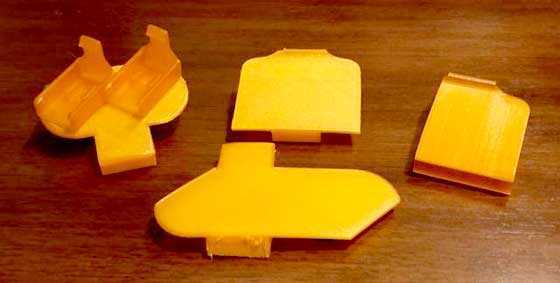
Here are some of the iterations that led to the final side holder. It wasn’t a straight line to the final design!
Other resolved issues with the Sumatra
I have to admit, I’ve had my gun tuned, and one of the things that the tune did was reduce lever effort. But I remember that before the tune was applied, the lever was rather heavy to operate. I thought about trigger shoes, and wondered what effect a “lever shoe” might have. In short order, I’d made one that about doubled the width of the bottom of the cocking lever. My already lighter lever felt even lighter!
Something the tuner couldn’t help with was the open sights that arrived on the gun. Apparently the manufacturer was in the process of switching between stock designs, as the comb is too high to use the open sights! Ironically, the stock was also too low to use with a scope, without being padded up. But armed with the printer, I made a set of sight extenders that fit over the factory sights, duplicating their profiles, effectively raising them to the needed height. As a bonus, I could still use both the elevation and windage factory adjustments!
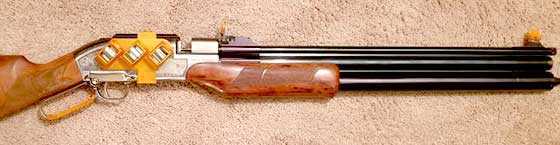
Here’s my Sumatra, all dressed up with its add-on parts.
Summary
3D-printed parts have completely transformed the experience of one of my favorite airguns. It went from a gun that demanded being used in a very specific way with a very specific mindset, to a gun that can joyfully rip and snort with the best of them. It will still shoot brilliantly from its bipod, all scoped and padded up. But now I can strip it down, and use it like some strange overdone six-shooter. I can shoot mid-range knockdown and spinner targets the same way as I can my Hatsan Vectis. A soda can lineup out to 40 to 50 yards doesn’t stand a chance, and those cans sure do dance!
With the lighter lever and the lever shoe, I can actually get a faster follow-up shot with the Sumatra! Who would have ever thought that was possible! Isn’t technology great? In fairness, I really like my Vectis too. I guess I’m a sucker for lever action rifles.
Maybe my experience will prove to be the exception. I had the perfect subject, and the right kind of issues, that lent themselves to 3D-printed solutions. But I’d encourage others to consider their collections, and what niggling problems have kept them from enjoying their airguns as much as they could. The solutions may turn out to be easier to create than they ever imagined!

I pretty much use PETG for everything. It takes a bit more effort but the parts are strong. What are you printing with?
I’ve been experimenting with a couple of different filament types. The PETG is definitely stronger and more durable than PLA, but PLA seems to make a part that requires less filing and sanding after the print. There’s an intriguing PLA that has carbon fiber added to it that’s supposed to bridge the gap between the two. I’ve just started working with it, and it shows promise, but flat black for field use? Sounds like parts begging to be lost!
As a point of reference, the orange parts are PETG. They are a little translucent, which I actually like. The yellow and green are made with PLA, and the “with lip” holder is the carbon infused PLA.
I occasionally use PETG but I prefer nylon for most mechanical things, due to its ruggedness, flexibility (living hinges work very will, in the more flexible nylon formulations), and self-lubricating nature.
New To Old Guns,
Great explanation! I envision a day when the global manufacturing supply chain’s transportation emissions make it unfeasible with co2 emissions, that every neighborhood will have multiple types of 3-D printers and make most of your stuff locally.
3-D printers rock!
Will you make me a large a/o wheel for my scope?
Thanks,
Yogi
Thank you!
The hobby is going through the phase where the price of admission is tumbling. The system I use would have cost over twice what it did not 3 years ago! I think they figured out that they can always “get” you with the cost of the filament. 😉
I’m limited to 5″, but more importantly the software I use doesn’t have a way to describe that nice spiral shape. Otherwise, I think that’d be a great thing to try.
What type of plastic was used?
Do you get many different types of plastic that work with your printer?
Do it need to be virgin plastic?
Thanks,
-Y
Sorry for the late replies, I’m not quite as early a bird as many of you 🙂 . You can find the types discussion above now.
The system I use is pretty basic, and limited to various types of PLA, and PETG.
The plastic shows up like a spool of wire. I believe in all cases it is virgin, but interestingly the PLA is biodegradable. None of the types I can print with release toxic or noxious fumes. But some of the more advanced printers can print with more durable plastics (like ABS) that actually come with an air circulation warning!
Very cool.
With the clip holder and the clip holder holder, am I the only one disappointed there isn’t a clip holder holder holder?
Thanks!
After the lever shoe, I was going to call the sight extender “sight socks”. Maybe holder holster? 😉
New To Old Guns,
Excellent report. Fine pictures. Impressive. 4 questions,….
1) Can someone who does not know Auto Cad learn to use this easily?
2) Older plastics tended to deteriorate over time. Is there any chance of these deteriorating over time?
3) Is there a way/setting to reduce/eliminate the somewhat rough looking appearance to the surface of the plastic products?
4) Are these products considered to be as strong/stronger when compared to traditional injection molded products?
Again,… fine job on the report! Good Day to you and to all,……. Chris
Thank you!
1) the software I use is very interesting in that it is oriented to non cad users. It has a library of basic shapes (ball, box, extruded triangle they call a “roof”, a pill etc.). Parts can only be altered on x,y and z axis by stretching, and rotated on the same axis. Parts are created both additively and by subtracting. So for instance, that egg was made by taking a ball and removing half of it, stretching the pill to get the long tapered end and removing most of that, then joining the half ball with the tapered end. If you can see the parts you want to make that way, the process isn’t all that bad!
2) yes, these plastics do degrade over time. Their failure mode is to get more brittle. I’ve read that the PLA looses considerable strength in a year. But, oddly, it doesn’t seem to degrade in a linear manner. It is good, it is good, then oh, it got weak. The PETG seems to degrade more slowly.
3) sure! They all respond to sanding and filing. And it is worth mentioning that with printers, there is a bit of “you get what you pay for”. I had a prototype professional printed, and that part came out great, with no after processing required. But, that printer was a big commercial unit. The parts from my unit about all need sanded and filed. 😉
4) I’ll have to go out on a limb with this and say chances are, injection molded parts would be stronger. The reason is no matter how carefully temperature is controlled, the final printed part is still a result of laminates. Each layer can have subtle adhesion variations or defects that can become points of failure. I imagine molded parts wouldn’t suffer from that. But in practice, the parts I’ve made so far have only failed on laminations when the filament itself was already degrading. Most of the failures came from good old “poor design”, classically, making a part too thin.
NewToOldGuns,
Injection molding would definitely be stronger. The plastics that can be injected are tougher and don’t degrade. They can be blended with glass and other materials as well. ABS is a pretty poor plastic among what is available today in the injection molding field. What is PETG and PLA, BTW?
I found it a little ( I know someone is probably going to say that this isn’t irony, but it’s the best I can do with my understanding of the word ) ironic that you got a machinist to build a prototype for you to try out before you were comfortable printing it. I thought that it worked the other way around. 🙂
Regardless, you saw a need, you filled it for yourself in a very creative and thorough manner, wrote a VERY interesting report about it and, it seems, could have a product design that could solve the same problem for others while earning you the “filthy lucre” to buy better equipment and materials for future inventions. Job well done, I’d say!!
And thank you BB for allowing readers to contribute in this way. You’ve had some pretty good instincts about what would be of interest to your regular readers.
Half
Let’s see.. PLA is Poly-Lactic Acid. PETG is Polyethylene terephthalate. Don’t know if that actually helps or not, but that’s about all I know.
Ah! He didn’t actually make a machined part, he made the model in his cad software! The first real part made was in printed plastic. But let me say, watching as he worked his cad magic, I quickly realized I’d have a long row to hoe learning modeling in that app!
Well, thank you! We will see if it actually goes anywhere 😉 . In the final analysis, I consider the cost of the printer and filament tuition to a self-taught class on printing, with the perk of having my Sumatra tons more fun than when I started.
Of course, I don’t understand why every Sumatra owner out there wouldn’t want a couple of the clip holders, at very least. Field reloading those clips is a right royal pita! 🙂
1. Most people find any capable solid modeling CAD program to imply a challenging learning curve. It’s fun though and you can create simple stuff to start and transition to more complex projects as you learn. AutoCAD not my personal favorite vendor, however. I prefer history based parametric modeling CAD like Solidworks or Alibre/Geomagic, if you have less money to spend. For a free program, FreeCAD has come a long ways too!
2. Yes–plastics deteriorate in time. The rate depends on the material, temperatures and environments of usage, etc. My favorite 3D printing material is nylon, which is one of the longest lived and rugged plastics in FDM 3D printer use.
3. Other than tweaking print settings (or the printer) to produce smoother surfaces, ABS responds to MEK dips very well (ABS cement is just ABS dissolved in MEK). Some people use acetone, but it’s not quite as effective. PETG can be dipped in methylene chloride, but it’s even nastier than MEK! I’ve never tried MEK or other solvent dips with PETG, because methylene chloride works so well. Some people has similarly smoothed PLA and polycarbonate too, but nylon is highly resistant to all solvents so I don’t know of any available method to chemically smooth it. It can be machined with good tooling and sanded too, but it resists abrasion and thus sanding too, to some extent. ABS, PETG, and polycarbonate probably respond the best to sanding of all the common FDM plastics. PLA tends to be a bit too “gummy” to sand optimally, I think, but it can be sanded too.
4. I bought an Ultimaker printer in 2012 so I was a fairly early adopter. (I think it was 2013 when I showed B.B. a nylon 3D printed Dana 34 piston seal at SHOT show.) With several mods, the Ultimaker still holds up very well in a comparison with most consumer grade printers today. I also have quite a bit of experience in designing injection molded parts, which are almost always stronger than the 3D printed prototypes that I print.
Calinb,
Thank you for that added, detailed insight. I thought of you when this was printed and hoped you would weigh in as I remembered you did 3D and had helped to educate us all about it before.
Chris
You bet, Chris! 3D printing is really great for custom gun accessories and I’m pleased to see that others here are adopting it.
New To Old Guns
Nice report.
And yep I do believe it will be a new way of machining I’ll call it. For certain types of products anyway.
NtOG
I purchased a printed bull pup stock recently for an Airsoft M11 pistol and it came with a warning, ” Do not leave the stock in direct sunlight on a hot day or on a hot surface in order to avoid any possible distortion”. This was a substantially thick creation too so you may want to look into that when choosing material and item designs. At least you need to keep it in mind. Nice job done. Noticed someone created a vehicle.
A friend of mine has a 3D printer and can’t stop creating things now.
Bob M
Thanks for bringing that up! I do remember seeing that filaments have a use and a storage temperature specification for both before and after printing.
They are a little addictive 😉
NTOG,
Thank you for this report! At Virginia Tech and I am sure at others they are teaching 3D printing. They have various types, some of which are quite sophisticated. Companies are also working on 3D metal printing.
Though it is not a “cure all” it is amazing what can be done with these things. My newest laptop comes with a program (app for you youngsters) that allows you to design something you would like, then send your file to this company and they will “print” your product, for a fee of course.
You do realize that now everyone here is going to be clambering to have parts made? 😉
P.S.: You appear to be a prime candidate for the Seneca Eagle Claw when it finally hits the market.
You’re very welcome, and thank you Tom for publishing it!
The direction the technology is going is definitely fascinating! I’m sure if I were heading to college now (as opposed to 30 years ago) I’d be trying to take some classes. I watched a video a couple of years ago that featured the notion of space explorers leaving with less parts than they’d traditionally had to carry, but with printers to make what they need. As proof they printed a classic worm drive adjustable wrench. In one print. No assembly required. I still don’t understand quite how they pulled that one off. But there you go, print the tool you need, and when you’re done, grind the part back in to raw material. If they could do that then, imagine what can be done.
I noticed my Windows 10 box has that as well! I can only imagine how expensive the per part print would be. I had a clip holder professionally printed before I bought my printer, and it was $15 before shipping!
If I downloaded and learned a real CAD app, oh the things that could happen 😉
Eagle Claw, funny you mention that.. I had a chance to shoot one at the Cup! Yes, I’m definitely a candidate… chomping at the bit!
NTOG,
Maybe this will help you understand how those guys knew they could make that wrench. This stool is no less fascinating and required the same “outside the box” frame of mind.
https://www.youtube.com/watch?v=qQmrGQDaI08
Half
That’s a video of an amazing mind (well, apparently thousands of years of amazing minds), and a talented person! Thanks for sharing!
I just googled “printing a working wrench”, and found a bunch of videos on the subject. I guess I know what I’m watching later on tonight…
NTOG,
Way back when there were some folks making aftermarket stocks and different shaped levers for the Korean air rifles. Those mods made them more user friendly. Maybe you should dig around and see what you can turn up.
The Vectis has intrigued me for some time and now the sighting of the Eagle Claw has my attention. A good quality lever PCP would be most welcome.
That would be an interesting thing to look into, thanks!
I’m sure many would debate the use of the word “quality” when it comes to these guns, but I sure enjoy them. The Sumatra was good out of the box. But I wound up having a valve issue that led to it needing serviced. And, why just get service, when you can have it tuned? I was truly impressed with what I got back. The lever was lighter, and the shot string was much longer.
The Vecits is a little rough in some ways, but it costs so much less. And its fun factor is, for me, really up there. I’m getting a dueling tree “adjusted” to handle the power of these guns because they are so much fun! I’m definitely okay with the little bit of crunchy roughness in the lever, but I might just take the chance and do some surgery to clean that up. And of course, while in there, might as well see if I can change the shot pattern from a diagonal dropping line to something with a bell curve of sorts. Others have cut off part of the outer shroud and fitted an LDC, leading to a rather surprising increase of accuracy. There are lots of paths to take, if one is inclined.
I’m sure the Eagle Claw will have its teething pains too. And in all likelihood, they’ll respond to tuning the same way the Sumatra did. As I mentioned, I for one hope to find all that out!
Going way off subject for a moment. Sorry NTOG.
I saw yesterday that the new Chief II multishot air rifle is shipping.
https://hardairmagazine.com/news/beeman-chief-ii-pcp-air-rifle-now-shipping/
I don’t think that anyone has mentioned it but a lot of public libraries now have 3d printers, and often better ones than most hobbyist buy. So, all you need is to download free design software. You pay a nominal fee for the plastic and pick up your finished parts to play with. I have a friend that has been doing this.
David Enoch
I’d thought about doing that for the prototype, but could just imagine in this day and age: “What is it?” Me not thinking carefully.. “a part for a gun”. Yikes!! 😉
NtOG,
Thanks for an excellent report!
I’ve been watching 3D printers with a great deal of interest for a while now. The first one I saw (years ago) was a huge industrial unit that could scan and replicate complex shapes. The PCB assembly house we used had a printer that worked with UV cure resin that was pretty cool. And if you do a search on “3d printed concrete” there are examples of houses and bridges made with the process. Amazing technology!
Would love to have a 3D printer in the workshop – I would like to do a bit of foundry work and could use it to make patterns for sand-casting molds.
OH, BTW, I need a couple of these forks, if you could print off a couple 4 inch ones I would buy them from you…
Cheers!
Hank
My pleasure!
I’ve seen a video of a house being concrete printed.. fascinating!
Oh, yeah, I’ll get right on that.. LOL! And an Escher staircase while I’m at it 🙂
Here’s the printer we have been using at work.
I work at a metal machine shop. We been using it to design new cutting tool insert holders for specific jobs. We eventually make the holders out of metal if they will work in our turning heads and applications.
And lately we printed up some hard gage holders for the machining check stations. There’s usually 3 to 5 go and no go plug gages at each machine. They use to just lay on the table and get all moved around. Even from machine to machine. Now they are in a organized labeled tray for what dimension each gage checks and the job number is now on the tray also. That keeps the gages from getting mixed up from one machine to another. Pretty cool stuff. It has helped.
And we really have been seeing about putting together a small multiple (5-6) 3D printer shop together. The owner of the company is actually all for it.
I see some heavy competition in the future for 3D printing. Which should be a good thing. For a while anyway. If a person puts their mind to it the posabilties are pretty enormous actually.
Oh and I like the solid color material better. It seems to print better and is stronger. Well the stuff they have used anyway at work.
Here’s the one we been using.
https://www.creality3d.shop/collections/3d-printer/products/creality-ender-3-3d-printer-economic-ender-diy-kits-with-resume-printing-function-v-slot-prusa-i3-220x220x250mm?gclid=Cj0KCQjwiILsBRCGARIsAHKQWLMpN30Qo-d33Sobq42kgWjVMhBaHoBS5WRMkonOqLH0I8AkfG8vE-QaAsQzEALw_wcB
That company seems to have a good reputation, and I’m happy to hear of your success with it!
I’ve pointedly not mentioned the printer I have because I’ve been involved in some wrestling matches with it that I think I shouldn’t have had to go through. I’m not saying it is bad, but I wouldn’t “recommend” it either.
NTOG
Not really my success. It’s actually the engineers printer that he brought from home. They just hired him awhile back to try to help get our tooling issues worked out. Basically strength and design of the cutting tool holders. I know cad cam but not 100% involved with it. So I volunteered to work with him on the projects that come up. Which has actually been pretty fun. I have been a machinist for 30 something years now along with tech and maintenance and making repair parts for our machines on the old manual vertical mills and lathes. So this has been right up my alley if you know what I mean.
I really think this 3D printing is cool. At first it got some bad rapps I think with stuff people was trying to make. But I think it has evolved to bigger things. I really see it moving on if the right people get it on its feet.
I think there will be so much stuff out there for people to print from manufactures needing parts that it will be overwhelming. At first there won’t be enough places to do it. It will probably then mellow out and there will be work that can be had. The people that know the type of business will have the one up on others of course. There will be competion I’m sure. I say the sooner someone gets involved the better.
Escher prints – now there are some real mind-benders! You have to wonder about a guy who does stuff like that!
After reading your report I went off and read a couple of 3D printer reviews – prices have come way down from when I last checked.
I come from a CAD/CAM background (Printed Circuit Board design) and I am semi-AutoCAD literate. Do you think that would that be a good front end program for the 3D printer “slicer” programs?
Yes, I think it would be excellent! You will have a lot more flexibility regarding what you can print. For instance, one glaring omission in the software I use is a screw! You just can’t make a screw. Nor by extension a threaded hole. I’m pretty sure both of those can be done with CAD fairly easily.
Also, the slicer programs out there can typically accept the output files from the popular CAD systems.
Hank
They work together.
The slicer program converts the cad cam drawing in a sense so the 3D printer can understand each other.
Then the print is on.
Hank
I remember when my dad drew one of the triple finger tuning forks and told me to draw it. Yep that was fun.
And here’s a simple one.
Does the box flip around on you as to how you look in it.
NTOG,
fascinating blog. For some reason, I just don’t think of 3D printing when I have to fabricate a part that I broke around the house but still think in terms of wood, wooden dowels and various aluminum and steel stock but I see I need to move on! It will be interesting when sintered metal printers (?) become common. Holy smokes, I take it back. Just found a couple – only around $250K.
Fred formerly of the DPRoNJ now happily in GA
Man, that’s cool. So you print the part with a plastic that has the metal incorporated in it, wash the plastic binder out chemically, then heat the part to fuse the metal. I hadn’t seen that yet! Thanks for bringing it up!
And in fairness, the first year I got the gun I did try to make a carrier out of what I had around. It just didn’t work out well. I had to reapply the tape every couple of uses, and the edges were sharp!
Here are some interesting videos about 3-D printing. The one at the very bottom is especially interesting. It’s about bioprinting to reproduce human body parts. These videos are from Nov 2016, so I am sure the technology has advanced a lot since then. https://www.explainingthefuture.com/3d_printing_videos.html
Geo
I didn’t watch the video. Low on time right now. But supposedly they printed a ear drum I believe it was and implanted to a kid and he could hear.
To me that’s amazing stuff there.
And thought I would mention this.
There is APPs out there along with websites that have programs that you can download to print on your 3D printer. In other words print out something you pick out.
And here’s something that will help you towards programing.
https://www.tinkercad.com/
And here’s a site that has things you can pick out to print.
https://3d-gallery.xyzprinting.com/en-US/gallery/
A company named SRU PRECISION, https://www.sru-precision.com uses a 3D weaving system and makes all kinds of custom airsoft gun stocks. Mostly for bullpup conversions for both pistols and rifles. That.s where I got the M11 pup from I mentioned earlier, in another days blog and above. Wicked looking Tac-T-Cool stuff.
One that fits an airsoft M712 will surely fit the bb version and others may fit both types of airguns.
Bob M
NTOG,
Have you ever tried to “flame” smooth a part instead of sanding? (partial/surface only melt) That would be my first inclination. I am thinking anything from a small pencil torch to a torch used for copper plumbing,… as examples. Even a heat gun as used for stripping paint from wood.
Chris
I know some of the plastics react okay to that, but I think the risk you run is the part deforming before the surface actually smooths. As was brought up above, even hot day dashboard heat in a car can be enough to cause distortion. I wound up having to get a small set of files to clean these parts up. And of course, maybe are setting to tweak that I don’t yet know about that could make them print better. So very much to learn!
NTOG,
My thought was that (just) the surface would be impacted,…. not the entire piece. That would be different from leaving something out in the sun and having the (entire) piece heated evenly through.
Have you ever tried it? Maybe give it a go on some scrap projects you have laying around?
Chris
Goodness knows I have lots of mistakes around to try it on. I’ll have to get some propane, my little pencil torch is out. I’ll let you know the outcome when I get a chance to try.
NTOG,
I would think a pencil torch would be ideal, (more precision),….. but you do this and I do not. Looking forwards to the results when you get around to trying it. Thanks for the added effort.
Adder: I just googled “flame smoothing 3D printed parts?” and got quite a bit. Here is just one of (many) items found,……
https://blog.trimech.com/three-ways-to-smooth-pla-parts
Best wishes,….. Chris
Chris
Hi Chris
Now I remember what was going on.. I wanted to make the “production” parts out of PETG, not PLA. If memory serves PETG doesn’t respond to surface heating the way PLA does. But, nothing says I can’t experiment! I think I mentioned I’d really like to make a bunch of parts out of the carbon fiber stuff, and it is PLA. Maybe I’ll make the part that attaches to the gun and the trays out of the carbon.. they’re not likely to get lost. But right now my favorite is actually the orange! I’ve not lost a piece I’ve made out of that stuff yet!
Have a good one!
Well, the experiment was an unqualified failure! The pencil torch must be too hot, because the PLA actually caught fire. Before that, the surprise (that shouldn’t have been) was that the plastics are really good conductors of heat. The heat wasn’t at all localized around the area I was trying to heat, instead the whole part heated up, and in a hurry! The PETG softened, and maybe by pressing something flat against the flat surfaces they could be made smoothly flat. But, the part also started losing shape.
Remember the part in the article you sent? It was a thick solid. Maybe that stands up to heat better.
NTOG,
Thanks for giving it a try and glad the link jogged your memory. There was many sites/articles/airgun-videos that the search pulled up. Some,.. even used solvents to melt the plastic. I understand the added durability of a solid part.
As I recall,… most all materials will “gas off” when heated. That is what actually catches fire first,…. somewhat similar to spontaneous combustion.
At any rate,… thanks for giving it a try. Chris
NTOG,
Maybe counterintuitive?,…. but maybe a small fan to dissipate gasses and provide overall cooling while going at it with a pencil torch? Just an idea.
Good Day,…… Chris
What an awesome co-incidence, I just started doing this myself 2 days ago!
Being a lefty who just got a second-hand Daisy 747, I found that the grips are unusable, and I couldn’t find any online (especially not here in Europe).
So I got to making my own!
They’re not functional without post-printing tweaks yet, because I’ve made a few mistakes, but I can finally use my pistol (and it’s looovely!).
Oh, and I used MeshRoom and Blender for my modelling, then just plain old white PLA to print, as it’s all I had (it came with the printer). I can’t wait for my wood filament to arrive so I can try make imitation wood grips!
NoshBar,
Welcome to the blog.
B.B.
Thank you, B.B.!
I’ve been lurking for a few months, but never had anything to worthwhile to add, as I’m relatively new to this.
I really love how detailed your tests are, especially on the older, more esoteric guns, thank you!
NoshBar,
You are welcome. It’s nice to know people appreciate what I write.
B.B.
NoshBar,
Welcome too. Do not be shy! 😉 A general question, comment or even a “job well done!” are all appreciated. Posing any question here will generally get you a good answer and a good place to start. If you choose to research further,… go for it. In general,.. this blog will steer you straight, no BS and can save you a bunch of time researching and learning. Off topic questions are welcome on any blog. *Best to post on the (current) day’s blog*. A Friday question will have Fri., Sat. and Sun. to get replies,… so a good day to ask one.
Chris
NoshBar,
Welcome to B.B.’s airgun blog. Nice job on the lefty grips too.
Geo
Hello and welcome!
I’d never heard of MeshRoom before. Thanks for pointing that out! I’d have torn my hair out trying to make a shape like that in the software I use.
Best of luck!
Ahoy!
I had actually tried to model the shape myself first, but I’m a coder, not a modeller (CLEARLY!).
I first tried MeshRoom with the simpler grip on the other side, because it didn’t handle the thumb grip too well.
Then I figured that maybe the dark colour of the grip wasn’t giving enough contrast, so I put some talcum powder on it, and wow, from just 20 photos I got that result!
So it can be very powerful, it just needs the right conditions.
Nice job on your clip holder, too! I love being able to help yourself.
And I’ve had my eye on the Sumatra for a while, but I’m nowhere near skilled enough yet for something like that.
Oh, I’ve got a little log about the development of it: https://github.com/noshbar/Daisy-747-for-lefties
Thanks, and I hope everyone has an amazing day.
That was pretty brilliant of you! Good job with all that! I read the blog you have out there, and it was a fun, interesting read. I’m not sure what I’ll get involved in next part-wise, but this software certainly looks like something worth learning.
I really laughed at the wood putty direction, because I did the same thing, and on the same gun! I built up layers of putty on the finger-side grip, squeezed the soft putty, let it dry, sanded, and repeated, until I had a grip that I could almost not hold repeatedly the same. And I couldn’t agree more, it didn’t look anything like wood at all 😉
Have a great one!
Thank you for the kind comments.
Also, having a repeatable hold didn’t even cross my mind, but yeah, that makes a lot of sense!
I’m just such a bad shot right now that it didn’t occur to me as something you need in a grip.
The wood putty… it makes sense, right?
I’m going to inverse the grip prints and make a “cast” of sorts and try with some wood putty in that, seeing as I have some now anyway.
I’m also keen to try taking a bunch of fine/coarse sawdust and mix it with glue and see how it goes.
But I definitely think wood PLA is probably going to be my best bet… but I enjoy experimenting, so we’ll see!