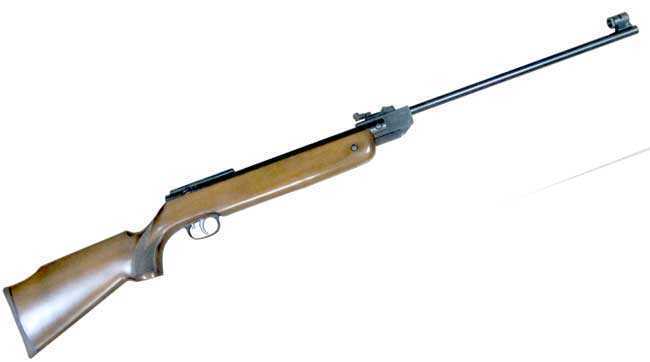
Marksman model 70 breakbarrel rifle.
Part 1
Part 2
Part 3
Part 4
Part 5
Part 6
Part 7
This report covers:
- Disassembly
- The trigger
- Preload
- Cut off the spring
- How much preload remains?
- One last thing
- Where are we now?
- Cocking effort
- No suction test
- Summary
Today we remove the rest of the mainspring of the Marksman model 70 breakbarrel air rifle so no preload remains.
Disassembly
Because of the things I learned in Parts 6 and 7, the disassembly this time went fast and easy. As you recall, this rifle’s trigger unit is removed before releasing tension on the mainspring, which is held in place by a bushing.
The trigger
The trigger is connected to the bushing by an anti-beartrap device. That is connected to the safety. It must be removed before the trigger will come out of the rifle. Let’s look.
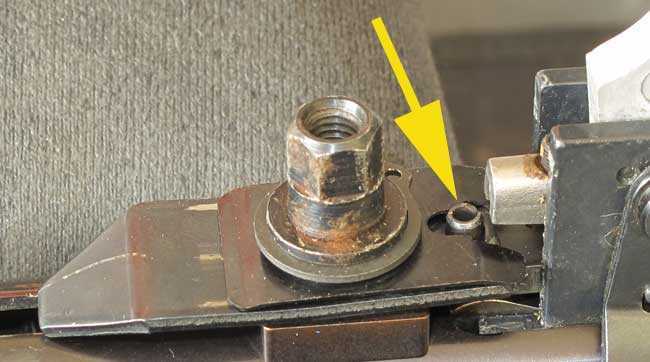
Before the trigger can be removed, the anti-beartrap device must be removed. The trigger’s safety has a pin connecting it to the anti-beartrap (arrow).
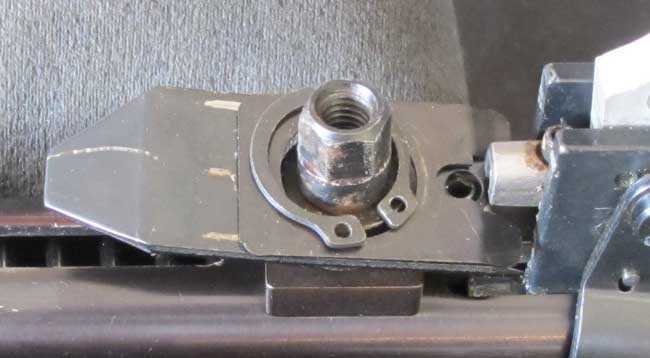
When the circlip is removed the anti-beartrap slide and the spring above it can be lifted off the threaded bushing, freeing the trigger. See the three strips of galling on the beartrap slide? When I replaced the trigger I greased that spot with moly grease.
Preload
I vowed to measure how much preload was still on the mainspring from the first cut, so when I backed out the threaded bushing today, I measured where it stopped. There was way more preload than I told you in Part 7.
When I wrote Part 7 I thought there was still about an inch of preload remaining. But when I measured it today, it came to 1.826-inches. Now, my method of measurement is just a close approximation — from the center of the threaded hole in the bushing to the center of the hole the bolt passed through, and the base of the spring guide adds something. What I’m saying is don’t pay attention to the thousandths or even to the hundredths. But still — this is quite a bit more preload than I thought.
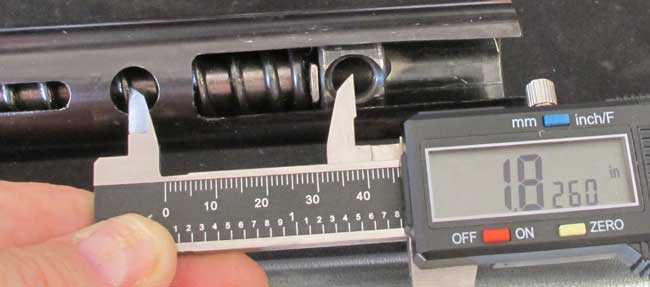
The mainspring is fully relaxed. This measurement is not precise, but there is easily more than an inch and three quarters remaining on the mainspring.
Cut off the spring
Out came the Dremel and I cut off most of the length I needed to lose, knowing that I would grind the end of the spring flat and crush the last coil. So a little more length would be removed.
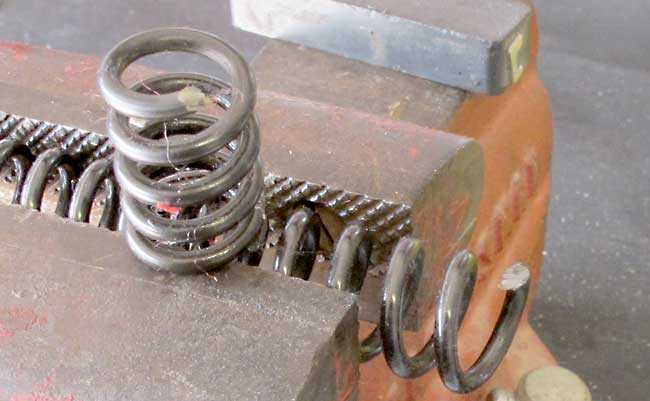
A lot more of the mainspring was removed.
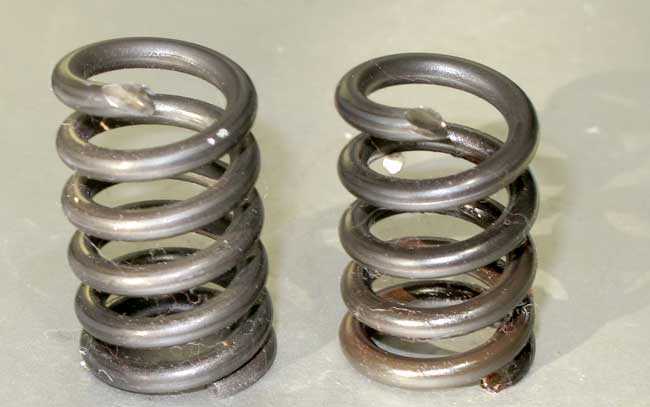
The first piece of spring I removed is on the left. This last piece that was removed in this report is on the right.
As you can see, almost as much spring was removed this time as last time. But there is still one more thing to do. Lube the spring lightly with Tune in a Tube then insert it and see how much preload remains, if any. I hope the spring is as close to right on but no less than that. I don’t want it loose when the gun is at rest.
This may look like something that is measured in the thousandths of an inch, but when you do it — cut the spring, grind the end flat and then crush the last coil — all the “precision” goes out the window. Yes, I believe someone who does this all the time may do a better job than me, but I doubt that anyone ever gets it right on without a little luck.
Used an angle grinder
I cut off the spring with a Dremel, but used an angle grinder with a cutoff wheel to flatten it. It’s just like a Dremel, but with a little more horsepower.
How much preload remains?
I got the mainspring down to about 3/8-inch of preload. That’s where we are right now.
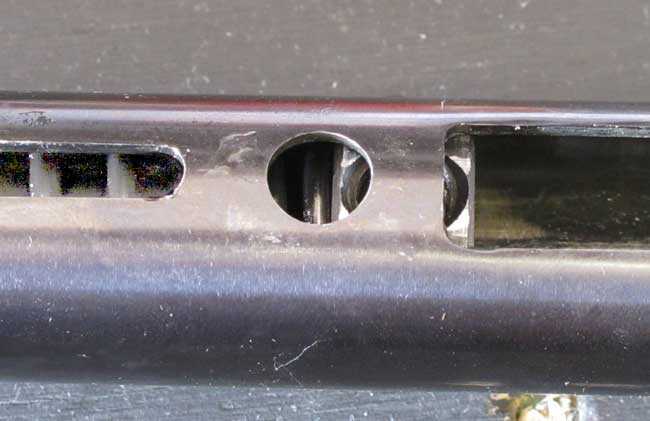
This is the preload that remains. I’d say it’s about 3/8-inch.
One last thing
Before we test the rifle with the new shorter mainspring, let me show you one more thing. The threaded bushing that the mainspring and spring guide push against has two sides. The threaded hole is centered in the bushing but it doesn’t go all the way through, so there are only two ways the bushing can be installed. Let’s look.
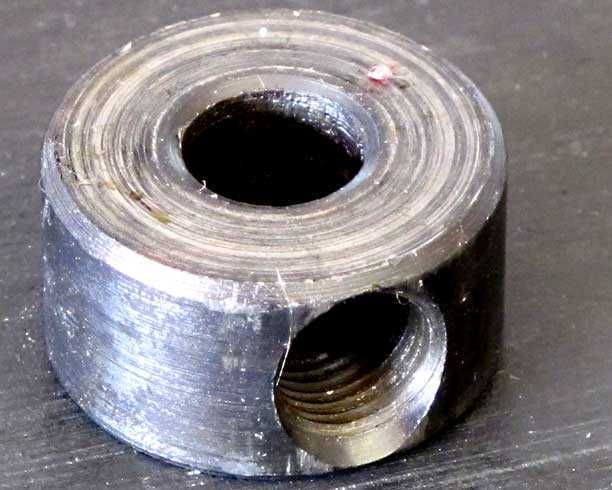
Side 1 of the bushing.
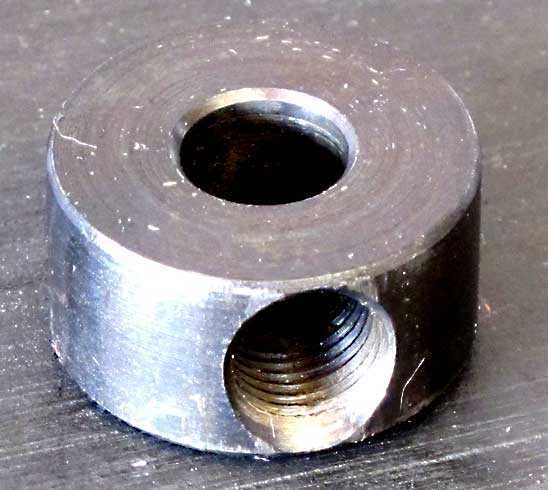
Side 2 of the bushing. Which side do you think the spring guide pressed against?
Where are we now?
The rifle now fires dead calm. And the forward thrust has been reduced noticeably. It’s still there but the rifle is much smoother.
In the first velocity test with the rifle as it came from the factory and with the canted mainspring, RWS Hobby pellets averaged 715 f.p.s. with a 15 f.p.s. spread. After the first spring cut the velocity averaged 746 f.p.s. with a 12 f.p.s. spread.
Today, after the second spring cut, the velocity averages 606 f.p.s. The velocity spread went from a low of 595 to a high of 617 f.p.s., which is a difference of 22 f.p.s. So shortening the spring to almost no preload dropped the velocity 140 f.p.s. and boosted the spread by 10 f.p.s.
Now we have a baseline for this rifle. The couch commandoes will say that adding 1.75-inches of preload will bump her back up to 746 f.p.s. But there is about that much less spring in the airgun. We have lost almost 5 full coils of spring, and I think that will have something to do with the velocity, regardless of whether there is the same preload, or close to it. I guess we won’t know unless we try it.
Cocking effort
From the factory this rifle cocked with 28 pounds of effort. After the first spring cut that dropped to 22 pounds. It now cocks with 20 pounds of effort, with a spike to 23 pounds when the trigger is cocked.
No suction test
GunFun1, I purposely did not do your piston seal suction test because a parachute seal acts best when it’s pushed forward and its rim is filled with air. I understand what you are doing with your test, but I just didn’t think it was one I wanted to do. It has been my plan from the beginning to replace the piston seal, once I find a good tune for the rifle. We aren’t there yet.
Summary
I never imagined in the beginning how much fun there would be in this old rifle. I am learning so much from our experiments. I hope you are, too.


B.B.,
Your journey in tuning the spring of this rifle makes me think of Goldilocks.
Siraniko
Yes, except I think B.B. knows what he is after, just hasn’t found it yet.
-Y
B.B.Is it accurate enough to turn it into a 10M target rifle? Maybe short-stroke it?
Sort of like an engine builder. Do I want high revving or low down torque?
-Y
BB
Probably now that you slowed the gun down its making less pressure so the seal is more than likely doing its job. Or is it?
GF1,
You may find out when he puts a new piston seal in her, Or will you?
RR
If the velocity stays the same or changes will tell you something with a new seal if BB keeps the rest of the setup the same.
GF1,
I’m thinking of stacking washers next. After that I may install a new spring and then get a new seal.
BB
BB
All sounds good.
You been doing a velocity test after each change which is mandatory. And shooting some groups also. Which is also mandatory.
And you might find that the little bigger fps spread means nothing. When you find that sweet spot with the shot cycle and velocity the gun will get usually very accurate. Sometimes no but mostly yes.
Tunning is alot of work when a person starts understanding how much Is really involved. But we’ll worth the effort when its all said and done.
BB
Oh and watch out for spring bind now that you chopped coils.
Now you have solid washers and the spring compressing distance will need to be watched more now.
No more air gap between the coils when you compress that 1 and a half inch you had before removing more coils.
Yep told you tunning makes you become more aware. If your on the edge is when you will find out one way or another. Good or bad.
BB,
I am really liking this journey you are taking us on as it is my intention to do the same with my Webley/Hatsan Tomahawk. Reducing the power will likely help some with the accuracy. It will definitely improve the cocking effort and recoil. I am also going to be trying a different air stripper and possibly be playing with the barrel harmonics.
This is going to be fun.
Fascinating results. I would assume that pretty much all of the kinked part of the spring has been cut off now. What do you think accounts for the increase in velocity spread? Was that a surprise? Going back to the earlier posts, when cocked, how much room is now left for adding washers before the spring gets too close to being coil-bound? I’ll bet you have lots of room to add washers, now. I hope you are able to restore this gun to shooting cloverleaf groups as shown in the test target included in the box. That would be a most satisfying result to this series. Keep up the good work!
Roamin,
When I put washers behind the spring I will measure it and tell you the fully compressed length. I know I can add 1.5 inches with no more problem.
BB
BB
You might be surprised about that distance you think you can now shim the spring back to.
The distance between the coils is not there anymore in that distance you removed the first and second time cutting the spring.
GF1
Just guessing, here, since I have never been inside one of these,, but couldn’t someone just measure the coil wire thickness and count the removed coils to arrive at how much space they took up before the surgery?
The air space wouldn’t be there when the rifle was cocked so the coils shouldn’t be “locked” until the coil times the wire thickness was reached. Or, at least, my high school math teacher would likely agree,, tho I doubt Mrs Ugren ever tuned an airgun, either.
Ed
Ed
I use math all the time at work at the machine shop and at home when I’m working on stuff. Math doesn’t lie if you got your numbers right.
Yep that should work to not get coil bind.
Oh and you never know. Maybe your math teacher might of tuned a air gun. You just never know. 🙂
Shootski, I couldn’t respond to your last comment yesterday about airguns shooting in space, so I will just admit defeat here. I now have more reasons than ever to blame for my bad shooting. It must be the cosmic winds! Yeah, that’s the ticket! LOL.
B.B.,
I’m going to shorten the spring in my Cometa Fenix as you did here, too. That one is the last springer I’m likely to pick out and use, because of it’s harsh shot cycle. It shoots 11.9gr Hobbies in the 890fps for 21fp force, so it can spare some oomph. It is a pretty gun and when I’m at my best, it is accurate too. I’ll measure the velocity with the Chrony as it is now, then test it again after the checkup, cleanup and spring mod. I have some TIAT and we’ll see what effect that has, too.
You said you’re going to get a new spring (a select one from J. Maccari?) for your gun after you’re finished ‘sperimenting. Can you ‘splain your thinking?
Thanks for showing this, B.B.!
Will,
I don’t know yet where I will get my spring. I have about 30 new ones in a drawer just waiting for an opportunity to shine. Maybe one of them?
BB
B.B.,
Not having an OEM or a JM aftermarket spring made specifically for your gun is a problem lots of airgunners have.
If you decide to replace the spring it would be interesting to know what your criteria and priorities are for choosing a replacement spring. Wire diameter? Number of coils? Overall length? Compressed length? Or?
Kevin,
I am most interested in getting a spring that grabs the guide tight and also fits tight inside the piston.
BB
BB
I have had the top hat break because of that before.
The guide and spring need some free play too. The spring will wrap things up tight if there isn’t some expanding tolerance.
Great stuff BB!
Love tinkering around with things just to see what happens.
Since many of the most accurate airguns shoot from 550 to 650 fps range I don’t see the velocity drop as a negative thing. The 30ish percent drop in cocking effort is real nice though!
I’ll take smooth over power any day – time to shoot some groups?
Hank
Hank,
I could do that, I guess. I thought about it. Yeah — tyat sounds like a plan! 🙂
BB
BB
I just replied to you above. You have to shoot groups when your making changes to the gun (tuning). After all that’s what tunning is about. Accurizing your gun (as it was called in the old days).
BB
A quick question about another airgun subject.
Did you try reloading your Bug A Salt Shred er clips yet?
GF1,
I’m writing tomorrow’s blog about the SHRED-ER. I haven’t loaded the clips yet, but it will be an interesting report.
BB
BB
OK good deal. Will be waiting to read.
BB,
I am enjoying the reports on this rifle. My 70 I “tuned” arrived with a broken spring, and the previous owner had installed some hardware store washers that I removed. I replaced it with a JM spring for an R10. Which gives high power. I believe I wrapped the spring guide with copper sheet that I sweat soldered to the guide. I had a lot of trouble with accuracy until I read read the R1 book again. The scope rail on mine moves on final lockup and this prevented good accuracy with a scope. I also removed the anti bear trap so i could set -reset the safety. I think I will put it back on now.
Rob,
I remember you telling us about your rifle with the broken spring. I’m glad you are finding this series helpful.
BB
B.B. and Readership,
This seems to be turning out as a validation of Yhprum’s Law!
The companion to that Law is not as most think, to wit: Murphy’s Law, but rather shootski’s Law:
The universe is not simply indifferent to intelligence, it is absolutely hostile to it.
(That is a shootski Original.) I give all Readership permission to use it with proper attribution; shootski’s Law. Buba also ‘nowed that!
shootski
PS: Yhprum’s Law: “Everything that can work, will work.”
Shootski
And which law precedes the other.
😉
Gunfun1,
If you need to ask…
;^) LOL!
shootski
Shootski
I think we both know that answer.
😉
Gunfun1,
No! or is that KNOW. Really…LOL!
I would have never guessed!
shootski
Shootski
🙂
Yhprum’s Law should read, “Everything that can work, will work; just not very well.” *
*used with permission of Shootski.
Yogi,
I think what you have quoted is the opposite of Sod’s Law…LOL!
shootski
BB, So 750 fps in .22 is a bit much for best accuracy it seems like you are saying. I figured that .25″ inch of preoad equals about 25fps of velocity. Do you test with the heaviest ammo? I think that is really good performance for this .22 rifle.
I am enjoying this spring gun expose’ you are doing, and I have nothing but praise for my new, srpringified, Synergis. Once I took all of the marketing, plastic junk off of the rifle, stuff it really doesn’t need, I have found a nifty, old school underlever that uses a magazine, and is not hold sensitive at all. I took almost a pound of weight off the muzzle just throwing away the stuff they put on the box to get you interested. The shroud, the plastic handle with a spring mechanism, the shroud guide, end cap, the catch on the shroud are all designed to add value, but ended up in the trash pile in the corner. Plus the anti bear trap device. This is a rifle that you cannot grasp the cocking lever easily because it’s not shaped well, and its way too heavy, but that all can be remidied. To do this sort tuning, I think a drill press and an x/y vice and a set machinist drill bits
are very helpfull. Some of this work is very hard to do in your bedroom, but not impossible.
It’s been asked before, but why they dont just sell the gun as you would have it is complicated, but I still think its allot of fun racking 24 rounds and never have to touch a pellet, and get really nice accuracy is moving the ball down the field. How about that shoot off with Gamo Swarm?
The Gamo stands no chance!
Rob
Inputting the spring free length, number of coils, wire diameter and spring OD into a spring calculator will tell more than just the spring rate. It can show how much safe travel the spring is capable of. Then taking the stroke into account, the amount of preload that can be safely added before deforming the spring can be determined. For what it’s worth, deformation can occur before the spring is coil bound, so the safe travel is also good to know before “scragging” a spring. The calculator I use is here: https://www.acxesspring.com/english/deflection-of-compression-extension-and-torsion-springs.html, there are others.
cobalt327,
Thanks for the Link!
I have one that I had used before but I think this one is better from the standpoint of formulas and calculators.
https://www.thomasnet.com/articles/machinery-tools-supplies/types-of-springs/
shootski
Thanks Cobalt327. Would a proggresively wound spring work in a spring gun? Cocked, the piston acceleration is initially fast, near the end of its travel,
less spring rate, softer recoil? Motorcycle and bicycle suspensions use them.
Rob
OK, who can make B.B. a custom wound spring??
-Y
B.B. or others,
Do you know if the OEM FWB 300 springs were progressively wound? Why might I think that???
-Y
Yogi
From what I remember one of my FWB 300’s had the original springs in it yep springs. It had 2 counter wound springs with a spacer in the center. And they was not progressively wound.
I may be wrong about the progressively wound part but I don’t think so. It has been a while though since I was inside that one.
Yogi,
I don’t think so.
BB