by Tom Gaylord
Writing as B.B. Pelletier

The Beeman R8 looks like a baby R1.
This report covers:
- Disassembly begins
- Remove trigger
- Unscrew end cap
- Some words about the Rail Lock compressor
- Grease everywhere!
- Remove piston
- Cleanup
- Best grease
- Next
- Summary
Disassembly begins
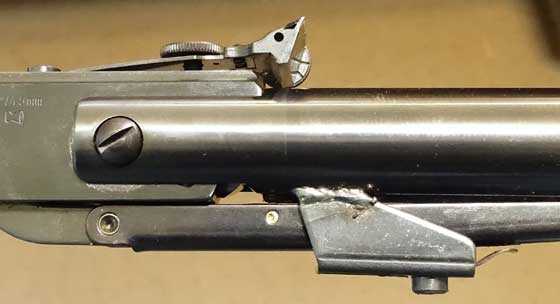
Today I take the Beeman R8 apart and we see what’s inside. First the barreled action comes out of the stock. When it does I can show you the articulated cocking link and the part that keeps that link under control.

Here is the cocking link. It passes through that bridge that keeps it aligned, and the spring on the right keeps the long link away from the stock. It quiets the linkage.
Remove trigger
With the action free, the trigger is removed from the end cap by pushing out two pins that hold it. The safety and safety spring will also come free.
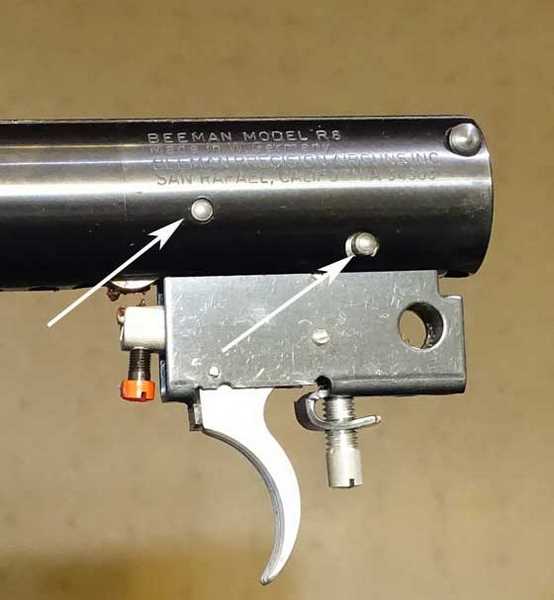
Remove the two pins (arrows) and the Rekord trigger drops out.
Unscrew end cap
Once the trigger is out, the end cap is unscrewed. Getting it started on newer guns that haven’t been apart many times can be difficult. My trick is to insert the end of a large crescent wrench in the trigger slot and rap it from the side to get the cap started turning. It acts like a large screwdriver. The rounded edges of the wrench protect the sharp edges of the end cap.
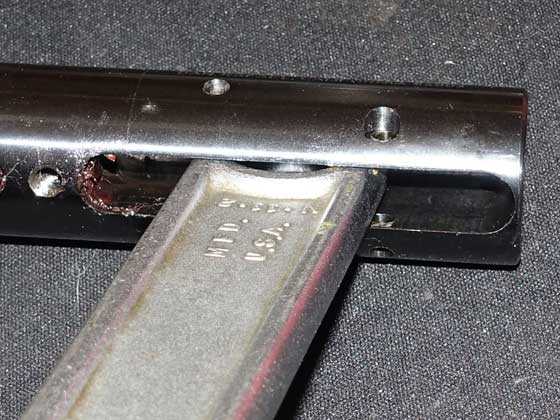
Just rap that crescent wrench downward to start the end cap turning.
Unscrew the end cap until only a few threads hold it to the spring tube. Err on the side of too many threads the first few times you do this.
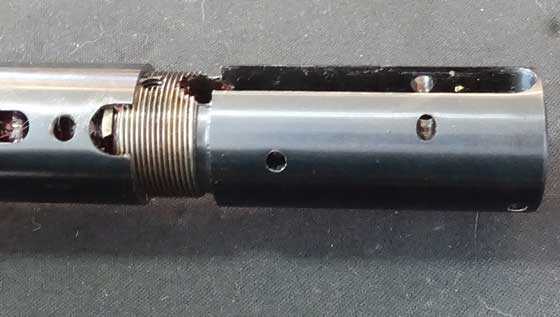
The end cap is almost unscrewed. Time to install the mainspring compressor.
Now it’s time to install the Air Venturi Rail Lock spring compressor. It clamps to the 11mm rail on top of the spring tube. That rail is also on the end cap, but since the cap must turn and also come free of the gun, you can’t clamp to it.
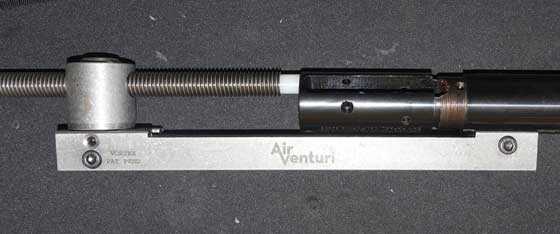
The Rail Lock spring compressor is installed and is pressing against the R8’s end cap.
Some words about the Rail Lock compressor
Several readers asked about the screws on the tail of the compressor. They are the two screw on the left, in the picture above. The larger screw on the bottom works with the large screw on the right to make certain the Rail Lock jaws are parallel with the scope grooves on the spring tube. The compressor is two parallel half sections and these two screw keep those sections parallel for maximum contact when clamped to the gun.
A couple readers wondered how well this compressor grabs the rifle. The clamping section seems very short. Well, it clamps very tight! I looked at it with that in mind this time and can tell you that compressor is not going anywhere when it’s tightened!
The smaller screw above the large screw on the left tightens the round object above that holds the threaded rod. Once the white tip of the threaded rod is tight against the end cap, tighten this screw to keep the rod straight against the end cap.
Remove the end cap
Now loosen the threaded rod on the compressor a smidgeon (a half-turn is good) and then unscrew the end cap as much as you can. Keep doing this (threaded rod/end cap) until the end cap is free. Then unscrew the threaded rod until all the mainspring tension is off the end cap.
The mainspring is completely relaxed. The end cap can just be removed at this point. Then the compressor comes off the gun and the disassembly continues.
Grease everywhere!
As we saw before, there was grease everywhere in this rifle! The grease is tacky brown petroleum-based grease that’s not as thick as black tar. It obviously does work well, but I am going to tell you about a much better gease for this application.
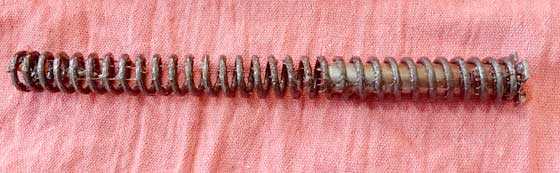
Mainspring has a heavy coat of grease.
Remove piston
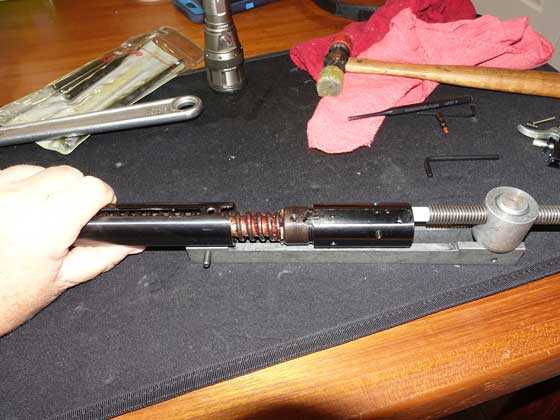
The spring guide is stock, so I know the tune was nothing special. Next I removed the pivot bolt and nut and separated the barrel from the spring tube. Now the cocking link comes out of the spring tube and the piston can be removed.
The swelled end of the cocking link is pulled out of the spring tube, once the barrel is separated from the spring tube. That flat spring that quiets the cocking link is seen at the left.
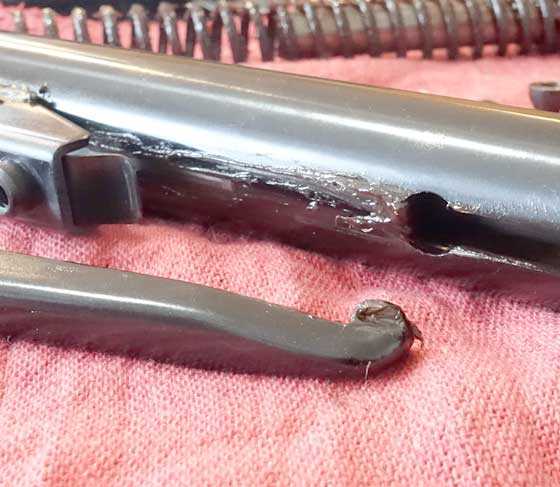
The piston is coated with the same tacky grease, inside and out. The piston seal is the original Weihrauch white seal that’s now turned yellow from exposure to the grease. So, this was a lube tune with the one goal of calming the action. Velocity did not matter to the person who did this.
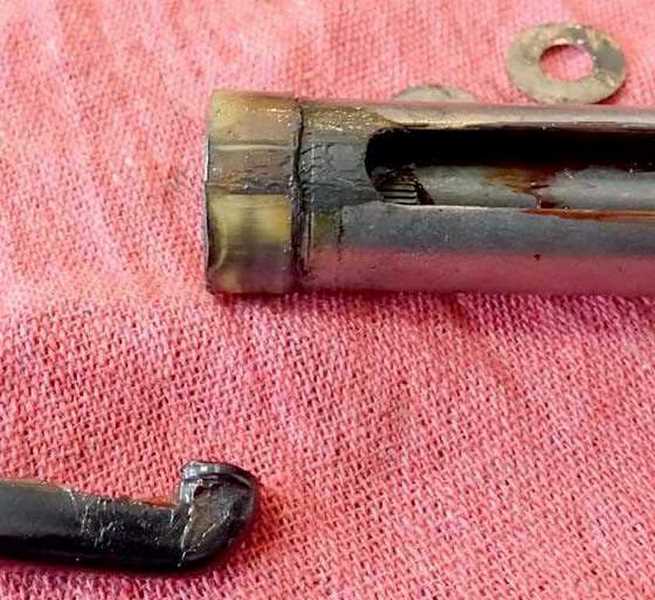
The piston seal is stock.
What looks like moly in these photos may be some moly powder that was mixed with the grease. But it didn’t stain my hands right to be moly. Therefore, the majority of what you are seeing is just dirty grease.
Cleanup
Now it was time to clean the parts. Removing the grease from the spring tube I saw that the compression cylinder was lightly honed. I have read where people advise polishing the compression chamber to a mirror finish, but that is not recommended. Just like the piston sleeves in your car’s engine, the metal walls of the compression chamber need some roughness to hold the grease and oil on the walls for better compression. This one was done right.
Best grease
I will address what I did to refresh the rifle in the next part. But let me tell you about the grease I used. It’s a grease Pyramyd AIR uses in their tech department for all their tunes. Gene Salvino from the Pyramyd AIR tech department told me about it years ago and I discovered that it’s great stuff. I just talked to Pyramyd AIR and they plan to package this stuff for sale, so everybody will be able to use it.
Next
In the next report I will describe the remainder of the things I looked at and did. It’s mostly cleaning and inspection. I will lubricate and assemble and then test the results for velocity.
We are not finished with the R8 by a long shot. But after the next report I will give you a break and look at somethinbg else while I continue to work on the R8.

B.B. Pelletier,
I had thought you would be revealing the grease today. Well in a sense you did reveal how much grease there was. Wonder how much of a difference your re application would do to the performance? Would it reveal a twang that was being silenced in the first place?
Siraniko
Siraniko,
The rifle is apart and I am as curious as you about that.
B.B.
Hi BB
I’m really liking that spring compressor. But some guns like my Striker and 125 have elaborate end caps, for which I had to make custom end blocks from Teflon bars. What is the material of the white plug on the rail compressor? Would it be enough to grip any end cap? BTW the piston seal in the picture seems to be damaged right at the edge which could affect proper compression. The mainspring too seems a bit crooked. Just my 2 cts & please keep up the great work Sir. I read every single post though I rarely comment. God bless.
Errol
Errol
The white material is Nylon, I believe. As far as gripping any end cap, I plan on testing other airguns to find out.
I see the spring looks crooked in the picture, but I don’t think it is.
B.B.
B.B.
When honing an airgun compression chamber, what’s a target crosshatch angle and what grit finish is preferred? No idea if my small hones would be useable for airguns, but Flex-Hone has tools for firearms and paintball guns, so I’m thinking if I had something to go by, they could probably recommend a part number to get good results..
Cobalt327,
I would go real easy on the honing. The only time you should really do such is if you have a lot of scratching from the piston/spring along the length of it. I had some serious gouges in the compression chamber of my 1906 BSA, but thankfully they were close to the end cap end and not inside the actual compression chamber, though there was some damage there also.
I used a sanding bit that is made of a bunch of little squares of emery cloth for sanding inside pipes and such. The main idea is to eliminate the scratches and such from the moving parts. The angle of the crosshatching is not really that important. The grit should be relatively fine. You want it to hold the oil, but not abrading the seal.
Cobalt327,
I think you just run the hone in and out and get crisscrossing angles. This one appears to be 90 degrees to the line of the tube, which I have never seen before.
B.B.
B.B.
Thanks. 45 degrees is what I use for most automotive type honing (7/8″ to 1-1/8″ brake cylinders being the smallest). I can’t imagine 90 degrees would be optimum, but then again I’m out of my element. I’ll do some more research before contacting Brush Research for a Flex-Hone recommendation.
Cobalt327,
45 degrees would also be what I know. But I don’t know everything, so I will leave this as is for now.
B.B.
BB,
This is really a very well designed air rifle from a quality point of view. From a manufacturing point of view it is way too complicated to assemble. A few modifications to the design and this air rifle could be assembled in half the time with fewer parts. I am so glad that Weihrauch did not do that.
B.B.,
Nice report. I love to tear into things and see how things work and what all of the parts do and the design concepts. Not just airguns, but things in general.
The seal looks a bit “iffy”, but really can’t tell from the grease. Will you be replacing it?
Also, will you re-hone the compression chamber portion of the tube? Even if you do not see any scratches, the 90 degree hone marks is interesting. I would be tempted to hone it for that reason alone. I have done it on car engine cylinders and drum brake piston cylinders way back in the day. It is not hard. One thing though, you do need to “get after it” (keep the tool moving) to get the 45 degree angle or something close to 45 degrees. I would be inclined to use the ball type but there is also the spring loaded stones. Then, the flap wheel type that RR mentioned and though I do think it is intended for such an application, it might work well enough if the correct diameter wheel was selected. Kerosene I believe was the lube while honing, but not sure. It has been awhile ago.
Chris
Chris
Flex-Hone actually sells a product for lubrication of their hones and is what I will use for airguns. A couple things I picked up over the years is kerosene can be used for honing but the cutting action tends to be very rapid, and I couldn’t recommend it for airguns unless the operator has experience using it. In automotive use, ATF was a common lube when honing engine cylinders, with or w/o thinning, depending. Brake cylinders always use brake fluid for the lube.
Cobalt327,
Thanks for that added insight. Like I said, it has been “awhile”. Everything you said rings a bell. Also, I meant to say that the flap wheel that RR used is (not) likely intended for such an application, but may still work if size selection is correct.
Going to order the Red Ryder spring today for the 499. I am looking forwards to trying it. On the 499,… I always have a heck of a time getting that small spring for the safety repositioned for reassembly. I think the last time I did it , I stripped off a bread twisty and used the wire to hold it in position, put the safety in and then pull the wire out. Any ideas on that?
Chris
That is a fiddly part of reassembling it, isn’t it? I have been using a dental pick with a hooked end to hold the spring leg down out of the way for inserting the safety. Haven’t tried any other ways but your way should be fine.
G’luck!
Cobalt,
Spring ordered. (aka: plunger assy.) I love the quick and easy service,… and was more than glad to tell them so! Daisy is a “PREMIER” model for parts service,…. plain and simple.
I will do some (pre-tune) trigger pull data and some chrony #’s,… maybe 3 each and of course the same (post-tune). I will also shoot a couple of 10 shot targets at my usual 24′,.. both (before) and (after). That way we can compare notes.
Thanks again for the idea, the effort to prove/try it and the help on getting there.
Chris
Looking forward to how it turns out for you.
Cobalt,
Got the spring/plunger assy.. ( Red Ryder spring to modify a 499) Big question,… did you try the Red Ryder piston seal? It is much more pliable and seems to be very close in size. I measured it with calipers. The spring is the near the same length (within 1/8″) and definitely heavier wire. I figure plug the hole in the center with a short well fitting bolt and it would work fine.
What do you think? Hit me up on the Friday blog so we can discuss.
Chris
Chris,
No re-honing. The hone looks perfect. As for the 90 degrees, I don’t understand it, but I won’t change it.
B.B.
B.B.,
I have to wonder if someone did re-hone it and did not know what they were doing? Also, if the bore was over-honed, that could help explain the lower fps in that the bore is now over sized? Either way,.. I respect your decision to not re-hone. The change in spring lube,.. and other lube,.. should prove something to the positive I would think.
Chris
Chris U
That’s what I was thinking.
GF1,
Mmmmm?,…. that is not like you to “hold your tongue”. You are usually pretty straight forward on your thoughts,.. which I like by the way. 😉
Chris U
What are you talking about? I was agreeing with what you said here.
“I have to wonder if someone did re-hone it and did not know what they were doing? Also, if the bore was over-honed, that could help explain the lower fps in that the bore is now over sized? Either way,.. I respect your decision to not re-hone.”
Read my comment at the bottom to you and Belgrath04.
GF1,
Will do on the comment. What I was referring to was that you were thinking of it too. I (just) thought of it in the last few minutes. So, if you were thinking the same thing, prior,… I was wondering why you had not said something.
That darn B.B.,….. he throws out all this odd ball stuff and makes us all dwell on it for hours on end! If I did not know better,… I would swear that he was a teacher at one time!
😉 ( yea B.B.,… that 😉 was for you!)
Chris U
Was at work today. So not much time to get on the blog. Say’n what I can when I can. Just commenting earlier what caught my attention at the time.
You and Cobalt was going on so I was just sit’n back and not interrupting.
Gets like that sometimes ya know. 🙂
GF1,
Yup,.. I know. 😉 Sat. is looking bad for shooting, but Sunday is looking like a maybe. Today was shopping and a mow. Itching real bad to test the 100 yard again. From a long glance though,… it appears that the May Apples have “eaten” the 100 yard marker,… which means that the cordless hedge trimmer will be getting a workout.
Gotta’ keep that 100 yard lane open!
Chris U
It’s been raining since last night. Pretty heavy actually. Suppose to continue all the way till Sunday night. Flash floods warnings and all that stuff. Like 5 inches on top of the 3 inches we already had
The feild behind my house is soaked. Standing water and mud everywhere. Making for nice big mud blast holes when the pellet hits. The .25 Mrod is blowing 3″ holes in the mud at a 100 yards. I love it. Perfect time to double check my holds at different distances. And love hearing the pellet make a loud pop when it impacts. Again love it.
Mr. Chris,
Please get your feet off the desk and turn your attention to the front of the classroom!
B.B.
BB
Ok I’m slow. I just got it. That was about Chris’ comment of swearing you was a teacher at one time.
Haha. But you are a teacher. Ok us kids apparently do need to wake up and pay attention. 😉
Chris U
Whoops. Copy and pasted to much of your statement.
I agree with everything you said. Except the part about BB not rehoning the cylinder. The cylinder does need some work done to it. You know to make a good seal.
Again. Read the bottom.
Chris,
That’s what I think, too.
B.B.
Chris,
The piston seal cleaned up fine. I won’t replace it — at least not yet.
B.B.
These are my favorite types of blogs as I am always (too) curious as to what is inside.
My usual excuse for disassembling something new is to remove excess factory grease and maybe replace it with “good stuff”; remove any burrs and sharp edges and check that all the hardware is properly tightened. Sometimes it is good to add a shim, washer or lock washer.
Happy Friday All!!!
Hank
B.B.
Nice job on the pics and words to describe how to get the end cap off.
I think even someone like me could use this Rail Lock compressor. =)~
It’ll be interesting to see how it turns out when you’re done.
Keep up the good work!
take care & God bless,
dave
B.B.,
I fear this is a stupid question that will reveal my vast inexperience with this sort of work, but how/with what did you clean off the grease? Kerosene?
Michael
Michael,
I use a combination of paper towels, rags and a lubricating solvent like Break Free. The less liquid I use, the better.
B.B.
Michael,
I wipe off 99.9% of any grease and oil with whatever works too. In fact, I have never used a solvent other than when I want to insure clean threads for something like Blue Loc-Tite. No doubt that a solvent wash of sorts would be faster and more thorough along with a compressed air blow dry, but I don’t want the hassle of disposing, fumes and the mess. I have also used a concentrated soap (Dawn) and water mix in the kitchen sink for a final clean after a wipe down. That works too and is more convenient. Beware of rust forming, which can occur pretty quickly.
Isopropyl alcohol works the best. It cleans and evaporates fast. That’s what we use at work to clean cylinders and pistons and seals before assembly. Especially after honing.
Gunfun1,
I’m glad you mentioned that. (Where ya been, Gunfun1, ol’ Buddy ol’ Pal? :^) One mechanical device I AM handy and familiar with is the manual typewriter. I have used baths of denatured 91% alcohol on parts of typewriters I have purchased and am cleaning. (I’m a collector.) A high purity isopropol alcohol is an effective yet gentle solvent that evaporates quickly and CLEAN. No extra worry about rust as one should expect with water.
Almost all un-refurbished manual typewriters are filthy inside, and dust bonds to the oil in typewriters, creating a greasy gunk. This is sometimes exacerbated by the over-oiling of typewriters by their owners in the 1980s. (Like watches, the fine-fitting machinery of a typewriter requires little and extremely light oil — hey, kinda like the fine-fitting machinery of a Feinwerkbau air rifle, which also requires very little and very fine oil :^)
Michael
Michael
I think the typewriter is a good comparison to spring guns. Especially in the way they get all gunked up and stuff and need cleaned and properly lubricated.
And you made me think of something. And you’ll probably have a fit when I say. Back probably about 15 years ago we was moving to another house. We was doing the usual sort and packing or getting rid of what we didn’t want to carry with us.
But I ran across a typewriter I had from probably the mid to early 70’s. I can remember very clearly that I hit a key and they would pull the key next to it up with it, if I’m using the right term. Then I opened the top up and remember like yellow brown dryed up looking grease all over everything. Amost looked like dirty bee’s wax. Really thick and sticky.
Well you know what I did. I said to my wife. Probably won’t use this thing again. And yep it went into the not going to take pile. I never at the time or even now thought that anybody would be restoring typewriter’s.
That sounds like a fun hobby I’ll call it. Oh and don’t ask me what brand it was that I had. Have no idea. But I do remember that it was a aqua green blue color.
Gunfun1,
Aqua green blue? It might’ve been an Olivetti-Underwood Lettera 22, Lettera 32, or Studio 44. Nice light action on those after they are cleaned and adjusted. I have a Lettera 32 I can just fly on.
It is indeed a fun hobby, very relaxing to work on a typewriter. A lot of guys find basket cases at yard sales and resale shops for two or three dollars, rarely more than seven bucks. Take it home, pull the chassis out, and clean it up, sell it for $40 or sometimes a LOT more if it’s really nice and/or rare.
That gunk you described was whatever it was over-lubed with mated to dust. Dust is mostly desiccated, decayed human skin that sloughs off of us constantly. The oil reconstitutes it, and it eventually becomes that disgusting brown-orange-black grunge. And the symptom of multiple arms rising together from a single keystroke, along with arms that stick in the up position at the platen are the consequence of a dirty machine.
What I usually do it put the chassis up on overturned film canisters on top of a folded up old bath towel. Then I have 91 percent isopropal alcohol in a squirt bottle and drench the whole thing except for the platen. I let it drip and dry and then repeat a few times. When I pick it up, the towel looks like somebody got sick on it! Then I put it on a fresh old towel and sit at it with brushes and alcohol or sometimes lighter fluid. The lighter fluid is only after the alcohol can’t do much more on a specific spot. It provides a nice overall lube/protective film. I use clean hand towels to wipe away excess and also to reduce the smell.
Then with a syringe I apply a very light silicone machine oil, practically a watchmaker’s oil, to each and every articulating joint. Very little, though. All the while I rapidly work each key dozens of times, one at a time. I do that until there is no more sticking and everything is snappy. It’s a great sound and feel, very gratifying. Oh, and NEVER strike a typewriter’s keys with no paper in it. I always use two or sometimes three sheets together with a typewriter to protect the platen rubber.
Finally I clean the type slugs, which always have dried, caked ink on/in them. I use tiny amounts of kerosene on stiff toothbrushes and sometimes the end of very small dowel rod. I know guys who get impatient and quickly bring out the dental tools, but I rarely resort to that. The slugs are a pretty soft metal and it would be too easy to scratch one. I usually let a sheet or two of paper soak up any excess kerosene from the slugs when I’m done.
Then back into the cowling it goes. As for the cowling/case, I usually use a soft cloth and a watered down solution of Murphy’s Oil Soap, which smells a lot better than the lighter fluid! For some time now I have thought about replacing my use of lighter fluid with Ballistol to see how that works instead, although it is pricey. Another option I might try is lamp oil that people use for patio torches, but obviously not with a citronella scent. It has less odor and seems pretty refined.
Michael
Michael
Well it sounds like your a regular ole typewriter repair man. 🙂
Hmm the skin comming off the fingers and getting mixed in the lubricant. That never even crossed my mind.
I know contaminants is one of the biggest problems we have with things at work. You wouldn’t believe what air filters look like when they don’t get changed regularly. It’s amazing what’s floating around in the air.
Gunfun1,
What I meant is that typewriters that are not kept under a cover or in their cases get regular household dust in them over time. Regular household dust is largely made up of decayed dead skin that is constantly coming off our bodies.
Michael
Michael
Yipes dead skin dust floating around in the house.
That must mean I’m allergic to myself cause I sure get the sneezes at times. 😉
Was wondering the same thing myself. My guess is that this is an ideal moment for degreaser which I believe is some kind of solvent. On the other hand, I’ve read how the Marines in Korea had to clean their M1s and 1911s of all grease to keep them functioning in the -40 temperatures, and clearly they couldn’t use baths of degreaser. They must have just wiped down the parts.
Matt61
Matt61
Makes me think that grease could be a bad thing in certian situations.
If something is greased and dust or whatever gets blown around. The grease will catch it. Then what happens when it gets dragged inbetween the two surfaces it’s lubricating. Probably a bunch of scratches eventually. Then guess what happens next. The scratches get bigger over time with use. Then more particles can get trapped.
It might not happen right away but eventually it will end up making problems of some sorts I’m guessing.
B.B.
Great article as always!
Can not wait for the next instalment about cleaning all the old grease out. Also wondering what the new magic stuff is? Always have been wondering when Moly grease is best to use and when Krytox is best? I guess I will find out next week.
Happy weekend everybody!
Yogi
Since he said that Pyramyd AIR Tech department has been using it for years but are only now planning on packaging for sale and that he recently discovered what great stuff it is…..
I think it’s going to be Tune-in-a-tube.
Belgrath04,
Tune-in-a-Lube crossed my mind, but if P.A. has used it for years, I’m not so sure. B.B. has me wondering and curious, once again.
Michael
I also enjoy getting a peek under the hood so to speak. My go to cleaner when low oder is a factor is Gojo hand cleaner. It works as well on greasy parts as it does for greasy hands.
Gopher,
Yours is yet another vote for Gojo. That’s it. Tomorrow or Monday I’ll pick some up.
Michael
Doesn’t Gojo have those particles of abrasive mixed in with it? If so I don’t think I would use it to clean air gun parts.
Or maybe I’m thinking of that stuff called Fast Orange. The Gojo is like a white smooth cream. Kind of gets a clear liquid on top if it sets for a while if I’m remembering right now. And doesn’t have the abrasive particles in it.
Man I use to use both of those to clean my hands when working on cars. Haven’t used any for quite some time now. Didn’t realize how long it’s been since I worked on a car.
If somebody uses either refresh my memory on them if you will. But for me it would be no abrasive particle cleaner for air guns for me.
It has been a long time for me also that I have used the Gojo clean. It is the smooth white cream cleaner. I would use it when I cleaned up parts in the laundry sink because I did not have a heated work space.
Gopher
Ok and wasn’t Goop another white smooth cleaner? Maybe that’s what I was thinking of?
Gunfun1,
You just brought back a childhood memory for me, helping my dad work on one of the family’s cars. Afterward we’d wash up with a bar of Lava hand soap. I can still smell it.
Michael
Michael
Same here when I was young. Matter of fact they still put bars of it out at work. Good soap.
Gunfun1
I beleave that Goop and Gojo are almost the same formula. There was a Gojo with pumice that was gritty but I never used it.
Michael
As I recal we used lighter fluid in the military to get rid of residue of the cleaners. It cleaned up the surface from the cleaners. Brass would shine longer because of it.
Gopher
Ok maybe that’s the Gojo that I was talking about at first. The one with the pumice in it.
BB
In that last picture the piston seal looks like it has a notch wore in it the width of the cocking groove. Or is that grease build up there?
And figured I would mention this here. As you know and some of the other readers as well that I have worked in a machine shop for over 30 years now. Work with alot hydraulics and air systems.Plus built alot of drag car engines over time and other various things on race cars.
We have a general rule of thumb with engines that have cast iron rings. Those type of cylinders get honed with the 3 finger type hones and we do use transmission fluid to help the stones cut. The rings can stand a heavier grit stone that produces a heavier cross hatch pattern. The ring moving up and done the bore on the piston will actually help the ring fit itself to the cylinder bore. They in a sense sand each other to a perfect fit.
When we do cylinders that use hydraulics like say brake cylinders on a drum brakes of a car. We use a smaller diameter 3 finger hone and with lighter grit stones. Also use transmission fluid to help the stones cut. Most of those seals are what we call lip seals or some people call them cup seals. But on those type of seals we use a very light cross hatch pattern. The same thing happens to the lip seal like the cast iron ring. The seal will kind of sand itself on the cross hatch to fit the cylinder but since the cross hatch is light it will get polished out as the seal works in the cylinder.
And the last thing we have is air cylinders. They use o-rings or lip seals also. On those cylinders we use a very, very light hone and transmission fluid to help the stones cut. And basically the same thing happens to the o-ring or lip seal as the hydraulic wheel cylinders. It will polish out the cross hatch as it works.
Most of the hydraulic and air cylinders when we take them apart have a nice polished area the piston moves in and the area the seal or o-ring doesn’t travel to will still show the cross hatch.
So to get the best performance of the seal. Things do need to be done right.
Anyway thought I would mention what I have encountered. Oh and I am liking the spring compressor.
GF1,
That’s just grease buildup. When I wiped the seal clean it looked perfect.
B.B.
BB
I saw you mentioned it about the piston seal. You should of showed a before cleaning along with a after cleaning picture of it.
Oh and glad Pyramyd AIr is going to start selling the grease.
Do you know how long before they start selling it?
GF1,
I hope it’s soon (within 4 months).
B.B.
BB
Guess it takes awhile to get all the packaging and stuff ready.
GF1,
Yes. And also to make the deal.
B.B.
I really hope the grease is what I think it is.
Is the packaging by chance a tube?
Belgrath04
And why do you hope it’s tune in a tube?
The stuff works, and I like to support PA and buy through them as much as possible.
Belgrath04
I’m thinking it’s not going to be tune in a tube.
I think RidgeRunner was the one that told about it a little while back. I’m betting BB’s mystery lube will be something else.
Either way I’m with you. I by from PA mostly also.
Belgrath04,
It’s in a 14 ounce container now, but I have no idea what Pyramyd AIR will select.
B.B.
BB
I know a packing company that can put that stuff into 1/4-1oz foil packs.
No way. I didn’t know that you built cars. I once read a book on automotive engineering and was stunned at the complexity. It was as difficult as anything else I’ve studied.
Matt61
Matt61
Really. You don’t remember me and Buldawg going back and forth telling our bench racing stories on the blog from back in the day.
But yep I have been messing with cars my whole life up to about maybe 5 years ago. I built engines, altered suspensions, reworked carbs, messed with nitrous and blowers and turbos on early and late model cars and even made parts we couldn’t get. I can’t even begin to explain all the different things I did on the muscle cars we drag raced. I was pretty well known for making things work that people that done it for years said wouldn’t work.
You know that saying No Fear. Well that pretty well tells the story. You ain’t going to get no where if you listen to people that say you can’t do that or it can’t be done. And yes I had some pretty quick cars in my time that looked like not a thing was done to them. Sleepers is what we called them. They ran their butts off but looked like grandma’s car that was parked in the garage all the time.
B.B.,
Sorry this is off-topic, but I have a chance at a FWB 124, with a very plain stock, smooth on both sides – no obvious cheekpiece (?). From pictures, it looks to be in good shape and from serial # I’m guessing it was made in 1978. Owner-seller says it needs a basic set of seals, etc. but not sure who would do this work (I can’t). I’m just wondering what a fair range in price would be, considering a tune is needed.
Thank you so much,
dw
dw,
I am about to launch a new series on tuning the FWB 124 very soon. And Pyramyd AIR reseals 124s.
Black plastic trigger blade is an older gun. Shiny aluminum blade is 1990 and newer.
That rifle is called a Sporter and is worth $200-275, depending on condition. That’s needing the tune. I just paid $200 for a Deluxe 124 that doesn’t need a tune, but that was an exceptional buy. My rifle is worth $375-450.
B.B.
Thanks so much, BB. It’s good to read your reports. I appreciate the info – that really helps a lot.
Sincerely look forward to the upcoming series.
Best,
Dixon
B.B.,
D’you ever tune a San Anselmo era lefty Deluxe 124?
Mine is awfully clean, but absolutely must have had a tune once upon a time. It shoots smoother than a broken in TX. It’s almost as smooth as a Marauder. I chronied it only when I got it, and I hadn’t started to keep notes yet. But it was about spec. with Hobbys, as I recall, and it is VERY accurate right off a bag.
It’s a small world, after all.
Michael
Michael,
No, I never tuned a leftie. Isn’t it nice to have such a smooth rifle?
B.B.
B.B.,
It really is a wonderful experience. It even cocks smoothly.
Everyone should save up and splurge and send a well-made and accurate but vibrating, bucking twanger to one of the many guys I’ve read about online who do first-rate tunes. I read once that even a regular Joe should, just once in his life, treat himself to a tailor-made suit, or at the very least a tailor-made jacket. Same idea.
Michael
Michael
I’d like a tailor made Corvette or something.
Maybe one day I’ll treat myself to one of those. 🙂
Oh yeah! (But that’s a lot more dinero than a tailor-made suit!)
Michael
Hey if I’m gonna dream I may as well dream big. 🙂
As a matter of fact, a rich uncle of mine just got that very thing. He has had a lifelong interest in Corvettes and recently he bought himself what he claimed will be his last one. It is a custom-built C7 for which he has promised me a personal review. I asked him if he was getting the HUD display. He said that was old technology from around 2008 but very good and that once you use it, you can never go back to a conventional dashboard.
Matt61
Matt61
I would like to hear more about that Corvette when you get your personal review. Sounds cool to me. 🙂
Darn right. My B30 as bought from PA was literally falling apart in my hands with parts coming off periodically. But I sent it off to Rich from Mich who made it an unfailingly reliable and super-accurate gun realizing what the former Charlie Da Tuna called the “best deal in airgunning.” I always wondered what happened to Rich who seems to have disappeared.
On the subject of tailoring, I was once in Hong Kong where they said I could get a tailored suit made in a single day. Not having any use for suits at the time, I passed up the opportunity. Not long ago, for formal business occasions, I paid for what I think of as Donald Trump clothes that are tailored and high quality with a slight glossy sheen. But with the trousers at a mere $50, he would probably laugh at them. On the other hand, I have a new field for tailoring with my re-enactment gear. I am no end of pleased that I actually navigated the Russian sizing charts to get the right fit for my Russian camo fatigues. They feel great.
Matt61
Dixon,
B.B. would be the expert, but I can say what the Blue Book says. Based on % of condition,.. 60,80,90,95,100%,… the value is stated as 195,295,395,400,N/A. Most were right most likely and right picture will show no check piece as it would only be on the left side of the stock. Add 10% for a lefty. Add 5% for a San Rafael address and 10% for a San Anselmo address. That’s all I got for ya bud. Oh yea, the book says discontinued in 1989.
Chris,
The 124 may have been discontinued in ’89 but they were still being sold new in 2001. I guess I was thinking of that, more than the production schedule.
My prices are based on what I see them actually selling for at shows.
B.B.
B.B.,
As I stated, you are the expert. Looking something up in the Blue Book is about as “expert” as I am likely to ever be. I figure that it is nice to provide a reader with Blue Book info. as well and it gives me a chance to look up something specific. There is a lot of detail that I am sure is tuff to remember and plus,… it takes time and more time to relate that info.. Time is something I have more of than you.
Chris
Ahhhh. I’m glad I reread these comments. My 124 is both San Anselmo (earliest Beeman address, I believe) AND lefty. And it still has the original plastic trigger, not the “cop-out” replacement steel trigger mailed out to placate no-nothing air gun Philistines! ;^)
Whatever it’s worth, let my widow know. It’s the best shooter in my collection (well, except the lefty FWB 150 Tyrolean and 300s, of course).
Michael
Oops. The “make-nice” trigger was aluminum, not steel. BAH! The plastic was just fine! With a trigger pull like that, papier mache would have been stout enough. ;^)
Michael
Michael
Don’t you Love when you get a nice trigger. 🙂
Gunfun1,
Yep! I am fortunate to have been spoiled by triggers that are wonderful with a handful of my air rifles (predictably Weirauchs and FWBs), a super light and smooth first stage that stops at a second stage that is almost as light but has so little travel, it is like the proverbial glass rod.
Michael
Michael
I know exactly what you mean.
I absolutely loved the triggers on the FWB 300’s I had. They were pretty much just like you described.
Thanks, Chris. It’s the San Rafael address. Now I;ve got to get off my b*tt and try to see this thing in person. Nerves of steel…
Dixon,
If it is clean finish-wise (metal and wood both), it is a really nice, classic, heirloom air rifle, one of the all-time best, and something that will outlive you. My point is, don’t pay too much, but these are . . . well, don’t pay too much, but if it is original and in great shape, it would be tough to come up short by getting one and having a pro reseal it.
Just my two cents,
Michael
Thanks for the encouragement, Michael. I’m going to try meeting the 124 today, if the snow storm let’s up!
Thanks to all of you for your tips for removing the grease from a mainspring.
I showed my wife B.B.’s picture of the spring and asked her what she would do, and she came up with an idea I never would have thought of (although the replacement lube would have to be applied pretty quickly to prevent rust): as a first step take it out behind the garage and pour two gallons of boiling hot water on it. Pick it up with tongs and place it in the sun to dry and cool down a bit, and then go with a solvent after that
Of course while common greases melt, this sticky stuff might be an exception.
Michael
Michael,
That’s great for parts you can get to, but there arer parts like the spring tube that are harder to reach into. I like just wiping the grease off.
B.B.
B.B.,
I agree that I with something as gloopy as that spring the best first step would be to wipe it down with rags or shop paper towels like Rags in a Box. Pushing a wrapped dowel through it might help get at the grease on the spring’s inside.
I confess to trying to think of a quick and “less mess” method of getting at the grease between the coils. Back to heat as an option, if the grease would melt significantly, a heat gun might work.
Michael
Michael,
Jam some rag into a few of the coils at one end, hold it,.. and start to turn the spring with the other hand. Works good. BBQ skewers, driveway marker poles. Soap and water works good as I said and I thought that hand cleaner idea was a very good idea from an above comment. That stuff really works and smells good to boot. Gunk engine cleaner is good too and you can just use a garden hose with squirter to rinse it off just as you would a car engine.
The advantage of a lubricating solvent as opposed to a degreaser is the compatibility of any potential residue with the new grease.
Most degreasers will leave some for the residue unless you go with a break or throttle body cleaner.
But like BB pointed out there really is no need to get every single molecule of old grease off unless there’s a material compatibility issue.
Belgrath04,
I agree. No need to get too carried away. There has been some good information shared on lube cleaning and honing cylinders today. As with anything, more thorough is better,.. but often not a necessity. After all,.. we are not talking about 10,000 RPM engines.
Belgrath04 and Chris U
I’m with you both on the spring cleaning.
But the cylinder and piston is a different story.
You wouldn’t believe what kind of scratches can happen to the cylinder or piston seal if contaminants have not been thoroughly cleaned from the components.
What I know from what I work with. A scratch in the piston seal be it a o-ring or lip seal or even a air gun piston seal and the cylinder wall leads to sealing failure. The air or fluid will escape past the scratch.
In a spring gun that failure of the sealing components probably doesn’t matter much. You know were just slamming a piston forward to produce compression to send the pellet flying down the barrel. Who cares if some the air blows by the piston seal. Right?
Oh but wait. Remember when I kept cutting the spring in a spring gun and velocity did not decrease. That was probably cause the extra spring pressure pushed the piston so hard the air blew by the piston seal. Now think what happens if we have that scratch in the cylinder wall and piston seal.
I still believe the proper amount of spring preload matters. But also the blow by or how well the seal can hold air matters to. To me I want that piston seal working real good on my spring gun when it’s all said and done.
Somebody got a better idea I want to know. I’m all ears right now. Well?
GF1,
No argument here. That is what optimal design is all about.
“Oh,.. but wait”,… that was classic!,… and something that I plan to steal at some unknown point in the future.
Chris U
What part you gonna steal in the future. 😉
Well, I can’t speak for anyone else here, but “Oh, but wait!” is going right into my lecture notes for Monday morning!
Michael
Michael
A big 🙂
Oh and here’s the hone I’m talking about that will work for most airguns.
https://www.amazon.com/Powerbuilt-648401-Brake-Cylinder-2-25-Inch/dp/B001G7RB2G
Oh and don’t hone a air resivoir on a PCP gun. That will more than likely cause a leak if a o-ring is used in different places on the air tube. Like the Marauder’s and Maximus and Discovery’s and such.
You need a nice smooth polished bore for those o-rings to seal. Not a cross hatch. The reason is there is no moving part. So as it works it can’t polish out the cross hatching.
Figured I better mention that so some one don’t try the hone on a PCP tube and not finnish it off right.
Well I guess you could usethe hone to get a scratch out but you better polish it with some light scotchbrite after you hone it. Then wipe it down nice with a lint free cloth and the isopropyl alcohol. Add a little silicone grease to the o-ring before you assemble and you should be leak free after that.
Hello Gunfun1,
Been meaning to touch base with you. I recently purchased another Crosman Custom Shop 2400KT, with the new .22 14.6″ LW barrel. I was pretty excited about this because my only disappointment with my other .22 2400KT (18″ Crosman barrel) was accuracy, especially at 20 yards.
Well, I put her over the chrony and I am getting about 100 to 150 fps less than with the 18″ Crosman barrel depending on the pellet. (Middleweight example: 434 fps average with the 14.6″ LW vs 558 fps with the 18″ Crosman, using Benjamin Discovery Hollow Points — 124 fps less.)
On the flip side, I get 25 good shots per CO2 cartridge with the 18″ Crosman, and am getting more than twice that — about 55 shots — with the LW 14.6″. Of course, the different barrel lengths will affect velocity some, but wouldn’t double the shots per fill. Clearly, there are different internals (hammer spring and/or valve) because the ONLY non-cosmetic difference on these two guns is the barrels.
So first question is, any idea what part swaps Crosman is performing in its “black box” Custom Shop? While I absolutely love these guns I continue to be baffled by the radical swings in performance I see from one gun to the next, from a shop that lets you customize everything except how the gun will actually perform. Sifting through tons of forum posts, information is highly inconsistent and contradictory and I think part of the reason is that different internals go into different guns–and there’s no way to tell what you’re getting until that box shows up on your doorstep. Some forum posters state that CCS guns have a different valve that gives higher velocity than the “box” 2XXX pistols, but if so I didn’t get one on my latest. But Crosman Customer Service tells me the valves are the same on all CCS guns. Your opinion appreciated.
Second, since “it is what it is” with my new 14.6″ LW barrel, I am (finally) ready to mod a bit for more velocity. You and Buldawg76 had some very helpful suggestions on my 2400KT blog for some simple and easy mods, and I’ve actually obtained a 2300S adjustable end cap that I’m ready to drop in. But, I’ve got a couple more questions and hope you can save me some testing time:
1. The 2300S power assembly includes the hammer spring–use that one, or stick with the original? However, a lot of modders appear to be swapping out for the heavier Benjamin Discovery hammer spring (2261-009). What’s your suggestion among these three options?
2. Buldawg76 (haven’t seen him posting recently) also suggested sliding a 1/4″ thick nut into the hammer to add some inertia as well as some preload to the spring. What are your suggestions for including or dropping this based on spring choice above?
Thanks–if you can save me a few assemble/dissassembles as I test the various options that would be appreciated.
Just a couple side notes to add. When I found that my wife’s .177 2400KT with LW barrel was getting almost identical velocities to my original .22 2400KT, I speculated that Crosman moderates the velocity in guns with LW barrels in order to optimize accuracy. What I’m seeing with my two .22 2400KTs here seems to support that, though I’d really like to know more about what exactly is going on.
And finally, that 14.6″ LW .22 barrel can shoot! While I’d like to boost velocity, accuracy is outstanding. While the 18″ Crosman barrel on my other 2400KT wasn’t terrible, the LW barrel is making ragged one-hole groups with a number of pellets with my limited testing. The barrel is REALLY TIGHT, though, and smaller diameter pellets seems to do better so far. I’ve only gone to 10 yards so far but am very happy in the accuracy department.
Thanks again, Gunfun1 (and crew, for anyone else with advice), for your thoughts!
Also: With a nod to Crosman, I have to thank them for pretty quickly adding the 14.6″ .177 and .22 LW barrels to the 2400KT and 2300KT lines pretty quickly after they showed up on the new 1300KT Pump Carbine custom guns. I ordered my latest pretty soon after they became available, and am extremely pleased with the accuracy.
Hiveseeker
On the custom shop guns verses the 2240 and such guns velocity wise. I have no idea if Crosman is changing the valves or striker spring or even the transfer port orifice size in the custom shop guns. I have not had a custom shop gun yet so don’t know what’s inside them.
And man that is a big difference in shot count between the two barrels. That makes me think they went to a smaller transfer port inside diameter hole. That’s what they do with the 1720T’s. It comes with a bigger transfer port in the gun that gives a higher velocity and lower shot count. Or you can put the smaller transfer port orifice in and you get less velocity and a higher shot count.
So then about the Discovery striker spring. Yes you can use it with the adjustable end cap. But if I remember right the spring that comes with the adjustable end cap is shorter than the Discovery spring. If you put it in you need to put the end cap on and hold the cap in with the bottom screw and your thumb before you put the barrel on. And make sure you have your adjustment turned in all the way for like max velocity. Take and cock the gun and see if it will cock and if the cap starts pushing on your thumb before it cocks all the way. If so you need to trim some off the spring till you get the gun to cock without bumping the end cap. That’s basically coil bind if that’s happening. After you got that done then you can adjust your velocity up or down.
Then on the other part along with the Discovery spring. You can get a Discovery transfer port orifice from Crosman. They are a bigger inside diameter than a 2240 or 1322/77. So that will up the velocity a bit too but lower the shot count like we talked about above. And on another note. If you was doing this on a 1322/77 then I would go with the biggest inside diameter transfer port orifice I could get. Remember your not worried about shot count. Your just dumping as much air as you can when the trigger gets pulled
If you decide to do something on it let me/us know. I’m interested in knowing how it goes.
Hi Gunfun1,
Appreciate your thoughts and knowledge, and I’ll keep you posted. I’ve been waiting for it to warm up a bit to get some decent baseline numbers before starting the modding, and it won’t be long now!
Buldawg76 had some good comments as well, but I haven’t noticed him posting recently–know how he’s doing? Maybe I’ve just missed his posts but hope he’s well.
Hiveseeker
Haven’t talked to Buldawg for a little bit but he’s been alright as far as I know. I’ll have to give him a holler and let him know people on the blog have been asking about him.
And no problem. Like I said let me know what you come up with on your guns.
B.B.,
You’ve created a heckuva interest in what this mystery lube is. As my mother would say, “I hope you’re happy, Mister!”
(Perhaps I will give her the basics of this discussion Sunday over lunch. If I do it just right, she’ll have a good chuckle and ask me to inform her of the outcome, even if she won’t really care. It’ll be fun for us both.)
Michael
Whoever asked about the sight options for the HW50S, the fiberoptic sights have not been available for many years. The traditional iron sights are all that are available for that model.
B.B.
Much of the disassembly of the R8 is a mystery to me, but the part about not polishing the compression chamber made perfect sense. Apparently, the principle is the same as what underlies high blood pressure. I’ve always wondered why blood pressure causes heart disease. It doesn’t actually do anything to the heart directly as I had suspected. The problem is that the pressure over time batters and roughens the walls of arteries which cause them to retain plaque and other debris. The buildup restricts the opening to increase the pressure in a vicious cycle until the whole vessel is blocked and you get a heart attack. So the message is that if you want to retain grease in the rifle, keep those surfaces rough…
With all the discussion about lubing and polishing, does anyone have suggestions on how to “ease” the clip for an Enfield rifle? I’ve bought a couple sets that are supposed to be original, but the surfaces are so rough that I can barely slide the rounds through to load the rifle. I asked Derrick, and he suggested polishing with 0000 steel wool which I’ve acquired. Also, one person online described bending the sides of the clip outward in a vise. Would this actually work? It puts me in mind of the discussion about changing a spring’s shape through pressure, and I seem to remember that that is hard to do. Also, the clip appears to be stamped metal, and as my gunsmith from South Carolina said about the magazine, “You break off a piece and you buying another one.” So far, I haven’t had much success with the steel wool, but maybe it just takes time.
ChrisUSA, with your meticulous documentation of shooting, can you tell if you are improving? It’s the overarching question about shooting history. It sounds like you have reached something of a plateau. That’s natural. The big gains quickly come early. On the other hand, I don’t know if there is a reason why one shouldn’t keep improving unless the practice level drops below a particular point or unless there is physical deterioration. I, myself, shot off almost 100,000 airgun rounds before I met a guy with much less shooting time who beat me in a contest with 1911s. I realized that I was using an approach technique for shooting, trying to hit the target on the move, which wasn’t reliable. I got a lot better after I made the adjustment. But I read about a professional shooter for Para-Ordnance who claimed that he fired a million rounds before he learned how to shoot, so I might have a ways to go. While it is reasonable that doing the same routine should give you the same performance, that is not entirely true of the human body. My brother got this obsession of doing 100 push-ups a day for many years. I think he made it to a quarter of a million before he stopped, and he kept getting stronger the whole time.
One another subject, I’ve tried out my jump boots for a couple days and they are a very pleasant surprise. While they are massive and heavy, they are not tiring. In fact, I kind of feel like Michael Flatley. I think a lot of it has to do with the abundant support around the ankle which transmits energy into my legs. And all the support is very comfortable. Contrary to what I read, break-in has been minimal. I would strongly recommend them for daily footwear. Now, I never feel unarmed. And I’m looking forward to new achievements in offhand shooting and in the kneeling position (with the aid of gel kneepads).
But the boots have confronted me with a paradox that I’ve encountered in other fields of learning which is that informed people will give you completely opposite and conflicting opinions on basic questions. In this case, the question is how to preserve the leather. My understanding was that neatsfoot oil is the way to go. I laid in a big supply in preparation for the boots and have already used it on my rifle slings and holster for my Single Six. But now I see that there is another school of thought saying that neatsfoot oil is close to the worst thing for leather!? The reason is that in softening the leather, the oil breaks down its structure and ultimately rots it away. The same is supposed to be true for mink oil and is given as the reason why there is almost no leather that has survived from the Civil War. It was customary to treat it with mink oil, and it all rotted away.
There may be a way to resolve this paradox. Breaking down the stiffness of leather is especially undesirable for boots which I want for support, but it may be a fair trade for baseball gloves to play with them. You can always get a new baseball glove. Even for the army, it may be worthwhile to soften boots for comfort knowing that you have a whole industry willing to provide you with replacement. Anyway, one school of thought says that the best way to preserve leather boots is to do nothing to them which I like a lot. It’s one of the things I appreciate about airguns.
On the subject of camouflage, I’ve made a surprising discovery as well. Naturally, I was wondering how American camouflage fared during the early days of this technology in WWII. The answer is not well. The p42 frogskin camouflage used initially by the Marine Raiders was discontinued and eventually sold to France. This is curious since the frogskin pattern was apparently based on the dots of the leopard which proved so uncannily successful with German SS camo. The problem apparently was that the frogskin had too much of a white background that showed up in the jungle. But it was also a problem of application. The jungle camo didn’t do well on desert atolls. Moreover, tests showed that the U.S. Marine sage green utilities actually provided superior camouflage on the move compared to a disruptive pattern. I’m guessing this applies as well to the ghillie suit as we discussed. If you are lying motionless like a sniper, it’s great. But if you are running around, you will look like Sasquatch. So, here is another benefit of the iconic sage green uniform which was originally designed as work clothes. I see myself getting a set to liven up my range visits.
Matt61
Matt61,
I am quite surprised that you find my method of keeping shooting records so meticulous. It seems like the very least and most basic. With you doing hand loads for powder burners,.. I would think that you would want to some similar form of record keeping.
As for any “plateau”,.. you may be right. I have put in all of the work up front, kept good records and pretty well know what me and my guns can do. I did any mod. that was fairly easy to do. I don’t shoot near as often as I would like. I do not have the time or energy to be infinitely obsessive. Let’s face it,.. we all have our limits, as well as our equipment. That however does not negate the need to always strive for better. I am always looking for the next tune or tip.
The Maximus would be a good example,.. tuned what I could. Got the trigger down to 1#,.. from 6#+. Shaving the T shaped trigger blade down to more of a target trigger, now that it is lighter. Shot 10+ type/brand pellets to find the best. You do what you can do,.. but at some point you start to reach an end point in progression.
No substitute for lots of practice though. That, in the end, will take you to as far as you can go.
Chris
Matt61
Polishing the cylinder in a air gun chamber would be a good thing. That’s what I talked about above with air cylinders and hydraulic cylinders at work.
That’s part of what I do. Rebiuld that kind of stuff along with valves and such.
If you have a o-ring or seal such as the piston seal that’s made out of some type of synthetic or rubber. A smooth true round finnish on the bore is what will give the best seal and help make the most compression in our case of spring guns.
That’s what I talked about lightly honing a air gun cylinder. It would be to true up the diameter and remove scratches so it has a nice seal the whole travel of the piston stroke. The seal moving the distance of the bore will automatically polish in the cylinder wall and size the piston seal to conform precisely to the cylinder bore.
The more the gun gets shot the more the piston seal and cylinder wall sizes theirself to each other. And you know that’s why the few drops of a good oil helps at different times down the transfer port hole on a spring gun. That’s actually helping the polishing process.
Matter of fact we have rubber wheels on dremmel type tools that are air operated and adjustable in rpm. We add oil and polish flat steel surfaces that slide on each other. So the synthetic seal on the front of a spring gun piston is actually a very good choice for a air gun. Wonder if someone thought of that when they decided to start using synthetic seals in spring guns. 🙂
GF1,
I do not know if a parachute type seal is available for an R-8,.. but I think that I would be inclined to go that route given the hone marks at 90 degrees and the possibility that it might have an over sized piston bore.
A soft, expanding type seal would go a long ways to making up for fit errors, if any exist.
Chris,
The R8 comes with a parachute seal. All Weichrauch rifles with synthetic seals have them.
B.B.
B.B.,
Sorry for the mistake. The picture from above looked like a hard ring with no expanding potential at the front end.
Chris
Chris U
Guess I should mention this to.
There is a difference between umbrella seals and the lip seals or also called cup seals I mentioned.
They actually have the open lip facing forward towards we’re the compression is made.
The umbrella seal is exactly opposite. On automotive umbrella seals used for sealing valve stems in the head. The lip actually faces backwards of the sealing area. Basically like its name says. It’s a umbrella. It keeps the oil that comes from the top directed away and over the edge of the seal.
So thinking I don’t know if the front seal on a spring piston is really a umbrella seal. If that’s the case it would direct any compressing air away from the center and out towards the cylinder wall. So I don’t really think the seal on a air gun is a umbrella seal. That would aid in loosing compression seal.
Chris U
Sometime back when I had two FWB 300’s I messed with some different things as far as sealing the piston to the the cylinder.
The FWB 300 has a cast iron ring that fits in a groove in the piston. Pretty much just like a car engine piston. That gun picked up velocity when I honed the cylinder lightly with cross hatching. Then I put a few drops of tranny fluid down the transfer port hole. Basically that’s the same thing I did to race engine’s when we did the first start up on them. We ran them for about 30 minutes breaking in the lobes on the cams and lifters. When we shut the engine down them spark plugs got pulled and thrown away and replaced with fresh plugs. But we did compression tests with un honed engines and freshly honed engines with the same rings and ran in with the tranny fluid. Big time difference in compression.
And then on the other 300 I took the cast iron ring off and tryed different o-rings with some RWS silicone oil down the transfer port after light honing. Guess what. When I found the right o-ring fit velocity increased drastically. And yes when I took it apart after some time the cylinder wall was polished.
And then about the umbrella seal. I don’t know either if something like that’s available for spring guns. But look at a synthetic seal for the piston. The front of it kind of gets bigger in diameter plus it kind of has a rounded o-ring are that transforms and wraps around to the front of the seal. And another thing I bet people don’t think about is the seal is actually kind of a cushion the way they do usually cup in at the front of the seal.
Don’t know what the replacement seal was like for your Tx tune kit you got. But mine was a synthetic seal that went on the front of the piston. And it had a o-ring groove cut in it for a black o-ring. I actually messed with that with my TX trying different combinations of o rings.
So to me the cylinder wall and piston seal is very important. As well as being cleaned very well before assembly and lube being put in just the right places and not excessive. Just me. That’s another thing I’m anal about besides acurracy. 🙂
GF1,
On the TX seal,.. I left the stock one on as you had already tried other various things. To me, a forwards facing cup/lip seal would be optimal for all air guns pistons. Synthetic, semi-soft and the lip engineered in such a manner that the compression stroke would force the lip outward to contact the cylinder wall. O-rings, square cut seals and cast iron rings would all seem to have their limitations on sealing.
The whole theorization of seal profiles/design, honing, break in and sealing is always a fascinating topic though.
Chris U
Yep I agree that type of seal would work probably real good for a air gun.
And all this honing and seals and o-rings and valves is what I do every day at work. Matter of fact I have been involved with the engineers trying to come up with different seal designs for some of the racks that have to cycle double the amount of the times and some that have to work harder than the rest of the machine. And they are in a sense high stress. They do the hardest part of work on the machine. Imagine this with a hack saw. Try cutting through a 2-1/4″ stainless bar. How long do you think it would take? The machine can do that in 3 seconds. The saw is basically a round blade about 12 inches in diameter and has carbide teeth. Tell me that ain’t working those racks and seals on the saw unit. I bet it would take 4 minutes or more to cut through a stainless bar that big with a hack saw.
And the valves we have basically have spools in them that are sealed with o-rings and check valves. They are what controls the cutting tool feed rate. Basically when the valve fires as we call it the tool rapids out to about 4 mm from the part then transitions to a slower normal feed rate. So basically two adjustments on the valve the rapid and the feed. When those two things can’t be controlled anymore by the adjustments that means something is wore inside and bleeding by. The tolerances on the spools outer diameter and such are held very close the bore it fits in. You have to be very careful when work is done to the valves. If I sand or polish something a little to much then that $4500 valve is trash. And yes no typo. $4500 for one valve. Heck the saw unit that the racks are part of costs like a $60,000. So when I work on them it’s got to be done right. And also has to be assembled very clean. Otherwise again the dirt particles can build and ruin the valve and plus contaminate the rest of the system.
Same things apply to the industrial air cylinders and hydraulic cylinders I rebiuld. They are a little more forgiving on tolerances than the hydraulic valves I just talked about. But if I hone to much or to heavy. Guess what. It just sand’s the seal down quicker when it’s working. Plus less chance for the seal to polish the cylinder wall. And also guess where all those particles are going from the seal that’s getting sanded by the heavy cross hatch. Going through the rest of the system and getting trapped in places. So all that leads to premature failure of the parts working correct. So in other words more time and cost for the repair.
So see why I said I’m anal about honing and rebuilding valves and hydraulic and air cylinders. For one thing is I like doing the work I do. But I don’t like doing it over if it wasn’t done right. 🙂
GF1,
Well, you sound like the man for the job! Topping the guns off and the Guppy. 82F today and mostly sunny. Got the 100 yard lane cleared. It was in pretty good shape except for the 100 which was engulfed in May Apple plants. The trees were still dripping wet at 8 AM when I went out. Going to give the 100 a try today with the .25 M-rod. Wind should be good. From the South, which is to my back and maybe only 16 mph. The trees and brush are filling in nice and will be a nice buffer. Looked real quick for some Morrels’, but did not find any. They are starting to pop up around here.
That’s all for now. I’ll check back in later.
Chris U
Probably why I’m the one when the time comes for the rebuild. There’s only one other guy at the place I’m working at now that knows how to rebuild the valves and such. But they always got him busy in another part of the shop. All good though I don’t mind doing it.
And sounds like you got your shooting area back in shape. It’s still raining steady here. The feild out at the bottom of the hill at around 80 yards is like a big lake now running over to the drainage ditch in the woods. I been shooting though out of the breezeway. I definitely can see impacts no matter how far out I shoot now. Even out at 400 yards with my .25 Marauder I can see the water splash in the feild through the scope. Pretty fun.
And me and the daughters found a few Morrels the other day. Should be some after all this rain gets through. Will have to check the beginning of this week coming. I’m sure they will be popping up.
You ain’t trying to repeat your 100 yard group are ya? I was wondering if you been thinking about trying again.
Matt61,
Re: Preserving your leather boots
I’ve got a little experience with leather work boots and hiking boots that have seen very hard use by me here in the Colorado Rockies.
I’ve got a pair of red wings that have seen lots of use over the past 50 years. I’ve got a pair of asolo’s that I’ve put thousands of miles on over the past 35 years. Both have been resoled numerous times. Take care of good leather boots and they’ll last a lifetime.
Moisture is the major enemy for leather. Dirt attracts moisture.
The type of leather and the finish of the leather on your jump boots dictate the type of protectant you should use. Many boots today are made out of thin, chipped/compressed leather sheets. They won’t last and I don’t have a good suggestion on treating this material. Many boots today are made out of leather using silicon tanning methods. This tanning method makes treating the boots with effective protectants difficult.
IF your boots are made out of full grain leather and don’t have a slick finish use snoseal. Clean the dirt off the boots (out of the pores of the leather) and let them dry. Put your boots in your oven on a lined cookie sheet with the oven on its lowest setting (175 degrees is best). After 20-30 minutes pull one boot out of the oven at a time and slather a heavy coat of snoseal on the boot putting a generous amount on all seams especially where the upper meets the sole. Put the boots back in the oven and check them in 20-30 minutes. For new leather you may need to repeat this process until the leather won’t accept anymore snoseal.
When the leather won’t accept any more snoseal pull the boots out of the oven and if you’re anal you can wipe off the excess snoseal. I leave it on.
You will want to repeat this process when boot wear dictates.
Thanks, Kevin! Interesting you should mention Redwing boots. My Dad likes to recall a summer in college when he worked for the forest service in Idaho which he makes sound like an idyllic western adventure. He said that the ultimate boot at the time was made by the White Boot Company in Spokane, WA, and it featured an extra high heel for slopes. At that time and later, he used Redwings which he liked a lot. Anyway, I think hiking around mountains is a good test.
My jump boots are supposed to be replicas from WWII complete with the brown coloring, so I’m hoping that the leather is authentic. It feels like it. Okay, I’m taking your recommendations as a plus one for sno-seal which I’ve come across in my readings, and that goes for the heating procedure in the oven as well. Otherwise, I was nervous about submitting my boots to those conditions. I remember an episode of Seinfeld where the character Kramer realized that he loved the way his shirts felt when they came out of the dryer. So, he worked out a deal with a local pizza place to warm up his shirts in their oven. But he kept asking them to raise the temperature. Or perhaps they forgot about the shirts, but they came out burnt on one occasion. So, the deal collapsed amidst shouting and vituperation. But with your precise directions, I will try the sno-seal. Thanks.
Matt61
Hey Reb,
Happy Birthday amigo!
Well it was still raining here this morning but stopped a bit ago. So decided to try something with the Wildfire. Something in particular with the trigger pull.
Found something interesting with the trigger return spring. First off it is heavy. Second thing the hammer spring is kind of a medium weight spring.
I didn’t want to mess with the hammer spring cause I thought it might change velocity and fill pressure if I lightened it. Although a lower fill pressure wouldn’t bother me as long as velocity stayed fairly close to what it is and still got my four 12 shot clips on a fill.
Well here’s the interesting find. The trigger return spring also controls the sear arm for how far back the hammer swings. In other words lighten the spring and the hammer doesn’t swing back as far. More trigger return spring pressure and the hammer swings back farther.
But here’s another interesting thing. With less trigger return spring pressure the gun wants to work at a lower fill pressure. Right now I have the trigger return spring set for a 1400 psi fill. I can fill to 2000 psi still and just to mention with no leak down out the transfer port to the barrel. But what does happen is the gun is basically in partial valve lock around 1500 and up psi. Real slow velocity basically.
But right now I have probably around a 2-1/2 pound trigger pull verses around 9 pounds from the factory. And now my working pressure is 1400 psi down to around 900 psi. And that just so happens to be what my 1077 liked when I converted it to a PCP.
Now I just need to see if I get a slow leak down overnight. Not that what I did would cause that. That from what I see would happen with the o-ring on each side of the tube they use that transfers air up to the actual valve that the hammer hits and sends the air to the barrel.
Anyway I can pull the trigger with the gun at my side almost like I’m bump firing a semi-auto rimfire rifle. In other words if I time my trigger pulls out with the right rhythm it sounds almost like a automatic firing. Can’t rely on the recoil the rimfire has so the rhythm is what’s important. So for me anyway I like the gun better this way. And the trigger is actually better now than the 1077’s I had. And now it would be a more friendly gun for hand pumping. So multiple benefits this way.
GF1,
Sounds as if you are moving in the right direction with the Wild Fire. I am back in. Did 4 eight shot groups with the .25 M-rod at 100 yards. The first 2 were sight in and reestablishing hold overs from last year. I had mixed notes, but did re-find them and verified 2 1/2 dots with 33.95’s. The last 2 were 2 1/2″ eight shot groups. Not bad for me. Oh,.. and the 16 predicted wind turned into more like 30+ up top. The trees filling in did add a lot of buffer at ground though.
I also did some playing and “pushing” with the Maximus. First, it is not liking the 2100 or 2200 fill. It hits it’s stride right about 2000 to 1900. Second,.. I pushed the shot count to see how far I could go before POI started to drop. From a 2100 fill, I got 50 shots. I also tried some 100 with it. Hold over turned out to be 3 1/2 dot. Boring though as the can did not move much. The M-rod will send a can flying! At 50, I put 30 Maximus shots into 1″. Towards the end, I got a couple of low power shots (1″ POI drop) for no reason. Report was less too. I was well out of any partial valve lock range. I hope nothing is sticking.
Overall,… (very) happy camper with the Maximus in .22.
That is about it on any kind of an update.
Chris U
Yep the Wildfire is for sure better to shoot now. And just got through chronying it. Still starting out at around 650 fps with the 10.34’s. So definitely happy with the results.
Makes me wonder why Crosman increased that trigger return spring pressure on the Wildfire. They could of left it like the 1077 or even lighter like I did and still got the same velocity as the 1077 and at least 50 usable shots. Probably 60 if your plinking. And again pretty much the same results I got with my 1077 pcp conversion I had. Maybe they thought people wouldn’t buy into the idea of a lower 1400 psi pcp.
And on your Maximus comment about the can hardly moving out at a 100 yards. Why was that. Was the pellet punching through so fast that it didn’t have time to transfer the energy like the .25 does.
My .25 Marauder verses the Maximus out at a hundred yards is just the opposite of what you just said. My .25 Mrod punches through a beverage can so fast I don’t even see the can move. But the .22 Maximus hits the same can at a hundred yards and makes it go flying. I’m guessing that extra 100 fps my Mrod is making over what yours makes is helping it punch through so fast the can just bumps. Now if I hit that same can out at a 150 yards with the Mrod then it does start knocking the can around.
GF1,
Interesting. Maybe I had some “off” hits on the 100 cans with the Maximus? Like you said, the M-rod will put a hole straight (through) them and not even blink. They are last year’s cans and already have a bunch of holes in them too. Shredded is closer to the truth. Time to make some new ones with the typical florescent orange paint. That, by the way is the PERFECT way to sight in the A.O.. When you can see those blown out pellet holes in the can,.. perfectly,… you know that the A.O. is set to perfection.
All in all,.. it was a good day and discovered some things to boot. I was shooting pretty well to given the wind and overall mood and energy. I was trying not to take things too seriously and have some “fun” as B.B. put it the other day. Still, I was trying to discover some stuff.
Chris U
Well I’m sure you was putting the pellets through the same holes that were in the cans already today. 😉
But yep for real you need to get you some fresh cans out there. Then you will know for sure.
And yep I’m kind of having one of those shooting days too despite the weather. Overall good results. And you should get you one of these Wildfires. Or at least a Daisy 74 so you can do some fast action can killing outside. Gaurentee you that’s the way to not get serious and have some fun shooting. Real fun when you got someone else shooting one also and you both try shooting the same can. Or what’s fun too is you put two cans down in a spot and you race each other by who can shoot their can over the finnish line first. And I’m getting one of these on my next PA order.
/product/rocket-shot-target?a=5946
Me and the daughter have been practicing with a plastic milk jug throwing it up in the air. Now we been shooting at beverage cans with pretty good results. So I think we’re ready to graduate to the can launcher. We will see. 🙂
Gf1,
Looks like fun. Done with the “Bachelor’s degree”,.. and onto the “Master’s degree”. 😉
Chris U
Got to make it past plinking 101 first.
🙂