
by Tom Gaylord
Writing as B.B. Pelletier
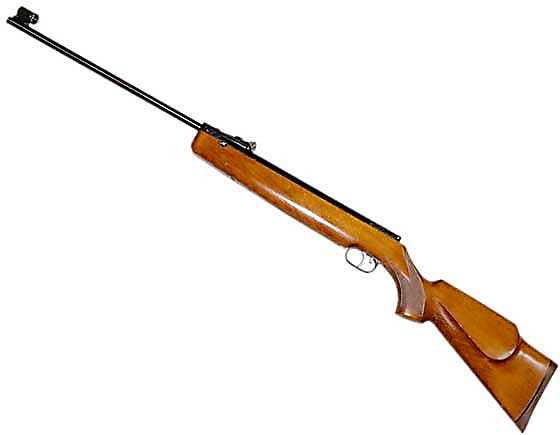
The Beeman R8 looks like a baby R1.
This report covers:
- Clean and inspect
- Little wear
- Install the Rail Lock mainspring compressor
- Now what?
- Tip
- When to take off the compressor
- Finish threading the end cap
- The trigger
- It’s been modified!
- Installing the trigger
- Trigger tip
- How does it feel?
- RWS Hobbys
- RWS Superdomes
- JSB Exact RS
- What happened?
Today I finish inspecting and cleaning the Beeman R8. I will then assemble it, lubricate it and test it with the same pellets I used before, so we can compare.
Clean and inspect
As I cleaned all the grease off the parts I inspected each of them. The piston and spring guide have not been altered. The mainspring is straight (test it by rolling on a flat surface) and fits the piston and spring guide reasonably well. There is some tolerance between the spring and both those parts, and if I were doing a top grade tune I would make a new spring guide, plus I would either shim the inside of the piston or find a mainspring that fits it closer. I’m not doing that today.
The spring tube was not swimming in grease like I thought. I wrapped a piece of paper towel around the end of a 3/8-inch dowel I use to clean spring tubes and I wiped out the inside of the tube — all the way to the end of the compression chamber. This allowed me to see the honing pattern that I mentioned last Friday.
There is no evidence of deburring on the spring tube — no file marks or shiny spots left by a stone. I think the rifle is exactly as it came from the manufacturer
Little wear
The base block has a lot of bluing remaining on both sides where the thin washers fit between it and the action fork legs. Usually there is a lot of finish wear at this spot. Also the pivot pin has all its bluing remaining, even though I could see no evidence of moly grease anywhere. I decided to grease these parts with the same grease I’m using on the mainspring — just to see how good it is.
It was challenging to fit the base block back into the action forks and to get the two thin washers to align with the pivot bolt hole. I bet I fiddled with that task for 30 minutes! In the past I’ve assembled several Beeman R1s and a couple HW35s with these same parts and they all went together much easier. The tolerances in this rifle are close to zero!That’s good from a performance standpoint, but bad for the mechanic. Part of that is due to the cocking linkage passing through that bridge on the underside of the spring tube I showed you last Friday, but the dimensions are also tight.
When the barrel goes on, the cocking linkage that’s connected to the base block must be linked to the piston. So now the piston is back in the gun. I did lubricate the outside of the piston and the piston rod with the same grease I’m using for everything else, but I used it sparingly.
With the barrel on and the piston installed it was time to lubricate and install the mainspring. I tried to use half as much grease as I had removed from the rifle, because this stuff is tackier. Hopefully we will see a little more velocity with no additional vibration as a result of this work. That’s the goal.

The special Air Venturi grease was applied sparingly.
Install the Rail Lock mainspring compressor
Now it was time to install the Air Venturi Rail Lock Mainspring Compressor. I positioned the end cap against the bottom of the spring guide and slid the compressor’s threaded rod in until the end cap was under a little spring tension. Now I had to turn the spring compressor in over an inch to engage the end cap threads.
As the threaded screw is turned, the end cap walks around because the Nylon plug at the end of the threaded rod doesn’t turn. It’s not a problem to control, just keep an eye on it. When the cap finally gets up to the spring tube is when you have to align the threads. I found it easy to rap on the end cap several times to get it to move where I wanted.
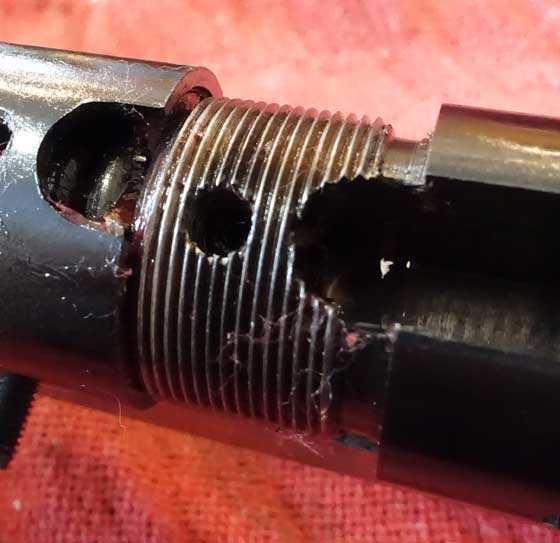
The end cap is up to the spring tube threads, but it’s not aligned yet. A couple sharp raps will bump it into position.
Now what?
This is one of the major hurdles with using this compressor. The end cap is under a lot of pressure from the spring. The threads must be precisely aligned so the cap won’t cross-thread. Here is how I did it. I tightened the threaded rod of the compressor, all the while turning the end cap. Suddenly I heard a small click and I knew the threads were aligned. It probably took 30-45 seconds of fiddling around to get it lined up.
Tip
To turn the end cap in the beginning takes real effort because it is under so much pressure from the mainspring. I used the rounded end of the Crescent wrench to start it and get it turned in about two threads. The mainspring compressor got in the way as I did this and I had to muscle the end cap past that, but this tip makes initial threading easier.
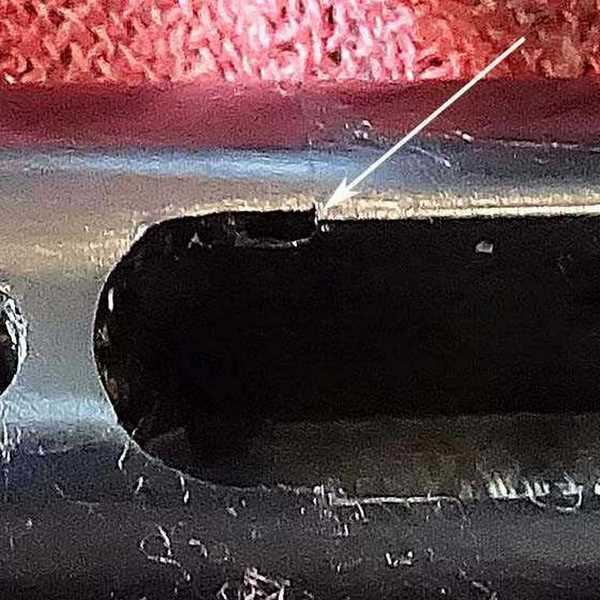
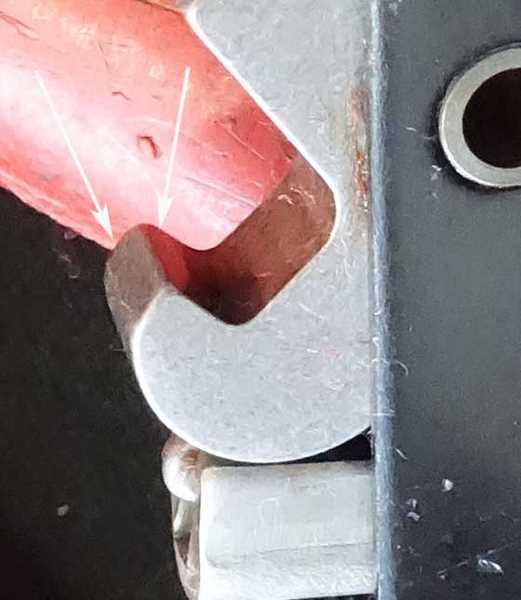
When to take off the compressor
As you turn the end cap you are also tightening the threaded rod of the compressor. Turn cap/tighten the threaded rod. Eventually (after 2 threads are engaged) a point is reached where the compressor isn’t needed. I kept it attached a little while longer for safety. I don’t want that powerful mainspring to strip out a couple threads on the end cap!
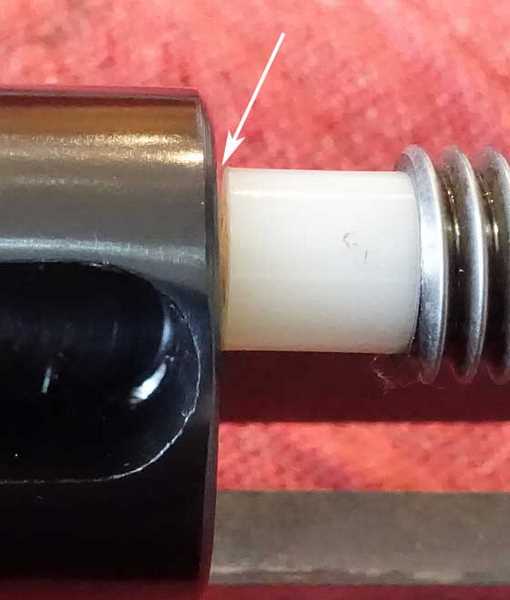
At some point, the end cap threads start holding and pulling the cap away from the compressor (arrow). This is how it looks when that happens.
This is where the end cap was when it pulled away from the mainspring compressor.
Now I removed the compressor. The end cap could be grasped all around for a better grip to turn.
Finish threading the end cap
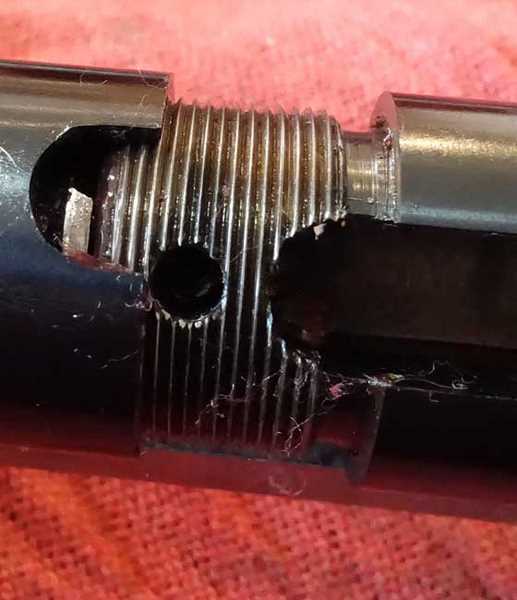
The end cap is turned all the way down to the spring tube. If a gun is new, like this R8 seems to be, the cap won’t go all the way down. There will be a slight misalignment in the end cap slot where the trigger goes. The rifle can probably tolerate this misalignment, but I can’t.
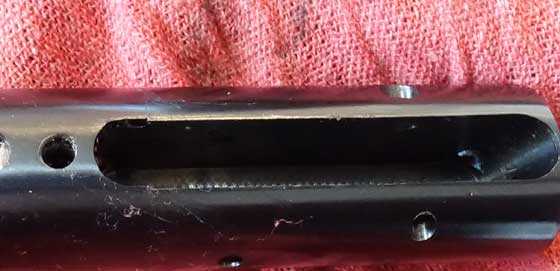
The end cap is turned all the way in, but the trigger slot is not perfectly aligned yet.
The end cap needs to be turned a little farther for the slot to align (arrow). The rifle will probably work like this, but I want it to be aligned.
To get that final alignment I used the crescent wrench and just kept backing off and twisting the end cap home until it finally aligned within a couple hundredths of an inch. If you keep at it, you’ll get it to align.
After I fiddled with it a few minutes, I got the end cap to align like this.
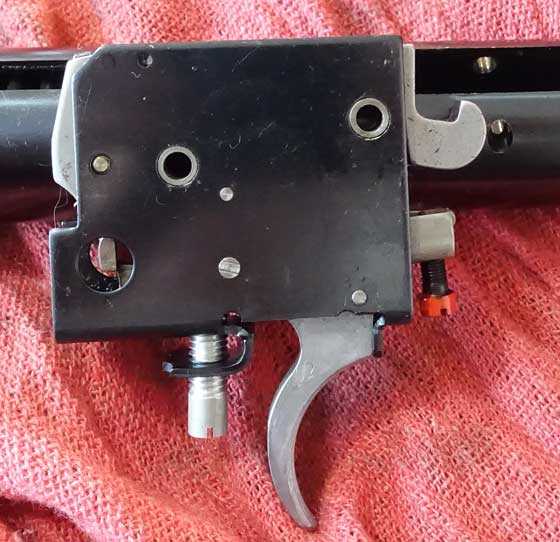
The trigger
As you may remember, the Rekord trigger in this rifle was full of tractor grease that had to be removed. I don’t like to use any grease on a Rekord. Moly isn’t that useful, though I’ve used it in the past, because the Rekord doesn’t work like you think. There’s not a lot of friction to overcome, because it works by levers. By just wiping off the grease I left a residual film that lubricates the parts all they need.
It’s been modified!
After I got all the grease off I examined the trigger parts and discovered that this trigger has been modified by someone who knows Rekords. The piston hook has been trimmed down and also beveled and smoothed to release the piston more cleanly. This is hand work, not a factory job. I’ve seen this before, but only on the triggers in HW55 target rifles. Those triggers are hand-worked by the factory like this for a better release, while the sporting Rekords are just assembled. Whoever worked on this trigger knew about the target Rekords, but they left the sporting return spring in the trigger.
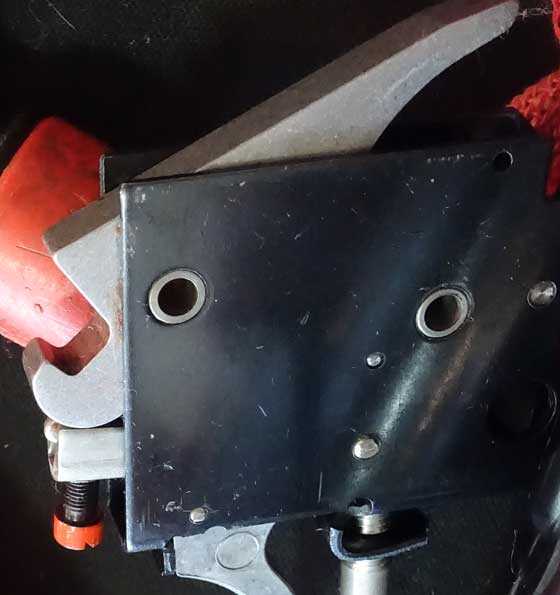
The Rekord trigger (shown uncocked) has been modified.
The top of the trigger hook has been removed (left arrow) and the engagement side has been beveled and smoothed (right arrow). This was all done by hand.
Installing the trigger
The last part of assembly involves installing the trigger in the gun. The Rekord is modular, so installation is easy.. First insert the safety bar and spring back in the end cap. Now the trigger is ready to go in. You will have to press in on the safety button to get it out of the way as you align the trigger with the pin holes.
Trigger tip
It helps to cock the trigger before installation. Do this by pressing down on the back of the piston hook until the sear catches it. You don’t have to do this, but it sure helps if you do.
The Rekord trigger is cocked by pressing down on the back of the piston hook.
Now the trigger can be installed in the end cap. It helps to shine a bright light behind the cap to see when the holes in the trigger box and cap are aligned. I install the rear pin first — and the pins are different lengths, so make sure you put the right one in the right hole.
Weihrauch machines these end caps perfectly, so the pins go in with finger pressure, alone. Just move the trigger unit around slightly while pressing in on the pin and it should go all the way through. Once the pins are installed, check the safety to see that it moved both directions and the rifle is ready to go back in the stock.
How does it feel?
The rifle shoots just as smooth as before. After a couple shots, it was time to test velocity.
RWS Hobbys
The average with RWS Hobbys is 402 f.p.s. Before it was 523 f.p.s. The velocity was increasing the more that I shot, but it wasn’t changing that much. The spread went from 365 to 429 f.p.s.
RWS Superdomes
With RWS Superdomes the average was 425 f.p.s. Before it was 503 f.p.s. The spread went from 417 to 430 f.p.s.
JSB Exact RS
JSB Exact RS pellets averaged 582 f.p.s. The previous average was 645 f.p.s. The spread was from 573 to 591 f.p.s.
What happened?
Obviously my straight lube tune didn’t work. I believe the grease I used is so tacky that it slowed the gun down too much. I used too much grease. I will ponder this awhile before deciding the next direction to take with this Beeman R8.


B.B. Pelletier,
Something is really going on. Less grease yet slower velocity? How thick/viscous is this new grease?
If I search for Air Venturi Grease it only takes me to this product: /product/air-venturi-moly-metal-to-metal-paste-1-oz?a=3498 which tells me that Air Venturi has yet to market this grease. At this level of viscosity it can’t be Tune in a Tube. Yet Pyramydair technicians have been using this product for some time. Could it be related to an automotive grease used to reduce vibrations?
Siraniko
Siraniko,
I need to learn this new grease. It’s the same stuff I told you about.
B.B.
B.B. Pelletier,
When I used the automotive grease it took some time to get the grease sorted out. Maybe simply it needs a whole lot of shooting.
Praying for the success of your cataract operation.
Siraniko
B.B.
Krytox is supposed to be the bee’s knees! Why would you not use it?
Please do a full report on it, please?
-Y
Yogi,
Youy may need to keep after me to try it. I have a lot on my plate at present.
B.B.
We use Krytox in alot of our large bore (3″ +) valves in the oilfield.
These valves use metal to metal sealing and handle 15,000 psi of bore pressure at 350F for 10 years.
Never thought to draw the similarities between airguns and oilfield valves, but from a physics standpoint they are quite similar.
Yogi,
Would you happen to know which grade of Krytox is used in airguns? Looking at the various types I would guess GPL 215 or 217 might be best since it contains moly disulfide but that’s just a guess.
Regards, Jim H.
No idea…that is why I want B.B. to use it, so I get an idea!
-Y
When will the Air Venturi grease be available?
Sp4449,
They are supposed to be working on the details now. I hope 3-4 months.
B.B.
When would one use grease versus just the Air Venturi Moly paste in the spring tube?
Do they work the same from a lube standpoint, with the grease just having the added benefit of improved dampening?
Belgrath04,
Moly is for lubrication of metal to metal. This grease was mostly for dampning, not lubrication.’
B.B.
You should try one of the tuning kits from here in the U.K, we get the very most out of the 12 ft lbs available to use, a little over £20 buy a Delrin spring guide, top hat, and adjustment washers, all the HW’s are easily improved with these kits, over here we have be careful not to go over the limit.
These kits negate the metal to metal contact at either end of the spring and a piston sleeve furthur dampens the action, the action is then run very dry, with moly paste buffed into the piston body, and a brushing of moly grease on the spring, if done correctly with the spring shortened to the correct dimensions you should achieve 11.6 to 11.8 ft lbs. with no resonance.
BB
I have never had any of my springers apart and ,of coarse, have never tuned them. I find your tuning reports very interesting ( and sometimes intimidating ) and, in this case, the fact that a grease you obviously trust has given you a result that is opposite of what you expected demonstrates to me just how much art is involved in this practice. I may undertake it sometime but for now I’m apparently not sensitive enough to my guns’ firing characteristics to even be sure that they need work ( they are 1980s vintage Diana 45, Diana 52, and FWB 124 so maybe they don’t need work ) and I don’t feel I know enough yet do the work if they needed it. I will keep reading your blog ’til I do though !
As an aside, did the tornados in TX yesterday hit anywhere near you? They are a concern all spring and into the summer here in KY and I can’t imagine what it would be like to live where they’re not a threat ( which is , surprisingly, most of the rest of the world.) Tornado warnings have been such a normal part of my life, for my entire life, that I grew up thinking that every kid grew up fearing them like I did. I still would never own a home without a basement, how ’bout you?
Halfstep,
Lotsa wind. No tornados. I don’t allow tornados to come where I am!
B.B.
BB,
Only so much wind can fit in any given area, huh? 😉
RR
That was funny, I don’t care who ya are ! 🙂
Halfstep,
I will be tuning an FWB 124 soon.
B.B.
I will be watching for that one. I shoot my Dad’s old 124 all the time. It’s been resealed and I lubed it with “Tune in a Tube”. Other than that it’s stock.
Mike
Halfstep
Thought you might be interested in this. I messed with the Wildfire yesterday. I wrote a reply on yesterday’s blog about what I tryed. And by the way I’m liking my Wildfire a whole lot more after messing with it. But here I’ll copy and paste it here if you missed it and possibly interested.
“Gunfun1
April 30, 2017 at 3:00 pm
Well it was still raining here this morning but stopped a bit ago. So decided to try something with the Wildfire. Something in particular with the trigger pull.
Found something interesting with the trigger return spring. First off it is heavy. Second thing the hammer spring is kind of a medium weight spring.
I didn’t want to mess with the hammer spring cause I thought it might change velocity and fill pressure if I lightened it. Although a lower fill pressure wouldn’t bother me as long as velocity stayed fairly close to what it is and still got my four 12 shot clips on a fill.
Well here’s the interesting find. The trigger return spring also controls the sear arm for how far back the hammer swings. In other words lighten the spring and the hammer doesn’t swing back as far. More trigger return spring pressure and the hammer swings back farther.
But here’s another interesting thing. With less trigger return spring pressure the gun wants to work at a lower fill pressure. Right now I have the trigger return spring set for a 1400 psi fill. I can fill to 2000 psi still and just to mention with no leak down out the transfer port to the barrel. But what does happen is the gun is basically in partial valve lock around 1500 and up psi. Real slow velocity basically.
But right now I have probably around a 2-1/2 pound trigger pull verses around 9 pounds from the factory. And now my working pressure is 1400 psi down to around 900 psi. And that just so happens to be what my 1077 liked when I converted it to a PCP.
Now I just need to see if I get a slow leak down overnight. Not that what I did would cause that. That from what I see would happen with the o-ring on each side of the tube they use that transfers air up to the actual valve that the hammer hits and sends the air to the barrel.
Anyway I can pull the trigger with the gun at my side almost like I’m bump firing a semi-auto rimfire rifle. In other words if I time my trigger pulls out with the right rhythm it sounds almost like a automatic firing. Can’t rely on the recoil the rimfire has so the rhythm is what’s important. So for me anyway I like the gun better this way. And the trigger is actually better now than the 1077’s I had. And now it would be a more friendly gun for hand pumping. So multiple benefits this way.”
Just checked a few minutes ago.
Wildfire is still filled dead on where I filled it to yesterday when I stopped shooting it for the day.
Figured it would be. I made sure that air tube that runs from the air resivoir main tube to the valve was lined up real straight. I found the locating notches that is on the transfer port side of the valve can be rotated to line the valve up with the air tube. If it cocks that 1/8″ tube to one side from not being positioned true that’s what could cause that flutter sounding fast leak down or slow leak down too.
But holding good so far. Going to check tomorrow when I get home from work again to make sure.
GF1
That is interesting but not much use to me since I had to send my WIFI back for a refund. I voided the warranty on one by trying to fix it while I was waiting on a replacement for the other one that also leaked so bad I couldn’t put air in it as fast as it leaked out. The replacement came and worked for about 100 shots then it just started blowing air out as fast as I pumped it in, so I sent it back for a refund. The one I worked on is gonna have to just sit until they start selling parts, then I guess I’ll buy a new valve. If I ever get a new valve I may try your mod because, for my use, I would like a good shot count and a lower fill PSI (and a lighter trigger for sure). I don’t think the bugs are out of these yet and I’m glad you got a good one. If your’s does have that intermitent leak again, take the mag out and stick your finger over the nipple up in the mag well and see if the sound changes. That’s how I knew my valve top hat was leaking. Have fun with yours for me cause mine were just disappointing. 🙁
Halfstep
I have a feeling the valve and internals of the valve is the same as the 1077. I think all they did was add the heavier trigger return spring to move the hammer so t has more stroke so it would strike the valve stem harder for the higher 2000 psi fill..
I think if you was to order a 1077 valve from Crosman it would work in the Wildfire. Just a guess but I think so. And I’m betting the valve ain’t over 20 bucks. Maybe even less.
Call Crosman and ask how much a 1077 valve is if you get around to it. Heck you might be able to pry some info out of them about the Wildfire valve. You never know until you try. Let m know if you do.
GF1
I tried to repair one of the WIFIs (the one I can’t send back now ) by taking the valve out of one of my 1077s and installing it in the WIFI. It leaked. The hammer spring is painted a different color on the WIFI so I thought it might be heavier. If it was, I figured it might be holding the valve open some. (it looked like the same number of coils and length but it’s made of fine enough wire that it would be hard to tell if it was thicker just by eye. Seemed stiffer to me) so I replace it with the 1077 hammer and spring. Then it was valve locked at any psi over about 900. One thing I noticed is that the Wifi hammer face was actually worn from striking the valve, like it was too soft. The second thing I noticed was that that worn spot was not in the center of the valve face but on the right half (as you hold the gun to fire) That would maybe support your theory about the valve not being struck squarely. (I think it was you that suggested that to me in an earlier post)
My next move, if I do anything, will be to take a 1077 valve apart and see if the spring in it is lighter than in the Wifi valve. If it is I may swap them out and see what happens.
I’ve been trying to understand how the trigger spring tension affects the hammer travel and I can’t see it in my head. Maybe I’ll understand after I take the gun apart again and can study that part of it better. And if I do talk to Crosman I’ll let you know what I find out. Seems you and I are the only guys here that bought the darn things.
Halfstep
What I did was have all the trigger componants together in the left half of the receiver. No barrel or valve in it. The right side of the receiver was setting on the bench with the barrel and valve.
I held the pieces in place with my finger while it was laying on the table. Then pulled the trigger while trying different length trigger return springs I had. The front of the spring rests on a little bump on the sear arm. The heavier the spring the more it pushes on that bump which kind of changes the angle the sear arm pushes the hammer back.
Go to Crosmans website and down load the 1077 parts diagram. You can see what I mean. But you can tell better if you put the one half on the table like I said above.
GF1
I’ve had these guns (1077 and Wifi ) apart so many times the print is burned in my brain. LOL I didn’t think that bump on the sear was for anything but retaining the spring, but now I understand that it also provides the force to keep the sear tight against that roller pin on the side of the hammer. If the sear has less force it will slide off that pin earlier in the hammer’s travel. Thanks for putting me on to that. Did you modify the original spring or install a different one. If you can, describe the spring you ended up with.
Halfstep
What worked the best was the factory trigger return spring shortened by a couple coils I believe it was. Basically when the spring goes in against that bump on the sear. The back of the spring just slips perfectly in the spring seat. So in other words no freeplay and no preload on the spring. A just right fit. And also that helps the trigger componants from the spring load trying to push them out when you assemble the two halves together.
GF1
OK i got that. By the way if you pinch the trigger with you thumb goin thru one side of the guard and your finger thru the other side it all stays in place taking it apart and goin back together. I posted somethin down below too.
Halfstep
Good info on taking the half’s apart.
GF 1
I called Crosman as you suggested and was told that the Wifi uses the valve BODY of a 1077 but the guts are different. He said the parts are listed on his system but have no prices yet. He’s going to talk to someone about setting a price so I can buy one.
Talked to a rep at PA and asked if others are having the problems that I am and he said ” yes ,this hasn’t been a very good product launch for Crosman. We’ve had a lot of returns”. He also said that a Crosman rep told him they are trying to get it fixed, but he didn’t know what “it” was. The guy I talked to at Crosman said he was unaware of a problem since he had only processed one return himself. When I told him what the guy at PA said, he said that most of the sales were going through them and they may have a more accurate impression since they would be dealing with the early (30 day) returns. He said Crosman is not even selling them from their website yet. He also confirmed that the hammer is a 1077 with a heavier spring attached.(and a different part no.) So show yours lots of love, she’ a rare keeper.:-)
Halfstep
Yep I knew PA was the only one selling the Wildfire that I know of. If you go on the Crosman site it directs you to get it from PA.
And I wonder what the different things are wrong with the guns PA has gotten back. I do know there is some customer reviews on the PA Wildfire webpage. Guess I should read those and see what people have to say.
But I’m going to say it straight up. I think Crosman messed up making it a 2000 psi gun. The 1077 I converted to a PCP worked great at around 1200 psi down to 800 psi. I could fill it to 1400 psi but that clip was down about 50 psi. So at 1200 down to 800 psi. I was getting 48 shots with a 30-50 fps higher velocity than Co2.
And yep definitely going keep the love going on my Wildfire. Gaurentee you I’ll keep it shooting using 1077 parts.
Halfstep,
I tried posting this to you earlier, but it did not seem to take.
Get some Tune-In-A-Tube.
https://www.airgunproshop.com/shop/tune-tube-airgun-lubricant/
Shoot your Diana 45 some and then remove it from the stock and apply a small amount as directed. You will likely have immediate results. I used a small amount in my Diana 46 and it went from a cranky cocking and buzzy shooter to a smooth, quiet cocker with a solid thump shot cycle. The difference was as stark as night and day.
RR
Thanks for the info and link. I’ve seen this product mentioned here many times but didn’t really know what it was. If it can be applied without taking the action apart I may give it a try.
Halfstep,
That is what is so great about it, you do not have to take the action apart. It comes in a syringe that allows you to apply it through the slot in the compression chamber. Start with a very sparing amount and if more is needed, it is easily applied. Just follow the directions.
RR
By dampening the buzz ,vibration,whatever, does it make the gun easier to keep on target, easier to shoot accurately, or just make the gun quieter if the noise bugs ya ? Same with the cranky cocking. Does it make it cock more easily or just quieter.
Halfstep,
By reducing the vibration, it does make it easier to keep on target. I also used it on my Webley/Hatsan Tomahawk, one of those uber magnum sproingers. It had a very rough cocking and firing cycle. The lube job quieted and smoothed it right out. The “cranky” cocking comes from the spring twisting and rubbing against the compression tube and piston. A little lubricant makes the parts slide against each other easier.
I am sold on it. It will not fix things that are broken, but it does help things work smoother.
Thanks RR,
My RWS 52 and FWB 124 don’t have any issues that I can detect but I may just be too dumb to know that they aren’t shooting as well as they could be. I haven’t shot the RWS 45 in many years so I think I’ll get it out and see if I can detect what you are talking about. If I do, I’ll buy some of this and try it out.( will probably do all three at that point just to see if it makes a difference) The website says that it may cause a reduction in velocity and I would have to consider that if I were to put it on the 52 and 124. Do you get a noticeable reduction when you use it ?
Halfstep,
I honestly do not know as I did not have a chrony at the time. With the Diana 46 I probably do not think so as I did not use very much and I did not notice a shift in POI. With the Webley I am certain as I used a considerable amount.
B.B.,
How disappointing. I am at a bit of a loss for any suggestions other than some silicone chamber down the air port to provide some extra sealing on that white piston seal and to double check the breech seal.
As for the cap on the compressor not turning,.. my immediate thought is to find a well fitting bottle cap and slip over it. Lube the inside to facilitate slippage and add a couple of lubed washers inside.
Good luck B.B.. Darn you anyways!,… now you will have me pondering this “quandary” all day, while at work! 😉
Chris
Also, if that piston seal rotates at all,.. perhaps it is not in the exact same position that it was in? Even though you said that seal and the bore looked fine,. perhaps it was “wore in” with a unique profile?
Chris,
Theoretically the seal rotates. This one doesn’t.
B.B.
B.B.,
Well, that is good then and eliminates at least one thing. As you can guess,.. I was thinking of everything looking good, but having a bit of a out of round situation going on,.. that the piston ring may have worn itself to match.
With a seal that is relatively hard and (does) rotate,… that could be a factor to consider during reassembly when using a stock/old seal. A quick check with calipers would also be another way check to for specific wear anomalies.
Hope the “new” eye is as “good as new”.
Chris
BB,
Wow, that is some tacky stuff! I do not know how much you had put on the piston, but you did not seem to have that much on the spring.
Now, did you shoot the pellets in the order in which you recorded them here? I ask this because each pellet’s velocity was closer to it’s original velocity as you progressed. Perhaps things are settling in and the grease is becoming better distributed? Perhaps with more shooting you will see a velocity increase?
You commented that the shot cycle was as smooth as previously. Have you tested the accuracy as of yet? Perhaps there is a subtle change in the shot cycle besides the obvious reduction in velocities that will have an impact upon consistency and grouping?
Perhaps if you were to stand the rifle on it’s muzzle at a slight angle so that if you place a couple of drops of silicone chamber oil into the compression chamber slot, it will soak down around the piston and maybe loosen up some of the tackiness? Leave it like that for a couple of days and see what happens?
RR,
I shot the pellets in the same order as before.
No need to test the accuracy. It will remain the same.
I probably used too much of this grease. That’s my thinking at this time.
B.B.
Everyone,
I’m having my cataract surgery on the other eye today. My eyes are dilated now and I cannot read the screen very easily. So don’t expect many answers from me today.
B.B.
B.B.,
Hope all goes well. Thoughts and prayers.
Praying that all goes well for you!
BB
Praying for ya. Let us know how you are.
B.B.
My prayers are with you Sir, for an excellent outcome on your other eye as well. Take care and God bless.
Errol
Good luck with the surgery.will be great to have two good eyes.
BB
You have said enough for today. Sending you a prayer that your surgery goes well.
B.B.,
Like RidgeRunner I looked at your photo of the spring, and it looked like a modest amount of the grease to my eyes. Then again, I have never opened up an air rifle, so I don’t know how much is too much. It must be extremely tacky.
Then again, might this air rifle have extraordinarily close tolerances? Perhaps it needs almost no lubrication at all. Might it shoot smoothly with only a light oil for wear and rust prevention?
Michael
Puzzling, to say the least.
Michael
At the Malver show this weekend there was one R8, 3 HW 50’s (old type), and one HW 55. I did not come home with any of the above. I did make some benificial sales and purchased some interesting airguns.
“The rifle can probably tolerate this misalignment, but I can’t.”
Roger that, B.B.! I would feel the same way. =)
My trip to Malvern,
I live about 4 1/2 to 5 hours from Malvern. I had gone to every Arkansas show for the last 20 years until last year when I was not able to make it. In all but the first two years I have had a table, not so much to sell a lot of stuff, but to have a home base at the show.
This winter my shoulder has been bothering me. When it got to the point where I couldn’t wrap my arm around a gun stock I made an appointment with the doctor. The final result was shoulder surgery on April 12th. I didn’t think I would feel up to doing the show so I didn’t get a table or rent a hotel room. But, when I read the post of the guys heading towards Malvern I couldn’t take it. I called my brother Bryan, and asked him if he would be willing to drive me to Malvern for a long day trip.
I got up at 5:00 and got to Bryan’s by 6:00. We got to the show around 10:30. It was fun to get to see everyone. I looked around the tables a few times and got to visit with a whole lot of friends I only see at the show. There are still a lot of guys I know but can’t remember their names but I was amazed this year at the people’s names I did remember.
After about 3 hours at the show we went and had barbeque and headed home. Bryan and I talked all the way there and back and the day flew by.
Of course, I would rather have the full weekend and have a table but I proved to myself that a long day trip is much better than not attending. I hardily encourage guys that can’t make the full weekend to make a day trip, even if it will be a long day.
I want to say thanks to Bryan for driving,
David Enoch
B.B.
Good luck with the cataract surgery. Hope all goes well.
Ken
Here is a very interesting video. Hope this link works. It shows how to disassemble a HW50. It also shows the added insert on the cocking arm to prevent galling. Sometimes the names HW50 and HW50S are used interchangeably. The video was made in 2015. My question is can anyone tell if this is the same as the current HW50S being sold now?
https://www.youtube.com/watch?v=-rCKzgY_-x4
Ken
The S or mark II has the Rekord trigger. The Mk 1 does not. In addition, this model in the UK is called the HW 99. Go figure…
-Y
Yogi
Does the current HW50S come apart like this? No spring compressor needed?
Ken
Never say “No Spring Compressor needed”. YMMV.
Some people say that it is easier to unscrew the rear block while the gun is horizontal not vertical.
-Y
Pelletpopper,
As stated in the youtube video you linked, the gun being disassembled is not an export (FAC) HW50S therefore does not have the larger spring with more pre-load.
If you plan on taking apart an export version/higher power version of the HW50S I would strongly encourage you to use a spring compressor.
Pelletpopper,
Your youtube video link shows the current HW50S being sold now. The dead giveaway is that the end cap is pinned not threaded.
Based on the checkering, with the Weihrauch name on the forearm, it looks like the current model.
B.B.
I hope number 2 turns out as well as number 1 did.
My thoughts and prayers are with you, the force too….
-Y
Hmm, would Tune-in-a-tube have been better?
Thanks for the information. I think I will stop holding my next order to Pyramyd AIR waiting for it. In four months I am sure I will need to order something else.
Just another data point for you. I tuned my R8 with a Maccari spring, guide and piston seal a few years
ago. I used his moly paste on the piston and his tar on the spring. After the tune it was shooting
7.0 gr Hobbys at 701.6 fps and 7.72 gr (JSB?) Diablo Match at 690.1 fps. It’s a very fine rifle, probably
the last one I’ll ever sell (well maybe that honor would go to one of the HW55’s, they’re all great!).
Best wishes,
Jay
New vs. Old HW50
I’m reading comments on the blog which illustrates the confusion that Weihrauch created by manufacturing two very different airguns that have the same model number, HW50.
Let me try to point out the differences between the models to hopefully minimize confusion.
Manufacturing of the old HW50/R8 ended in the late 1990’s. Production of the new HW50/R6/HW99 began in the late 1990’s.
The differences between the old HW50 (R8) and the new HW50/HW99 (R6) are:
Old one: threaded end plug like on the R1
New one: press in end plug like on the R9
The piston and chamber are different diameters, The old HW50 (aka R8) uses a 25mm piston and seal. The newer HW50/HW99 (aka R6) uses a 26mm piston diameter and seal. The tube sizes are identical in these two guns it’s the id that differs. The newer HW50 tube is thinner. The new HW50 also has much shorter transfer port.
Kevin, which would you say is better? New or old? Just wondering.
Doc.
Doc,
That’s a huge question but let me try to answer.
Here’s my disclaimer: I’ve probably owned over 50 different older HW50 guns, including the HW55 models which are mechanically almost identical. Triggers differ slightly and stocks are different.
“Better” is subjective because every airgunner has their own priorities. If you want power then the newer HW50 is what you want since it’s slightly more powerful than the older HW50.
If your priority is a good trigger then an older HW50 with the rekord trigger, not the perfekt trigger, will be equivalent to the newer HW50. If you want a target trigger and will settle for less power than the older HW50 get an HW55 (speaking in general here. I had an HW55 tuned by Paul Watts that exceeded all but one older HW50/R8 that I owned).
Bear in mind that the older HW50 started being made in the 1950’s. Many early guns had from the factory or now have problems with leaking compression tubes (bad solder joints). Never heard of an R8 having this problem or the late model older HW50 guns.
Many different stock styles on the older HW50 guns so there’s something for everyone. Being an American and growing up in the west I prefer the Gary Goudy stock design found on the R8 best (I had a few tyroleans on HW55’s that fit me well though).
Lastly, before I answer your question you need to know that I prefer a springer that is easy to cock, mid powered, not buzzy or jumpy that I can hit the target with every time. Your preferences may be different.
With that said, I’m not a fan of the newer HW50S because for the small increase in power it’s very buzzy, harder to cock and even when adjusted you need to slap the barrel to open it.
I never de-tuned a newer HW50 but that might be the cats meow.
Kevin, Thanks for your insight! Nice to know.
Doc
Kevin
Did the older 50 have a synthetic piston seal or was it leather. I never owned a older one. But maybe a leather seal aids in buffering the shot cycle.
Don’t know why but I never thought of that before. Maybe that’s why the older springers shot smooth.
Gunfun1,
Yes, the older HW50 had leather piston seals. Over the past 60 years many have been converted to synthetic since all it requires is an inexpensive adapter that fits onto the piston. All R8’s have synthetic seals.
Not sure a leather seal completely explains a smooth shot cycle since there are many more issues in play. The lower power certainly contributes to the docile behavior of a typical older HW50 but without tight tolerances there are many airguns that can be jumpy and buzzy in this low power range. I’ve owned several R8’s (all with synthetic seals) that shot to spec and shot smooth.
Kevin
I have been thinking real hard lately about getting me a new HW30s.
But you know what. After hearing more about the older HW50 shot cycle and velocity. Maybe I should look into getting on of them first before I get a HW30s.
Are they still in the same weight catagory as the HW50s? Without looking I think the HW50s is around 5-1/2 pounds.
Gunfun1
According to the Pyramyd site the HW30S weighs 5.5 lbs. The HW50S weighs 6.8 lbs. Weihrauch also sells a HW30S Deluxe that has a nicer stock. It weighs 6.1 lbs. but Pyramyd does not carry it. I asked them if it could be specially ordered, they said no. I too am interested in a HW30S or a HW50S but am undecided as to which one.
Ken
Ken
Yep your right. Don’t know why I thought the HW30s and HW50s was the same weight.
I had a new HW50s a while back. Was a nice shooting gun. What I’m looking for is a lighter lower velocity gun for plinking. Something easy to cock also. So probably will get a 30s when I get some money saved up. It keeps nudging at me that’s for sure. 🙂
Gunfun1
Looks like we are pretty much looking for the same thing. I am looking for light weight, backyard friendly, offhand plinker. I prefer .22 because the pellets are a little easier to handle and for no other reason, it just leaves a bigger hole ha ha. Been looking at the HW50S or maybe a RWS 34 Panther. But it might be a little heavier than what I want.
Ken
Ken
I think you would be happy with a HW50s. The RWS 34 I can’t say. Never owned one of those.
I got a new HW50S from PA about a year ago. Actually got it of the Reman/Refurb’d section, although it looked brand new. I put about a tin of pellets through it, and was really enjoying it – then B.B. tested Tune-in-a-Tube. I put some of that in it, and although I thought it was a smooth shooter, that really smoothed it out. I think you’d like it. It’s a .22, and I have not put a scope on it.
Jim M.
Jim
I have gone the Reman/Refurb’d route in the past and have been very satisfied with all purchases. A HW50S does not seem to turn up very often on those lists. Thanks for the info.
Ken
Kevin
Thanks for your input on the confusion that Weihrauch created.