by Tom Gaylord, a.k.a. B.B. Pelletier
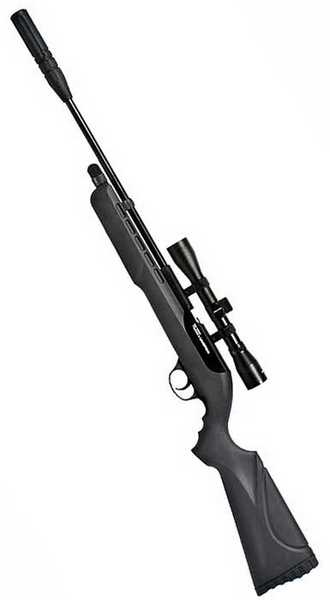
Umarex Fusion CO2 rifle
Part 3 of most reports is the day we test accuracy. Sometimes, we test accuracy more than one time; but Part 3 is usually when we test it for the first time. But that isn’t going to happen today. Blog reader mikeiniowa told us that the Umarex Fusion CO2 rifle rifle has both adjustable power and an adjustable trigger. I said I would look at that in detail when we got to it. Well, today’s the day.
The CO2 cap assembly
Before I get to either of those things, however, I want to talk about the CO2 cap in detail. I promised I would show you how this works, so I’m going to take it apart and show you the internals. I’ll also try to describe why the cap is as complex as it is.
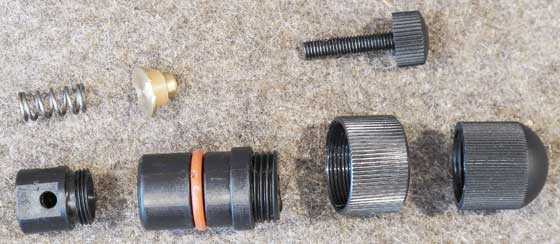
The Fusion CO2 cap disassembled. The parts are described below.
Let’s examine the parts, starting at the right of the above image. That rounded cap is the cover for the gas exhaust screw. It has left-hand threads, so you must remember that because it’s made of plastic and can easily be stripped. Next to that is the threaded metal cap that holds the CO2 cap assembly to the rifle when there’s pressure in the gun. One of our readers noted that this threaded metal cap is separate from the main CO2 cap assembly. It has to be made that way because of the o-ring. When gas is in the gun, the o-ring swells and will not permit the CO2 cap to be removed. If the threaded cover was attached to the main cap assembly, it would be locked in place until the o-ring finally returned to normal size — you couldn’t even turn it. Back in the 1960s, it sometimes took days and even weeks to get the CO2 cap out of some guns because of the way they were designed! The threaded cap retaining ring, as I call it, was created to allow the cap to be removed when the main cap was frozen in place from internal pressure.
Crosman came up with the idea of making this threaded retaining ring separate from the main cap assembly. That allowed the threaded ring to be taken off the gun, and then the main cap assembly could be removed from the gun by wiggling it from side to side. That one change reduced the time to remove the CO2 cap from days to minutes! The Fusion uses the same design to achieve the same result. But if the o-ring didn’t swell in the presence of the gas, this type of design wouldn’t be necessary.
The pressure-relief screw seen above the first 2 parts on the cap pushes against the brass part seen to the left. That opens a way for the gas to escape. The coiled spring holds the brass valve seat shut at all other times. This is why it is important to back off the pressure-relief screw when piercing the CO2 cartridges.
The long part with the orange o-ring around it is the main cap body that all the other parts assemble to. As seen in the picture, it’s a hollow plastic tube. And the part to the extreme left houses the piercing pin. Though the part is plastic, the piercing pin is a metal insert.
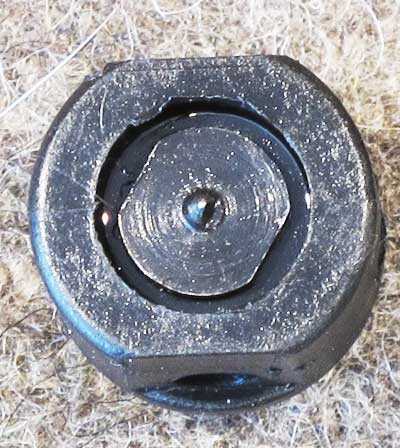
The piercing pin inside the plastic cap is a metal insert.
Trigger and power adjustment
Okay, now we understand the CO2 cap, let’s look at the adjustments on the gun. To get to them, the action has to be removed from the stock, and it isn’t as straightforward as it is on some guns. The forearm has one screw at the bottom front. Once it’s out, the trigger unit has come out. That’s where it gets complex. The rear screw fastens a separate piece of plastic at the back of the triggerguard and holds the rifle to the stock. Take it out, and the barreled action is loose in the stock; but 2 more trigger screws have to be removed.
Once the trigger unit was outside the gun, I saw what it is — a unitized trigger that is highly based on the Crosman 160s trigger. It isn’t a copy, but it works the same with most of the same parts. Only the safety slide is different.
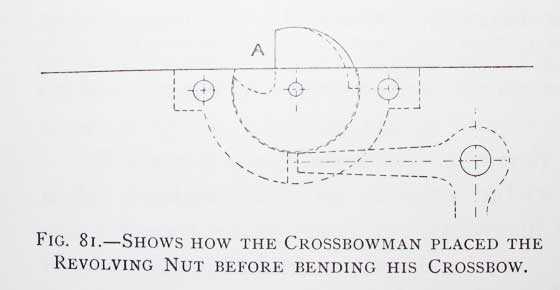
From Sir Ralph Payne-Gallwey’s book, “The Crossbow,” (published in 1903) this illustration of a 15th century crossbow nut shows how a great force can be overcome by a smaller one.
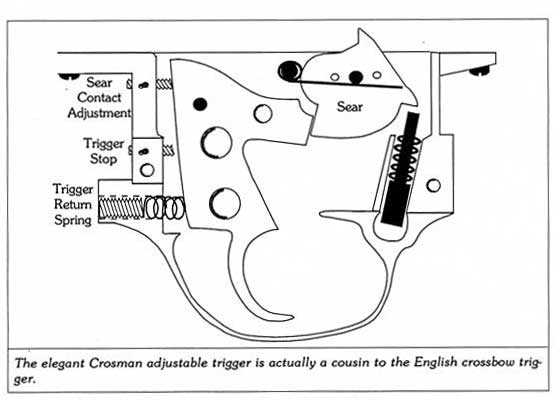 From the Beeman R1 Supermagnum Air Rifle book.
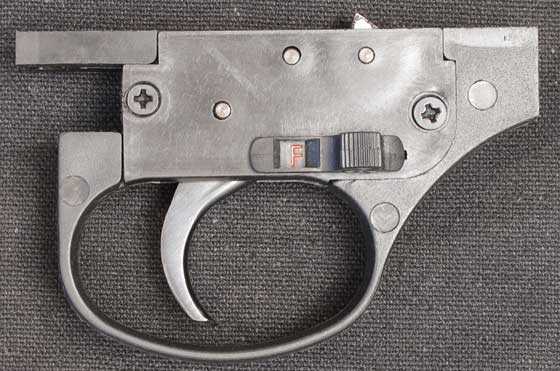
I didn’t have to open the Fusion trigger to see that it’s very similar to the Crosman 160 trigger.
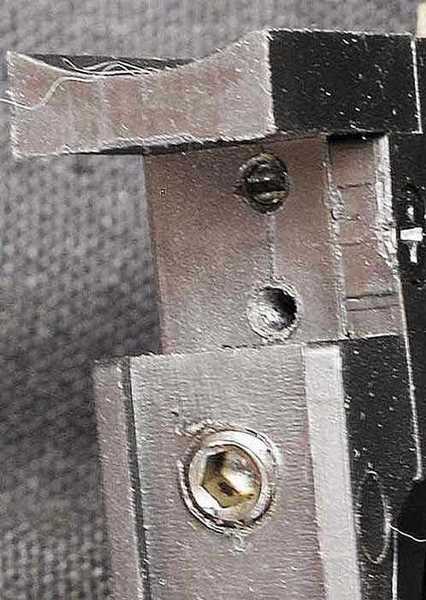
Apologies for the blurry image. Like the Crosman 160 trigger, the sear engagement is adjusted by the small screw at the top. There’s no screw in the hole below that, which is the trigger overtravel adjustment. The large Allen screw at the bottom adjusts the trigger return-spring tension, which is the weight of the pull.
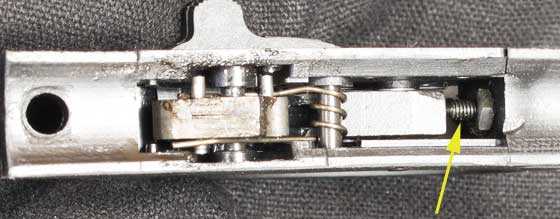
The threaded sear adjustment screw is shown at the right (arrow).
I tried adjusting the trigger, but apparently I don’t know the secret, if there is one. I couldn’t take the second-stage creep out of the sear without making it impossible to cock the rifle. I settled for lightening the pull to 3 lbs., 5 oz. But the trigger still had a lot of second-stage creep.
I’m hoping mikeiniowa will tell me that I missed the trigger optimization screw that fixes everything; because each time I adjusted the trigger, I had to assemble the rifle in the stock to test it. I bet there’s more to this trigger than I’ve discovered. And, of course, none of this is in the manual!
The power adjustment is very straightforward. Simply tighten or loosen tension on the striker spring with a screw located at the rear of the receiver.
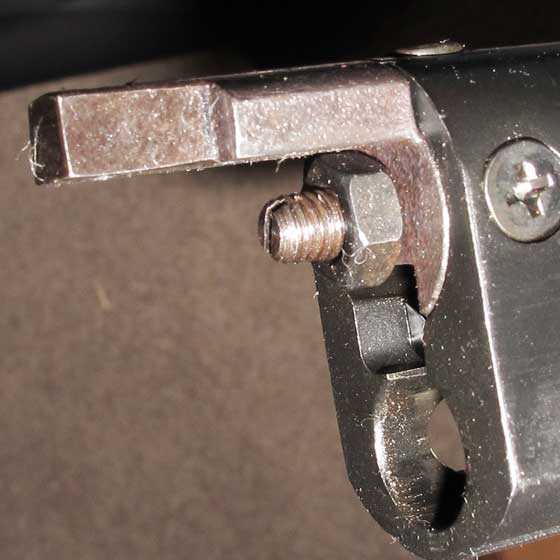
The power adjustment screw and locking nut are located at the rear of the receiver.
Observations
The Fusion has some interesting designs, but I don’t think they were done by an airgunner. Each area shows a lot of attention to detail, but the complexity of the CO2 cap shows the designers were either unaware of the advances that have been made in CO2 gun technology, or for some reason they thought this was the best way to design it.
The trigger shows potential, but I obviously don’t know how to make it sing. I hope somebody will take me to school.
Given the complexity of working on the Fusion, I can see why the instructions for these adjustments were left out of the manual. If you are smart enough to find them, I guess you’re qualified to adjust them!
Accuracy is next!

BB
I could be looking at this type of trigger wrong. But if it works like the Crosman 160 trigger like in the 5th picture down. I think maybe this is whats going on.
It seems to me that the top set screw needs to be adjusted in. (the 1st stage sear contact adjustment) So the trigger is ready to fall off the sear.
If you look at the sear the trigger will actually push the sear up as you pull the trigger. So that’s your first stage. And how long you want it to be.
So your second stage should just come up and touch the sear and back it off maybe a 1/4 turn after you adjust the first stage. If you want to adjust the first stage longer or shorter you always need to touch off your second stage and back it off a bit. That will keep the two adjustments balanced.
I think you may have been backing the first stage sear adjustment screw out thinking it would make it longer but you were actually putting more pressure on the sear raising it so you could not pull the bolt back over the sear. Not implying. Just a thought.
I don’t know if I explained this right. But the best I can say is they (first stage and second stage) both have to be kept in the same location to get that crisp fall off on the second stage.
GF1,
I guess I didn’t spell it out, but that’s exactly what I did. When the screw went in, then gun no longer cocked.
B.B.
If you look at the safety (no shown in post) you will see there are two small tabs, the front one is what moves the safety to the safe position when the rifle is cocked. The rear one is the actual safety for the trigger. It stops the trigger from moving when in safe mode. When you adjust the sear engagement if you go to far the trigger hits the safety tab and won’t go farther, if misadjusted the tab will not be able to get past the trigger when cocking the gun…the length of the tab for the safety is not adjustable and is set to keep the lawyers happy. If you need to have a crisp let off you will need to shorten the rear tab very carefully, this is an “if you don’t know what you are doing leave it alone” type job….if you are skilled enough it is possible to get a very crisp let off. There will always be some creep due to the design but when set up right it is not noticeable to most shooters, take up first stage then just a hair more and it fires…the trigger had to be made this way to get past safety inspections in China and the US…
Mike,
Since this isn’t my gun I will leave it alone. But thanks.
B.B.
Mike,
I should add that you explained that very well and I think I now understand what’s going on. I see why just a small adjustment stops the gun from cocking.
B.B,.
Having some input on the design helps understand some of this reasons it’s made the way it is…Xisico has the same rifle without the muffler and a wood stock…
Mike,
I remember that very well. I remember talking to you about the rifle in Malvern.
B.B.
mikeiniowa, I like how the Xisico comes in 22 cal too! I hope Umarex comes out with one in 22 cal too. Along with an updated cap and/or seal.
BB,
Thanks for the trigger info. I have a very deep interest in how things work have always enjoyed in depth explanations of such, most especially on this particular subject as I desire to design one.
Ridgerunner,
I know what you mean. Given that the desired end result of releasing the hammer (for CO2 and PCPs) is always the same, it is amazing how many different mechanical approaches there are to that end. As evidenced by the discussion here, it often takes some serious head scratching to figure out how they actually work. Some of them still baffle me. And these are just the CO2 and PCP triggers that might be holding back 10 or 20 pounds. I still haven’t totally grasped how my RWS54 trigger grasps and releases 200 pounds of spring force with such amazing precision. I love the animated youtube videos that people do for complex mechanical mechanisms. They are a great way to learn. Wow, am I a geek or what……. but I know I am not alone, LOL.
Lloyd-ss
I always like to see the adjustments of different triggers. Triggers are all so simple, but at the same time their geometry is really quite complex. Angles and radii, positioning and ratios are all things I like to pay with even if only as a mental exercise!
Boy! I and po’d at UPS! I used to recommend them, having had few screw-ups in the past. It seems that they are becoming artists at messing up my day recently. My latest purchase, that tiger stripe LG55 that I linked to, arrived in Commerce City, CO, last Thursday (the hub for my area). It should have been delivered on Friday, but wasn’t. I thought, darn, have to wait the weekend and get it Monday. Didn’t come Monday either…. Yesterday I find out that they sent it back to it origin shipping point and now it is on its way back across the country. I contacted their customer service and they were most unhelpful refusing to even admit that UPS even made a mistake! I tried to get them to intercept the package and send it overnight from there so I’d have it today, got profuse apologies, but again a refusal to actually do anything about it. I have to wait until after dark on Halloween for its rescheduled delivery and hope it makes it here then… Not the first time I’ve had this happen, but the first time dealing with their customer service. I won’t be using them anytime soon. None of this was the seller’s fault, it’s all on UPS.
/Dave
Shipping company mottos:
UPS-Ur parcel, squished!
FedX-We don’t need no stinkin’ trunk monkeys!
Trunk monkeys! Lol! I haven’t seen those videos in a long time! Gonna have to dig them out again!
Sometimes things happen. A guy on the forum I go to ordered a tank system for his PCP’s. We’re in Canada… the tank went to Brazil!!! It was sent USPS and then it was lost and never heard of again.
It’s all the same, no mather the carrier used they can all make mistake and workers who just don’t care about their work will do the bare minimum in order to get their paycheck and not get fired.
J-F
Yeah, people make mistakes. I make mistakes… But the difference here is I try to make mine right, not just blow it off. UPS’ service always was great for me in the past, but it seems like they are either screwing up more, or my luck just ran out. This isn’t the first time they’ve sent one of my packages the wrong way. I never contacted them before because I Kew it would do no good, but this time I just had to bring out to their attention. Big surprise? They could care less…
You should see how it works for us up here!
They charge us crazy brokerage fees and there’s no way to get justification for it. They just seem to pick a percentage fee out of a hat and sometimes you get it at the same time as your package and sometimes you get a bill later and sometimes you get BOTH. My mom once received the bill for the brokerage BEFORE the actual package which they lost and she never received!!!
I wasn’t trying to say they didn’t suck, all I’m saying is I don’t think they’re they only bad ones, if you ask everyone has an horror story with every shipper.
Shippers are a weird mysterious kind…
J-F
Bummer, Dave! If it makes you feel any better, when I read the beginning of your post, I jumped to the conclusion that your new rifle had been damaged in shipping. Could be worse, I guess!
I just happened to have another chance to shoot an LGV Olympia over the weekend. I think this is not too different from the LG55, right? What a great experience! Gorgeous; great ergonomics; bank-vault mechanicals; awesome trigger; mega-accurate; barely even feels like a spring piston rifle. Puts a smile on your face that is tough to wipe off!
Dang, this sort of fawning probably isn’t helping your patience, Dave. Sorry!
B.B., this LGV made me think of you, and not just because I was shooting it on the DIFTA range. The owner had acquired it while in the Army in Germany in the ’60’s. He and his buddies were using the LGV and other airguns for target practice in the barracks. This was allowed, and they were allowed to keep the airguns in their foot lockers, until dead crows started falling from neighboring rooftops. Then the airguns had to go live at the armory.
-Jan
No worries… The wait won’t kill me. Just a little upset because I ordered it as a birthday present for myself and I knew it would be at least a few days late, but not a week and a half. I guess if it gets shipped somewhere else or damaged, I’ll deal with that then.
Happy Birthday Dave !
J-F
Thanks! It was only after I ordered it that I realized that it was appropriate. Turn 55, get an LG55!
LOL then I’ll never get a TX200
J-F
/Dave
Mine was just the 17th of this month. So what are you? A Libra or a Scorpio?
22, Libra, on the cusp. (Which is just to say in astrological terms for those who believe in it, that I’m more confused all of the time than most…)
/Dave
Yep now everybody knows what’s wrong with me. I’m always trying to balance out the situation. Makes my life interesting sometimes. Sometimes its fun. Sometimes its a pain in the butt. 🙂
That sucks, but if you’re thinking of going back to the United States Postal Service think again. I called once about checking on some package so the polite young man on the phone said that he would check. Ten minutes later, I broke the connection and called back rather irate. I got the same guy and without accusing him directly told him with thinly veiled anger what had just happened. Unruffled, he told me that he would check on it, and 15 minutes later, I broke the connection…. What could I do? Ranting and raving at him personally would have no effect, and I could imagine a complaint getting shuffled away in the bureaucracy.
Matt61
USPS? Not a chance! Seems that most postal employees are the epitome of the “could care less” crowd.
Options are limited. UPS is my favorite one here (USPS is not bad, either), mainly because I know all the drivers and they go out of their way to deliver stuff properly. Fedex delivered one of my Xmas presents to an unsuspecting lady halfway across the county! If the lady had not been honest/nice enough to do a little work and look up my wife(and I’m sure she had other things to do, a few days before Xmas), Fedex would have considered it fine, as they marked the item “delivered”!
It seems over complicated for no apparent reason…
Engineers sometimes seem to have a hard time with the KISS principle. Sometimes there is no way or need to make a better mousetrap.
I’d still like to give the rifle a try 😉
J-F
JF,
I think most triggers look overly complicated, too. Almost like they started with a simple design, but then had to do a bunch of little mods to get them to work just right……or not. I bet it is more difficult than it appears.
Lloyd
I wasn’t talking about the trigger. I was refering to what you have to do to adjust the trigger and how you have to load the CO2. If I’m trying to establish a cannonball record from NY to LA I’m not going to go thru Miami even if it’s a nice place to visit.
J-F
BB,
The little extra tidbits you put in your blog can be so provocative, and the picture of the crossbow nut is definitely one! I saw a similar (maybe the same) picture in a book I checked out from my junior high school library almost 50 years ago. (Yes, i did return the book!) I have always loved to make things and using that book as a guide, made a cross bow with a nut almost identical to the one in the picture. I remember the details vividly. I had a table saw and router for making the stock, and an electric drill was my only powered metal working tool. I got a leaf spring from a small foreign car at the local junkyard, and ripped it lengthwise with a hacksaw. That took several days and many blades. The stock was 2 pieces of mahogany, routed out between the halves to accept the nut and axle, and the long trigger lever. It had a removable cocking bar and shot short bolts made from 3/8 diameter hollow fiberglass arrow shafts with heavy steel field points. It was serious beast and I remember accidentally shooting through the asbestos shingles and wall of the workshop. Luckily, my dad understood the primal need to do that sort of thing so long as I didn’t hurt anyone other than myself, LOL. I apparently sold that crossbow in my late teen years and that is one project I really wish I still had. So again, thanks for the “trigger” picture. It is nice to retrieve those lost pleasant memories.
Lloyd
Lloyd,
That book you read is the same one mentioned in today’s report. I believe Robert Beeman has a few copies left to sell. They are listed on his website if he does.
B.B.
RIP Jack Haley.
The airgun community has lost an enormous asset.
kevin
Kevin,
That is sad news — except that Jack is finally out of pain. I knew Reba better than Jack, because she is so friendly and outgoing.
B.B.
B.B.,
You’re right of course. No more pain.
Reba and Jack reminded me of you and Edith in that the sum is greater than the parts. Hope you’re both doing well. You’re both in my thoughts often.
kevin
Kevin,
I’ve said it more than once: Tom and I share a brain. Which, I guess, means that neither one of us has a whole one 🙂
Edith
I wasn’t even thinking about the trigger safety getting in the way of the adjustment of the trigger. It always seems the easiest things get overlooked when there is a problem.
And BB did you put some cartridges in the gun and try the end cap? How did it work out?
GF1,
No, I haven’t tried to load CO2 cartridges since I made these adjustments, but I had found that problem and fixed it in the last report. I have no reason to thinks that it isn’t still working okay.
B.B.
Oh I didnt look back. A I forgot about it.
Replyig from my phone. Sould say…..And
I just got home from work and was reading my reply I left from my phone earlier in the day.
I was correcting my mis-spell from the first reply and messed the correction up with the word (should) on the second reply.
All I know is the touch screen keys on my phone are smaller when I reply to the blog verses my phones touch screen keys when I txt.
I wonder if that is related to the blog or my phone? All I know it is easy to double key or skip when I do the blog replies on my phone because of key size. I have not tryed a different brand phone to see if that’s the cause. Maybe I will try that with my daughters phone to see.
Its my phone. Key size stays the same size on my daughters.
Those are great pictures of the trigger mechanism. I’m still waiting for Derrick to post his blog to detail the outstanding job he did on my Daisy trigger. It’s a new gun, and I’m able to hold a single contiguous hole with 10 shots at 5 yards (minus the odd flyer or two). So exactly what part of the trigger is involved in the “stoning” process to lighten its weight? This is part of my fantasy Mauser 98k. I would get a cheap Yugoslavian version made to the German wartime specs, rebarrel with a Lothar Walther barrel, mount a modern high-power scope, maybe glass-bed, and lighten the trigger.
Beazer, what’s wrong with “a good bluing job”? I don’t get it.
Duskwight, that is awesome that your grandfather was in the thick of it. I still marvel that I’ve got the Eastern Front coming out of my rifle barrel where it was apparently really packed in there, and you have a relation who was actually there. I’m sure that there was a lot of expertise in the Red Army at the end. One German sniper’s account that I read said that the Russian infantry he was shooting at was hard to hit because they were so adept at scattering, and their return fire with their Mosins was “disturbingly accurate.”
Titus, yes, the names are hilarious: Mr. Thwackum and Mr. McChokeumchild. You’ll want to look at Wemmick in Great Expectations. I guess we would call him a prepper with his castle although it was more in fun and probably more like the Society of Creative Anachronisms and other re-enactors. The unusual thing about him is that he is supposed to be a complete gopher and functionary in a bureaucracy, but right in the heart of 19th century London, which is quite a noisome place, he has created something very original and imaginative out of his living space.
Matt61
Stoning applies to any pair of surfaces in which one flat moves past another.
In the case of a crossbow nut, that would be the squared edge between the nut and the end of the trigger.
But you must ensure that such work retains a safety margin — in simple terms, pulling the trigger has to subtly push the sear /against/ the force trying to release it. {trigger on left]
//
vs
\\
where the tension on the sear can push the trigger back and release the striker.
For case-hardened edges, you have to avoid cutting down to the unhardened base metal.
B.B.,
I just received a bundle of UPS joy, my very first Crosman M1 Carbine (Croswood, lighter color version). It was advertised as in working condition, but, uh, no.
The good news is that it’s complete, including the fake magazine (although I haven’t figured out how to remove it yet). The gun cocks and fires a modest puff of air, but I cannot get it to accept bbs. I was able to gently pry (with a wood bamboo skewer) a .177 soft lead pellet out of the loading port. I also put a couple drops of Pellgun oil in the oiling hole and have worked the action a dozen times.
But when I place a bb in the loading hole it just sits there. It does not drop and roll to the back of the gun like it ought. It does not look as though it has any bbs in it by looking into the oiling hole, and I can’t hear any rattle around if I shake the gun up and down.
Any ideas?
Michael
Michael,
I sounds like someone has jammed lead pellets in the gun and they must be removed.
To get the magazine out, lift it straight up, push it forward and then rock the rear down and pull it out the bottom of the gun.
B.B.
Thank’s B.B., gunfun1, and mike in Iowa.
B.B. your pictures and your explaination helped me to completely understand how the Co2 valve assembly functions. I didn’t want to take mine apart because the Manual said that it would void the warranty, plus I figured the reason they didn’t want that to happen is because of the potential of springing internal parts every where? But after seeing the pictures I took mine apart. On first seeing the pictures and understanding how it works my first potential question was how does that brass piece seal? There had to be some O-ring or something once you backed the exhaust screw out. And as I took mine apart, sure enough there is a rubber type seat on the back of that brass piece that I just didn’t catch in the picture. Also knowing what I know now with your help the manual is actually pretty good on it’s description, but I know that I would have still been in the dark unless I had seen a video on YouTube and your explaination and photos. I love this blog!
Greg
That’s one of the reasons I like BB’s blog. If you go on other sites, forums or blogs. Some people get upset, offended and pretty rude sometimes.
And I’m not just talking about air guns.
Cars, Guns, R/C Airplanes, Motorcycles and so on. Here everybody is sensible, and they have knowledge about different aspects of the shooting hobby. And I’m not saying the other sites don’t have the knowledge going on. Here it seems everybody has a mind set to understand and make the topic more clear for somebody that doesn’t understand and to make the person feel not embarrassed if they ask that weird question. Its all about learning. And the more you learn the better you get.
My opinion. That’s a recipe for success.
Greg,
I’m glad the pictures helped you. I wasn’t able to shot the inside of the main cap body that holds the valve seat for the brass part, but you figured it out. Good for you!
B.B.
What concerns me the most about this rifle is the orange o ring. I have a Fusion hopefully arriving today. Is this o ring available? Knowing Murphy Law and my mechanical talents it would be handy to have a couple spares. It would appear to be a silicon o ringe, but assumptions usually bring on disasters.
Ray,
The o-ring is white when you get the gun. It’s colored by the Pellgunoil I used.
I wouldn’t worry about damaging it if you follow the things we have talked about here, but Pyramyd AIR should have spares.
B.B.
BB,
I appreciate the info you have put into this. My Fusion arrived today, looks good. I checked the o ring and mine is orange, go figure.
Ray
Well, it shows what negative thinking will get you. Having read that the o ring swells, I just did not imagine how much. I also did not give it enough time to warm up. It now appears that there is a split forming in the o ring. Checking with Pyramyd, they did not have one. Umarex said they expect some 12/15/2013, bad news. I really like this rifle.
It appears that Rex on the GTA Forum has found a substitute for the o rings on Amazon. You get 100 of them for around $10.
The rifle was very quiet. It showed 81 db on my iPod app compares to 94 db on a Crosman 3576. Trigger pull was 2# 3 oz.
I would like to take a look at bulk feeding, but I am new to air guns and have a lot to learn.
Ray,
Thank you for your feedback. It really helps.
I have talked to Umarex USA about changing the o-ring material and they tell me that Germany is considering it. I hope they do, because there is a lot to like about this rifle.
B.B.
“The power adjustment is very straightforward. Simply tighten or loosen tension on the striker spring with a screw located at the rear of the receiver.”
Excuse my ignorance but do you tighten or loosen for more power? Is it the screw or bolt and locknut? Thank you in advance.
Bob C,
Look at the picture of the power adjustment screw. The locknut is loosened so the screw can be turned, then the screw bit turned in to increase tension, and out to decrease. When you have it where you want it, tighten the locknut to lock it in place.
B.B.
I want to use a laser bore sight on my fusion. How do I take the dan noise dampner off??? It looks like uve takin this thing apart so I request ur help if u can. To me after seeing the video it looks like the pieces are held in place with a series of o rings for each of the sections and the end cap. Is this true? Please get back asap Vernon season is here. Ha ha ha.
Thnx
Dave