
by Tom Gaylord, a.k.a. B.B. Pelletier
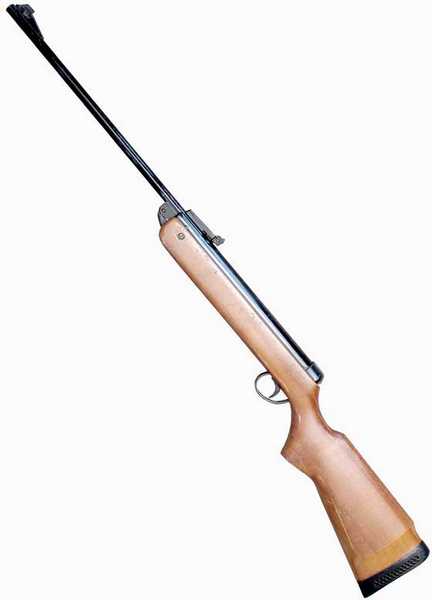
My rifle is actually a BSA Super Meteor.
The last report on this BSA Super Meteor was on October 15. That’s how long it’s been since we saw this gun in print. But in the background, I’ve been doing lots of things that I’ll share with you today.
The last time we looked at this rifle, I was taking it apart and getting a lesson on how it was built and what was wrong with it. To summarize for you, this BSA Meteor is made from folded metal, in the same way Daisy BB guns are made. And the piston head was attached to the piston by means of an E-type circlip that was incapable of standing up to the stress. I can tell that by the damage that was done when that clip let go — but more because the Brits have invented a much better solution for fixing this gun today, when it does break down — and all of them are going to break!
I sent my order to T.R. Robb in the UK for a replacement piston head, o-rings and spacers. The problem is that when I sent in that order I didn’t pay attention to the fact that the same order button also got a piston head for a BSA Scorpion pistol, which is larger than the Meteor head. Well, guess which one Mr. Lysdexic ordered?
That’s right, I ordered the Scorpion piston head. And a couple days later, when I realized what I’d done and contacted T.R. Robb, they had already shipped the order. But to their credit, they sent a second piston head — this one was for a Scorpion, too. That’s right! They sent me 2 Scorpion piston heads and no Meteor head! But I’ll give them credit for trying to help me, for being very generous and refusing my offer to pay for the second head, and for being very prompt in shipping both heads. I had them in less than 10 days.
So, blog reader David Enoch — I now have a spare BSA Scorpion piston head that I believe you said you needed. The price will be right, too. You’ll pay what I paid, which was nothing.

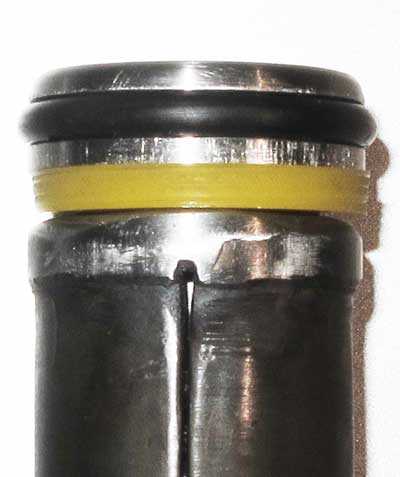
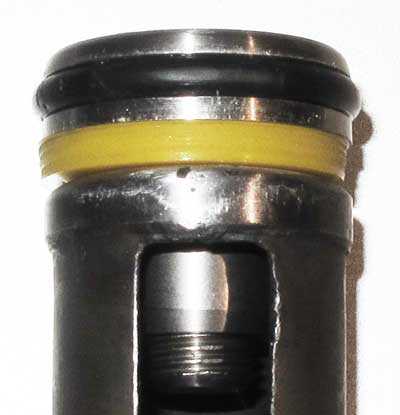
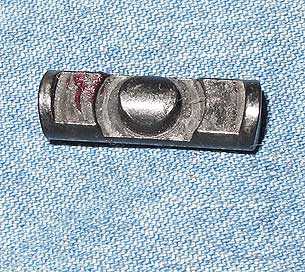
Lots to see here. The replacement piston head is the shiny one on the left, the darker original is on the right. Obviously, the replacement part is larger and has to be cut down to fit. The blue spacer and 2 o-rings are just some of the soft parts that came in the kit. There were a total of 4 o-rings of different sizes and 2 more spacers of varying thicknesses. They allow you to set the power of your airgun, and they also allow for differences in the tolerances of different guns.
When I saw how large the piston head was, I knew it wouldn’t fit. I asked my friend Otho to cut it down for me on his lathe. He also had to cut the o-ring channel deeper at the same time.
Silly me — I thought that would solve everything. So, Otho took the head and had it back to me in a week. Then, I assembled it to the end of the piston and tried to insert the piston back into the spring tube. But it wouldn’t fit! I’d taken it out several weeks earlier, and now it wouldn’t fit back inside! It was like that pair of blue jeans that used to fit, before they suddenly and quite mysteriously shrank. I hate it when that happens — especially to jeans I’ve worn for years!
I took a more critical look at both the spring tube and the piston. Glory be — they’re both made of folded metal like a Red Ryder! Except that Red Ryder spring tubes are generally round, while both of these pieces had variable shapes, with a tendency toward the oval.
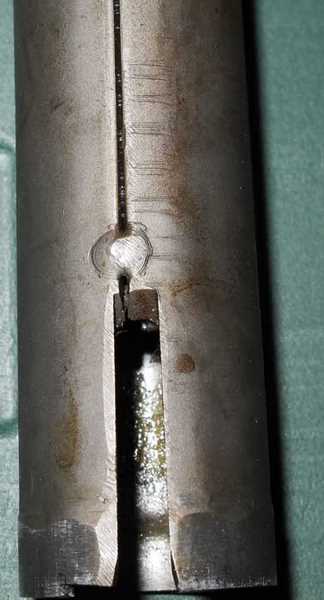
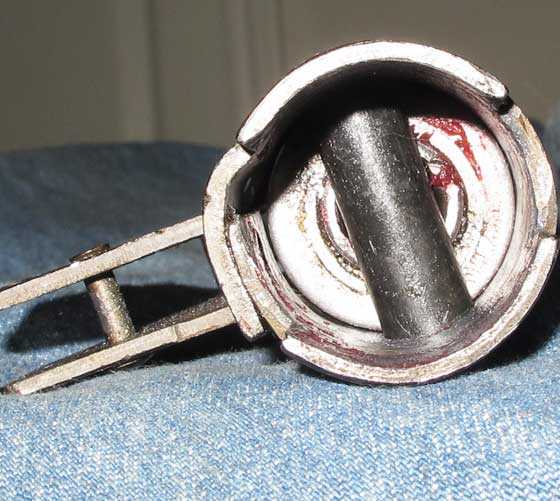
The tail end of the piston. Here you clearly see that it’s folded metal, tack-welded at each end.
At least that’s the theory! Here you see the weld at the piston head end has broken. Wonder why the piston is no longer round?
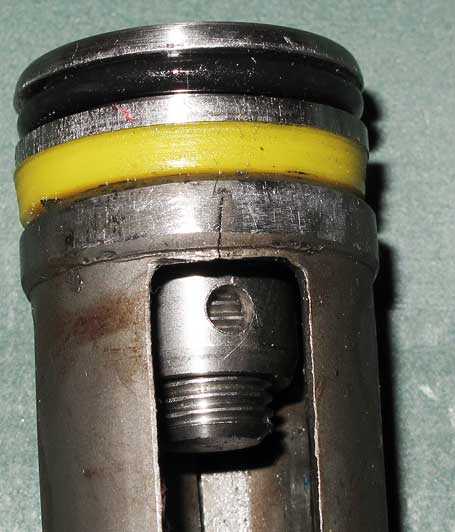
And, on the other side of the piston, opposite the broken weld, the solid metal has also cracked! Here you can see the nut that now holds the piston head to the piston body. It’s not about to break off like the circlip did!
Looking at just the condition of the piston gives you an idea of the shape this rifle is in. I don’t think the design of the rifle caused all this damage. I think people continued to try to cock and fire it after the piston head separated from the piston, and they hammered it into the mess you see here.
I examined the interior of the spring tube very critically at this point and found a lot of metal galling (shiny areas that indicate the scraping of metal against metal without lubrication). There was also a fair bit of surface rust. I also found that some of the folded metal edges of the spring tube that hold the trigger parts were bent into the interior of the spring tube and were blocking the passage of the piston. I fixed those with a Dremel tool, but the inside of the tube was too deep to reach.
I showed the spring tube and piston to Otho, who agreed with me as to the extent of the damage. He felt he might be able to clean out the tube with a tool that holds strips of abrasive paper and is spun in an electric drill. I don’t own that tool, so I was only too happy to let him have a go at it. He also said he could tack-weld and refinish the piston where it was separating.
So, Otho came to the rescue once more. And he was true to his word, because a week later I got back the tube and piston, ready for assembly. But that wasn’t the end of the rifle’s problems!
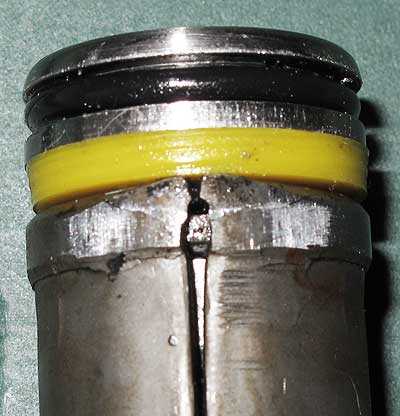
Otho welded the broken piston and dressed it round again.
Otho also welded the back side of the piston where it was cracked.
Loose barrel pivot
I had discovered that the barrel wobbled from side to side when I first got the rifle. And a little research online told me this is a common problem with Meteors from the 1970s. Apparently, when the forearm stock screws are tightened, the shape of the stock allows them to pull apart the action forks that hold the barrel breech. It’s a design flaw of the rifle, and the solution is to not over-tighten those screws. But how to fix it — since the barrel pivot is a pin, rather than a bolt? Well, this is something I know how to do.
I chucked the forks in the padded jaws of my bench vice and closed the jaws on the forks. When there was some inward tension on them, I hit the outside vice jaw with a 2-lb. ball-peen hammer, which sent a shock wave into the metal of the action forks and realigned their crystalline structure. Or at least that looks cool when I write it. I haven’t got a clue what really happens! All I know for sure is that when you do this, the metal takes a set in the new position, and now the action forks are about 5 thousandths of an inch smaller then the breechblock of the barrel that has to fit between them.
Finally, all the faults had been corrected, as far as I knew. The piston now slides into the spring tube with only a little friction, not unlike a Weihrauch piston in a Weihrauch gun. It was time to assemble the rifle!
Otho and I both think whoever designed this Super Meteor Mark IV was a genius at eliminating cost and making one thing do many jobs. The way this air rifle is designed should be a study in an engineering course, but the students would first have to know how others had done the same things with other spring-piston powerplants. At every turn, you can see the embodiment of the Spartan design.
And the parts that need to be hard are hard! I mean glass-hard! There’s no wear on any of the trigger parts, or on the piston, where it’s held by the sear. The boys at BSA knew what they were doing.
Since there had been so much metal galling in the spring tube, I first lubricated it with Moly Paste before any parts went back in. The molybdenum disulphide particles will bond with the metal surfaces and will not wash out over time. I applied this paste (which is a thick grease) with a swab made from a long thin dowel rod covered with a paper towel on one end.
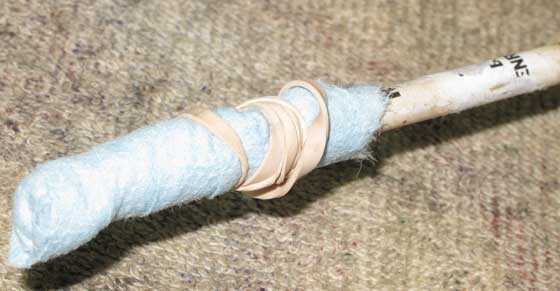
This simple swab can be used to clean the inside of spring tubes/compression chambers, as well as to lubricate them.
After the inside of the spring/compression tube was lubricated, I also lubricated the outside of the piston head and piston tail with the same moly paste. I’d like to say a word about the piston head now. The kit of parts I was sent had 3 spacers of differing thicknesses. Any of them will work, but each gives you a piston head of a different length when it ‘s fastened to the piston body.
The way the Meteor is designed, adjusting the length of the piston head controls the power of the rifle. A shorter piston head will give a longer piston stroke and therefore greater power. I don’t want power. I want a smooth rifle that’s easy to cock and is also easy to shoot. So I went with a thicker spacer on the head.
Now, I lubricated both the piston head and the tail with moly. The center of the piston body can be left dry because it’s narrower than the ends and will never touch the inside of the spring tube.
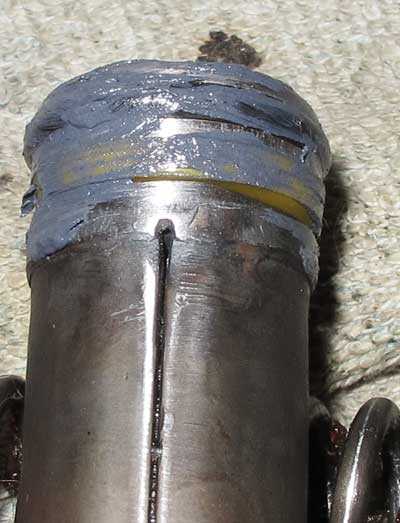
The piston head is lubed with moly paste. No precision is required for this application because this stuff spreads as the gun is cocked and fired. The other end of the piston got the same treatment before it was slid back into the spring tube.
Once the piston was in the tube, I coated the mainspring with Beeman Spring Gel and slid it into place inside the piston. Don’t look for that product anywhere — it’s obsolete. It was a viscous silicone (Beeman only says it’s a synthetic in their catalog; but given where it’s going, I’m pretty sure it’s silicone) grease that dampened vibration without slowing the gun much, if any. So, pretty much any viscous silicone with the consistency of toothpaste should suffice. Or, you could do it the old-school way and just use a lithium-based grease.
The powerplant went together the same way it came apart; but the barrel, which was the next item, was harder to install because the action forks were now smaller, thanks to my repair. Nevertheless, the barrel did go into the action forks of the spring tube (I “buttoned” it in using the baseblock to spread the forks slightly), with the cocking link locked inside the piston and lots of moly grease on all metal surfaces that touch.
When it came time to close the barrel, I got a small surprise. It seems the spring-loaded chisel detent (the chisel-looking thingie that holds the barrel shut when the gun fires) was sticking out so far that the barrel wouldn’t close! Examination revealed that the detent is held in the baseblock by the pivot pin that passes through. How in the heck was I going to do that?
Well, if you think like a redneck cheapskate, which I am trained to do, you insert the pivot pin partway, lever the chisel detent back as far as it will go and then tap the pivot pin home. I could have closed my eyes for this maneuver, it went so smoothly. Obviously, I’d discovered something that the original 28-year-old BSA assembler, Trevor, could do 175 times in an 8-hour shift back in 1978.
From there, the only big task was to get the mainspring back inside the spring tube all the way. It only stuck out the end of the tube less than an inch, but it also had to go another full inch into the tube, where it would be held by a crosspin that’s profiled on one side to capture the base of the spring guide. It’s easier to just show you.
This is the side of the assembly pin that fits inside the base of the mainspring guide and holds it inside the rifle.
This 58-cent tool was made from a 4-inch plastic sprinkler pipe in about 20 minutes. With the action in the mainspring compressor, it pushes the washer at the base of the mainspring, while allowing the crosspin to be inserted through its slot. It isn’t beautiful, but it worked both times I used it and looks like it will hold up for dozens more jobs like this.
And the pin is back in place. The contours on the other side of the pin have meshed with the base of the spring guide.
I showed you these parts and the trigger parts in the earlier reports, namely in Parts 2 and 3. So I’m covering ground that I’ve already explained. When I took the rifle apart back in October, I didn’t have to use a mainspring compressor; but to get the mainspring back in place and insert the crosspin, I did. And it was easy.
And the remainder of the airgun went together exactly as it should. I have a theory. Whenever something goes together easily, it means I’ve left out something. I’m in my wetsuit but have forgotten to put on my briefs! I remember learning how to disassemble and assemble the M1 Garand rifle. I thought I could never learn, but a few weeks later I was stripping it like a pro. That’s the way BSA spring rifles are, I guess. You’d like them to come apart in 30 seconds without hand tools, but they don’t. However, once you’ve been down the path a few times, I’m sure the job seems simple.
The proof
This is the part I dreaded. Sure the parts were back together, but who was to say they were where they should be? Only cocking and firing the gun would tell me that. So I did. And it did! Hurrah!
The only task left to do is to clean the barrel. I had close to 2 months to do that while it was off the rifle; but to tell the truth, I wasn’t sure if I would be able to get the gun back to functioning again. No sense doing a great job on a barrel I’ll never use. But now the gun is working, so the next report can be about the velocity.


BB, have you seen the new Gamo little cat? I have a Daisy (Gamo) 130 that looks a lot like the little cat (plastic barrel with a steel liner, plastic fork attached to the compression cylinder). I think that Gamo has reissued the 130 with the new trigger. I have only seen the pictures of the little cat on the Pyramyd site. Am I right ? Thanks, Ed
Ed,
I saw the Little Cat at the 2013 SHOT Show, back in January. I can’t tell you how close it comes to the 130, and Gamo has no people in their booth to tell us anything about the products, so everything we report on them is a guess.
But it is intriguing. I do like youth guns.
B.B.
LOL! Things had definitely changed at BSA from 1906 to the 1970s! I guess they discovered Six Sigma earlier than we did.
RR,
Six Sigma? From what I see, BSA has never embraced Six Sigma. I can’t tell what you think about it, but a real Six Sigma is a revolutionary thing. It can transform a company, its products and services. But I’m sure a phony one is quite a sham.
B.B.
A considerable bit of thinking went in to how to build that Meteor using the least amount of materials and labor. When I look at mine I see the barrel and action block is made from one piece of steel and the joint of the action block and the compression chamber is almost invisible. Almost every piece is machined steel.
I have noticed that in later versions they cheapened them down (Six Sigma), especially with the approach of WWI.
I understand the true purpose of Six Sigma, but what I have seen in practice is the reduction of quality.
RR,
Six Sigma is NOT cheapening the design! (I thought that was what you were implying). It is a streamlining of the entire operation by which a company does business!
When Motorola started what became Six Sigma, it took them 6 months from the order time to ship a pocket pager. After completely revamping how the company operated, they cut that time down to 15 minutes! That is Six Sigma!
I used to teach this stuff to engineers and managers. If the company’s senior management gets behind it, it really works. But if they only give it lip service, it devolves into a campaign of slogans on the walls and reorganizations and layoffs to protect the guilty. I have seen both results.
Kawasaki built a motorcycle plant in the U.S. that was able to build a different model of bike every other spot on the production line. At the same time Harley Davidson had a production line so long that it took six MONTHS to complete a bike.
Harley has learned their lesson and changed the way they operate. And they have also learned how to seal their motors so they don’t leak oil continuously. I remember back in the 1960s, they said it couldn’t be done, give how the Vee twins were designed.
Six Sigma can work, but only when the whole company gets behind it. Otherwise, it can be a disaster.
B.B.
I have witnessed the other end at GE, both the destruction of quality and the layoffs.
BB,
In your last picture of the end of the tube, is that tab bent out of place or is it just me?
RR,
That tab was one of the places that I had to Dremel to get the piston to fit, again. It still isn’t perfectly round, but in that location it doesn’t have to be. Just as long as it doesn’t get in the way when you install the piston.
B.B.
You can definitely see how out of round the tube is where they welded on the trigger tabs.
I have recently fixed up a Webley Hawk Mkll, a BSA Mercury, and a Meteor MkIV, and every single one had to have there forks adjusted in a vice as they allowed side to side play with the breech. Admittedly it looked like the Mercury and the Hawk was caused by someone firing it with the barrel cocked, there were other signs like a bent barrel or a crack in the stock. All of them use just the pin method as the pivot on the breech and forks that holds the detent back, so i’m getting a dab hand at sorting it out now.
I can’t for the life of me understand why these companies didn’t use a screw bolt like their European counterparts, even Relum’s have Screw bolts and locking screws and they were cheaper than a Meteor back in the 70’s. My theory is that a youngster could dismantle his air rifle with his penknife, it was that sort of aptitude that adults liked to see from us kids in the 60’s and 70’s.
Another corking blog from you again there B.B. I’m really looking forward to you putting it through it’s paces, it should be good. These rifles were good for taking out rats and rabbits out to 30 yards when i was a teenager and that was with open sights, though now i’m older and wiser (ha ha) and need glasses i use a scope to get a clean kill and keep the open sights for paper punching.
TTFN
Best wishes, Wing Commander Sir Nigel Tetlington-Smythe
Sir Nigel,
I’m definitely getting an education with this rifle. Up to this point I have been inside some pretty crazy airguns, but this one tops the list. Like I said, it was designed by a genius, because he eliminated everything that cost money or took time to make.
And yet, it shoots like a dream! Sorry to tip my hand for the next report, but shooting this Meteor is very satisfying. It isn’t exactly like shooting a Diana 27, but the good feel of it is in the same category.
B.B.
I have read an article in the past about the BSA Meteor. They liked it a lot for what it cost. Were the ones made in the 1960’s better?
Mike
Mike,
This is my first experience with a Meteor, but those who know say the Marks I and II, which were made in 1959-1968 are much better made than this Mark IV.
B.B.
I wonder if the different size head spacers were part of the original design and they would use different spacers for whether it was for “local” use or for export?
I’m pretty sure the different size spacers is a new idea, the original piston head design with the key hole slot into the piston body only allows one size of spacer. Home tinkering with the right tools can lengthen the piston stroke like i did with the BSA Mercury http://angryangryguncompany.blogspot.co.uk/2013/10/longsroking-22-bsa-mercury.html as many others have done, it’s a bit easier with the Mercury.
They put out 10 ft/lb which was ideal for the Junior shooter, though i did try spacers and a longer spring in my meteor and all it did was make it harsher when shooting. this set up with lengthening the stroke with smaller washers should bring it in line with the more recent Mk VII which puts out nearer 12 ft/lb, but sadly BSA are going to stop production soon, alas.
TTFN
Sir Nigel
RR,
I agree with what Sir Nigel says. From what I’ve learned, the different spacers seem to be a new idea, like the threaded nut that holds the head.
B.B.
I had a BSA Meteor a few years ago, when I was collecting a little of everything…. which was a big mistake! I’ve changed my ways to collecting only one line of air guns.. the USFT. But that little Meteor was one of my favorite spring guns, and I wish I had it back to loan out to the kids that come by the range.
I put it in the class of “Fun and easy to shoot” with the “Bronco, R7, Hyscore 806, (which is a Diana 16, I think), HW 25. and Slavia 631 and 634. These were all low price, but quality air rifles, that really are a pleasure to shoot fairly accurately all day.
BB. It’s great that you are showing us how to rebuild these old air guns, so they can stay on the road so to speak… I sill have my Hyscore 806, which I’ll be giving to a grand child someday, and when I pick it up to shoot and or loan to a youngster, I have to smile with a warm heart… the memories of shooting with dad, overwhelm me..
Wacky Wayne
Ashland Air Rifle Range
Wayne,
Don’t forget your cool little Hammerli tap loader, love that thing.
What kind of paper do you use for your benchrest cards? I have a proof sitting at the printer in ashland, and neither of us know what you use. I’ll send a couple hundred your way. Only 6 meters off hand, shoot inside by the pool, where it’s warm!
-allan
Hi Allan,
Yes, I did forget the tap loader Hammerli, as one of my favorites.. it’s a larger air rifle, but shoots so smooth. It doesn’t fit into the smaller kid size air rifles though.
I just use whatever card stock they have the most of on hand, (best price they can offer) for the bench rest targets.
Yes, I’ve been shooting inside over the pool lately:-)…
Allan: you mean Héctor’s “Zimmer-Silhouetten” target?
B.B.: nice work by you and Otho on the old Meteor.
-Jan
Wayne,if you EVER want to visit some (a lot)of your old collection……feel free to drop in on me in Huntsville! I even still have the Red Ryder (one of 20)made for the cast& crew of “The A Team”.
I also still have USFT #92 in mint condition with the Benchrest goodies Tim made for it……if you need it I would give you a great deal! You could make it “famous”,I’m sure of it. Frank
Howdy Hey Frank,
Thanks for the offer, but this time of year, I’m in “no buy mode”… I’ts still a couple months until our season starts and the cash flow with it:-) … let’s talk later:-)
I had to sell a couple USFTs even, to get through the slow season this year.
Blessings on us all!
Wacky Wayne
Amen to that Wayne…..here’s to a record season next year! It will be here when you’re ready Wayne.
Didn’t some one offer to donate a new barrel (Ill have to revisit the other posts).My other question is are BSA springers made entirely in the UK? Or its a joined effert where Gamo supply them with some part made in Spain. My 2005 Gamo Hunter 1250 has lettering Made in England(serial# 227024-02) on the breach block,and the bluing is noticeably better than my other three Gamo I have. I would like to own a BSA,this past summer I had a chance to handle a few BSA Super Sports at a show.But all had loose barrel joints also. I may take a chance and get one PA has the one with the caliber etched on the barrel just in front of the breach block,I have a UK Stingray with same barrel etching.
Chris,
Larry Hannusch donated a new barrel for my Diana 23 that we saw last week. There is no new BSA barrel.
B.B.
BB,
“The only task left to do is to clean the barrel. I had close to 2 months to do that while it was off the rifle; but to tell the truth, I wasn’t sure if I would be able to get the gun back to functioning again.”
I can sure relate to that feeling… I’ve been tearing things apart just to see how they work since I was a child. I always had good intentions on fixing them, or improving them but was without the tools and knowledge necessary to accomplish that task. I had more toys in pieces than I had whole. Pretty soon I stayed TP see the signs that I wouldn’t be able to get it back together like rivets and welds and I left those alone, but even today I am always afraid that I’m need some special tool that I don’t have on hand (or is buried in the garage…), or a print that I cannot find on line.
/Dave
….started to…… Darn phone strikes again. Just like someone I know, always thinking that they know what I mean to say…..
I just wanted to mention your buddy Otho worked some nice magic on the gun. And also your little vise trick BB.
Don’t you just love when a repair works out.
But I got a question about the spacers. On average how much would the spacers change the FPS and cocking pressure if you use all of them our none of them?
Edit: or none of them?
GF1,
From the reading I have done, the Meteor gets pretty stressed when it get up over 9 foot-pounds in .177. I’m guessing that it’s in the 500s somewhere right now, and that’s fine for me. Getting up to over 700 would be too much of a strain.
As for what the spacers do, I’m guessing small 20-30 f.p.s. changes. But I don’t really know.
B.B.
500’s is a nice fps for the gun.
So your keeping it smooth. Do you think that the Torrington bearings we talked about before would help this gun out?
GF1,
No, they won’t even work because of how the rifle is constructed.
B.B.
Hi BB,
I will sure appreciate the new bushing and piston seal. This new system looks much better that the stock design. Those circlips are not tempered and bend when they are removed. It is really hard to get one back on well enough to hold the piston seal in place. Plus, it’s a bear to get that clip in place.
I hope the Meteor shoots well enough to justify the work that has gone into it. I look forward to seeing how it shoots. If it shoots like a smaller Supersport it should be great.
David Enoch
Hi B.B. and fellow Airgunners
I enjoyed reading today’s blog on the BSA Meteor. I also appreciated that you took us through each snag you had to deal with. The pictures are always welcome as they are a visual refrence to the topics you are describing in print. It sure is helpful to know people who are handy with lathe, welding, brazing, etc. The one thing I’m trying to get my head around, is how Otho made a large piston seal into a smaller one. It’s not like you can cut around the edges to make it fit. Or is it? Could you please elaborate some about the procedure Otho used, thanks.
Ciao
Titus
Titus,
The BSA Meteor piston head is made from stainless steel. That is what Otho cut down to fit. The seal is really an o-ring that fits in a groove near the top of the pistol head. When the piston goes forward and compresses the air in front of it, the compressed air pushes the o-ring against the back of the groove, where it deforms up to seal the compression chamber walls. That’s the seal in this piston. So nothing was cut. I just used the smallest o-ring that would fit the piston head.
B.B.
B.B.
Just like I promised – made my experiment on groups vs. magnification and sent it with photos on your mail (copy in Edith’s box). Some interesting stuff I think.
duskwight
duskwight,
I saw it and already sent you a response. Let’s show it to the group!
B.B.
B.B.
Thanks for your explanation. I am finally able to see the obvious. From the picture, I thought I was looking at a dark coloured synthetic seal. I know see that it is indeed, stainless steel. I was confused because the only piston seals I have worked with were on Weihrauch airguns that use synthetic seals. I have had to take sand paper to the edges of a seal to make one fit properly, but couldn’t see how you took so much off. This blog is a wealth of such tidbits.
Ciao
Titus
Titus,
Yes, an o-ring is not a common type of piston seal. I’ll admit that it threw me for a loop, too. Then I realized what the BSA guys had done and figured out how it worked and it’s fine. It will wear out faster than a conventional seal will, but I think BSA intended for the o-ring to be changed more often. I think in their eyes the rifle is easy to strip and rebuild.
B.B.
Couldn’t you just have Otho cut a deeper and wider groove for a bigger diameter o-ring if needed?
That’s the wonderful thing about pressure. It distributes its forces equally. It will by nature center the piston to the bore. Same thing that is encountered with the gage port on a Discovery or the pressure transfer valve assembly.
I wonder if people think that because the gage is sticking out one side of the gage port. That its pushing the gage port away from the reservoir tube where the gage screws in at. Making a air leak.
But of course if there is a mechanism that binds or forces it from center it will definitely not allow it to seal right.
Sorry but another wonderful night at work. I will stop now.
GF1,
Sure I could. But it doesn’t seem to be necessary. The gun seems to be fine as it is. But the velocity test is coming next, so we’ll all see.
B.B.
No I didn’t say you needed to.
What I meant was if the gun wasn’t performing like you want. You could try the wider/thicker o-ring.
Kind of like putting a wider tire on a car. It gives more contact area to the side of the cylinder wall.
We do that at work sometimes if a cylinder bore is wearing out and there is no replacement available.
First we take the 3 finger brake cylinder hone (on the smaller cylinders) and try to true it up like that and put a very lite cross hatch in the bore. And you can use a hand drill to do the job. Also use a little tranny fluid when you do the honing. It helps get the job done a little easier.
GF1,
Oh, then yes, that is the benefit of this design. The owner can always choose a larger or smaller o-ring, if necessary. It’s something that regular piston seals cannot offer without modification.
B.B.
BB
We have some equipment at work that is pretty old.
And its a heck of alot cheaper than replacing the whole system. I have been at my job for a long time and we have pretty good luck doing it that way. Even with the bigger stuff. I just thought I would share the idea.
Good to see that your meteor is finally coming together..
will be fun to see if you can shoot any acceptable groups!
That is different I would never thought that the piston face is stainless steel smashing into the end(air transfer port) bare metal to metal.
Chris,
I does sort of prove that the air pressure stops the head before it hits the end of the compression chamber. It sounds risky, but it looks like it works.
B.B.
If the seals are doing their job, and you are not using loose or too light pellest, there will not be any “smashing” of steel against steel.
Dag,
Robert Beeman explained how the compressed air stopped the piston from slamming into the end of the compression chamber, but a lot of folks have a hard time believing that.
B.B.
BB
I believe. 🙂
This report is great! I can hardly wait for the shooting results. I just found my BSA Meteor MKV a few months back. My cousin stored it at a friend’s place and I forgot about it. I hadn’t seen it in 10 years! Unfortunately he never kept it well. I found a seal for the piston at a hardware store in the plumbing section and it seems to work. I used synthetic motor oil that I had around to lube the piston. I ordered a spring and a breech seal from Jim Maccari. The seal was for a HW 35. I’ve seen replacements on the pyramydair site and I may try those. The one I am using is a little high and I should have shaved it down. It’s cracking a little bit. I think I spent $30 for all the parts.
I didn’t have any sights so I had to make some. I do have the original rear sights but not the adapter for the base. I made something out of Bondo body filler. It’s not pretty but it works. The front is a block of wood with a marker cap and some wire. I tried a Stoeger air rifle scope but it moves around too much. If I crank it all the way down and to the left it seems to group about 1″ at 35 feet. I bought a daisy 953 for $60 and I may use it on that. I get it this weekend. I hear it is pretty accurate at 10m.
Roger