by Tom Gaylord
Writing as B.B. Pelletier
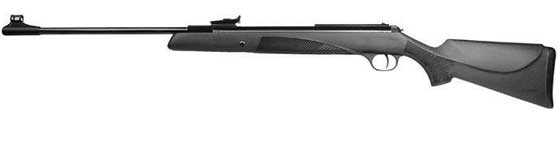
The Diana RWS 34P is a classic breakbarrel spring-piston air rifle.
This report covers:
- Happy birthday, America!
- Vortek Pro Guide 2
- Disassembly — Rail Lock Spring-Compressor
- Spring break!
- Removing the piston
- Trouble
- Lubrication
- Assembly
Happy birthday, America!
Today the U.S. celebrates 241 years as a nation. It will be loud tonight (fireworks)!
Today I install the Vortek Pro Guide 2 tuneup kit in Geo791’s .22 caliber Diana RWS 34P. Now that we know his rifle is accurate it will be nice to also know that it shoots at the top of its form.
Vortek Pro Guide 2
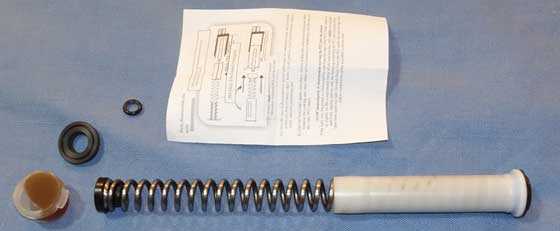
Pyramyd AIR doesn’t sell this kit, so if you want one you’ll have to get it direct from Vortek. The kit consists of instructions, a new mainspring, a special new spring guide, a synthetic top hat/forward spring guide, new piston seal, new breech seal and grease.

The Vortek Pro Guide 2 kit comes with everything you need to tune your Diana 34.
The mainspring in this kit appears to be made of good spring steel. I know that Diana has had problems in the past from over-hardening their mainsprings, so this tuneup should ensure George a long time of good operation with his rifle. The piston seal is also special and I will cover it in a little bit.
The new spring guide fits around the outside of the mainspring instead of the inside. You may remember that a coiled mainspring expands slightly when compressed, so this guide will become tighter rather than looser when the gun is cocked. As the kit comes, the guide is already on the spring extremely tight, so there isn’t going to be any vibration in this area!
Disassembly — Rail Lock Spring-Compressor
To fit the kit the rifle must first be disassembled. I used the Air Venturi Rail Lock Spring Compressor to remove the mainspring. This is the second type of action I have used the Rail Lock on and it works like it was made for Dianas!
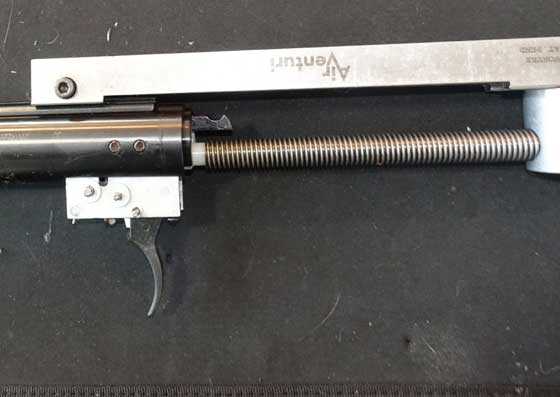
The threaded rod of the Rail Lock Compressor spans the Diana safety and presses in on the back of the trigger — exactly where you want it!
Once the compressor was in place, I put a little tension on the trigger block and both pins that hold the trigger block in the spring tube came out. The action came apart in seconds, making this the fastest I have ever disassembled a Diana. The Rail Lock is the reason for that.
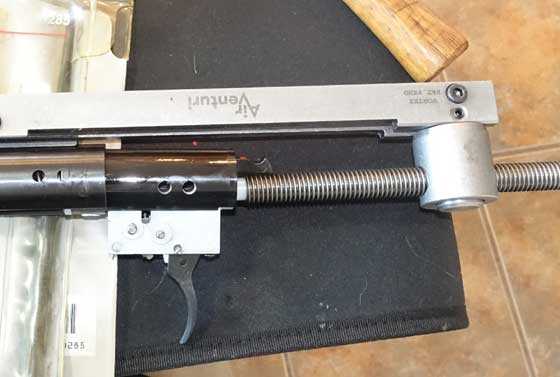
The trigger block is pushed out this far by the mainspring. All tension is off at this point.
Spring break!
Now the spring guide and mainspring could be removed and, once they were out, I saw something that I have seen many times before. The mainspring was broken about one inch from the end on the spring guide end! This is a very common fault with Diana spring rifles, though I thought they had corrected it in the past decade. The unbroken end of the mainspring has a small cant in it, as well. So, George was lucky that I decided to tune his rifle! I actually wrote a report about this in 2006 titled, Spring Break.
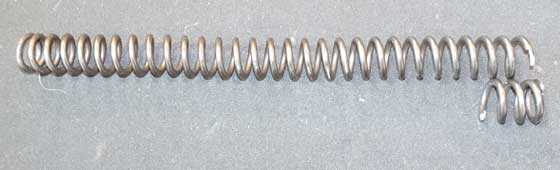
A broken mainspring is a common Diana fault. They typically break about an inch from the end like this. Notice the last coil on the other end is canted.
Remove the piston
The next step is to remove the piston. The barrel has to come off for this, because the cocking link must be separated from the piston body. Dianas are made to come apart easily this way and I had the barrel off in less than a minute.

All the powerplant parts are out of the gun.
Trouble
The piston seal in the rifle was like new, but since the Vortek kit has a new one, I removed the Diana seal. Getting the new Vortek seal back on the piston, though, was not easy. It took me all of 45 minutes. I found that the seal material likes to be warmed by flexing, before it will hook the flared top of the piston. But I got it.
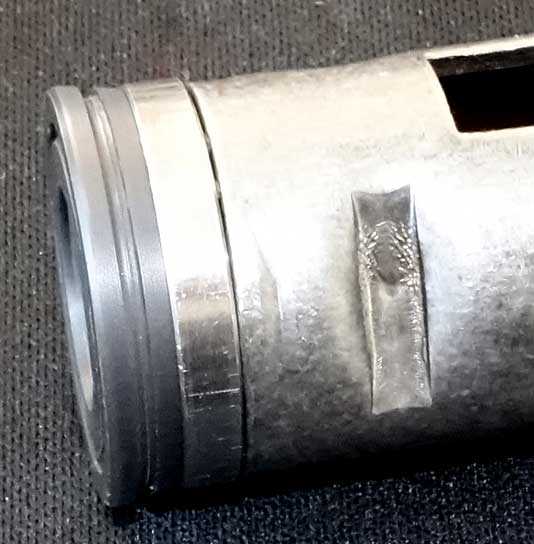
The Vortek piston seal is made from different material than the Diana seal, plus it has a groove around the circumference. That groove prevents lubrication from migrating forward from the mainspring.
Lubrication
I lubricated the piston seal (very sparingly), the rear of the piston body and the mainspring with the special grease that came in the Vortek kit. The Vortek owner, Tom Gore, tells me this piston seal will wear in to become incredibly slick with use, so it doesn’t need much lubrication.
I put a bit of extra grease at the mouth of the spring guide, since I couldn’t get the mainspring out to lube all of the coils. Cocking the rifle will spread this grease back on the back coils of the spring.
Assembly
The rifle went together just like it came apart. Once more the Rail Lock compressor was easy to install and operate. I discovered the Vortek spring was a little longer than the factory spring that had the last inch broken off.

The Vortek mainspring is ever-so-slightly longer than the broken Diana spring.
The last job was to replace the breech seal. The old one looked fine, but since the kit came with a new one, I installed it.
Start to finish this job took 2 hours. That time includes taking pictures and 45 minutes fiddling with the piston seal.
After that I finished the assembly and went to my range to test-fire the rifle. How did it do? That’s coming tomorrow.


B.B.,
Because of your testing before installing this kit, we know this rifle was accurate, apparently not greatly affected by the broken spring. What effect would that have had – increased vibration, maybe? Would the vibration, or recoil, likely have gotten worse over time? What are some typical symptoms of a broken spring?
Happy Independence Day!
Jim M.
Jim,
Decreased vibration. Diana’s always get smoother after the spring breaks. I( have had them break at both ends and then the power dropped, but it didn’t drop much this time — I think.
B.B.
B.B.,
That’s wild. I was not expecting that answer at all. I was thinking the broken off piece would cause some weird, “extra” vibration of some sort. I did follow the link and read your old post on broken springs. Another good one.
Jim M.
B.B.,
Excellent article. While it may have no effect on the ability for Geo to shoot better groups, it is great that you have discovered the broken spring. Apparently the broken spring had no tell tale signs that were obvious from you prior testing. Maybe in hind sight, there was “something” about the cocking and firing cycle that you just could not put your finger on?
On the Vortek kit, at least the one I put in the TX200:
– There is also an inner plastic tube. This rides on the inside of the spring and the piston latch rod passes through it. That is the black in the picture.
– The two tubes make a chamber for the spring to sit in. At the bottom of that chamber sits what looks like a garden hose rubber washer. It is blue and can be barely seen in your photo. It is very soft and cushions the spring at that end.
I did a 12 fpe kit and it did come apart. The HO kit fit together much tighter and while I did get it apart, I paid for it when I tried to put it back together. That said, just leave it alone for anyone else pondering taking one apart.
The spring was longer in the kit, if I am remembering correctly. I think that part of the reasoning behind that is that extra power is needed to overcome the tight fitting plastic guides, and still maintain the same power. If I can find my exact notes, I may have exact data on all of that.
All in all,.. fine job! 🙂 and looking forwards to the next phase of testing.
Happy 4th to you and to anyone else in the audience that participates,…. Chris
Chris,
Is that black inner plastic tube the kit’s “top hat”?
Michael
Michael,
It has been awhile since I have studied up on my springers, but I believe the top hat is at the piston end.
In the second picture, it is on the left end of the spring. The piece I am talking about is the black piece on the right end and replaces the spring guide that is normally there.
If I got that wrong (anyone),.. feel free to jump right in.
Chris,
I see the black top hat on the left. I thought that was the black piece you mentioned above. On the right I see the much larger, white spring guide, different from others I have seen in that it guides the spring from the outside, not the inside.
Michael
Michael,
Look again at the white plastic piece. There is another black one/pc. there too. That is the inner guide and it goes up inside as well. Both tubular. A sleeve in a sleeve if you will and the spring sits between the 2.
Chris,
Huh. Even now, knowing what it is, it still looks like a shadow on my monitor. The old screen ain’t what it used to be!
Michael
Michael,
Well, you should at least see some shadowing difference. That is a solid flange as is the end of the inner tube/guide. The 2 tubes press fit together.
I tried all sorts of things/ideas that I got from GF1 and Buldawg76. I even put a flat roller bearing (Torrington) at the top hat end and it sat right in the piston well. O-rings, rubber and steel washers, polished parts, etc. Fun stuff. Learned a lot. Gunfun1 is the real expert though.
Chris U
Stop will ya. No expert. I just try different things like you.
How else would you know?
Just what I like to do. 🙂
Some additional data for anyone interested:
The stock spring in the TX is,.. 8 3/4″ long, .825″ OD, .132 wire diam.
The Vortek HO kit spring is,…. 10.00″ long, .775″ OD, .118″ wire diam.
As for any power differences, with 15.89 JSB’s:
Stock 631 fps
12 fpe kit 536 fps
HO kit 643 fps
While in my notes I ran across a stock TX200 spring (rotation) test that I did a few years ago. The test set up consisted of all thread rod and bearings on each end. In 4″ of compression, there was only 32 degrees of twist when both ends were allowed to slip. The topic of spring induced torque/twist comes up from time to time and this was my contribution to the topic.
I will be out most of today, incase anyone has any questions.
Oh yea, the TX spring diameter grew from .825″ OD to .833″ OD in 4″ of compression. That is a topic that comes up from time to time as well.
An additional thought, I do believe that there was a bronze/brass? washer on top of that blue rubber washer. In theory, that would prevent the spring from digging into the shock absorbing blue washer and possibly provide a rotational surface for the spring to bear upon. I am pretty sure that I can see the washer in the picture as well. I do remember it was gold-ish in color.
Chris U
Got something else for you to check out on your scopes the next time out.
While you got the gun rested and your looking through the scope. Take your trigger hand and try to move the ocular lens up and down and side to side. Watch what the reticle does.
I got a fix for that too. But I’ll wait and say after you tell me what you see.
Oh and after you try it. Tell me what you think that will do to accuracy.
GF1,
Calinb brought that up the other day. I checked all of my scopes and they all have some degree of movement. I will not be back out for a few days. Sooooo,…. what’s up?
Chris U
I must of missed his reply about it.
But I take 3 or so o-rings and put them in to fill the gap. Then take black electrical tape and wrap it tight over the o-rings and also make sure I contact the fixed part of the scope as well as the ocular lens where you grip it to rotate it. I do a couple times around it. I stretch the tape and wrap it tight.
No more movement after that. It will tighten up your groups.
GF1,
Nice tip. I will take some measurements, buy some and give it a go. I am not a fan of electrical tape on the scope though. If on there awhile it can leave some nasty gunk.
Chris U
It will wipe right off with alcohol or acetate.
GF1,
I have seen band clamps made of plastic that operate on the same principle as a zip tie. That might look better? And,… is this a method that you still employ today?
Catch me on the bottom,… we is running out of room “up in here” as the saying goes.
Chris U
Posting now.
Hi Chris,
Are you saying you have tried both kits — 12fpe and HO — in your TX at different times? If so, which do you prefer, which have you left in?
Happy Independence Day!
Jim M.
Jim M.,
It has been 3 years. Yes, I did try them both. The 12 fpe is fine, but trajectory at 25 and 30 yds. was weak I thought. The HO kit is in it now. Nice shooter and you can see the data. I will tell ya though,… PCP’s got me downright spoiled.
BB,
It sounds like it would behoove me to disassemble my Diana 46E and have a peek inside.
RR
Yep I would like to know too. That’s one gun I never did open up. I basically didn’t like the flip open breech when I had it. I didn’t like the big angle where the pellet is loaded.
I never had much luck with it grouping good. But I think you said you ended up getting it to group. But yep. Maybe than gun will benefit from a tune.
First off happy 4th of July to everyone.
And now about Geo’s gun. Curious to see how the gun changes with the kit. And of course since it won’t have a broken spring anymore.
I did one of the pro guide kits in the .177 caliber Tx 200. It is a nice kit. I also I tryed a bunch of different of my own tunes in it too. Definitely ended up with a easier gun to cock then when I got it with my tune and no pro giude kit. Plus it increased velocity and a had a very, very smooth shot cycle.
And yes it did shoot more accurately.
From the photos and the coments it looks like if a person were to buy a Diana spring gun they should also get a vortex kit and a spring compressor. I am wondering about how long is the lifespan of a factory spring?
Gopher,
Knowing that this is only a 3-4 year old gun, I would say yes,.. knowing what we all know now. It appears that they still have spring issues.
B.B.,
What is your general opinion of buttoned pistons?
Michael
Michael,
I like them in the guns that need them. But they are a pain to install./ I remember the RWS 45 that I buttoned. It became much smoother, and I liked that. And Weihrauch rifles respond well to buttoning. But the TX 200 doesn’t need buttons. I don’t see how it can get any smoother than it is from the factory.
So — buttons where they are needed, but not in all airguns.
B.B.
B.B.,
Are the studs themselves made of Delrin? Nylon? Nothing-fancy-plastic?
Delrin is resilient, whereas Nylon is slick but wears quickly. I wonder if anyone in the industry has tried making powerplant components from carbon graphite.
Michael
Michael,
I used Delrin. As you say, it works well.
You can also use PTFE (Teflon), when you can get it. PTFE conforms to a shape and then doesn’t change. The Beeman P1 pistol has a PTFE piston seal.
B.B.
B.B.,
I was drawing from my guitar collecting hobby when I surmised what materials might be appropriate. The material for some air gun parts must have the same challenging combination of characteristics of some guitar parts. Buttons on a piston need to be like the nut on a guitar. Guitarists are often frustrated by their guitar strings binding in the nut grooves, which causes tuning instability.
Traditionally nuts have been made of bone (sometimes ivory in centuries past), with plastic standing in for cheapo instruments. In the 1970s brass was tried a lot, but brass and the nickel plating on electric guitar strings create galvanic corrosion (a chemical electrolysis, I believe, you have written about), so that fell out of favor. Carbon graphite impregnated (or not) with Teflon is popular, as is Corian and synthetic ivories.
I guess it doesn’t take much to grab my interest. Most folks find this sort of problem-solving boring. I am fascinated by it. Maybe I should get out more!
Michael
Michael,
It’s ironic, I guess, that the publishers of the Blue Book of Airguns also publish the Blue Books of Electric Guitars and Acoustic Guitars.
B.B.
B.B.,
You might be right. Consider, however, what airguns and guitars have in common. Airguns are cool. Guitars are cool. :^)
So, where is “The Blue Book of Wristwatches”? Muscle cars? High-End audio? Military surplus? Hard-boiled Detective novels? Perhaps simply a thick tome entitled “The Blue Book of Big Boy Toys.”
Michael
B.B.,
I just reread Parts 6 and 7 of your RWS 45 report, and man, adding buttons to the tune does indeed add a lot of extra labor. I started to feel tired reading your description of the process. Whew!
Michael
Michael,
That job may have been extra-tough because of the hardness of the piston body of the 45.
B.B.
Check this out. Ivan posted this on yesterday’s blog. Pretty cool.
“Ivanhcastillom
July 3, 2017 at 5:24 pm
Greetings from Colombia. I’m a frequent reader of this blog and the comments from other readers, and this is the first time that I gonna post a comment. Does anybody use the Range Buddy software (you can find it in the Goggle’s Play store) to measure their groups?
Using it I find myself shooting slightly better with open sights than with the scope (13mm vs 16mm CTC 7 shot groups) at 20 meters with my Hatsan 95 Vortex .22.”
Here is what I found. It explains how the app works. You can click on the highlighted word’s and it will give a drop-down and explanation at the bottom of the page.
http://rangebuddyhelp.appspot.com
Happy Birthday America!
B.B.
Great report that I think every reader has thought about. Could you use a different spring in the Vortek Spring Guide? Could you use an O-ring on the piston seal? I would think this would enable usage of an undersized seal.
-Yogi
Yogi
The FWB 300 I have I put a o-ring on it instead of the cast iron ring that comes on them from the factory. Works great and velocity went up.
Also the Tx 200 I was talking about above. The pro glide kit came with a front seal that looked normal in the front but had a deeper groove made in it than what the seal looks like that BB showed above. And it actually came with different thickness o-rings. I eyed several different ones. I have n that paticular gun the factory seal gave the most velocity.
Alot of it’s about fit for sealing but not to tight to slow the piston down. I tryed I think 6 different o-ring sizes on my 300 before I found the performance I was looking for.
Yogi,
I asked Tom Gore that exact question and the answer is no. The piston seal is very tight. That groove is for lube control, only.
B.B.
BB, it is said that the blue parachute seal of the Diana air rifles are probably as good as they get. Then why tuning kits come with a new one? Do they provide some other distinct advantage while maintaining the level of performance?
And it looks from the photo that the rear guide fits the O.D. of the spring. Does it eliminate vibrations better than the I.D. fitting guides?
Riki,
See my comment(s) at the top. There is an inner and outer guide. B.B. could not get the kit apart to show us the inner guide. I had 2 kits and the one came right apart while the other one was very tight.
Chris , I see. So it is as guide within a guide a the coils of the spring in between them, right? The outer one fits the O.D. of the spring to reduce twang?
Riki,
Yes, you got it right. I think the inner guide helps out as well. It is a good, well thought out system.
Riki,
Yes, the blue Diana seals are great. This one has a groove to control lubrication from coming forward.
B.B.
B.B.
Wow! I am surprised to see that broken spring. Is this something that would have been covered under the warranty? Would this explain the variation you saw when checking the FPS with the chronograph. Sure glad I sent you the rifle for the tune. I would never have had any idea the spring was actually broken. Is it possible that the broken spring contributed to my poor groups? At least you actually found something wrong with the rifle. This tune should make it perform better than new and hopefully it will have better longevity as a bonus. Thanks for all of your hard work and for sharing the journey with all of the fellow posters on this blog. Happy 4th of July 🙂
Geo
Geo,
No, the broken spring did not contribute to your poor groups. Remember — I shot the rifle with the same spring.
I don’t think the velocity varied too much when I tested it. Maybe on the high side of normal.
You will see the new tune tomorrow.
B.B.
B.B.
Looking forward to the blog tomorrow. In part 2 you checked the velocity of three pellets. The JSB RS checked out at 639 fps, Superdomes were 701 fps, and Hobbys were 736 fps. So I guess it was only the JSBs that shot low fps. As I recall, the RWS 34 should shoot 14.5gr lead pellets at 680-700 fps. It will be interesting to see the fps following the tune. Great blog showing the disassembly and Votek Kit. Big “Thank you” to Tom Gore for donating the kit for this blog. Hopefully the blog will spark more interest in the Vortek Kit for other springs guns as well.
Geo,
Trust me,.. we are all rootin’ for ya’. 🙂
Chris U
Yes I have done that to the scopes for a long time now. I don’t trust not having it done. Some seem worse than others.
So once I get the reticle focus sharp with the ocular lens. It gets the o-rings and taped. I have noticed in the past that the eye peice will try to rotate also. Especially with spring guns. Yes I marked it before to see. And matter of fact some side and front AO adjusting knobs rotate also. Again mostly on springers. I have not locked them down but I do watch to see if they rotate off the distance I set them at.
GF1,
Well, I am interested in this for sure. Darn it!!! You did it again!,…. throw out a tease, give a solution or something new to try,… and you got me following along just like a little lost pup! 😉
Chris U
Well you know I got to spread my little tricks out over time. Plus ain’t got that many left. I think I done showed them all. 😉
GF1
Are these scopes that don’t have a locking ring on the ocular or all kinds?
Halfstep
The ones that don’t have the locking ring.
Chris U
Also you may want to check it yesterday’s blog. Me and Halfstep was talking about my hold when I shoot rested from a bag. I posted to short video’s of my fore hand hold and my trigger hand hold with the thumb placement. It’s around the middle to bottom of the blog.
GF!,
I use the same hold that you do. If it ever came to me having to rest the gun on an open palm, it would never happen in a rested position. Too uncomfortable. Now,.. if doing off hand, braced on a tree let’s say,… then yes,.. an open palm would be quite natural. Though it might be more of sitting it in the V/web between the thumb and index finger, while the thumb is braced on the tree. that would be very natural.
Chris U
Basically what I said too.
But one big think I pointed out is I set the gun on the bag balancing without me touching it. And basically setting there like that naturally pointing at the target. Then I use the hold just to stabilize the gun.
But I don’t think you seen my 2 finger and thumb hold I use with my fore hand. I did a short video of that along with a short video of my trigger hand and thumb placement on the stock.
I guess I could post the video’s here. Yep probably should since people might not know the hold we are talking about.
https://www.youtube.com/watch?v=ak-5E2phnCw
https://www.youtube.com/watch?v=Z7BCE1339fg
GF1,
Yup, same thing that you do. Works good. The balance thing I have not tried, but I do not have a bag rest either.
Chris U
Your talking about your bi-pod on the Marauder I guess.
But what about the Tx and LGU?
GF1,
The M-rod has the fore grip,… which I grip. For the TX and LGU, I use the same method as in your videos,.. on a hard rest topped with gasketing and rested at the very front of the forearm. Could it be better? Maybe. Am I going to try something else? Probably not.
Chris U
Well bummer for you.
How will you ever know if your shooting your gun to the maximum level of accuracy. 😉
Chris USA
Glad to hear someone point out how uncomfortable the artillary is on a rest. I thought it was just me and I had weird wrist bones and ligaments and stuff that got bound up in that position. Sometimes I find that it’s even a little painful.
Chris USA,
I should have made a note, but which pellet does your Maximus like? Thedavemyster graciously sent me a selection of pellets to try in the Gamo. I think that I’ll try few of those in the Maximus.
I’m starting a reference document. Doing some cut-and-paste to build a reference file so I don’t have to rely on my too-easily-distracted mind.
Also, my memory says that a couple of years ago there was a post about making an outer liner for the spring out of a plastic milk carton. Or not.
Finally going out to try the Maximus after dinner. The day was consumed by another project. Happily that’s successfully completed and I think that Wed and Thu evenings are mine as well as all day Friday.
I’m skipping over the Gamo for a little while and spending some quality time with the Maximus. Not giving up on the Gamo, I want it thoroughly “sorted out” before I sell it. But all that I’m reading here and elsewhere strongly supports PCP over springers.
GradpaDan
GrandpaDan
I got 3 springers right now that would give my Maximus in .22 caliber a run for it’s money out to 50 yards.
Don’t base springers on the performance of your Gamo. And I do speak from exsperiance. I had a Gamo Whisper. It no kind of way compares to the springers that I have now.
GF1
Viewed your videos. Gorgeous air rifle. Interested in knowing what those three springers are that are accurate out to 50 yards. I was under the impression that springers were only accurate out to about 35 yards max. I tried resting my RWS 34 on my shooting bag and the POI dropped 2″. The groups might be good when shooting from a rest but that doesn’t help when pesting and not shooting from a bag. I need to learn how to hold the rifle consistently in order to be accurate in all circumstances. It’s not about how good I can shoot when resting the rifle on a bag. That really doesn’t matter to me.
Geo
Thank you on the Tx. But that’s just how they are made. They are a work of art. And shoot that way too.
But yep that’s one of them that shoots good out to 50 yards. Well actually 70 yards is doable with it bench resting.
The other is my FWB 300 I modded. It’s got a single spring that is heavier than the double counter wound springs from the factory. Plus took the cast iron ring off the piston and used a just right fitting o-ring. From the factory the 300 comes with a cast iron ring like a car engine uses. Plus the action slides forward in the stock when you cock it. When you shoot it slides back eliminating the recoil that’s transfered in the stock to the shooter. But they are known for being very accurate guns from the get go. I just shoot mine out farther than there suppose to with food groups. 😉
The last one is my HW30s. It is very accurate. But I probably shouldn’t of included it saying it would give my Maximus a run for the money at 50 yards. I can bench rest with it with a scope out at 50 yards with 1-1/2″ groups. Yes I have a scope on it now. The problem with it or I shouldn’t say problem. I should say it just don’t have enough spring for 50 yards like the other two guns. If I tuned it up with a heavier spring it might shoot better out at 50 yards. But maybe not cause that will increase the felt shot cycle. It’s a very smooth springer as it comes from the factory. But don’t get me wrong. Already got several starlings out at 40 yards with it. And that’s standing unsupported. Not bench resting it.
So there you have it. 🙂
Geo
Also there is ways to shoot those birds without bench resting.
Prop up against whatever you can. But the main thing is try to make the gun rest on a branch or use your fore hand gripping a door frame and rest the gun so it points naturally at your bird pest.
And yes I know you don’t have very long to make all that happen. All I can say is been there done that. The more you practice the better and faster you’ll get.
Yeah, that’s exactly what I do. I open the sliding door about 4″ and grab the edge of the door and then rest the rifle on my hand while trying to not grasp the rifle too tightly and get a bead on the sparrow. When I shoot out front where my bird feeders are, I sneak out into the garage and get a stool to sand on. Then I grab or rest my hand on the roof rack of my suv and then rest the rifle on my hand. It’s only about 15 yards to the feeders so this has a higher success ratio. I have to rush the shot often because the sparrows won’t sit long before flying off. They are sharp eyed little buggers too and sometimes they pick me out before I can get a bead on them. Fun stuff.
Geo
Yep on all that.
But don’t you just hate when you got them locked on nice. You pull the trigger and you think the shots going to land and they duck.
I have watched what the birds did at distance to get my hold right by them watching the pellet go by and turning there heads following the pellet. They definitely have better eye sight than we do.
GF1,
On Tedsholdover YouTube channel I saw some slow motion video of pigeons seeing the pellet coming at them and trying(not usually succeeding) to fly away. Nature is incredible !!
Halfstep
Yep seen it. And yep about nature.
Grandpa Dan,
Good to hear from you. Glad you are finally getting out with the Maximus. On pellets:
AA 13.43 11mm
HN 14.0 18 mm
JSB 14.35 15mm
HN 14.66 25 mm
JSB 15.89 22 mm
AA 16.0 15 mm
Pred. Mtl. Mag. 17.0 28 mm
Sniper HN 18.0 22 mm
JSB 18.13 13mm
HN 21.14 23 mm
All 30 yard, 5 shot groups. Now, it would appear that the 15.89’s did not do the best, but I settled on them for some reason,… I just cannot remember why. 😉
It really does not seem that pellet picky. Plus, yours may not shoot the same as mine. (After),.. you have shot it a bit, there is some easy trigger mods. that will bring that 6#-ish trigger down to around 1-2#. But, that is for later.
Grandpa Dan,
Out’a here soon. Your Wed., Thur., Fri.,… off,…, is my 3 days,.. on,.. this week. I will be sure to check in the AM and PM and assist in whatever way I can.
On pellet selection,.. my basic premise is to shoot more of whatever did the “best”. Usually 10 shot groups. The “best” may stay the best,.. or it may not. I look for repeatability over several sessions, several tries. If I had to guess, that is what made me select the 15.89’s. That said, looking back over what I posted, I might re-think that. Some pellets I only had very few left.
Bottom line is that you will just have to see what works in (your) gun. Good luck, best wishes and be sure to keep us posted.
Chris
Chris U
If I remember right that is why you chose the 15.89 JSB’s. That’s definitely what made stay with them.
They are consistent in repeatability. The other pellets for some reason tend to do fine one time and not another time.
The JSB’s tend to be more consistent in repeatability more times than the others.
Oh and I get very similar groups with JSB 15.89’s and 18.13’s. I chose the 15.89’s cause they tend to shoot a little flatter so it’s easier to not have to hold over as much at different distances.
Hi Chris,
Finally got to get the Maximus out and mounted the scope, per Tom’s video on YouTube. Tried a couple of shots knowing that the air pressure was at the 1bar level. Got out the pump but am having a dickens of a time getting the pressure up.
I bought the Maximus from another airgunner who sold this and a Hatsan to finance a higher-end PCP. The deal was for a Maximus Hunter and a pump. The seller is on the up and up. Everything is as it was advertised. I’m guessing that he did not shoot the Maximus more than 50 times. It looks like I just bought it.
I’m struggling with the pump. It’s Chinese, no-name but appears sound. I weigh 165 and I practically have to climb up on it to get the down stroke to bottom out. I looked up Tom’s video about the advantages of a pump. My experience is nothing like his demo, I’m working up a sweat. In one of Tom’s posts, he said that a female was able to charge the Discovery to 2 bar seated. Wow!
I’m sure that I’m missing an important step, like turning on the gas when the mower won’t start. The Maximus docs just say to hook up the whip and pump away. I don’t see any kind of valve to open on the gun and only a relief valve on the pump. The pump docs are very badly translated English and offer nothing that I can see.
I hate to spend more to do pesting on local vermin, but I am mentally committed to the PCP platform. It seems the most trouble-free after I master the learning curve, (or buy a better pump.) But if the pump is the problem then the Hill hand pump at $200 will have to be my next step.
Sometimes I feel like such a dummy.
GrandpaDan,
Disconnect the pump from the rifle. Then pump it ands see if the pump rod goes both ways unobstructed. Does air come out of the fitting? If not, that pump is bad.
There is nothing on the rifle you need to “turn on.” The inlet valve will accept air if the pressure is higher than what’s inside the gun already.
You are only going to 2,000 psi (not 2 bar, which is about 33 psi). You should be able to pump most of that with one arm.
B.B.
B.B.
Thanks for your quick reply.
I am getting air in both up and down strokes of the pump.
Something has to be amiss. After ten to fifteen strokes, It’s a hard pull up and harder down. After a few more strokes it’s impossible to “bottom out’ in the down stroke. The pump feels like it’s solid.
I received the Maximus from the seller with the pressure gauge at 1000. I can’t move it up from that pressure. The pump has lots of resistance but the gauge on the gun does not move. That’s the reason that I thought that there might be some valve to open or close.
Puzzling…
I see that Air Venturi offers a G4 and a G6 air pump. I don’t want to make that purchase until I’m sure that I’m not missing something that would make this pump work properly with the Maximus. Or that the Maximus is not part of the problem.
Of course, in trade school, I was taught that a poor machinist blames his tools.
GrandpaDan,
The problem is — I don’t know what your definition of “hard” is. I remember when we developed the Discovery, I had their female lawyer fill it with a pump. She was under 5 feet tall and overweight, but she could do it. It did take some coaxing from me, and I could tell that physical exertion wasn’t something she relished.
I once demonstrated filling a Korean rifle to 3000 psi at an airgun show. My wife, Edith did the pumping and when she passed 2500 psi it was a challenge. We had a man who weighed 140 lbs. at that demo and he couldn’t go above 2800 psi. Edith weighed about the same at the time, so I don’t know what the difference was.
Maybe a hand pump isn’t your cup of tea?
B.B.
Grandpa Dan,
I am sorry that things did not work out, straight out of the gate. I have no experience with hand pumps and will have to defer to the experts that do have experience. The Maximus does have the check valve at the end of the air reservoir where you hook up at, but as BB said, there is nothing to turn on.
It almost sounds as if the check valve will not open up and the pump “thinks” that it is already trying to do full pressure. I do not know.
I would comment on the (current) blog if I were you, but that is up to you. BB should be able to answer any pump questions, but others may have some input too.
(Hang tuff and do not give up). Something sounds amiss. If not the gun, which I doubt,.. something must be up with the pump.
Chris
GrandpaDan
I agree with GF1. I have a Gamo Whisper Fusion that just is not the gun my RWS 52 ,45 and FWB 124 are.Was way cheap at $109.00 on clearance and is well worth that but the German guns are better. They have been at it for a long time and they are, you know, Germans.
Halfstep,
Lots of German in both my and my wife’s families. I do appreciate superior the engineering and craftsmanship that seems to part and parcel of the the German psyche.
GrandpaDan
Grandpa Dan,
So,… how did it do? Also, there is super quick fix if you find the bolt handle/bolt to be a bit “loose feeling”. Just unscrew the bolt handle and add a piece of tubing. Cut it a little long. The “squish” of the rubber will provide tension. Cut to length until you get the “feel” you like. Works great.
Catch me on a current blog when you get the chance/time.
Chris
B.B.
Greetings from Colombia. Thank you for this illustrative report. I have a question concerning my hatsan 95 vortex. A couple weeks ago I notice an strange noise during the cocking (something like metal friction inside the piston) followed by an
exagerated increase in the holdover to hit the bullseye at 20 and 50 meters, so I conclude that something is wrong with the speed from my rifle. First I check the breech seal, and found a little bit wore, I extract the seal, puts a shim inside the groove; in this way the breech seal came out 2 mm. There was no improvement in the POI. I think that there is a problem with the piston seal, but in Colombia we do not have spare parts readily available. Do you think possible for a Hatsan 95 Vortex that a leather piston seal work? I am dreaming crazy things? Thank you
Ivanhcastillom,
No, I don’t think it would be easy to replace a synthetic seal with a leather one. The end of the piston would probably need to be changed. But you don’t know that your seal is damaged. Why worry before you know?
It sounds more like a spring problem to me.
B.B.
BB.
Thank you for your answer. My hatsan is the gas piston version. I also consider some air leak from the gas strout, but when I left the rifle cocked for 20-30 minutes, there is no change in the POI. But you are right, I need to be sure about the real reason of the trouble.
Greetings.
Ivan…
I’m no expert on spring piston guns and I have to admit that I am only guessing that your gun has a spring and not a gas piston. If it has a spring, based on what I have learned on this blog (or what I think I’ve learned), I would suspect that you may have a broken spring. Although the broken spring in Geo791’s gun didn’t give itself away with a grinding noise or a very low velocity, I’ve read here of other guns that did make noises and shot slower because the spring was broken. I hope I’m wrong since that could prove harder for you to get than a proper piston seal.
I sometimes take for granted how easy it is to acquire things here in the USA. I can drive 10 minutes, where I live, and purchase almost anything I need,sometimes from 4 or 5 sources. It’s that convenient. But quality air guns and parts have to be bought from the internet. Is that not available to you for some reason? I don’t understand whether you can’t get parts or it is just difficult or takes a long time. I’ve read other comments from other countries that say the same thing. Can you help me understand?
Halfstep,
Ivan said he had the Hatsan 95 Vortex. I have the same model and that is the gas piston version. I’ve been reading this blog for quite a while now, but I don’t recall very much posted on gas piston troubleshooting.
Larry in Algona
LarryMo,
Hi Larry. How come you’re not in bed? Do you think the sound he’s hearing is the piston scraping the inside of the cylinder because the piston seal has worn away. Seems like the gas would rapidly leak out if that were so. Where is Algona ,if I may ask?
Hi Halfstep. I wish I knew what could be making that sound. I may have to deal with something like that with my own Hatsan someday but I haven’t had it long enough to have torn into it. I have a couple more gas piston rifles and one air pistol. I’ve noticed that there just doesn’t seem to be many comments on this blog about gas piston troubleshooting, but probably in time… I’m in the Pacific Time Zone near Seattle (about 20 miles south) so I get to stay up later than most of you 😉
Larry in Algona
LarryMo,
First off, why no Curly or Shep? Second, from what I can tell, stayin’ up late is just the beginning of the great things about living in the Pacific Northwest! And C: don’t go borrowing trouble. Repeat every night( when you finally DO go to bed) “My Hatsan Will be fine.” My Hatsan Will be fine.”…
Halfstep – A. My sobriquet originated several years ago while working in an IT department where “read and initial” memos were an almost daily plague. There was another Larry in the department, also with the last initial of M. To clarify things, he would initial LMe and I would initial LMo. This was during the time of the Elmo pandemic so people preferred to call me LarryMo. B. We are encourage by Mom Nature to stay up late this time of year – it doesn’t really get dark this far north until about 2200. and, 3. My Hatsan is OK. I just have to remember to really slam the barrel home after cocking, but it is getting easier.
Was is Sam the Sham that counted off: Uno, dos,,,uno, dos, tres, FOUR?
The Elmo pandemic bit really “tickled” me. :-{)>
Halfstep.
Thank you for your answer. As I tell to BB, my hatsan is the gas piston version, but until I can disassemble the rifle, I can´t be sure about the thing.
In the Colombian particular case, we cannot buy sport weapons or their parts or accesories directly from websites like PyramydAir, because you must have the official register as a importer with our customs office. If I buy a rifle from PA, when the gun arrives to the Colombian port, it will be seized by the authorities. Sadly, Colombia has a guerrilla situation and we don´t have second amendment 🙂 :), so the goverment controls the gun trade. This is good, but for my hatsan will implie some trouble for their repair!!
Greetings
Ivan…
How does the government treat selling or trading airguns or parts between it’s citizens. Maybe you could find a network of people like yourself to trade with for used parts. The Cubans kept their American cars running through a complete embargo.
If there are other Columbian airgunners out there reading this blog, don’t be bashful, comment if you can help Ivan… out with his parts problem !
One question that I forgot to ask: Are you going to do any adjustments or mods to the T06 trigger? I know that my D34 trigger is OK, but not as good as the trigger on my TX200. On my TX200, I have adjusted the trigger to break at 8 oz, and no 2nd stage creep. On my D34, the trigger breaks at about 1.5 lbs, and there is still a little creep in the 2nd stage. I have the trigger weight screw turned out all the way (as light as it will go), the 1st stage adjustment screw turn all the way in, and the 2nd stage backed out as far as I could while having the trigger still operate properly. At this setting, the D34 trigger has a reeeaaaal long 1st stage, and the 2nd has minimal creep. I was just wondering if there is anyway to lighten the trigger pull more and eliminate the creep. Thanks.
Fjjoachim,
I said in Part 2 that I will not adjust this trigger. It breaks at 1.5 lbs. now and that is as light as I want to go with it. Yes, there is a small bit of creep in stage 2, but this creep is just trigger movement — not the creep that cheaper triggers have. I have many other guns that have the same creep and I love their triggers.
B.B.
By the way, my D34 has a Vortek PG2 installed. Really made a difference in the smoothness and accuracy of the rifle. I took 3rd place last October in a FT match at my local AG club against a filed of high end PCPs. A really nice rifle. After the installation, I never had to lube the spring or piston seal again. I finally had to replace the Vorek spring and piston seal after 25,000 shots when the rifle developed a ringing sound at the end of the shot cycle!. Cost for re-building the Vortek kit in the D34: around $30. Talk about low maintenance. I would highly recommend the Vortek to anyone owning a D34.
Fjjoachim,
Thanks for that info. I can never put that kind of shot count on a test gun, so your comment was well-put. George may never put 25,000 shots on this rifle.
B.B.
Hi B.B.
I have a Diana 350 T06 that, as you know, is pretty much the “same” as the 34. Regarding the piston seal OEM replacement it has been always a fight.., no matter if I warm it in boiling water, etc. Then, I saw a tip in the GTA forum about using a small cone over the piston end in order to gradually enlarge the inside diameter of the seal until it dresses the piston end. Then, last time.., as I had never tried the cone before, I put it and decided to push/tap down the seal with a plastic tube. I didn’t have to warm the seal and, as far I could see, it worked fine.
(indeed, my cone was a plastic cone trunk; I luckily found an empty cream tube cap that fit “perfectly” .. larger diameter = piston end diameter).
Did you ever try the small cone..?
Marcos
Marcos,
I “invented” a truncated cone while talking to Tom Gore as I was trying to install this seal. The secret is to get the seal warm and flexible and it gets much easier to install. I hope I can remember that.
If I had to install a lot of seals I would make a truncated cone.
B.B.