by Tom Gaylord
Writing as B.B. Pelletier
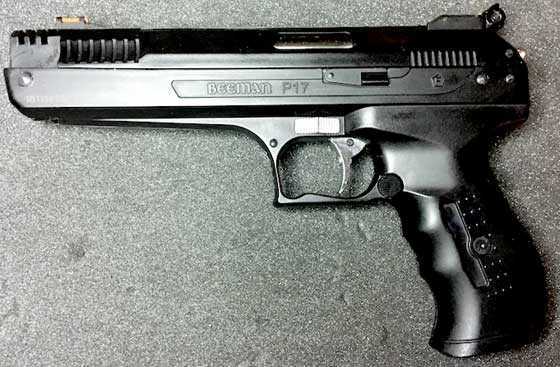
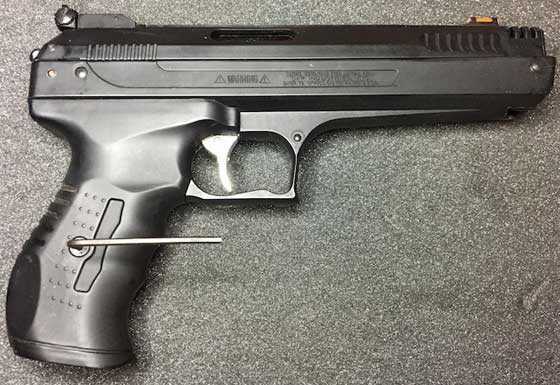
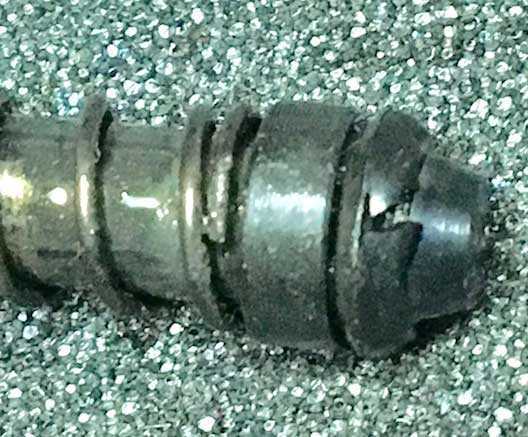
Beeman P17 air pistol.
Today’s report is written by reader 45Bravo. It is Part 2 of his report on resealing the Beeman P17 air pistol. This is the part of the report I have been waiting for, because I want to go deeper inside my P17.
This report will go differently than some in the past. We will first learn how to reseal the pistol, which ends today, then I will test one for you. But while this story has been unfolding I have bought a Beeman P3 pistol to test alongside the P17. We will find out how the two airguns really compare in all ways. I hope you are as excited as I am!
If you’d like to write a guest post for this blog, please email me.
And now, over to you, 45Bravo.
Resealing the Beeman P17 air pistol: Part 2
This report covers:
- Step 2.
- Step 3.
- Just remember:
Now it’s time to go beyond the simple fix we did in Part 1. Thankfully that is the biggest problem people have with the Beeman P17 and it is so easy to fix. Today, however, we are going past that to something else that sometimes happens.
Step 2.
If your pistol is dumping the air when you get to the end of the pump stroke, or if you can hear air escaping as fast as you pump the gun and you feel absolutely no resistance while pumping, then we need to dig deeper.
This requires disassembling the pistol, so we will start by removing the piston like we did in part 1. Then the right grip comes off by removing the screw in the right grip with a 2.5mm Allen wrench.

Remove the right grip panel.
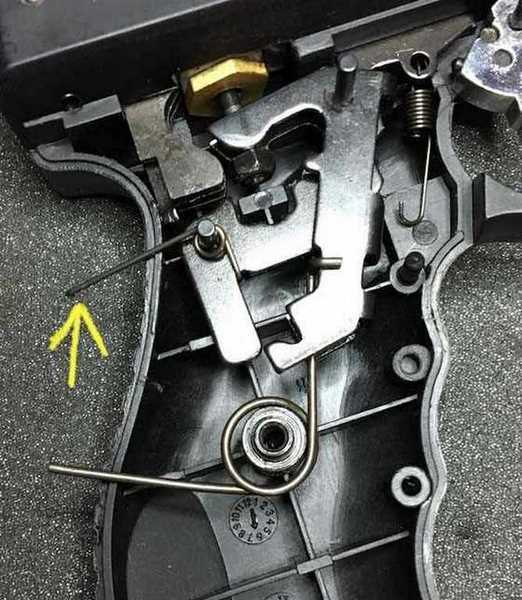
As you slowly pry the grip halves apart, an L shaped spring that connects to the sear will pop out of the rear of the grip, but don’t worry, it is wrapped around a pin, and will not go anywhere. [Editor’s note: Some of our readers have discussed this spring already. Apparently it gives problems if not installed correctly.]
The 2 pins SHOULD stay in the left grip with all the parts in place.
It looks very complicated under the grip, but in actuality, there are only 11 parts, and they are assembled in 3 groups.
Group 1. The sear and L-shaped spring and pivot pin.
Group 2. The hammer, the larger L-shaped main hammer spring, the smaller internal P-shaped spring inside the hammer, lever, coil spring, and pivot pin.
Group 3. The trigger and pivot pin.
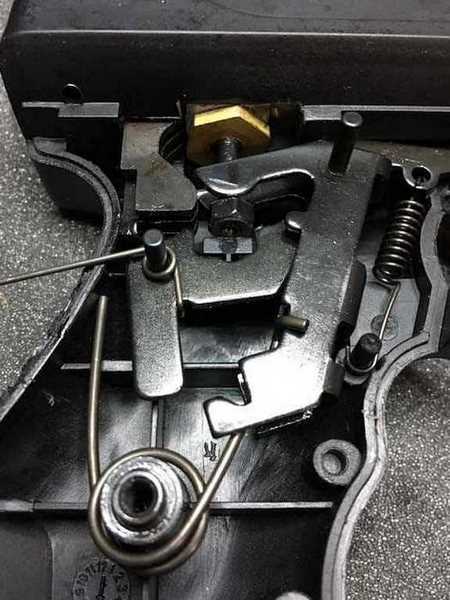
How the parts are arranged under the right grip panel.
Tip: Take photos before you remove the parts as you go.
Using needle-nosed pliers lift the tail (on the left) of the lower L-shaped hammer spring out of the grip frame to relieve the spring tension.
Lift the left-most pivot pin just enough so it clears the plastic hole, and pull the sear, and spring rearward and out.
Unhook the lower spring from the hammer. That’s the part that looks like a big number 7. You do not have to take the trigger out for this repair, but if you do, it is only the trigger and the pivot pin.
Unhook the lower end of the coil spring by the trigger, and remove the spring.
Pull the hammer pivot pin out slightly, then lift the right side up to rotate it around the valve stem, and the whole assembly will lift out.
Inside the hammer (the number 7-looking piece) is another spring, shaped like a P, that the pivot pin goes through, please pay attention to its orientation.
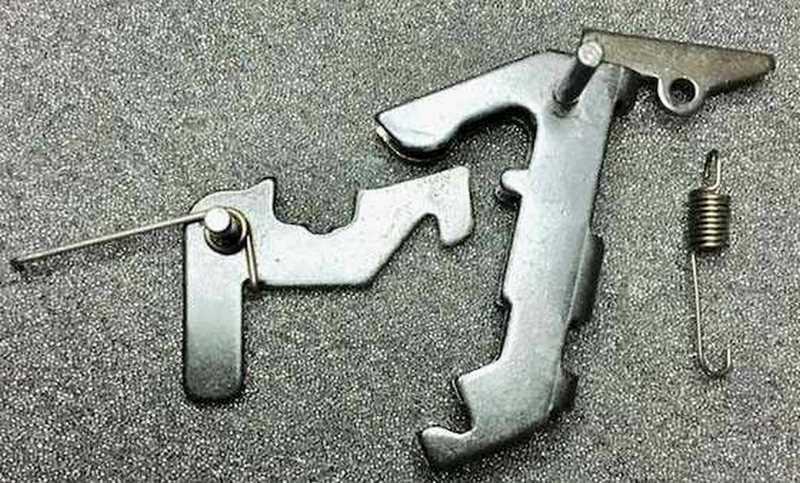
The sear assembly (left) and the hammer assembly out of the gun.
Step 3.
Now we need to remove the compression chamber.
On the left rear of the compression chamber is a 2mm grub screw, loosen it and, using a punch, knock out the pin holding the compression chamber in the frame.
Tip: Support the plastic frame of the pistol while you drive out the pin.
A simple way is to take a scrap piece of 2×4 and drill a 1/4-inch diameter hole through it, as you punch the pin through, it will go down the hole you drilled.
If you don’t have a 2×4, you can support the pistol on a roll of electrical tape and the pin will go into the center of the roll of tape as you drift out the pin.
Loosen Allen screw so pin can be driven out.
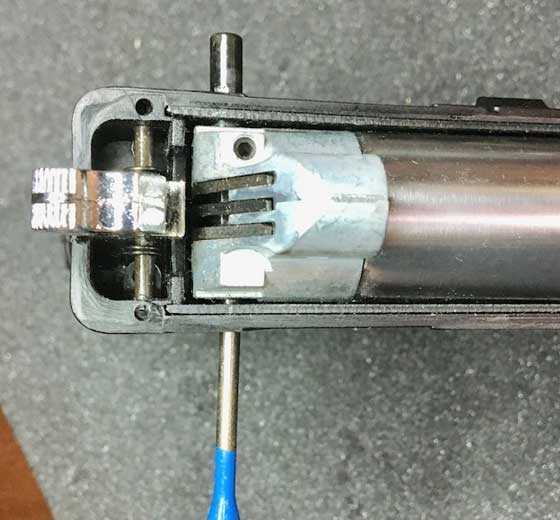
Loosen Allen screw so pin can be driven out. The pin and punch is shown here for clarity, but you want to support the far side of the plastic pistol frame as described in the text when doing this.
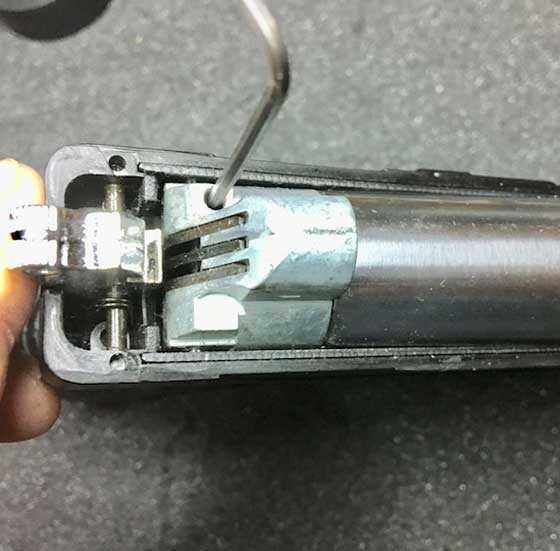
The compression chamber now lifts straight out the top of the pistol.
There are 3 metal “fingers” at the rear of the compression chamber, they are held in place by a small cross pin, the center “finger” is different than the others at the base. This center “finger” engages the sear during the cocking process. Drive the pin out and remove the three fingers.
The center “finger” in this picture engages the sear during the cocking process.
The breech o-ring at the top of the compression tube can be can be replaced easily, it is one of the 2 #009 o-rings.
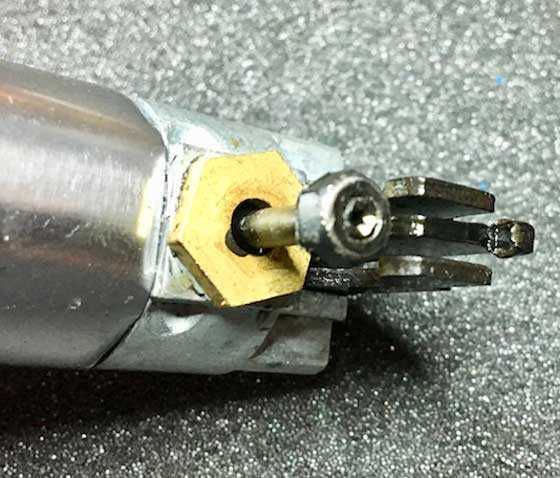
A 13mm wrench is used to unscrew the brass valve nut on the lower part of the compression tube.
After it is unscrewed the valve just pulls straight out.
The valve pulls straight out of the compression chamber.
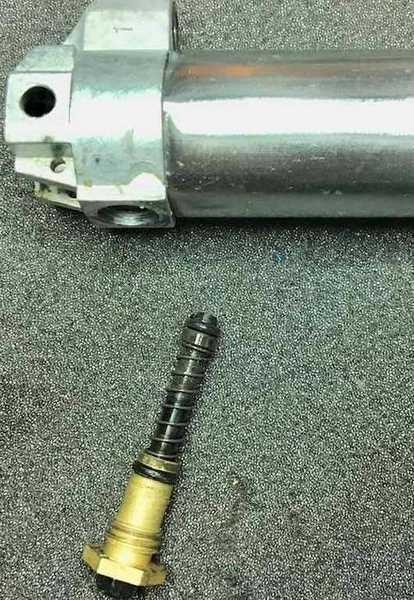
Clean the valve, and inspect the 2 o-rings.
On the gun I’m resealing, the smallest o-ring at the top of the valve in the picture above was split. Replace it with the #006 o-ring, and lube it with your choice of lube.
The smallest o-ring on the valve was split.
Replace the lower (larger) o-ring with the second #009 o-ring.
Tip: Wrap Teflon plumbers tape around the brass threads on the valve to give an extra layer of sealing. (it may not help, but it doesn’t hurt either.)
Screw the valve back in to the compression chamber.
Tip: Hold the valve stem nut while you tighten the brass valve nut in place to prevent the top o-ring from spinning in its seat, and possibly being damaged.
Put the 3 “fingers” back in in the correct orientation, with the different one in the middle.
Put the compression chamber back in the frame, and tap the cross pin in (supporting the frame as this is done) to secure it to the frame, and tighten the set screw at the left rear of the compression tube with the 2mm Allen wrench.
Take the hammer assembly, put the left side of the number 7 looking piece over the valve stem nut, then rotate it to the right, just the opposite of taking it out.
Tip: There is a small groove in the frame where the pivoting lever part of the hammer assembly will fit up into. If the lever doesn’t go up into there, the trigger will not contact the piece to fire the gun.
Put the larger of the 2 springs back on the lower screw shaft, and put it back in place on the hammer (the thing that looks like a number 7) but do not put it under tension yet.
Slide the sear and spring and pin back in place, but don’t put it under tension yet.
Using the needle-nose pliers, hook the small coil spring back into the pivoting lever piece of the hammer assembly behind the trigger.
Correct orientation of everything before putting tension on the springs.
This spring (arrow) is the last one to be tensioned, it goes UP into the right side grip frame.
Now, using the needle-nose pliers, put the left tail of the lower spring up into the left side of the frame.
Start the right grip panel on the pivot pins, and just before it closes completely, push the tail of the smaller sear spring up into the frame. Make sure it goes UP into the right side of the grip.
Tip: If the tail of the sear spring goes into the left side of the grip, it puts pressure on the sear in such a way that it doesn’t catch the hammer consistently, causing the gun to sometimes dump the air on cocking, but not every time.
Tighten the right grip with the 2.5mm Allen wrench.
Put the piston back in as in part 1, and function test the pistol.
This addresses the 2 major reliability issues with this pistol. There are many threads online about how to mod it for more power and many other things.
The one last thing that is a nuisance is when pumping, you accidentally press down on the rear sight assembly, when you do, it relieves spring tension on the elevation screw, and allows it to rotate, thereby slowly raising your point of aim with every shot.
To solve this problem open the action, and unscrew the rear sight elevation screw, be careful, as there is a spring under the rear sight that can go flying if not careful.
Also there is a nut under the sight inside the “slide” that will fall out when the screw is removed.
Tip: Put a piece of tape over the inside nut, so it doesn’t fall out when you remove the elevation screw. Just remember to remove the tape when done.

That nut will fall out when the elevation screw is removed. Put a piece of tape over it to hold it in place while you work on the rear sight.
I put a small piece of the same fuel tubing we used for the transport seal in the S&W 78G reseal on the elevation screw, it now keeps the screw in place, and doesn’t rotate when you press on the rear sight assembly during cocking.
Just put the tubing on the screw, put the spring in place, and tighten the elevation screw.
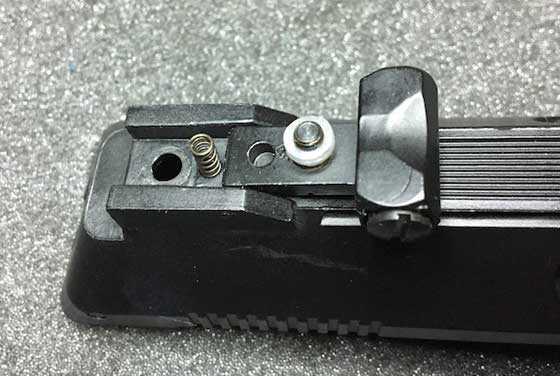
A small piece of fuel line tubing (white) on the elevation screw prevents it from rotating during the cocking process.
There you have it, it sounds harder than it is, but for a $30 investment, you get a accurate pistol that is a great value for the money.
When it stops shooting, you have an opportunity to repair the gun with little or no investment.
Just remember:
Be Curious enough to take it apart.
Be Skilled enough to put it back together.
Be Clever enough to hide the extra parts when you’re done.
Thanks,
45 Bravo

“Be Curious enough to take it apart. -They don’t call be George for nothing.
Be Skilled enough to put it back together. -What does that mean?
Be Clever enough to hide the extra parts when you’re done. -Under my rug is already pretty full.
Great instructions, just too many for me to follow….
-Y
The first time I took one apart, i took about an 45 minutes after opening it up, moving bits and pieces back and fourth, looking it over, understanding how it worked, and how the parts worked in relation to each other.
And looking it over to see what could be done to it without permanent modifications.
The second one I opened up was a 30 minute job just making sure it was all clean and everything was back in place just so.
The third time I opened one was about 20 minutes to replace the seals and re assemble it.
Without rushing, that’s about how long it takes to clean and reseal one from top to bottom.
It sounds like a lot of steps, but it really isn’t.
The Lock work looks the most intimidating.
It’s only 11 parts,
3 of them are pivot pins.
4 of them are springs.
That leaves only 4 parts to get in the right place, and they all go over the 3 pivot pins.
Would the process for resealing a PCP be similar? I understand that that should be done ever 5 years or so. Also, when changing one seal, doesn’t the -while I’m in there, might as well- take hold?
-Y
Some people love to tinker on their guns constantly.
Personally, I subscribe to the” if it ain’t broke, don’t fix it “ therory.
I will have a seal kit on hand for when it does leak, but I don’t reseal it on a schedule.
Yes while you are in inside the gun, you might as well change all the soft bits.
I just recently resealed the valve in my Gunpower stealth made in 1998, because it had developed a slow leak.
If it’s working like you want it to, don’t fix it, just shoot it and enjoy it.
45Bravo,
An often overlooked item on parts removed from where are roll pins and solid pins.
Are all 3 pivot pins interchangeable?
shootski
I did not measure them, so I can not be sure.
I always try to keep the sub assemblies together, and separate from the others.
I have never been big on putting all the parts in one bin when removing them.
I would THINK common sense would be to make them all the same,
But common sense is not a fruit that grows on everyones tree.
Especially engineers.
45Bravo,
They look similar in diameter but length is impossible to mensurate on your posted photographs.
“But common sense is not a fruit that grows on everyones tree.”
Recent trees are pruned of that fruit by modern educational practices!
“Especially engineers.”
Particularly today’s Mechanical Engineers that have never seen a lathe up close or held any file other than to their fingernails!
shootski
I will pull the grip on one of the guns today after work and measure them and post the measurements here.
Having the length and diameter would help people that may have lost a pin replace them with a shortened drill bit.
45Bravo,
You are showing some Common Sense and consideration for others to boot!
You will be rewarded if only in your heart!
shootski
Ok, they are not interchangeable.
They are the same diameter, but different lengths.
The sear pin is 0.118 of an inch in diameter (3mm), and 0.71 of an inch long (18mm).
The hammer pin is the same diameter, but 0.90 of an inch long, (23mm).
The trigger pin is the same diameter, but 0.63 of an inch long (16mm).
So if you lose a pin, a cut down drill bit could work, or some other steel pin of the same diameter (3mm) would work.
Since it is not in the main article, I hope whoever needs the info digs deeper and reads the comments..
Ian
45Bravo,
Maybe B.B. can retroactively edit the article to include the pin lengths?
Siraniko
Ian,
Perhaps BB will find a little time to insert that information about the positioning Pins into your outstanding blog.
I just saw Siraniko’s post above…great minds?
shootski
Yogi,
Your final remark answered your second remark.
B.B.
Good morning everyone.
It seems that my beloved HW75 has a relevant problem. It gets sufficient air only after some fast pumps,otherwise it just goes back and forth.
Any suggestions from our hosts?
Thanks in advance.
Bill
I have no experience with the HW75.
But if I Owned one, and it developed an issue.
I would download an exploded view, and search the internet to see if someone has written about the same issue.
Then I would order a complete set of seals, and I would start with the simplest fix first, the piston seal.
If that doesn’t fix it, then move to the next possibility.
Only You know your own skill level of mechanical ability.
But my theory is, if someone else can replace parts, unless it requires special tools, I can replace them too…
Keep us posted.
Your final words were decisive. The power plant is almost the same, and allen wrenches are on the table. Took the piston out, examined o-ring and felt seal, looked ok but I applied some silicon grease. Deburred and cleaned the chamber, put them all back in place without any parts remaining. And when I realized the power needed to press down the slide I knew that miracles do happen. It is in better shape than ever. Do not ask what was wrong, if I had known I would not have bothered you all.
Thanks a lot 45Bravo, you reminded me my old para unit motto; Ο ΤΟΛΜΩΝ ΝΙΚΑ. I think you can search it a little…
Bill
It is never a bother, I am glad it is working again.
It apparently just needed a little love.
Now it’s happy again…
Congratulations.
Bill,
Your seals have gotten hard with age. Try lubricating them with ATF sealant, of best of all, get the pistol resealed by Pyramyd AIR.
B.B.
Bill,
I sent out my Beeman p2 (Beeman branded HW75) for a reseal repair at Pyramyd AIR. Took a few weeks, but now is back. Very happy with their service.
45Bravo,
Another fine installment. A bit short on time, but is there any lubing tips in there? Some moly paste at contact points for example. I might have missed it after only a (very) quick read.
That O-ring at the front sure does look like that it takes on quite a tapered/conical profile after awhile.
Good Day to you and to all,…………… Chris
Ian,
Another great set of instructions to remember about. I thank you for a major contribution to the “Airgun Encyclopedia” which is filled with an incredible amount of useful information.
Thank you.
I want to contribute so much to the encyclopedia because there are so many guns out there that people own, and there is just no information about them on the web, much less Information about maintaining them.
In the late 1990s and early 2000’s I was shooting with the club at the Olympic training center.
I resealed several of the Crosman Skanakers, they had as loaners to the junior shooters, but I never recorded or took photos of any of it.
On the Internet there is NOTHING about them other than a very short blurb that was done on this blog back in 2006 or so.
I need to find one and reseal it and write an article on it.
Ian
Ian,
Maybe we can do something about that.
B.B.
Ian,
I can certainly sympathize with the lack of funding, however I think BB may be able to help you with writing your next blog. We’ll see.
45Bravo,
Excellent post. I do not have a P17. But if I did, you would have inspired me to open it up.
Your tips are thoughtful and relevant. Things like “Put tape over it… so it doeant fall out…” Excellent tips that come from experience. Would save many of us from having to comb the garage floor with a magnet…
StarboardRower
45Bravo,
Thanks for the DIY report on resealing the P17 Ian!
Very well done – much appreciated!
Hank
Bravo, Bravo!
This is an excellent report for those that want to keep and maintain their guns. Reports like this that show a meticulous how to method are invaluable.
I have printed out both parts so far for reference. I had a couple of these myself (purchased from Wally World on closeout a few years ago for about $20!!) and did some of the things you have done. I also discovered that tucking the tail of one of the springs in just the right way or the wrong way will either mess up or fix the sear engagement.
I have recently passed along both of my p17 pistols to my nephew and his two sons, my great nephews, in hopes that they will grow into them and have fun shooting these neat little pistols once they are strong enough to cock them.
I have since purchased a Weihrauch HW45 SSP pistol that replaced these. It is much more expensive but has hey beautiful, light, two-stage trigger and a hammer that you pull back yourself to Cock it. Very satisfying, and fun to shoot with a final a sculpture and stippled wood grip. It doesn’t crack quite as loudly as the P17’s but has about the same velocity.
I also discovered an easy modification for these pistols in the linkage for the automatic safety engagement. I can’t remember the details right now, but it was mechanically easy to see how removing or reorienting a part changed the safety from automatic engagement to strictly manual. if you have learned proper control of your trigger finger when you handle these guns, as with any gun, this is a very very natural modification that makes it more enjoyable to shoot.
I also put Moly paste lube on the trigger sear.
Regards,
Feinwerk
I did remove the auto safety feature on the very first P17 I owned, it was easy.
While I am not a fan of automatic safeties, it is a reality within the industry.
I prefer not to suggest or write about things that involve removing safety features.
The same with power modifications,
while I may take the risk and accept the liability on my personal weapon, I will never suggest you do the same to yours.
Ian.
45Bravo,
I’ve taken note of the “Tips” you’ve provided, such as using a roll of tape to capture a pin as it is punched out and taping a fastener so it does not fall out. These are the sorts of little touches someone like me, who is not at all handy, does not know about and will not think to do.
Michael
Been playing with my little P17. Was testing some different pellets. The Beeman Hollowpoints shoot real well (especially for the money), but to my suprise the PolyMags did very well. I just haven’t ran them thru the Chrony.
I use this for backyard plinking and some starling control at close range (under 25 yards). Here’s a couple of pics, hope they come thru ok. shawn
Shawn,
Just curious. How do you pump your pistol with the scope where it is?
B.B.
just put my palm on top of the first ring and push down while watching my thumb and index finger so not to be part of my downrange results.
Shawn,
Ah — the ring! Never thought of that!
Thanks,
B.B.
Shawn
Dovetail rail on my P17 is on the soft side and the grooves deepen if scope mounts are tightened too much. I would have guessed this would eventually happen using the scope ring to pump the pistol.
Deck
thanks for the tip. I’ll keep an eye on it.
This is a fun little shooter!
BB,
I have a similar scope on my P17 and it makes it easier to pump. I think it’s a combination of a rounder, more comfortable grip on the scope instead of the sharp edges of the rear open sight, coupled with the extra leverage that the scope provides. If you’re concerned about moving the scope accidentally during cocking, I’d like to say that I don’t personally take any pains to situate my hand over the rear ring ( you won’t get any extra leverage if you do that ) and the POI has remained on target.
The scope does make the gun heavier than I like, but my grandson can’t cock it sans scope.
Half
Half,
I will have a LOT to say about pumping with the scope! I have seen tubes bent that way! Not with this pistol, but with a Sheridan Blue Streak.
B.B.
i guess i don’t know how to post two pics in one comment
I have put red dots one them, and reflex sights, but have not scoped one yet.
Maybe that will be my next “upgrade.”
It’s an old “Tasco” silhouette scope, 1.5X , I had on a Rem XP-100 in a 35 rem. when I was in Alaska.
Used it a lot for deer and black bear. I just wanted a little more to focus in on for those pesky bird heads. shawn
These are awesome with little red dot sights such as the tiny Bushnell. The little Bushnell has a single clamp and you can use one of the UTG picatinny to dovetail adapters that fits inside the picatinny clamp. Here’s a picture of one I had with a largish Leapers dot sight installed using a set of the UTG adapters.
Also the best pellet I found for mine were the jsb express 7.33 grain domes.
The 2 P17’s I currently have are just over a year apart in manufacturing dates, but over 1 million different in serial numbers.
Beeman is turning these things out like skittles.
I wonder if any other manufacturer other than Daisy is turning out units of a single model in that volume.
Thanks 45Bravo, well done!
I know what I will be doing this PM. I will post if I find something interesting.
Henry
PS. Thanks BB for bringing these reports to us, you are The Great Enabler in more ways than one.
Ian,
Thank you for the very detailed instructions. I will be using them for sure. I haven’t been into the valve yet so that will be very useful.
I have not paid attention to the location of the sear spring, I will be checking that today. That may be what sometimes causes me problems on reassembly. Thanks for the tips.
Don
45Bravo,
Why are you tellin’ us to take pictures of that assembly? You think we ain’t smart enough to hold that in our head for a couple of hours? Just kidding!! I know I ain’t. I still don’t need no stinkin’ camera though. I just saved those excellent pics you took. Great job on the articles and the pics. You have a real knack.
Half
PS Does the power mod you mentioned give a significant increase and does it make pumping or the trigger pull harder?
Half,
The other day we were talking about polishing the crown or leade on a pellet gun barrel. I don’t think I mentioned why I use a hand drill.
I use the drill so I can frequently reverse the spin on the felt polishing tip. That helps maintain a more symmetrical polish on features like the lands and air port in the barrel.
Let us know if you give it a try.
Don
Don,
Will do and thanks for the tip.
Half
45Bravo
I see in the picture with the yellow arrow. Below the bottom spring is a time stamp.
Reminds me of when we watched for correct matching number cars when we was buying and selling muscle cars.
I don’t recall seeing that on air guns. Have you?
I see the date stamps on a lot of the polymer air guns when you get inside them.
But not on the vintage guns that are made of metal.
Ian
45Bravo
Hmm never payed enough attention I guess.
45Bravo,
An excellent report on resealing this pistol. Your explanations and photos were very good, and easy to follow. It appears to be a very easy job for anyone with even minimal skills. I do not own one of these pistols but found the report to be very interesting in any case. Now, I have an old Crosman 130 pistol that I disassembled years ago. I have a box with the many pieces. If you could now do a report on putting that thing back together, that would really be something interesting 😉
Geo
Geo, I have not been inside a 130, but a friend just resealed one, maybe I can borrow it for a day or so.
I am in the process of resealing a Crosman 761xl, that also has the auto cocking valve like the 130.
But it’s giving me fits.
I know it’s something simple I am not seeing.
Ian.
Geo791,
Do you have the Crosman EVP for your pistol?
https://www.google.com/search?q=Crosman+130+EVP&oq=Crosman+130+EVP&aqs=chrome..69i57.16405j0j7&client=tablet-android-lenovo&sourceid=chrome-mobile&ie=UTF-8
If not the EVP may help you get the 130 back together.
shootski
Hey Shootski,
Thank you for the link. I downloaded the EVP diagram. Right now I have my Crosman 140 lying on the bench. I replace the rivet pin and bushing and now I’m thinking of taking it down to inspect the seals. After 50 years I’m pretty sure it could use some new O-rings.
After I get the 140 back together, then I’ll take a look at the 130. I know a lot more about airguns now than I did at the time I disassembled the 130. I took it apart because the piston was seized. Don’t remember the reason for the pile of parts I ended up with. Maybe I should sweep some under the rug?
Geo 😉
B.B.,
A few blogs back you made a comment about barrels not getting the benefit of technology advancement that other parts of shooting system have benefited from. I found an interesting piece on just one such possible advancement:
https://www.thefirearmblog.com/blog/2019/07/30/tacomhq-structured-barrels-better-in-every-aspect/
We airgunners may not need to cool our barrels but if these barrels are harmonically “dead” as they claim then this would be a major breakthrough. And before someone notices the pricetag do realize that this is cutting edge for firearms not what might be possible for cold gas guns.
shootski
Shootski,
Thank you. I love stuff like that and was aware of the concept. The harmonic benefits sound too good to be true, given different loads. Truly amazing.
I am a bit surprised that they did not sell to the military first, before going the public sales route. .
Chris
Chris USA,
Are you certain that they didn’t?
Maybe not in the normal contracting pipeline of NSNs but in the world of QRC. I honk the Canadian Shaped that holds the record distance confirmed kill used at least some of their gear.
As far as the harmonic deadening of a barrel it makes sense to me.
Gunfun1 is probably at work making one already for one of his air rifle projecs!!!
shootski
Shootski,
No,… I am not sure. As I recall,… they have been working on it for a couple of years and it is just now getting some notice. That sounded pretty direct to consumer to me. Maybe more $ that route?
I do not know of NSN or QRC’s,…. but my sense is the Gov. get’s it first and then we may see it trickle down to the consumer in some watered down form. Maybe.
Personally,… my plans for selling the Gov. $1,000.00 hammers is very near completion. I just have to narrow down the tone of the gold spray paint. I want it to say “bling”,… while not being too flashy at the same time. 😉
Chris
This was an excellent blog post, and one that I really appreciate because I have a P17 on my desk with just this issue! Thanks!
45Bravo,
I questioned lubing the trigger parts earlier in the AM and after a re-read,.. I see little mention. Besides that,…I would think that cheaper guns will have stamped trigger parts and may have a shearing seam on the mating surfaces. Doubtfully, these parts are hardened in any way,… and,.. if there is any evidence of shearing marks,.. a light polish may be of benefit,….no?
Then again,….you may have presumed,… “well of course use some moly and deburr anything obvious in the mating surfaces”. I know,… trigger mods are an off topic,..topic,…so maybe best left out?
You did say that some common sense was required after all….. 😉
Chris
Chris, sorry I missed it.
Yes I put a little moly grease on the contact points.
On my personal weapon, if the trigger is acceptable, I won’t normally mess with it.
Yes the trigger group stampings have some burs and shearing.
They don’t appear to be hardened in any way.
That being said, I have a whetstone I polish the burs and shear surfaces until smooth and square.
But not enough to change the engagement.
One of my P17’s has a great 2 stage trigger that breaks with no creep.
The other has about a 1/16 inch creep on the second stage, no matter the adjustment I tried.
That one has been polished and de burred.
It has improved the trigger, but not as good as the other pistol is from the factory.
Ian