by Tom Gaylord
Writing as B.B. Pelletier

Today’s report is another guest blog from reader Ian McKee who writes as 45 Bravo. He’s going to finish the report on resealing the Crosman Marks I and II CO2 pistols.
If you’d like to write a guest post for this blog, please email me.
Part 1 — resealing the end cap
Over to you, Ian.
Crosman Mark I and II reseal
Ian McKee
Writing as 45 Bravo
This report covers:
- Disassembly
- Bolt removal
- Hammer spring
- Remove trigger guard
- Remove the valve
- Prep and assembly
- The 4 o-rings in the pistol
- Piercing cap o-rings
- Assemble the pistol in the reverse order
- Test the function
So, your Crosman MK1 is still leaking, even after you replaced the seal in the piercing cap as we covered in an earlier blog.
There are only 4 o-rings in this pistol, only 3 have constant gas pressure on them when the gun is charged, and 2 of those are in or on the piercing cap assembly, and those we already covered.
If you have an interior leak, 99.9% of the time, it is going to be the nylon seal inside the valve stem assembly. I will show that at the end of the disassembly.
Replacement valve stem assemblies are available online from several sellers. Some are made from Delrin, with a steel valve stem inserted. Others are made from brass and steel, with the Delrin or nylon valve seat like the factory ones were made.
Some sellers sell refurbished original valve assemblies and require you to send in your old valve stem assembly as a core exchange, so they can rebuild and resell it; others make an entirely new assembly and sell you that.
If you have the skills and tools, you could remove the old stem assembly, remove the damaged nylon seal, and make and press in a new one. There are videos on youtube that does show that process. Unfortunately, there are a lot of steps just to change out the valve stem assembly, which has a nylon seal inside that is literally the heart of the gun.
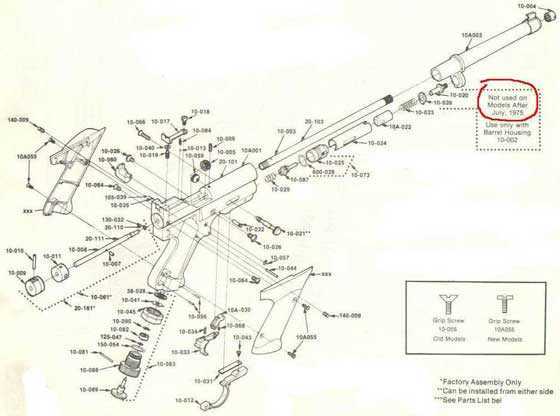
This reseal is going to be a little different, as I will include the Crosman part numbers as shown on the exploded parts view. That will help you keep track of the little bits and bobs.
An owners manual and parts view are available as A FREE DOWNLOAD FROM CROSMAN.
Disassembly
Make sure the gun is unloaded, and degassed.
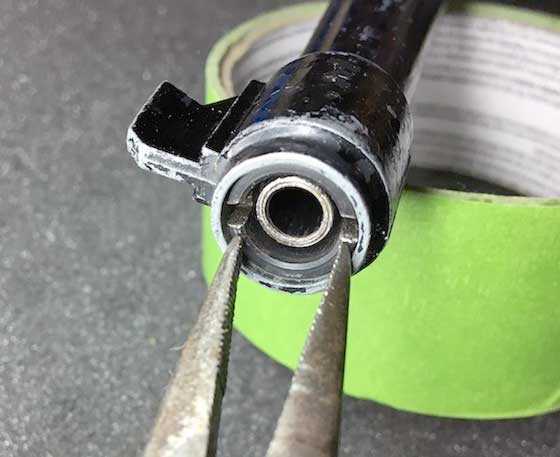
Take the grips off, put them and the screws in a safe place. Also remove the piercing cap.
Loosen one of the small rear sight windage adjustment screws (140-009).
While holding the pistol upright, carefully remove the rear sight screw (10-018). The rear sight blade (10-017) holds a very small spring and ball detent (10-084 & 10-013) for the bolt probe. Be careful not to lose these. This pistol I’m working on is missing the spring and ball.
I used a 1/8-inch (3mm) ball, and a .098 (2.5mm) spring as a replacement.
Replacement springs can be had online, and you can cut them to length, or you can source a 2.5mm spring from under the red button on the smaller Bic lighters, a 3mm spring can be found under the red button of the regular lighters. (I don’t smoke, but they are cheap, and easy to find when you need a spring.)
Older models have a set screw under the rear sight that covers the spring and ball.
The rear sight installed, with 2 screws removed.
The rear sight is out of the pistol. The ball and spring are missing from this gun. The two windage adjustment screws have been left in place. I have removed the elevation adjustment screw and washer (on the left), in preparation for removing the bolt guide.
TIP: I either put the spring and ball on a small magnet and then put them in small pill bottle, or put them together with a piece of clear scotch tape.
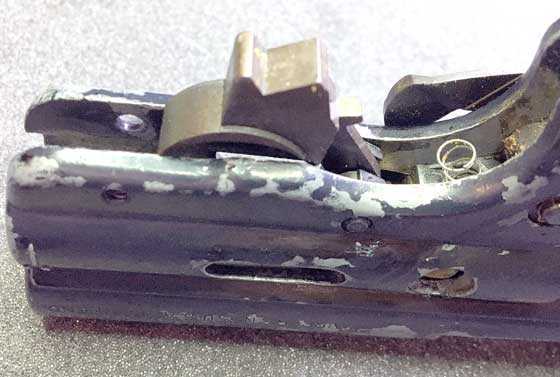
Older models have 2 bolt guide screws (10-064) that hold the bolt guide in from either side of the frame, the newer models do not have these — the bolt guide is held in place with the rear sight elevation screw. That is what I’m about to address.
Remove the elevation screw (10-019), and elevation washer (10-040).
Bolt removal
TIP: The bolt has a pin (10-007) that sticks out of one side of the bolt, it is used to lock the bolt in the closed position for firing. Make sure that the bolt is rotated counterclockwise and pulled rearward fully before trying to remove the assembly, as it will not come out if the bolt is in the closed position.
Carefully remove the bolt and guide assembly (10-061) out of the rear of the frame, if it seems stuck, check to see if you have all of the screws that could be holding it in, if all of them are out, some heat from a blow dryer may be applied to that area of the frame to help loosen things.
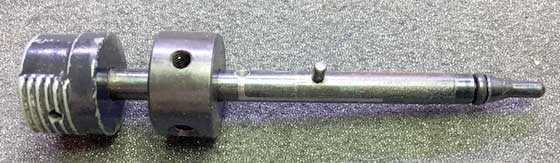
Bolt and bolt guide.
While we are on this subject of loosening things, we do not know the history of most of the pistols we work on, and they can be decades or more old. Some of the parts may be hard to remove, because the lubricant a previous owner may have used may have solidified, and now have some of the internal parts stuck together quite well.
Heat is your friend; a blow dryer should be sufficient to soften the goo. But be careful not to harm your finish with the blow dryer.
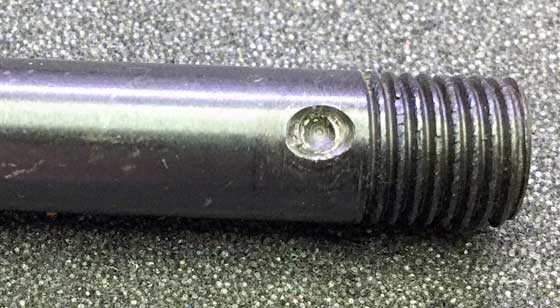
Using either a pair of needle-nosed pliers, or snap-ring pliers, or a spanner wrench, remove the nut (10-004) from the muzzle that holds the outer barrel in place.
As you loosen the front barrel nut the outer barrel (20-163) will start to back away from the frame as it is under spring pressure from the hammer spring.
Needle-nosed pliers double as a spanner wrench for the muzzle nut.
Next, loosen the barrel setscrew (10-006), just ahead of the loading area in the top center of the receiver. It is not necessary to remove it entirely, just loosen it.
Holding the rear barrel nut (10-005), you can loosen the barrel and remove both it and the nut from the frame.
Hammer spring
Remove the hammer spring (10-023), the cocking knob and shaft (10-059 & 10-021), the hammer (10-022), and the sleeve that the hammer rides in (10-024), out of the front of the frame.
The hammer assembly out.
Remove trigger guard
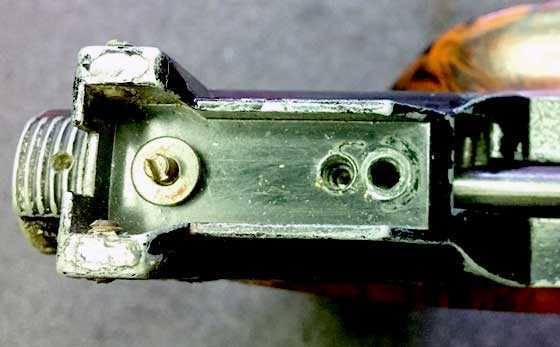
Remove the front trigger guard screw (10-066), and the rear trigger guard pin (10-044).
TIP: To access the rear roll pin, the safety has to be up in the SAFE position. Drive the pin from the left to the right to avoid putting pressure on the safety lever and possibly damaging it. The safety does not have to be taken off to reseal the pistol.
This roll pin does not have to be taken out completely, just enough to remove the trigger guard from the frame. Support the frame in that area with a roll of tape so the pin has a place to go as its being driven out.
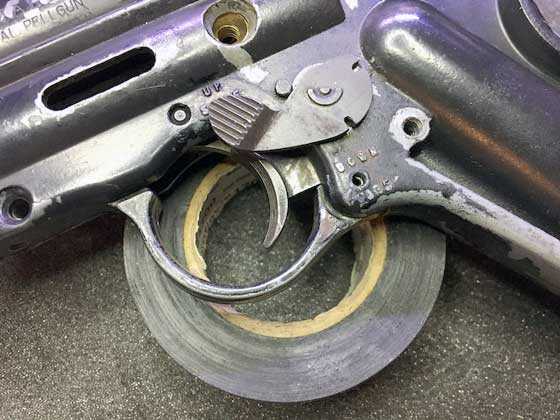
The trigger guard screw is out (left) and the pistol is sitting on a roll of tape so the rear roll pin can be driven partway out.
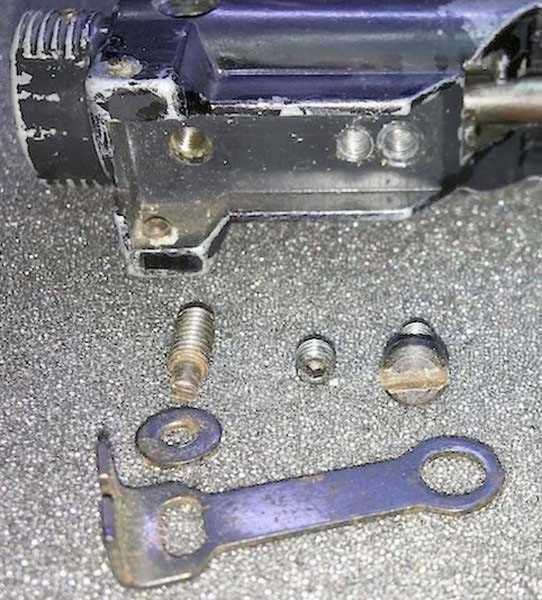
Remove the trigger guard (10-012), being careful of the small trigger spring (10-034) at the rear of the trigger guard and trigger.
Remove the trigger pivot pin (10-032).
Tip: This pin is tapped out from the left side to the right side, you will notice the pin has ridges on one end (arrow), to hold it in the frame, make sure it goes back in the same way it came out.
The trigger blade has been removed and the trigger spring is left in place.
Once the trigger is removed, stick the pin back through to keep it for assembly. Note the knurled end of the trigger pivot pin (arrow) that holds it tight in the frame.
Remove the trigger (10-033) and sear (10-030), paying close attention to its orientation.

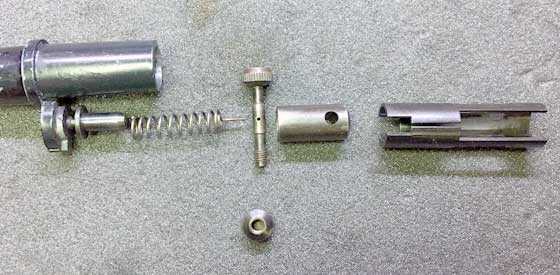
Remove the valve
Remove the 2 screws holding the valve in the frame (10-026).
There is a special groove in the valve body (10-025) to help with removal.
Using a flat-bladed screwdriver with a fairly wide blade and long handle for leverage, place a small wooden dowel, or a second screwdriver across the trigger area to use as a fulcrum, to pry the valve body (10-025) from the frame. I used a pin punch in the pictures.
TIP: Heat may be needed to get this part out, and the rubber seal sometimes sticks to the valve body and frame, so make sure the frame does not have any fragments of the seal in this area before reassembly.
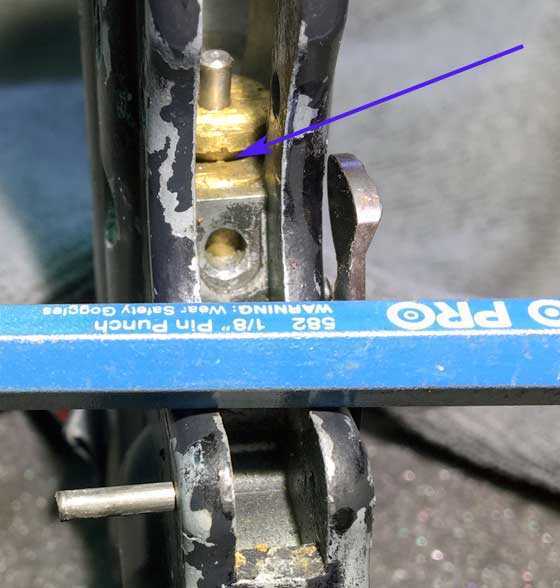
To remove the valve, put something across the frame like the blue pin punch I am showing. Then a screwdriver can be used in the slot (arrow) to pry the valve out of the fame.
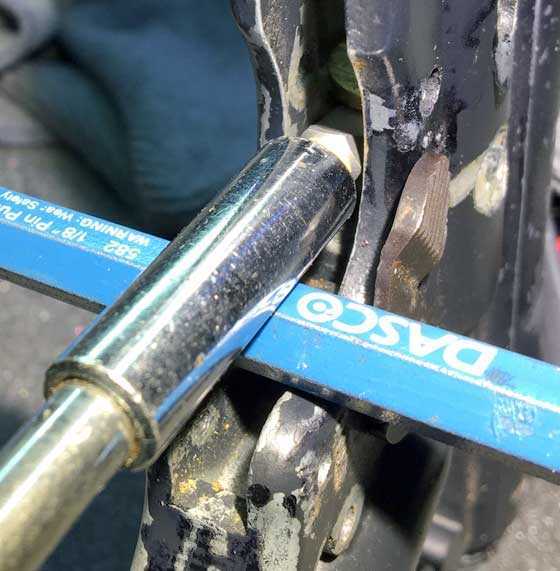
A flat-bladed screwdriver is used to pry the valve out of the fame. I’m using a screwdriver with interchangeable bits here.
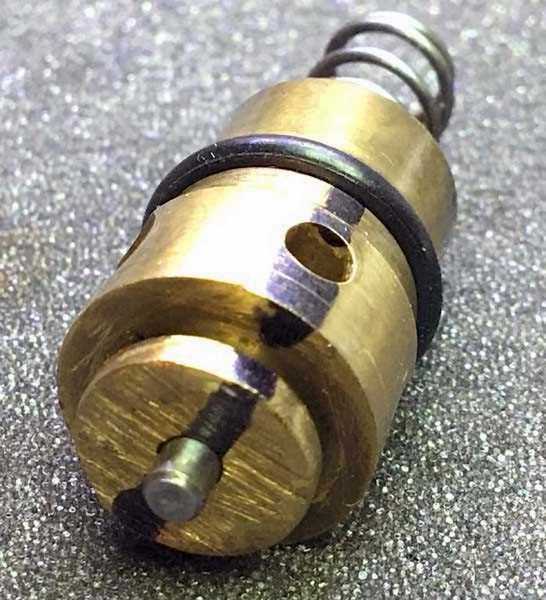
The valve stem (10-067), and valve spring (10-029) will come out with it.
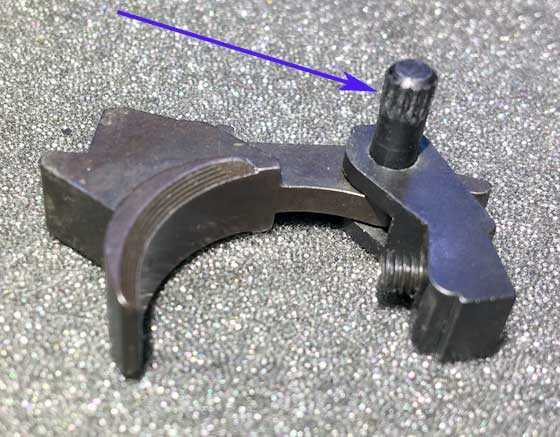
Everything we have done to this point this has been just to change a couple of parts in the valve. Let’s look at the valve stem and valve seat I mentioned at the start of this report.
The valve stem on the right still has its valve seat. The one on the left has its seat removed for comparison. This is a part most of us will have to purchase — as rebuilding will be beyond our capabilities.
Prep and assembly
Look everything over closely, and clean the parts as necessary, paying close attention the grooves where the o-rings go. Any old rubber or debris there will not let the gun seal. Clean the o-rings grooves with alcohol or your choice of cleaners.
The 4 o-rings in the pistol
Valve body seal is a 014 o-ring. This is one we should replace on this job.
The bolt probe seal is a 006 for the .22 bolt probe, and a 004 for the .177 bolt probe. You have to choose which bolt o-ring to use based on the caliber of your gun. This is the other o-ring we replace on this job.
Piercing cap o-rings
The piercing cap that we rebuilt in the last part of this report has two o-rings. It calls for a 005 o-ring for the pin seal, (I have used a 006 with no issues), and a 113 o-ring for the outer cap seal.
After you clean the valve parts and everything dries, lube and replace the replace the o-ring on the outside of the valve body, insert the valve spring, and valve assembly in the valve body and insert everything into the frame, make sure the port is pointing UP towards the barrel.
TIP: to insure the port is aligned with the transfer port in the frame, I use a sharpie to mark around the valve body lengthways. That way I have a reference line I can center in the trigger area of the frame, and I can also check for vertical from the front of the frame to be sure of centering the port.
I draw an index line on the side and the end of the valve, to tell me where the exhaust port is.
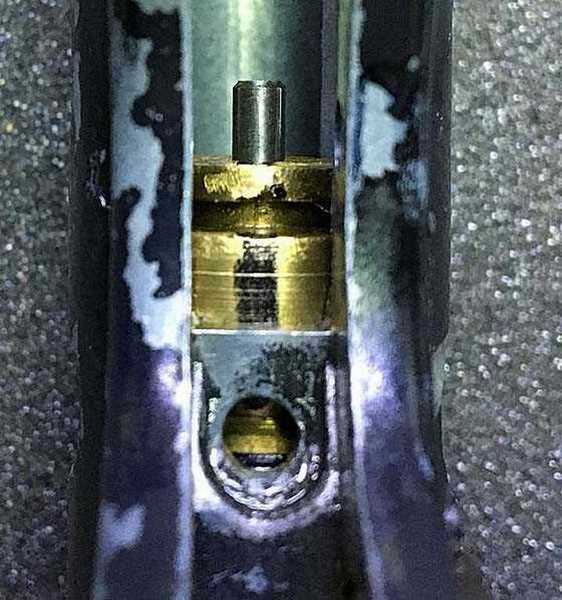
The index line, as seen through the trigger slot when the valve is back inside the gun.
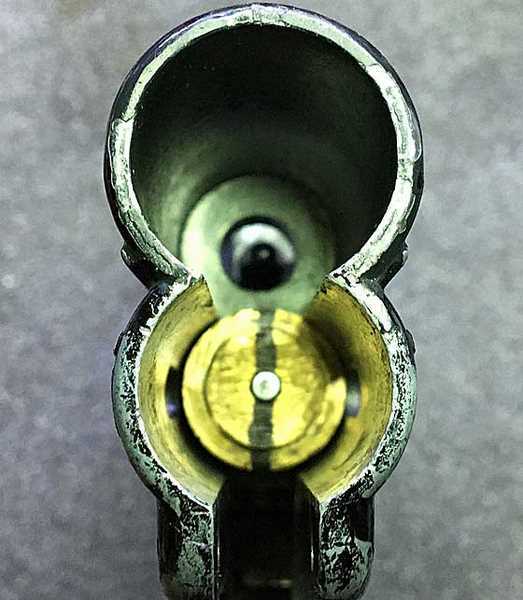
Here is the rest of the index line as seen from the front of the gun. We will be installing the hammer assembly in the lower tube in front of the valve stem.
Assemble the pistol in the reverse order
TIP: When installing the 2 valve screws, I put blue thread locker on the threads to help prevent any leaks from this area.
Install the trigger pin, the pin goes in from right to left, with the serrations on the right side to grab the frame. Pay close attention to the orientation of the trigger and sear.
Install the trigger spring, it may be a little fiddly getting it back in the right place, but a dot of silicone grease on one end will hold it in its recess while you align the peg on the trigger into the spring.
TIP: Hold the trigger in the fired position to keep the trigger spring in place as you install the trigger guard, put the front trigger guard screw in first, it will hold the trigger guard and trigger spring in the right places, as you tap the rear trigger guard roll pin in place. Support the opposite side of the frame as you tap the roll pin in place, The pistol’s frame is metal, but it is an alloy, and is over 50 years old.
Install the bolt probe o-ring in the groove on the bolt, and reinstall the bolt and guide assembly into the frame. Remember, on newer pistols the elevation screw goes in the top hole, and on the older models the 2 screws go on the sides.
Put the rear barrel nut in the loading area, insert the barrel into the frame, and tighten the barrel into the rear barrel nut. Orient the barrel with the transfer port down, and the small divot up. That’s where the barrel setscrew (10-006) screws into to keep the barrel indexed correctly.
This divot accepts the barrel setscrew that keeps the gas port on the other side of the barrel aligned with the valve exhaust port.
Reinstall the hammer sleeve, and hammer, put the cocking knobs through the hole in the hammer, rotate the cocking knob until the tiny hole aligns so the hammer spring extension will go through the hole, this can be seen clearly looking at the rear of the hammer from the front of the gun.
Reinstall the outer barrel, and the front barrel nut, it just needs to be a little past snug.
Test the function
Before you install the grips, and before you charge the pistol, put a new CO2 cartridge in, and before you pierce the cap, carefully using a blow dryer, or by setting the pistol out in the direct sun, heat the pistol until it is “toasty warm”. This raises the pressure in the CO2 cartridge, and softens the seals to help the parts seat properly.
The design of this pistol is one of the few made where it is ok to be left under pressure. But the decision to leave the gun charged with CO2 is a personal decision, just know there is no face seal for the CO2 cartridge to compress and degrade over time, and the gun being under pressure keeps dust and debris out of the internals.
Congratulations, you have just given your aging Crosman MKI a new lease on life for a few more decades.
I really love these guns, they are accurate, fun and comfortable to shoot, and in my opinion, have the best trigger of a low cost air pistol ever made.
Cheers
45Bravo

Thanks Ian/45Bravo for a fascinating look inside this great pistol!
Siraniko
Ian,
It is obvious that this particular one has seen a few miles. It is nice to know it has a few more to go. Thanks for the peek behind the curtain. I sure do enjoy bringing the old gals back up to form. They surprise many by how well they can dance. The latest ain’t always the greatest.
Ian,
Excellent report/tutorial. That must have taken quite a bit of time to put together.
Well done,…. Chris
B.B.,
From your description of the problem it seems you have to form some form of wire hook that will go inside the spring that will then be pushed by a tube to compress it.
Siraniko
Ian,
This blog IS. SO. WELL. DONE!
Excellent photography, lots of the tips that would escape a newbie as well as cautions about springs and small parts that *really* would escape a newbie. I’m looking at a Mark I now because you wrote this most excellent blog. I figure that with this to back me up, I got it.
Of course, hubris is part of the new person learning curve. 😀
Dan
Thanks guys, I enjoy doing them.
And we are all here to share information.
Please leave feedback if you like the part numbers included or not for future articles.
Ian
Off Topic,
I have FWB 300S that Likes H&N Final Match Rifle in head size 4.51. I found this out after trying several pellets. Of course I bought several tins. They are all finished now but I can’t find them anywhere! I contacted H&N and they told me they no longer make 4.51 pellets! Now the search is on for a choice pellet. Really frustrating, I was at a friendly shoot on Saturday where I shot the last of the 4.51. I was in second place when I ran out of the pellets and switched to Field Target 4.50. What an embarrassment. I came in last for my trouble!!
Ton,
Total bummer dude! Keep an eye on the HAM site. They are starting a new series on the best pellet for your gun (for what that is worth,… LOL!) At any rate, check out the intro. article. Well, at least you know what does (not) work from previous/initial eliminations,… so you at least have a bit of a head start. 😉
Good luck mate!….. Chris
Ton,
I had the exact same problem years ago with H&N Field Target Trophy and my Gamo CFX. All I can suggest is you try JSBs or RWS R10s.
Better idea. It is a lost cause for you. Just send your FWB300S to RidgeRunner’s Home For Wayward Airguns so that she may retire in comfort.
Lol!
I’ll bear that in mind if I can’t find a pellet that shoots. But your wait might be very long ‘cause I am going to try every pellet there is!
Ton,
Nikkonos has them listed in his drop-down. I see he has Field Target Trophy in 5.55, too. I might order some for my old Webley.
https://www.ebay.com/itm/177-22-H-N-Pellets-for-Hunting-Plinking-Targets-Shooting-and-more/332403465187?hash=item4d64ca5be3:m:mKK9wUrkVmZC9QGwMsA1BEQ
Michael
Thanks Michael
Michael. I just received a bunch of the H&N Final Match Rifle from Nikkonos. Thanks for the info. man. I appreciate it.
Ton,
Glad to help.
Michael
Ton,
Hey, I’m just thinking of her. She would likely enjoy playing with my 1906 BSA and my 20s FOR and my 30s Webleys and my 40s 101. These gals would not mind the company either.
Do they speak German? That all she speaks lol
Ton,
The FLZ does.
RR,
FOR = ?
Michael,
Maybe he meant to type FLZ?
Siraniko
Michael,
Friedrich Langenhan of Zella.
This is the one I am referencing.
/blog/?s=millita&btnGo=
RR,
Ah! Siraniko was right then.
I have a Langenhan air pistol that resembles a percussion lock. And I like the word “Milita.” It rhymes with “authoritah,” as in Eric Cartman’s line, “Respect my authoritah!” ;^)
Michael
Michael,
Make me drool. Post a picture.
RR,
Here’s a pic of it from the auction I won.
Michael
Nice!
Ian,
Thanks, well done, and my smartphone wont take photos that good.
A Glock cost more to make now than this classic did then.
Rob
45 Bravo ,
The valve stem is no longer available as NOS . You either have to install a seal to reuse the original stem . A valve stem from a 2100 or 2200 also works and are made of delrin and will not deteriorate like the original seal . Crosman # on valve stem is 2200G006 . Mac1 airguns also has valves and I believe a kit for these also as does Baker Airguns. Great old guns .
Gene
Thanks for that info gene, I am always suggesting places for parts.
45Bravo and B.B.,
I have a couple Hahn Saddle Pal / Crosman 166 BB guns. One I bought after it had been resealed by its owner. It is much less powerful than the other one, with probably only half the velocity it ought to have. I’m wondering, could the problem might be a weak hammer spring?
Michael
Michael,
That is a likely explanation. Or something is blocking the hammer from striking with full force.
B.B.
B.B.,
Thanks. (And thanks for not pointing out my “could-might” in my question! ;^)
I guess I’ll take a look at an exploded parts diagram and see how complicated replacing that spring might be. Another thing I ought to do is charge both of them with CO2 and see how many shots each gets. If it gets many more shots than the properly shooting one, well, that would be telling.
Michael
Ian,
Wow!! Well done.
~ken
45Bravo,
Thouroughly enjoyed your Guest Blog! A really fine piece of work on a complex Airgun.
“Please leave feedback if you like the part numbers included or not for future articles.” As long as you have an EVP or a Parts List it makes a great deal of sense to include the part numbers in the text in my opinion. I know at times it was necessary to jump back and forth on some of the Crosman (as well as other manufacturers drawing and parts lists) when the image(s) use letters and/or Numbers that refer back to the part list; that can be distracting. On my first read through I just ignored the in text numbers and it read smoothly on the second I split screen the EVP and took note of the itn text numbers and refered to the EVP each time.
Worked for me…maybe the rest of the Readership can comment especially if the think differently ;^)
Thank you Ian!
shootski
“Please leave feedback if you like the part numbers included or not for future articles.” — 45Bravo (Ian)
Ian, I was offline most of yesterday and half of today; hence, I apologize for being “late to the party.” That being said, I think this is a great report; it makes me want to buy one of these pistols just to try these steps; and I think, yes, it’s good that you include part numbers, because someone will likely be using these reports as reference material years down the road; and even if those part numbers have been superseded, at least they will have a reference, a starting point. Great job! Keep up the good work. =>
Take care,
dave
“Replacement valve stem assemblies are available online from several sellers. Some are made from Delrin, with a steel valve stem inserted. Others are made from brass and steel, with the Delrin or nylon valve seat like the factory ones were made.”
I sent off a valve stem to be refurbished, and it was lost in the mail. Google hasn’t turned up much regarding replacement valve stem assemblies available to purchase outright. Does anyone have any additional information on ordering the above? Or what is needed to make the 2100 or 2200 valve stem (as mentioned above) work? Thanks!
If you have the exploded parts diagram from the Crosman website, you can probably order parts from Mike Baker at:
peter_built78@hotmail.com
503-706-9512
If that doesn’t work, reply back, I have an alternative too.