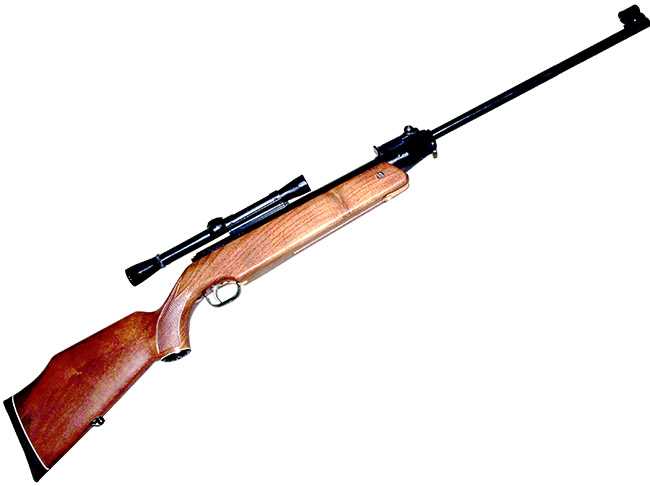

The FWB 124 I am overhauling.
- This report covers:
- The piston seal
- Assembly and lubrication
- Slide the piston into the spring tube
- Lube the shoe rails
- Mainspring in
- How did I do?
- Summary
Oh boy! These blogs just keep getting more and more fun and today I finish assembling and lubricating the resealed FWB 124 that I did for Glenn who I met at the 2022 Texas airgun show. Then I test its velocity to see how successful things were. Put on the coffeepot and grab a couple donuts — this one will be long and fun.
The piston seal
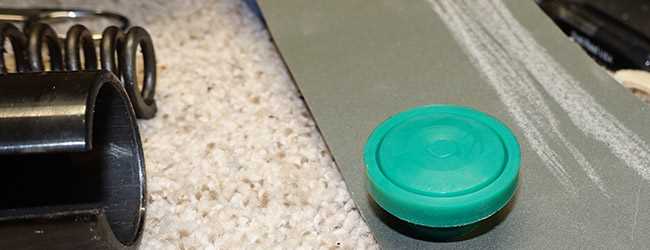
We ended Part 2 with me telling you that the new piston seal I got from Pyramyd Air was almost the perfect size for the compression chamber. Almost, but not quite. That’s the way you want them, so you can take them down to the perfect size. I sized (ensmalleated/reducified) the seal by rubbing its edge against 400-grit sandpaper. I turned the seal slowly as I went to keep the edge round.
I sanded the edge of the piston seal against 400-grit sandpaper.
I worked on the seal for about an hour. After 45 minutes I brought out some 240-grit paper because 400-grit was going too slow. The coarser paper sped things up. I kept fitting the seal to the spring tube, knowing I wanted a snug fit that was short of a force fit. You want the piston to stay in place no matter how the spring tube is turned. It should take about 15-25 pounds of force to move it.
Fitting a piston seal is an art, and for bumblers like me there is a lot of luck involved. Fortunately for Glenn it was good luck this time.
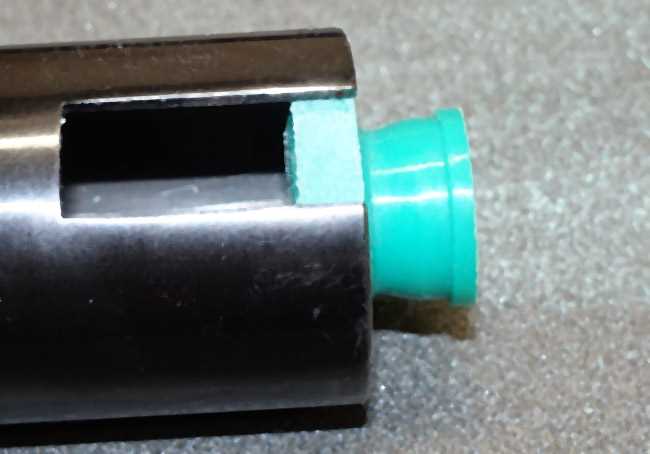
When the seal could be pushed into the spring tube with light pressure, the job was done.
Assembly and lubrication
Once the piston seal was the right size, I pushed its bottom end into the piston head. Because the Pyramyd AIR seal material is so flexible, it went in in less than a minute. I then lubricated the edge of the piston seal with moly grease and set the piston aside.
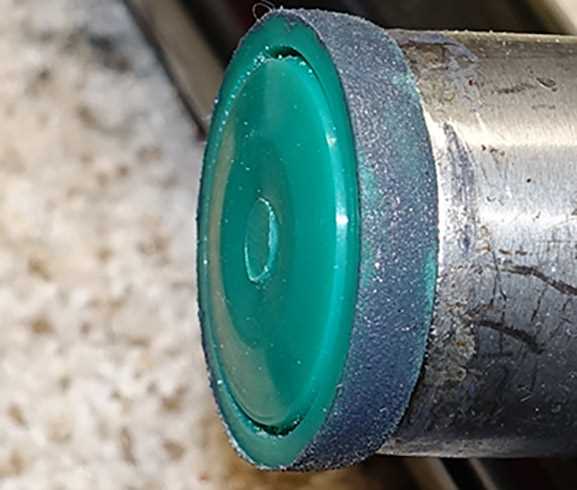
The sized seal took the moly grease well.
I put a section of paper towel on a 14-inch long half-inch dowel rod and used a rubber band to hold it tight. I then coated the paper towel with moly grease and used the dowel as a long applicator to coat the inside of the compression chamber and spring tube with moly.
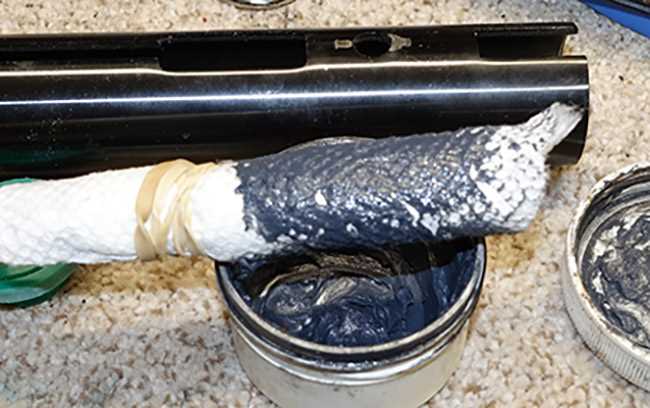
Paper towel on the end of a longer (14-inches?) dowel rod makes the perfect applicator for the inside of the compression chamber and spring tube.
Remember — the compression chamber is not a separate part. It’s just the forward end of the spring tube. That’s where you want most of the moly to go. And know this — moly is not a grease. Molybdenum disulfide is a solid particle. It is suspended in grease to get it to the place you want it, but when it gets there the solid particles bond with the metal and don’t rub off. So you aren’t greasing the compression chamber; you are coating it with a dry particle that is about 500 times slipperier than grease.
Don’t use a lot of moly grease in the compression chamber. Try to get a thin, even coat. The moly that’s on the piston seal will help with this. The goal is to have a solid wall of moly for the piston seal to slide on. The piston itself never touches the inside of the compression chamber, just the seal.
You also grease the rest of interior of the spring tube with moly, but the application there is much lighter. The only thing that ever should touch the wall of the spring tube is the slightly swollen end of the piston body.
Slide the piston into the spring tube
Now insert the piston seal into the spring tube and slide the piston inside. It should slide and yet still be tight, as I described above.
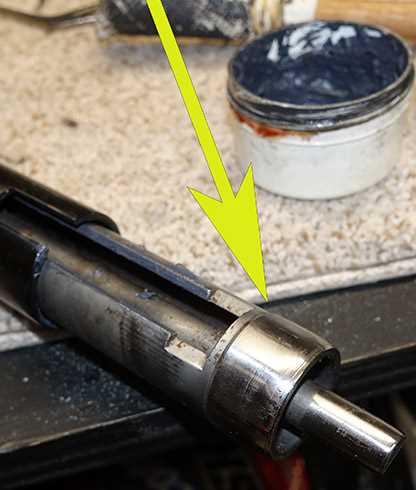
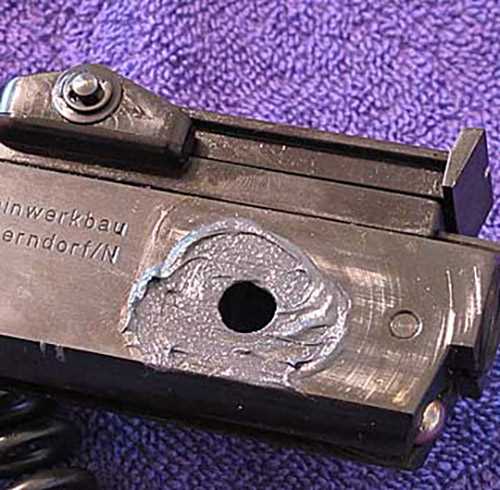
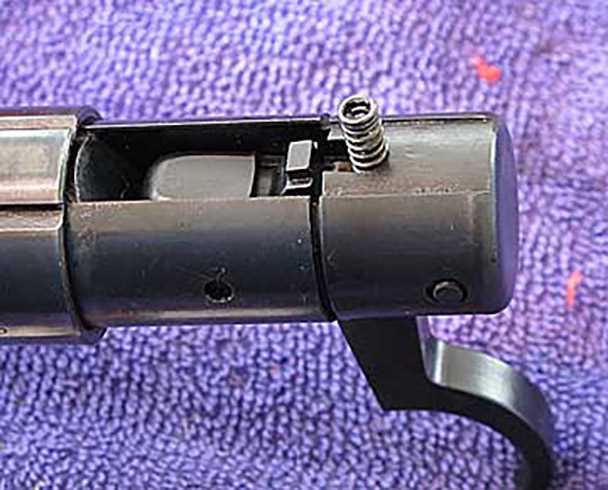
Slide the piston into the spring cylinder. Moly the slightly swollen back end of the piston (arrow).
Lube the shoe rails
Okay, those who are careful observers — this is in the last picture, but I didn’t call your attention to it yet. The sides of the cocking slot in the piston are flat “rails” for the sliding “shoe” that connects the cocking link to the piston. I lubed these rails with moly grease so the shoe will slide along them with very little friction. Let’s look.
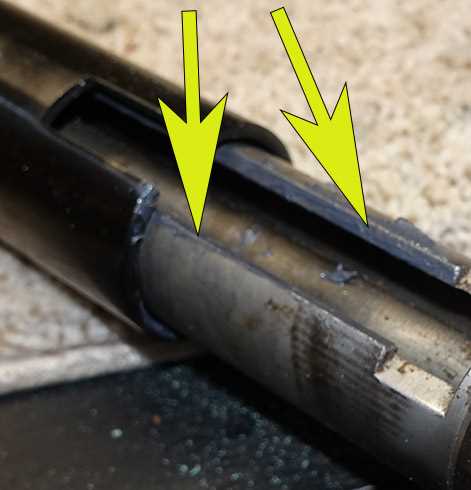
I put moly on the rails (arrows) in the piston body where the cocking shoe rides.
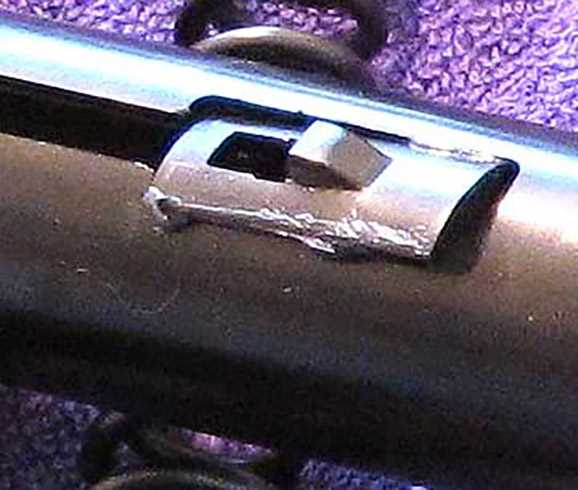
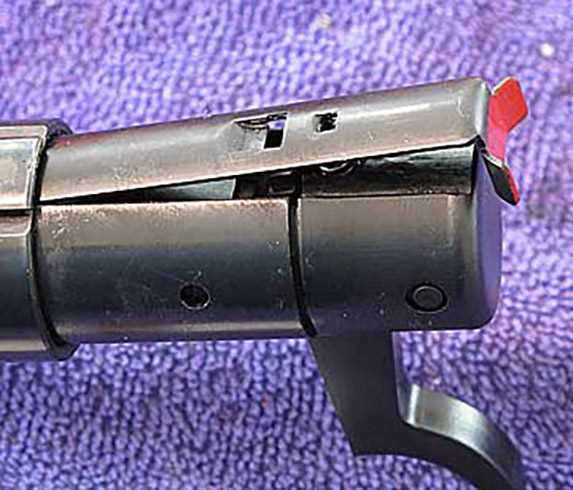
Then I put moly on the sides of the cocking shoe and inserted it into the piston body through the enlarged hole in the rear of the spring tube.
Now we can put the barrel and spring tube back together. Insert the end of the cocking link into the sliding cocking shoe in the piston. Then lubricate the washers on both sides of the base block (the flat block the barrel is pressed into). Remember that the flat washer goes on the left side of the base block and the formed washer goes on the right side. Also put moly into the bolt hole.
Put the flat washer in the moly on the left side of the base block and the formed washer in moly on the right side. The moly helps hold the washers in place when the base block is slid into the action forks.
The moly helps hold the washers in place when the base block is slid into the action forks. But even with that you must be prepared to shove the washers back into place, especially the flat one, as the base block enters the action fork. I use a flat-bladed screwdriver for this. When you get the alignment close a screwdriver or pin punch through the bolt hole helps line things up perfectly.
Now coat the outside of the pivot bolt with moly grease and slip it through the hole. Thread it in by hand and when it gets tight use a screwdriver. Then the jam screw goes in the right side. Keep the moly off this one. Snug it down but it’s tiny so don’t overdo it.
Mainspring in
With the barrel attached and the piston connected to the cocking link, it’s time to put the new mainspring in the gun. Now we start lubing the spring with Tune in a Tube, or some other sticky red grease. And it’s also time to lube the piston rod (the central rod inside the piston that grabs the sear when the rifle is cocked). You could have lubed the rod before you put the piston into the spring tube, but I have that neat little grease gun I recently wrote about that allows me to reach in and apply TIAT grease to the rod while the powerplant is holding the piston. It’s cleaner for me and for the rifle that way.
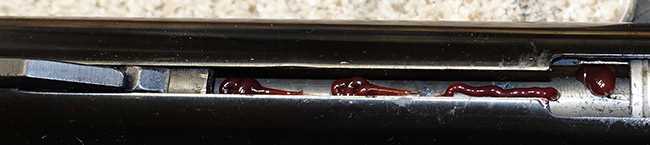
I’ve reached through the cocking slot in the spring tube and in the piston to put TIAT on the piston rod. The action of the piston will spread the grease.
Now spread red grease on half the mainspring and then push the that half of spring into the piston inside the spring tube. Look at the picture to see how much grease to use.
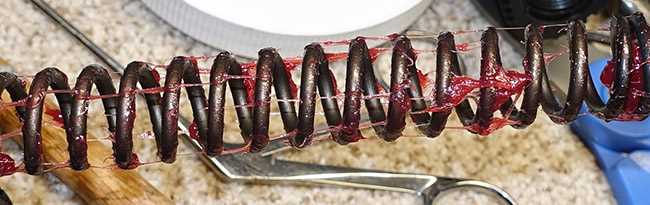
I used this much TIAT on the first half of the spring. After taking this picture I rubbed the grease evenly all around the coils.
I also put a large glob of TIAT on the open end of the spring before putting it inside the piston. That helped distribute grease to the piston rod.
With the spring halfway into the powerplant where it was held I could now grease the other half.
While the powerplant holds the front half of the mainspring you can grease the back half. Spread this grease evenly, as well
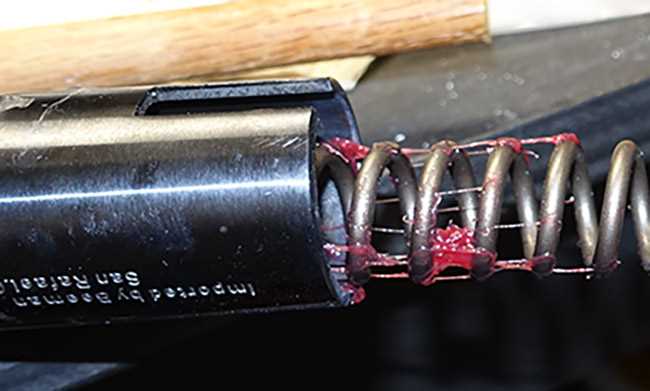
Now we finish the powerplant assembly. The end cap holds the spring guide that’s coated with TIAT. A big glob of TIAT is put in the hole through the spring guide to get onto the piston rod as it passes through. You HAVE to use a mainspring compressor to get the end cap in the gun. And, as it enters the spring tube, the safety bar and spring are placed in the end cap and the rear of the safety is held down as the mainspring compressor pushes the end cap into the spring tube.
The safety spring is actually the trigger return spring.
The safety bar goes on top of the safety spring and then the mainspring compressor pushed the whole assembly into the spring tube. The mainspring isn’t in the gun in this picture or the end cap would be several inches outside the spring tube.
When the end cap threaded hole that’s in front of the trigger blade lines up with the hole in the spring tube, the threaded bushing is screwed in and the powerplant is together. The barreled action is dropped into the stock and the three stock screws are tightened. Then the new breech seal is pressed into place and we are done.

How did I do?
I cocked the rifle and fired it into my pellet trap and it fired dead calm. That’s the first success!
Then I tested it with JSB Exact RS pellets, RWS Superdomes and RWS Hobbys. The fastest 124 I ever tuned before this pushed Hobbys out at 838 f.p.s. This one shoots the same pellet at an average 895 f.p.s., making this the fastest 124 I have ever tuned or tested. The low was 885 and the high was 901. This rifle actually broke 900 f.p.s. — something I have never even heard of with a stock 124 mainspring — with aftermarket custom springs, perhaps, but not with the factory spring. The spread was 16 f.p.s. and, at the average velocity, the 7-grain Hobby develops 12.45 foot-pounds. Glenn, you are one lucky boy!
JSB Exact RS pellets averaged 885 f.p.s. with a 7 f.p.s spread from 882 to 889 f.p.s. At the average velocity this 7.33-grain pellet developed 12.75 foot-pounds of energy.
RWS Superdome pellets averaged 810 f.p.s. with a 12 f.p.s. spread from 805 to 817 f.p.s. At the average velocity this 8.3-grain pellets develops 12.09 foot-pounds of energy.
Summary
We have just seen an FWB 124 pellet rifle go from not shooting a pellet out the barrel to one that shoots over 900 f.p.s. All it took was a standard mainspring, a new breech seal and a Pyramyd AIR piston seal — and many, many hours of careful cleaning. This is phenomenal! I give most of the credit for this result to the Pyramyd AIR piston seal that I was fortunate enough to size so well.
Accuracy comes next. I can’t wait!


BB,
Considering how it is performing for you, although I think the answer would be a No! Would you consider decreasing the amount of preload on the mainspring?
Siraniko
Siraniko,
You are right about that answer. I will leave well enough alone.
BB
BB,
I don’t seem to recall you mentioning the force required to cock this rifle. Hopefully hear about it in Part 4? I do suspect that it is in the usual range for this rifle for you not to remark about it.
Siraniko
Siraniko,
Yeah, I sort of got out of my usual cycle with this one because I was so anxious to test the velocity. I will measure the cocking effort and also the trigger pull.
BB
Siraniko,
I seriously doubt he will as this is not his. If’n it was mine, I MIGHT want to take it down a bit, but this gal is at a pretty good power level right now. It still has plenty of power to reach out there a good bit, without the slamming and jarring of those magnum sproingers. Even with all that preload, it is probably still pretty easy to cock.
Now, I have a Webley/Hatsan Tomahawk that needs a good going over and it could stand to come down a bit. I will probably start trimming the spring until I get it where I really like it and then have a new spring made for it. Around 12 FPE is really a good power level for sproingers.
I do not have that particular air rifle and yet, I have learnt much, especially from the thirteen clear pictures. Thanks Tom Gaylord.
Your considerable rebuilding effort must surely have made Glenn’s FWB 124 an even better shooter than it was new, fresh from the factory.
Question: is your camera now covered in molybdenum and grease too? 🙂
hi3,
Ha! Nope. The camera is too important to me to be left in harm’s way.
BB
Pookey, I do not have any donuts!
Ensmalleated? Reducified? You have been hanging around me too much.
Those are some awesome tight spreads! I am looking forward to see what this gal does in the accuracy department. Glenn is most definitely going to be thrilled when he gets his sproinger back.
I would really like to have one of these gals move in here at RidgeRunner’s Home For Wayward Airguns, but that is probably not going to happen. I should have picked up that one you had at Roanoke, but I did not know what it was then. Maybe I will stumble on one for a stupid low price at the NC Show. If wishes were fishes, the seas would be full.
Not being afraid to go in and rebuild these old gals opens the opportunity to own some really fantastic airguns for not very much money. Several of the airguns around here I have picked up for around one hundred dollars. Some of those did not even need working on.
Oh, and thanks. I usually always learn a new trick or two when you go inside one of these old gals.
RR,
This time I learned a trick or two myself!
BB
B.B.
Nice report! When you sized the piston seal, did you go back to the 400 grit to polish the edges?
Why moly grease and not synthetic?
-Y
Yogi,
No, once I went to 240 grit I finished with it. I should have started with it and forgotten the 400 grit altogether. This seal isn’t that smooth and smoothness is not what I’m after.
Moly for metal to metal and also in the compression chamber. That was to reduce friction.
Red grease to reduce vibration.
BB
Yogi, Friday you mentioned something about tranquilizer guns.
As luck would have it, I currently have a PNEU-DART multi pump on my workbench being resealed.
It is made by Crosman on their 397 platform.
It is a .50 caliber smooth bore.
Ian.
Bolt open.
Cool!!!
How about a guest blog about it?
What is it’s effective range? Accurate?
How many pumps?
-Y
The customer didn’t give me any darts with the gun, but I ordered a set of practice darts to test it.
And here is its power chart, they suggest out to about 30 yds.
And yes a guest blog will come..
Ian.
Wow. That is cool. Any idea what those darts weigh? Or how fast it lobs them? Seems like a lot of my relationships and daily conflicts would be a lot more manageable if I had a tranq gun handy.
Very good tutorial, though FM is not ready to tear into any springer here and so far no need to do so. HW30 has been adopted and is on the way. Do hope RR will find the right sproinger at the right price in Newton. Bummer to have gotten pumped up about the show and all the air let out of FM’s plans.
Hello BB,
I have been enjoying this blog considerably since I also own a vintage FWB 124 s. Actually I was inspired to rebuild it about 10 years ago after reading your blogs and building my own compressor. Just like all of the others, bits of the original piston seal were blowing out the transfer port and barrel. In my 30s, I once managed to disassemble and reassemble it without using a compressor and I remember struggling quite a bit with all my strength, bracing the chassis against my shoulder and using my body weight to help compress the mainspring down on my workbench just far enough to get the bushing bolt inserted.
I was particularly interested in Reading how you sized the new seal and was surprised that you specified a dry friction force of close to 25 lb. However the results speak for themselves it seems. One thing that I found critical during reassembly, which you did not mention, was to carefully tuck the leading lip of the seal down as the Piston advanced into the receiver past the various slots that may or may not have sharp edges. I think that’s how many seals get damaged during assembly.
Congratulations on what looks like another fine rebuild.
Regards,
Feinwerk
Feinwerk
That is how o rings in pcps and Co2 guns get messed up and leak also when assembling.
BB,
Very nice job. While I was reading your technique to re-size the seal, I was thinking about the velocity stability directly. Re-size to smaller diameter with the hand, without using lathe may easily ends bad. That is at least my experience, I destroyed many good seals because of not being patient enough…
Anyway, the kinetic energy is higher that I would ever expect it may be in this configuration. I guess the moly stuff and the piston seal do the job.
I tuned my HW30s and I used a custom made seal which friction is so low, even at highest pressure almost stable as without it. I had to even went back from the kit Oteva spring to original “weak” mainspring. Even then, it was too kicky! I had to cut the original one a bit… And still, it has like 6.5 ft-lbs. More is just not good for this small lady. But this is how the good piston seal is changing the performance. Especially important: the friction vs. air pressure in the compression chamber function. When the piston friction is not increasing exponentially, or similar dramatic, with air pressure increase you will get much more energy. The last 5mm piston way before it hits the wall are most critical, I think. Simple – the kinetic energy of the piston-spring system goes to compress the air faster, and not to heat up the cylinder…
Are you happy with the shooting cycle? Is it not too kicky?
BB, Really enjoying this series since I have a 124 needing the same thing this one did. I’m somewhat intimidated by the seal sizing step, but your step by step guide has given me confidence. There is a well known supplier of seals and springs that offer a seal that is described as not needing sizing.( but not for the 124). For future repairs, would this seal be something to consider rather than sizing one ? I appreciate any advice. Thanks
“Glenn, you are one lucky boy!”
B.B.,
That’s for sure! You did a great job, especially with the pictures so we could all see exactly what you did.
I’ll be curious to see what Glenn thinks when he gets it back. I’m really looking forward to the accuracy testing. 🙂
Blessings to you,
dave
A FWB 124D is the best all round airgun I can think of for a person with one airgun. It cocks more easily than any other airgun I know of for the power it produces. It cocks easily enough to be your all day plinker. It is light enough, powerful enough, and accurate enough for small game hunting, and is accurate enough to hold its own against the best springers and most PCPs out to 30 yards. And these gems are easily found for less than $500 on the various airgun classifieds sites. I highly recommend everyone trying one.
David Enoch
BB,
Raining today, found my FWB 124 “RoundTuit” (my homemade wooden spring compressor) hanging in the garage and did a quick clean and relub.
The 124’s are such nice springers to shoot!
Hank
Very nice looking spring compressor rig, Lots more travel than mine. But that wood flooring is arguably even more beautiful.
My 124s is definitely my favorite plinker, and is my garage back door gun for pesting. It still has a great, vibration-free shot cycle from the lube tune and seal replacement 10yrs ago.. I gave my old Weihrauch HW50s (from ARH in the 70s) to my Nephew to share with his boys when they get old enough. That one is even easier to cock and shoot, more suited to youth.
BB
Received my second Dragonfly Mk2. Pumping mechanism works fine and no other issues either at least so far. I bought the 10 shots for $10 and velocities are in line with yours. I can now recommend this rifle to any who have been on the fence. Do buy the test by PA techy because it gets pumped 99 times which should expose any flaws.
Deck
Same here on my DF Mk2. First one was horrible and was returned. Second one works very well and has taken up guard duty for tree rats at my river home.
Super hot 124. My guess is it will slow down after a couple of tins of pellets. 1st time I have heard of a 124 that is within arms reach of a 34 Pro-compact.
I do still kind of kick myself for not picking up one of the FWB 124s there at the Texas show. But my thought process still holds mostly true. My HW30s is incredibly accurate for me and it just felt like I would be buying the same gun over again. The only thing that I see differently now is the FPE difference, so yeah. maybe I should have bought one instead of the Diana 48 that I did buy. But I am liking the Diana a lot and I got a smoking deal on it with the UTG optics that came with it, so not a big regret.