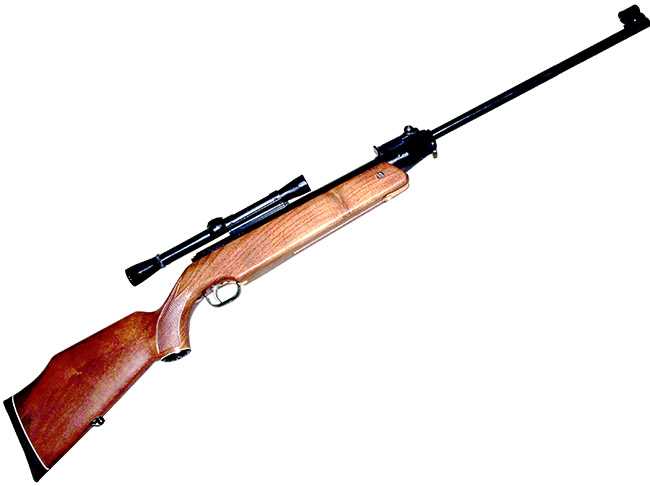

The FWB 124 I am overhauling.
This report covers:
- Let’s go
- Remove the stock
- Remove the mainspring
- Remove the piston
- Remove the base block washers
- Remove the piston
- Discussion
- Summary
It’s been a long time since I worked on an FWB 124 and many new readers have never seen the insides of one, so this will be their opportunity. I got this rifle at the Texas airgun show a couple weeks ago. Glenn, the owner, had never shot the rifle and he brought it to the show so someone could repair it for him, since it didn’t work when he got it. He looked all around the show and when he couldn’t find anyone to help I volunteered to do the work, as long as I could write about it for you. He will cover my costs.
Let’s go
Today we dive into the 124 and I will show you all the parts. I had to disassemble the powerplant to discover which parts the rifle needs. Glenn had told me that his rifle wouldn’t shoot a pellet out of the barrel and I knew immediately what the problem was. I’ve told you readers this dozens of times over the years. When Feinwerkbau made the 124 they used a synthetic for the piston seal that dry-rotted over time. You may remember my discussion of that in the series A shrine built for an FWB 124. Look specifically at Part 3. This always happens and the solution is always a new piston seal. FWB mainsprings are under a lot of pre-tension, too, so I need to see the condition of this one.
This rifle is a very late one that was made in the late 1980s. The serial number is in the 54,000 range, which makes it the latest 124 I have seen. It has the metal trigger, as all late rifles would have because FWB got a black eye in the market for putting a black plastic trigger blade in their first models.
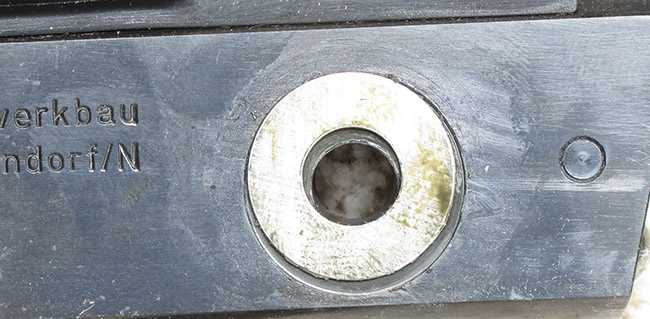
I didn’t open the breech until I got home because at the show all breakbarrels were closed with a cable tie for safety. When I did I found exactly what I knew I would — a pellet in the breech and brown waxy-looking particles. They are the remains of the piston seal.
The rifle came to me scoped with a Weaver C4, which is a cheap tip-off .22 rimfire scope. Since this rifle can shoot rings around most rimfires out to 50 yards it really deserves a better scope, but that is the owner’s choice. It does have the open sights that really add value to the rifle. I removed the scope before working on the rifle.
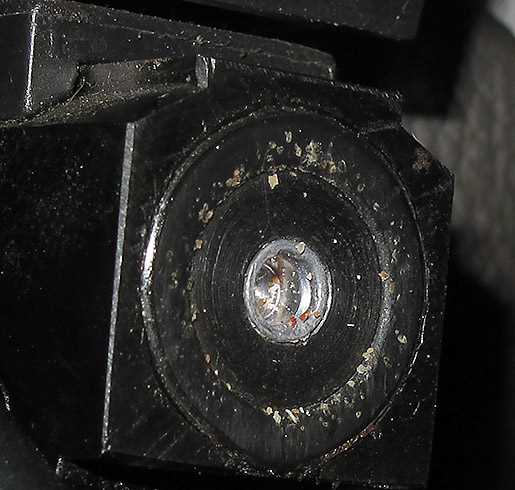
The brown particles are the remains of the piston seal.
Remove the stock
To get to the guts of the rifle the barreled action has to come out of the stock. That’s two forearm screws and one trigger guard screw out. With the stock off I found a mass of piston seal particles all over the insides. They looked like sand, but they are actually just the remains of the dry-rotted piston seal.
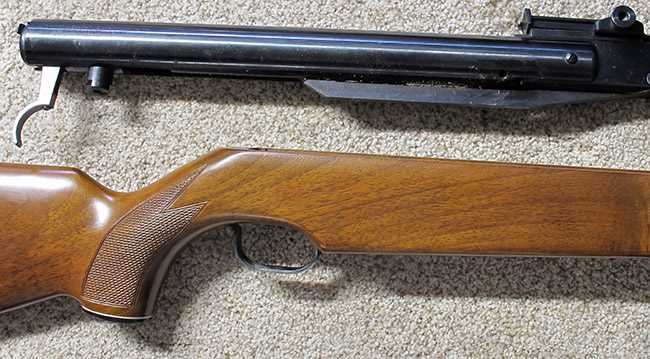
Step one is to remove the stock.
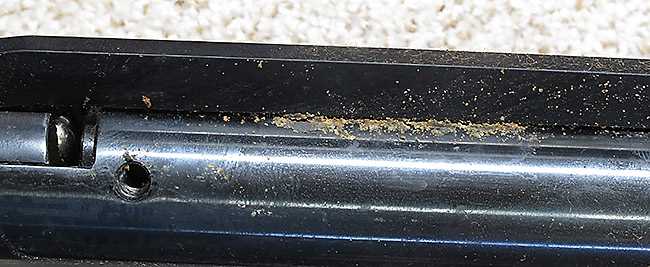
The piston seal particles are everywhere on the inside of this rifle. They look like sand but are actually synthetic that has dry-rotted and crumbled. The oil they soaked up has turned them brown.
Remove the mainspring
Once the stock is off the next step is to remove the mainspring. The end cap and trigger assembly are held in the spring tube by a threaded nut on the bottom of the action. The mainspring in the 124 is under a lot of pre-tension, so put the rifle into a mainspring compressor before this next step. You CANNOT hold the end cap against the mainspring, no matter who you are. Don’t look for trouble!
Once the barreled action is in the compressor and tightened down just a little to take the tension off the nut and also so the action won’t go anywhere, use an 11 mm wrench to remove this nut.
Use an 11mm wrench to remove this nut. Put some tension on the end cap with the mainspring compressor to take tension off the nut’s threads.
Now CAREFULLY loosen the tension on the end cap. The cap will back out of the rifle about 4.5 inches. The 124 has more preload than almost any breakbarrel around, except for perhaps an HW 77.
When the end cap comes out the safety bar and safety spring also come free. Remove them at this time.
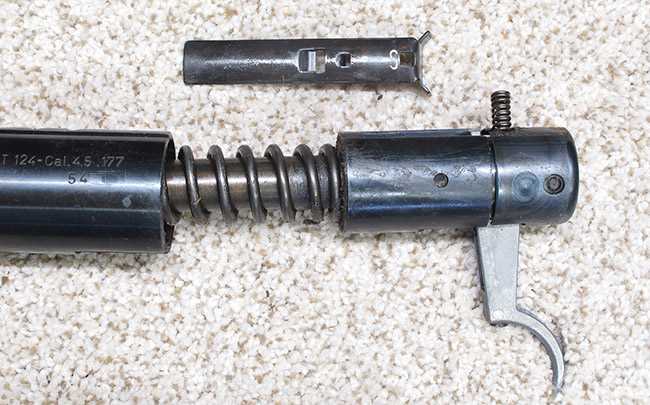
Take the barreled action out of the mainspring compressor and the mainspring will come out of the spring tube. This one was filthy with piston seal particles embedded in its grease. The spring looks okay, but it’s not completely straight, which causes vibration. Since it’s been in the rifle for 35 years or so I decided to replace it. Notice that the trigger group is an assembly that need not come apart.
The mainspring is out. Notice that it isn’t completely straight. That’s why I decided to replace it.
Remove the piston
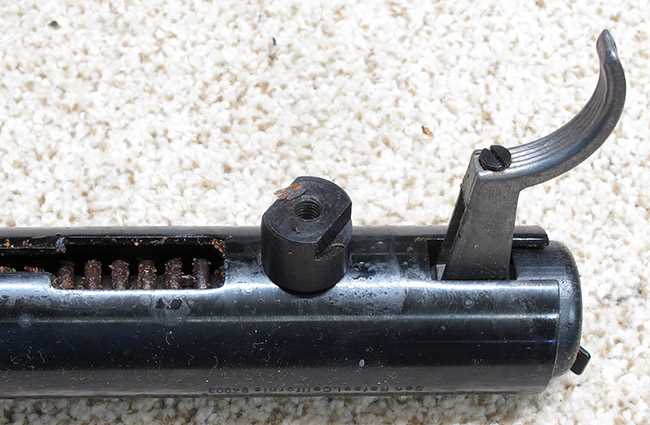
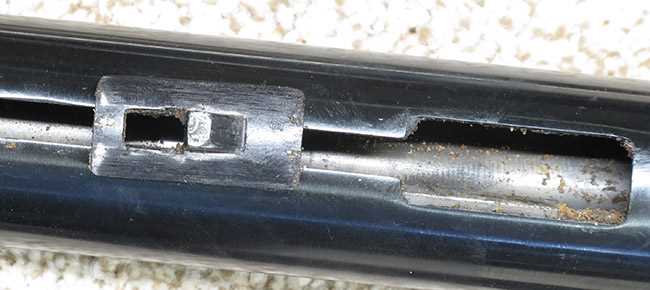
The next step is to remove the piston. To do that the barrel has to come off the spring tube, so the cocking linkage can be removed from the piston. A jamb screw on the right side of the pivot bolt is removed first. It spreads the legs of the pivot bolt to hold it in place. Once this screw is out the pivot bolt can be removed and then the barrel is separated from the spring tube.
The pivot bolt that the barrel pivots on when the rifle is cocked and its jamb screw.

Remove the base block washers
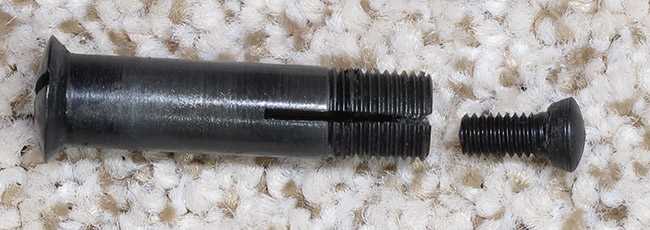
With the barrel separated from the spring tube you can remove the two washers that are on either side of the base block — the block the barrel is pressed into. The washer on the left side is flat and the washer on the right side is shaped to fit a recess in the base block.
The pivot washer on the left side is flat.
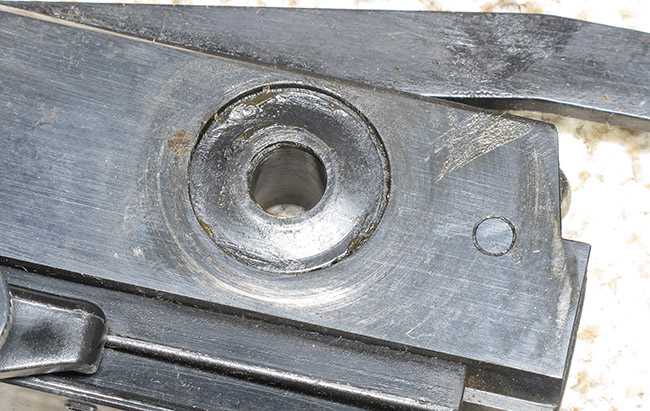
The washer on the right side is shaped to fit into a recess machined into the right side of the base block.
Now the cocking “shoe” that connects the cocking link to the piston can be removed from the spring tube. This frees the piston to slide out of the spring tube.
The cocking shoe is removed from the piston, allowing the piston to slide out of the spring tube.
Remove the piston
Now the piston can be removed from the spring tube. This one had a piston seal that has been hammered by shooting the rifle many times. I’ve never seen one in this condition before. However, what’s left of the piston seal appears to have cushioned the piston and I believe there has been no damage to the compression chamber. Of course that won’t be clear until I clean the chamber which will take a long time with all this particle dust jammed in there. It’s really caked up good inside there.
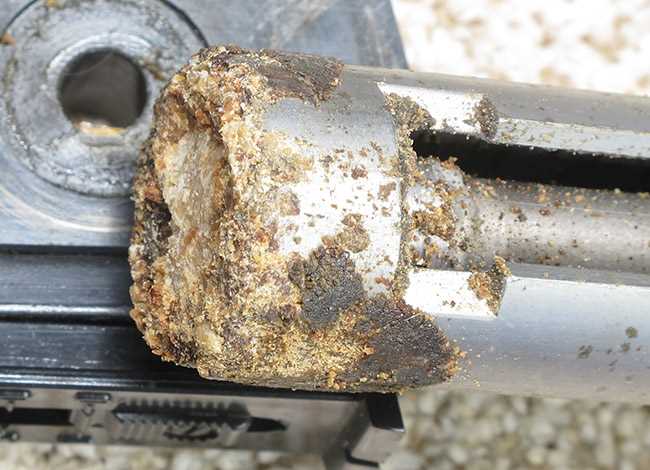
The piston seal has been smashed against the end of the compression chamber by repeated firings. However, no part of the steel piston appears to have poked through. I believe this is a good thing though I won’t know for certain until I clean all the parts.
Discussion
This 124 is in sad shape. The piston seal was well past its expiration date. The parts are on order from Pyramyd AIR. A new mainspring and piston seal cost $85.49 with tax and shipping. The rifle’s owner is getting a deal because an airgunsmith would charge him at least $350 for this job.
I have a huge cleaning job ahead of me. Every piece of this rifle’s action is layered with particles from the old seal and they are hardened with time. The spring tube also has to be cleaned out on the inside.
I’m putting this rifle back to factory spec. There are kits out there for tuning the rifle but I chose not to use them. The one thing the rifle’s owner will get is a dead quiet mainspring, thanks to Tune in a Tube.
I will show the rifle going back together, then I will test it after things are together. I will remount that scope for the owner, though a rifle this accurate deserves a much better optic in my opinion.
Summary
This series will be a chance for a new batch of readers to learn about the FWB 124. Stay tuned.

B.B.
That is one corroded piston seal. Use brake cleaner-wear gloves, outside-and wipe it off. The brake cleaner will remove all the hardened gunk. Otherwise you can wipe till the cows come home. lol.
Can the barrel pivot bolt go in from the other side or is it pretty clear that only one side will work?
Time to use good new 21st century synthetic lubricants! Did any 124’s ever come with leather piston/breech seals?
-Y
Yogi,
They could not use leather seals in these because the required oil for the seal would cause a detonation at these high pressures. Leather seals are great on lower powered sproingers, but when you get to these high power / velocity sproingers, they just do not work.
Hello
Very good info on repair of the 124. I have one that is at least 30 years old and since it doesn’t blow a pellet out the barrel anymore, the piston seal is no doubt toast. I’m going to try and fix it. Where do I get a mainspring compressor?
Thanks for your help,
Russ
.
Ruko,
https://www.pyramydair.com/product/air-venturi-rail-lock-spring-compressor?a=7764
https://www.springcompressor.nl/en/
or you can make your own
https://www.google.com/search airgun spring compressor diy
It is best to post your question on the current blog so that a lot more people can see your question and give an answer.
Siraniko
Yogi,
As RidgeRunner said, always synthetic seals in the 124/127.
Yep, I have a lot of cleaning to do!
The pivot bolt only fits in one side.
BB
B.B., Under the section Remove the Piston: “Once this screw it [is] out the pivot bolt can be removed….”
I am going to enjoy this series.
Roamin,
Thanks, I fixed it.
BB
Hello everyone,
Here at work taking my lunch break catching up on the blog. While the rest of the world sleeps, I eat and read.
My favorite and most enjoyable blogs– classics brought back to live.
I have an BSA Airsporter MK1 (.22) with the most horrendous trigger. Least accurate rifle because the trigger is so heavy. Does anyone know of a website or video tutorial to help me adjust the trigger? Have looked around but have not found one clear enough.
Thanks in advance.
Wow, Alex, I’m surprised and a bit disappointed that you did not get any responses to your question all day. Hopefully, someone will see your question and respond soon.
Have you had the stock off the gun? Perhaps send a picture of the trigger assembly as a response to your question.
Do you have an exploded parts diagram? If so, add a link. Sometimes you’ll find a smart cookie who can tell you how thing work just by looking at one.
Good luck!
There is a reason it would cost $350 or more to overhaul/renew this or similar air rifle – you need the right tools to do it, the experience, know-how and common sense. The owner is fortunate you took on the job for essentially just the cost of parts. This has also reminded FM once more that, when in doubt, hand over a job to those who actually know what they are doing.
“… I volunteered to do the work, as long as I could write about it for you.”
B.B.,
That’s way cool of you; it’s win for the owner and for your readership.
Actually, it’s a win for you, too; you know you’ll have fun with this. 😉
Take care & God bless,
dave
BB,
Was there ever a time when the 124 was made with a more robust piston seal? I own one that I haven’t fired for many, many years and I wouldn’t dream of firing it now, after all the times you’ve covered the way the seal just dies a slow death on its own. I figured I’d end up replacing the seal at some point and didn’t want to damage other parts by firing it with a potentially bad seal. I guess I saved myself a lot of clean up as well. If you know about better seals being used at other times in production, I may not need to change mine out. Also, what do the tuning kits accomplish?
Half
Half,
As far as I know FWB never changed the seal material during the run.
BB
Hi BB,
Have the winners of the Sub MOA Challenge been announced? The challenge was supposed to end mid September. I see the challenge still advertised like it is still ongoing.
David Enoch
David,
No idea. I will ask.
BB
David,
The challenge is over and Pyramyd AIR is reaching out to the winners. Once they have they will publish the winners.
BB
Tom Gaylord (B.B. Pelletier), what mainspring compressor did you use?
I too have an airgun with brown crumbs for seals. 🙂
hi3,
I used a B Square compressor that’s no longer made.
I recommend that you make one:
/blog/2006/07/spring-gun-tuning-part-3mainspring-compressor-continued/?swcfpc=1
BB
Thanks for the suggestion and the link for a do-it-yourself mainspring compressor.
I shall attempt to make my own, however,…
I wonder if there is a ready made, easy to use and safe mainspring compressor, available to buy for Europeans? I ask because, looking online, I must have somehow missed them all. 🙂
Hihihi, you might find a used one, floating around. I think all the ones made for the retail market have been discontinued. B.B. reviewed a couple including one by SunOptics.
hihihi,
https://www.amazon.com/Air-Venturi-Rail-Spring-Compressor/dp/B06WLM8GKH
https://www.airgunspares.com/compressortitanmk2springcompressor.html
https://www.trrobb.com/Airgun_Spring_Compressor_Steel_for_professional_use/p1449438_16563255.aspx
shootski
The ones from TRRob and Airgunspares look to be quite usable. They are both in UK. Of the two, I would prefer TRRob’s. The one from Amazon is usable if you have scope slots.
I have a SunOptics. It is a slightly improved version of BB’s Square B. One that Rick Eustler made is even better.
Wow, now that’s a result.
Thank you Roamin Greco, a used SunOptics mainspring compressor would indeed be nice!
And thank you shootski for searching online, finding some (and I thought I knew how to drive on the web) and sharing, with easy to use / find links!
Thanks also, RidgeRunner for your research and practical advice!
What a useful place pyramydair’s blog is, by which I mean Tom Gaylord (B.B. Pelletier) and his readers / commenters. Thank you all! 🙂
B.B.,
Caption on photo of the breech: “The brown particles are the remains of the breech [PISTON] seal.” The breech seal looks okay to me unless the DRY piston seal particles have damaged it too.
Old Nylon stockings might be better to use than paper towels.
Happy cleaning; hope it goes quickly.
shootski
shootski,
Thanks. Fixed it.
BB
B.B. and Readership,
/product/air-venturi-rail-lock-spring-compressor?a=7764
Time for a review? Do I need one of these for my ASP20s?
shootski
PS: How do I attach it to my PICATINNY rail?
B.B.,
Let my fingers do the walking: /blog/2017/04/air-venturi-rail-lock-spring-compressor-part-2/?swcfpc=1
Will need to take a hard look at the ASP20s to see if modification or jig is needed.
If I bought one it will insure that my Gas Springs will NEVER fail! LOL!
shootski
Because of Murphy’s Law in reverse….
If I carry an umbrella on cloudy days, then I can be assured it will not rain.
https://www.amazon.com/Groz-39102-bar-Clamp-Length/dp/B01DAPPY20/ref=pd_lpo_1?pd_rd_i=B01DAPPY20&th=1
I have heard of people using a sash clamp as a spring compressor. I was set to get one myself when the Sun Optic one went on clearance. Could probably go with a shorter one but don’t know if it is worth the savings.
Pat