by Tom Gaylord, a.k.a. B.B. Pelletier
Part 1
Part 2
Part 3
Part 4
Part 5
Part 6
Part 7
Part 8
Part 9
Part 10
Part 11

Brand new TX200 Mark III. It’s very similar to my older TX, but the checkering is different and the line of the forearm is more scalloped.
Today, I’ll use the new Air Arms TX200 Mark III to test how a red dot sight works on a precision air rifle. This test was requested more than a year ago by blog reader Mannish in Mumbai.
Going into the test, I thought about the recent test of how high and low scope magnifications affect accuracy on the same air rifle. That test was suggested by blog reader duskwight from Moscow; and not only did I test the premise (in Part 11), he also tested it with a special guest blog. Both of us discovered that the magnification has no bearing on accuracy, and duskwight’s test was skewed toward favoring the lower-powered magnification!
I’m shooting the new TX200 Mark III with a Tasco Pro Point 30 red dot sight. The sight does not magnify the target at all; so, in essence, I’m shooting with open sights. I chose 25 yards indoors for the test, feeling that was enough range to show the trend. From the past testing of this rifle, I selected the H&N Baracuda Match pellet because I thought that it had demonstrated the best grouping at 25 yards. It was only after the test was completed that I discovered I’d selected the results of the other TX200 that’s my personal rifle. Oh, well! I do make mistakes from time to time.
Baracudas are still very accurate pellets in a TX200, and today’s test was not invalidated by their use. When you see the results I got, you’ll agree that this test is valid.
Dot sights in general
A dot sight is one that projects a red light in the center of the lens on the inside of the sight. No light leaves the sight, so this is not the same as a laser. Only the shooter sees the dot.
The dot is adjusted to shoot the pellet to the place you want it to go. The adjustments are the same as for a scope, but there’s no erector tube involved. Think of the dot as the intersection of the crosshairs. Canting the rifle is still possible and has the same affect. And, on a quality sight like this one, the brightness of the dot can be varied. That’s important because, as the dot grows brighter, it also appears to grow larger — covering more of the target. You want to cover as little of the target as possible, while still being able to clearly see the dot in the light you have. The Tasco Pro Point has a rheostat with 11 different brightness settings.
I adjusted the setting to No. 8, which gave me a dot I could see, yet was smaller than the black bull on the 10-meter pistol target I was using. I found that using the dot was the reverse of using a precision target aperture sight with an aperture front insert. There, you encircle the bull with the front aperture — with the dot you place the red dot inside the black bull, so the black encircles the red. Once I figured this out, I was satisfied that I could aim with precision.
Sight-in
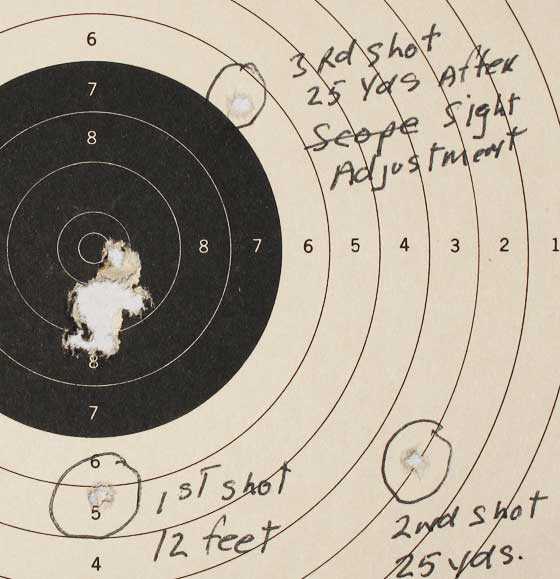
The first shot was fired from 12 feet and landed at 6 o’clock, just below the bull. I was on paper, so it was safe to move back to 25 yards, where I fired a second shot. This one landed at about the same height as the first, but 2 inches to the right. I adjusted the sight up and to the left (the adjustments work just like the ones on a scope) and shot again. The third shot landed more to the left but was too high. The sight was adjusted again and the next shot nicked the 10-ring of the bull, so sight-in was completed.
I fired 9 more shots with this sight setting and never once looked through the spotting scope. The rifle was rested on a sandbag because we’ve learned the TX200 does very well that way. With each shot, I paid particular attention to centering the red dot inside the black bull. That was easy to do because I had the dot sized perfectly against the bull. But on shot 7, I noticed that the sandbag had moved forward by several inches, so the rifle wasn’t always resting at the same spot. I would correct that when I shot the second group.
When the group was finished I walked down to the trap to change targets. The first time I saw the group was when I entered my garage and saw one ragged hole! Holy cow! I did it! The dot sight is incredibly accurate!

Here’s the first target. You can see how the pellets landed during the sight-in, plus you can see that first 10-shot group!
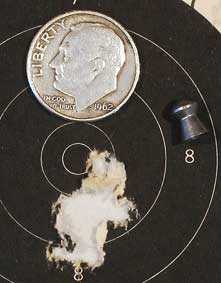
Ten H&N Baracuda Match pellets made this 0.619-inch group at 25 yards using a red dot sight.
While this group looks very good, it’s almost double the size of the 0.336-inch group I shot from my own rifle at 25 yards with this same pellet while using a scope. So, it does appear that using no magnification has opened the group just a little. The next group would tell for sure.
Back I went to 25 yards to fire a second group. This time, I paid attention to the exact spot that the rifle was rested on the bag, and I was also careful to center the dot every time. I really thought this group would be smaller than the first. When I walked down to see it, however, it was not only clearly larger — at 1.177 inches between centers — but it was also very horizontal. The first group had been vertical, if anything. I wondered what had happened.
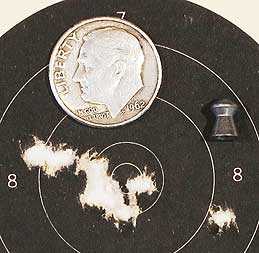
Ten H&N Baracuda Match pellets made this very horizontal 1.177-inch group at 25 yards. This is clearly not as good as the first group, plus what’s with that flier on the right? There were no pulled shots in this string!
The first group had satisfied me that the dot sight was accurate. Perhaps I was losing concentration by the second group, which really wasn’t that many shots. Only 24 shots in all had been fired. And why had the rifle thrown a shot wide to the right like that? It was almost as if the sight was loose or something.
Oh, no!
That was when I remembered that I had done nothing about installing a vertical scope stop with this dot sight! I preach about scope mount slippage all the time to you readers, but apparently I can’t be bothered to do it right myself.
Sure enough, an examination of the mounts revealed they had slipped backwards on the rifle by 2 full inches! The Tasco mounts are 11mm; but being made for firearms, they have no provisions for a vertical scope stop, and so the inevitable had occurred. Naturally, I didn’t discover this until the range was completely knocked down and put away.

All that work for nothing because I didn’t use a scope stop. The rear mount is only on the rifle by about a quarter inch! No amount of clamping pressure, alone, can hold a scope mount or this dot sight mount from moving, unless you’re using BKL mounts.
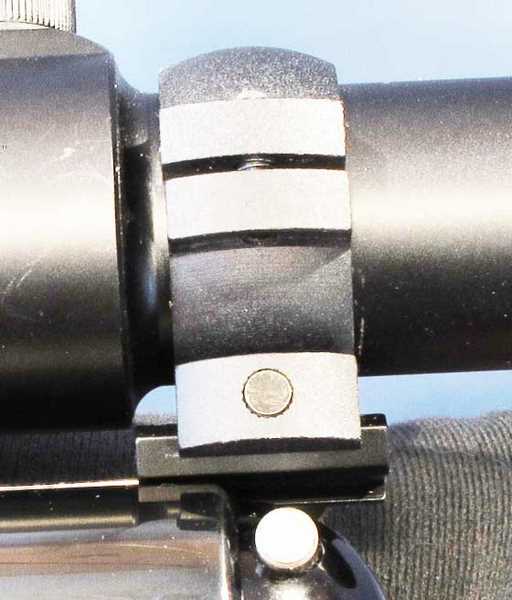
This enlargement makes the rear mount easier to see. It’s almost off the rifle!
I don’t think this is so bad. After all, the rifle and sight turned in a good performance, even when the mount was not locked down. Imagine what it might do if it was solid.
What do I do?
There’s only one thing to do — rerun this test. I will install a vertical scope stop next time, and I’ll show you how easy that is to do. Then, I’ll shoot the same pellets at the same distance, and we’ll see exactly what a red dot sight can do. Since this was supposed to be the final test of the new TX200 Mark III, it seems I have a reprieve. I can’t argue with that!

I’m a big fan of red dot sights, but have only used them on co2 guns. With more airguns coming out with weaver style rails built into the receiver, red dots would seem like a natural option. It’s somewhat surprising more airgun hunters don’t use them IMO.
The problem some folks have with red dots is that they try to aim using the dot. The correct way is with both eyes open to focus on the target and let the dot float in front of your eye. Takes some time getting use to, but it’s really not that hard.
Another issue is dot size. Most of the more common and affordable models will have a 3-5 moa dot. However this is where airgunners have an advantage. Since most of our shots are under 50 yards and realistically more like 25 the effective dot size is reduced to one fourth to one half the advertised size making accurate shots easier. One other point the brightness should only be set as high as needed to see the dot. Too high and you can get a big bright fuzzy ball that will hurt accuracy.
Bub,
I always used my red dot sights as if they were iron sights. That is, I focused on the red dot and let the target go hazy. The advice you give here is something I never thought to try or even heard of before. Is this a common practice with dots or something that you just tried and found works well for you? I’m going to give your method a try tonight and see if there is a difference for me. Glad you mentioned this!
Fred DPRoNJ
Fred,
I’m sorry to disappoint, but that was not my discovery. In fact it’s the recommended method for using a red dot sight. A few years back it was my good fortune to get to discuss red dots with one of the guys that tests and supply sights to the cool kids.
Anyway he explained the correct use. First off the eye naturally wants to center things. However only one thing at a time can be in focus. As a shooter I was always told to keep the front sight in focus and assumed you focused on the red dot, but in this case I was wrong. With both eyes open and focused on the target the dot should seem to just float in the background and often the sight tube will disappear kinda like a ghost ring.
Try this at home some before you go out shooting. Remove the back cover from the sight, but leave the front cover on. Then adjust brightness setting to the desired level. Now with both eyes open, the front of the sight covered, pick out a target, focus on the target, and now raise you gun as if you were going to shoot. You should see the dot on the target even with the end of the optic cap covered.
A problem you run into using the red dot like a cross hair is the dot is not a true circle. BTW the better the sight the less round they seem to be. Plus if you have an astigmatism like me the dot is even fuzzier.
One last point, as mentioned above dot size comes rated MOA ie 2,3,4,5,6….so airgunners shooting at closer ranges will be dealing with smaller perceived dot size than if shooting at longer distances ie 100-200 yards. However don’t get worried if you think your 4 MOA dot looks too big at 25 yards. The eye and the brain don’t register much below 2 MOA no matter the size. If the dot appears oversized try turning the brightness down and that usually will fix the problem.
Hope this helps and good luck.
Bub
BB your bringing me back some memories again.
I used scopes off and on throughout time. But I liked the Dot sights on my pump guns. As my eye sight got worse they seemed easier to place a shot on a pest bird than open sights but with the same results.
It was a easier sight to find the target quickly and was easier to place the Dot at center mass of the object. I didn’t have to line the front sight up with the back sight while trying to aim for center mass. If the gun could hold a inch and a quarter group at 40 yards I was pretty well guaranteed a Starling was going down with the Red Dot sight.
And then I got a Disco in .177 cal. when they came out with the Benjamin hand pump. I thought to myself what better way to get into a PCP gun than that package. And of course a Dot sight went on.
I had a little trouble with the Disco at first because of the trigger. I learned that I needed to hold my trigger hand a little firmer and apply the trigger easy but steady. The gun grouped really good after I learned that. It wasn’t quite like the Crosman pump guns triggers that I was use to.
But you know what it had a Tasco Red Dot on it. Its like I couldn’t miss with that combination after I got it figured out. I even tried a scope on the Disco because I was making some shots out to 50 yards. But I had better luck with the Dot sight on the gun.
And man BB you almost shot your Dot sight clean off the gun. Does that TX buck that much?
And again I forgot something.
Is the scope rings the right ones for the gun. You know that 11mm and 3/8″ dove tail stuff will screw you up. Some rings seem like they clamp good but really ain’t.
I learned that on one of my guns. Couldn’t keep it sighted for you know what. I grabbed the gun by the scope one time when I was picking it up and I thought the gun was going to land on the ground.
The dove tail clamps were tight but not on the dove tail of the gun! Lot of silly little things to watch when your messing with these air guns.
GF1,
Actually 11mm and 3/8-inch are so close that both mounts will usually work on either base. Leapers labels their mounts for both sizes. What is called 11mm actually runs from 9.5mm to almost 14mm these days.
B.B.
GF1,
No, that’s the strange thing. A TX 200 is very smooth, compared to most spring guns in or near its power class.
B.B.
Did you find anything wrong with the mounts?
I think the problem I had was because of the type of scope rings I had. It was those high see thru rings. There is 2 steel straps for each ring that holds the scope in. And the ring is separated in the middle .
The left side that looks like this were it attaches to the gun (
And a right side like this )
When I tightened the two halves together it wasn’t enough to grip the gun. They kind of claw into the gun if you will. They seemed like they were tightened up. I couldn’t move the scope at first. But after I had that happen on the one gun I talked about above. I found that I could move the scope around if I applied some force in the right place.
And that’s a good point you made about how much of range the scope rings are supposed to accept.
If you actually look at what 11 mm is (.433″) and what 3/8″ is (.375″) that is (.058″) difference. And if you split that in half for each side of the receiver dove tail grooves that’s (.029″) a side difference between the two.
So that makes me wonder if the gun manufacturers hold them grooves on the gun to what they say they are and how much tolerance they allow. I wonder if 3/8″ is a true .375″ and if 11 mm is a true .433″ . Kind of hard to measure the gun.
GF1,
Dan Bechtel (the founder of B-Square) and I measured dozens of airgun dovetails in the 1990s when B-Square was trying to establish the width of most guns. Turns out, they were in the range I gave — 9.5mm to almost 14mm. B-Square published a brochure with all the dovetails we had measured and for the first time they established the need for some mounts to be sized to certain guns. For the CZ and BSA guns, for example, the mount jaws had to be exceptionally wide, and also needed clearance above the jaws, to clear the rounded spring tubes.
We measured the width with a standard engineering method. A calibrated wire was placed in each dovetail and the caliper touched it on both sides. The wire was of a certain diameter and we both used the same wire.
We also found that the angles of the dovetails varied from 45 degrees to 60 degrees and everything in between. We had to give up on trying to make sense of that, but B-Square cut their jaws with a rounded point that compensated for any of those angles. That’s why the jaw points are rounded today.
B.B.
The rings I got were from wally world. They were flat on the bottom. And the top had a 30 degree angle going to a sharp ege that was supposed to catch in the groove of the reciever.
So bad design on the rings I got then. I always wondered if there was a standard that thy went by to make the rings and guns to.
B.B.
Many thanks for the test.
Now I got to get the Tasco dot sight.
Manish
Mumbai
India
Manish,
I am so glad you saw this! I have wanted to do this test for so long. And I am going to do it again, but I know that it’s going to turn ot better than today.
Good luck!
B.B.
BB, a timely lesson for me, as I plan to sight-in an RD 30 red dot on my HW 45 this a.m. I’ve already had to file out the shoulders of the twin mounts so they fit the pistol’s non-standard (?) 14mm dovetail. 2 screws per mount are well cinched up. I’ll make pencil marks to check for slippage. If there is any I’ll try tightening down a mount grub screw, though there are no arrester holes. Looking forward to your vertical scope stop info…
Slinger,
On a P1 all you have to do it butt the front ring against the back of the front sight. Beware, though. It will deform the front sight after a lot of shooting, because the P1 really does recoil. I have had this very sight on my P1 in the past.
B.B.
Talk about deforming parts. Being new to high power springers, a few years back I picked up a RWS 350. Assuming the screw on the top of the receiver was a stop pin I mounted one of the scope rings against it. Long story short not a stop pin and no more screw.
Bub,
That is an old story! When I went to Leapers with the scope base for the Diana guns, all my idea had was the recoil shock shoulder in front of the mount to stop the base from sliding back, and a cutout to go around the large-headed screw. I have sheared off several screws, myself.
It was Mac who came up with the idea of putting in the droop.
B.B.
Oh the good ole days of reversing the mount and hanging the stop pin over the front of the rail.
Shame on diana for apparently changing their design so an excellent work around is rendered useless.
kevin
Thanks again BB, nice to know I’m in ‘good company’, this sight recommended by a HW45(P1) enthusiast over here. Hoping it & the artillery hold will let me shine a little at the range.
This is very interesting, red dots are a lot cheaper than scopes and easy to aim with. Is there a way we could see what you’re seeing to see just how much of the bull is covered by the red dot?
J-F
We could see what he’s seeing to see just how much he’s seeing but it might be seeing too much if he’s seeing as much as we think he’s seeing!
BWAHAHAHA!
Sorry J-F, couldn’t resist! : )
What? Wouldn’t you want to see what can be seen when seeing what others can see?
I’m blaming the -40 temperature for my bad choice of words. Man I hate winter.
J-F
J-F,
That is an extremely difficult shot to set up. If the camera moves a couple hundredths of an inch, everything moves. I will try to take it, but if I can’t then I’ll draw a graphic to show you what I see.
B.B.
I tought it would be possible using two tripods. It doesn’t need to be mounted on the rifle. The red dots I have at home are the super cheapo ones that are often included in packages. The dot is so big it hides everything (and keeps shifting it’s POI).
J-F
The one I have for my Ruger Mk-II Gov’t Competition Target model has a choice of two sizes of dots, a dot/circle, and a + (as I recall).
Cheaper, really? Have you priced an AimPoint sight?
B.B.,
I like dot sights, too. They’re fast and easy for short and medium range shooting.
They worked well for me in combat, and I like them for deer hunting at short ranges. Beyond 75 yards, and in dim light, I prefer a magnifying, light gathering optic. I especially like the combination of iron sight + dot sight co-witnessed together. I am clumsy with optical sights on handguns, but I recently shot a pistol with tall suppressor sights cowitnessed to a small, compact dot sight. It was a GREAT combination that was easy to hit with and very fast.
Thanks for doing this test, B.B.
I’ve looked down the muzzle of my TX200 to find evidence of pellets hitting the baffles. I don’t see anything obviously wrong, but without buying a borescope, I can’t see well enough to know for sure. I laughed when I saw your 1.1 inch group fired with a sight sliding off the rear of your rifle because that is exactly my average group with my rifle. My Hawke scope is (I think) properly mounted in BKL rings in front of a scope stop. I still wonder if it’s just my lousy shooting with a quality spring piston rifle, or whether something else is wrong.
You wrote a great article yesterday. Thanks for the New Year’s gift to all of us, and look forward to reading more about your project.
Sincerely,
RB
RB,
Apparently we haven’t helped you with your TX yet. I have forgotten all the details. What caliber is it?
Have you shined a tactical flashlight down the muzzle? Sometimes they will show things that aren’t otherwise visible.
One thought would be to assume one baffle is off and to ream all the baffles to a slightly larger size. I’m talking a few hundredths of an inch larger than they are now. They are made of plastic, I’m pretty sure, so the reaming can be done by hand, which it should be, for precision.
B.B.
Glad to see a red dot sight made it into an airgun test. I like quality red dots for short range, quick acquisition shooting.
IMHO open sights are better than poor quality red dots and there are a lot of poor quality red dots out there.
kevin
Even a poor red-dot may be better than open sights if one’s eyes can’t manage the needed focal range… The exit side of a red-dot should appear at some moderate distance (most are likely in the 50-75 yard range; archery versions may be 35 yard).
That means the eye is operating at close to “infinity” focus, or at least at whatever one’s distance correction is based upon.
Hi BB. Great blog on the TX200
I have a TX 200 HC in .22
I have a couple of quick questions.
I notice that after shooting my rifle several times that the 2 screws closest to the barrel have a tendency to get loose. Is that normal? Any solutions?
Also when i am loading a pellet, I am afraid of cranking the under leaver handle too hard. Should I be concerned?
Thanks
Louis,
Try using blue thread-lock (medium strength blue Loktite) on those screws. Only need a drop on the threads per screw. You’ll still be able to take it apart, but the screws won’t vibrate loose. You can get it at any hardware or auto store.
/Dave
Louis,
Those are the forearm screws, and, yes, it is common for them to loosen when shooting a spring rifle, though TX 200s don’t loosen as often as other guns. The Loktite solution is the one to follow.
Don’t worry about pulling hard on the underlever. In fact, it is possible to cock the rifle without setting the safety, if you don’t pull it hard enough.
B.B.
Louis,
With all due respect to /Dave and B.B. I must disagree with loctite being a long term solution for your forearm screws working loose.
The problem with a seizing agent like loctite, in any strength, for stock screws in a wood stock, is that it will eventually mask your loose stock screws.
Guns with factory/stock action fasteners (screws) tend to compress the wood as you shoot and the action will loosen in the wood regardless of how snug and loctited the screws started out.
The problem is the loads seen by these screws are beyond what the wood under the washers can support and the wood starts to erode or compress. Over little time, especially with springers, your screws will still feel snug but because the wood has compressed beneath your action is now a sloppy fit to your stock.
The best solution is to install screw cups in your stock. Screw Cups distribute the load to about three times the wood and eliminate erosion because the cups don’t spin in the hole. The cups press into the wood and the lock washer presses into the cup so nothing spins and screws stay tight.
For heavy users of springers it is about the only way you can avoid screws loosening. No loctite required.
A less than ideal solution, but better than loctite, IMHO is vibratite.
http://www.vibra-tite.com/vc3.php
kevin
B.B.,
My TX is .22 caliber. I purchased the rifle six months ago from Pyramyd. The rifle grouped 1.1 inches at 25 yards. The rifle vibrated a lot and often shook loose the forearm and action screws, even with Loktite. The piston seal failed and was repaired by Pyramyd. In an effort to improve its accuracy I sent it to David Slade. The rifle is now much smoother upon discharge, doesn’t shake screws loose, and groups average 0.9 inches. I’ve tried different premium pellets, including Crosman Premier, JSB and H&N. I’ve fired 5,000 pellets through the rifle. Groups tend to be round without fliers. Some groups are a single ragged hole, but the next group might be +1.5 inches. I’ve been shooting pellets straight from the tin without inspecting, sorting or preparing them. The rifle’s had several scopes and two different BKL mounts, and currently carries a Hawke Sidewinder. I like the scope.
I’ve looked down the muzzle with a tactical flashlight in front of the muzzle, and also tried shining the light through the breech, and can’t see evidence of pellets hitting the baffles, but I don’t know for sure.
It doesn’t like being held tight, but seems not to care if it is held loosely with the artillery hold, or rested on a sand bag. The rifle seems so capricious, I suspect something is wrong. However, this problem might simply be my inability to master a spring piston rifle. It is my only scoped, high quality spring rifle, so I have nothing to compare it to. Sometimes frustrated, I’ve pulled out an accurate .22 rimfire just to prove to myself I can shoot better groups at 50 yards than I can with the TX at 25 yards.
How do I ream the baffles without risking damage to the crown?
Appreciate your help. As a friend often says, these are “good problems to have.”
Sincerely,
RB
RB,
Something is wrong with that rifle! Perhaps the barrel isn’t rifled correctly or something, but no TX 200 should ever behave like that. The vibration is a real puzzle.
Push a pellet from the muzzle to the breech and catch it, so you can look at the rifling pattern. Are all the grooves there?
As far as reaming the baffles — don’t you do it! It takes a machinist with a deft hand to do that sort of this. I no longer suspect the baffles, anyway. That early vibration has me puzzled. It sounds like something on the gun wasn’t properly aligned.
Can you tell me what velocities you are getting, and with which pellets?
As far as “mastering” a spring rifle, the TX 200 is so forgiving there is almost nothing to master. I don’t think that is your problem.
Tell me more about those groups that vary from a single ragged hole to 1.5 inches. When they are a single ragged hole, how small are they? This variable grouping suggests that whatever was wrong is still wrong but it is not consistently wrong. It comes and goes.
Tell me this, is there a pellet your rifle seems to do best with? Does that pellet have fewer large groups? Is there any pellet that produces groups of the same size all the time — even though they may be large groups?
You should be able to shoot pellets straight from the tin and do well with your rifle. I always do that, unless I specifically say otherwise. The TX 200 is very tolerant of different pellets.
I want to know more about that vibration. Did the stock get any drag marks inside when it was new — from firing it, I mean? When you cock the rifle is the underlever and the cocking mechanism centered in the cocking slot?
I know these are lots of questions, but I need to understand your rifle if we are going to get to the bottom of this.
B.B.
I use a holographic sight on my custom AR15. I really like it much more than iron sights. This is the first serious use I ever put a dot sight to use. I found with a nice optic target acquisition is far easier than using military style iron sights. Seems this test pretty much proved what I just found out yesterday when I fired my AR15 for the first time. It was beautiful butter smooth and no felt recoil. I liked it.
Dragging a thread from earlier as the reply nesting was maxed out:
Very low resolution image — I can only read about four words on the whole page.
I see nothing in this design that would leverage low pressure air in any way. It is a straight line case of using air pressure to compress another air chamber. That means that, at full cock, the larger chamber will have to have enough air pressure to exceed the pressure expressed on the face of the piston… For simplification, that means if the cocked “right side” is at 2000PSI, the entire volume on the “left side” has to be over 2000PSI… And that means the source reservoir that feeds into the “left side” will have to be 3000PSI or more depending upon the volume of the reservoir vs the “left side” chamber.
Ignore that it is a “nitro piston” for the moment.
Visualize something like a 7″ tube with a transfer port on the left end (this is where your air reservoir will be placed). Inside this tube is a double-faced piston, say 1″ long
)=(
positioned on the very left end. The air space on the right of the piston is sealed at ambient air pressure (that is, if you don’t have a pressurize air source on the left end, the piston is pushed to the left).
Now, to “cock” this arrangement (push the piston all the way to right) you have to feed pressurized air into the left. The piston position is always in equilibrium — the pressure on each face will be equal. Ambient pressure on both sides when the piston is to the left. When the piston is in the middle of the tube (half way along) the pressure on the right side will be 2X ambient — and so will the pressure applied on the left side. To push the piston to the 3/4 distance, or 1/4 of the total tube and 4X ambient — requires the entire left side, 3/4 of the tube, to also be at 4X ambient… Note the result — the left side, the side you intend to bleed out, has three times as much actual air in it as the right side which is going to drive the piston. Keep going: the next doubling of pressure gives you 8X ambient, and 7/8 vs 1/8 the air volume… Next doubling is 16X ambient (about 240PSI), and the air volumes are 15/16 vs 1/16!
Look at it this way.I have a carbon fiber tank in my back pack with 4500psi in it.
It has a hose and a open close valve that I control.
The hose is attached to a chamber that houses the body of the nitro piston. The body has a o ring on it. The chamber is the same lenth as the stroke of the piston shaft that moves.
The shaft sticks through a hole in that chamber and a o-ring seals that chamber so no air can leak out into the area is were the piston is on the end of that shaft.
That chamber only makes what ever air preasure the piston on the end of the nitro piston can produce when the trigger is pulled. Only that air makes the projectile move. The body of the nitro piston does not move.
Doesn’t really matter which end of the gas strut is the moving part… The problem is that to cock this device requires enough air at a high enough pressure to FILL the chamber side and push the strut to “cock”.
That means EACH shot is requiring the air equivalent of filling a PCP (pistol — think the Crosman Silhouette model) reservoir from EMPTY (not just the normal “lower shooting limit”). If the stroke length is 6″ and the internal pressure of the strut when cocked is 2000PSI, that means you have filled a 6″ long chamber with (allowing for parasitic losses) enough are to provide around 2200PSI.
I will try to post a better picture when I get home tonight.
http://i1373.photobucket.com/albums/ag362/gcars/1_256_00000152_0_zps0c5f1c3b.jpg
I tryed to edit the picture but its not working out.
Wulfraed
There were more posts on the $100 PCP about what we are talking about. So I left a comment over there.
Sorry but kind of off topic over on this TX 200 red dot topic. And no sense in having two conversations about the same thing going on in different places.