by Tom Gaylord
Writing as B.B. Pelletier
This report covers:
- P.O.I. rings
- What do you want to know?
- Not cheap
- New scope
- That’s it
Today will be different. For once I am stymied how to test two new products in a meaningful way. Maybe I’m biting off too much to test them together, but they do seem to compliment each other, so this seems to be the thing to do. I’m hoping some of you can help me decide how to proceed.
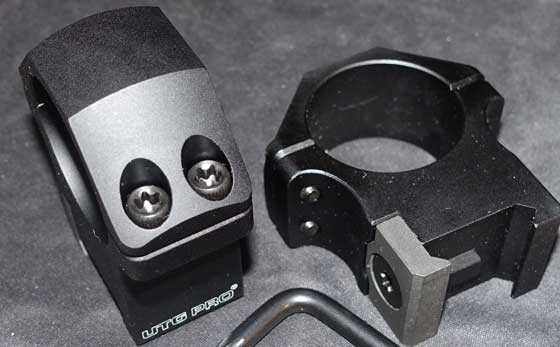
P.O.I. rings
The first product is a set of the new UTG Precision Optics Interface (P.O.I) rings from Leapers. I saw these rings at the 2016 SHOT Show and told you about them in the Day Two report.

P.O.I. rings are very stout, and come with a torx wrench for installation.
These rings are supposed to be more accurately aligned, and have tighter tolerances than other rings. They are made thicker, so the appearance is one of strength, but how do I test strength and precision? I want you to tell me what you think I should do. Remember that I am not a tsting laboratory. I have to test in the same way you would.
What do you want to know?
I’d like to know what you expect from rings. These have Weaver bases, so they fit both Weaver and Picatinny rails. But I can always install them on a rifle that has 11 dovetails by using the proper adaptor. One thought I had was to mount the rings on my super-accurate AR-15 for one test. How easily do they mount? How readily do they align with the bore? I already have a jumbo scope on that rifle, so there is a baseline for comparison. I know what the rifle can do; can it do it any easier or better with this scope?
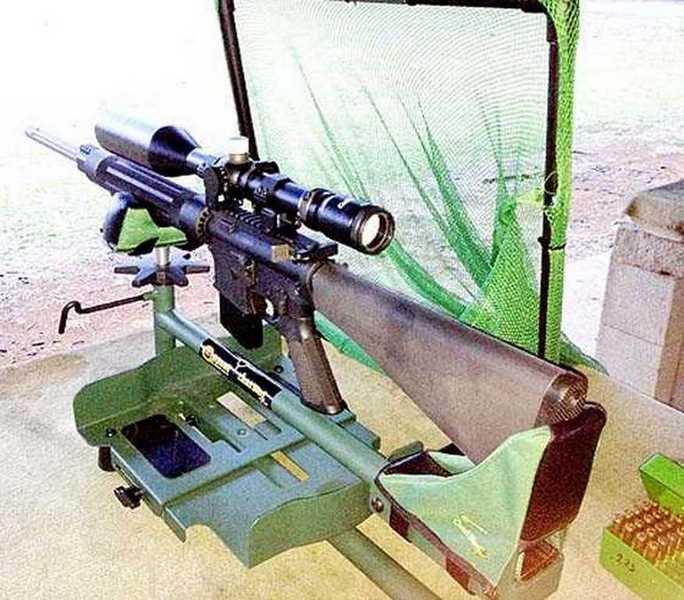
My AR-15 currently has an 8-40X56 Tasco Custom Shop scope. I set the power at 30X because the optics get hazy and dark fast at higher power.
The joint where the caps meets the ring base is very smooth. You can barely feel it. So the scope tube is surrounded more completely for better purchase.
The bottom jaw that clamps to the rifle’s scope base is guided by two steel pins that keep the jaws in perfect alignment. This jaw is spring-loaded, so it backs out smoothly when you loosen the Torx screw with the wrench that is provided.
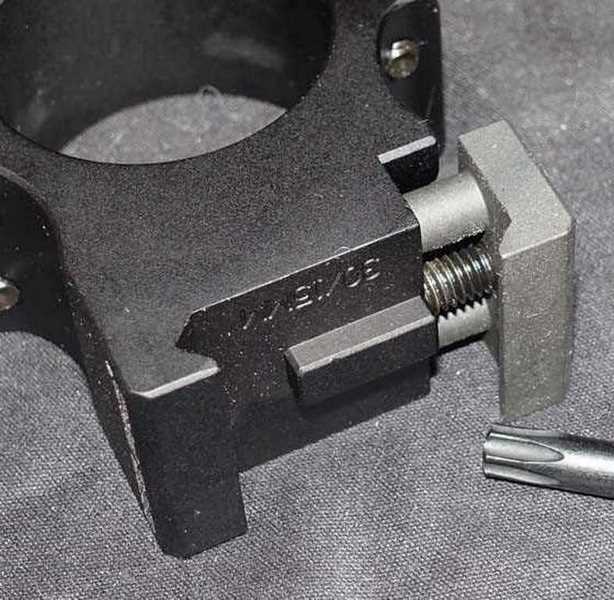
The spring-loaded jaw is guided by steel pins, to move effortlessly and stay in perfect alignment
I also want to test the rings on an accurate air rifle. My TX200 is the most accurate springer I own and my Talon SS is the most accurate PCP. I know I should test the rings on the TX, but it doesn’t recoil very much, so I’m not sure what that would prove.
Not cheap
Just because these new rings have the UTG name, don’t think they will be cheap. The advance literature has a suggested retail price of $64.97. They may not cost quite that much, but they will never be budget rings. I hope to discover if they are worth the expenditure.
New scope
The other item I need to test for you is a new UTG scope. It’s the Accushot 8-32X56 with a G4 illuminated dot reticle. It looks similar to this scope. This is a large scope for target and long-range shooting, but the feature you will like most is the G4 reticle. There is a 1/2-mil dot at the center of the reticle that is the only thing that illuminates. Like all UTG illuminated reticles, it has 36 colors/degrees of brightness. That comes in very handy when you are colorblind as I am. I can barely see the red dot, but there is a purple color that stands out for me! When the only light is a 1/2 mill in diameter, you need all the help you can get!
This scope is made for long-range precision, and that is exactly how I intend testing it. But once again, how do I do that? My AR-15 should be involved, I think. But what air rifles? Should I use one of the the two already mentioned? What about something else?
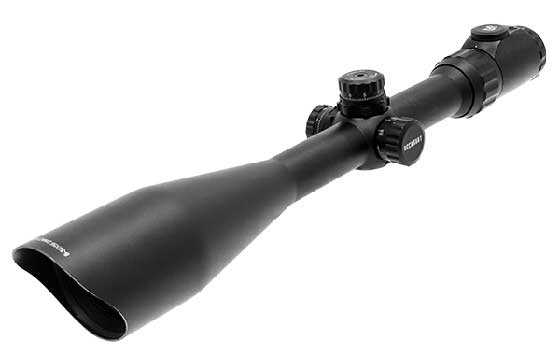
The new UTG Accushot 8-32X56 scope with illuminated 1/2-mil dot at the center of the crosshairs. This is a large scope!
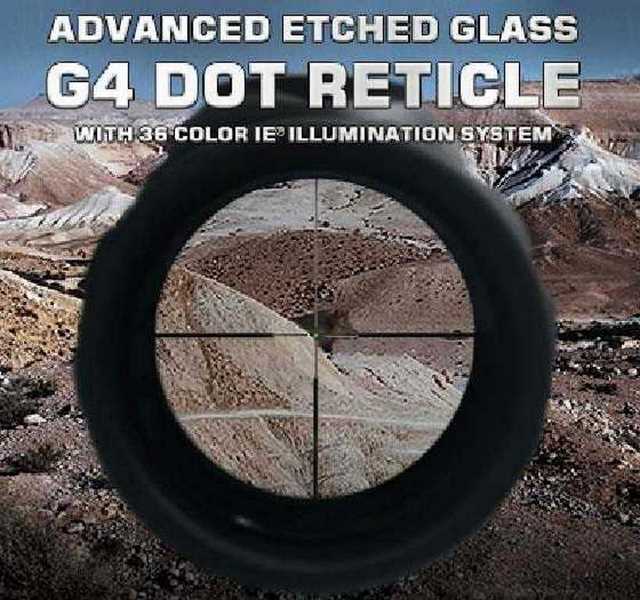
This is what the G4 reticle looks like. The tiny dot is illuminated in this image!
Another feature this scope offers is one I have never noticed before, because I don’t typically use the illumination feature on a scope. With one click you cal recall the last color and brightness setting, rather than having to toggle through a menu of colors and brightnesses. I plan to learn how that works, because with a dot of light this small I’m going to need a lot of help!
The scope comes with a set of 30mm rings that have Weaver bases, but I will be setting them aside to test the new P.O.I. rings, instead. It also comes with batteries — one for the illumination and a spare. The reticle is etched into glass, so there is nothing mechanical to fail.
All lenses are emerald-coated for maximum light transmission. They are protected at both ends of the scope by spring-loaded lens caps.
The scope has side-mounted parallax adjustment. And it focuses from 10 meters to infinity — making this a fine scope for field target. Naturally an optional larger UTG sidewheel can be slipped over the focus knob for better acuity in determining distance (i.e. — a rangefinder).
It will be easier for me to evaluate the scope, because I know things to do to test it. But I still want to hear what you have to say. Sometimes I’m too close to these things, or I don’t think the way some of you do.
That’s it
There you go. That is your assignment. Help me make sense of this pair of product tests for you.

BB,
Barrett 50 cal sniper rifle at 1,760 yards. Let someone else do the actual test firing; no need to risk your eyes. Also would be a good test of your spotter scope.
Jim
Hit send too soon.
For air rifle, how about the Hatsan 30 cal break barrel for endurance testing. For accuracy testing, hmmm. Texan at 100 to 250 yards. What was the distance that Rossi hit at LASSO last year at the Texas show?
Jim
Jim,
Rossi hit at 250 yards. But his target was a half-sized ram. That’s not precise.
As for the Carnivore, that might be an interesting test. I will have the scope long enough to do it.
B.B.
Jim,
🙂 I think B.B. would really enjoy the opportunity to do that. Top end “everything” of course.
Jim,
A Barrett was how Leapers tested this scope. And I don’t have one. And finding a range that permits .50 BMG rounds is difficult!
B.B.
B.B.,
The logistical hurdles notwithstanding, shooting a monster like the Barrett would probably be fun. :^)
Michael
That’s why I suggested the Barrett. I’ve always wanted to shoot one.
Jim
Accuracy & strength. Two things that don’t always meet on the same gun…
How about this, you say your TX is your most accurate springer, does that include your FWB 300?
These guns recoil like no standard fixed springer thanks to the sledge system.
And are extremely accurate without hold sensitivity.
Then you have the scope killers, the Air king, even using the sledge system, they have a reputation of killing optics, maybe they are as harsh on the rings too.
Just a thought…
Maybe a NPXL, with the picatinny rail, so no adapter needed, or some other ultra springer or gas ram gun with a reputation of harshness.
If you are testing for strength, you need brute force, no if and or buts.
Just my thoughts on it.,
45Bravo,
Yes, the TX200 out-shoots the FWB 300 by a fair margin. I have other springers that out-shoot it as well at 50 yards.
B.B.
B.B.,
The TX out-shoots a Feinwerkbau 300s at 50 yards, but not at 10 meters. A bench rested FWB 300s at 10 meters should make one small hole, as you have shown in at least one previous report. Doing a test that way would have some validity and might be less work than shooting a rifle with more power at a longer distance. Do the rings make a difference to a tiny degree at 10 meters? If so, that difference would be exponentially greater at a greater distance with, say, a TX.
Michael
This is going to be a very interesting test. I would like to see the POI rings mounted on a magnum gas ram air rifle.
as they look to me to be a very good alternative to a good one piece mount perhaps the Diana 350 N-Tech.
Mercury,
Be nice, but I don’t have a rifle with a gas spring on hand.
B.B.
BB,
For testing the precision construction of the rings it will take a considerable amount of range time. First you will need to mount them with the screws to the right and zero them at say 10 yards. Then shoot a group at 10, 25 and 50 yards with an air rifle and further with your AR and see if the groups drift to the left or right.
Next take and mount the screws to the left and repeat the above series and see if the groups drift.
Now mount the rings with one to the left and one to the right and repeat test and then reverse them and repeat test again.
Another test is to mount a scope with them, zero the rifle, remove rings and scope as a unit from the rifle and remount the unit and see if POI has changed. This should tell you how precisely they mount onto the rail system.
As for testing the scope, one thing is the box test to see if the adjustments return to zero. Another test for a scope such as this is many large power scopes such as this lose clarity and the image darkens as you approach the upper power range. Also, does POI change as power changes.
I am sure others will provide their bits of insight on these.
BB,
Regarding the precision of POI rings, perhaps expand on RR’s zero-remove-remount test to compare mounted POI rings versus standard rings. Theoretically, if a mount is perfectly precise, it puts zero out-of-plane side pressure on the scope tube because front mount and rear mount are perfectly aligned. Which means that each ring of the pair wants to point the scope to the exact same spot on the target. The procedure will take advantage of partial mounting compared to complete mounting… shooting groups to compare. (This is a little like clicking shots around a target through 40 clicks of windage and elevation, testing the scope’s precision of adjustment by seeing if you come back to the precise starting place.)
Mount POI rings and scope to your Air Force rifle. Standardized the torque values for all the top cap bolts. Zero. Shoot 5 shot group on fresh paper. Remove top cap from front mount, shoot 5 shots to the same paper, compare the groups. Reinstall front top cap, but use only 1/2 torque value, shoot 5 shots to same paper, compare the 3 groups. You should have 3 groups recorded on one target. If those groups print exactly on top of each other, it’s convincing evidence that the mount is precise.
Next, do the same procedure with a standard mount to produce another 3 groups on one target. Compare the POI target with the standard rings target.
The hypothesis is that the POI target will show less variation group to group than the standard mount target because, being more precise, the POI will put less out-of-plane stress into the scope. The 1/2 torque groups could show the result of an intermediate level of stress on the scope.
-Andy
BB,
In the above ring test that I described, if you use adapters, insure they are always fitted to the rifle facing the same way with the same one to the front so as to eliminate as many variables as possible introduced by the adapters themselves.
An addition to the ring test is to mount one ring to the front on a series and then mount the other ring to the front for another series.
We are talking some serious range time. 😉
RR,
Yes, and like I said, I’m not a testing lab. I doubt I will spend the time, because without comparative data from other mounts tested under the same conditions, the results would be meaningless.
B.B.
I’ve tested a few scopes since I last found time to post here, but I try to at least keep up in reading your blog, B.B.!. I continue to find scope deficiencies large enough to have a significant impact on my POI in all low to mid-priced scopes, if I turn adjustment knobs between courses of fire.
I returned my first Bushnell 2-7 AR Optics scope that I mounted on my TalonP for warranty service and Bushnell sent another one to me that performs better than any cheap Chinese scope that I’ve ever tested. I could write a guest blog on my setup, if there is interest. I designed and 3D-printed a stock for the TalonP and used Burris Pos-align medium signature rings (typically quite low for an AirForce gun) and +/- .020 inserts to point the scope objective down and achieve a 50 yard zero with the Benji pellets with less than 3-1/2 turns POI up from the bottom (out of a 10+ turn adjustment range). The .020 shift at each end angled the scope and permitted the scope’s large diameter eye piece to barely clear the TalonP rail too.
By the way, my results with the TalonP have been very similar to yours. Your methods served as my baseline for testing and pellet settings.
As you know, I don’t believe that live fire is a good method for testing scopes. I prefer to use my Leopold Zero-Point (a method we all know Gunfun1 loves so much ;)) to find deficiencies in mechanical controls and calibration in scopes, but I think it would be a simple matter to conduct a test on the UTG rings (and even others) as follows.
1. Mount a scope in the rings on a gun that permits conventional bore sighting (you must be able to look down the bore from the breech) and center the scope E/V adjusters in the middle of their ranges.
2. Strap-down the gun in a gun vice or other contraption on a bench and place a target in the field of view of the scope.
3. Mark the position of the scope cross hairs on the target.
4. Rotate the scope in the rings 180 degrees and re-tighten the rings without disturbing the “aimpoint” of the rail/rifle. This is where the the Zero-Point comes in handy, because there’s no need to strap down the rifle at all.
5. Mark the new position of the scope cross hairs on the target.
Of course you must find a scope and mounting system that permits a 180 degree rotation of the turrets. You could conduct a test with less than 180 degrees of rotation using the same concept, however, if the scope turrets get in the way.
If the rings AND rail combination provides perfect alignment, bore center should point below the midpoint of the line drawn between the two points. The line midpoint should also be offset from the bore centerpoint by a distance that is equal to the mounted height of the scope centerline above the bore centerline.
Cal
What’s up. And I forgot all about that conversation we had about your scope device. 😉
But I do believe I like your set up on your Talon P. I like the sound of your 3-D stock also. I would like to see that if you could maybe post a picture. Now that could be cool to turn out a stock for a Marauder even that would allow the use of a AR butt stock.
But good to hear from you. And would like to hear if you made any other stuff on your 3-D printer. It’s been some time since you posted about that.
I’ve been busy with Phase 1 of a big family move GF1 and don’t have much free time. We’ll be moving again, once we find our final resting place, but not for many months, most likely. At least I’m back in a place where I can shoot off my back porch (TalonP or firearms too) again! Actually, I can shoot about 700 yards off my back porch!
I’ll take some photos and post a link to the TalonP. I’ve also found that I can exercise a little bit every day with my Hill Mk 4 to fill my 80 cu in. SCUBA tank and shoot my TalonP all I want when tethered! Contrary to the AF’s billing that the small Escape size tanks are easy to fill, larger tanks are actually more efficient (fewer pumps stokes per shot).
Cal
Sounds like you got a nice place to shoot too.
Been busy also with stuff going on. Don’t know if you seen but I been on a co2 gun kick. Shooting feral cans rapid fire. Got a m22 blow back pistol and a Python pellet pistol. Also my trusty 1077 with a Bugbuster scope. Just got my Daisy model 74 today. Haven’t even seen the box yet. Still at work. It came this afternoon. But that’s what my ball game will be this weekend. 🙂
Yes. I believe I have read most of your CO2 and ferel can posts GF1! My only CO2 gun is a 1911 Airsoft blowback pistol that uses dual fuel. I mostly fill mags with propane (and an occasional drop of silicone oil but of my 20 or so mags, two of them are CO2, which I use when I desire more shots between fills.
I experienced an impulse buy of two CO2 tanks at a K-Mart that still have four years left in them. They were so cheap but now I need to find a gun to use them. I wish I could fill my little 12g CO2 cartridge 1911 mags from them. I remember seeing some kind of adapter or a similar one once. It added length to the CO2 cartridge but many I could adapt them. I tinker with all my guns, after all!
Hmm–now I might have to buy an M-rod to work on your stock idea. 😉 I still need to find time to post links to photos of my TalonP (or maybe it’s a Talon(C)arbine now)! I’ll post them to the latest blog for all to find and see, as I noted B.B. recommends doing, in general.
Cal
Yep just post the pictures whenever.
Cal,
Thanks for this thoughtful comment. It will help.
B.B.
Sure, B.B.! I intended my idea to just be a little lube for the wheels in your brain too. You or others here might very well be able to improve on my idea for evaluating scope ring alignment.
I’d be willing to loan my Zero-Point to you for a few months just to see what you think of it for evaluating scopes, but I am worried about it getting lost in the mail. I guess UPS or FedEx might be trustworthy but I never send anything that can’t be replaced via USPS. (Leupold stopped making the Zero-Point due to both high component costs and patent issues, I think.)
I know that Vortex Optics uses them in their shop for quick and dirty scope eval, just like I do. Mel at SniperCentral.com was also very interested in finding a Zero-Point for sale to use for his very thorough scope tests and reviews, after I described the process to him.
BB,
I have not as of yet tried out my new Webley / Hatsan Tomahawk with a scope mounted on it, but from the few test shots I have taken with it I would say it will eat wienie scopes and mounts for lunch. An uber magnum sproinger is always a good durability test for scopes and mounts, but that takes a lot of shooting which becomes a durability test of the shooter and most of those would require an adapter for these rings, again introducing another variable. Also, most of those type sproingers are extremely difficult to shoot accurately to begin with.
B.B.,
Those are some real good ideas that Ridge Runner came up with. But they are all the standard test that you would/could do anyways. Most would be very labor intensive. Plus you mentioned long range shooting. That means range time. You have that kind of time? I am at a loss for testing that would effective and at the same time be somewhat time friendly.
As for the rings,… the link showed an ad that said “progressively machined”. What does “progressive” mean? With a Pict./Weaver mount,.. things are not going to move anyways. Most UTG P/W mounts have a round cross pin. Weaver brand is the only one I have found that have a square one. I like the integral square block in these. Also, all of the UTG mounts that I have had, all had that silky “cushion” tape inside the rings. These appear not to have that. I am not sure that did much anyways as I have had the cushion slide back. The sticky bond being the weak link.
I can’t see using those adapters. They look cheap and will just add 1 more complication into the mix. The 11 to 11mm will the weak link. Do they even have a stop pin?
As for the scope. 1 center dot huh? No mil-dots and half mil. lines? For what I do, I use the illuminated feature (a lot). And yes, that repeat setting feature is nice. I usually use green. I also vary the brightness according to light at the target. When doing 1/2~3 1/2 mil dot hold overs, that lighted reticle is an (absolute) must. Having just the center lit up would do nothing for me. It is nice too for doing 1/4 dot increments as I can “bracket” a dot and a dash over the bull.
Sorry, none of that was probably much help. But, that is my 2 cents.
Chris
Chris,
I have used those particular adapters before and find that they work quite well. They are now in GF1’s possession so you can ask him for his opinion. Perhaps these would be more to your preference?
/product/hawke-sport-optics-2-pc-adapter-3-8-to-weaver-rail?a=4162
I do not have these, but they are in my Wish List. Hawke has two other adapters that are one piece and droop adjustable. I have both of them and I would highly recommend them. They are quite sturdy and provide a decent amount of droop compensation.
RR,
Of the 2 options, those look to be much better built.
Chris,
I concur. They are also over twice the price. Another thing to consider is these will raise the scope some while the others do not.
As I have said, I have used the others that BB has linked to and they work quite well. The Weaver rings wrap around them totally and these just fill in between the clamps, while with the Hawke the Weaver rings mount on top of them and they clamp to the rifle.
The UTG adapters are well worth the cost. They are “RidgeRunnerRecommended”.
Oh no.
Now we got triple R rated air gun stuff. 😉
GF1,
LOL! Now you’ve done it! You should not have encouraged me! Now, not only will you see RRR ratings, but also NRRR!
RR
Haha there you go. Now we need to come up with our own ratings to give those air guns that give those high velocity readings with light weight alloy pellets. You know the high fps horsepower wars.
I think it’s best not for me to give any suggestions on that subject. I’m afraid they would definitely be a NRRR rating. 😉
B.B.,
As a final thought, I believe that it was you that said that any serious field target shooter “clicks” there way to different yardages,…. as opposed to hold over and under. So, if anything is “off” in the rings,…. it becomes a mute point.
By the way, the side wheels are nice. I have an 80mm. on both the UTG’s. Like I think you said before too, the Parallax knob is pretty stiff on the UTG’s. The wheel overcomes that with the extra leverage.
And since you are doing a UTG scope,… it might be worth a mention to turn the lock rings past that 1/2 turn point where they “appear” to slightly tighten up again. Go another 1/2 turn and the knobs will turn much easier. You taught me that,… and it works.
Chris
If you want to test the durability of the rings, don’t mount a scope that could be damaged or destroyed, Mount a solid rod of steel, the same diameter as the rings. then use a harsh springer or powder burner and just excercise the the mount by firing. The weight (inertia) will tax the rings (and the adapter mount if used), far more than a valuable scope.
It is clear that the rings are intended to be rigid, and they would transfer all or most of the shock to the scope or rod in the rings. The heavier rod will resist the movement and place stress on the rings.
After some brutal treatment, check the rail mount for wear. Similarly, check the inside of the rings and the mating surfaces of the split rings.
What might be interesting: mount the rings and scope on the TX-200, align center and fire an accuracy set. Remove the mount and scope, mount the rings and the steel bar on the harsh springer , run 50-100 shots thru it, remove inspect and then remount the previous scope on the TX with the abused rings and see if center has been lost. (note I switched to springer because the cost of 100 wasted powder rounds is considerable)
you might have to check and see if the scope could be removed and remounted without losing center prior to the brutalizing of the rings
It might be interesting to use an inch pound torque wrench/driver when installing the rings. After shooting, the torque setting could be checked to see how well the screws hold.
TJKing,
An excellent idea.
Michael
BB– Now that you are going to test rings, I hope that you will also test the Burris signature rings . A side by side comparison would be interesting to me. Ed
Ed,
Snore!
I have looked at the installation instructions!!! Do you really want just one blog that week — because that’s how long it looks like those rings take to install and then set up. 😉
B.B.
B.B.,
One test that I consider the must basic test is to install these on a super-duper, bucking bronco magnum springer and make precise before and after measurements to see if the scope (you could sacrifice a cheapo or ask for a donated destroyed one) has moved fore or aft.
Michael
Michael,
Gonna try to do that.
B.B.
B.B,
You can also test the resolution, contrast and color correction of the scope’s optics. This can be done in this context without a lot of math and expensive test equipment.
Resolution is the easiest to determine empirically. You can print either a USAF 1951 resolution chart or an ISO 12233 chart free from online resources. Your printed copy will not be as good as one you buy, but it will save at least $125. Just mount it at a fixed distance, 50 yards for example, and see which bars resolve completely. Not only will it give you a yardstick to judge resolution, it will also help determine the maximum useful magnification of any variable-power scope.
Contrast can also be determined with a chart, but it isn’t necessary for these purposes. Simply use the scope on the same target placed and oriented in a fixed location at early morning, mid-day and late afternoon, and make a subjective judgement. This will give you an idea of the quality of the lens coatings. You have used enough optics to have an idea of crisp vs. washed out.
You already know about false color, a good indication of the quality of the glass and its finishing. Simply point the scope at any bright target with a sharp edge, and look for the purple fringe. Again, results will be somewhat subjective, but you can compare your observations with those made with a “benchmark scope”, one with well-known performance.
All of the above can be performed without shooting and can be done in a back yard.
I own the UTG 4×16 X 56mm. It has fair-good optics and good mechanics. It is sharp, an indication of good grinding & polishing process, but has poor contrast in any situation where the target is not directly lit. This shows that they saved money on coatings and glass quality. It is a good performer for the price, and does as well as any scope could without ED glass.
Hang in there!
Walt
I like this! I’m going to make a note of these two charts for my own use. Thanks for sharing this tip, Walt.
As for ring construction, I personally would consult a machinist like Otho or a tool and die worker or even a millwright. They would have the tools and knowledge to measure concentricity of the rings, size of holes, alignment and so on.
Fred DPROoNJ
Walt,
I WISH Meopta would make an airgun scope! It would cost $800 or more, but it would be perfect!
B.B.
Walt,
That is the scope I have in the M-rod. Like you said, it is a good value and does all I need it to.
B.B.,
I can think of one issue with these rings just by looking at your photos.
They are so impressive looking (and expensive) that anything less than a $700 scope would be kind of a joke, like a Ferrari Berlinetta Boxer sporting $50 tires. These rings are for the very well heeled. Others need not apply.
Michael
Good morning Mr. Pelletier. Well, you opened the door so I am going to jump in with both feet.
1. I am going to start with a novice question. What is the difference between a Weaver and a Picatinny mount? I could go to Wikipedia but then I would not get the opinion of an expert. Does the world really need 2 different mounts and does it really matter? It would appear that adding an adapter is just another intermediate item that will affect accuracy.
2. I added an UTG scope to my Remington 700 but had to purchase adjustable rings because I had adjusted the windage to the maximum and was not happy with that situation. The range master where I shoot most weekends made the observation that a longer scope will amplify any small machining variance in the scope mounts cut into the receiver. This will cause any misalignment to get worse.
3. The POI rings look like well made precision pieces in the photographs but why are they better? This is where the manufacturer enters the picture. Truth in advertising requires a manufacturer to provide testing and proof for their claims. What are the exact claims for these scope rings, and what laboratory tests has Leapers done to verify their claims? I would think that a phone call or email to Leapers would get you a copy of their tests for you to evaluate or retest. They want to sell these quality items at a fair price, so not sending you their data would be counterproductive.
4. I have tested, replaced and sighted in several scopes and rings on a number of my rifles over the last 12 months. A scope can lose it’s “zeroing” just sitting in it’s case at home, so every time you disturb the scope/rifle pair, you have to calibrate the combination all over again. Moving the scope and rings to different airguns/firearms will be like starting the process all over again from the “Start” position. Apples and Oranges.
5. I have worn eyeglass since I was about 10 years old and have been cursed with poor vision my whole life. I had a 3X9 variable scope on my Remington when I purchased it used, and it was a piece of junk. You made the suggestion that I purchase a Leapers 4X16 variable scope, and it has been a wonderful experience using it. I can easily see the bullseye at the range almost without using my 20X60 spotting scope. A scope with 30X sounds like a great addition to my rifle, however, I have an issue at 16X that would be amplified at an even higher power magnification. When using my bipod or the sandbag rest at the range, I notice the reticle does not stay exactly on the point where I am trying to aim. I seems to microscopically “wander” and then can move when I finally pull the trigger. Using the artillery hold without a rest would even cause more wiggle. While I like the idea of the higher magnification, I am concerned that in my case, the movement would be too great that it overcomes the larger image. Possibly someone with superior eyesight would appreciate the benefit of the higher magnification.
Bob in Pearland, Texas
PS: looking forward to our visit next week and going to the airgun show. Hope for good weather too.
It sounds like you are having issues with parallax since the retcle seems to wanders. If this is the problem, you can fine tune your parallax adjustment to remove it. Also, keeping your eye centered in the scope will help.
Mike
I appreciate your thoughts but as I mentioned, I have been wearing glasses for a looooong time. As an adult, I went to a specialist and found out I had a non-correctable sight problem called nystagmus. From Wikipedia:
Nystagmus /nɪˈstæɡməs/ is a condition of involuntary (or voluntary, in rare cases)[1] eye movement, acquired in infancy or later in life, that may result in reduced or limited vision.[2] Due to the involuntary movement of the eye, it is often called “dancing eyes”.[3][a]
In a normal condition, while the head rotates about any axis, distant visual images are sustained by rotating eyes in the opposite direction on the respective axis.[4] The semicircular canals in the vestibule sense angular acceleration. These send signals to the nuclei for eye movement in the brain. From here, a signal is relayed to the extraocular muscles to allow one’s gaze to fixate on one object as the head moves. Nystagmus occurs when the semicircular canals are being stimulated while the head is not in motion. The direction of ocular movement is related to the semicircular canal that is being stimulated.[5]
Mike,
I ran across some notes on parallax that I had made a couple of years ago. Move head, reticle moves, you have issues.
So, the other day,… I did a quick test. Parallax dialed in at 150 when shooting 70 yards. (Normally), I would use shot up cans at the target yardage. The bright, shiny, blown open metal shows up quite nice as well as the ridges in the can.
I was rushed when I did this and will do it again the next time out. I will shoot both ways. As for parallax, the UTG scopes always land spot on the yardage being shot and being clearly focused.
I thought that with a scope that had parallax adjustment, that all you had to do was get a clear picture and you were done. Maybe not.
Any thoughts are appreciated. Chris
Bob,
Ben,
Weaver bases have 3.5mm cross slots and they can be placed anywhere. Picatinny bases have 5mm cross slots that are evenly spaced along the rail. Both are about 0.625-inches across, but that will be stated in millimeters.
Weaver rings work in Picatinny bases because once the keys on the bottom of the rings butt up against the backs of the cross slots, they stop moving.
To get either of those standards changed you have to convince the scope ring industry (Weaver) or most of the armies in the Free World (Mil Std
1913 Picatinny).
The kitties are ready for you! 😉
B.B.
B.B,
Like the 3 guns you suggested but would sub an Rws 48 or 460 for the TX ( much recoil with fairly good accuracy).
Mount the new scope with rings supplied on the 3 rifles and test for accuracy- airguns @ 25& 50 yds and the AR @ 200 yds.
Repeat with the new scope and poi rings and see if it makes a difference. My only concern with the poi rings is that you would have to be extra careful when tightening them on your scope so as not to bend the scope tube.
Pete
B.B.
Seams the best would be to test separately.
Scope ring test: The purpose of Scope rings is to secure a scope and prevent movement. Mount the rings on a harsh recoil springer or powder burner. Mount a metal rod of proper size to the rings ( as has been suggested ). Make a very fine scratch on the rail at the base of the mounts and on the metal rod. Then fire the setup several times and see if there has been any movement. If the mark disappears under the ring base or scope clamp, make another scratch and when the base is removed you will be able see the distance, if any. Different types or cost of clamps could be compared this way. Once you are sure the rings are doing their job you can move on to the scope.
Scope test: I’m sure you have tested many scopes before and know how to do that. No suggestions needed here.
I’m an avid reader but seldom comment. Thanks for the work you do!
FlyBoy
FlyBoy,
You are right, of course. By doing both at the same time, I am muddying the data/outcome. But the rings are hard to test by themselves, unless I go into a huge test with controls.
Perhaps it is better to say I am evaluating the rings and testing the scope?
B.B.
BB,
It’s been awhile since I’ve seen a true Weaver mount rail (I haven’t had my old 7mm rifle out in a long while, been using a bow for my big game hunting), but from memory they don’t have the serrations/slots that Picatinny rails have. I.e. that slot filler/stop that appears to be integrally machined into the dovetail base of the rings — will that not allow the rings to mount on a standard Weaver rail?
Dunno how you really test the “accuracy of machining” claims without access to a metrology lab or a machinist’s inspection bench. Not sure it means much, either, as any sight will still need to be adjusted to compensate for the scope and receiver/rail misalignments, and for ballistics, etc. I think testing the AR-15 and a springer, just to show how readily it mounts, and that no signs of slip are seen in some dozen or so round, ought to be sufficient.
As far as the scope goes, I’d be interested in what you think of its low-light characteristics too, but I’m not very interested in a scope without a mil-dot or similar ranging/windage indicating reticle.
Have fun with it though.
Ben,
Weaver bases have 3.5mm cross slots and they can be placed anywhere. Picatinny bases have 5mm cross slots that are evenly spaced along the rail. Both are about 0.625-inches across, but that will be stated in millimeters.
Weaver rings work in Picatinny bases because once the keys on the bottom of the rings butt up against the backs of the cross slots, they stop moving.
B.B.
Hm. You could test the two products separately and together on your AR and a TX200. I’m sold on Leaper’s products. That’s what I use on my Anschutz rifle, and they work better than the super-expensive and complicated German rings I used before.
In your first paragraph, I believe that “compliment” should be “complement.”
Is the rest for your AR a Lead Sled? Is it different from shooting in a vise?
Matt61
Matt,
The rifle is resting on a Caldwell Lead sled. Unlike a vise, the rifle is not locked down. What the lead sled does is take the recoil for you.
B.B.
The clamp on the rings with the guide rods are very similar to some of the precision vises we have at work. Those clamps on the rings should repeat their mounting of the scope to a gun. Should allow for easy removal and be able to be put back on and not have to worry about resighting the scope. And the asking price of the rings is not bad if they are indeed as precise as I think they will be for repeatability in mounting and unmounting. Our precision vises at work are very expensive.
And I like the scope. Does it seem clear and crisp with the longer tube? That’s what I have been told anyway throughout time. But I do not like that type of reticle.
I like the half mildot sights. The reason is even if I’m placing the center of the reticle cross directly on the center of a target with no hold over or under. Say a 1-1/2″ spinner. I still like to use the 1/2 mildot dash line above and below my spinners outer diameter. Just more reference to see if I have day light between the reticle dash and the spinner to keep the reticle centered on the target or spinner that I’m talking about.
With that type of reticle on the scope that BB is talking about today you have alot of distance from that center dot to the outside diameter of the target. That reticle would make it very hard to shoot good groups with.
GF1,
That is kind of what I said way above. If someone were to adjust their turrets for each shot/yardage, this type of reticle would be ok. Less busy,…. if you will.
Chris USA
True but remember when I said I sized my target circle to fit the mildot size out at the hundred yard distance we did our competition at that time. You said you tryed messing around with target sizing also.
Well that’s what I mean about using the dots and dash’s on the 1/2 mildot reticle.
Even if I had the scope that BB is talking about today and I used the center lit up dot placed on the center of my 1-1/2″ spinner and used turret clicks for different distances. I would still have room for error for the reticle center lit up dot placement on the target. There is no outer dots or dash’s to try to match up on the outside diameter of my spinner.
For example. Draw a 1-1/2″ square on a peice of paper. Measure and put a dot directly in the middle of the square. That dot is that lit up center dot of the reticle on the scope bb is testing. Look at all the open area around that dot.
Now take and draw a line up above the top line of the square about a 1/16″ right in the center about a 1/8″ long. Then draw a same size line below the bottom line of the square a 1/16″ away. Those lines would represent the 1/2 mil dash’s.
So which sight do you think would fit the target better? Then draw a big circle inside the square and have the line of the circle touch all four lines of the square. That circle would represent a mildot at a distance matching the square. Thats what you do when you use a red dot sight also.
So what I’m saying is I’m sight sizing to the target. Less chance for sight error that way instead of trying to put a little tiny dot in the center of a target bullseye and keeping it there for the shot.
I think you did similar to your front sight on your 499. Same just you didn’t use a scope or red dot. That’s why I don’t like the reticle on the scope that BB is showing today.
GF1,
Yup on all the above. Bracketing and centering is nice. It does help a lot. It is worth the time to figure that out. I am using a solid 1″ dot in a 3″ circle at 70 on 9 mag. The 1/2 dot line takes up about 7/8″ of that 1″ dot. That is easy to see and keep on target.
See the reply to Mike/Big Iron above,….. thoughts? Maybe that is the my issue? I still need to revisit it some more. I know you leave your mag. set at 6,…. but I am assuming that you (are) adjusting parallax for a clear sight picture at 50 -vs- say 100? Am I wrong?
Chris USA
But remember Fido 3030 did that test by putting a hole on the outer edge of a scope cover. He then rotated the scope cover in different positions. Like 12:00 or 4:00 or 9:00 and shot at his target and was still able to shoot a good group. I was the one that brought that up that I could still shoot good groups even if I didn’t rest my cheek on the comb of the gun.
What mattered is that I held the reticle on the target the best I could in the same place.
Think of this. Say we get our air gun and set it in a lead sled or gun vise. We sit down and line the reticle dot dead on our target. Now we stand let’s say to the right of the gun and bend over just till we see the reticle dot and confirm its still on the target. And we have our cheek no where near the comb of the stock and we don’t even touch the gun. We have someone else pull the trigger. Or do it the other way around have them bend over and look through the scope while they are stand off to the side. Once they confirm the reticle dot is still on target you pull the trigger. And presto we hit our target.
It doesn’t matter where your head is if you have the reticle dot held truly on the target.
And yes the Hawke scopes work out good at 6 magnification wit my eye sight. The . 22 caliber Talon SS and .25 caliber Mrod are both set at 6 magnification and side wheel is set for 100 yards. I can focus clearly on a target from 15 yards on out to about a 125 yards. The 1077 with the Bugbuster scope is set at 4 magnification and the front adjustment is set at 50 yards. It’s good for 10 yards out to about 60 yards.
So again the magnification is to do with my eye sight that works for me shooting both eyes open. And I try to set my parallax or side wheel adjustment for usually about 25 yards less than my max shooting distance out at a 125 yards on my longer range air guns. The in close guns that shoot out to 60 yards or in are set at 10 yards less than my max shooting distance.
You have to see what works for your eyes and brain. Oh and don’t think that you will be able to be focused at 15 yards and your side wheel set at a 100 yards and use 10 or 12 magnification. You need to drop to a lower magnification like I do if you still want to have a broad range of focus your scope will see at with different distances and not adjusting your side wheel all the time.
Don’t you remember me and Fido3030 discussing that?
GF1,
Interesting. Notes made and will try. And yes,… I remember the backing off the reticle test.
I just figured if the sight picture was super sharp, that the parallax was good as could be.
You are right,… on shooting 70,… I can see the 100 pretty darn clear. Actually,.. back to 60 or 55 too. I have never tried just leaving it alone.
Out’a here. Tomorrow is blown as well. Weekend looking like rain. I will do my best to get out.
Thanks,…. Chris
Chris USA
Ok looks like you got more air gun work ahead of you now. Your gonna have to stop talking to me you know. 😉
But hope you get some quality shooting time in soon. 🙂
The oldest daughter texted me that my Daisy model 74 came today. And you know what I’m ready for. But ain’t even going to be able to unbox it till Saturday. Got to get grass cut again tomorrow morning before I go to work and before the rain starts again Friday night and Saturday. Plus we’re working overtime again. They want to stock pile some parts. The new owners bought a new building and they are getting it all painted up and ready right now so we can start moving the machines and parts washers and everything. Suppose to happen end of next month. And the whole building is air conditioned this time around. So glad of that.
But can’t wait to try out the 74. Feral cans watch out this weekend is all I can say. 🙂
Let us know what you think of the Model 74 please. I’ve heard that it gets a whole lot of shots per CO2 cartridge. Also that it shoots at pretty low velocity. Maybe you can clarify these issues.
Birdmove
Here read the comments in last weekend’s blog. I tell all about it.
/blog/2016/08/quackenbush-number-7-bb-gun-part-1/
BB,
Devising tests for the rings is a nice challenge. Thanks!
First question is then: As what point can rings fail? In my opinion (and slightly oversized hands) the rings have failed when:
1. The rings are unstable when installed and only connecting them with the scope makes them rigid.
2. The scope moves when everything is correctly installed. Sometimes already directly after installing, sometimes while shooting. I have a recent HW50 which is quite harsh for scopes and mounts.
3. The treads are not up to recurrent use (especially in aluminium) and slip after a while.
In general:
Use a torque wrench to have the pressure as must the same between the tests as possible as TJKing suggested.
Secondly test then against a set of no name cheapo’s so there is a sort of baseline.
I would first install one and clamp a hollow aluminium tube (thickness 1 mm at least, I would prefer 2 but that can be to heavy) tube in it of about 1 mtr. I would then test first by hand whether the mount has any movement and if there is movement check where that originates, at the base or where the ring holds the tube. If it needs to be formalized, I would punch a hole at the end of the tube, hang 500 gram at he end and measure the drop.
Clamp the tube correctly and balanced in two rings and shoot 20 or forty rounds as Alongship mentioned. Measure any movement after that and check the torque for movements in the screws.
Check the wear on the thread if possible or does anyone know something to check this better than by sight? I mostly know that the treads are no good when they part with the screw from the ring. That sort of destructive testing is probably not the best way.
Ridgerunner suggestion of mounting the screws right and left and measure the deviation from straight is interesting to do and would certainly say something of the quality of machining of the rings.
Can you make it a separate post in which you set out to explain which tests you are going to do and what you expect from the results. It would be quite interesting to compare it then with the results and see what is useful and practical.
Regards,
August.
August,
Thank you for all the thought you put into this. I will consider everything you said. It is exactly what I needed.
B.B.
I can think of two simple tests for the rings:
Precise machining should mean that no lapping is necessary. If you have a precision ground lapping bar, install and lap the rings for 30 seconds. The scratch pattern will show height, rotational and tilt misalignments in the casting and machining. If you don’t have a lapping bar, mount the rings next to each other and see if your finger can detect any change in height at the bottom of the cradle, or a little ledge at the top corners of the cradle which would indicate a rotational or tilt difference. Then turn one of the rings 180 degrees any try the same tests again. If the machining is concentric the results should be exactly the same.
Stronger rings should not fail as often or as easily as regular rings. I suspect most rings fail at the screw thread junction. Ie: If the rings slip, people crank down the bolts and strip the threads. Also, aluminum rings with fine (as opposed to coarse) threaded steel screws (i.e.: almost all aluminum rings) are notoriously easy to strip the threads. So the strength test would be to crank the bolts down to 45-50 pounds of pressure and see if the threads strip or not. If you don’t have a torque wrench just use a 12″ cheater bar and make them feel “very tight”.
This from my brother, TCups on the blogs…
Rings lock onto rails. The rail may or may not be in proper optic alignment with the bore. These look like either aluminum or titanium, not steel (?). You have my scope mounting kit with the lapping tool for the rings. One easy test is to clamp both rings on a solid rail, and then use the lapping tool. It the lapping tool removes metal unevenly, then the rings on the rail are not aligned. Could take a red or black marker, or the funny red or blue thin paint used to mark up machine dies (I have some), and see if the lapping tool removes the paint evenly. The spring loaded, and guide-mounted base clamps seem a good idea, but perhaps a rail clamp with a bit of play might actually seat better if the receiver’s dove tail isn’t perfectly in line. Bottom line? Mount a scope in the rings and use them on a heavy recoil air rifle for a few hundred cycles and see what happens. Then lap the rings and check again.
BB— Re the Burris Signature mounts– I wish I lived near you. It takes me ( alone, no helper ) under 30 min. to install them and sometimes I can do the job in 10 min. With a good rifle vise, rest and 2 people it is very easy. Have you asked a gunsmith or a friend (like Otho) to help, or do the job for you while you are writing your blogs? Again, I wish that I could get to your house . Ed
Ed,
I’m just being crotchety! I haven’t taken the time to understand them. It’s probably no more than a couple hours to fully understand them.
B.B.
B. B. ,
Yes, a Meopta airgun scope would be superlative!
Further thoughts on optical testing:
On false color fringing, I failed to account for your red color-blindness. Instead of purple fringing blur, you might see muddy blue or blue-green. But you should see something besides a sharp, well-defined edge if false color is a problem with the optic. BTW, streetlight housings of the mercury vapor variety make good daytime targets because they are reflective. White metals, like aluminum or chromium, work well. Of course, false color gets easier to see as magnification increases, and ED optics generally show little or none out to 30x per inch of objective lens aperture. APO can perform even better.
You can also describe the amount of field curvature easily. Just report the relative size of the sharp central area of the field. Average optics have sharp areas that cover 30-50% of the field, where high-end images are sharp almost to the edge of the field. Wide-field scopes with low field curvature are naturally harder to design and more expensive.
I’ll stop, as you probably know this stuff already.
Walt
Walt,
Thanks for this comment. I will read it later and internalize it.
Thanks for taking the time to reply,
B.B.
Spring piston guns are tougher on scopes than firearms, so stick with sproingers. RWS 54 or 36?
Motorman
PS: Gunfun, if you’re 20 miles SE of East SLT, we’re pretty close. I’m in Fenton.
Motorman
Really I have actually worked on machines in Fenton some years back. Back in the industrial park that was across the highway from the old Chrysler plant.
Hmm maybe we could get together and shoot air guns at some point in time.
Gunfun 1
I’d like to do that. Tom, how do we get in touch with one another without posting our email address or phone number on the blog?
Motorman
St. Louis, MO
Motorman,
I guess you do it on another website. I have no good way of doing it.
B.B.
Motorman
Let me think about how we can connect. I don’t like listing that information either.
I wouldn’t mind if you came over with some of your guns and you could shoot mine. I don’t know how your place is to shoot. Be would be no problem at all at my place.
Like I said I’ll see if I can think of a way.
Gunfun1, I guess I could just meet you at Mickey D’s in Columbia? Or Fairview Hts if that’s closer to you?
Motorman
Gunfun!:
Maybe we could just meet at the Columbia Micky D’s or maybe someplace in Fairview Hts. If that’s closer for you?
Motorman
Motorman
Have to see when a good time would be. Kids back in school and working overtime right now. I will try to get my email to you. Then we can go from there. But Fairview Heights is about 7 miles from my house and Columbia is I’m thinking around 25 or so miles. But hang tight and I’ll see what’s what.
Motorman
Do you by chance have RidgeRunner, Chris USA or Vana2 email address or phone numbers?
If so I can have them email you my email address or phone number.
BB
I went to the Leapers web site and looked these rings up. Seems they have done everything possible to prevent the rings from being the cause of any scope alignment problems when installed, particularly on a picatinny rail. Over the top precision machining to address the three most common scope alignment problems.
1) Seamless Ring – to- Scope Interaction
2) Flush fitting locking side plate
3) A complete surface contact recoil stop block
Looks like the heads of the cap screws even sit in close tolerance drilled holes. They do have a recommended torque value.
How about just checking for play in the parts just before they get tightened up, while still holding them in your hand. Tight alignment between parts seems to be the goal here.
Bob,
I did plan on reporting about the mounting, so I will cover the tightness of the parts.
Thank you,
B.B.
BB
Just for the heck of it I checked out my Hawke Tactical Match Mounts and realized these rely on the side mount plate screw to hold the ring in the Picatinny rail grove where as the P.O.I. rings have a dedicated block that fills the entire grove in the rail to prevent fore aft sliding and having ‘dual’ alignment pins, above, ensures correct locking plate engagement with the rail mount.
It eliminates any fore / aft and parallel alignment problems that may occur with a single locking plate screw.
Both of these rings utilized torx screws, however while the Hawke rings have three screws in a row, the UTG P.O.I. rings seem(?) to utilize two that look more substantial. Same with the plate locking screw and it also appears to be countersunk further enhancing alignment.
Next I inspected the Hawke scope bore alignment between the lower ring and the cap. To my surprise there was a noticeable ‘ridge’ on the cap protruding into the bore that I could not slide over to realign. It did however disappear when I rotated the cap 180′ and reinstalled it…. Something else to check on the P.O.I. rings…..and ALL rings from now on !
If that is not a problem with the P.O.I. rings then it appears they may have achieved perfection in designing these rings. I’m sure some one piece mounts may achieve the same results but we are talking apples and oranges there.
This really opened my eyes about scope rings … not only that, I never really paid attention to the fact that some locking plates used on 11mm and 3/8″ rings are reversible to better fit each. I always looked for the plate fit to the lower ring as with Weaver mounts …. However once in a while I did notice that turning a plate ‘upside down’ allowed the plate to be more perpendicular to the rail slots.
It really is “In the small details”. We mounted helicopter blades to the hub using long bolts that had ‘gold’ plated tapered cones for shanks. They had some ridiculous torque applied, like 600 ft-lbs, and the gold plate, being soft, eliminated any distortion down to the molecular level. Sounded like a 22 cal being fired when they were loosened up. Most critical mount bolts and surfaces are paint free to avoid vibration induced paint disintegration resulting in loose bolts. So the finish applied to the rings may come into play also.
I have found some shock absorbing ring tape folded over, obviously not good for alignment either.
All those tapered edges surely help avoid interference caused by slight dings too.
In this case you probably do “Get what you paid for !”
Bob,
Thanks for taking the time to tell me of your observations. I will read them before I test those rings.
B.B.
What can you do to test a set of scope rings?, most proprietary ones with a recoil pin and 4 screws a mount work fine, have done for 20 years, stick them on a gnarly Hatsan springer and fire 50 lightweight pellets, if it stays on declare it as just as good as the rest of them, mark them down for pointless use of Torx screws
The scope, test as usual, then change parallax and see if the poi changes, the do the same with magnification, then mount it to the same Hatsan and see if it breaks it, job done 🙂
B.B.
Sorry to add this, but it just wouldn’t leave me alone: Depth of Field can also be important to note, particularly if you see poor depth of field or really great depth. This can matter to a hunter who is trying to pick his target out of jumbled brush or other background. Poor DOF or lousy field curvature may be evident in less expensive shorter focal length scopes, as well as a plethora of other common optical defects. Won’t go into it all, as you may not be interested. If you’d ever like to get into it in detail, I’d be happy to help.
Thanks,
Walt
Walt,
See tomorrow’s report! 😉
B.B.