by Tom Gaylord
Writing as B.B. Pelletier
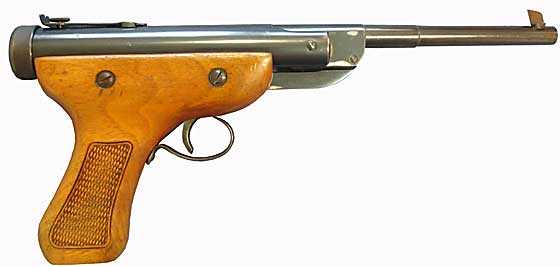
Diana model 5V pellet pistol.
This report covers:
- 5 screws
- Gun fell apart!
- The solution!
- Case-hardened parts
- Stoning is out!
- Back to the pistol
- Testing the trigger
- Job done
This one will be a quickie. You will remember that I wanted to remove the grip from my Diana 5V pellet pistol to see if I could do anything to reduce the trigger pull that was over 12 pounds. Well I did, and in less time than it will take me to write this short report, I discovered and corrected the problem.
5 screws
The grip is held to the action by 4 screws. They sit two to a side. The fifth screw is a wood screw that holds the base of the triggerguard to the grip. The front of the triggerguard is hooked over a pin in the action. If you don’t remove this screw first, the grip won’t come off the action.
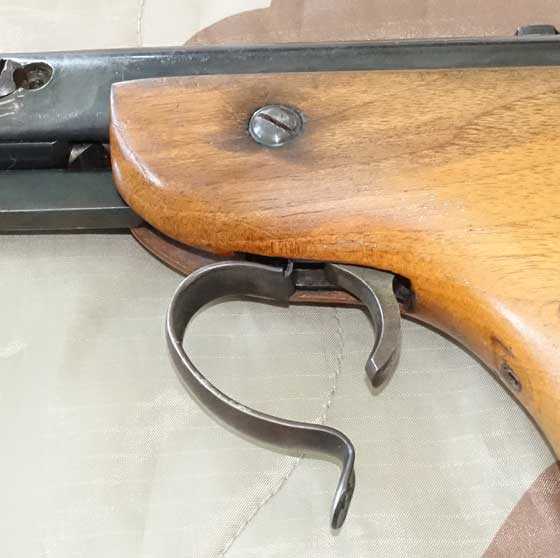
Step one is to remove the triggerguard.
The side screws came out easily and each had a lockwasher underneath. Then the grip slipped down and off the mechanism. A reader had told me that the trigger return spring was inside the grip. I found it right where he said to look.
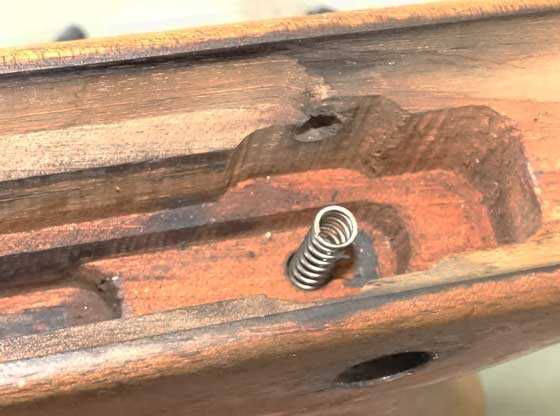
There is the trigger spring — right where it should be.
This spring presses up on what I will call the sear. It’s the bar that releases the piston. To do that it moves by pivoting down. The trigger pushes the front end of it up to make this happen. I will show that in a moment.
Gun fell apart!
The trigger and sear are held in the action by two pins. These pins are loose in their holes and held captive by the wooden grip. Once the grip is off the action, the pins fall out and the trigger literally falls apart! That’s a good thing, because it makes it easy to disassemble. And it is dirt-simple. Just a trigger, a sear, the two pins they rotate on and that spring.
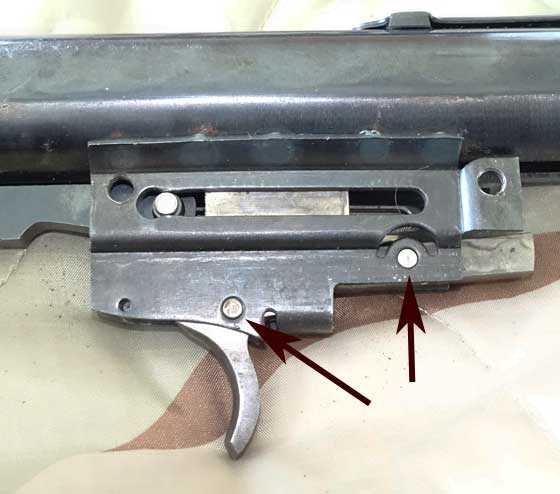
Two pins (arrows) hold the trigger and sear in the action. Both are loose and fall out on their own. The grip keeps them in.
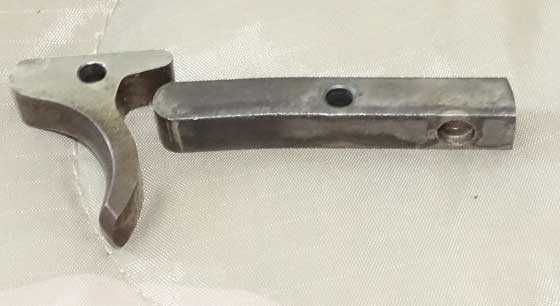
With the trigger and sear outside the action, you can see how they work. The trigger pushes the front of the sear up, which makes the rear drop away from the piston it’s holding.
The solution!
When the sear fell out of the action I saw the problem immediately. It had been installed in the action upside-down! There is a cutout on one side where the trigger spring fits, but that side wasn’t where it should have been. Not only did that allow the trigger spring to press harder on the sear, it also put the wrong part of the sear against the piston.

This is the way the sear is supposed to be in the pistol. The spring fits into the cutout on the right. Notice the rear of the sear has two different angles (on the right end). The wrong one was pressed against the piston when the gun was cocked. That was where the hard trigger pull came from.
Case-hardened parts
Before we proceed I want to talk about the sear for a moment. The picture shows that it is case-hardened. That is the mottled look you see on the side and bottom of the part. Case-hardening is a way to harden steel parts that have a low carbon content, such as 1018 and 1020 steel. Carbon is the main element that makes steel able to be hardened, and if there isn’t enough of it the steel can never be hardened by heat treating. But steel with enough carbon to harden is more expensive than low-carbon steel. and case-hardening allows manufacturers to use materials that are less expensive but can be made to do a job just as well.
Case-hardening infuses a thin shell of carbon into the outside of a steel part, to allow it to become hard. The mottled appearance is incidental, though on some parts that show it can be enhanced to become attractive color case hardening.
The shell of hardened steel can be from a few thousandths of an inch thick up to several hundredths of an inch. The thickness depends on the process. The point is, the shell is thin and underneath is the same carbon-poor steel that is unharden-able. If the shell is ground away for any reason, the part underneath is soft and will wear rapidly. Case-hardened steel parts rubbing against case-hardened steel parts will not wear through the shells in a lifetime, unless an abrasive that is harder is present. The shells will wear until they are shiny silver, and that is as far as it will go. In the picture of the sear you can see a shiny line on the left, at the round place where the trigger has worn away the case colors.
Stoning is out!
For this reason, never stone, grind, sand or file a case-hardened part. Leave them alone, so the hardened case remains intact.
Back to the pistol
In this case (wocka, wocka!), all that was required was to put the parts together in the right order. I knew that the moment I saw the hollow in the sear for the trigger spring. But, I am an airgunner, so I applied some moly grease to the two places where there is contact — one on the piston and the other on the end of the sear that touches it. Then I put all the parts together and slipped the grip back on the action. The entire job took me 15 minutes — start to finish — and that includes taking the pictures..
Testing the trigger
I knew this was going to work, because I have seen it work many times before. But I was still as curious as anyone would be. So I cocked and loaded the pistol and squeezed off the first round. And it worked! How much of the new lighter pull is due to the moly grease is anyone’s guess, but at least it does no harm.
The single-stage trigger now breaks cleanly at 2 lbs. 13 oz. That may sound heavy to someone who is used to a 10-meter rifle trigger, but on a pistol, that’s a very light pull.
Job done
I wish they all turned out this well! The trigger is now fixed and I can proceed to the accuracy test. Stay tuned!

B.B.,
From about 18 pounds to 2 lbs. 13 oz.! All from correcting trigger geometry and some moly.
You didn’t happen to notice if the spring needed some Tune in a Tube while you had the pistol disassembled did you? Would it have been accessible? The slot where you can see the spring looks narrow.
Siraniko
Siraniko,
I didn’t mention it because I don’t want to be goaded into retesting the velocity, but the spring was dry so I did put some Tune in a Tube on it. Can’t really tell that it has made any improvement, because the pistol wasn’t that harsh before.
B.B.
B.B.,
I don’t believe a repeat test would be warranted. The accuracy test is what counts. Being about to concentrate on the target instead of the trigger is a big plus.
Siraniko
Siraniko,
That was my thinking, as well.
B.B.
If whomever sold it to you at Findlay because of the terrible trigger reads this, they will slap themselves on the forehead so hard, that they will wake up next week.
Sean,
I bought this pistol from one of our readers who sells airguns at reasonable prices. I think he will just be glad for me.
B.B.
We shall see. I am expecting a rueful groan/smile/laugh, at least.
B.B.
In general, why do pistol have such heavy triggers? If 10 meter rifle trigger need a minimum of 500 grams, is the same true for 10meter air pistols?
Thanks,
Yogi
Yogi,
I don’t understand your question.
B.B.
Yogi,
I read your question again and I think I understand what you are asking. Ten-meter rifle triggers have no minimum pull weight. They can be 30 grams, if the shooter desires. It’s 10-meter pistol triggers that have to be set at no less than 500 grams (1 lb. 2 oz. approximately).
Pistol triggers have a minimum weight because pistols are held in one hand, only. If the trigger is set too light, it could be tripped by just trying to hold the pistol.
B.B.
B.B.,
Very nice and simple fix with stellar results. The above trigger and sear pictures might leave someone thinking that the back of the finger blade is what pushes up on the sear,.. instead of the top, right of the (T shaped) blade. The picture with the trigger/sear assembled does show the correct relationship/positioning though.
Nice reminder to be cautious with case hardened parts.
Good Day to you and to all,…. Chris
BB,
I noticed in the assembled trigger assembly picture the cocking arm pushes on a block that apparently attaches to the piston and that the sear engages. Is this block permanently attached to the piston or can it be removed when the pistol is disassembled?
RR,
I don’t know. I didn’t disassemble that far.
B.B.
If I remember correctly it is permanently attached.
BB
Nice report and thanks for the pistol smithing lesson. Among powder burners I have not seen a factory stock pistol trigger pull that is less than 4 pounds.
Gopher
Off topic, but got my Titan GP back from having a new gas spring and tune, its shooting smooth, and the trigger is much improved, but it was shooting a vertically dispersed group, really more like a pattern. Wish I had all the pellets back I wasted thinking it was me or the gun. Then I remembered geo and his problem with accuracy, low and behold my scopes elevation was cranked way up. So to make a long story short I cranked the elevation turret all the way down now 1 inch groups at 25 yds, sure they’re 10 inches low but finally a respectable group. Drooper mount is on order.
Coduece,
I have become a firm believer in drooper and adjustable mounts, even on my PCPs. I like shooting out past 50 and 100 yards with some of them and need the extra adjustment to zero at those ranges.
Coduece,
Now, THAT is what people are supposed to do with these reports! Good job!
B.B.
When I saw what Coduece had written, I knew it would put a big smile on your face.
Along with fixing the 5v’s trigger, a satisfying few days for you.
Coduece
Glad the scope spring tension solved the vertical stringing. Do try larger head diameter pellets assuming your rifle is .22. H&N Field Target Trophy pellets are available in 5.54 mm. Expect some size variation but anything over 5.53 mm will group well with my Titan GP.
Have said this before but the notorious trigger pull has gone away on my rifle. I did nothing to it except shoot a few thousand pellets. My Titan GP is hard hitting, quiet and surprisingly accurate now that the trigger pull effort is okay.
Decksniper
Yes I have those pellets on order as well, per your advice. it’s been over a week since I ordered I got 5.52,.53.54.55 h&n FTT pellets.
Thanks to you and your readers I’m getting smarter
Btw BB great article in Firearms news on tuning springers. Highly recommend it to everyone, very informative.
Proper case-hardening is an involved process but small parts can easily be done at home.
I had to grind a couple of punched-out trigger parts (the way the metal was sheared had created an angled instead of a square surface and the mating parts were binding) to get a proper fit.
I case hardened the repaired parts in the wood stove… I took a 6″ and a 5″ pottery flower-pot bottom, filled the 6″ bottom half way with finely powdered charcoal dust (hardwood BBQ charcoal – not those compressed carbon briquettes – crushed and sifted through a nylon stocking) added the parts and covered them with enough charcoal dust that when I put on the 5″ bottom it all compressed tightly.
I used some coat hanger to wire the whole thing together and put it on a bed of coals in the wood stove and built a good fire on top. Kept the fire hot for a couple of hours and next morning the parts were retrieved.
A “file test” (a light stroke with a fine file “skated” over the surface rather than mark it) showed that the parts had been hardened.
I don’t know to what depth the hardening penetrated but the rifle has been in use for a number of years now and working fine. The parts have a shine on them but no wear that is noticeable.
You might want to try re-case hardening a trigger that someone has (incorrectly) stoned to “soft metal”. I have fixed a couple of triggers this way.
Hope this is of interest.
Happy Monday!
Hank
Michael,
That’s a happy error, as non ferrous metal cannot be case-hardened.
B.B.
B.B.,
Gotcha. It does look cool and adds, at least to my eyes, a sense of extra realism.
Michael
Hank,
Brownells sells Kasenit, a material that does what you are describing. But you described the classic method of infusing carbon into soft steel.
B.B.
B.B.
I don’t need to case harden things very often and always have hardwood charcoal close at hand. I will look into the Kasenit out of curiosity though, thanks for that.
Yes, a classic method of case hardening – got the information from a library book on blacksmithing way back when I was a teenager.
I like the old technologies. Doing some flint-knapping right now – awesome stuff!! 🙂
Hank
Hank
If you’re not familiar with it, I picked up a lot of the “old technologies” from the John McPherson set of “Naked Into the Wilderness” series of book and (then VCR) tapes. He takes you thru flintknapping, cordage, brain tanning, etc., and any of the other old technologies you may be interested in.
Larry from Algona now in Colorado
Larry,
Thanks for that author, not familiar with that series but will make a point of checking him out!
Yeah, making Cordage is probably the most important survival skill to know. From twine to rope, cordage is needed for shelter, traps, weapons and more.
Brain-tanned a deer hide once. Its a lot of work but the end result is worth it.
Cheers!
Hank
B.B.,
Thank you for the detailed description of case hardening. I always like the contrast between case hardened and traditional blued parts on western replicas such as Ubertis.
Here’s the thing, I swear the action of my Dan Wesson 8″ pellet revolver (the early one, not the 715), especially the portion around the crane and the crane itself, appear case hardened. They have a bit of that mottled look. Now, as pot metal, that cannot be case hardened, right? Either a faux mottled finish was added, or it was simply a QC error (albeit one I like), right?
Michael
This one: /product/dan-wesson-8-co2-pellet-revolver-black?m=3461/6660
Michael
B.B., Good article,just goes to show you can’t “assume” anything,as you well know.I’m inspired to go practice my shooting alittle bit.’ Ze enemy may be approaching Ze gate,have to keep vermin soup cans,little round yellow/blk eyes at bay Yaaa!Great Day to all,Dan
Dan
That’s Diana 98 isn’t it?
Cool picture though. Makes me feel like I’m out in the woods in a cabin.
And believe me. Please don’t take that the wrong way. Looks like a down home when I was a kid kind of a setting back on the farm.
Good Evening Gunfun1 Yes thats a K98. It shoots wonderful w/Bacacuda Hunter Extreme 19.9 .22cal.I,m a somewhat disabled/challenged 50+ guy living in an old 1978 mobile home stuck in the side of a mountain, got a little land,when the bank lets me have it!Did the two story house,garage,lawn,town,three kids,luv the children,grown now,shoulda got the extended policy on the marrige contract! who new!Been forged in fire,can only get better!:-) Dan
Dan
All I can say is happy for ya.
You sound like you are.
And as it is. Times change. And again. Cool picture.
BB,
I’m beginning to think you bought that pistol from the gentleman that I sold it to. The “nag”, so to speak, is the missing locking screw in the pivot. My pistol was missing the same screw. Is the end cap in pristine shape? By the way, I never took my pistol apart.
Fred formerly of the DPRoNJ
Fred,
This one is a .177. And the end cap is missing its screw.
B.B.
Ach, my mind is going. Forgot from part I that the pistol is .177. Mine was .22 (as you well know but only saying for the rest of the bloggers).
Fred formerly of the DPRoNJ
Going, Going, Gone.
Here’s an interesting item for you eclectic collectors:
http://www.ebay.com/itm/Crosman-Hahn-CO-2-Pellguns-BB-Shooting-Tube-Display-Store-Display-RARE-/142456589625?rmvSB=true
Thumbs Up! I knew something was amiss. Glad it was easy for you to fix.
David Enoch
Cool! =)
BB:
When you do the accuracy test, please take a minute to describe the proper hold for a springer pistol.
I’m not knowledgeable about springer pistols and was wondering if a special hold is required.
Thanks,
Jim
Jim,
I will certainly tell you how I hold the pistol, but I’m not sure I know how to hold this one best. I’ll have to experiment.
B.B.
BB,
Thank you,
Jim