by Tom Gaylord
Writing as B.B. Pelletier
This report covers:
- Accuracy from gross to fine
- Rough airguns
- Smooth airguns
- Trigger
- Cleaning the barrel
- Sight picture training
- The triangulation system
- Making a triangulation sighting bar
- Conduct of the exercise
- A simpler, faster way to begin
- Style of the sights doesn’t matter
- The results you want
- Summary
Wow! I started this series for one reader but it seems like many of you are enjoying it. I have a lot to cover today, and part of that comes from your comments. So, thanks! I want to begin where we left off in Part 2.
Accuracy from gross to fine
In Parts One and Two we looked at the things affecting accuracy. They started with major things like sights and rifling that caused gross increases in accuracy. Then we looked at things that made smaller improvements — things like the hold, breathing and trigger control.
We have gotten to the point of refinement where any further improvements will be very small, but many shooters are not using the things we have already discussed. We’ll start with the hold, but we will focus on the airgun rather than the shooter.
Rough airguns
There is a class of airgun that is quite rough in operation and it’s nearly impossible to be accurate with one. The breakbarrel springer that shoots at super-high velocity, say 1,200 to 1,400 f.p.s. in .177 caliber, is a good example, however you will find air rifles like this in every caliber. These guns almost always operate roughly. They are hard to cock and vibrate and recoil a lot when they fire. No matter how potentially accurate their barrels might be, it is practically impossible to shoot such airguns well. They come from China, Spain and Turkey, but in the past have also come from Germany and the United Kingdom.
I tested a Turkish-made Webley Patriot in 2007 and found it to be adequately accurate, though a lot of special hold technique had to be used. By that I mean the artillery hold. Resting the same rifle on a sandbag tripled the size of the group at 25 yards.
More recently I tested the Hatsan 135 QE Vortex .30-caliber pellet rifle and found it very accurate at 25 yards but far less so at 50 yards. However — and this plays into what I’m saying about the roughness of the powerplant — I also shot the same rifle that Rich Shar had modified and tuned for smoothness and I found his to be very accurate at the longer distances. We shot it out to around 40 yards at the 2018 Pyramyd AIR Cup. Now, besides tuning the powerplant to be incredibly smooth, Rich has also replaced the Hatsan barrel with a custom barrel. So that test wasn’t a one-for-one test. But I think it does support my point about smooth airguns shooting better.
Smooth airguns
Contrast what I have just said with air rifles that shoot smoothly, and the Air Arms TX200 Mark III is the poster child of smooth-shooting springers. The TX isn’t weak. Mine shoots a 7.9-grain Crosman Premier pellet at over 950 f.p.s. When I first got it about 20 years ago it shot that same pellet at 875 f.p.s. and all the increase in speed has come from just shooting the rifle. And, talk about smooth? It’s the closest new spring gun you can find to shooting a precharged rifle!
Remember how I raved about the ASP20 when it first came out? That’s another spring-piston rifle that has been made very smooth, only that one has a gas piston that is usually quite harsh. But, through engineering, Sig managed to smooth out the action and make a 23 foot-pound (in .22 caliber) spring rifle. So, shooting smoothly is one answer to accuracy.
All of this discussion centers on the subject of hold, only this time it’s all on the side of the rifle rather than the shooter. But even with an accurate rifle, the shooter can hold incorrectly and lose much of the potential. We have discussed using the artillery hold that works for nearly all recoiling spring-piston air rifles. Until shooters learn about it they will never get the kind of accuracy we see.
The same holds true for the shooters who don’t control their breathing. The sport of biathlon (cross-country skiing and marksmanship) is structured around extreme exercise to get the heart rate and breathing outside comfortable levels and then force shooters to shoot accurately.
Trigger
I haven’t said as much about the effects of the trigger, but they are just as real. We don’t celebrate the Weihrauch Rekord trigger for nothing! Even a precharged airgun can lose some accuracy if the trigger is either too rough or too vague. A 5-pound trigger that breaks consistently is better for accuracy than a 5-ounce trigger that has no distinct second stage. In recent tests you read where I praised the triggers on both the Air Arms S510 Ultimate Sporter and the FX Dreamlite. Of course both of these are high-end air rifles, but the TX200 Mark III sells for half as much or less, and the ASP20 is less than one-third the price. Good triggers don’t have to cost a lot, but bad triggers can spoil the whole shooting experience.
Cleaning the barrel
I don’t like cleaning airgun barrels because I think it’s not usually necessary, but there is an instance when it is. When the accuracy of a given gun deteriorates, you should clean the barrel. And I mean clean it aggressively with JB Non-Embedding Bore Cleaning Compound on a brass or bronze brush.
I’m not just talking about barrels that have been made dirty from shooting. An airgun barrel will ALWAYS have black stuff inside because it’s the anti-oxidant compound that’s on most pellets. It’s not actually dirt and it gets pushed out of the bore with every shot, while new stuff is deposited. Don’t worry about that stuff. I’m talking about lead fouling. Lead from pellets will smear inside the bore and degrade accuracy. That’s what the JB compounds gets rid of.
When your airgun starts to become noticeably less accurate it’s time to scrub the bore with JB compound. Some world-class target shooters clean their barrels this way once each year. I seldom do it and I have guns with over 10,000 shots since they were last cleaned.
I have also seen improvement when the barrels of certain brand new airguns were cleaned in this way. One of my jobs when I worked at AirForce Airguns was to clean every barrel by hand in the way I have just described. These are all premium Lothar Walther barrels but after they were delivered to us we ground their outsides to a precise dimension, and we had them all blued. Cleaning was the final step before they were assembled into airguns. I am talking about hand-cleaning hundreds of barrels at a time — a job that could easily take up most of an 8-hour day! I feel quite certain that other makers of premium airguns like Air Arms, FX, Daystate and others do the same thing.
Now I’ll talk about a major training tool for the novice shooter. It’s how to use the sights!
Sight picture training
For new shooters, some training with the sight picture establishes whether or not they understand how the sights work. Here is a wonderful way to teach people how to use the sights.
The triangulation system
When I was a youngster, my mother enrolled me in an NRA-run course that taught me how to shoot. This was in the late 1950s, and the techniques used to teach us back then were those that had been popular both before and during World War II. I’ve researched both the modern U.S. Army and Marine Corps marksmanship syllabi and find that what I’m about to show you is, unfortunately, no longer taught — but it should be! Today’s lesson could turn out to be the most valuable teaching technique you ever learn for training new shooters.
We’re going to teach the new shooter how to use sights through a method called triangulation. Although we’ll be using aperture sights that are the easiest to learn and the most precise to use, any type of non-optical sight may be taught by this method. Read everything before asking any questions. This method will immediately reveal whether a student understands how to use sights, plus it will show the student’s level of skill in sighting — all without the use of a rifle.
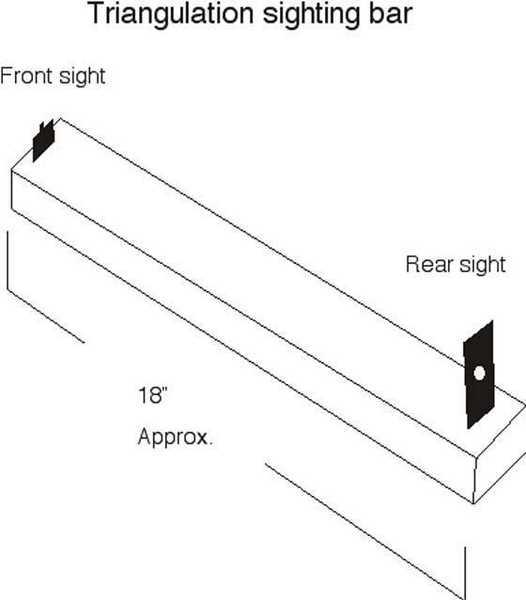
Making a triangulation sighting bar
You can make a simple training aid to teach the student how to use the sights. It consists of a straight bar with open “sights” on each end. An 18″ strip of wood will suffice for the bar, and you can fashion the “sights” from paper index cards. If you’re the coach of a shooting club and plan to teach a lot of kids, it might be worth the effort to mount real sights to the bar, though that isn’t necessary. Simple card-stock sights taped to the bar as shown in the drawings will work great. If you cannot find a piece of wood to use for the bar, a long ruler works well as a substitute. The dimensions of this training aid are not precise and critical, as long as it’s made reasonably close to what’s described here.

Poke a small hole through the rear “sight” for the student to peer through. The front “sight” is just a square post. Fasten both front and rear sights to the bar so they cannot move during the exercise, as repeatability is important. Place the sighting bar on a box so the student can use the sights without touching or moving them.
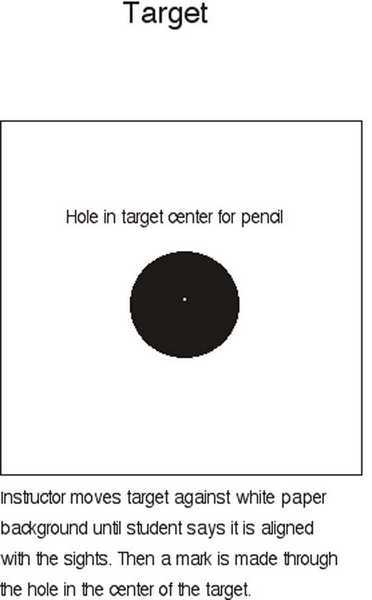
The instructor stands or sits 33 feet away and holds a black bullseye target against a large white piece of paper that’s attached to the wall or to a large box under his seat. In the center of the black bullseye on the target, a small hole has been made for a lead pencil to poke through and mark the white background paper.
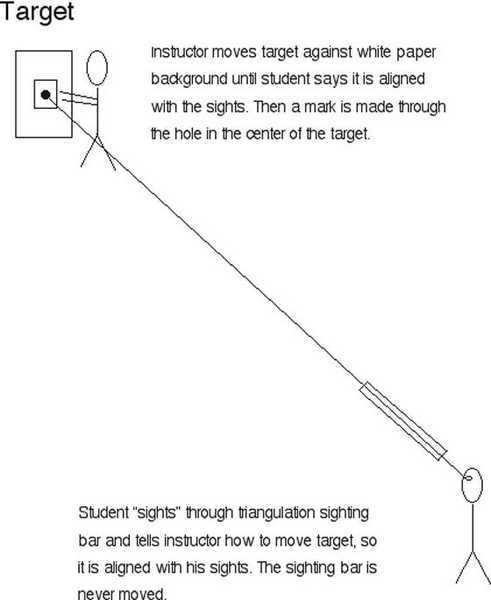
Conduct of the exercise
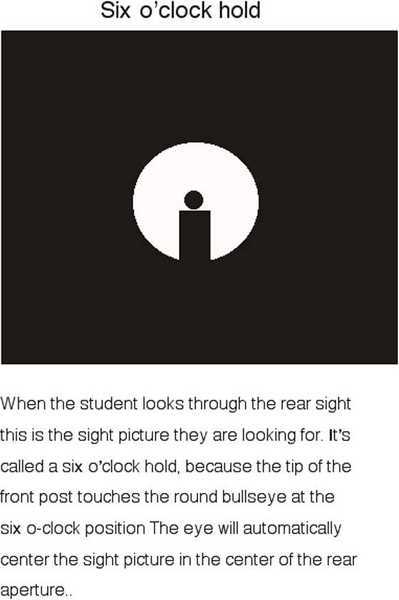
The student looks through the sighting bar and tells the instructor how to move the bullseye target until it’s positioned perfectly against his sights for a 6 o’clock hold. It’s important that the sighting bar does not move during the exercise — only the target, as adjusted by the instructor. When the sight picture looks right, the student tells the instructor to mark the target and the instructor makes a mark on the white background paper by pressing his pencil through the hole in the center of the target.
A simpler, faster way to begin
You can avoid making the sighting bar if you want to by simply using the rifle itself. Simply rest it so the student can see through the sights without touching or moving the rifle. This will be more difficult because the stock gets in the way, which is why the bar was created, but it is possible. Once again, you don’t want that rifle to move.
Many people don’t like the idea of being downrange with a rifle pointed at them, and the sighting bar makes it unnecessary. I think the sighting bar is a much better training aid that takes only a few minutes to create.
Style of the sights doesn’t matter
Don’t worry if your rifle’s sights don’t look like the sights I’ve shown here. You can make them any kind of sight you desire. Just cut them out of card stock and color them black to help the student define the sight picture. If you plan to use open sights with a rear notch, be sure to allow enough room on the bar behind the rear sight so it appears reasonably sharp to the student when aligned with the front sight. And remember to tell the student that the front sight is what they must focus on — not the rear sight and not the target. Both the rear sight and the target should appear slightly out of focus when they sight correctly.
I have wanted to share this technique with you readers for years, but I held back because I felt it might be too difficult to follow. I hope this report has made it clear and that this exercise helps both you and your students learn how to use open sights as it once helped me. One week after completing this exercise successfully, I was shooting five-shot, dime-sized groups at 50 feet from the prone position, which was the first position the NRA taught.
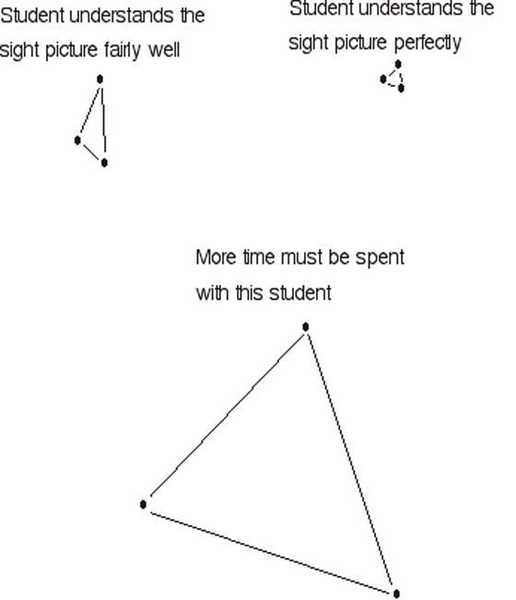
Repeat this exercise three times and there will be three pencil marks on the white background paper. The closer these marks are to each other, the better the student has adjusted his sights. This gives both the student and the instructor an excellent idea of how well the student understands the sight picture.
The results you want
What you are looking for is three dots on the background paper in the form of a triangle. A good result is if the dots are all within one inch of each other. Don’t be surprised if they are within one-half-inch of each other. The closer they are, the better and more precise the student is seeing the sight picture.
But if the dots are several inches apart, the student is not yet seeing the sight picture correctly. They may not understand all that is required of them in the exercise, or they may not appreciate the precision they are expected to achieve. Also, this could be an indication of a vision problem.
Once you determine the problem(s), you can run the exercise again until they get it right. When the student can place three dots close to each other, they will instinctively know how the rifle sights should look.
Summary
This report grew long because of explaining the triangulation exercise. I didn’t address the problems of different ammo, nor of the difference that airguns bring to the accuracy table. And there is also the problem of how close airgunners are to their targets. So there is more to come. If you have additional things for me to address, please let me know.


B.B.,
The instructor pulls the target away each time,.. again places it,… and the student sights through the stick again,.. telling the instructor to move the target to align with what the student is seeing,… right?
Or, does the instructor (purposely) move the target in a small triangle,… and then will only move it again if the student says so?
Or, does the target remain in one place,.. the student steps away (each) time and then re-sights (each) time,… and the target is only moved if the student says to move it?
What is to keep the 3 dots from (not) being a tri-angle? Why could it not be horizontal stringing or vertical stringing (3 dots in a row)? What keeps the exercise from being perfect (1 dot, same place, 3 times)?
Yes, the sighting bar is never moved,… I got that.
Sorry,…. maybe not enough coffee yet or maybe I am a bit slow,… or both. 😉
Good Day to you and to all,………. Chris
Chris,
The instructor pulls the target away each time.
The dots could be in a line, but that would be most unusual. I have never seen it happen in practice.
B.B.
B.B.
Another *keeper* for my library. You really should consider another book, a collection of the fundamentals of airgunning.
I doubt that my experience is unique. Much of my so-called research was reading posts in airgun forums and watching videos as well as checking out web sites of airgun vendors. The truth of the matter is that the majority of forum posts and videos deal with hardware. I don’t recall any that addressed the software, the guy holding the airgun and the technique that produces accurate shots. Lots of talk regarding guns, pellets, chronographs, stocks, sights and modification and tuning problems and solutions.
Imagine my surprise when the “good” gun that I finally selected failed to produce any kind of accuracy. Of course I had purchased 5 tins of “fishing sinker larvae” with the gun. By then I had learned a little more and found that the pellet was part of the accuracy equation. Pellet selection? Who knew?
My experience so far has been a little like hunting diamonds in a gravel pit. Lots of discards before one finds a gem. This is not to disparage posters in forums. There are many talented and dedicated shooters that share their experience and wisdom online. However much (most?) is far more advanced than I and deal with hardware not technique. When the shot count exceeds 10,000 it’s easy to forget how one arrived at that level of proficiency.
This series is so much what I’ve needed, so I urge you to write another book. Sort of “Before you pick up an airgun.”
End of nag.
A good day to all,
Dan
Dan,
I’m so glad this series pleases you. I will address fishing sinker larvae in the next installment.
B.B.
Mr. Gaylord:
I second the idea of a book (easy for me to say, since you would be the author!) on the fundamentals of shooting, particularly from an airgunner’s perspective. I learned by trial and error on my uncle’s farm back in ’62-’64 on a Benjamin Comp that we very seriously over-pumped (to the point that it should have valve locked).
The triangulation exercise is simple but it helps the novice gain an understanding of what the sight picture should look like but also gives feedback that is measurable and graphic. Incidentally, that feed back also demonstrates why the fiber optic sights can deteriorate accuracy as they are round and not triangulated to make a precise aiming point on the front blade!
Included could be safe loading of a break barrel (hold the barrel or underlever until one’s fingers are clear of the mechanism! I’ve done that instinctively, but never thought it through until one of your articles triggered that caution. As a springer shooter, I’ve always had a sense that very bad things can happen if that barrel gets “away.” I wonder how many others consider this at all.
Such a volume could obviate the trial and error learning that I flummoxed through since those years of my youth during the summers on extended family farms.
Please give it some thought. I’d be happy to proof read and comment!
Lance
Lance,
I will give it thought.
B.B.
Thanks B.B.!
I am really enjoying this series! Like the triangulation method for teaching sights.
Interesting about focusing on the front sight… I pay close attention to the sights for sighting in, punching paper and learning the trajectory but for most plinking/hunting (1 inch groups out to about 20-25 yards) I focus on the target. Guess this comes from my archery background.
I was out managing our chipmunk infestation (don’t know what happened to our foxes so I have to do it now) on Saturday and shot over a dozen at ranges from 10 to 40 feet – can’t remember looking at the crosshairs at all. They never sit still long enough to be fussing with sights so it’s just focus on the target and shoot when the sight-picture is right.
Back when I was still deer hunting with a rifle I the guys often asked for help in improving their shooting speed and accuracy. I found that the best tool for teaching shooting was a lightweight target bow. With a bow, the shooter is the stock, trigger and sights – the slow arcing flight of the arrow is easily seen and any inconsistencies in form are quickly apparent. After a couple of hours shooting with a bow a rifle seems easy.
Hank
B.B.,
Pairing this with the “Teach Me to Shoot” series /blog/2016/10/teach-me-to-shoot-part-14/ would make a good primer to introducing the shooting sport to a lot of people. Can’t wait for the 4th part to be posted. I’m enjoying this review of the basic concepts and realizing that I have made a few missteps along the way.
Siraniko
Siraniko,
Missteps? Haven’t we all?
B.B.
B.B.,
We may all have missteps, but most important is to recognize them and make the effort to correct them. Opening one’s eyes to new ideas instead of blindly accepting handed down wisdom is a way of recognizing these things.
Siraniko
BB,
Wouldn’t the front sight and target look more like this image if the student had his eye positioned up close to the peep as they are designed to be used. Here the rear peep is not even part of the picture. My brother as well as other shooters I know use their peep sights by holding their eye back from the peep and trying to hold the circular perimeter of the aperture and the post and target all in alignment to get a sight picture like the one you picture here. That doesn’t work very well and most of those same shooters claim that peeps are inferior to open sights. When I have tried to point out that they are not using the sights correctly they insist that they are because they are getting a sight picture identical to the one that you have provided. That depiction must be fairly common because they can readily find that image to show me that they are right, but I, respectfully, believe that that is not the image that one sees if he’s using the sights correctly.
This is what I see when I look through a peep.
Half
Half,
Yes! You are doing it correctly.
I don’t think I ever knew why people thought a peep was hard, but that explains it. It can’t work by holding your head back and centering the front sight. You lose too much precision.
B.B.
B.B.,
Really busy today but still had to read all of your blog!
I have only one BIG statement for now:
Why not a video? The Triangulation System deserves to be a video and it needs to be Scripted, you have most of the technical Storyboards, and shot by a professional videographer! You could check with my son who is a Biathalete and a Videographer.
shootski
shootski,
I’ll think about it.
B.B.
B.B.,
Minor items:
In the triangulation system 2nd paragraph:
Read (the) everything before asking any questions.
In the:
Summary
This report grew long because of explaining the triangulation exercise. I didn’t address the problems of different ammo, nor of (T)he difference that airguns bring to the accuracy table. And there is also (how) the problem of ( ) close airgunners are to their targets. So there is more to come. If you have additional things for me to address, please let me know.
End of potential fixes.
“Making a triangulation sighting bar”
“If you’re the coach of a shooting club and plan to teach a lot of kids, it might be worth the effort to mount real sights to the bar, though that isn’t necessary.”
Just an idea for coaches/shooters who are craft handicapped; they could use a Picatinny (STANAG*) rail and mount various appropriate front and rear sights.
shootski
* https://outerimpact.com/understanding-the-difference-between-the-weaver-picatinny-and-nato-specifications/
shootski,
Fixed.
Thanks,
B.B.
BB,
Would any of these instructions change for a person that does not have an eye dominance?
My Son does not have a dominant eye. He writes left handed and shoots a rifle left-handed. When he shoots with open sights he is usually way off target. Through a scope he can sight and shoot well. Have tried him with right handed and results are similar. Except for the slight awkwardness of the right handed hold and trigger finger.
Thanks,
Silver Eagle
Silver Eagle,
I would think that all people have a dominant eye. I am (totally) right handed, but shoot rifle left. I would hate to even think about trying to shoot right.
I assume you have tried the standard test of holding a finger out at arms length and then covering one eye,.. (either eye)? Then,… hold the opposite arm out and cover the other eye. Both test are done while looking at something static (a lamp, TV. etc.)
The finger will “appear” to move in relation to the fixed target with the (non)-dominate eye,…. the finger will (not) move in relation to the target with the dominate eye.
With me,… doing the test,… the left eye open, right eye covered,… does (not) move the finger. Thus I shoot left,… which is totally natural.
Sorry if you knew that already,… but thought that I would pass it along anyways.
Chris
Silver Eagle,
I think your son needs to try the other eye. Way off is a clue to using the wrong eye when there is dominance.
B.B.
Silver Eagle,
“My Son does not have a dominant eye.”
Eye dominance is like most things in humans in that it comes on a sliding scale from strong to weak. If your talking about cross dominance that is yet a different topic since there is no direct relationship of left or right handedness and eye dominance. There are some simple tests that your son can try to establish his dominant eye. You and your son may find the following link of interest:
https://www.allaboutvision.com/resources/dominant-eye-test.htm
If you still have questions I would recommend visiting with an Eye Doctor to see if there are other vision issues at play.
HTH,
shootski
B.B.,
That is another basic,…. establishing what is your dominate eye.
Chris
Chris,
I’ve done that one a lot but you’re right.
B.B.
B.B.,
Shooting with both eyes open might be another. Most,… squint,… I think. GF1 mentioned it several years ago and I have never gone back to squinting the off eye. Now,… to be honest,… if I have (not) shot in awhile,… squinting the off eye is something that I naturally find myself doing. Bad me. 🙁
But,… I will say that if the sun is bright,… squinting the off eye might be of some benefit. A scope ocular rubber eye cup/bellows is super nice too! Maybe another topic?
Either way,… maybe a topic(s) for blog fodder?
Chris
Chris
I definitely like shooting with both eyes open. But I do find that for certian lighting conditions I need to squint to focus better. And that’s with a scope. Even more so with open iron sights.
I would rather not squint and be more relaxed when I shoot. But sometimes I find I just have to so I can focus good.