by Tom Gaylord, a.k.a. B.B. Pelletier
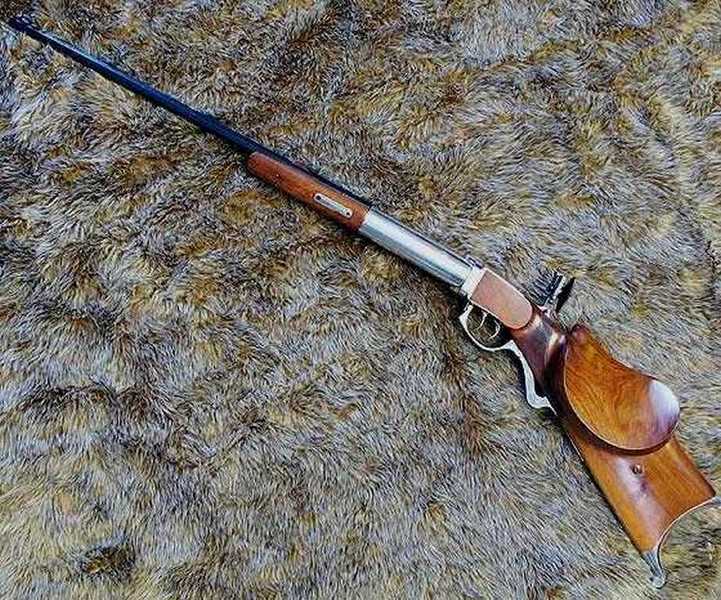
B.B.’s Bugelspanner.
It’s been a while since I wrote about this gun, I know. Airgunner Larry Hannusch told me how to disassemble it, and I started…only to stop when I encountered a barrier. I’ve resolved that barrier, and today I’ll show you the inside of my gun to the extent that I’ve disassembled it.
Larry told me to remove the screws on top and beneath the action that were obvious, then separate the two parts — action and stock. I removed 4 screws, and the action came loose from the stock a little bit. Then, it stopped cold. That was where I stopped working and set the gun aside. Yesterday, I picked it up and began from that point.
A bugelspanner (actually, correctly spelled buegelspanner or bügelspanner since the u has two dots — called an umlaut — over it) translates to a triggerguard-cocker. The triggerguard is pulled down to retract the piston and set the sear for firing.
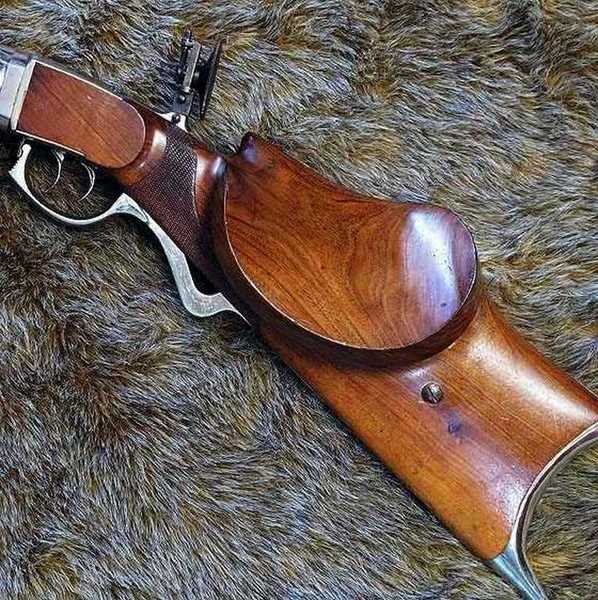
Triggerguard is up in the shooting position.
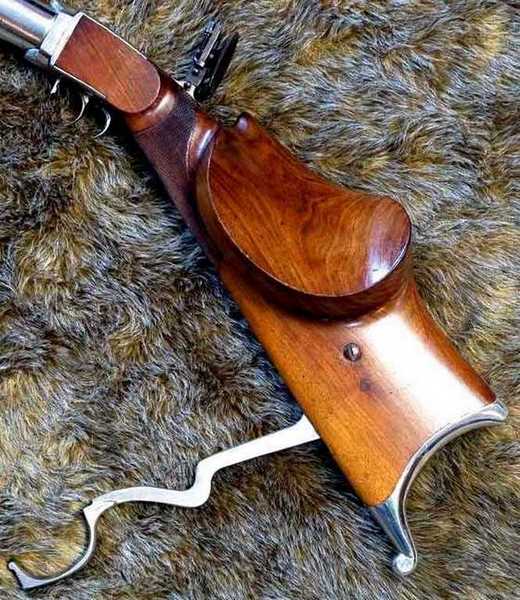
Triggerguard is pulled down to cock the springs.
The triggerguard lever is fastened to a pivoting axle bolt located in the back of the stock. The bolt shows in the photos above. Since this lever is connected to a linkage that’s connected to the back of a piston held under tension by powerful mainsprings, it made sense to me that it had to be disconnected from the piston for the stock to separate.
I removed the bolt that screws into a very long bushing inset into the opposite side of the butt. Then that bushing was tapped out the other side of the stock. But the cocking lever wasn’t quite free. At the top of the triggerguard lever, the cocking linkage passes through the lever and is prevented from coming free by a small screw that passes through one end of the linkage. I have arranged the two parts and their screw below for you to examine.
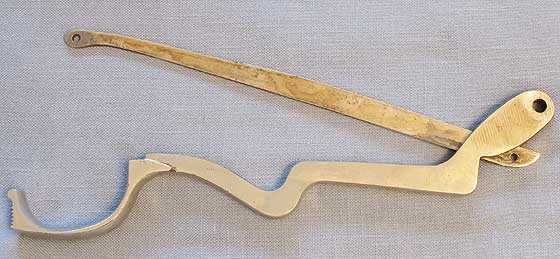
The triggerguard and cocking linkage, arranged as they are in the gun — I think! Until I assemble the gun, again, I won’t be sure of the correct orientation of the cocking link.
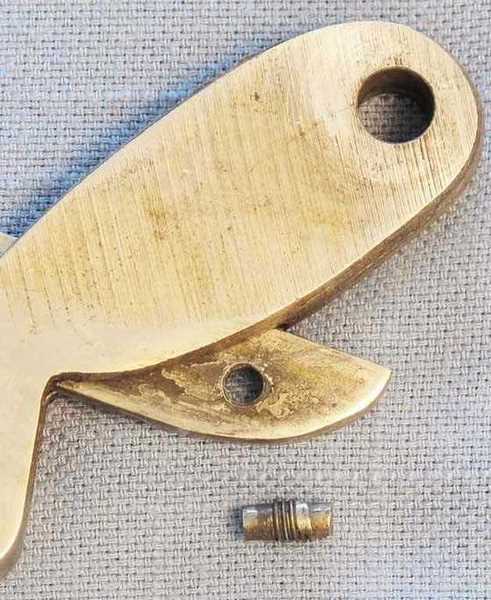
That tiny handmade screw goes through the hole in the cocking link and prevents it from slipping through the triggerguard when the gun is cocked. Notice that it has two smooth bearing surfaces — one on either side. As the gun is cocked, the cocking link moves up and down in the cocking slot that’s in back of the triggerguard. It’s a moving fulcrum.
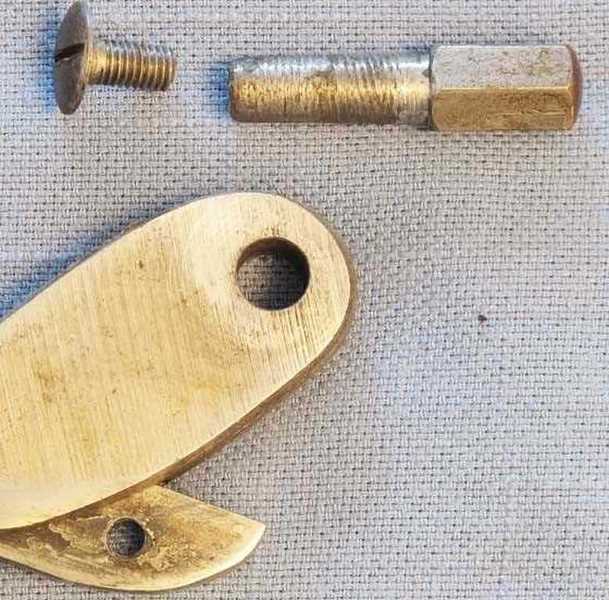
This is the triggerguard lever pivot bushing and screw on which the lever pivots when during cocking. Note the smooth band around the base of the bushing. We may assume that’s where the pivoting happens.
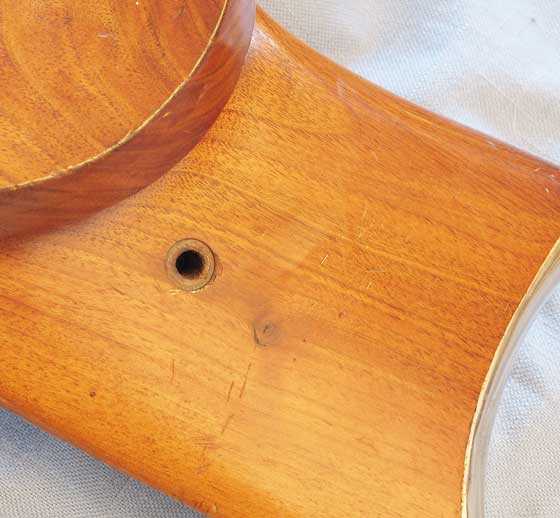
The screw and pivot bushing have been removed from the stock.
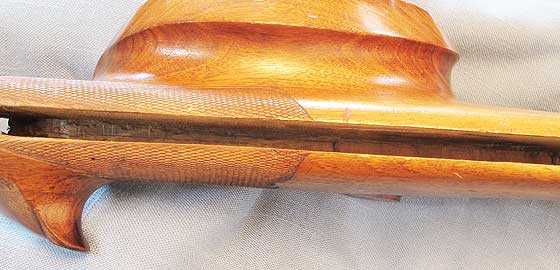
The entire underside of the stock is open, allowing room for the cocking linkage to move.
When I removed the cocking link from the back of the piston rod, I found the screw that attached the link to the piston rod was sheared in two, plus the rest of the screw was very mangled from pressure and work. Clearly, this part is too soft and also overworked.
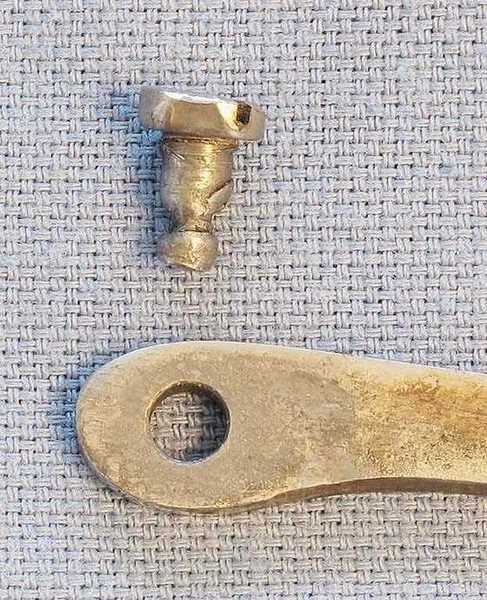
The screw that holds the cocking link to the rear of the piston rod is mangled and galled from too much strain. The threaded portion remains in the back of the piston rod and needs to be removed. This part may need to become a roller bearing.
The first part to come off the gun was actually the top action plate that also holds the rear sight. It is the anchor plate for 2 long screws and one short one that holds the action together. Once they were out, the plate didn’t come off without a lot of wiggling and some prying.
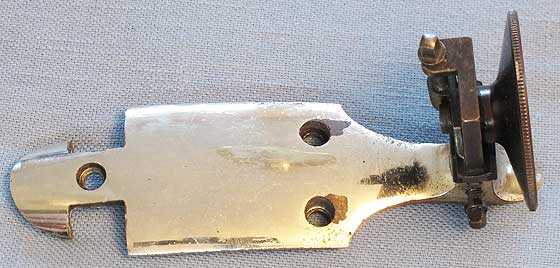
Three screws, and the top plate came off with the rear sight attached.
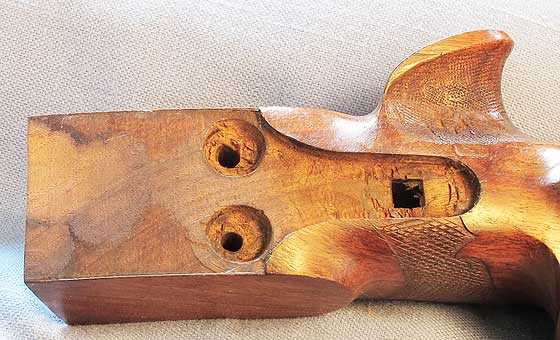
This is where the top plate came from.
The gun is now partially disassembled. The double-set trigger mechanism is exposed and can be disassembled and cleaned, but the piston is still under compression inside the compression chamber that hasn’t yet been separated from the barrel. To see the piston and mainsprings, The backplate that the piston rod passes through has to be drifed down out of its dovetail
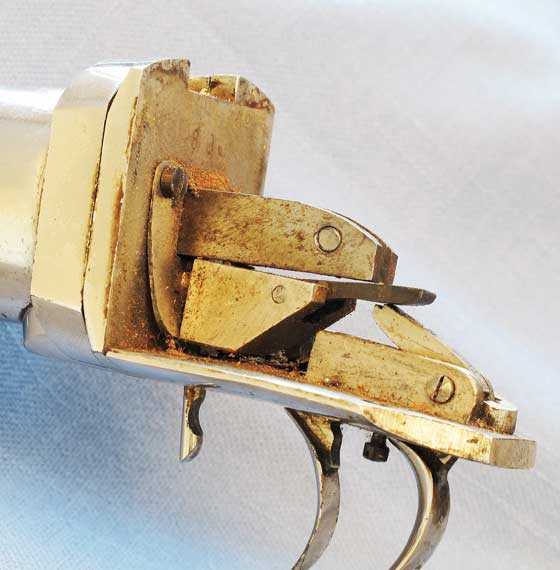
The double set trigger assembly is now exposed for cleaning and possible disassembly. To remove it from the gun, it’s tapped down, freeing its front dovetail.

The double-set trigger assembly must now be removed downward from the cylinder dovetail, freeing the trigger plate and back plate from the cylinder and relieving tension on the mainsprings.
I found the number 80 on many of the larger, unique frame parts. I believe that’s either a serial number or an assembly number to keep all the parts together because this gun shows a lot of handmade parts and hand-fitting.
When I open the barrel, I see some dark particles that I believe are small chunks of leather that have broken off the piston seal, so it may be deteriorating. And I need to look at the condition of the mainsprings, plus probably lubricate them just a little.
The bottom plate on which the double-set trigger sits is dovetailed into the frame (the rear of the compression/spring tube). It has to be pushed straight down to relieve tension on the mainsprings, and I do this with by tapping with a rubber hammer. The plate comes out of the dovetail easily enough; but the double volute mainsprings are under considerable tension even at rest, and the trigger plate and separate backplate fly off the gun along with the volute springs.
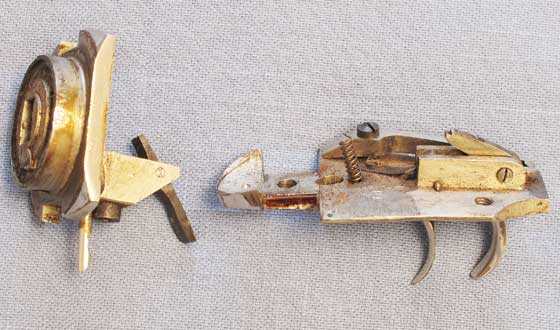
The trigger plate has a dovetail at its front that grabs the rear of the cylinder and holds the powerplant together. The cylinder back plate (left in the photo) is held between the 2 parts. The black part that’s flopping down on the back plate is the sear.
The piston can now be withdrawn, and I can see that the leather seal has, indeed, deteriorated. The part that comes in contact with the air transfer port is damaged from repeated impacts. I think I’ve found the reason the gun fired so roughly.
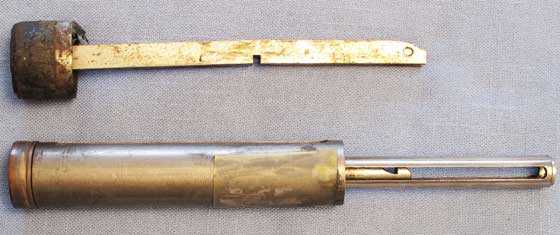
Bugelspanner piston at the top is much fatter than the Beeman R1 gas-spring piston unit below, but the stroke is also shorter. The notch in the bugelspanner piston rod is the cocking notch.
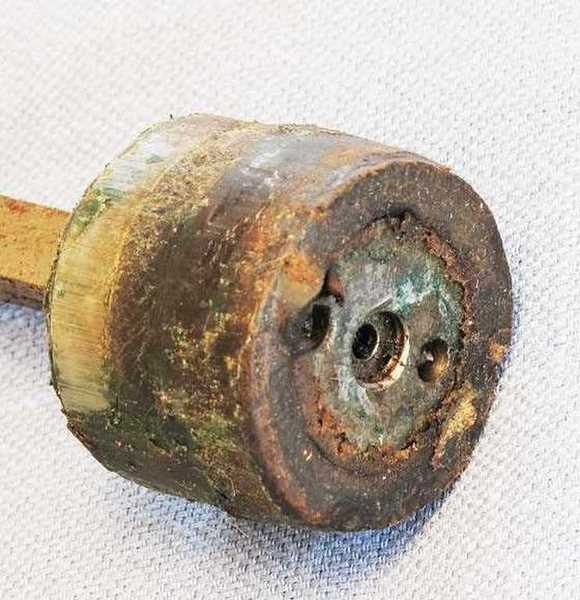
The leather piston seal has deteriorated. It looks okay, but it’s crumbling and flaking off. This is why the gun fires so harshly.

Double volute springs attached to a central guide for the mainsprings of the bugelspanner. They’re in good condition but very dirty and dry.
The double-set trigger has a weak front trigger leaf spring, which accounts for it not setting well and firing too easily. That will also have to be corrected.
The inside of the compression chamber is filthy, but it doesn’t seem to be damaged. A good cleaning is all it needs.
For many of you, looking inside this airgun is probably like looking at the dark side of the moon. So many of the parts appear foreign to your eyes. All that has really changed over the years, though, is how the parts are designed. They work in the conventional way that modern spring-piston parts work, so they must be corrected in the same way that a modern spring-piston powerplant would need to be.
There are numerous major repair jobs that must be undertaken before this airgun will shoot again. There’s certainly lots of cleaning, which is followed by careful lubrication of many of the parts.
Some new parts have to be fabricated, as well. That will not be an easy task, but it’s worth the effort. I know you were hoping to see a test real soon, but that’s not going to happen. I have to feel my way around this gun carefully; because if every job isn’t done right, the gun won’t work when it goes back together. I’ll go about the work methodically and take some pictures as I go, but I probably won’t report on the gun again until all the work is completed.

You know, it didn’t occur to me in Part 1 that this stock-located cocking design might permit a noticeably longer barrel length, in rifles of the same overall length. Am I reading this right?
Kevin,
I don’t know. The spring cylinder is still as long as it needs to be, but now that I think of it, you are probably right. An underlever wouldn’t be able to pull the piston back as far as this cocking system can.
So I guess the answer is yes.
Good thinking,
B.B.
You can say that. But I think from what I learned is 20inch is about all that is needed in Spring power guns after that velocity drops so no benefit. Do not need leverage for cocking since it is a lever style. That barrel does look longer than 20inch though. Its just a thought.
Chris,
Actually, spring guns hit their maximum with about 9 inches of barrel these days. It used to be 6 inches, back in the 1970s.
B.B.
Yep you are right. It seem like the creator of this gun wanted to make a show piece he was very knowledgable of air gun design. And yet he chose to create a masterpiece instead. Its to pretty for hunting way to expensive to be a parlor gun. I don’t think made for monetary gain more like high standard for being cream of the crop.
Hello All
This Bugelspanner air rifle is quite the unique gun. All the parts look quite basic, and seem well thought out. I must say that as much as I would desire to own this rifle, B.B. has shown it needs a lot of tender loving care. I do not believe I would be equal to the task. I don’t own the proper tools, and I do not posses the proper skills. I am content to watch B.B. bring this air gun to its former glory from afar. Thanks for giving us a look at this peace of airgunning history.
Ciao
Titus
Titus,
Thanks for your vote of confidence. I’m not sure I have the ability to do this, either. I’m going to work slowly and carefully
B.B.
Still don’t know if this is a dart gun or .25 caliber pellet gun. Either way the attention to detail and hand craftsmanship are dazzling.
They didn’t have programmable lathes or CNC machines a hundred years ago did they?
Remarkable.
Kevin
Kevin,
No, they didn’t! In fact, I didn’t draw attention to this, but if you enlarge some of today’s detail photos, you can see files marks.
If I can get this gun working right again, I’m going to be proud of my achievement.
B.B.
Howdy Mr. BB, VERY cool! Thanx. Shoot/ride safe.
Beaz
Fantastic, Thanks for sharing. Look forward to more progress. Really like the detailed report.
Yeah, I’m hooked on these old things.
Wow, you now officially have my attention. What a wonderfully crafted piece of workmanship, not only on the outside but on the inside as well. If i am reading the pictures correctly the piston stroke is from the notch on the piston rod to just past the end of the rod where the sear sits further back, looking like the cocking linkage would come to rest on the sear at the end of the stroke. With that, the diameter of the piston, and the pre load on the spring itself, that looks like a good size volume of air to compress. So with it being a .25 it must surely have put out a bit of power when new, and again when, without doubt, lovingly reconditioned.
You have an amazing project there B.B. and i bet your really going to enjoy this one, i know i can’t wait to see how you progress with it. So thanks again for another stunning article, i await with baited breath.
TTFN
Best wishes, Wing Commander Sir Nigel Tetlington-Smythe
Sir Nigel,
I’ll admit I am scared about this project. The mechanism isn’t that complex, but every part in it seems to be hand made, so there’s no running to the hardware store. I have to make each part. Right now that piston seal has me concerned. It looks good, but it’s a crumbling mess.
Well, I guess I will have to make haste slowly.
B.B.
So basically what you have here is a Dennis or Gary air rifle of an earlier time. It is almost a one of a kind and parts from one may or may not fit another. Any replacement parts will likely have to be made or modified to fit. I love it.
RR,
Closer to a Barnes gun than a Quackenbush, I think. And yes, each part I replace will have to be hand made. This may end up becoming a small book.
B.B.
I hope you do publish one about it. Then you could send me an autgraphed copy of it.
I have always had a very strong interest in the old timey powder burners and now it has expanded to include antique air guns.
Anybody out there have a Lincoln Jefferies air pistol that needs a new home?
RR,
Don Raitzer and perhaps Ingvar Alm have both offered Lincoln Jeffries air pistols at airgun shows. At Roanoke Alm was o0n our left and Raitzer was behind us.
B.B.
Unfortunately, I didn’t know I wanted one then. As I was walking around at this year’s show, all of those antique air guns were starting to cry out to me to take them home.
The modern ones seem to have less and less appeal to me. I have always had the craving for the quality of the old craftsmen. In today’s world so much is meant to be used for a while and then thrown away. Quality can be found, but you are going to pay dearly for it.
B.B.
I can look at this as an example in design problems .
Trigger spring may have been improperly tempered…….or it could be just metal fatigue .
Soft screw improperly tempered and not quite right for the job in the first place .
Let’s call the piston seal normal ops and not count that .
So all it takes is one or two parts that are not right to louse up an otherwise well made gun. It’s something we still see in new ones today .
twotalon
TT,
I think the trigger spring is so small and thin that it has lost its temper over time. It still has some power — just not at the end of its stroke, where it really needs it.
B.B.
You can also say with a little bit of John Wischombe vision. Off topic I bought a new Beeman Kodiak 2005.Has about 30 shots through it took it out and the first shot the forearm screw fell out.Oh no it snapped off . Upon disassembly all the screws are identical extremely skinny. I need to drill out the broken screw and find replacement with cups. Any place I can find better hardware? Two other screw are bent.
BB,
Thanks for doing this article. It has excellent photos and description, it is possible for even an amateur like me to follow the operation of this gun.
I’ve only had three airguns apart, but it was “like looking at the dark side of the moon”. But you made it understandable.
This is a beautiful old gun. I’m glad it is in the hands of someone capable of restoring it to operation.
Les
That’s a heckuva project, BB! Looks like maybe some work for your buddy Otho… I really like the workmanship on these nice old guns like this one. A bit scary to work on, but I’m sure it will all come together and work when you’re done. I cannot wait for that report!
/Dave
/Dave,
Otho just called to tell me that he read the report and I put him on alert!
B.B.
BB
Sorry off topic, I just picked up a Benjamin Sheridan 397P .177 and the barrel is starting to separate from the pump tube what is the best way to fix this. The gun still shoots accurate.
James,
Sorry to tell you but this is the fatal flaw in a Benjamin or Sheridan multi-pump. No one has ever successfully come up with a way of re-soldering the barrel on a repeatable basis. There have been a couple successful attempts, but they were luck, and no one has learned how to do the job right every time. Cracks don’t always spread, though, so you may be able to just shoot the gun as it is.
Whatever you do, DON’T put an intermount on it, as that is what cracks the solder joint to begin with!
B.B.
Thanks BB good thing I got it for free, I guess I’ll just shoot it till it stops working
Well, that got my attention:
So this would mean then that mounting a scout scope on a 392 just went into the “bad idea” bin? Unless there are other mounting options than the intermount, I mean. At any rate, duly noted, as I certainly wasn’t aware of that. Thank you for the intel.
Is this a general rule with other guns that use the intermount too? Say the Crosman 1377/1322 series, 2240, etc.? Or is it something specific about the joint on those rifles?
Kevin,
It has always been a bad idea to use an intermount on a gun that has a soldered barrel for exactly this reason. The scope and mount become a lever to wiggle the barrel from side to side, eventually cracking the solder line.
Other guns that don’t have soldered barrels are not a problem.
B.B.
Like BB said. They are a different design.
Here is something to try.
Take 2 barrel bands and cut a spot out of the bottom the width of the slot in the air compression tube. Drill and tapp a spot on each side of the bottom part of the band were you just cut the bottom out. Take the front pump hing point off then slip the bands on in the spots you choose and put some set screws in the holes you drilled and tapped to hold the bands in place on the compression tube.
So now the barrel band is on but you have to router out the wood pump handle so when the pump handle closes it clears the bands you put on. Then you can slip the plunger back in the tube and reattach the front hinge point. Oh and depending on the band you use you may have to drill and tap the top of the band to secure the barrel. Maybe just may keep another old Benji alive.
BB
When you do a rebuild/restore on a gun do you keep the original parts if you replace them so they can go with the gun if you sell it? I think that would be a big benefit for next owner of a gun. I did that when I was doing the Muscle cars and the person getting the car always appreciated that.
And do you think you may up grade the spring and piston to something modern or have Otho make a different piston head maybe something like what the BSA Meteor has.
I know your just getting the ball rolling but I was wondering if you had a game plan yet.
GF1,
My game plan will be to stay as original as possible. If a new part must be made, it will look like the old part that came out. I won’t do any upgrades.
B.B.
Oh and BB didn’t you just do that article about the Bugelspanner room.
Maybe you could link it to this series of reports if you think it would fit in. Running on low sleep right now and the old brain is going slow. Maybe it was something else I was thinking about. Just thought I would mention that.
With regard to the “game plan”,, there are a few of us ( this would be me) who haven’t done anything like this project you are beginning. If it wouldn’t upset the applecart,, would it be possible for you to insert periodic updates as the process proceeds? You will be taking pictures anyway,, why not let us follow the work as it happens, so to speak. I would think that this would be a slow, work in progress kind of thing,, so none of us would expect you to rush on our account,, but my interest is peaked,, and it would help those of us not as methodically inclined as you,, to see how it SHOULD be done.
Ed
Ed,
I think periodic updates are a good way to go. They will keep me sane, and you guys can hold my hand as this thing progresses.
As far as doing it how it SHOULD be done, I think you have me confused with someone who knows what they are doing. My workmanship has been compared to that of a rabid beaver. People think I’m being modest, but I once showed how I inlet a rear sight into a Bronco shock and I don’t think any of the oldtimers on this blog will every let me live that down.
B.B.
Whaddaya mean?!? That was functional beauty at its finest!!
/Dave,
Da, comrad! Better is enemy of good enough!
B.B.
Yes, that is why we don’t take him too seriously when he makes fun of us barnyard bubbas :)! We know he can “get the job done”.
I like it . but it looks like working on it goes like what the guy that showed me how to run a lathe said take slow light bites like the cat that ate the wedge . I bet when you get it done its going to be interesting . makes me think of the old ballard rifles from times ago
Robert W.,
The Ballard is not gone. I am making a jig that will allow me to breech-seat lead bullets without altering the rifle. When that’s finished, I will take her back to the range. I have a new bullet mold that might prove very accurate.
B.B.
I have a rifle which looks very similar to this, except for the stock. I am trying to find to get information about it and its possible value. Any suggestions?
CLW,
Well, I suppose you want just a specific answer about your gun — you don’t want to know about the whole field of them?
You probably have a common Bugelspanner. They are pretty common, but not among those who don’t hang around in the airgun world. They range in value from $100 for a parts gun to perhaps $400 for one in excellent condition from a maker who signed his name on the gun.
What else do you want to know that isn’t in this report?
B.B.
Thanks for the information. You are right the few people that I have shown it to have no idea what it is. Do you have any suggestions on how to find someone who can give me an accurate value and the best way to find a buyer?
My Dad brought this gun back from WWII. It has an octagonal barrel. It has “L. Bruns Nachf”, “L. Knappworst” and Braunschweig” imprinted on one side and then on the other side are the imprinted initials “SB”. On top of the metal cylinder is a lion and underneath the lion it is stamped “Brunsviga”. I am assuming Brunsviga is the manufacturer, but I have not been able to find out any information regarding that. It is in much better shape than the couple similar ones that I have seen online.
CLW,
You are in the right place for the evaluation. Post detailed photos of your gun on a web sharing site and I will look at it.
Also I need to know the3 caliber and whether it is rifled.
B.B.
I have posted some photos to shutterfly. Let me know if you have any issues accessing the photos. This was my first time using that site.
https://buegelspanner.shutterfly.com/pictures/12#9
CLW,
I looked at the photos. Your gun is in very good to excellent condition, so it should command a higher price that run-of -the-mill buegelspanners. They are not rare in the U.S., but nice ones like your are always appreciated. I would think it should bring $350 or so.
You never told be what caliber it is, or whether the barrel is rifled. A .22-caliber gun would be worth more than a .25 and a rifled barrel would be worth more than a smoothbore.
B.B..
It is a .22-caliber. I believe it is rifled, but I do not know for sure. Any recommendations on the best method of finding a buyer?
CLW,
Two possibilities. One is to sell to an airgun collector and those you find at airgun shows. The other is to put it into an auction with an arms company.
There will be the largest, most active airgun show in the U.S. in April on the 12th. It’s in Findley, Ohio. That would be a good place to show and possibly sell it.
B.B.
Thank You! I appreciate your time and help.
WOW!! Can’t believe I found info like this.
I just acquired one of these as a gift. Not because they love me, but because it has been through a fire, 90% of the stock is gone, and maybe I can figure out what it is and how to fix it.
There is engraved silver plating on the exposed metal.
I will be looking for more of your postings and anywhere else I can find more info.
Thanks so much, BB, You-da-man
chezler,
Welcome to the blog.
B.B.