by Tom Gaylord, a.k.a. B.B. Pelletier
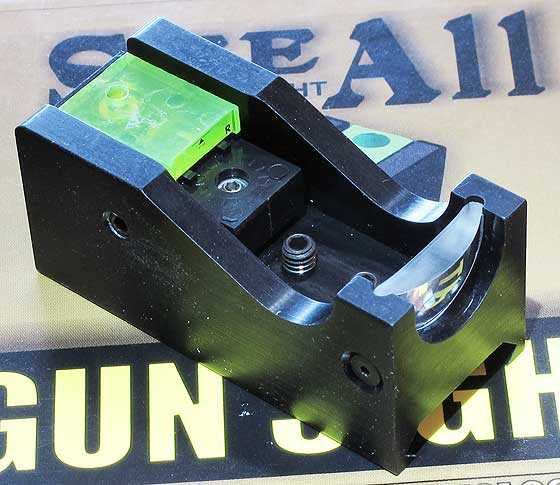
The See All Open Sight is revolutionary!
Today, we’ll test the See All Open Sight on a firearm! Last week, my shooting buddy Otho brought his Thompson Center Contender rifle to the range. It’s chambered in .17 HM2, a chambering and conversion he did himself.
With a scope mounted, this rifle will shoot about a one-inch group at 50 yards. He mounted the See All on it and proceeded to shoot groups.
At first, he wasn’t able to adjust the sight. That was tracked down to the sight being loose. That mounting system they use is really marginal — not just for spring-piston guns but for firearms, as well.
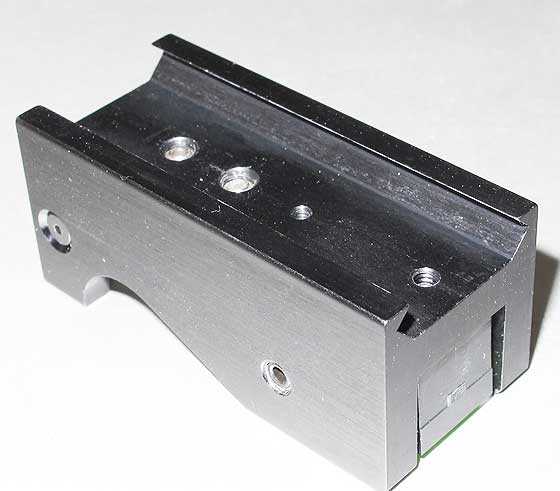
The base clamp of the sight relies on 2 screws that run down to push the jaws of the sight up against the Weaver or Picatinny dovetails. Those screws are seen on the upper left of the base.
But that problem was solved, and the test proceeded. Sight-in went quickly once the sight was stable. Otho discovered, as I did, that it takes only a very little movement of the adjustment screws to move the strike of the round. Despite there being marks on the sight, they aren’t helpful when adjusting. You have to just look at the position of the Allen wrench leg and go by that.
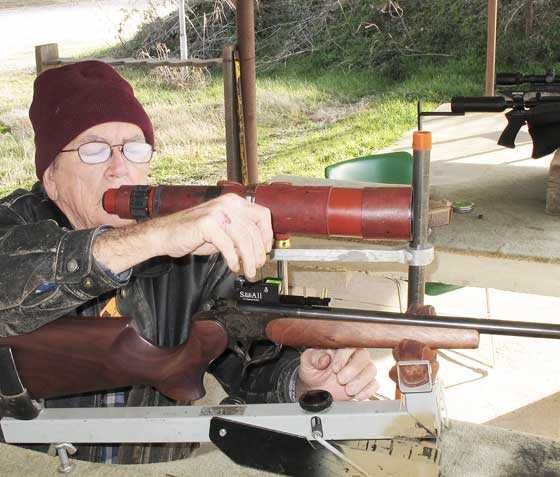
Once the See All sight was tight on the rifle, Otho was able to adjust it pretty quickly.
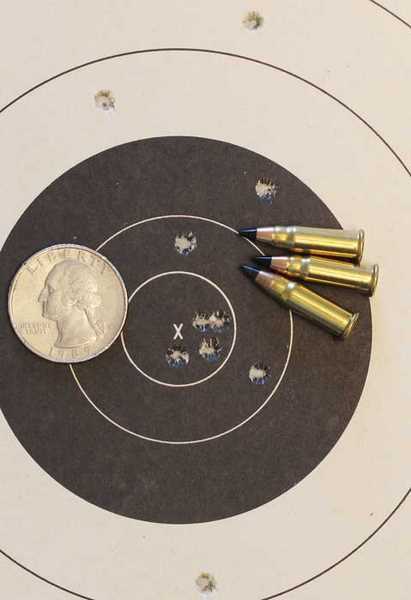
He shot 2 10-shot groups at 50 yards. While I didn’t measure them, the first one may be the best. It appears to be about a 2.50-inch group, with 9 shots in 1.25 to 1.40 inches.
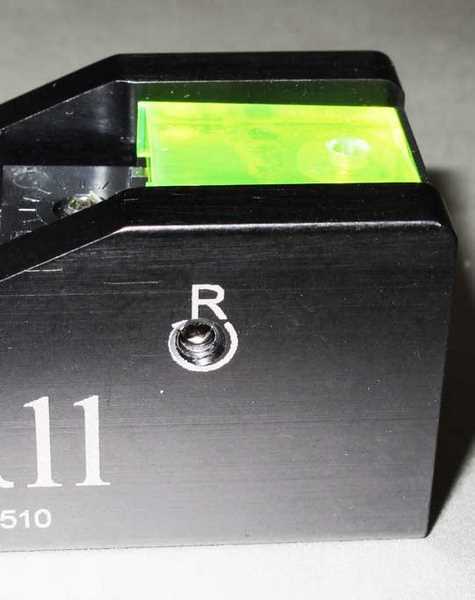
I never saw this horizontal adjustment graphic until I took this picture. This is enlarged and enhanced.
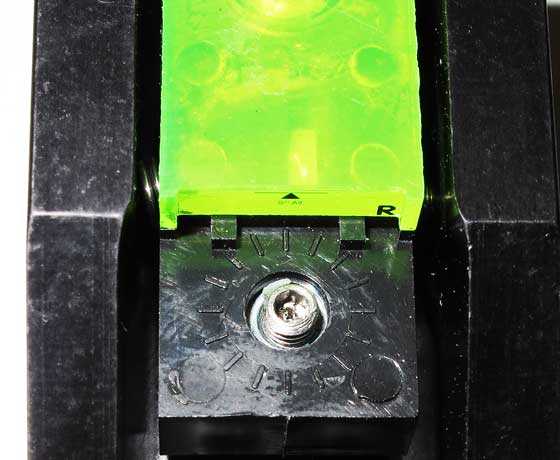
The vertical adjustment marks are still nearly invisible, despite enlargement and sharpening.
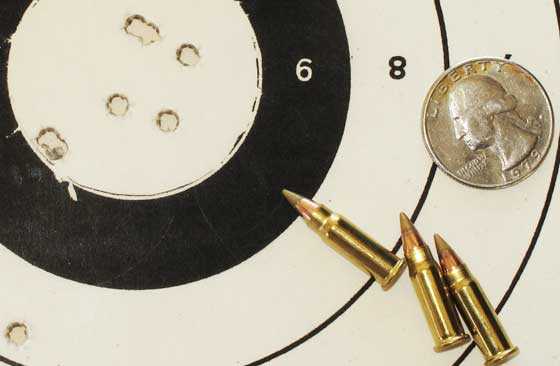
Otho’s first group was the best. Ten shots went into about 2.5-inches, with 9 of them going into about half that size. An American quarter is just under one inch in diameter.
Otho complained that he wasn’t able to put the point of the triangle on the bottom of the target. The black line and green material above the tip of the triangle made it necessary for him to guess where the tip was located. He would like to see the material removed down to the tip of the triangle for greater precision while aiming.
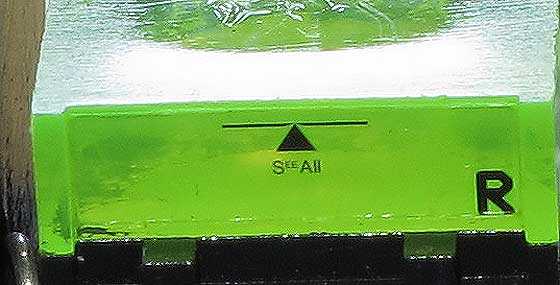
The material above the point of the triangle, plus the horizontal black line, make it difficult to position the tip of the reticle precisely.
His second group is about the same size as the first, but more scattered. Look at how tight it is from side to side. It’s clear there is an aiming problem in the vertical direction but not in the horizontal.
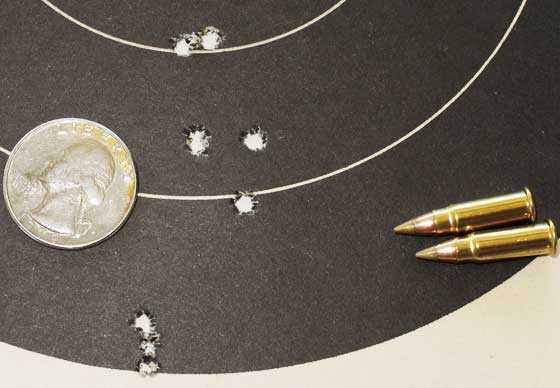
This second group shot by Otho is about the same size as the first, but this one’s strung out more vertically. Yes, there are 10 shots here.
By the time he was done with the second 10 shots, he was finished. Guessing where the tip of the reticle was has taxed him. So, he turned over the rifle to me.
This is the first time I’d shot this rifle, so I was unfamiliar with it. But it has a fairly crisp trigger, and I didn’t have any problems shooting it.
As you can see, I had even more difficulty than Otho with the vertical component. Seven of my shots landed in 1.427 inches at 50 yards, but the 10-shot group measures 4.433 inches between centers. I had a very hard time seeing where the tip of the triangle’s located relative to the target.
My group is very vertical, measuring 4.433 inches between centers. But as you can see, I got 7 of them into 1.427 inches, which isn’t bad.
Discussion
Otho brought up the point that the See All sight might not be ideal for shooting targets, but then he figured that the black bullseye was still giving the most exact aiming point possible. If the sight has trouble with vertical placement on a bullseye target, it will be much harder to control against a gray animal.
Please note that Otho is wearing glasses when he shoots. He has to wear them even when shooting with a scope, so the See All did magnify the reticle for him, as we’d hoped. He and I both believe this sight has something very unique to offer.
He wants to try the sight again on animal silhouettes. I have some nice Shoot-N-C animal targets he can try it on. That should give us the information we want.
Otho is also thinking of shaving off the top of the green plastic, to put the tip of the triangle at the top of the reticle. He wants to remove the horizontal black line, which I agree is distracting.
He also finds the green on either side of the triangle difficult to work with. He wishes it wasn’t there. I don’t have a problem with it myself.
Neither Otho nor I know if modifying the sight is the right move or not. The black line tells the shooter where the tip of the triangle is. But it’s so difficult to get the tip on the target where you want it. I think the See All folks must have tried several iterations of this already, and I am not convinced removing the top of the green is a good idea. When you look through the sight without a target to focus, the tip of the triangle is easy to find. It’s only when you aim against a specific spot that it becomes more difficult.
I’ll be shooting the See All next on my Beeman P1 pistol.

I ordered mine last week. So I hope I get it before the weekend. Got my fingers crossed.
But now I’m wondering if I will have to do something to get the aim point more visible. I’m pretty sure I will because I would like the object/target that I’m shooting at to be sitting right on top of the triangle point.
I guess milling the top surface like Otho said would work. But I’m thinking more like painting a fine black line vertical straight up from the point of the triangle. Or another color line for that fact to keep the point of aim more visible on a animal or such. My dad had me paint the front post on my Winchester 190 white so I could see it better when I lined up the back sight and the target. And that way I could still have the triangle as the quick reference point if I made the line. But if I wanted to take more time like in precision target shooting I could use the fine vertical black line I made. Or white line or orange line for that fact.
Well another reason I cant wait to get mine. To see if that will work or if it will take more doing to get it the way I want it.
It sounds as if this sight would be fine for a scatter gun or a mattelomatic where accuracy is not an issue, but when you want pinpoint, this is not the way to go. That is not what it was designed for. It is obviously a “combat” sight. It would probably work great on that airsoft pistol thingey you tried out a while back for those competitions they have. It might even work real nice in a home invasion scenario where reaction time and light levels are likely to be real low, although in that instance, sights most likely would not be a requirement.
When I saw this sight in your blurb, I envisioned it mounted on top of a scope to allow a quick, close in shot at a tree rat or a ground hog at 10 yards or less while your scope is focused at 50 yards.
I agree. Maybe this sight excels at reflex shooting.
Matt61
I received mine and will try it also on my P1 next week-end…The fixing is a real issue on this sight (clamping with two very near screws…meh !) and even more on a P1 and its 13mm dovetail (I’m going to file a low profile adapter because I don’t want the BKL 14mm solution which rises the sight quite a lot (0.69″).
I hope the vertical accuracy won’t be too much of a deal on the P1 at shorter range…
Can’t wait to see what BB can do with it !
B.B.
I wish I could find reviews like the ones here in other places on the web, you have me hooked on this blog, that is for sure! I would try some fine thread or a piece of hair as the vertical extension for the aiming point, you may be able to use tape to secure it to the block before milling the edge glow material. Otho did excellent work on that conversion, and as you had not shot that T/C before, did you have to adjust the SAOS for your group?
ReManG,
I don’t know what the SAOS is, but I made no adjustments to the sight. I just shot it the way Otho had set it.
B.B.
Didn’t I warn that all these abbreviation were getting extreme?
S ee
A ll
O pen
S ight
^
|
|
ROTFLOL! WTMTXTNGITW!
The Federal Government needs to step in and ban texting. Between the poor educational system and texting, it is no wonder most people MUST rely on spell check. Of course, that is on the assumption they bother.
My apologies, too much time in the military and the acronyms come way too easily to me.
B.B., I did mean the See All Open Sight with the abbreviation of SAOS, it is good to see the parallax wae not a problem when you shot it.
BB,
Maybe before milling the top off, you can add to the triangle with a Sharpy. Mask off the outline of what you want with tape so you get nice sharp lines and a fine point. Do the same to add a new horizontal line on the top edge for reference. You’ll end up with a taller triangle and two horizontal reference lines, but since your just using the tip of the triangle it shouldn’t matter.
/Dave
My thought is that the entire end with the exception of the triangle should be black so that when you raise the sight, the triangle glows.
That would make it look a little like a Trijicon triangle, which is pretty effective. You could still leave pieces of the top horizontal line green and have your reference line.
Well my first observation is A CLAD QUARTER really. I hope this was just because the pictures were taken at the range and you forgot the silver quarter at home.
I do think that this sight is an interesting concept and would make a decent open sight for action shooting where the targets are large and the distances short, but I don’t think it will ever be a precision
instrument and in the airgun field precision is were its at.
So its good for one shot groups
Here is the instruction page on the See All website. Is the picture with the sight aiming at the deer pretty much what you see when you look at the sight.
http://www.seeallopensight.com/instructions/
Maybe the height that the sight is mounted at makes a difference for the sight axis. If you look at item G description it says (sight axis). Maybe if you are looking thought the magnifying lens which would be item A at the wrong sight axis angle it will make the reticle not to appear right.
I’m just throwing out a guess I don’t have mine yet so its hard to tell by looking at the pictures. And without having the sight mounted on a gun and setting in front of me. But I think that will be a easy thing to fix so the reticle can be seen better.
GF1,
I think the farther the sight is from your eye, the easier it is to align the triangle. I have held it by hand and that seems to be the case. Since I’ll test it on my Beeman P1 next, I should find that out.
It will be interesting!
B.B.
BB
Good. Hopefully that will show something more about the sight that hasn’t been seen yet. You will definitely be able to rotate your wrist with the pistol to get different sight pictures.
Since I don’t have a safe backstop currently, I’ve not tried firing it, but just for visualization I put the Picatinny rail onto the Sig-Sauer X-5 BB gun.
With the See-All on top, at my arm length, the triangle basically fills the view. Just a hint of green under the base of the triangle, and two green triangles on each side…
Hmmm, they do need to re-do the mounting interface — at least fit a cross beam to fit the Picatinny grooves. Has some side slop too…
This sight does appear to be in a bit of a bind. Remove the green material on top, and you cannot track the tip of the triangle. Leave the material, and you cannot get the tip of the triangle on target. The sight is an innovative idea but the groups are not impressive. They might have some work to do.
Ridgerunner, that is pretty cool to have a falcon nest. Any idea what species of falcon? I used to read up on them very extensively.
RifledDNA, good man to take the neighbor’s boy out like that. The fun factor of shooting is vastly underappreciated.
Matt61
Thanks, his grandfathers wake was today, (my neighbors father) he passed on the 13th, such an awesome man, very sad but he was loved beyond words, looked so peaceful with his smiling face just literall comforting. Sorry if this bothers anyone, I’ve never been to a wake.
I know this might not be the place for such deep talk, I’ve got two daughters a wife, and the only guy around is the boy (who’s twelve) so you all are “they guys” just by default. I’ll try to keep it on the subject at hand in the future.
It might take a little concentration but a second triangle with its point level with the top and contrasting black center glow interior and black triangle border, like a triangle target?
I think the green fluorescent is critical of the whole design if you shave any material off the top in low light the triangle will be hazy and will have more difficulty orienting on target. It is what it is in that its a new design where they incorporated front and rear sight in one small package.
Chris,
I agree. I don’t want to shave any of the green.
The sight works best when it’s far from the sighting eye, so maybe things will get better when I try it on a pistol next.
B.B.
Oh and I think I see a Escape setting in the back ground of the picture Otho is in.
GF1,
That was the third rifle on the range this day. It will be tomorrow’s blog.
B.B.
Good deal. I have been waiting.
BB,
Given the extremely short effective sight radius, I’m pretty impressed that the horizontal dispersion is as good as it is. I think I can see the problem with vertical, or at least I have an idea after looking back at the sight picture in part I: The “vertical” reference (i.e. a horizontal plane) on the “rear sight” portion is pretty much non-existent and the virtual (for lack of a better term) slot is far too wide. I think the black line is intended to correct for this and is not a bad idea, but given the lack of focus (which is unavoidable with the rear sight), there just isn’t enough information in the sight picture. One thing I would try is to put a plate on the back of the see-all with a smaller, esp. narrower, notch. That might help line things up better vertically and shouldn’t hurt it horizontally. Worth a try–and its not destructive? I don’t really think messing with the green stuff/black line will accomplish much, but I can always be wrong; you will still have that option.
B.B.
Work on my compensator scope mount has finally started. In some 2-3 week I’ll have the lowest possible mount for FWB C62 with 1 mm between opened loading flap top and scope tube bottom, yet giving some .4 degree slope for pellet drop compensation at 50 m. Lots of measuring and prototyping from cardboard to modeling clay. Hope it’ll give me the much-needed edge in accuracy with lower scope.
duskwight
duskwight,
That sounds interesting. I know lots of shooters who want their scope as low as it can get.
B.B.
B.B.
In my experience they are right, especially when it gets to some far-end ballistics and pellets tend to fall rather than to fly. The closer the center axis of the scope to barrel’s center axis, the easier it becomes to shoot accurately, at least in my own experience. It works both for 15.8J .177 at 50m and for several thousands J .308 at 500m.
The problem of cant is almost automatically eliminated so on. Cheek weld is also a concern in this case – C62, despite its adjustable stock, is made for shooting with diopter thus cheekpiece can only be raised to a certain height. And it looks more like chin weld, not cheek weld 🙂 Not very consistent and comfortable, so to say, and not very accurate as a result. 10-15 mm lower works magic, I can feel the difference with my current “hand and needle file made” mount – it compensates all right (600 mm up at 50 m) but it’s 15 mm above desired height – groups are horrid. However flat low mount, despite lack of compensation and using lowest bead for aiming shrinks them dramatically.
duskwight
When is Pyramyd air going to stock these and what is the price?
John,
They are evaluating the sight at this time. Don’t know what the price will be until they pull the trigger.
B.B.
I just checked and found these on Amazon.com for $99. I think that price is a bit much. For a little bit more I could get a fairly decent scope.
This sight seems to have promise but it still has to have the “Bugs” worked out of it. An example would be the mounting system. I for one would wait for an upgrade.
Mike
Got home from work tonight and my See All Sight was setting on my desk.
And also got my order from PA which had the BKL mount and also my UTG butt stock for my .25 cal. Marauder with the R.A.I. adapter. Im a happy person right now.
Here is the BKL mount I used. And it mounted fine on my Discovery.
/product/bkl-3-8-or-11mm-dovetail-to-weaver-cantilever-adapter-4-long-matte?a=2920
Then I mounted the See All Sight on the BKL adapter with absolutely no problem. I just made sure the 2 set screws that locked the sight down were lined up on top of the weaver rail. Not down in the notches that the cross pins would normally go in.
Now finally I get to look through a see all sight. STOP. No you don’t look through a See All Sight.
You look over the top of the lens which they call the optic (A). And yes the line of sight (G) means everything about what you see.
If I moved my head up or down slightly like I was shaking my head yes I could line the black horizontal lines on the sides of the triangle and the point of the triangle up with the top of the optic lens I could then place the object I was shooting at right over the top of the point of the triangle. Just exactly how they have the sight placed on the deer in their instruction picture.
It works out basically like how I set my dot sights. I put the object I’m shooting at setting right on top of the dot. I did a quick sight in at about 11 yards in the garage using my trusty ole paper plate target with a black circle the size of a dime traced on to the plate then filled it in with a black marker. I hit high and right so I’m glad of that also. That should be good for when I move to a farther distance outside. I had the sight adjusted in about 6 shots. It kind of reminds me of adjusting a laser sight. So now I’m glad I did mess with laser sights for some exsperiance there.
I don’t know what other people are seeing but it reminds me very much of how you line up a rear notch, front post open sight. Instead of the top of the front post lining up with the horizontal rear notch sight and centering the post side to side in the notch. All I have to do is line the top of the point of the triangle up with the horizontal line that the optic lens makes.
I’m sorry but I think I’m going to like this sight with out having to do anything to it. I’m going to try to do a few shots outside before I go to work tomorrow. I will know real quick if I like it or not then.
Oh and I did mount the BKL adapter and the See All Sight as far as each could be mounted forward on their gripping locations.
After considerable time shooting with the See All over the past several weeks, here’s my reaction to today’s blog report and comments:
1. The See All Open Sight is NOT AN OPEN SIGHT and does not function as such, despite the maker’s name for it. The sight picture puts the black line/triangle “reticule” and the target all on ONE VISUAL PLANE the way a red dot does. The black line and the triangle appear to the shooter’s eye to be flat on the surface of the target.You do not line up a rear sight element with a front sight element plus the target as with real open sights. This is hard to grasp, especially because of the misleading name. The rear magnifying lens of the sight does not magnify the target and does not affect the sight’s alignment–it only makes it easier to see the line/triangle combination.
2. The See All works ONLY if you can tilt it fore and aft when mounted You must tip the sight up and down along the axis of the barrel until the horizontal black line and the tip of the triangle are all you can see at the top of the sight. Any green you leave in your sight picture above the black line blocks part of the target and alters the accuracy of the sight. No need to mill off the top green area, just tilt the sight until the green disappears from view.
3. The correct See All sight picture is with the black line at the top aligned horizontally with your point of aim (elevation), AND the tip of the triangle placed on the exact vertical point you wish to hit (windage). It looks like a squared up teeter board. You are actually designating intersecting X and Y axises as the point of impact. Using this sight picture, the See All is as accurate as any of the less expensive red dot sights.
4. Because of Point No. 3, the lower the See All is mounted (as on the M4 177’s rail) the more difficult it is to find the correct sight picture. If you mount the sight back on the rail close to your eye, it is almost impossible (you cannot tilt it). However, mounting the See All relatively high above the barrel of a pistol and about halfway down the length of the barrel makes it easy to aim (you basically regard the mounting point as the fulcrum for the up and down tilting motion of the barrel). You aim for correct windage by just moving your entire hand left or right.
5. Following this procedure was accurate for me, but very slow.
There’s an easier solution other than milling off all the green down to the line. Use a triangle-shaped jeweler’s file and cut a depression down to the top of the black arrow. You’d have to be careful the two points lined up exactly, but it would leave the remainder of the line to help center things up, and you could put the tip of the arrow exactly where you wanted.
I wonder if we could ask the makers of See All Open Sights to provide us with answers and their rationale for adding extra green and the black lines. There’s so much discussion here that I think it would be in their best interests to provide some answers and engage our blog readers.
Edith
Edith,
The answer is probably embedded in their patent. Maybe they don’t want anyone to know because they will invent other sights of this type.
But we can ask. I will do so.
B.B.
Leon got his post in before mine, but what he wrote makes sense to me and also means no fudging with the thing will be necessary. It does sound very slow however, but I suppose you’re not in any races shooting a single-shot airgun anyway.
If quick acquisition is the idea then it still looks like you’re better off with a dot or holographic sight.
I didn’t compare with a red-dot, but at pistol (sight) distances acquisition felt about as fast as with a red-dot (not a straight comparison — 30mm red-dot on a Ruger Mk-II target model some 5+ years ago, vs See All on a Sig BB model). Actually, the biggest drawback was that the Sig grips don’t fit my hands squarely, resulting in a leftward yaw that I had to manually pull my wrist to the right to get a straight view. In contrast my P99 at least fit me square, so it was mostly vertical adjustment to pick up the hint of three white dots in rapid fire).
Also, at pistol sight distance, there is not much green showing (any further and the triangle would nearly fill the lens).
For those interested in reading large quantities of technical detail, click here to read the patent for the See All Open Sight.
B.B.
I think the reason you had vertical stringing in your groups was because the sight was not tilted enough to make the green disappear and therefore to allow you to place the tip of the triangle in the right spot. As long as there is green showing above the tip, the sight is not on target up and down (elevation). If you had the black line square with the target, however, you would be accurate as to left and right (windage). That looks to me like what happened.
Otho was right that the sight will never be accurate if there is green showing above the tip of the triangle because you have no idea of where the sight is really aiming. But you don’t want to mill off part of the sight, just tilt it so you can place the tip accurately.
You really have to disabuse yourself of all the normal approaches to using a sight.
Leon,
Yes, I know that. The secret to this sight is to position it as far from your eye as possible, because only then can you align the magnified reticle tip and the unmagnified target.
B.B.
I just shot the Discovery with the See All sight at 25 yards. First thing that happened it was shooting low and right. Windage adjusted right in.
The elevation adjustment was another story. I was able to get within about a 1/4″ from bullseye. In other words 1/4″ low. I ran out of adjustment with the set screw. So I turned the set screw back in till it made the sight adjust again.
Then I shot about 15 shots and all grouped within a inch so I was happy enough with that. But now I got to figure out what to do to get more up adjustment. Once I do that and then take it out to 50 yards that will be the real test.
But the sight is very easy to line up on the target. And again repeatability of your line of sight is everything and its not hard at all to do after you aim the sight a few times. So elevation adjustment is the problem I’m having right now otherwise I like the sight so far.
Gunfun1,
Try backing the elevation screw all the way out of the sight block. Then press the sight block ALL the way down to the bottom against its spring and hold it there while you screw the elevation screw back in. As you screw the elevation adjustment down, it should engage the threads in the sight body (and the sight block which you started it into) once it bottoms out, you should be at max elevation. Continue your sight in and adjust as needed. This worked for me, and I was about 4 inches low at 25 yards with a sight elevated about 2″ above the bore.
I like this sight, and had some vertical stringing as well, but I do not tend to shoot as accurately as B.B. or Otho, so it is not an issue for me, but this review series is excellent. I also like that there is a lack of parallax with this sight.
RMG
I didn’t have much time before I went to work today when I was trying the sight out. So I was hurrying. I just got home and read what you just said and was checking it out some more. So this is what I did.
I went out in the garage and shot it at 11 yards as it was set for the 25 yard sight in I did before I went to work that I talked about above. I used a blank piece of note book paper and traced a dime for my bullseye in the center of the paper. I just aimed for the circle on the paper and shot 5 shots and circled the group where it fell and labeled them group 1.
Then I did what you just talked about with the set screw and shot 5 more shots and they did land higher and I circled them and labeled them group 2 . So the next thing I did is I moved the See All sight as far as could go forward and still use both set screws to secure it. And I also moved the BKL adapter forward to where it is actually hanging half of the mounting grips off of the receiver. So I am about 3″ more forward than I was before.
So I shot the 3rd group. And the 5 shots did land a little higher. So from the 1st group of 5 shots to the 3rd group of 5 shots it raised the point of impact up just about 1″. So at 11 yards that’s a fair amount of improvement.
So I hope I get time tomorrow before I go to work to get some shots of at 25 yards again to see what happens. If I don’t get to shoot tomorrow I will be off Friday so I will for sure get something figured out then.
And thanks RMG for the tip. And yes when I get past this little obstacle I know I will like the sight.
Glad it helped, there is a blurb in the instructions about going too far with the elevation screw, that is what happened to me, and Ron at See All got me running again with a quick call. The adjustments on this sight are like adjusting your front sight, so down is up and left is right….. Let us know how your session goes when you have time,
I as able to zero the gun at 25yrds. But it was maxed out on the up adjustment. Tryed at 50yrds. and it was hitting low. So I was done.
I found someting interesting out though. The adapter that the sight is mounted on angles upward making the barrel act like it has droop. So I have to get figured out and then I think it will be ok.
Ironically, I shimmed my parallel to the bore mount before I got a hold of Ron at See All, so I feel your pain….
It seems like this site was rushed into production priced pretty high being it looks like they could make it for 2 dollars. Seeing the weak mounting system along with the problems in sighting with it. It looks like greed has overtaken designing it right and getting the bugs out of it. The site has potential and should be redone like a Gen 2 or 3 lol
Respectfully uka, I do not think it was rushed into production. Anything can be refined, so Gen 2 may be “better”, but the “weak” mounting system is part of a monolithic frame, it is plenty robust to me. I feel the attachment via the two setscrews is simple and more repeatable in my humble opinion, as it uses the entire outside edges of the sight on the rail for alignment and spreading any shock to the sight from recoil or impact. The two dollar manufacturing comment just tells me you have not handled one yet, hold off until you have, it is well engineered. The sight received a patent in 2012, so the idea behind it is worth something as no one had thought of this type of system since our country was founded…. So I am ok with paying someone for their unique idea and I do not consider that to be greed….
reman did you see the trouble BB had with it getting loose and the other guy running out of adjustments. The mounting system will never hold up to a springer. when the patent runs out the Chinese will make it for $19.95
Yes, I had that too, it took all of 30 seconds max to fix, so not really a problem. I think that this site gives some of the most comprehensive and extensive reviews of the equipment they test and have been reading a bunch. With all positives there are negatives and the scale of them is what makes something unusable, in this case the scale for me is negligible. I think that this mounting system would hold up on a springer, some thread locker and if that did not work, then the industry standard of drilling a couple of divots or even threading some holes in your weaver rail where you want it mounted would suffice quite nicely and be as permanent as anything short of welding. You could also apply thread locker to the bottom edges of your rail, this would act to further secure the sight to the rail. In fifteen more years, or whenever the patent runs out, I cannot wait to see how good the current See All Open Sight system will be, and I can put a $20 Chinese copy on my hood to help with aiming my car…. uka, you really should see one of these in person, the web has a way of exaggerating the good or the bad of something, you can best make your choice in person. Good luck with a sight, I will be sticking with the See All…..
If it were a molded plastic body (as is the green part carrier), the $2 might be on the mark. It appears, however, to be extruded or milled aluminum (or other metal). That alone puts it above a Celestron/Orion/Daisy red-dot finder
$99 may be on the upper end of the range, true…
The way I see it you can pay some good money for a good dot sight. And you can definitely pay some good money for a scope. So to me the See All sight is a good value at the price they are asking. And it will be priceless for me to shoot again something that resembles open sights like I shot when I was a kid when my eye’s could see.
I haven’t got to mess with the mount adapter that I have the See All sight mounted on yet. But going to tomorrow. So I want to get it squared away because I got a weekend of shooting planned. Also going to shoot the .25 cal. Marauder rifle for the first time with the R.A.I. adapter and UTG AR stock on the gun. So busy day for me tomorrow. T.G.I.F. again. My weekend starts tomorrow. 🙂
Well I did shoot out to 50 yards and I will just say it how it is. I had problems trying to keep the line of sight consistent everytime I shot.
When I came in closer and shot at 25 yards I was better at repeating my sight picture and my groups were better. And same applied if I moved in to a closer distance like 11 yards. My groups got even better.
Tryed it on my 2300S pistol at 11 yards and it wasn’t bad. And also I can do better with my red dot sight. But I’m going to keep the See All sight on the 2300S for a while. Maybe I just need to use it more. Will see.
GF1,
Thanks for the update on the sight.
B.B.
Thanks BB. And I will be waiting to see what you come up with also when you do some more testing.
And its still a interesting sight to me. And it seems like there is something I’m overlooking that will improve the way the sight works. Something like how it mounts to the gun. Or even maybe something like making the flat part of the top of the magnifying lens black. I think that could make the sight pick up the object better. Either way more experimenting to do.
GF1,
Don’t do anything to your sight! I think I have discovered the secret of making it perform and it isn’t modification. It’s optical and we can do it with the sight as it now comes.
B.B.
BB
Ok good. I can use the sight pretty good at 25 yards or closer. I hope your trick will work out for the farther distances.
I liked the sight on the Discovery I just couldn’t make it do what I wanted at the farther distances. So I can’t wait to see what you got up your sleeve.
We are waiting with baited breath, B.B.! Will you be updating us with this information when you report on the pairing with your Beeman P1 pistol? Personally, I haven’t even seen an actually SeeAll but was thinking along the lines of milling it too. I’m not ready to give up my Trijicon RMR sights yet, despite paying 3.5x what a SeeAll costs!
Calin,
There will be NO milling of the sight. The sight is manufactured to 1/10,000-inch! It’s done photographically.
I am currently struggling with the sight on a Beeman P1. Look for that report later this week — I hope!
And welcome to the blog.
B.B.
I just bought a See All and fitted it on my Talon SS using an adaptor that came with some used scope mounts, so its plenty high enough. The combination looks good and works well. I was amazed at the results when shooting at 25 yards. Leon is dead right about the need to position the image of the reticule at the very top of the lens.
I find that, since the hard edge of the lens is right in the center of your field of vision and just a few inches from your eye it blurs and softens the image of the reticule to the point where you cannot clearly see the very tip of the triangle, hence the horizontal reticule lines are vital since they indicate the vertical location of the tip.
Taking advantage of the blurring it is possible to find a view where there is not a clear divide between the target area in the upper half of the field of view and the reticule in the lower half, instead the image of the reticule is superimposed on the target which I suppose makes it somewhat like a red-dot.
I normally use glasses when shooting with open sights, but with the SeeAll I don’t. The manufacturer does need to improve the mounting provision though. With its simplicity and potential robustness it should be a good choice for heavily recoiling guns, but I don’t think I would count on it with the current mounting arrangements.
Overall I’m glad I bought the SeeAll rather than one of the cheaper red-dots, it performs well and with a bit of modification to the mounting it will likely prove reliable on a variety of guns.