by Tom Gaylord
Writing as B.B. Pelletier
This report covers:
- Talon SS?
- Triggers
- Accuracy expectations
- Scopes
- Get parallax adjustment
- Match the scope to the task
- More to come
This is Part 2. In the first part I was brutally honest about the precharged pneumatics (PCP) I think are good for beginners. Now that I am doing my experiment about learning to sharpen straight razors I appreciate the level of information most new guys are seeking and are able to accept. There will always be some folks who don’t get it the first time around, but I won’t talk down to the rest of you to cover that. I will answer their questions and explain in greater detail as they require.
Talon SS?
Reader Cal raised an issue in Part 1 and answered it at the same time. Why didn’t I put AirForce rifles like the Talon SS into the entry-level category? Can’t someone who is new to precharged airguns shoot one of those? Of course they can! The Talon SS is no more difficult to learn to operate than any other PCP. The reason I held off is the style of the rifle.
When you shoulder a Talon SS for the first time, it feels different than most rifles that have conventional stocks. The straight line of the air reservoir that also serves as the stock bothers some people. They feel they can’t get their face low enough to see through the scope. I can show a person how to hold the rifle properly in a minute, and have done so many times, but even then some folks just will not like doing it my way. Because this series is for new shooters, I thought I had better not recommend a rifle they might not feel comfortable with, once they get it in their hands. However, if you can accept the difference, the Talon SS makes a wonderful first PCP that will out-shoot anything near its price range!
Triggers
Let’s talk about triggers and what your expectations are. Some people buy a PCP thinking that the trigger will be like one they have read about on a thousand-dollar rifle. It won’t. For the most part the trigger is the one place in which entry-level PCPs are lacking. Other than the Benjamin Marauder, most entry-level PCPs have triggers that are just okay. The Marauder is the only one that’s highly adjustable and lives up to the PCP trigger expectations. The Talon SS trigger is very good, but it’s not adjustable.
Is it possible to modify an entry-lever PCP trigger to make it better? Sure. You can do any number of things that range from a basic slick-up and tightening of the bearings to (sometimes) installing a Marauder trigger like Lloyd Sikes did on my Disco Double. Expect to pay for what you get.
This point is very important for new buyers. Don’t expect a world-class trigger on a $200 air rifle.
Accuracy expectations
What do you expect from your new PCP? If you expect 10-shot groups that are sometimes smaller than 3/4-inches at 50 yards, either buy a Marauder, a Talon SS or wait for me to test those entry-level rifles I haven’t tested yet. First of all, I am talking about TEN-shot groups — not five-shot groups. There is a world of difference in the group size when you shoot 10 shots.
Next, don’t think that any rifle can always shoot groups that small. None of them can. There will always be groups that are larger than your expectations for a variety of different reasons. But a really good PCP can shoot groups this small quite often, under the right conditions.
The Marauder and Talon SS can both do it, with the SS getting 10-shot groups of around 0.60-inches in the right shooter’s hands. But surprisingly, several of the lower-priced rifles in the budget entry-level category can do almost as well. With the Benjamin Discovery you may need to play with the positioning of the forward barrel band, but when you hit the sweet spot the Disco will surprise you.
And remember this — one of a PCP’s biggest advantages is the fact that they have no vibration or movement to throw your shots off. With a spring gun you are fighting recoil and vibration on every shot.
Scopes
Here is where things start to get hairy for the first-time PCP user. Nearly everyone will scope their new rifle, but you have to adjust your thinking when you select a scope for an accurate rifle. I am all for you choosing an inexpensive PCP, because you don’t know if you’re going to stick with this hobby. But a cheap scope can undo all the positives that the manufacturers build into their airguns.
However, just because a scope isn’t cheap doesn’t mean that it can’t be economical. For not too much more than you spend to buy an off-brand scope you can get a reasonably good one that has decent optics. It will probably offer lower power (3-9 is common), but the image will be reasonable clear.
Get parallax adjustment
I recommend that you any scope you buy comes with parallax adjustment. Do you notice that I am not suggesting any specific scope models? That’s because there are hundreds to choose from. Get one whose features you like and whose name you respect. Hawke and Leapers/UTG are two that come to mind, but there are others. Just stay away from those Red Star scopes that you find at gun shows for $30. [That remark is going to wake up somebody who swears by Red Star scopes, I just know it!]
If you push me to recommend a scope it’s going to be the UTG Bubble Leveler. Sorry if it costs more than the PCP you have chosen, but remember — you can use this scope on any airgun or firearm.
Match the scope to the task
If you want to shoot groups at 50 yards, get a scope with higher magnification. Sixteen power would be the minimum I would recommend.
If you want to hunt, get a scope that’s lighter weight and smaller — so it’s less cumbersome to carry in the field. Also consider one of the shorter scopes like the Bug Buster 3-9X32. They are not only lighter but also a lot smaller, so they don’t get caught in brush when you walk through the woods. Just bear in mind that a short scope like a Bug Buster has limited mounting options. The short scope tubes that are available to go into the rings don’t give much back-and-forth movement. I see shooters trying to mount these scopes on rifles that have a scope mount base located too far forward on the rifle. Then they can’t slide the compact scope back far enough to get the best eye relief.
More to come
There is at least one more report in this series. I want to talk about filling options for your entry-level PCP.

B.B.
For PCP’s do you throw the artillery hold out the window?
-Y
I suppose the artillery hold will WORK with a PCP, but I don’t think it’s necessary — no recoil. My wife doesn’t like my Marauder: No noise, no recoil, “I don’t feel like I’m SHOOTING anything!” Which is exactly the point.
HiveSeeker,
Pull the baffles, like a 30 second job, and then let her shoot it. It WILL be loud.
Yogi,
I used to, but lately I find that I hold all non-recoilling rifle with the artillery hold. It works well on .22 rimfires, too. It’s just a way of standardizing my hold across the spectrum of guns.
B.B.
Very nice. Many good points made. The Center Point front AO that came with the Maximus was fine. I wanted a side AO and went with a UTG. The CP was good enough that I left it on for quite a long time.
As for magnification,.. I find that I do fine with 7 @ 50 and then moving up to (maybe) a 12 @ 100. Usually 10.
On triggers,.. I have the Maximus set up real nice. There is upgrade kits/units and even a repeating breech available, but then you need to add that up and seriously ask yourself what else is out there.
I did move the barrel band. It did help. About 3″ back from the stock position, if I re-call correctly.
That my 2 cents for the day. Good Day to one and all,…. Chris
Chris USA- I am interested in knowing more about your Maximus mods. I too really like my Max Hunter and mine has proven to be a very accurate shooter. Knowing some of the little “tweeks” to increase the enjoyment factor is always appreciated.
B.B.
Thank you again for your timely and informative Blog’s. Excellent.
2L8,
Mine is the Hunter too. Moving the barrel band fore and aft can reap some benefit. From the air tube cap (front) to the front of the band was 3 3/8″. I moved it to 6 3/8″. The idea here is the barrel vibrations. The trigger can benefit greatly with two 5/8 x 4-40 screws, a spring chop and relocation, a spring tweak and some lube. Very easy. Maybe a 1 hour job the first time. 15 minutes after you have done it once. A Limbsaver butt pad (large) upped the pull by 1″ and does not distract from the looks at all. The trigger is T shaped and I shaved off the left side (I shoot left). I found that the T was a source of puling shots and just did not feel right to me.
Questions? 😉
Thanks Chris, can you tell me more about this, “a spring chop and relocation, a spring tweak and some lube” . I have done the screws and polished the contacts and lubed them with Bel-Ray moly. I do as a mater of fact have an extra Limbsaver I will put on and as for the trigger blade, I will shave and mold my right side and see how it feels. Mine shoots Very consistent so I will not mess with the barrel band unless of course it will make my one hole .22 groups shrink down to .177…..*;) winking
Thanks again!
2L8,
If you have done the 2 screws, you know that the top screw will bring the “1st stage” back the more you turn it in. That screw also advances all of the linkage,.. towards the sear. The lower acts as a trigger stop. Too far in and the sear will not be able to drop. The spring on the trigger is behind/to the side,… but can be moved on the stop screw (lower). Adjust spring length as needed as this is the “pull” you are feeling on the trigger as you advance it. The “2nd” stage is where the linkage contacts the sear and will rock the sear from the hammer/weight. The hammer is held up by that V spring. You can bend it inward (close the V), but too much and it will not hold the sear up into the hammer,… it will not catch/cock.
If you pull that spring and bend it inward, the force to drop the sear will be less. I cleaned it, traced with a pencil and measured the angle with a protractor. 121 degrees was too light. 124 was ok and is where it is now. 130 was stock.
Hope some of that helps.
The (sear), that engages the hammer, is held up by that V spring, (not the hammer) as stated. My mistake.
On lube, I use silicone grease on plastic to plastic, moly on metal to metal. If there is metal to plastic, I use silicone grease.
Thanks Chris, I do understand all of your suggestions. Thanks for the details on bending the V spring to the sear. I will try your idea of putting the trigger spring through the bottom screw, I have it below now, and see what that brings. I replaced the trigger spring with a .023″ from the stock .028″ and it’s better but I think I will go down to a .020″ as I have heard this is the ideal size, I will make appropriate cuts of the spring for length. Thanks for the lube insight and Thanks again for your time and knowledge.
2 late
Now that’s the kind of thinking I like.
A .22 pellet making a one hole .177 group. 😉
Oh and seriously. You might be surprised at what moving the barrel band will do.
What distance do you shoot at anyway?
Thanks Gunfun1 , My backyard shooting distances are from 15 to a max of 25yds (all I got). When I do my part this rifle is a one hole wonder, shooting CPUM, CPHP and FTT 14.66.
2L8
My.22 Maximus was very accurate. Had a bunch of different Crosman guns this style.
Here’s some mods I did with my Maximus I had.
https://www.youtube.com/watch?v=eFSmrfRP71k
https://www.youtube.com/watch?v=EE8OvOJvmSU
https://www.youtube.com/watch?v=asozt_-2luo
And I got a simple way to make the Maximus/Discovery trigger feel like a two stage trigger.
GF1, That is some serious air going on there and creative ways to use the Maximus hardware.
My interest is of course piqued about your simple Maximus trigger mod…….Do share, please.
2L8
Here’s the bottle I used.
/product/air-venturi-tank-with-adapter-13-cu-in-aluminum-3-000-psi?a=7456
It’s a HPA (high pressure air) regulated at 1100 psi bottle. The bottle fills to 3000 psi. The Discovery’s and Maximus will run on Co2 pressure. So if you hook that bottle up to those gun’s you will get like 70 or more full power shots and they are consistent velocity wise because the air introduced to the gun is that 1100 psi. And the velocity will be right at what the Maximus and Discovery does from the factory.
And the trigger mod I’m talking about is too simple. And I do have to say I tryed that double set screw mod Chris is talking about back when I had one of my Disco’s.
But the mod I’m talking about adds one of those old click type ball point pen springs inside the factory return spring behind the trigger. I cut it to the legnth of the factory return spring.
Then I take the factory return spring that is behind by the trigger and cut a few coils. The coils that you cut off will give the effect of the first stage travel on on a two stage trigger.
The pull will be light on the first stage which will be the ball point pen spring. Then you will feel a distinct stop when you hit the cut factory spring. Just like a two stage trigger. A little more pull and the shot goes off.
And one more thing. That (V) shaped spring that engages the sear to the striker can be bent just like he explained to adjust trigger pressure. Basically in other words. How hard the sear pushes up to lock the striker back when you cock the bolt.
And that’s that.:)
Hope I explained right.
Thanks GF1 for the great commentary on your Maximus mods. Between your and Chris’s ideas I will have plenty to experiment with, I’ll keep you posted.
Thanks again!
Happy Shooting.
2L8
No problem. And definitely will be interested in how your Maximus does.
Let us know ok. 🙂
Hi Chris,
Where does one find the after market parts for airguns? I’m seeing some names here and other blogs but it seems like there is a kind of “underground” for parts and services that is not easily accessible. Seems like insider info that is discovered rather advertised.
GrandpaDan
Dan,
I have picked up a few here and there and save them to “favorites”. ((What do you have in mind?)) Did you get the pump up and running or get a new one. I am sorry your first foray into PCP did not pan out due to a faulty used pump, but you will love the Maximus once it charged.
Chris
BB,
My first PCP was a Talon SS. I too would hesitate to recommend it as a first. Besides being different in shape, their are quite a few adjustments that can be done with it that one who is inexperienced with PCPs can easily find themselves in over their heads and it no longer is a top performer. The same is true of the Marauder.
Your entry level choices were spot on. I wish all of them had been available when I crossed over to “The Dark Side”.
Same here my first PCP was a Marauder gen 1
BB,
This scope is a superb choice for a light PCP or rimfire.
/product/hawke-sport-optics-hd-ir-series-2-7×32-ao-rifle-scope-illuminated-mil?a=3864
It has features found only in scopes at over double the price. I have given it my RRR rating.
RR,
I have the Hawk scope you recommend and the other 2×7 that is lower priced both are excelent scopes at a reasonable price.
All of my Hawk scopes are very good.
Don
B.B., Yup–I’m still looking for quarter size 10 shot air rifle groups at 50 yards. I may need to install the lower power Talon SS hammer parts in my TalonP (along with my longer barrel) and swap out my valve for a Talon valve! Accuracy trumps all but, as a hunting / survival rifle, I still like the smaller tank of the TalonP/Escape models.
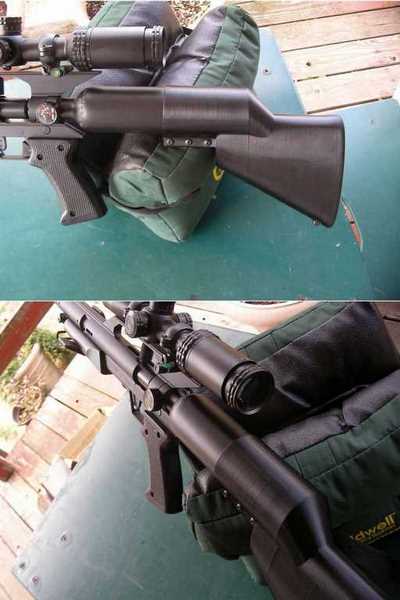
The AirForce tank stock always seemed like it would work fine for me too, but I solved my TalonP pistol’s lack of a stock issue with a 3D-printed nylon part that I designed. Although I shared links to photos with you and your readers previously, I’d like to flaunt it here again (since you brought up the subject) using your blog’s upload feature that wasn’t available when I posted the links. I’m very happy with its ergonomics and the very solid but comfortable cheek weld it provides against the conical surface aft of the air cylinder. By leveraging the size benefit of the small TalonP / Escape series air tank, I designed my stock to accommodate a cheek weld with a scope height that’s slightly lower than a typical scoped AR-15 (which is pretty high already) and significantly lower than the larger tank models. I shoot off a bench with the bunny ear bag, but I also use a “squeeze” sock containing a plastic bag full of walnut media under the buttstock. I still prefer to use my off hand to hold the TalonP’s fore end or frame but then I can’t use it to squeeze the sock for fine aim adjustments. That’s where the stock shape comes into play. The triangular underside of the stock rests on the squeeze sock. I can easily make elevation corrections by moving the gun slightly fore an aft. If I move the gun slightly forward, the triangular section of the sock rides up higher on my squeeze sock, thus lowering the muzzle and cross hairs. To raise the point of aim, I just ease the gun aft a fraction of an inch. The stock can also be positioned fore and aft on the air tank to provide a length of pull adjustment and it features a sling stud too.
-Cal
Cal,
That is a superb stock! Nice job!
Cal,
Nice job on that stock! Thanks for sharing it with us.
B.B.
Thanks, RidgeRunner! Thanks, B.B.!
Cal,
I bet you could sell a few of those. Great job.
Don
I’ve thought about having an injection mold made, Don.
3-D printing is great for prototyping and personal onesey-twosies, but it is too slow for production except in cases of limited production of small parts. This stock is fairly large. My concern is recovering the high cost of an injection mold, especially given that the AirForce product line has remained virtually unchanged for over a decade and I wouldn’t be surprised to see the old models discontinued any day now. (Recent AF factory promotions tend to reinforce my suspicions too.) On the other hand, the long history of the product line’s success implies a large customer base, which may or may not be happy with the existing AF and aftermarket stock offerings that are attached to most AF guns.
The TalonP/Escape series is the best candidate for stock improvement in the AF lineup. In using the smaller AF tank, my stock provides a wonderful cheek weld and the lowest possible scope height with the right scope and rings (improving hold repeatability and reducing the potential for cant-induced aiming error, respectively). Personally, I also prefer the look and lines of my stock, in comparison to current commercial products. In particular, the drooped tank adapter option (which provides the above benefits too) really ruins the lines of the gun and creates a new potential air leak interface (though leaks would still be unlikely, I think). As a product, a Condor tank would require a slightly different design and mold too, but I guess I could start with a TalonP / Escape product.
The next stock I 3D-print will likely feature a quick release clamp to permit rapid takedown for stowage in a small day pack and quick length of pull adjustments, instead of the three screws currently securing the stock to the tank.
Thanks for your comment and encouragement!
-Cal
I said it’s a fairly large print and I’d like to add, specifically, that this stock maxes-out the 8-1/4 inch (z) height range of my Ultimaker 3-D printer. (I print it butt end down.) I still have plenty of real estate in the x and y directions but it’s pretty big for most 3D printers! If I bought or assembled a new taller printer (or “stretched” my Ultimaker in height with a bunch of new parts), I’d probably increase the length of my stock to add more length of pull adjustment room. It currently features an inch plus of LOP adjustment range and I created the CAD model for my own 14-1/4″ LOP +/- 1/2″+ so it adjusts from about 13-3/4″ to 14-3/4″.
Yep, a friend of mine was ahead of the curve on making the plastic adjustable fishing pole holders for boats. He had a good design but was overrun by the big companies. He made some mony in the beginning but lost out in the end. His mold was a big expense.
Don
Calinb,
Very, very nice. You are very fortunate to have the resources to do that. Often times, selling an idea is enough. You have done one better by being able to do a working proto-type. I would approach Air Force and hope that they would be honest and square dealing with you. It is better than doing nothing. Heck,… you could be their “head proto-type dude” and bill on time and materials. 🙂 Nice work!
I’m still recovering from Hurricane Irma (power back two days ago and still iffy) and probably missed the discussion, but where did all our carefully crafted blog avatars go? Everyone’s…generic!
Hiveseeker
Hurricane. Bummer. How everything is ok.
And yep me and geo791 has been saying that about the gravitars for a while now.
Yeah, miss being able to spot specific commenters through the comments section.
HS
The comments section keeps changing in little subtle ways. When the generic gravitars came back they were large, now they are miniature. The comments RSS feed was really wacky for a while but now it is working better again, but not perfect. When I check the RSS feed for new comments and then right click to open in a new tab, I sometimes have to scroll down a few comments to find it. I check the time on the feed and match it up with the comment. As B.B. stated, the blog is in a constant state of change from either Pyramydair, or WordPress, or both.
Darn phone.
Hope everything is ok after the hurricane.
Thanks, Gunfun1, safe and sound. Though I’m considering moving to Kansas! 😉
Hiveseeker
Then you got to worry about tornado’s.
Either way no fun.
Main thing is that you survived and everything is ok.
Oh and I miss seeing your bumble bee. That’s how I could scroll through the comments and reference comments. If that makes any sense.
I think I’d rather deal with 5 minutes of terror than the week of trepidation watching Cat 5 hurricane paths meandering around your home on the projection maps. But if it’s not either of those, it’s flash floods or earthquakes. Or clowns! 😉
Hiveseeker
All true.
🙂
Wanted to make a comment on scopes…
All of my airgun scopes have an AO adjustment for the parallax and I feel that this is an absolute requirement. It can be very frustrating trying to sight in an airgun at 100 feet with a scope designed for a powder-burner which is parallax free at 100 yards.
Side adjust AO is great when bench shooting – especially if it has a wheel mounted on it. Side adjust is preferable for Field Target shooting where the parallax adjustment is used for range finding.
I prefer a front AO on my hunting scopes. I like to quickly set the parallax to the range that I expect to be shooting at (usually 15 yards for rabbits and 30 for squirrels) and leave it – there is rarely time to be messing with fine tuning the AO anyway. I find the front AO to be more convenient but that is just a personal preference.
About magnification and objective size…
I got caught up in the “bigger is better” thing and I quickly realized that you can easily end up with way more scope that you need. There is nothing wrong with a 4 power 32mm scope for hunting and plinking at normal ranges – I have one on my FWB 124 and it works very well! If most of you shooting is beyond 25 yards the you will want to look at the 3-9 or 4-12 variable scopes with a suitable lens. After that, specialty scopes get heavier and more expensive – I have a 8-32×56 scope that I use for bench shooting – it weighs over two pounds!
If you are new to airgunning I hope this helps you,
Hank
Vana2
I don’t have a scope over 16x . Only one has a sidewheel, but is not mounted on anything .
Front lens AO on everything else.
I usually leave them all on 8x and 25 yards. Works well for species identification and for spotting those small twigs that often get in the way and spoil shots.
I turn the magnification to the lowest setting for very close shots, but leave the AO at 25 .
tt
Yup, Twotalon. I agree that 8x is good magnification setting (see my comment below) and 25 yards is a good parallax setting. (The potential parallax error for a long yardage shot at 50 yards is then the same as at 12.5 yards and reasonably small.) By leaving the scope controls alone, you won’t suffer adjustment side effect errors, which are all too common in scopes under $1000 (and sometimes in scopes costing kilo bucks too)!
calinb
Temperature problems are bad enough, but when you make adjustments, you add in a whole bunch of possible errors . A lot of people try to blame the rifle for POI shifts when it is really the scope doing it .
Takes some playing around to figure out what is causing what, and how much.
tt
TT,
Pegging the parallax distance to 25 yards makes good sense as the error will be small and if one shoulders the rifle consistently it would be a non-issue. I adjust mine to 15 and 30 mostly for focus reasons.
My scopes are mostly 3-9 and I have 4-12 and 4-16s. Usually set them to the minimum magnification to get maximum field of vision for quick target acquisition.
I’ll try using 8x for squirrels – you have a good point, there has been numerous times when I didn’t see the twig and my “dinner invitation” was deflected 🙁
Hank
Vana2
I have a 4-12 Hawke on my FWB and still leave it on 8x . I target shoot 25 yds at small circles (about .20 inch) and the crosshairs are very fine . AMX reticle . No need for more magnification .
Field of view is not really much problem at 8x for me .
tt
TT,
I like Hawke scopes, have several of them. My 4-12x44SF is on the .177 HW100 that I use mostly for target and plinking. My 3-12x44SF is on the .22 HW100 that I use for longer range pesting (the FWB 300 is for close work). I do most of my hunting with the 4-16×50 and the .25 FX 500.
I like the largest field of view I can get because I am often shooting at moving targets, been using the lowest magnifications out of habit. I’ll check out higher magnifications to work my way up to 8x and see if I am comfortable with that.
Thanks for the suggestions!
Hank
Hank,
You are right on, good concise advise on scopes.
I have been using your 10 single shot series targets. They have really helped me figure out the gun and my technique with it. For each row I keep a description of what I focused on and what my body was telling me along with the feet per sesond from my chrony.
After 10 shots I get a good idea of the interaction of me and the gun. One thing that has really stood out is my focus on trigger pull, especially with guns that don’t have the best trigger. If there is a long creep I start to loose my focus. Now I stop take another breath and the contnue. Making sure I am pulling the trigger staight back along the axis of the barrel makes a big difference for me. These factors were always intuitive but I was able to see the difference they make with the one shot for each bulls eye and a short description of each shot.
Thanks for the target,
Don
Don,
Glad that the target is working out for you! It is my go-to whenever I am checking the rifle, pellet or myself.
Agreed – trigger pull is big area of concern. Find I am liking my heavier rifles (TX200 and FWB 300) for general shooting as they have light triggers and the mass not to move much.
Hank
I agree with your comments, Hank. Another reason for setting and leaving an AO adjuster (or moving it only over a small percentage of its range) is I can just about guarantee that you will induce a few MOA of reticle / point of impact error if you move the AO over its full range. If a shooter only cares about group size rather than accuracy, this is moot, of course. Side adjust scopes are usually better than AO scopes in this respect but 1 MOA error is still very typical in a side adjust scope. Sorry that I often harp on this aspect of parallax adjusters here on B.B.’s blog, but it irks me and maybe you didn’t get this particular memo yet! 😉
I also agree about magnification. The U.S. Military has done numerous studies on the performance benefits of magnification. Most people are “over scoped.” Shooters may think they need it but, other than perhaps the psychological or “placebo” benefit, the higher magnification doesn’t help them shoot any better.
For example: I won’t rest until I can consistently hit a quarter size target at 50 yards from a rested position, day after (windless) day, with an air rifle. However, I know 7x magnification is plenty of magnification to do it, because a 7x works just fine on my 17 HMR at this accuracy level (only 1.8 MOA). To understand scope magnification levels even better, consider that U.S. military snipers typically use 10x scopes. Anyone can do the arithmetic: A military sniper hitting a man size target (20″) at 1500 yards using a 10x scope is the equivalent of my goal and not at all exceptional in the military. Of course wind and other ballistics challenges can make the task difficult, but not the 10x scope magnification!
Framing my goal (a quarter at 50 yards using my 7x magnification PCP is comparable to a military sniper’s target at 1500 yards) in the context of B.B. comments here on accuracy expectations (3/4″ 10-shot group) is also valid and appropriate.
>but, other than perhaps the psychological or “placebo” benefit, the higher magnification doesn’t help them shoot any better.
I forgot a couple of things so I need to comment on my own comment! Psychological factors can be psychologically damaging with excessive magnification too. A Leupold rep once joke with me that he gets nervous when he can see his heartbeat against the target when shooting with too much magnification. Even though I’m sure that Leopold reps love to sell their much more expensive high power scopes, he told me my 2.5-8×36 Mark 4 was his overall favorite scope in the Leupold line. I also have a bit of experience at Appleseedinfo.com shoots where instructors warn students using high magnification scopes not to “fuss the shot.” High magnification can keep a shooter forever fussing the reticle around for each shot, resulting in worse accuracy than just taking a good and timely shot instead of fussing. I’m sure military instructors know about this high power scope usage tendency too.
Caninb,
No problem harping – does me good to re-read pertinent points! Agreed – the more you mess with things the more likely something is going to go out of wack.
Used to be that I would only shoot paper to sight in. Didn’t think much of bench target shooting because you could never drag a bench into the areas I hunted and the game would rarely accommodate you by sitting at a known distance. 😉 I’ve changed my attitude toward bench shooting and feel it is an excellent way to shake-down the equipment and train the operator to be consistent.
IMHO, small groups are a good indicator of consistency but a really skilled shooter will be able fire one shot at a quarter sized target, at random ranges and consistently “make change”.
Like your goal – a quarter at 50 yards @ 7x magnification. I measured an American and a Canadian quarter and they are within .010 inch of each other… about .940 to .950 in diameter. Will make up some targets and give it a go (weather permitting) on the weekend.
Hank
Hank
Yep.
😉
You remember what I said before.
I made some real good one hole 10 shot group’s at 10 starlings through out time. 🙂
What matters to me is I hit what I shoot at. The first time. Ok well there are some exceptions at 100 or so yards out. 😉