by Tom Gaylord
Writing as B.B. Pelletier
Today’s report is Part 3 of reader Vana’s excellent report on stock making.
If you’d like to write a guest post for this blog, please email me.
And now, over to you, Hank.

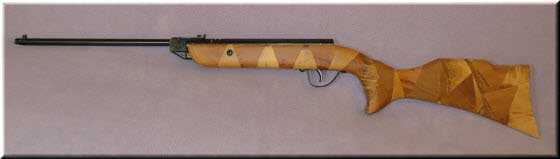
This is my original 55 year old Slavia 618 in its new “firewood” stock. I made this one in a “camo” style, using cherry and maple blocks in a random arrangement of the pieces.
This report covers:
- Parts of the hand
- The model
- Getting ready
- About the grip
- Carving the grip
- The Try-Gun stock
- Summary
Parts of the hand
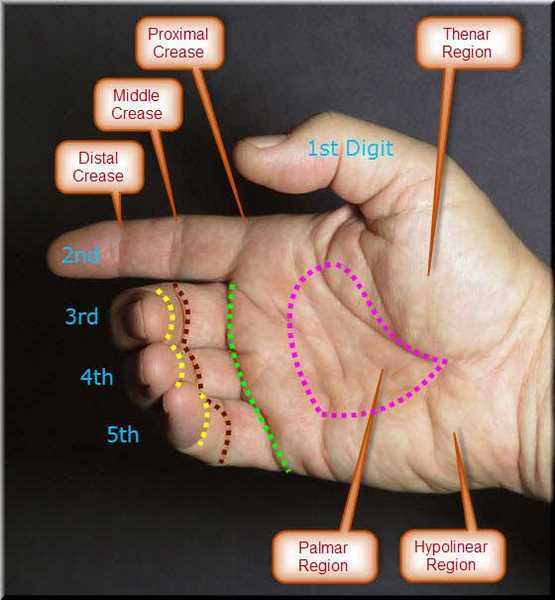
Legend: These are parts of the hand that I will reference in my discussion of the grip.
I made this legend so that it will be easier to follow my explanations. In the picture, my grip is relaxed and open so I can label the parts clearly. When actually holding the grip, my thumb (1st Digit) would wrap around the grip causing the Thenar region to move down to follow the top of the Palmar region perimeter (purple line), and the 3rd, 4th and 5th fingers would be curled in more.
Try closing your hand as if holding the grip on your rifle and look inside you will see the relationship of the planes formed by the areas between the creases and the palmar region and the thumb. This is easiest to see if we make a model to work from.
The model
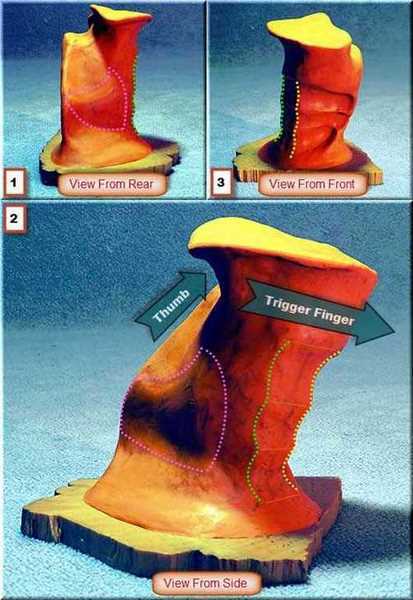
To help visualize your grip it is useful to make a Plasticine clay model. The line colors match those used in the legend above.
The closer we can duplicate those angles and forms the more comfortable/consistent our grip will be because the grip conforms to the hand. We don’t need to carve every detail but a model will show you the size, shape and angles of the humps, hollows and planes that will be the most comfortable to hold.
When I was a kid I would spend hours sculpting Plasticine modeling clay. Don’t know if that company is still around but I bought two packages of modeling clay at the dollar store. So for those who missed using this clay as a child — here is your chance to correct that! My lump of clay is currently disguised as a large orange leopard frog!
If you make a model, work the modeling clay to warm it up, form it into a cylinder on a rigid base (like a coffee cup coaster) and squeeze it into shape. Keep in mind that the grip on the rifle will be more
relaxed than the one you used to form the clay so once you have the basic shape you will have to reform the model to your normal grip.
Getting ready
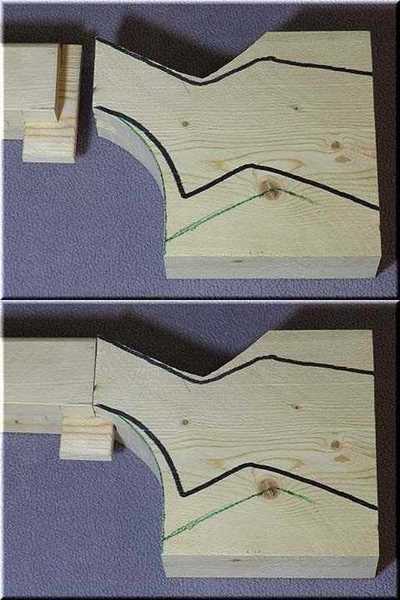
Here I’ve rough cut the grip and installed a temporary tenon to hold things in alignment while shaping.
I will be making the grip larger (green line) than the original so I have left a generous amount of wood for shaping. The extra wood below and to the right of the actual grip is to give me somewhere to put my clamp.
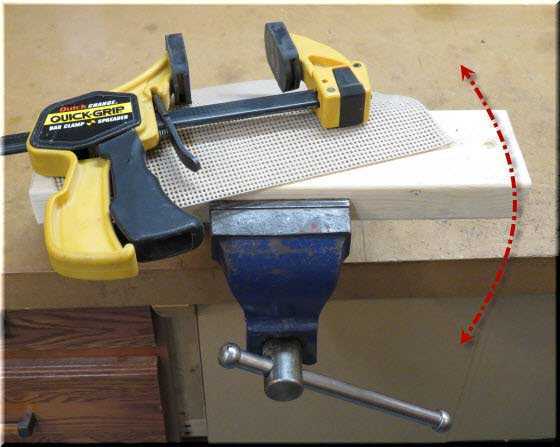
A solid non-slip surface makes shaping easier and safer.
About the grip
The grip is your most critical interface with the rifle. You can opt for a simple grip as found on commercial stocks or you can get creative. As an exercise for understanding how the shape influences the hold I will be carving a detailed grip for these stocks.
Since the shape of the grip has such a strong influence on how the rifle is held, I prepare several blocks of wood so I can experiment with different styles and shapes. A more vertical “target grip” encourages my arm to come closer to my body and increases stability. A more angled “hunting grip” causes me to raise my elbow which allows more freedom in stance and increases mobility. The angle on the “plinking grip” I made on the Try-Gun and firewood stocks is a compromise typical of many commercial stocks.
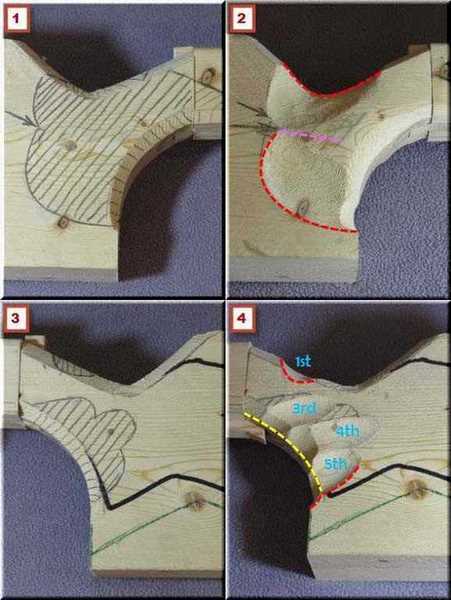
Tracing and roughing out the grip.
I prefer a relaxed grip on my rifle and rely on the shape of the grip to positively locate my hand and to hold everything firmly while I shoot. To achieve this I pay close attention to how I shape the hypolinear region of my palm, lower edge of my 5th finger and where my whole thumb fits to the stock (red dashed lines).
The positioning of the distal crease (yellow dashed line) relative to the proximal crease (not shown here) is important as that is the fulcrum from where the clamping pressure from the finger tips (which stops the rifle from canting) is applied.
In the picture above, the dashed yellow line shows the location of the distal crease for the 5th digit and the beginning of the curved area that blends into the fingertips of the 3rd and 4th digits. A correctly located middle crease allows the rifle to be held firmly with very little hand tension. Too thick or too thin a grip requires more effort to hold steady. On most of my angled grips I focus on the proximal and distal crease locations and don’t worry about the middle crease much.
Carving the grip
Carving the grip is the part that I like best. I use a “carving burr” mounted in an electric drill for most of the work but will also use a wood gouge chisel, a half-round file and 60-grit sandpaper for the shaping. I prefer a drill instead of a Dremel motor tool because I can easily change the speed and direction of rotation, forward or reverse to suit the wood grain – you want to be cutting down into the wood fibers, not lifting splinters.
I start the carving by rounding off the corners of the rough cut grip to make it easier to hold. To determine my hand position on the grip, I attach the grip to the forend (with tape) and install the
receiver (and scope if applicable) and raise the rifle to the shooting position. I’ll experiment with my hand and arm position until I find something comfortable and then trace my hand and fingers onto the wood.
Since the rough cut grip is much thicker that the finished one I have to approach the final shape slowly. All the shaping is done by feel, removing wood a bit at a time to bring your hand/arm into position – carving in one area will affect all the other areas. The sequence I follow is; the trigger finger (2nd digit); thenar and hypolinear regions and the thumb (1st digit) position. Once these areas are feeling ok (wrist angle and rotation are good, arm position is comfortable), I will start working on the proximal and distal creases paying particular attention to the lower edge of my “pinky” (5th digit). By carving the whole grip and checking frequently (with the forend attached) I can make the needed adjustments as I go.
I know when I am done shaping when I raise the rifle to the shooting position it feels natural and comfortable. When properly fitted, I can’t feel any high spots and the grip conforms to my hand so closely that I don’t notice it at all.
If you check the image (above) you can see how some of the carved portions are different from the original tracings. To me, the 5th digit is an important “key” and I carve it carefully, the areas for the 3rd and 4th fingers can be carved in detail as I prefer or just simplified. There is nothing wrong with carving one flat area for the 3rd, 4th and 5th fingers as long as the angle and location of the distal crease is correct relative to the proximal crease.
The Try-Gun stock
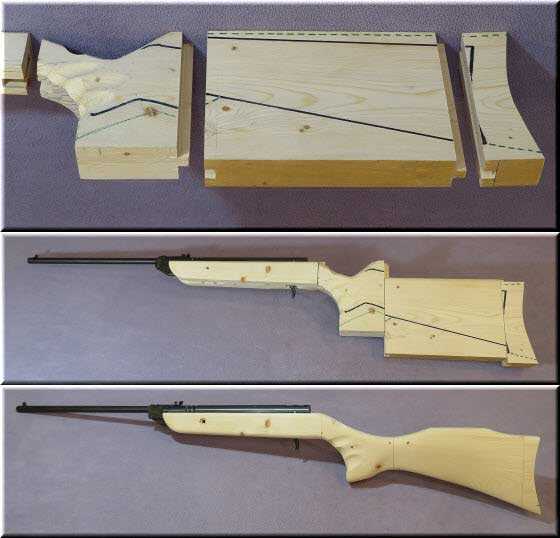
Putting it all together and removing the rough edges.
With the forend and grip completed I’ll cut the blocks for the cheek-piece and butt. I like to cut a tongue & groove in the butt, cheek-piece and the back of the grip as it is easier to keep things aligned when I tape them together for fitting. I’ll use a straight cut if I plan to glue the parts to make a finished stock. The only things left to do are rounding the top edge of the cheek-piece and cutting a shoulder curve in the butt in preparation for fitting.
Now the receiver (and scope) can be assembled with the rest of the stock and the pieces positioned for a comfortable fit.
For a Try-Gun stock I tape the components together so they can be readjusted (or replaced with different pieces) as required. To make a permanent stock I’ll glue everything together, remove all the “rough edges” and finish the surface to the smoothness needed. The size and thickness of the cheek piece affects the balance of the rifle but other than that consideration the shape can be whatever you want. If I am making a template for a hardwood stock I will leave the spruce stock properly shaped but fairly rough. It’s starting to look like a nice little carbine!
Summary
In this part we have discussed and carved the grip and finished the Try-Gun stock. Because it influences the hold of the rifle so much I consider it to be the most important part of the stock.
With a bit of experience under your belt you may want to make a hardwood stock. We’ll talk about that in the next part.


Hank,
Your work is simply amazing. What is your wood glue? Is it PVA (Polyvinyl acetate) based? When you said that you preferred using an electric drill instead of a Dremel I’m having difficulty imagining how that is accomplished considering my experience only extends to traditional electric cord and cordless drills. Wouldn’t they be too heavy? Are you using a flexible shaft for the drill as your handpiece?
Thanks for this series, it’s really inspiring.
Siraniko
Hi Siraniko,
I have been using WeldBond brand white glue. Its an excellent glue but it is tough on the tool edges. Any “white” carpenters glue that dries clear would be suitable.
I have 1/8″ and 1/4″ shank Dremels and a flexible shaft but prefer a corded traditional drill because it is geared down to have more power at slower speeds. I find that the Dremels prefer to run at speeds that are too fast for the aggressive carving burrs that I like. The traditional corded drill has weight and shape that makes it easy to control.
Here is a link to the carving burrs…
https://www.foredom.net/product/typhoon-tungsten-carbide-burs-1-4-shank-tapered-shapes-coarse-or-fine-priced-ea-copy/
I prefer the large “flame” burr for shaping concave surfaces but a chisel and coarse sandpaper does the job just as well.
Glad that you are enjoying this series!
Hank
Vana2,
Hank, WOW! You really are a total Student of stock making!
I totally agree with you that the hand to grip mating is the key to everything else in your offhand shooting position. Relaxed comfortable grip = rounds on target.
With each part of this series on stockmaking your ability to do the woodwork is overmatched by your presentation skills of the what, why and how.
Fantastic!
Can’t wait to see Part 4!
shootski
Sculpey was and is the modeling polyclay that I have used. Found it decades ago when I was building plastic models. It stays supple until it is baked at normal home oven temperatures.
shootski,
Glad that you are enjoying the series!
I’ll check out the “Sculpey” polyclay. Working with the Plasticine modeling clay for the grip model has rekindled my enjoyment of working with clay.
Hank
Hank,
Thanks for pushing me into making a gun stock. I know I can do better on the next one. One thing I learned is to leave plenty of extra wood so there is room to trim the rough blank stock into the final shape. And take time with each major cut to make sure it is taking the form you want.
Once I went through the process I found what works for me and what did not work. My stock will probably go through a few more modifications before it is done. For me fitting the stock to the gun was easier than coming up with a stock that had a nice final form. I filled in the pistol grip frame with aluminum plate and JB weld so the stock had something solid to attach to and could put two screws in each side instead of the original one screw for the pistol grip. It is not much for looks but works very well. I think my next one will be with laminated Juniper. The one I am working on is from some old drawer wood taken from our hallway remodel. I think it is Douglas Fir. Here is a picture.
Now if the weather will cooperate maybe I can get in some decent trigger time with the gun. I also removed the barrel band. I think that will be more accurate than with the plastic band. I will order a metal band if I need it later.
Don
Don,
You have done a fine job on that stock!
I see from your comments that in making your own stock that you have learned a lot. That was my whole purpose in writing this series – to get people to get some direct experience in stock making.
Guess that I should have warned you that stock making can be addictive LOL! Have fun with your laminated juniper stock!
Hank
P.S.
Nice conversion on the pistol, I may end up doing one myself.
Don, really nice work on that stock; it looks pretty sweet! =>
Hank
Good info again.
You could turn these stock making reports into a small book when your done. I think it would sell good.
Hank,
Wow. Seriously, I am even more impressed than I was before.
On the subject of glue, have you tried (silly, my suggesting a glue to an actual wooodworker, I know) hide or fish glue? They allow long working times. Fish glue has advantages in that it gets tacky, whereas hide glue stays slippery for a time. Also, fish glue keeps forever in the fridge (even freezer) and does not require a hot pot.
I only mention it because you do so much piecing. If at some time late in the process, or if after it is done, you decide the stock is not just right, a hot knife or soldering blade can easily separate the glued joints.
Again, your work is impressive.
Michael
Michael,
As a Bowyer who prefers to make “primitive” wooden bows I work with hide glue a lot (make my own). For gluing organic materials (wood, bone, sinew, rawhide, etc.) I haven’t found anything that works better – the stuff is almost as strong as epoxy! Haven’t tried “fish glue” yet.
The ability to re-position a misaligned part or to remove and repair a broken piece is a real benefit, on the flip side you need to make sure the joint is protected from moisture.
I have a 50 pound elm recurve bow that I am working on that is waiting for warm weather to get its sinew backing.
I prefer “white carpenters glue” for gluing up the pieces. The working time is long enough and the setup (clamping) time is short enough for how I work. Full cure time is reasonable as well.
What are you using hide glue for Michael?
Hank
Hank,
I initially bought my fish glue for installing several nuts I made on a few guitar necks,
I decided to go with fish glue as it does not require a hot pot, is tacky from the start, and it lasts for many years if stored in a refrigerator, basically forever if it is in a freezer. A good method is to keep a smaller amount in the fridge and the large container in the freezer. Then when needed, frozen glue can be thawed a little at a time in the fridge. Using such glues is really done as a courtesy to the next person who works on something, so they can easily separate components without damaging them.
In addition to providing long work times before they really start to “grab,” hide and fish glues, as you know, are useful for work that will likely need to be repaired years down the line. That is why it is the glue favored by luthiers. All of the wood-to-wood and bone-to-wood joints on a well-made guitar, for example, were adhered with hide or fish glue. If/when an acoustic guitar needs a neck reset, heated tools can be used to loosen the glue and open the joint with little or no damage to the wood. Luthiers usually have a bunch of small spatulas and specially shaped sad irons among their tools. If a joint is especially stubborn, with limits and as a last resort, steam can also be used to loosen these glues.
Michael
Michael,
Thanks for the information on the fish-glue. I was vaguely aware of it’s properties but never had the chance to try some. Will see if I can find a local source or better still a recipe for it.
The natural Collagen based glues are a lot stronger and more versatile than people know and are well worth the time to get to know them.
I use a natural “hot-melt glue” made from pine resin, charcoal and repurposed vegetable fibers (dried deer poop) for attaching obsidian arrowheads to shafts and bone handles on knives. Its not for finesse work but its very practical stuff as the joint can be disassembled and reset at will.
Hank
Hank,
You can buy a plastic bottle of fish glue the same size as those red (ketchup) and yellow (mustard) ones they used to have at A&W drive-ins and other, similar drive-ins. Try Stew-mac luthier supply.
Store it in your refrigerator near the back, but put a big “NOT FOOD — DO NOT EAT” sticker on it.
Michael
Michael,
Seems that Lee Valley Tools here in Ottawa sells fish glue so I might pick up a bottle the next time I am there.
I did find an excellent article complete with recipes for making fish glue so I will give that a go as well. Here is the link…
https://journeymansjournel.wordpress.com/2017/05/20/all-about-fish-glue-and-hide-glue/
…put a big “NOT FOOD — DO NOT EAT” sticker on it. Good idea! LOL!
Thanks Michael!
Hank
Hank,
Excellent report once again with superb illustrations. The grip importance and breakdown of important/functional areas was real nice. Leaving extra wood for clamping along the way is something I would have overlooked. Looking forwards to the next installment.
Good Day to one and all,…….. Chris
Chris,
Of all the contact points, forearm, grip, cheek piece and butt, I feel that the grip is the most important.
This is a “heavy” part – lots of information. Its hard to explain in words something that is best done by feel.
Leaving extra wood for clamping is something that you figure out real fast when you are actually carving the piece. LOL!
Hank
Hank,
Well described process! Have heard some people say that thumbhole stocks are the antithesis of the “artillery hold”.
The one Thumbhole stock that I have, I find that I am more accurate, in the standing position, when I do not place my thumb in the hole. I find resting it in the thumbs up position to give me greater accuracy. Your thoughts please.
Hopefully this will be a 25 part series that will include: stock combs, butt angle, butt shape, Tyrollean cheek piece,
fore end shape and angle, checkering, stippling, wood finishing, stock screw holes, choices of wood, etal…
Thanks for posting!
-Yogi
Yogi,
Stock design is a very personal thing – its all about what you like and what you want – that I why I wrote this series. I hope that people will actually start making stocks and experimenting with all the options. Construction lumber is ideal – cheap, easy to work and readily available.
I find thumb-hole stocks to be better for target/bench shooting than off hand or hunting because of the angle of the grip. If you stand in front of a mirror and try thumbs up and thumbs through grip you will see/feel how it affects the angle of you hand and arm. Accuracy is dependent on consistency and that is determined by geometry and comfort. I think that your results will speak truer than my opinion, what works for me may not work for you.
25 parts!!!! Oh my!! It has taken a lot of time to put this 4 part series together Yogi. Yes, it could be 25 parts but I would rather not go there. I might meet you part way with one more part – I’m collecting my notes on checkering, stippling, wood finishing.
Hank
Hank,
Great report; the “Parts of the Hand” was a real education for me.
I’m going to print that pic out and bring it when I go for my check up in a few weeks.
I’ll see if my doctor can guess who made the pic and why.
He will likely say some kind of other doctor for his medical journal.
I seriously doubt he is ever going to guess “rifle-stock-making-specialist”…but I’ll let you know.
Excellent report; great pics! =>
take care & try to stay warm up there,
dave
Dave,
I abbreviated a couple of the medical terms but the terminology is correct. I just hope that people are comfortable with the level of detail I had to go to to convey my explanations.
Glad that you are enjoying the report!
Hank
Yes, the level of detail was perfect; thank you. =>
Dave,
Please check your email, waiting for reply.
Thanks,
Hank
Woohoo! A custom made slingshot…I can hardly wait; thank you! I’ll have to post a pic of it. =>
Hank,
The information here is easy to follow. If a person were to read only this installment they would find it an excellent primer for making a great target grip for a pistol. The 2240 comes to mind.
Gerald
Gerald,
Thanks for that comment – I was concerned on how easy this section would be to follow.
Yup, this is how I made the grip for my FWB 100 pistol. Would work just as well for a 2240.
Hank
Hank,
Once again, thanks. I have noticed with all of the stocks you have illustrated but the AR20, that form follows function. Your grips tend to be more vertical and extended than would be “standard” on most stocks.
What many may not recognize in your AR20 stock is it also has form following function but with the addition of artistry. This is where the true skill lies. Not only is it totally functional, it is pleasing to the eye.
Hey RR,
So when are you starting your stock? Jump in and join the fun!
Think that now I am doing more target shooting I tend to to take a more deliberate aim than my usual snap-shooting style. Looks like my new stocks are reflecting my change in stance and hold.
Hank
Hank,
I have a couple of other projects to work on first. I am thinking about a couple.
On the subject of stocks…
For 97k owners….
Something has been bothering me for a long time about my rifle. The inletting for the trigger guard does not seem right.
There is no wood under the front of the guard from the hole for the mounting post forward. Tightening the mounting screw pulls the front of the guard into the stock, and the rear of the guard out of the inletting for it . It tilts.
Does not seem right to me as the front half of the inletting goes all the way through and leave nothing to support the front of the trigger guard.
Looks very wrong .
tt
TT,
Could you post a picture so we can see what you are describing?
Hank
Hank
Not as bad as I remembered. Can’t get a good picture.
I think I need a thin washer to bring the top of the mounting post up even with the wood behind it so the trigger guard can be level , but still install snug. If I can find some thin washers at Lowes….
tt.
Hank
This is what it looks like. You can’t see that the mounting stud sets lower than the rest of the wood inletting.
tt
TT,
The mounting boss looks like it has flats on it and might be screwed into place. Is it possible (is there enough thread?) to add a spacer (washer) between the receiver and the bottom of the boss?
Hank
Hank
It gets a bit complicated on the other end with a anti beartrap and small washer there.
A shim or washer on the top side would be safer to mess with.
I need to get the trigger guard to snug down without lifting the trigger guard on the back end too much. Word has it to be careful of too much tension on the rear screw. It attatches to the Rekord. Too much tension on the rear screw causes the Rekord to act up.
Maybe even a paper shim or two might do the job.
tt
TT,
Good luck with that!!
Hank
Very nice job Hank, and with the good descriptions and use of images I found it easy to follow. Your use of the modelling clay brought back some old memories.
I remember back in my youth talking to an old gunsmith (in hindsight, probably younger than what I am now) about pistol grips. He took from a scrap pile a a short piece of pipe – for weight and shape – and coated it with modeling clay. Then he asked me to aim at an imaginary target on a horizontal line with my eyes closed while gripping with some force the grip. The result was a grip shape and angle that perfectly fit my shooting hand. Years later I tried that technique with a .22LR pistol I had by removing the original grips, covering the frame with tape and a layer of clay. I never did the follow up work of carving a grip, but now it is starting to look like the right time. Thanks Hank!
I will also join others asking for at least one additional report covering surface preparation, checkering and finishes. More if you want! 🙂
Henry
Henry,
Yes – NOW is the time to do it! LOL!
Modelling clay is is fun and convenient for a lot of things. Been using it to “shim” objects to the correct angle when taking pictures. Very relaxing/therapeutic stuff!
OK, OK. LOL! …will do Part 5 on surface preparation, texturing and finishes. Not a problem – I have already started it. Give me a bit of time and I will get it done as soon as I can.
Hank
Very cool Hank,
I like the way this is coming together, like some others have said you could go on for quite a while on the fit and finish possibilities.
A little off topic, but not too much I think, is thinking about other construction media. I found this on the web and I thought it very interesting; https://www.youtube.com/watch?v=zBWc5Ye-uLU
Mike
Now THAT is cool Mike!
I’m always on the look out for different materials and how to use them. Would make a very interesting stock.
Like the way he used scraps to make a jig for his router.
Hank
Hank,
I thought you might get a kick out of his unusual composite building material, and it does appear to have a good bit of strength as well.
With a bit of planning you could make some interesting patterns, seems that he just tossed the pencil parts in at random.
Mike
I’d like to see a Part 5 on how you did the firewood stock. Aside from the fact that it looks really cool, it fires up my creative thinking about the kinds of wood that I might use (elm and maple? Hickory, elm and maple?). Also, if I made a mistake on one part of the stock I could cut it off on one of the wood lines and glue a new section on.
What do you say?
Motorman
St. Louis, MO