by Tom Gaylord
Writing as B.B. Pelletier
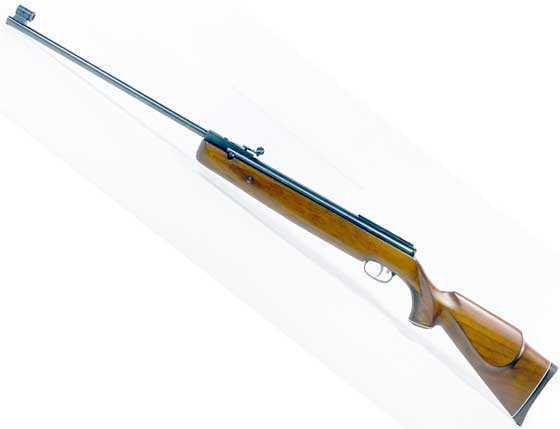
Beeman R10.
This report covers:
- Start
- Scope base off
- Tip 1
- Mainspring
- Remove piston
- Sleeved piston
- Threaded spring tube
- Breech seal
- Cleaning
- Piston seal
- Tuning strategy
- Trigger
- Insert the piston with the new Vortek seal — tip 2
- Last thing — the trigger box!
- Final assembly
- Summary
Today I disassemble the Beeman R10 and install the Vortek PG3 tuning kit. I installed one of these in the Air Arms PG3 SHO tuning kit in an Air Arms ProSport last year and the results were very positive. But this R10 is a different rifle in many ways, and I will cover that today as we go.
I am going to show you all the differences and nuances of the R10, but I can’t show everything about disassembly. If you want to see that read the 13-part series titled Spring gun tune. That was about a Beeman R1, but most of the steps are the same for the R10. I will address the ones that aren’t.
Start
The barreled action was out of the stock, so the first step was to remove the Rekord trigger and safety. To remove the trigger, drift out the two pins that hold the trigger unit in the end cap.

When the two pins are tapped out the trigger unit is free to be removed. Once the trigger is out the safety and spring slide out of the end cap.
When I saw the trigger I thought that this rifle has never been apart, because all the factory grease remains on the trigger parts No tuners I know would leave all that grease on those parts. It serves no purpose.
Before someone asks the obvious question of why Weihrauch puts the grease there if it serves no purpose, let me tell you that you have never seen the assembly of an airgun if a factory. It’s fast! The workers are told to squirt a little grease here and there and they do. Some do more and others less. In some countries where it is very hot perhaps the grease melts and runs over the parts. In others it ends up like this. That’s just the way it is.
Some airguns are dwesigned to need much less grease. The Air Arms TX200 Mark III is an example. So less grease is applied and the lubricity of the parts does the rest.
Scope base off
Next I had to do something that’s unique to the R10. The scope base is attached to the end cap by two screws. But the base is also attached to the spring tube by a flange, so the base must come off before the end cap can be removed. And there was a scope stop attached to this scope base that had to come off first.
Once the two screws are out the scope base should slide forward and come out of the spring tube. It’s held in place by a flange that I will show you. This one was stuck, though, by what turned out to be hardened grease. That’s more of an indication that the gun has never been apart. So I partially unscrewed the end cap with the scope base still on the rifle.
Tip 1
The R10 end cap unscrews from the spring tube. When the gun hasn’t been apart for a long time the cap can be hard to start turning. Once the trigger is out of the gun there is a large slot in the end cap where the handle of a crescent wrench can be inserted and used to start the end cap turning. I use the rounded end of a crescent wrench because it is rounded and will not damage the sharp edges of the trigger slot in the end cap. I also use it to tighten the end cap at the end of assembly. I will also grease the end cap threads so it’s easier to remove next time.
I have started to unscrew the end cap. The scope base is still attached to the spring tube, but the end cap screws are out so the cap is free to turn.
You can unscrew the end cap by hand until there are 3-4 threads remaining. Then put it into the mainspring compressor and keep tension on the cap as you slowly unscrew it.
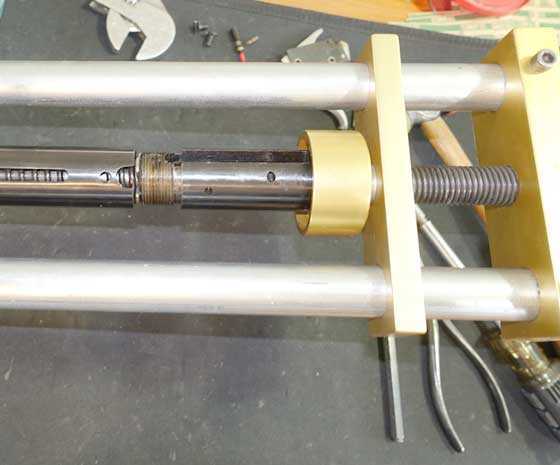
The end cap is unscrewed all the way, but the mainspring is still pressing against it.
I had no idea of how much pretension the R10 mainspring had, but the compressor was set to allow a long one. Good thing, because it turned out there are three inches of pretension on the spring — one is taken up by the end cap threads and the spring has the other two!

The mainspring has finally relaxed! As you can see, there is a lot of pretension on this spring!
Mainspring
With the end cap off, the mainspring and spring guide could be removed. This spring is unlike any I have ever seen in a Weihrauch product. What I thought was lube on the spring coils was actually just the shiny metal. There was almost no lube on the mainspring, which is consistent with other Weihrauch airguns I have disassembled.
The spring is canted at both ends — rather visibly at one end. This was the reason why there was some vibration when the rifle fired

The mainspring was canted noticeably — especially at the end that went over the spring guide.
Once the mainspring was out I could move the scope base forward until it freed up and slid out of the spring tube.
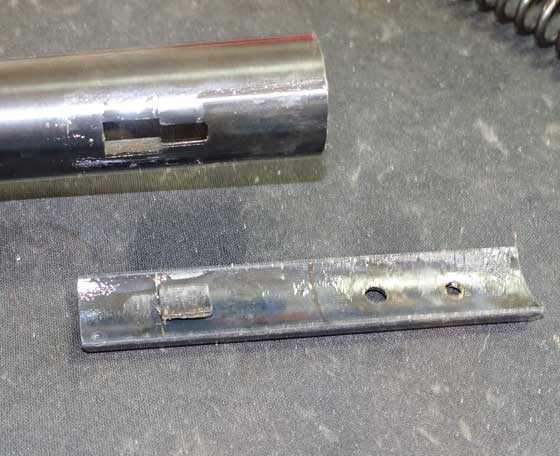
Here you see the scope base and the slot in the spring tube where it fits. The square piece on the left underside of the scope base is a flange that slots into the spring tube.

Remove piston
With the mainspring out the cocking shoe is removed from the piston and the piston is slid out of the rifle. There was nearly no lubrication on the piston, either, which leads me to believe that the gun had never been disassembled. If it was, whoever did the work did not lubricate it very well.
The piston was dry.
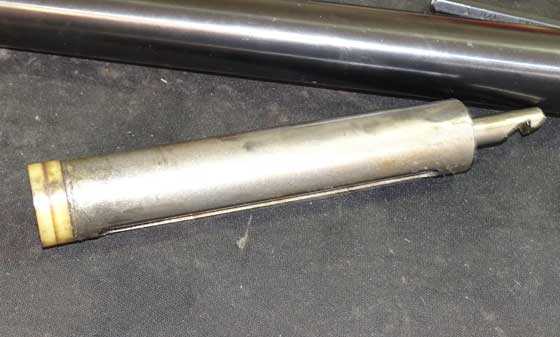
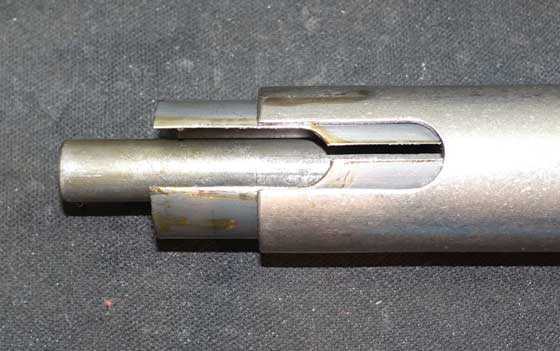
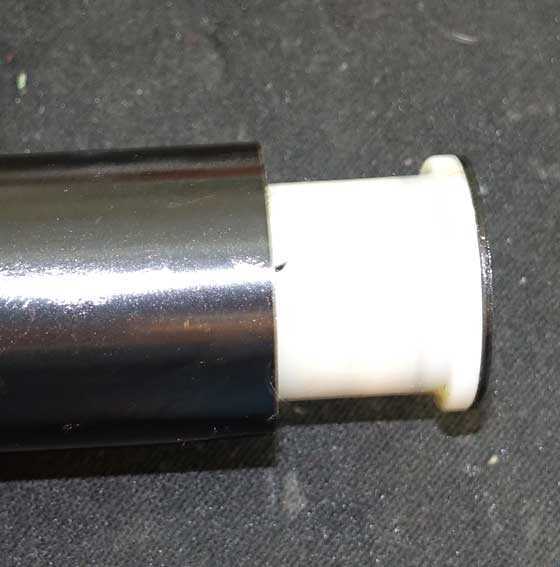
Sleeved piston
One R10 quirk is that the piston is sleeved. That reduces the clearance between the piston and the mainspring. The Vortek kit cannot be installed with the sleeve in place, so it has to be removed. There is a small hole at the top of the sleeve to assist you in this task.
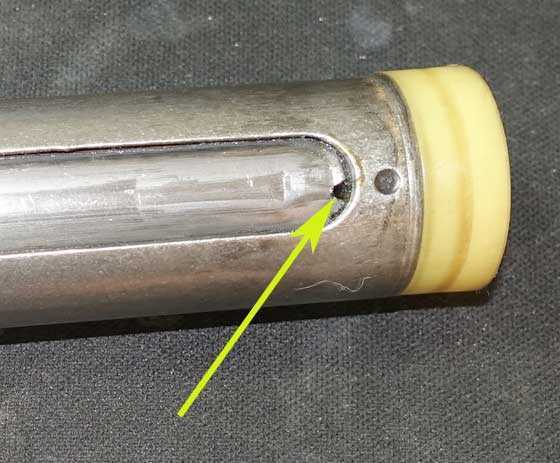
The piston sleeve has a hole at the top (arrow) to assist in removal.
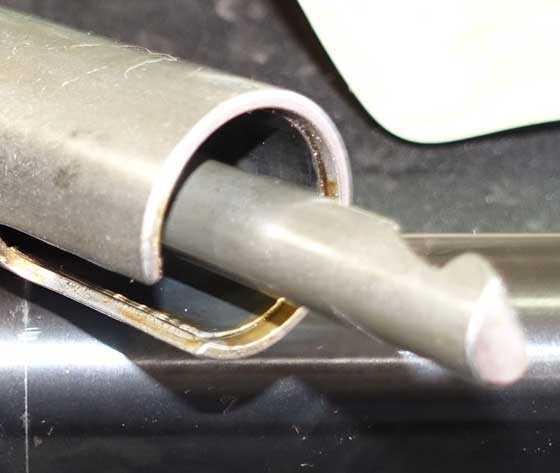
This view of the bottom of the piston shows the sleeve better.
The sleeve is sliding out.
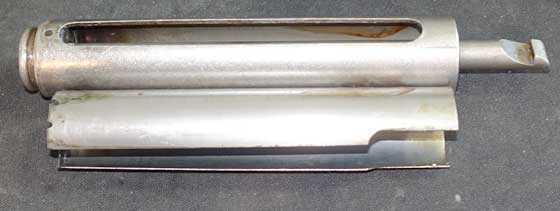
The sleeve has been removed.
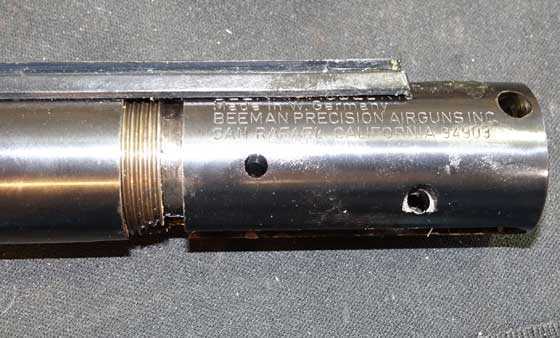
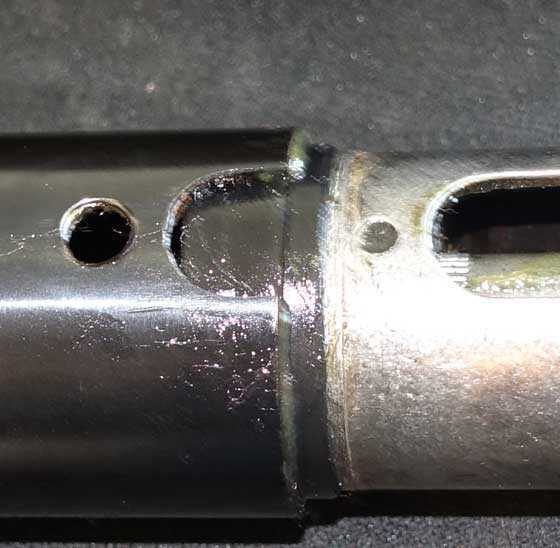
Threaded spring tube
Let me show you the threads in the spring tube. Remember I said that threading the tube was risky? Let’s see why.
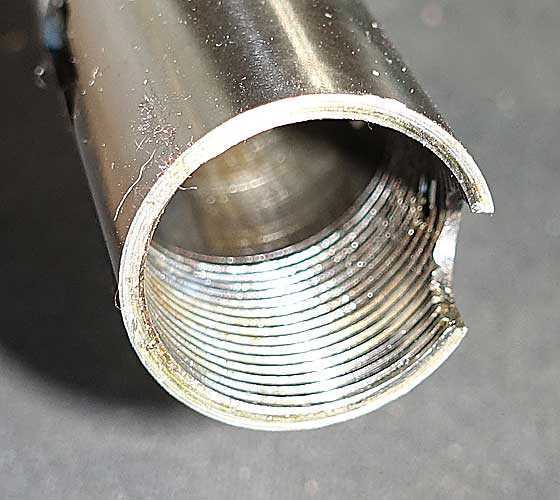
This is the threaded end of the spring tube, where the end cap screws in. There’s not a lot of extra material for leeway.
Breech seal
I was also sent a new breech seal for the rifle. The one that was in the gun looked okay, but when I went to remove it, it broke apart. The Weihrauch seal looks like an o-ring in the gun, but it’s three times as tall and is specially made for their rifles. This replacement seal seemed to be the same tough stuff that the Vortek piston seal is made of.
I’ve never seen a Weihrauch breech seal break apart that way, but I have seen a lot of other airgun seal break apart. So it’s a good thing it was changed. It took me some time to pick out all the broken pieces.
When I tried to pick out the breech seal it crumbled into pieces.
Cleaning
At this point I cleaned the rifle and its parts, plus I looked for any burrs to remove. I found no burrs, and the interior of the spring tube wasn’t that dirty. I use a long dowel with a piece of paper towel wrapped around one end and held on by a rubber band. I usually dip the towel into alcohol, but this time I used acetone, which cleans even faster.
The piston needed to be cleaned inside and out. And I cleaned the head of the piston after removing the old piston seal. The new seal needs to be on a clean piston.
Piston seal
The old piston seal was still in good shape, unlike the breech seal, but since the Vortek kit comes with a new piston seal, I put that one on. It’s made of extremely tough synthetic material which proved a real blessing during assembly.
Tuning strategy
At this point in any tune my experience takes over and I do things my way. When I tuned the Air Arms Pro-Sport I put a thin coating of Tune in a Tube on the mainspring of that PG3 kit, to cut the vibration. The Vortek kit is supposed to dampen all vibration, but I didn’t want to take a chance. But Gene Salvino said in the comments to Part 1 of this report that the Vortek lubricant that is provided is slicker than TIAT, so I decided to give it a try. At worst I would have to open the rifle again to fix my mistake if the kit vibrated.
Here is what Gene said to reader Chris USA,
“DO NOT use TIAT in a Vortek . His [Vortek’s] grease is a synthetic based grease that is very slippery and will not gum up in the cold weather . Zero benefits , the guides shield the noise anyways . TIAT is for high powered guns with factory guides with factory drop in tolerances , the Vorteks are very tight .”
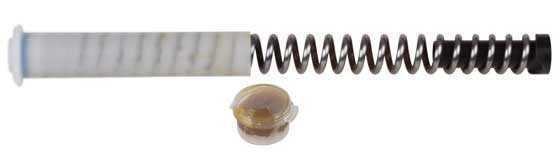
The Vortek kit contains a small container of special lube that’s supposed to be much slicker than TIAT.
I lubed the piston seal, the piston body, inside and out, including the central rod that connects to the trigger with the Vortek grease. I lubed the front of the mainspring generously because I couldn’t get the white rear spring guide off the mainspring to lube there. I figured when I cocked the rifle that part of the spring would get some grease.
I didn’t lube the inside of the rifle’s spring tube, which I normally do with moly. The parts that generate friction in the Vortek kit are all held by synthetic parts that have a low coefficient of friction, so I figured Vortek knows what they are doing.
Trigger
I spent some time cleaning the factory grease out of the trigger. Yes, an ultrasonic cleaner is probably the best way to do that, but I don’t have one. So it’s cotton swabs and paper clips for me.
When I had removed as much grease as possible, I then lubed the sear contact point and the piston rod catch with moly grease. Before doing that I cocked the trigger by pressing down on the rear if the long piston rod catch until the sear caught. I could then examine the sear contact area with a loupe. You will remember that I told you in Part 1 that this trigger is adjusted perfectly. I don’t want to do anything to mess it up.
To check the sear contact, cock the trigger by pressing down on the back of the piston catch lever (arrow shows where it is inside the black trigger box) until the sear catches. The sear contact inspection hole is at the lower left.
The sear contact is enough to be safe, as this trigger is adjusted. This is about a 10X magnification. The factory grease has not yet been removed.
Insert the piston with the new Vortek seal — tip 2
I tried and tried for 20 minutes to get the new Vortek piston seal into the spring tube. No matter what I did that seal was not going in past the threads. The seal has a small lip on the back that just will not pass the threads in the spring tube.
That small lip on the rear of the Vortek piston seal would not go past the threads in the spring tube.
Finally, after fiddling with the piston for 20 minutes, I decided to “thread” the piston seal past the threads. In other words, to screw the piston into the spring tube. It worked! This kit also works on a Beeman R9, but because its spring tube isn’t threaded, you will not encounter this same difficulty.
It took me about 5 minutes to thread the seal into the tube, but once past the threads the piston slid into the spring tube the rest of the way. It was by no means easy to move the piston inside the tube, but it did move, once the threads were passed. The seal appeared to suffer no damage from being installed this way. That’s what I meant about its toughness.
Once the piston was inside the tube and connected to the new cocking shoe that I lubricated with the Vortek grease, I was able to slide the entire mainspring with its guides into the spring tube. When it was shoved all the way in only about 3/4-inch of the parts stood out, compared to the two inches with the factory spring.
The Vortek spring and guides go into the piston much farther than the factory parts.
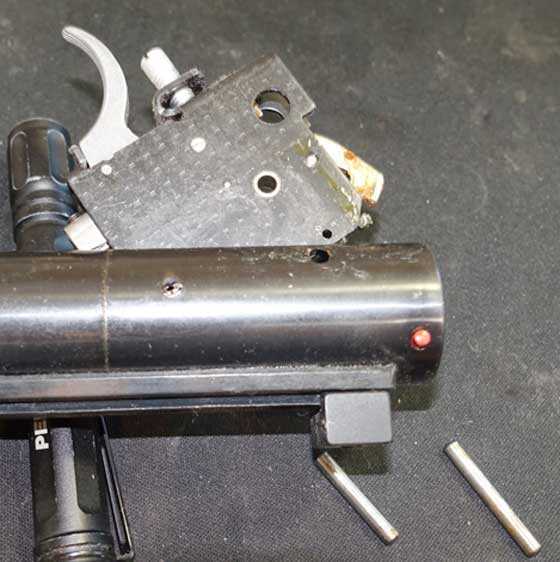
Last thing — the trigger box!
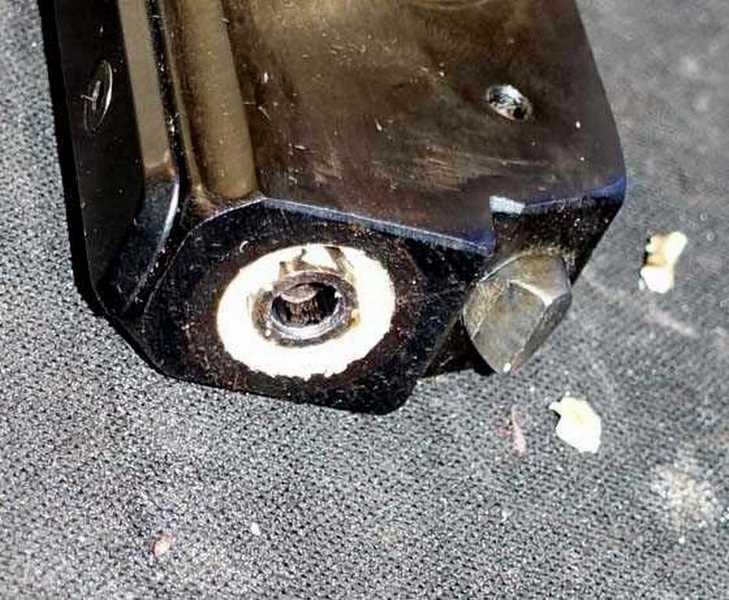
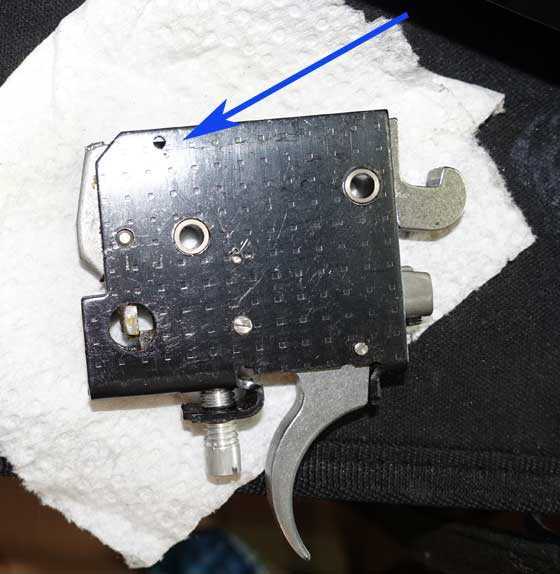
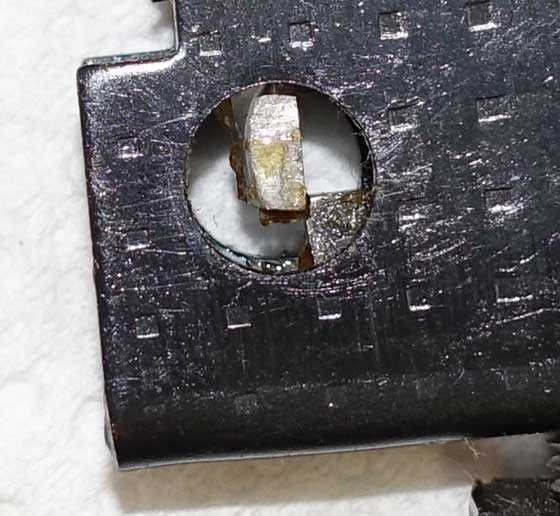
You may not know this and you need to learn. Beeman told the owners of R-series rifles not to over-tighten the rear triggerguard screws on their rifles. This is because Weihrauch used to just punch a hole for that screw into the bottom of the trigger box and then thread the metal flanges that were displaced by the punch. Those threads are extremely tenuous! I want you to see them.
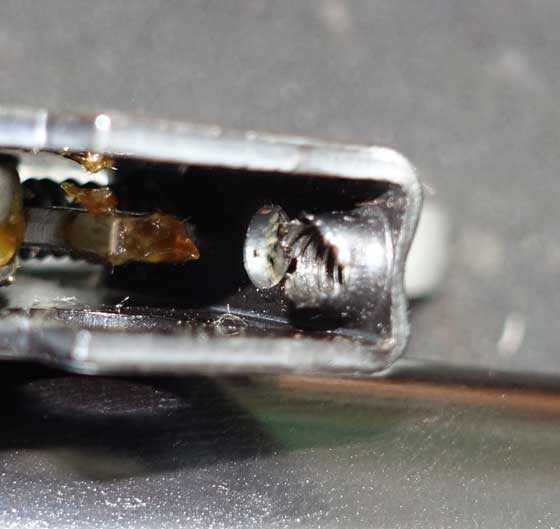
There are the threads that hold the rear triggerguard screw. Don’t over-tighten it!
At some point after this rifle was made, Weihrauch replaced this method with a small nut that slips into the trigger box, but even that is small and not that strong. Just don’t over-tighten that screw!
Final assembly
The R10 went back together the way it came apart. Again I remind you to read the 13-part Spring gun tune report to see the details. I have given you all the ones where the R10 differs. Once the barreled action was together and was back in the stock, the rifle was cocked and fired to prove everything worked as it should. It did!
The firing cycle is now completely dead and free from vibration. This is as good a tune as I could ever hope for. This Vortek kit works exactly as described and does a remarkable job. It’s a $400 tune for $90, if you do the work. I will say that a mainspring compressor is needed because those fine threads on the end cap are hard to get started.
Summary
I can do a job like this on an R1 in about 45 minutes. This R10 took 3.5 hours to do the same things. Part of that was because the rifle may never have been apart and part of it was the special design of the R10. The Vortek piston seal made installation of the piston take longer, but if you screw the piston in like I mentioned you’ll avoid the time it took me.
So — what did the Vortek kit do for this R10? To find that out you’ll have to read the next part of the story.


B.B.,
Did you use the new cocking plate?
Siraniko
Siraniko,
Yes. Remember that I call it the cocking shoe.
B.B.
BB,
Thanks for the tip on the tightening of the trigger guard screw. I would hate to crank on my grandson’s HW30S and strip it out.
It sounds like you are most definitely going to enjoy shooting this gal next time. A smooth, quiet firing cycle is so nice. Hmmm, maybe they have a kit for my Tomahawk.
B.B.
Did you use acetone to clean all the crusty grease off?
Did you consider “sizing” the piston seal before installing it? The piston should move with some force after installation, but not be too tight. Will the tight seal hurt performance? Will it size itself with enough shoots?
-Y
Yogi,
Yes, acetone cleaned off all the crusty old grease.
I have sized piston seals in the past, in kits where that was what you did. The Beeman Lazer tune kit had such a seal.
This Vortek seal is not meant to be sized. It is meant to be used exactly as supplied. It is tight, but it also moves very well when the spring pushes it. We will see how well when we test the velocity.
B.B.
B.B.
How about a piston seal comparison test? You could put OEM vs Vortek vs ARH vs the Aussie seals I hear good things about.
I would suggest using a test mule that is easier to take the end cap off of…..
-Y
Yogi,
That would make an interesting test with the right rifle. This one belonmgs to a reader, so I am proceeding on.
B.B.
Yogi,
“test mule” what is your definition?
As i know it: A Camouflaged Automobile test bed.
shootski
In this case, a rifle that is easy for B.B. to change piston seals on and a gun that has many different aftermarket seals for him to sample. Perhaps a HW 30 or Diana 240?
-Y
Yogi,
As i suspected.
Thank you!
shootski
Yogi
I say a TX200 because of ease of dis assembly and assembly.
BB,
Resizing the seal may be required (or just a good idea) regardless of what Vortek claims.
I recently put a PG-3 Kit in my R7. It smoothed out the shot cycle, but I lost a bunch of velocity compared to 100% stock. It also ended up with a larger spread and standard deviation than stock. My stock spring was pretty straight, but my stock piston seal was pretty hard and had some nicks and what looks like a small split.
When I put in the tune kit I remembered having to really shove to get the piston in. It was much tougher than expected. I decided to see if I could “shoot the seal in”, so I shot ~300 rounds through it, then checked again. No improvement. It is entirely possible that shooting a few thousand pellets would end up fixing the problem, but I don’t think that is reasonable.
I removed the piston and seal, measured the compression tube bore, and found that the piston seal was WAY bigger than the i.d. of my gun’s tube – a bit over 0.020″ over (just the seal – not the seal installed on the piston. The sealing lip was too large, but the back ring was larger. I turned the back ring of the seal down approximately 0.010″ and the lip down about 0.005″, then put it back together. Using the same pellet, my gun shot ~75 fps faster after resizing the seal. The standard deviation is slightly better than stock, but not where I would like it. I’m thinking about trying another seal…
-bes
BES,
I’ll start off with context, Corona Virus reporting is full of terms like “Record Spike”, “forest fire” of cases with no numbers or documentation of previous records…there are no previous records! Really gets my goat! Okay back to airguns:
Please do not take this as an Attack on your method or choice.
Do you have chronograph numbers [objective approach]? Or just “…but I lost a bunch of velocity…” [subjective approach] same pellet, same environment. What did it do too accuracy? Subjective can be very good starting point, even a way to decide for some, but to make a choice many of us need before and after number/group size to decide if the amount of loss is tolerable compared to the benefit of a smoother shot cycle.
My Opinion,
shootski
Shootski,
I will agree with “context”. The only number I give any credit to is new hospitalizations and deaths. Of course the “new” cases are going up due to more testing. If my county has 1 person in the hospital with Covid,.. and they get another one the next day,…. it is a 100% rise in hospitalizations! OMG! Shut everything down!
(New) hospitalization and death rates (over and above the #’s of when it was at the PEAK) is the only thing I will give any note to. But,…. they never put any of the current stats in any sort of “context”.
Like some air guns reviews,…. “a real tack driver!”,…. “1 hole groups”,….. etc.,…. with no mention of range or actual group size.
Chris
shootski,
Re-read my last paragraph…
-bes
BES,
I have.
” Using the same pellet, my gun shot ~75 fps faster after resizing the seal. The standard deviation is slightly better than stock, but not where I would like it. I’m thinking about trying another seal…”
I will need to ask you to forgive me…i come from a numbers background in Development Test & Evaluation (DT&E.) That was the reason for including, “Please do not take this as an Attack on your method or choice.” I can tell that you used a Chronograph by your mention of: “~75 fps faster after resizing the seal. The standard deviation is slightly better than stock…” but you know the actual numbers and your readers don’t. I did in fact miss that you used the same pellet.
Once more, I’m sorry if I upset you.
shootski
BES,
Thank you for all youir info. I will consider it as we advance.
B.B.
BB,
Interesting about the lip of the piston seal being too big. If not mistaken,… that lip is THE sealing surface? Were you able to view the after results after getting it past the threads? If yes,… (where) were you able to view the seal lip? Did the seal show thread marks? I figure that maybe you could see the seal lip through the sight rail mount slot or maybe the cocking slot.
If the seal is now threaded,… I suppose that means that it now has a series of small lips as opposed to one bigger uniform one.
Chris
Chris,
Yes — I mentioned in the report that there was no damage to the seal. The seat is not now threaded.It returned to normal.
B.B.
ChrisUSA ,
On the Vortek seal , the sealing is done at the front of the seal . That raised surface at the rear is a bearing surface to help keep it centered . Very good design , similar to the Theoben type seals . It would take allot to damage that seal. This is the current type/style used in Weihrauch guns instead of the parachute type seal. Weihrauch made the change in 2011 . You can use either type of seal they work equally as well , the edge to the Vortek type on longevity due to thickness and teflon/moly material. The guns shoot the the same speeds with either type of seal .
Gene Salvino
Gene,
Thank you. I had assumed the seal was at the front but since it was not shown (front end)….. I did not know. The area ahead looks smaller, so I thought that ridge might be the seal. I would think the parachute design would be the ultimate, but apparently not.
When I put the Red Ryder spring in the 499,… I used a TX 200 seal. The “seal” in a 499 is a quite hard nylon type material. I tried stock and the TX seal and there was no difference in fps. The TX seal did require a slight downsizing and I took a razor blade and thinned the inside edge of the seal lip to make it more flexible. At any rate,.. in the end the 499 is putting out 150 fps over stock and still is just as accurate,.. with added range.
Chris
“There are the threads that hold the rear triggerguard screw. Don’t over-tighten it!”
B.B.,
It’s one thing to read it, quite another to actually SEE it; this IS one of those cases where “a picture is worth 1000 words”! Thank you for that photo! =>
Take care & God bless,
dave
BES ,
Use the Air Rifle Headquarters seal . It is a parachute seal and works better in the lower powered gun . Or Pyramyd AIR has it link attached .
/product/air-venturi-piston-seal-fits-beeman-r7-weihrauch-hw30-hw70-marksman-28?a=3661
Gene Salvino
Thanks Gene!
I think I will go ahead and order one. My gun is close to 20 years old. It has been a good shooter since I got it. I was truly shocked when my chrono revealed much higher standard deviation and spread than I expected (given how it shoots). I expected extreme spreads under ~20fps and standard deviation well under 5 fps. I’m still not that close, but am closer. Maybe a new (better fitting) seal will do the trick!
If that doesn’t work, I’ll just quit shooting it over the chrono!
bes
Long time lurker, member of the old AGL forum, the old yellow forum and a first time posting here.
I just HAD to comment, as two days before part 1 I had bought a r10 at a flea market. It’s an early San Rafael from 1986 in good condition but needing a tune. And what an opportunity to follow along with Tom! Now I’ve been shooting pcp exclusively for many years, and my only surviving springer before this R10 is a Winchester 425. My first Springer was a R10 back in 1988 followed by a BSA Stutzen.
So with a touch of nostalgia I bought this R10 fully intending to resurrect it. So thank you Tom for this timely subject. Although I will be installing the 12fpe vortek spring, as soon as pyramid air has one in stock.
Breeze,
Welcome back to the fold! I remember a Breeze handle from back in the day of the AGL and forum.
shootski
Shootski,
that was me. Still shooting, but mostly field target.
Breeze,
Welcome to the blog.
What a coincidence for you! 😉
B.B.
Breeze,
Welcome to the blog. I have to tell you — I don’t want to see anyone get stuck with a clunker like these R-10s. I will offer you what you paid for it, plus cover the shipping, so you aren’t saddled with this boat anchor. . This is my R-10 B.B. is writing about. I bought it off the old Yellow Classifieds in 2016, and am very happy to have it in B.B.’s skilled hands. Looking forward to shooting it. Good luck with yours!
Jim M.
Well Jim I do appreciate your generous offer to take this “boat anchor” off my hands. Mine is the standard model with the shorter barrel in .177 but definitely a keeper.
Great blog! Is this Vortek kit the high output or the 12 ft. lb. version?
rillburgher,
That’s in Part 1. This is the high-power kit.
B.B.
ChrisUSA ,
There is a difference in the seals in low powered guns . In low powered guns the parachute seal is better . In higher powered guns there really isn’t a difference due to the guns being maxed out on spring power . The soild Vortek design ( New Weihrauch) is more durable in higher powered guns.
Gene Salvino