
Today reader Roamin Greco tells us about his sojourn with a Diana 24J. He will tell you that he thinks he is unworthy to write a guest blog. I will tell you that he isn’t — those are the best kind!
If you’d like to write a guest post for this blog, please email me at blogger@pyramydair.com.
Take it away, Roamin Greco
Roamin Greco’s Wrestling Match with a RWS Diana Model 24 J
|by Roamin Greco

RWS Diana model 24J.
This report covers:
- First guest blog
- Specifications—The Weigh-In
- Condition and Initial Cleanup — Sizing up my Opponent
- Trigger Troubles—Round 1 goes to Diana
- Adjusting the Trigger—Round 2 goes to Roamin’ Greco
- The Final Round? Probably not, but everybody wins!
- Post-match Wrap-Up
First guest blog
This is my first guest blog, so allow me to introduce myself by blatantly stealing a line from fellow reader, RidgeRunner: Hi, my user name is Roamin’ Greco, and I’m addicted to airguns. Like some of you, and perhaps many of you, I had a multi-pump BB/pellet rifle as a kid. I learned to shoot with a Crosman 760 (when Crosman was a Coleman company).
Around age 12, I graduated to powder burners for hunting with Dad (shotguns for small game and centerfire rifles for deer) and a .22 rimfire for pest control and plinking. I had forgotten all about airguns until a couple of years ago, when I decided that an airgun was the best way to teach my kids about proper gun safety and handling. That rekindled my interest in airguns, and that interest has grown into a hobby, and now practically an obsession. Here I am writing a guest blog!
Of course, part of being an airgun addict is having a wishlist of airguns that one wants to shoot and experience that is much longer than one’s budget for airgun purchases can handle. Currently, I’m interested in, among other things, vintage springers, especially the Winchester-branded Dianas from the late 1960s and early ’70s, so I have been trolling around on the airgun classified ads and a few auction sites looking for deals. While there, I have noticed a lot of folks paying more than I think something is worth, but there have been a few who have walked away with extremely good bargains (usually while I was too busy at work). I started thinking that if I saw a great deal, I could buy an interesting airgun at a very low price, play around with it for a while, perhaps make a few simple repairs, polish it up a bit, and then sell it and at least cover my costs of the airgun, shipping, and taxes. That way, I would get the experience of that airgun essentially for free. Well, I recently lucked into an auction of 3 airguns in a single lot. One of those airguns turned out to be a model that I had never heard of before — an RWS Diana Model 24 J. I don’t believe B.B. has ever reviewed that particular model [I haven’t], and I have not been able to find much information about it. But now that I have one, I would like to tell you all about it.
Specifications—The Weigh-In
The RWS Diana Model 24 J is a classic, spring piston, break-barrel air rifle, in 0.177 caliber (4.5 mm). This one was manufactured in December of 1987. It is 37-1/8 inches (94.3 cm) long overall, with a 13-11/32 inch (33.9 cm) barrel and a 12-5/8 inch (32.1 cm) length of pull, measured from the center of the butt to the deepest part of the curve of the trigger. It weighs in at a svelte 5 pounds, 2.5 ounces (2.43 Kg). It has a removable, hooded front sight clamped to a dovetail that is parallel to the barrel. The front sight post within that hood comes to a triangular point.

The front sight reminds me of a picket from a fence.
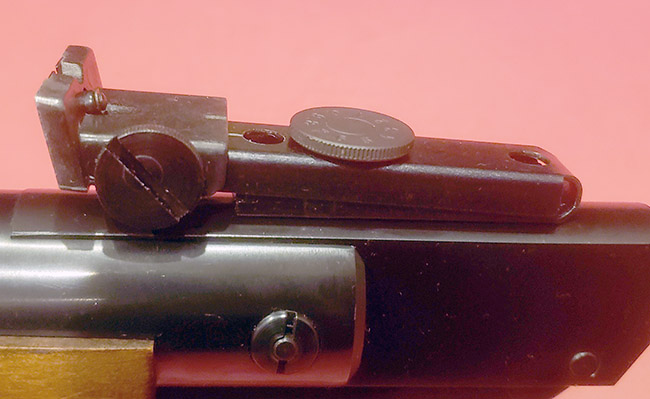
The rear sight is metal with a plate that can rotate to give you a choice of four rear sight notches. It is fully adjustable for windage and elevation.

The rear sight is all metal, except for a few, hidden plastic parts. Even the windage and elevation knobs are metal!
The spring tube also sports a modern Diana scope rail with the characteristic Diana grooved top and the rear screw that sticks up, inviting the uninformed to use it as a scope stop pin. Just don’t do it! Instead, research this blog on how to mount a scope on a Diana, and avoid shearing that screw head off. Interestingly, my gun does not have the famous Diana trademark: the image of the ancient Greek goddess of the hunt, Artemis (known to the Romans as Diana), dropping her bow and arrow in favor of an airgun. Instead, it simply has a large, circular RWS trademark stamped into the spring tube, along with the word DIANA and Model 24 with a J below it.
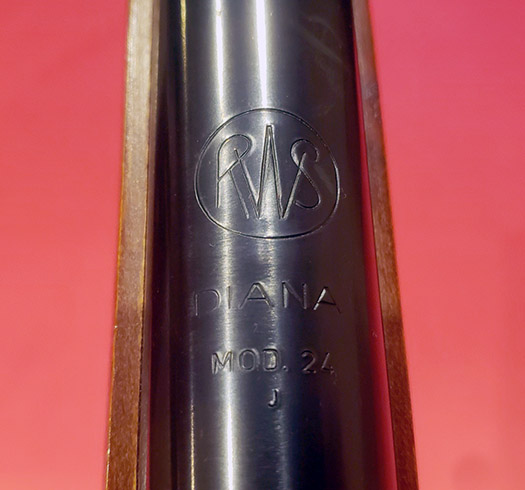
The famous Diana trademark is absent!
The stock is the traditional, dark brown hardwood, but I think a prior owner may have shortened it. The butt is not evenly perpendicular to the rest of the stock — it has a slight bevel making the left side a bit shorter than the right, and there are no characteristic grooves in the butt and no rubber buttons to hold the gun upright in the corner. The barrel is held in place with a ball bearing detent. The breech seal is a black synthetic O-ring, and I presume that the piston seal is also synthetic.
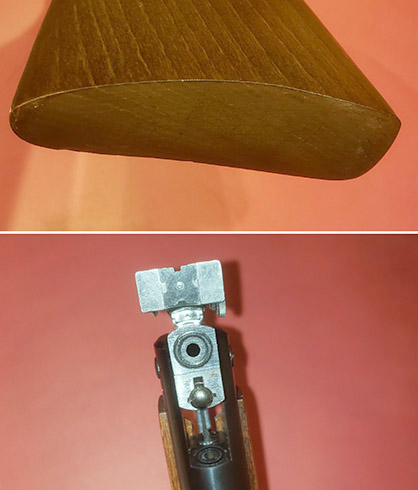
The suspiciously smooth buttstock and the breech, showing the breech seal and the ball bearing detent.
While I could not find much information on this specific model, I did find an exploded parts diagram online that had a handy inset showing the difference between the D model trigger, and some of the newer Diana triggers, including the T01 and the T02, T03, and T04 versions. This Model 24 J’s trigger seems to be the same as the D trigger in the linked diagram. Therefore, I believe my Model 24 J has a ball bearing sear. The trigger is very adjustable with two adjustment screws. However, a word of caution: the trigger’s adjustment screws do not behave like B.B. reported on his Diana Model 27. I will explain in more detail after the next section. If any of you have a Diana Model 24 D, I think that this J model would be identical except for its shorter barrel and stock. I would be interested to know if I am right.
Condition and Initial Cleanup — Sizing up my Opponent
Fortunately, the 24 J was in decent shape. There were only a few small areas of surface rust and quite a bit of grime. I took off the stock and gave all the exposed metal and wood a good rubdown with a rag sprayed with Ballistol. A relatively well-preserved gun emerged. I noticed the rear portion of the rear sight was flopping up and down a bit. An e-clip was missing from the tip of the windage adjustment screw, and a detent was missing from under the windage adjustment dial. It may also have a tension spring missing. I took apart the rear sight and found a shiny, silver-colored strip of metal that seemed to be the culprit of the floppiness. A bit of gentle bending with my small needle-nosed pliers increased the tension against the floppy rear section. I was able to locate a tiny e-clip for the windage screw, but I will need a small ball bearing or other part to act as a detent for the windage adjustment dial. In the end, I may need to get a replacement rear sight. If anyone out there has a Diana with a similar rear sight, I would love some close-up pictures of how it is put together underneath, especially what acts as a detent for the windage adjustment dial. Here is what this rear sight looks like:
The rear sight.
I have not built myself a mainspring compressor (yet), so I didn’t delve too far inside the gun. After removing the end cap, I did not see any corrosion or crud inside the mainspring cylinder, and I resisted the temptation to inject the mainspring with Tune-in-a-Tube until after taking a few test shots. I also don’t have an easy way to measure the weight of the trigger pull (yet).
Trigger Troubles—Round 1 goes to Diana
Here is where I had to eat a slice of humble pie. Reading a sizable portion of the past installments of this blog and a few other airgun forum posts, apparently has not made me an airgun guru. It makes me just knowledgeable enough to be dangerous. I saw those two little trigger adjustment screws and immediately thought, “I read about this in B.B.’s blog on the Diana 27. I know what to do!” I loosened that front screw a few turns, crammed down the rear screw all the way and then loosened it back out two full turns, and then crammed down that front screw. I then prepared to cock the gun and experience my fabulous and expert trigger adjustment.
Except, the gun would not cock! Did I just break it? “Okay,” I said to myself, “you got this! Just loosen the screws again and see what happens.” I loosened the front and rear screws a good bit, and then I broke the barrel and pulled it down. Hooray! The gun cocked. Then I held the barrel securely with my left hand, flipped off the safety, and pulled the trigger, intending to ride the spring tension slowly back up and thus de-cock the rifle.
No dice! The plastic trigger would not budge. Now I really broke it, I thought. So I started munching on my humble pie, and mulled things over. Well, if I didn’t know what to do, certainly my fellow airgun addicts and our fearless leader, the Great Enabler, will. Unfortunately, no one could come up with a manual for a Diana Model 24 J or 24 D. I noticed that this trigger is similar to the trigger in B.B.’s Diana Model 26 D, but that trigger was already adjusted so nicely, that B.B. never touched it. So, no shortcuts for Roamin’ Greco. Well, what is the purpose of this blog if not to share my meager knowledge and give back to B.B. and this group who have given me so much enjoyment over the last couple of years? I got myself into this mess, I needed to get myself back out, and then report back to all of you.
[Editor’s note: This is why this guest blog is important! I certainly don’t know how to adjust the trigger on this model. I didn’t even know this model existed. Diana doesn’t have instructions on their website. This guest blog may be the best set of instructions in the world on how to adjust the Diana 24J trigger.]
Luckily, the Model 24 does not have a spring strong enough to induce nose-bleeds. This is a relatively mild-mannered rifle. Although dry-firing a spring-piston airgun is generally something to be avoided, I figured one or two dry fires would not be overly harmful, so after checking the barrel for obstructions and finding none, I slowly started tightening the trigger adjustment screws again. First the front screw and then the rear until I judged them to be about 4 or 5 turns away from all the way in. Now I grabbed the barrel, broke the action open until I felt tension against the main spring, flipped off the safety, and pulled the trigger.
Hooray! I was able to de-cock the rifle! Whew, what a relief! But now it was time to unravel the mysteries of those two trigger adjustment screws.

Adjusting the Trigger—Round 2 goes to Roamin’ Greco
Here is another word of caution for you overly curious types out there: don’t do this if you can’t accept the risk of an accidental discharge, or if your walls are not covered with steel plates or boxes full of rubber mulch. I accept no responsibility for your actions. I’m just relating what I did. I am not recommending what you should or shouldn’t do.
Guns of any sort are dangerous, and tinkering with a trigger could easily cause the gun to fire when you least expect it. With that disclaimer out of the way, please read on, to learn how I know about such surprises. You will also see that in some cases, the sear was tripped by pulling the trigger, even when the gun was on safe! I decided to get a notepad and record each turn of each screw, step by step, so I could retrace my steps back to a safe place if I needed to.
I started under the assumption that B.B.’s Diana 27 trigger adjustment procedure was still the correct method for this model, but that perhaps the procedure needed an extra turn or two, here or there. Assuming the front screw was a lock screw, I loosened the front screw a good bit, perhaps 5 turns out from all the way in. Then I screwed the rear screw all the way in. At this point, the rifle would not cock. After loosening the rear screw three whole turns, the rifle finally cocked. Looking for the exact spot where the rifle would not cock, I turned the rear screw in ¼ of a turn. The rifle cocked, but curiously, the safety was not engaging. Pulling the trigger, even with the safety on, still released the sear. Well, that was no good. So I loosened the rear screw one full turn. Now we we’re cookin’! The rifle cocked, the safety engaged, and three firm raps of the butt of the rifle on a carpeted concrete basement floor did not cause the gun to fire, either with the safety on or off. Feeling very accomplished, I began screwing the front screw down to “lock” down the rear screw adjustment. After about two turns in….
POW! The gun fired! I had forgotten to de-cock the rifle after finally getting it to cock properly. I shudder to think if the barrel had been broken open and then snapped shut, bending the barrel, or worse, if there had been a pellet or other obstruction in the barrel. We now know with certainty that the front screw on a Diana spring-piston rifle with this D-type trigger is NOT a locking screw. Without tearing apart the entire trigger mechanism, I wondered whether that front screw was meant to partially move the trigger mechanism, perhaps a first stage adjustment, and whether the rear screw was meant to complete the movement and release the sear, perhaps a second stage adjustment. At least, that was my new working theory. If true, I needed to find a balance between the front and rear screw to get the trigger behavior that I liked. From the spot where the gun fired, it took 3-1/4 more turns to screw the front screw all the way in. At this point, the gun wouldn’t cock anymore. Hey, maybe I was on to something.
I loosened the front screw 3-1/2 turns (1/4 turn more than the spot where it fired) and found I was able to cock the gun again. I pulled out my Pyramyd AIR SubMOA Challenge Card. It is clear plastic, and it has a handy little ruler along the side, and it’s flexible. I held that in my right palm while I grabbed the pistol grip and lined up the zero inches line with the back of the trigger blade. Then, holding the broken-open barrel with my left hand, I was able to pull the trigger, re-cock, flip off the safety with my thumb, and pull the trigger again a few times until I could come up with the following measurements: 1/32-inch (0.8 mm) first stage travel, 1/32-inch (0.8 mm) second stage travel, and 3/32-inch (2.4 mm) overtravel. Not great, but also not the worst trigger I have pulled. I proceeded to loosen the front screw three full turns, measuring at each full turn with no changes to the trigger pull. I was starting to wonder if the front screw did much at all, but then I decided to see what would happen if I gave the rear screw some attention.
I loosened the rear screw one full turn. How odd! The trigger pull suddenly felt like it was dragging through a very fine grit for 3/32-inch (2.4 mm) and then the sear suddenly released, with no second stage, and then another 3/32-inch (2.4 mm) of overtravel. Yuck!
Loosening the rear screw another full turn brought back 1/16-inch (1.6 mm) of first stage, 1/16-inch (1.6 mm) of gritty second stage, and 1/16-inch (1.6 mm) of overtravel. I noticed that the front and rear screws were about even. I wondered what would happen if the front screw was turned in further than the rear screw.
Tightening the front screw back in one full turn yielded a 3/32-inch (2.4 mm) first stage, 1/16-inch (1.6 mm) second stage, which was smooth again, and 1/32-inch (0.8 mm) of overtravel. I could live with that, but for the sake of your inquiring minds (and mine), I wanted to see if things would continue to improve.
I turned the front screw in another full turn and found the first stage became a long 1/8-inch (3.2 mm) with a 1/32-inch (0.8 mm) second stage, and with 1/32-inch (0.8 mm) of overtravel. This was getting very interesting. On the Diana 27, B.B. described the trigger pull as a long first stage and a short and crisp second stage. Could I mimic that and minimize the overtravel?
Turning the front screw in a half turn made the second stage disappear again. Phooey! The first stage traveled smoothy for 3/32-inch (2.4 mm) and then the sear released with very little effort and no warning, and then there was 1/16-inch (1.6 mm) of overtravel. That trigger release seemed awfully light to me, but rapping the butt of the rifle on the carpeted concrete floor did not cause the sear to slip. Another 1/2 turn in on the front screw shortened the first stage to a very light, smooth 1/16-inch (1.6 mm) pull to the sear release, and then 3/32-inch (2.4 mm) of overtravel. Again, no second stage. One last 1/2 turn in on the front screw and now the trigger broke with the safety on! No thanks!
I then unscrewed the rear screw 1/2 turn, but the trigger still broke with the safety on. I began unscrewing the front screw again, and as I did, the first stage grew from nothing to 1/8-inch (3.2mm) with no discernible second stage, and the overtravel shrank from 1/8-inch (3.2 mm) to 1/32-inch (0.8 mm). This was getting interesting again.
I then unscrewed the front screw a final 1/2 turn, and EUREKA! (A Greek word, meaning, “I found it”) there you go. I had a 9/64-inch first stage (just over 1/8-inch or 3.6 mm), followed by a firm stop to begin the second stage, which was only 1/64-inch (0.4 mm) at a slightly higher effort, and virtually no discernible overtravel. That’s about perfect for me.
For those who haven’t been keeping score, that is a total of 6-1/4 turns out for the rear screw and 5 turns out for the front screw. I think my theory is sound. Hey, I’m smarter than I look! NOT!
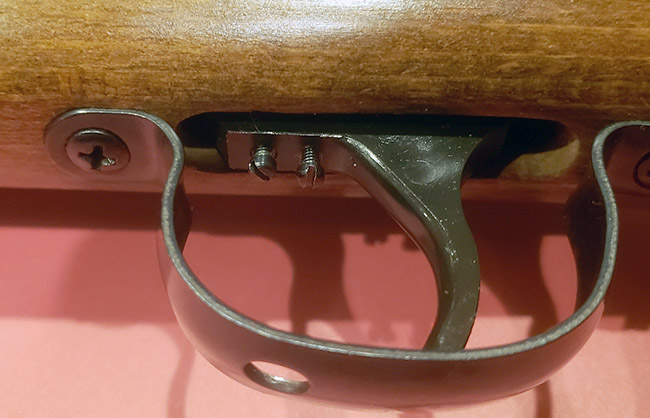
Here’s where my trigger adjustments ended up. Note the trigger adjustment screws go through the trigger blade itself, unlike on the Diana 27.
The Final Round? Probably not, but everybody wins!
All that tinkering around with the trigger would pay off as you will soon see. Since the rear sight was off the gun and disassembled, waiting for me to locate the right size e-clip, I took the rear peep sight from my daughter’s Beeman AR2078, which has more than enough clearance for that pesky little screw head that peeks up like Kilroy from the rear of the scope rail. I proceeded to shoot groups with a variety of pellets, and I am pleased to report that the Model 24 J proved to be not pellet picky, making satisfyingly round one-hole groups. She seemed to like the artillery hold best, with the gun’s balancing point in my open palm, near the rear of the cocking slot, and the back of my hand on a sandbag.
Although I have not tried every possible hold, this one seemed to work well with a variety of pellets, so I stayed with it. Everything else was held very lightly with my right thumb up and away from the pistol grip. Here are the results from my 10-yard basement range, 10 shots per group (unless otherwise noted), in descending order of group size:
H&N Excite Plinking, 7.48 gr.: 0.6715” Center to Center (5 shots);
Air Arms Diabolo Field, 4.51 mm heads, 8.4 gr.: 0.4960” CTC;
H&N Match Green (lead-free alloy), 5.25 gr.: 0.4530” CTC;
JSB Match Diabolo Lightweights, 7.72 gr.: 0.4470” CTC;
H&N Sport, 8.18 gr.: 0.4250” CTC (9 shots into 0.3525” CTC);
Air Arms Diabolo Field, 4.52 mm heads, 8.4 gr.: 0.4170” CTC;
RWS Superdome, 8.3 gr.: 0.4120” CTC;
JSB Match Diabolo S100 Heavyweight, 8.26 gr.: 0.3910 CTC;
Air Arms Falcons, 7.33 gr.: 0.3865” CTC;
Predator GTO Wadcutter (lead-free alloy), 5.5 gr.: 0.3815” CTC;
JSB Exact Express Diabolo, 7.87 gr.: 03650” CTC;
RWS R10 Match Pistol, 7.0 gr.: 0.3555” CTC;
RWS R10 Match Rifle, 8.2 gr.: 0.3450” CTC;
Air Arms Diabolo Express, 7.87 gr.: 0.3430 CTC;
JSB Exact RS Diabolo, 7.33 gr.: 0.3280” CTC;
RWS Meisterkugeln Rifle, 8.2 gr., 4.50 mm heads: 0.3265” CTC;
H&N Excite Econ II, 7.4 gr.: 0.3030” CTC (I love it when the cheapies can beat out some of the more expensive pellets);
RWS Meisterkugeln Pistol, 7.0 gr., 4.49 mm heads: 0.3010” CTC;
SIG Match Pb, 7.71 gr.: 0.2900” CTC.
JSB SCHaK, 8.02 gr.: 0.2285” CTC.
If there are any other pellets you would like me to test, let me know. If I have them, I’ll give them a try.
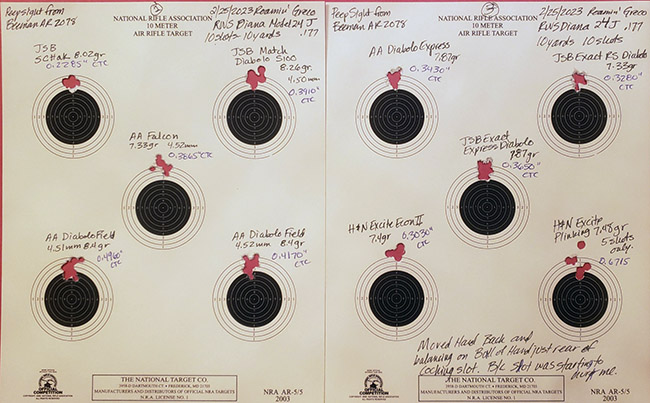
Here’s a sample of a couple of my target sheets. This gun likes to shoot! And I’m happy to oblige.
Post-match Wrap-Up
For plinking, the stock sights are great, but for target shooting in the basement over the winter, this level of accuracy deserves an upgraded front sight with interchangeable inserts, like a rectangular post or aperture front sight, or a small scope, like a Bug Buster. Groups may get even smaller. In the meantime, I will strip off some black insulation from some 12-gauge household electrical wire, and slide a small piece over the triangle front sight. From behind the peep, that will look like a solid black rectangle about the width of the bullseye at 10 yards, mimicking a post sight. Another reader uses heat-shrink tubing for this purpose.
I plan on cleaning the barrel with J&B Non-embedding Bore Cleaning Compound and then re-testing some of the above pellets along with some other pellets in my inventory, perhaps some more domed pellets. I will also re-measure the trigger-pull stages to see if things are staying consistent.
The shot cycle is very calm and quiet, no buzz, just a pulse in my hands as the shot is fired. After several hundred shots, the peep sight did not move at all. I will simply lightly oil the mainspring and leave well enough alone. If it ain’t broke…don’t fix it.
This little rifle is certainly growing on me! Although the short barrel offers less leverage and probably makes it harder to cock than a standard size Model 24, it’s not difficult. However, I’m not sure if this is the best gun for little kids because the increased cocking effort will soon tire them, and that’s when they resort to unsafe gyrations to cock the gun. But for middle schoolers, it might be just right. Remember though, that I think this particular gun’s stock looked as if it was cut down slightly, so it is hard to know for sure how much longer the original length of pull was. I found one entry in the Airgun Warriors forum that seemed to indicate that it would have the same length of pull as a vintage Diana 27, but with a better pistol grip that won’t pinch your fingers against the back of the trigger guard. I would agree with the latter. The Model 24 J was comfortable to hold. My shooting sessions were long and enjoyable.
At the end of the day, the RWS Diana Model 24 J is not as refined as say, my Beeman R7 (HW 30S), but this Diana isn’t as pellet picky, either. Overall, this Diana 24 J is a feisty contender who doesn’t let her short stature keep her down.

The Model 24 J makes for a devastating plinker!
Sorry for the long read, but thank you for letting me share this little beauty with you.


Roamin’ Greco, congratulations on your first guest blog!! Hoping there are many more to come!
Thank you, MisterAP. I have a new appreciation for what B.B. does every day. This took me weeks to write!
Yes congratulations on the first guest blog.
Welcome to the content creator and enabler community..
Great write up.
And I know many readers like the links to the pellets you used, that helps them find them easily.
That’s a very exhaustive list of pellets to test.
So what was harder, wrestling the Diana or writing the blog?
Writing is fun when you enjoy the subject matter.
Again, great job.
Ian.
Thanks, Ian for your kind encouragement.
Actually, B.B. must have added most of the links. I think I provided the link to that informative exploded parts diagram. Thanks, B.B.!
Shooting the Diana 24 J was fun. Writing about her was fun, too. Though it gives me a new perspective on what B.B. does every day. It took quite a while to write, research missing info, take pictures, and the rest. Of course, that trigger took a year off my life expectancy, but once I took a step back, I realized I could figure it out if I was simply methodical about it. So the entire experience was very rewarding because I learned a lot, and I got to share that knowledge to an appreciative and interested group of fellow airgunners. I would encourage folks to add to our knowledge base by at least writing comments. You won’t find a more supportive online community.
Roman: Well written and very clear prose. Excellent!
My Lt. Col. Army Engineer son began his shooting career with a brand new RWS/Diana Model 24J and instruction at the Precision Airgun Sales and Service by its proprietor, Louis Trepes. Louis was the originator of the felt pellet and nylon push rod system that RWS adopted.
Kevin, thus, started out with expert instruction in the basement of our more-but-mostly-less “local” airgun shop. It was a good 60 miles from where we lived in Vickery, Ohio, to the far side of Cleveland’s suburbs, so calling it “local” is actually a bit of a stretch! In fact, it was so far that a son and his father just HAD to catch a meal at Olive Garden on one of our armament forays!
Over the years, Kevin and I would go out shooting at a friend’s place in the country and chase soda cans across a big yard and into surrounding fields; he with the 24J and me with my Model 36. His shooting became the full equal of mine, but my honor was preserved by the longer range of the 36.
We added a Williams Peep Sight to the 24J and a better Diana globe front sight with the interchangeable sight inserts. Kevin became quite adept at shooting. It was never pellet picky, as was related in the article, above. Nothing but high-quality pellets were used in the .177 rifle. It never seemed to matter which brand or configuration – it always shot consistently.
We had Charles Trepes make one other single modification to the 24J, and that was adding a thick butt pad to the piece as my son began to grow. It actually made the butt of the piece quite classy and, of course, more comfortable when brought to shoulder. Kevin soon outgrew even that “temporary” modification and went off to college, and, ultimately to the US Army Engineers, two combat tours, and lots of time at Ft. Leonard Wood training future engineers for the defense of the nation.
I’ve tried to get Kevin to remove the 24J from my arms locker but the mechanics of having a personal arm on a military base isn’t quite worth the hassle, so, a milestone of his maturation is staying in the locker for occasional shooting and routine maintenance as all the arms receive. My grown son has a memento of his youth in the locker and reminds me of good times of long ago – something perhaps more important than the ballistics of the piece itself.
Like all the RWS/Diana pieces in the arms locker next to the indoor range, it still shoots with high levels of precision just as it did when my son got “the hang of it” several decades ago. Given the memories, I don’t push too hard for the Lt. Col. to retrieve HIS first arm! Besides, when my time here comes to its end, Kevin will inherit the whole mini arsenal, and HE’LL have the memories amid a mixed array of air arms.
With the attention to detail and engineering of Diana, I suspect that in due time my grandson will also receive a locker of memories. Those pieces downstairs are all built to last…
Wow, LFranke, thanks for sharing that, and for the nice words about the guest blog. I’m sure that 24 J will evoke fond memories for another generation or two, or three.
Roamin Greco,
Great job, man, very interesting report!
One question, have you monitored the two trigger adjustment screws for movement?
Like, do you think they’ll need Blue Loctite, or are have they got enough friction to stay in place?
Thanks again for an excellent report! 🙂
Blessings to you,
dave
I think they have enough friction, but if I end up keeping her, I’ll certainly report back if they slip. But I shot her quite a bit as you can see, and so far, so good.
Cool; she’s a sweet little rifle. 🙂
Roamin Greco, I’ll download a pic to show you why I asked. This is the old Webley Tempest I got from my Dad. Some say they are not accurate. But while they will never impress an Olympic pistol shooter, as B.B. has shown with his Webley Senior, you can wring some pretty decent accuracy from these little pistols…but it takes a LOT of time. I’ve got a few thousand rounds through this gun, and it took many hours of messing with the adjustment screws (as I’m sure you can relate! =>) to get it to the point where I can hit the end of these eye drop bottles at 15 yards. Hence, I now FOR SURE do not want these screws to loosen or move…some might call me paranoid, some might call me “addicted to Loctite”…I’ll own up to either, or both, of those, hahaha! 🙂
Color me impressed. Nice shooting, especially with a pistol. I can see why you are loathe to allow those sights to move. I also see the secret to your success…red bull!
“I also see the secret to your success…red bull!”
Correct! I have to be up at 5 AM tomorrow to make a run to Augusta to pic up a rocking chair my wife wants (it was made in 1900, the same year our farmhouse was built); the guy she bought it from said it was way too expensive to ship, but that he’d be willing to meet my wife halfway…so, as usual for such things, the task falls to the husband…
…and red bull will get me there and back in one piece, by keeping me awake! 😉
Safe travels to you.
Thank you! 🙂
Actually, to squeeze off those shots takes me over 10 seconds (and usually 3 breaths per shot…what can I say? I’m out of shape!) per shot, plus I have to use two hands, and rest my forearms on the bench; also, the trigger shoe I added helps a lot; plus, if you look carefully, you will see a #6 on the pellet tin; that reminds me that this is tin #6 I am putting through this pistol; that’s enough shots that they’ve allowed me to develop a very consistent grip (and more importantly grip pressure!) for this pistol. It may not be a target level pistol, but it’s one of the last things I got from my Dad before he passed away; shooting it reminds me of the good old days with Dad; and it’s one reason why I can never sell this pistol; it must be passed on to one of my nephews (the only ones in my family who are learning to shoot). 🙂
Good for you. I still have my now-non-functional Crosman 760, the airgun my Dad gave me. I just can’t throw it away.
Yes! That’s a keeper, for sure. 😉
R. G.
Very good report and mostly a very nice reading. It’s so good feeling proud for a fellowman drinking my coffee at 7am…
Regarding the trigger adjustment it somehow reminded me of the T01 procedure. I wonder if I am write.
Καλημέρα, Βασιλη! Unfortunately, I don’t have any experience with a T01 trigger. The exploded parts diagram that I linked to in the blog shows a T01 trigger, but that one has no adjustment screws at all. So I’m left scratching my head on that question.
R. G.
May I suggest that you look for “Diana T01 trigger adjustment”, especially for a schematic coloured image? It will be easy to find and see if that rings a bell.
By the way that three guns deal looks like a great one. It must have belonged to someone who cared. The choice of optic and peep sight says so. I will expect your blog on the 350. This will be a really interesting journey for you. Don’t ask how I know.
I suppose Καλό ξημέρωμα is now in order.
Yeah, the coffee is brewing. Time to get the kids up.
I read somewhere that the T01, 02, etc. was not really meant to describe different internal mechanisms and triggers. I wish someone from Diana would explain. I am going to let the folks from several other forums know about this article. Perhaps they can explain how Diana numbered their guns as they updated various models.
R. G.
From first hand experience I know the naming describes completely different trigger mechanisms/assemblies. T05 would be my last preferred. T06 good but having had failure in my first 100 shots with the K98, I am hesitant. T01 on the other hand is great and obviously made when Diana had real quality.
Speaking of my problem with the T06 trigger I must say that Diana has also failed in customer service reps at their HQ in Germany…
T06 is suppossed to be more adjustable than the T05. What “failure” are you having with the K98 T06 (forgive me, is it the underlever, spring-piston or the pcp)?
It’s indeed much more adjustable, that’s why I like it, just not up to the T01.
In my K98, springer version, a small piece of the trigger broke during the first 100 shots. Worse part of the story is the attitude on behalf of the official importer in Greece and the worst is the attitude of the company representative in Germany. Such a pity for a historic name.
Anyway a new T06 piston/trigger set from Schneider saved my day, since the small piece was not available anywhere.
In my initial testing, I think I lucked into a Diana 350 that will even shoot off a sandbag (most recoil too much and require the artillery hold, from what I have read). I can’t wait for the chance to shoot her at more than 10 meters. The biggest problem with that gun is the drooper mount and scope rings are so high that you really need a pad on the comb to raise your cheek quite a bit to see through the scope properly.
I used a drooper adjusting mount with very low weaver rings on mine. I hope this helps.
There seems to be room between the objective end of the scope and the spring tube for lower rings. If the gun turns into a keeper, I’ll definitely look into that and perhaps also a leather pad to raise the comb.
Roamin Greco,
Congratulations on you first guest blog! What were the other two rifles in the lot of three? I think the blade of the rear sight acts as a detent. In the absence of such, the alternative is a small bearing between the blade and the adjustment wheel.
Siraniko
Thank you, Siraniko.
The other two rifles in the lot were a Diana 350 Magnum with a Hawke Airmax 4-12×40 AO IR Scope and a vintage HW30S with a Williams peep sight.
Here is a set of pictures of the rear sight. If anyone has this style of rear sight, I would appreciate a close-up picture of how the windage detent works.
Roamin Greco,
A small ball bearing should be residing there in the hole acting as a detent.
Siraniko
I thought that too, but I could not find one that fit between the two pieces of metal and still protruded through the hole in the outer layer of metal far enough to engage the grooves in the windage screw.
Roamin Greco, my Diana 54 appears to have the same rear sight. In mine, there is a 2,5mm ball, jammed in the little holes between the thin u-shaped inner spring and the rear sight ‘housing’. Dunno what to call these things, so hope the picture helps… 🙂
Thats perfect! Thanks, Hihihi. I can now easily see I am missing that ball bearing and also a little washer. So that ball bearing just sits between the two layers of metal and sits prown of the out layer. I haven’t come across a 2.5mm ball bearing, so I will look for one.
“proud” not “prown.”
Hihihi, could I trouble you to measure the inside and outside diameter of the little washer?
Roamin Greco, measuring was no trouble at all. 🙂
Little washer dimensions:
inside diameter – 2,34 mm ~ 0.092″
outside diameter – 5,06 mm ~ 0.199″
thickness – 0,46 mm ~ 0.018″
Reassembly was fiddly… but, as can be seen below, I managed to shame the parts back to where they belong! 🙂
Thank you so very much, sir!
I’d guess that there should be a small coil spring then a ball bearing in that empty hole. The bearing would be a metric size, but close enough will work. Finding such a small diameter spring can be tough. Try breaking apart an empty(!) Bic lighter. Theres a coil spring under the thumb button that’s pretty skinny.
Thanks Derrick. Now I have another reason to pick up empty Bic lighters that I find discarded at the beach or the side of the road (insert mad face emoji).
Long read? Really? For me it seemed like a standard read, so much was I absorbed following your adventure. That’s what makes a great write-up, even though being longer than usual, it doesn’t seem like that at all to the reader. At least I am already a fan of your guest blog, hoping to see more.
Thank you for the good moment I passed this morning, on vacation in the South West of France, far away from my airguns.
As for the rear sight, you mentioned having a Weihrauch HW 30. Very often these rear sights are designed in a very similar way, you probably could get inspiration for the repair from this one.
Thanks again for the good read.
Pa’
Thank you for the kind words and the suggestion.
I am just thinking about one thing re-reading your trigger adjustment adventure. I had a similar experience with a Walther LGV (the recent version, not the classic).
Found a description including photos on the Rowan Engineering site, it sounds like the mechanism might be similar. Below the link (hope that I am not offending the forum rules):
https://www.rowanengineering.com/pdf/WalterLGVLGUAdjTriggerInstruct.pdf
All the best
Pa’
Thanks Pa’!
Pa’, I wanted to add for the benefit of others, that your little tip is now searchable by others interested in the Walther LGV. While the blog’s search box does not search through the comments (to my knowledge), doing an Advanced Search in Google (and probably in other search engines) for “Walther LGV” and limited to this website, “www.pyramydair.com/blog” does search through comments. So I would encourage all our readers to share their tips and experiences with a clear reference to the make and model of the airgun so that adds to the wealth of knowledge in this blog, which also indirectly helps Pyramyd AIR.
As an aside, one can learn a lot about motorcycles, model airplanes, and electric guitars from the comments on this website as well as a lot of other information.
RG
You might add slingshots and straight razors.
Excellent blog, by the way. Clearly written and very engaging. I think BB encourages others to write because of his success with you and a few others. Of course, I doubt we will get the chance to see what is in his reject basket. I, for one, would love to see what you do with the other two of your bargain buy.
Ed
I will take careful notes and pictures. You never know when they will come in handy. :o)
RoaminGreco, including the metric measurements (in brackets) was a tremendous help, thanks! 🙂
I had a look at some french adverts for Diana24s (pictured is a younger Diana24 for sale on naturabuy.fr) and noticed rather different stocks to yours and the one in the diagram. I wonder, whether the many differences also include the achievable accuracy?
Your shooting results seem really rather good! 🙂
PS What a journey of trigger screw adjustments! Phew… 🙂
You are welcome. I had you, Bill, Stephan, and our other international readers in mind. I almost put a 10 Eurocent piece in the picture of the targets but all I could come up with was a Dollar coin.
Thanks also for the kind words. The Diana in your picture is not wearing a scope rail and has a different rear sight, as well. The trigger looks the same, which tends to confirm that my “J” model is internally a “D.” Does the French advertisement show a picture of the trigger adjustment screws by any chance?
Roamin Greco, the four Diana 24s currently for sale must have their trigger adjustment screws up inside the stock. Besides, they all seem different to yours anyway. 🙂
https://www.naturabuy.fr/rechercher.php?title=diana+24
PS in the diagram it looks to me as if the screws 46 act on the sear 49, which would suggest the forward screw to act as stage one, the rear screw as stage two adjusters? 🙂
I think you are right about front screw stage one and rear screw stage two, but they are acting on the same sear, so there is an interplay between them. Over-adjusting one affects the action of the other. Also, I picked up on another tip today, the tips of the screws can be smoothed and polished so when they push on the sear, they will have less “creep.”
Roamin Greco, I imagine the “..interplay..” is simply that screw two takes over from screw one.
I think the idea is to adjust that takeover moment towards the end of travel.
Here, the second screw quickly finishes what the first started.
Because screw two is closer to the pivot of the lever being raised, it has to work noticeably harder.
This difference is what the shooter feels in her/ his trigger finger as stage two: wooarp-POM… nice! 🙂
(I should mention that I would not turn the forward screw in too far, for fear of shortening stage one to the point of shocks to the airgun setting it off.)
Filing the screw ends: if their skin is hardened metal, which is likely, then they will want to be re-hardened after smoothing.
And/ or a smither of molybdenum grease might work as well. 🙂
I forgot: all the above are purely my thoughts and imagination, ie I’m not talking from experience… Good Luck! 🙂
I think the point of the comment I mentioned was just to remove any burrs at the tip of the screw where the screw may contact that sear, so that it pivots smoothly. I can’t imagine those tiny screws would be harder than the sear, but what do I know.
RG,
What an awesome blog you have written!
I think your 24J was built at around the same time as my 34. I have assumed (you know what that can make out of you and me) that my trigger is a T05 because of the plastic blade. Mine is so sweet as it came to me that I have not even seriously thought about adjusting it. I will have a look see at it in just a bit. I also have this type of trigger blade on a Diana 46.
The sights on your 24J look to be identical to mine on the 34. It sounds like I need to take my rear sight apart and take a few pictures. 😉
I would say that your stock has indeed been modified. My 34 has the grooves in the wood at the back, but no button to keep it from slipping on the floor. You may consider getting a slip-on recoil pad to help lengthen the pull just a bit and make a nice non-slip butt. I have one on my Maximus. You may have to stuff it with something to tighten its hold on the stock.
Thank you, RidgeRunner!
The T05 trigger is definitely a different animal, from my research. And I just checked my Diana 350 Magnum made in 2007, which is marked “T05.” It’s trigger has only one adjustment screw and looks different.
Please take a look at the picture collage in my response to Siraniko. Close up pictures of your Diana rear sight from underneath should suffice. I would not want you to lose any tiny parts from your rear sight.
Roamin Greco,
I enjoyed reading you first effort at a Guest Blog just like everyone else that has congratulated you on it. You should feel proud of your hard work and accomplishment; especially since it triggered so many readers to offer, and deliver, help and information to make the RWS Diana even better!
I have a small tip on keeping small parts from flying off into the abyss of the Dust Bunnies: I use a big Garment Ziplock® bag on my workbench to put the device in as i disassemble or assemble things that have small parts that are spring loaded to attain Escape Velocity. You can use various clips, cords, and stands to hold it up and/or give you room to move hans, tools and parts inside of the bag.
If you have a hobby table top paint booth that works well especially if it has a vent and fan when using adhesives and solvents.
Thank you again for a great read and first of at least a few more Guest Blogs!
shootski
Thank you, Shootski.
RG,
On the trigger, you may be correct. I have not looked at the Diana 46 trigger, but the trigger on my 34 has two screws like yours.
As far as the rear sight goes on my 34, I have “tested” with it already and have mounted a scope. I am not concerned with parts going everywhere. I will post some pictures in the next couple of days.
Roamin,
Super detailed blog. However, my question is what where the other 2 guns that you bought?
Hope these diagrams help in your future RWS 24J exploration.
https://cdn11.bigcommerce.com/s-qovxruj8ue/images/stencil/original/c/24371__98061.original.png
https://cdn11.bigcommerce.com/s-qovxruj8ue/images/stencil/original/j/24370__93344.original.png
FWIW-They both say that your rear sight should be plastic.
Good report!
-Yogi
Yogi, thanks! I just realized that I forgot to measure the angle of the barrel at full cock for you!
I saw the Chambers diagrams in my research, but thanks. If you look closely, the plastic rear sight looks different in the Chambers’ drawing compared to the other rear sight shown. The elevation screw is in a different place. My rear sight has a plastic plug that fits inside the body, which is a folded piece of spring steel. The plastic plug is what the elevation adjustment screws into. The rest of the rear sight is metal. The trigger shown iin the Chambers’ drawing is my gun’s trigger, but the detail is lacking compared to the diagram I linked to.
RoaminGreco
Nice job. I considered doing a blog to describe how I took two entirely different Daisy 1894 rifles, a broken Spitten Image and the later horrible version Winchester, and modified, combined and created some parts to create one good new one. It took me weeks to accomplish the mods.
However, I concluded it would take a multi-part blog, and lots of pictures. Eventually I came to the conclusion that nobody would benefit from it, and it would only be for reading entertainment and take a very long time to organize, knowing what I do about creating a lecture.
The later Winchester version was pulled off the market in no time at all and the idea became pointless and reinforced my decision to ‘For-geda-bow-dit’.
It’s a real challenge and BB makes it look so simple. Like putting a conversation to print.
Still, there is something to be said for reading entertainment…. I hope my article was informative and (slightly) entertaining. I have seen Another Airgun Blog that is more pictures than words.
Great blog Roamin!
Thanks for sharing your experiences!
Wish that more people would write guest blogs, it’s always interesting to read how they enjoy our hobby.
Cheers!
Hank
Thank you, Hank. It’s a great hobby. There is so much to learn from so many disciplines, depending on how deep one wants to dive into it.
Roamin’,
Great review! (And excellent shooting!)
Michael
Thanks, Michael. I want you to know that I went through about 10 drafts. I had great English teachers in school, and I didn’t want to embarrass them. The shooting was hopefully, mostly the gun, as they were all done from a bench rest. My offhand shooting needs a lot of work….
I really admire your tenacity dealing with that trigger. Glad it worked out for you!
Fred formerly of the Demokratik Peeples Republik of NJ now Happily in GA
Thank you, Fred. Me too. :o)
Excellent report and writing; blogging on a subject one is passionate about involves a bit of blood, sweat, tears and time. FM knows, having blogged for 3+ years until burnout set in. Would think blog posts from the audience would give B.B. a break…and where does he get the energy and inspiration to write one 5X per week? FM will have what he’s having!
RG, you displayed the patience of Job during that trigger adjustment procedure – reinforcing once again FM’s personal philosophy of “don’t mess with it and it won’t mess with you.” Unless one is left with no choice. Thank the Air Power there has been no need to mess with the Rekord triggers in the HW springers.
PS – “she” is pretty and a pretty good shooter too.
Thanks, FM. Make mine a double! After this, I am in a bit of awe of B.B. Even more so if you add how he responds to comments throughout the day while trying to put together the next day’s blog. I hope my guest blog gave him a little break, but I know he had to spend some time editing and inserting all the links and pictures.
I honestly can’t remember what the trigger was like when I first received the rifle, but it was just asking to be adjusted.
RG,
Thanks for a very good blog. It was an easy read. I hope this is not your last one.
Don
You are welcome. We shall see. Overall, it was a gratifying experience. I’m glad I could give back some knowledge to this august group.
BB
I agree with Vana2, about readers contributing stories or submitting a blog post. It’s just not too comfortable going way off topic and putting it “In your face” kind of speaking during the conversations.
However, it could be a little intimidating to try and, be good enough to come up with an informative or entertaining experience without looking a little foolish. Being new at it may deter some readers. Especially if there is some sort of deadline or schedule to be met?
I’m sure you review guest blogs before submitting them to us and may decide it’s too short, long or whatever and pass on it or review it with the contributor first. But how about alternate ways to add them to the blog.
Like a small collection of them once in a while or over a weekend under something like ‘Readers write” It could be anonymous or not, or an addition at the end of your daily blog if not too long.
Not sure if it would actually add to your workload or give you time off but it’s just food for thought.
Bob,
I’ll give your suggestion some thought, but the comments are another way to tell a story.
BB
Skout Epoch PCP Air rifle: The Future of Airguns is Here (P/A Add and, another ‘In your face” off topic comment… See above)
So people, what do you think about all these new, top of the line, Hi-Tech, black, Tack-T-Cool PCP’s?
Long bullpup seems to be the way to go.
Personally, they are everything I could ever hope for in an airgun. A bit pricey but look what you get for your money. And I believe traditional wood stocked PCPs and others can stand right there alongside them as desirable options in this wonderful sport.
I may need to get a new mind set to start collecting them. Perhaps a hedge against inflation? 🙂
When, and if, RR doesn’t consider the likes of the select fire Western Sidewinder a Matel-O-Matic the ground may get cold as hell starts to freeze over. 😉 Not to worry there, just kidding.
And my WORD OF ADVICE to manufacturers and distributers. NEVER let a customer lose his ability to shoot one of these very expensive Airguns for a lack of PARTS or SERVICE.
Thank you very much!
Bob M,
Guess you got the same email I did, /product/skout-epoch-pcp-air-rifle?m=4405#11803 3000 bucks for an airgun not unless I win the lotto or something like it. I would love to try it out but my wallet says no.
Mike
Bob M, since you asked:
I think I can comprehend why some think “Tack-T-Cool”. 🙂
I wonder if they get that some think “Tack-Y-Cringe”?
By the way, pictured is how I think wood doesn’t look good and plastic can… 🙂
hihihi
I see your point. Black stain is a bit odd or unusual to say the least if that’s what it is.
I wonder if certain people care for Tack-T-Cool and others nice wood depending on their aptitude.
I am extremely analytical and mechanically inclined for example and prefer the hi-technology look over beauty in a lot of things. Like stereo equipment. And I would prefer to hang out in a nice garage with a beer and my cars and motorcycles than a comfy living room.
Bob M, that almost sounds like your garaged vehicles are technically interesting to look at but otherwise ugly?
And also, your garage must be enormous – round here, they’re mostly built to hold just one narrow car, however, used to store junk. 🙂
3hi
Real ugly now. Took out my ’71 Harley, a 69 Mustang and ’22 Veloster N to make room for 7 carloads of stuff I removed from my friend’s sailboat after I placed him in a memory care home. Had 5 cars in that 24’x30′ garage. Two GT40 type kit cars and my ’92 3000GT VR4 are still in there.
Moved three 60’s vintage BSA motorcycles to my dining room a while back. Lots to do this summer now that the rains have finally stopped. After 8 years of being empty, CA drought, my 10′ deep pond is overflowing, and a hundred croaking toads are expected. If they haven’t been eliminated by the drought.
Bob M, how is your old shipmate? Hope he’s less medicated, more looked after. 🙂
It seems your hangar (garage) could do with an extension. 🙂
Recently I’ve been feeling an itch for a motorcycle – a small engined retro like a Royal Enfield maybe, but our dining room is much too small for one, let alone three ! 🙂
Currently, our neglected little old pool, has been a handy source for watering various new plants. 🙂
I have fitted a wooden plank to an edge, as a rescue ramp, so I don’t have to fish out drowned mice, toads, etc… Our neighbour has a permanent pond and so, in the warmer months, I too get to hear a croaking chorus! 🙂
3hi
His health has improved a lot now that he is eating well and being monitored. Will remain on many drugs. Sad how much goes wrong beyond memory. Cognisent ability declines and proper decision making goes out the window. Your life literally falls apart.
I really could use a hangar. I have 15 ‘project’ vehicles and three more motorcycles outside. Most should go to junk or get sold off, but I can fix them all with some motivation and round to its. I’m into too much stuff at my age and too many people are, or were, requiring my time. Shoot airguns or … take a nap?
Bob M, I wonder if you’re like me, in that you’ll always try’n’help others, even if it’s just with the wisdom of your advice – in which case, you already know that the answer is, to forget about any “round to its” and “shoot airguns”.
After you’ve had “a nap”, of course!! 🙂
At 76, I declare that you deserve more luxuries than you can even imagine! 🙂
———
I’m sure you must’ve looked into the possible side effects of the drugs, their interactions with each other (!) and identified those that are given for the carers – so, it is very good to hear of improved health, thanks. 🙂
3hi
Well, I know that one drug they give him reduces his sex drive being among all those lonely mentally impaired women there and another calms him down but I’m not about to question a Neurologists prescriptions. I’m tempted to send a before and after photo of him. They are working well.
Yes, you have me pegged. Always trying to help and have often stated that it is ‘almost’ impossible to pass on wisdom to younger people.
How many guys care for their disabled ex-wife? Actually doing it for my daughters. By the way, I’m really nowhere near 76, have over 4 months to go. But I am over 75 🙂
Well Bob M, in that case, you’ll not have long to wait, for those luxuries to come enhancing your life… 🙂
Yes please to photos. Always, regardless of subject. 🙂
Also, how nice, to have faith in the Neurologist and her/ his choice of treatment.
My mum eats a small bowlful of pills&tablets daily and, happily, I know her carer well and trust him. 🙂
I, too, find it hard to observe others dispassionately, and then, well, I guess it’s just a matter of timing, in as much that I often perceive a need for help before they do… 🙂
On a similar note, would you totally trust your daughters to look after their mother? 🙂
Hello again, everyone. Here is an update on my guest blog entry. I’ll leave a link at the current blog so you can find this easily. This update is dedicated to Fish, who is looking for the perfect classic sproinger for indoor target shooting.
I went back to my basement 10 yard shooting range with the RWS Diana 24 J and put a few pellets through my new (to me) Shooting Chrony Alpha with the indoor light kit. I selected the most precise cheap pellet, the H-N Excite Econ II (7.4 gr.) and also the most precise pellet, the JSB SCHaK (8.02 gr.), and while I was at it, I dug up a tin of Daisy PrecisionMax Flat-Nosed pellets (7.8 gr.) because I seem to remember Fish saying that was his favorite pellet at 1 cent per shot. I never had any success with those in any of my airguns, but this one is for you, Fish.
The Econ IIs resulted in a high of 574.7 fps, a low of 565.3 fps, for an extreme spread of 9.48 fps, an average of 569.4 fps (173.5 mps), and a standard deviation of only 2.44. Using P.A.’s calculator, the average velocity and the advertised pellet weight of 7.4 gr., I get 5.33 fpe (7.23 Joules). At 1.2 cents per shot, that’s value!
The JSB SCHaK gave me a high of 525.5 fps, a low of 518.6 fps, for an extreme spread of 6.81 fps, an average of 522.2 fps (159.2 mps), and a standard deviation of a mere 2.23. The P.A. calculator tells me I am getting an average of 4.86 fpe (6.59 Joules).
The Daisy wadcutters would not go all the way into the breach, and the skirts were being bent when I closed the action (see pic below), so I had to use my pellet pen to seat them. The funny thing was the pellets are apparently not very uniform because some seated in 1/16 of an inch and others almost 1/4″. So I was a bit dubious about how they would perform. Soldiering on, the Daisy wadcutters yielded a high of 525.2 fps, a low of 506.6 fps, for an extreme spread of 18.6 fps, an average of 515.5 fps (157.1 mps), and a standard deviation of 6.78. This pellet provides 4.6 fpe (6.2 Joules). Not too shabby.
However, the real surprise was when I put away the chronograph, reinstalled the peep sight from the AR2078, and shot some targets. 10 shots went into .4540″ But 8 of them went into 0.1640″! That was a surprise! With the stock open iron sights, I was only able to almost get a 1/2″ group. That tells me I have quite a special little rifle here, one that I was sure that would be resold when I bought her as part of a group of 3 at an auction and after I danced with her for a while. Now, I am thinking of buying a new stock for her, installing a new globe front sight with interchangeable inserts and a peep sight, or a Bug Buster scope. I measured the front sight dovetail and it measured 8.2 mm, my Beeman R7 measured 8.3 mm, so I am hoping that the Weihrauch globe sight with inserts sold by P.A. will fit. For some reason, Diana globe sights with a full set of inserts are not sold as a package deal as far as I know, and one has to buy the sight and the inserts individually from JG or Chambers.
Well, Fish, what do you think of the Diana 24 as your next airgun?
And here is a picture of the target from the Daisy wadcutters:
The dreaded bent pellet skirt: