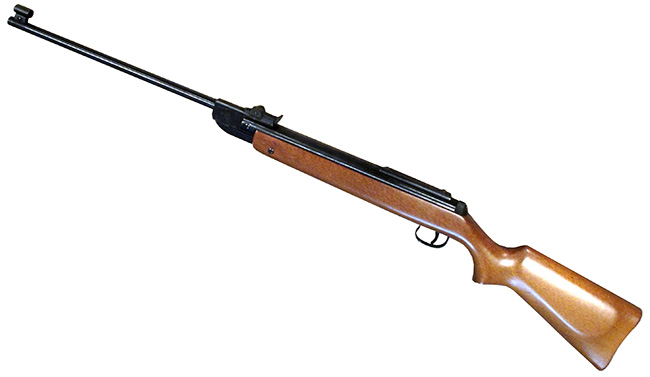

RidgeRunner’s Diana 34.
This report covers:
- Shootski’s request
- Cleaning
- The new mainspring
- Spring guide
- Assembly and lubrication
- Buttoning up
- Stock on
- How does she shoot?
- Where next?
Today I clean all of RidgeRunner’s Diana 34 parts, assemble the rifle with a new mainspring and lubricate it correctly. We will learn many things today and I won’t spoil the ending for you.
Shootski’s request
Before I get into the work I will grant reader Shootski his request from Part 1. I had said, “The groove in the inclined plane that the breech ball bearing rides on still has most of its bluing. I saw a report on the Airgun Nation forum where the owner thought that the groove had been worn in the steel by the ball bearing, but what he actually saw was the inclined plane with no bluing remaining.”
After reading that Shootski asked, “Dark Sider would like to know some more.
B.B. wrote “The Diana 34 has a ball bearing breech lock that rides over a steel inclined ramp, until the spring pushes the ball over the steel ramp to lock the breech.”
5. Could we get a detailed photograph of this steel inclined ramp on a future Part? Please.”
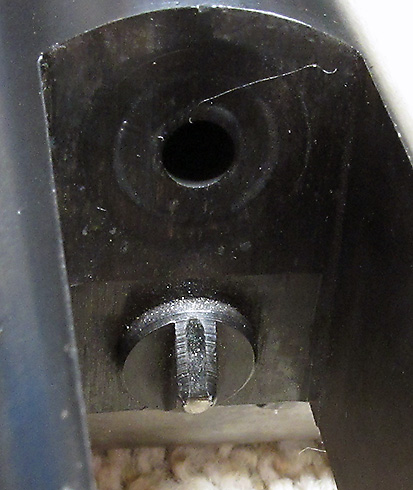
There you go, shootski. The breech locking ball rides up the groove in that small ramp. As you can see, all the bluing is still on this ramp, which gives you an idea of just how unused this rifle is.
Cleaning
Cleaning the rifle is job one. But this old girl came to me almost squeaky clean. I ran a couple cotton swabs down inside the spring tube and they came out clean. There is nothing inside and that’s a gun that needs lubrication!
I wiped off the piston with a rag and the soot on the piston crown mostly went away. What was left I got with alcohol on a cotton swab.
Remember that I thought there was a corresponding patch of soot at the air transfer port in the spring tube? Well, it turned out to be just the shadow of a deeply chamfered transfer port. There was no soot inside the compression chamber.
Once the parts were clean it was time to lubricate and assemble. This took most of the 90 minutes this whole job took job. For lubricants I used moly grease, Tune-in-a-Tube and a couple drops of SLIP 2000.
The first lube was a couple drops of SLIP 2000 in the joint of the cocking link where it joins the bottom of the base block beneath the barrel. I worked the link back and forth but that didn’t change things too much
Since I showed you most of the parts during the disassembly in Part 2 I will show different parts today. And I’ll cover the one tricky place in the assembly of a Diana 34 — in fact, for many Diana air rifles.
The new mainspring
I looked through my stash of new mainsprings. It would be so much easier and less expensive for RidgeRunner if I could find a spring for this job and not have to buy him a new one. Most of mine were made from wire that was too thick for this job, plus they did not have a large enough outside diameter. Remember the huge clearance between the factory spring (OD 0.824 inches) and the inside diameter of the piston. I measured the inside of the piston in Part 2 at 0.950-inches, but on this time I measured it again at 0.925-inches. The clearance between the new spring (OD 0.854-inches) and piston is still large — just not as large as previously reported.
The spring I chose to replace the factory spring came from a Vortek spring tuneup kit I either never used or installed and removed again. It was dry all over so I don’t think it has ever been used. The wire diameter is 0.135-inches so it is larger than the 0.130-inch factory spring wire, but the metallurgy of the wire may give a softer push. I’ll just have to try it to find out.
The new spring has 28 complete coils, compared to the 33 coils of the factory spring. That will give it less preload and I hoped that would make the rifle cock easier.
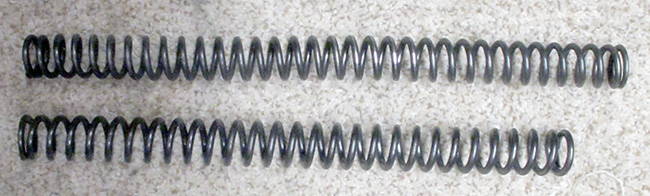
The factory mainspring (top) is longer than the replacement. The replacement has fewer coils and is of greater outside diameter, but the spring wire is 0.005-inches wider.
The Vortek spring guide did not fit over RidgeRunner’s trigger, and the piston rod in that kit shortened the piston stroke which takes power away, so the only part I used from the kit was the Vortek mainspring.
Spring guide
Remember I mentioned a hesitation in the cocking stroke in Part 1? Well the open end of the synthetic spring guide that receives the piston rod when the rifle is cocked had a couple rough spots on it where the piston rod had bumped it. They didn’t look large enough to cause that hesitation, but they were there.
The base of the spring guide, however, is broken off. It now looks like there is a thick synthetic washer and the guide that’s separated from it looks like a tube that now has a smaller flat base. The guide still works fine because the pressure of the mainspring holds it together, but I have to replace it and it will take some time to get one. Thankfully the rifle can still be assembled and tested.

Assembly and lubrication
The piston has to go into the rifle when the barrel is off the spring tube, so the cocking link will fit into the piston’s cocking slot. Of course the end of the cocking link gets moly grease as well as all the slots in the piston and spring tube where that link slides. Once the piston is all the way inside the spring tube the base block that holds the barrel can go back into the action forks of the spring tube. I lubed the two thin washers and the bushing that the pivot bolt passes through (see these parts in the Part 2 report) with moly grease.
Once the barrel is connected to the spring tube the new mainspring was lubed with Tune-in-a-Tube grease. To stay clean I lube the front half the spring coils then slide the spring into the piston to hold it while I put grease on the back half of the coils. Then the barreled action goes into the mainspring compressor to receive the trigger assembly and everything can be buttoned up.
Buttoning up
This is the tricky part of the assembly, but the new mainspring made it easier because it’s shorter than the factory spring. That gave me more room to maneuver the action in the compressor.
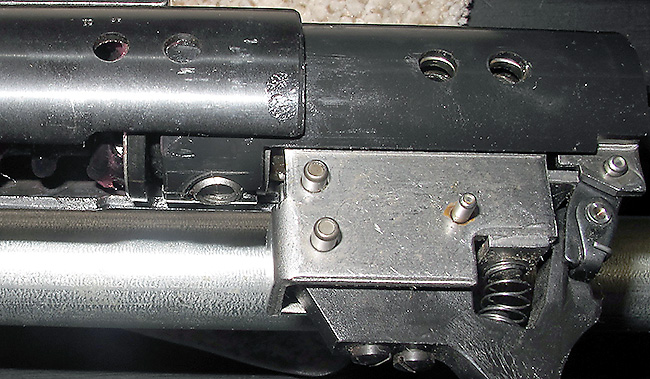
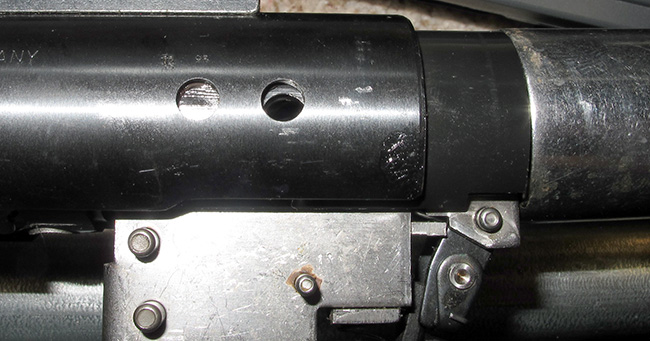
To button up the 34’s powerplant two crosspins are pushed through the spring tube and they pass through the trigger assembly. You can see the holes in the trigger assembly and spring tube here.
The tricky part is getting the two holes to line up all the way through the both sides of the spring tube and also the trigger assembly. I have found that putting the rear pin in first sometimes helps, but I have also put the front pin in first at times. When the holes align the pins will go through with finger pressure.
As you jockey the trigger assembly into place, watch the three crosspins in the trigger assembly. They are very loose and want to fall out, but putting them back can be difficult because spring tension in the assembly pushes the holes they pass through out of alignment.
I’m pushing the trigger assembly into the spring tube slowly. This kind of control is possible with a mainspring compressor. I can align the pin holes by pulling or pushing on the trigger to rotate the entire assembly at this point.
Stock on
After the barreled action is assembled, drop it into the stock. Don’t forget the plastic rear cap that the safety passes through. If you do, everything has to come out of the stock for a do-over.
How does she shoot?
The proof is in the shooting and cocking, so where did this spring and lube job get us? I want to take this down to the details, so here we go. On the first shot I noted that the cocking was almost as hard as previously, if not the same. BUT — there was no hesitation in the cocking stroke. I believe chamfering the entrance to the synthetic spring guide was what was needed. I still want to replace the guide, but after 4-5 shots it seems to work fine.
When fired…. wait for it.
The rifle now feels exactly like a Diana 34. Remember I told you that the bent mainspring was pressing against the inside of the piston and removing all the vibration. I said in Part 2 under the title Why so smooth?, “The mainspring is kinked on both ends and there are shiny silver spots on the outside of the coil where the spring has been pressing against the inside of the piston wall. That’s what kept the buzzing to a minimum. If the spring had been lubricated it would have been buzzier, not smoother, because the spring would have rattled around instead of pressing tight against the inner piston wall.”
I was right. This rifle now vibrates like all Diana 34s. I am not pleased with it at this point.
The cocking effort did diminish just a bit. For most of the stroke it takes 28 pounds to cock the rifle, but at one point the needle on the scale jumped up to 30 pounds, which is identical to what it was when I started the test. So the lube did smooth things a little (I think) but it’s not that much lighter like I hoped.
Where next?
We need a new spring guide for sure. That is what made the rifle difficult to cock — not a broken mainspring. I want to shoot this rifle more before I test it for velocity because right now it has detonated once in 4 shots. I want to try it with heavier pellets and see if it calms down. I may retest the cocking effort, as well
I like the new spring, but I will not tolerate vibration, so something’s got to change. I guess we learn what that is in the next report.

B.B.
Spend Ridge Runner’s money!
That stout spring will never be easy to cock.
I bet as is, it is still full 14+fpe power gun.
At least gas pistons do not twang…
-Y
Yogi,
I do not mind if he spends my money, but I have never liked gas sproings. Fortunately, the way a Diana is made precludes a gas sproing from being installed.
Let the master do his thing.
R.R
I wish I could enable you to try an HW 90. That 20+ fpe solid shot cycle is something you ought to feel sometime.
By the way I again thank you and others here, for enabling me into using open sights even with a personal touch. This HW 90 with the Truglo in front and the FWB aperture in the rear make rugged holes at 10 meters, with me on the wheel!
Bill,
I would really like to have an HW90 come visit RRHFWA. I would probably tune it back a bit, though.
It is good to hear someone else is enjoying open sights. I would really like a set of rear buckhorns if I had something worthwhile to put them on.
“If the spring had been lubricated, it would have been buzzier, not smoother…”
BB,
It’s not much of a surprise to see that your prophetic words came true.
Hence, “so something’s got to change.”
I look forward to seeing what that shall be…I’ll bet RidgeRunner does, too. 😉
Blessings to you,
dave
Tom,
How much preload did you have on assembly with the new spring? Previously you had about three inches of preload. Couldn’t the Vortek spring guide be modified for use?
Siraniko
Tom and Siraniko,
That was the question that popped into my head, too. Is the Vortek guide close enough to be modified to size?
Michael
Siraniko and Michael,
The new spring lost a little over an inch of preload. Maybe 1.25 inches?
I’m still ruminating (pondering) the new spring. I don’t think it will stay, but perhaps. As for cutting it down, I think it will remain at the power level it’s at, so that wouldn’t help that much.
BB
Tom,
If you are going by the new spring route maybe you can experiment with the preload of the current spring? Cutting a few coils off and seeing how it affects cocking effort and velocity.
Siraniko
Does the old spring fit inside the Vortek “sleeve”? If so, just cut a few of the twisted coils out and use the sleeve to damped vibration. Should be a softer, smoother shooter….
-Y
Yogi,
What you call the sleeve is actually the rear spring guide and doesn’t fit the trigger on this rifle.
BB
B.B. what’s the difference in the outer diameter of the replacement spring you found compared to the inside of the piston?
If you are considering a tune kit with a new spring, please give details on how you select it. I went to Vortek’s website and ARH and was bewildered by the choices. Thanks.
Roamin,
I edited the text to include the outside diameter of the new spring (0.854-=inches).
Thanks,
BB
I suppose that’s still too much space between the spring and the piston. Would you need to add a thin metal cylindrical sleeve inside the piston to take up that space?
Roamin,
I’m thinking along those lines, BUT — the cocking effort needs to drop and the detonations have to stop. That’s why this tuneup needs a break-in. Otherwise, if those things don’t change what’s the point?
BB
BB….First top hat the spring, make tighter shorter rear guide to fit with TH. Lube spring lightly…should remove all vibration, but you already know this….plenty of room with shorter spring
Mike, does one need a machinist’s lathe to custom make those parts to precisely fit?
That or a drill press, there is a way to get the spring to tighten up on the rear guide without machining but it’s not approved by many…
Off topic, but it has to do with fixing up vintage airguns. I now have a Winchester 333 (Diana 60 or 65, I think) target rifle. The pink rubber adjustable recoil pad is in pretty bad shape. It’s cracked and dry and falling apart. Can it be reconditioned? If not, where can I get a replacement? Thanks.
You might try removing it and spray-soaking it down with Armor All…it worked very well on the dried-out tires on my wife’s golf cart…it can’t hurt…as long as the pad is off the rifle. 😉
Thanks, it has been soaking for 24 hours in straight armor all, and has turned a bright bubble gum pink color and seems to be a little like pink feta cheese. I have it drying off now, and I’ll see what happens. In the meantime, the search continues. I may have to get an oversized pad and shape it to fit the plastic piece that allows it to slide up and down on its dovetail. It’s going to be a project all right.
Cool; it’ll be interesting to see how she turns out. 🙂
Roamin Greco,
Once that starts to happen it will just turn into sticky crumbles if you Armour All or 303 it.
These folks might have a replacement: https://www.midwestgunworks.com/winchester/recoil-pads.html
shootski
I may be at the sticky crumbles stage. See above my response to Dave. Thanks for the help.
B.B.,
Thank you for the: “…detailed photograph of this steel inclined ramp…” I can now see how it works with the ball to lock up the blocks.
After looking at the photo it causes me to ask another question. Is it machined in place or is that ramp assembly screwed into the block?
shootski
shootski,
That ramp HAS to be a separate piece. If it was part of the block it sits in why would they bother to machine its base into a circle? Whether it is screwed into place or not, I don’t know but I highly doubt it. To clock a part in a tight space like that so it aligns perfectly would be a daunting piece of work. It would be easier to either press-fit it or, more likely, to weld it in place wit a precision jig.
BB
B.B.,
Good points.
Reading my mind he is!
Thank you.
shootski
I’m sure a spring compressor makes it easy to install retaining pins, but this may help some.
I use a drill bit of the same size, or a bit smaller, to easily align the holes and temporarily hold things in place. Easier to handle than the small pins.
It’s easy to install a pin by simply pushing the drill bit out with it.
At the time I was compressing a spring with a screwdriver. One coil at a time and using another screwdriver to hold it in place while moving to the next coil.
Yes, it was dangerous but a spring compressor for a one-time use would cost more than the airgun at the time.