by Tom Gaylord
Writing as B.B. Pelletier
Part 1
Part 2
Part 3
Part 4
Part 5
Part 6
This report covers:
• Disassembling the Sport
• Spring guide was loose
• Remove the piston
• Piston comes out
• Mainspring tube/compression chamber finish
Okay, today the Feinwerkbau Sport air rifle comes apart, and we’ll start looking inside. This report is huge, so it will take today and tomorrow to complete.
Some of you might like to compare what you see in the Sport to the FWB 124. That can be seen in the 15-part report I did on the FWB 124.
Okay, enough explanation. This is what you’ve been waiting for, so let’s get to it!
Disassembling the Sport
First, the barreled action came out of the stock. FWB now uses Torx fasteners all around; and although I’m one of those dinosaurs who doesn’t like when technology advances and forces me to buy new tools, in this case it was the right move. I’ve stripped both Allen screw heads and Allen wrenches in the past when working on airguns, and the Torx seems to put an end to that. Three screws out, and the stock came off.
Now, I could see the gear oil that was still oozing from the action. If nothing else, today was going to get rid of all of that so I didn’t have to put a pan under the rifle like it was a 1949 Harley panhead (an old American motorcycle that leaked oil all the time)!
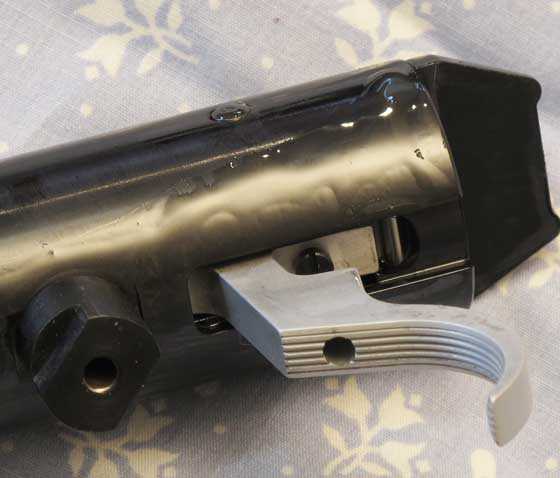
Gear oil was still oozing from the action!
Fortunately, Feinwerkbau finished the inside of the stock wood as well as the outside, so no oil got into the wood. That’s something you never see on a breakbarrel!
Next, I placed the action into my mainspring compressor and put some tension on the trigger block. The rear of the trigger assembly block has a flat that is perfect for pressing against with a compressor, so I used a wood block to press on it. That relaxed the tension on the crosspin that anchors the trigger unit (keeping it from rotating in the spring tube) and also the bolt that holds the trigger unit in the spring tube.
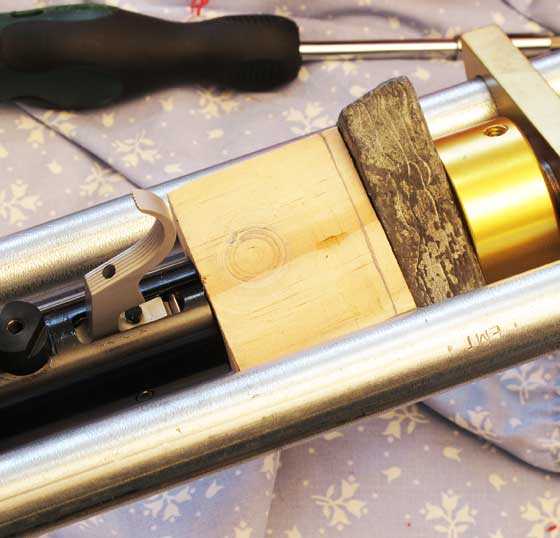
With tension on the trigger assembly block, you can remove the crosspin that prevents the trigger from turning and the main action bolt that holds the trigger assembly inside the spring tube.
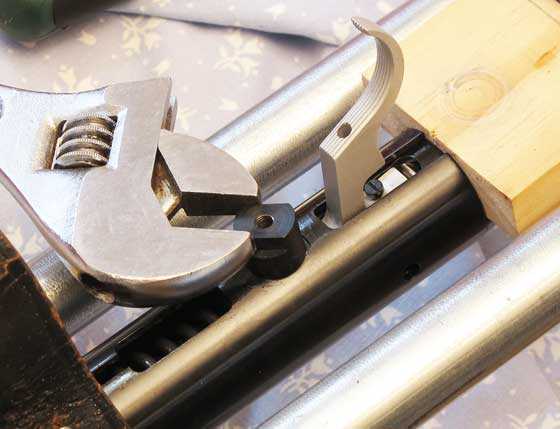
After drifting out the trigger crosspin, remove the bolt and the trigger block is free to come out of the spring tube.
With the bolt out, you can relax tension on the trigger assembly block. The mainspring will push it back out of the spring tube. The FWB 124 has a huge amount of spring tension on the trigger block and comes out several inches, but the Sport only comes out about 1.50 inches.
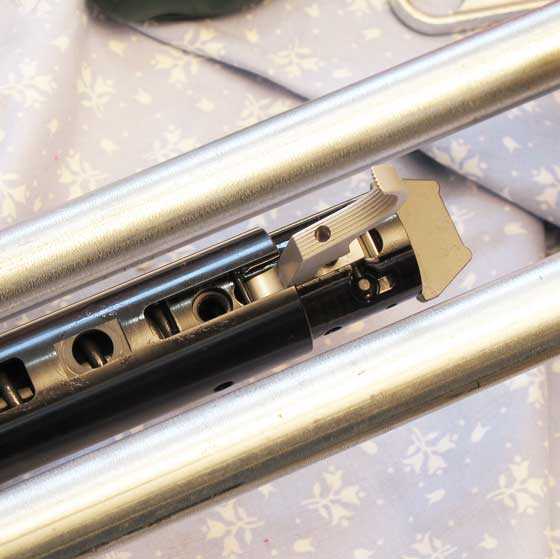
The compressor is backed out, and the mainspring relaxes. As you can see, this spring was under some preload.
The trigger assembly (which is contained inside the trigger block), the mainspring and the spring guide can all be taken out of the spring tube. I note that the gear oil I put in the gun has diluted some moly grease that was inside the gun to the extent that it’s impossible to tell exactly how Feinwerkbau had lubricated their gun. There was moly-filled oil everywhere! But moly seemed to be all they used; and with the tolerances I found, it wasn’t enough.
Spring guide was loose
The spring guide was very loose on the mainspring, and I tried both ends of the spring. Neither one made it better. The mainspring is a thick wire that’s not very long. This is a complete reversal of the 124’s spring, which is made from thin wire and is very long. So, the Sport’s cocking stroke is short, and the effort to cock is higher than the 124’s. And the rifle is also more powerful.
I don’t have a lathe, so I’m not going to machine a new spring guide, but that would be part of a real tune. I saw that the mainspring is perfectly straight, which means it’s doing as well as can be expected.
Remove the piston
It’s time to take out the piston from the spring tube. To do that, the barrel has to be separated from the spring tube. This is when I really came to like those Torx fasteners. The pivot bolt on the Sport is hollow with petals at the threaded end. A screw with a tapered head locks the pivot bolt in place by spreading the petals of the bolt as it is tightened. First you remove the locking screw, then the pivot bolt is removed.
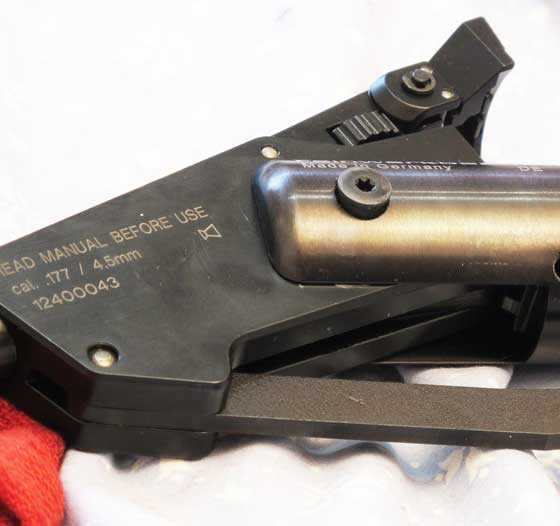
After removing the locking screw, the pivot bolt can be removed. The pivot bolt has a Torx head, making is easy to control and difficult to strip. This will come in handy during assembly when it’s time to tension the pivot joint again.
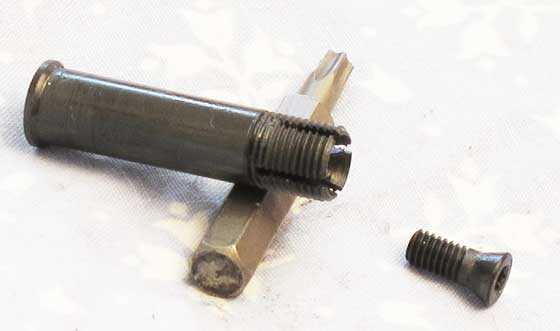
The pivot bolt petals are spread by the beveled head of the locking screw. This gives you superior control over the tightness of the pivot joint. This level of engineering is not found on most spring guns today.
Once the barrel is separated from the spring tube, you can see the baseblock washers, which act as bearings. These were correctly lubed with moly grease, just as I would do when tuning the rifle. The washer/bearings are shaped differently, so there’s no danger of swapping them to the opposite side during assembly.
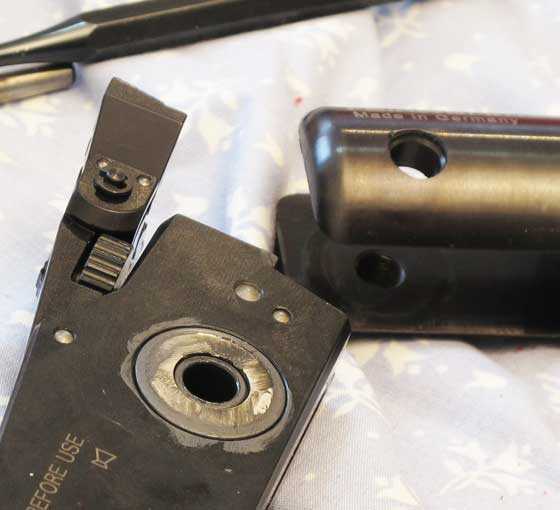
The pivot joints have bearings on both sides of the action fork. This is why the Sport cocks so smoothly.
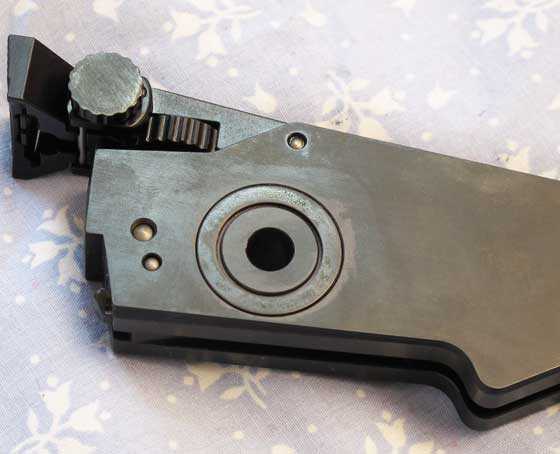
The pivot bearing on the right is shaped differently than the bearing on the left.
Now that the barrel is out of the action, the piston disconnects from the cocking link at the cocking shoe and slides out. As you slide out the piston, the cocking shoe has to be lifted out of an enlarged opening in the cocking slot of the spring tube.
The cocking shoe on this Sport is very well machined and smooth on all surfaces. Where a 124 benefits from stoning the cocking slot and the piston slot that the cocking shoe rides in, the Sport needs nothing — it’s already as smooth as can be.
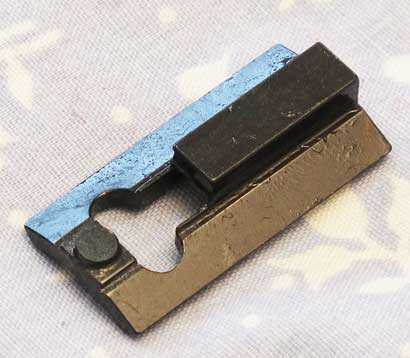
The cocking shoe is machined well and very smooth where it needs to be. It slides along a machined slot in the piston, so moly is the correct lube. No more smoothing is needed.
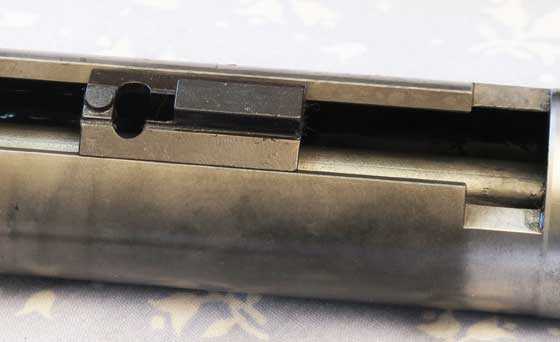
The cocking shoe slides in a machined slot in the piston. Normally, this would be an area of concern, but the Sport is finished very well and needs no work, other than moly lube during assembly.
Piston comes out
Once the cocking shoe is out of the piston, the piston slides out of the spring tube. The 124 piston was machined, but it was left a little rough. This piston is a jewel! The discoloration is from heat treatment.
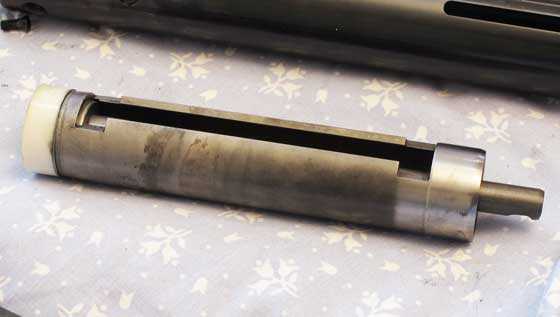
The piston is machined very well and also fits the spring tube well. The parachute piston seal is free to rotate.
I noted that the piston does fit the spring tube/compression chamber very well, though not overly tight. A top tune would probably button the piston (put bearings around the piston body, front and rear, to keep it away from the spring tube walls), but it wouldn’t be absolutely necessary for most shooters. The piston seal is the parachute style, and its free to rotate freely on the piston. It may not be as tight as it could be in the compression chamber, but only in a top tune would exchange it.
Inside the piston is a central rod that connects the piston to the sear when the gun is cocked. It also serves as a spring guide. At its front, there’s a short, bevelled swelling that serves as a forward spring guide. The mainspring does fit this swelling rather well, though not absolutely tight. Anything short of a master tune can leave this as is.
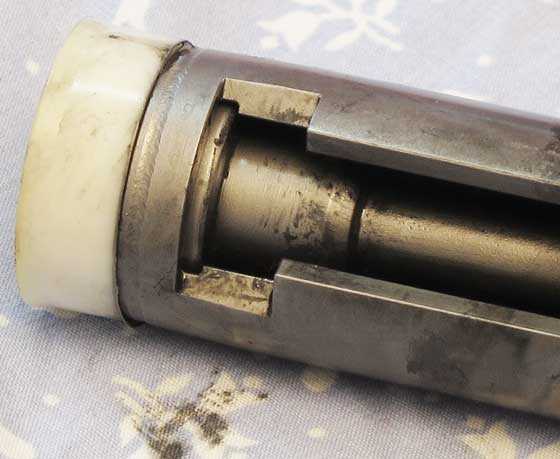
The front end of the piston rod swells to act as a forward spring guide. It fits the mainspring well, though not absolutely tight.
The rear of the piston rod is hook-shaped to grab the sear when the rifle is cocked. You will want to lube this hook with moly during assembly, but I will lube the entire piston rod, as well, since the inside of the mainspring will contact it at times.
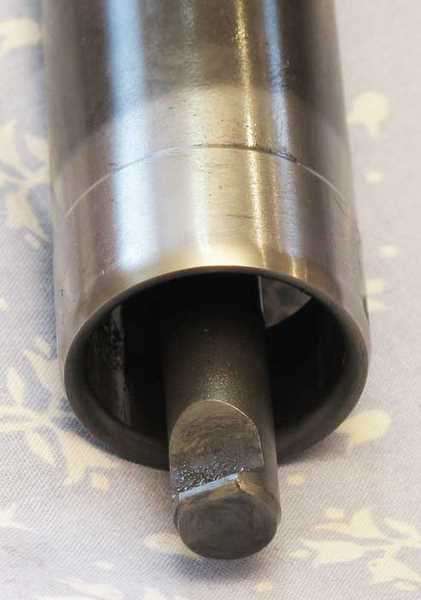
The sear hook is located at the rear end of the piston rod. As you can see, the Sport piston is centrally latched. Also, notice the fine finish on the piston in this photo.
Mainspring tube/compression chamber finish
The gear oil was coating the walls of the spring tube, so the first job was to dry the inside of the gun. I did that by stuffing a shop rag into the tube as far as it would go. It absorbed all the excess oil With that done, I could inspect the finish of the tube walls.
The inside of the mainspring tube/compression chamber is beautiful! I’ve never seen a spring rifle that was finished this well, though a vintage Walther LGV target rifle from the 1970s does come close. The FWB 124 does have smooth walls, as well, but there are often machining marks on them. This tube was completely smooth!
Leave your brake hones on the bench, boys — you cannot improve on this! It’s not a mirror finish, either, which would be detrimental. There are enough micro-hone marks for lubricant to grab, yet the finish is ice-rink smooth. I would have taken a photo, but have you ever seen a picture of the surface of a mirror? There’s no definition — nothing to be seen.
I’m going to end this report here, because it has already become too long. I’ll return to finish the job tomorrow, and that will include testing the rifle with the same pellets that were used to test it in factory trim back in Part 2.

Very good engineering, so far looks like spring guide is the culprit. Nobody is perfect.
Chris
Honest your comment wasn’t up yet when I did mine. But I think your right. Hows that saying go. Great minds think alike. 😉
So the spring guide is the culprit.
Of the buzz I should say.
Other than the spring to tube wall clearance is a little loose the gun is nice inside. So the tar lube would keep the spring from vibrating on the tube wall and no more buzz.
Or a outer spring guide. Derlin seems to be the choice now but the nylon should still work. Right? How come they don’t use like a 1” wide spiral cut shim inbetween the spring and wall tube.
Gunfun
Goes to show we pay attention in class . BB is a great teacher.
Chris
You never know. Maybe its something else that caused the buzz.
GF1,
The spring-to-wall tolerance is meaningless in any spring gun, because the mainspring doesn’t live there. It lives inside the piston and outside the spring guide. Get them tight enough and the mainspring will not touch the tube walls.
B.B.
BB
So the normal way to get rid of the buzz is lubing the spring?
GF1,
The complete answer to your question is a tiered one. Yes, use grease if the tolerance is very small. Yes, use extremely viscous grease if the tolerance is larger.
No, if the tolerances are too large, using viscous grease will slow down the gun and you need to tighten the tolerances.
B.B.
Considering the cost of the gun how difficult could it have been for them to have made a properly sized spring guide or install a Delrin spring guide straight from the factory?
Due to commitments and weather have not been able to shoot past two weeks. Fortunately the weather has been relatively mild compared to last year when Typhoon Haiyan passed by.
Siraniko
Really 2 weeks. That’s no good.
We got 3” of snow today and was shooting.
What kind of weather have you had? Seriously what is the weather like there?
Mainly sunny skies with some intermittent rain showers. Unfortunately my day begins at 4am and I get home by 5pm leaving me around 30 minutes of daylight before night falls. Past weekends have seen me taking care of my mother-in-law while she was in town and playing chauffeur for my family. I am really looking forward to this weekend. Fingers crossed that nothing intervenes.
Siraniko
It gets dark around my placeat 5:00 now also. It does cut the day short.
I’ll take a stab at this but I’m being ridiculous. The only thing I see that could have been done to go over the top is install roller bearing in the top and bottom of piston. But who does that? even at $900 no one.
I’ve heard that before and not really sure what that is all about. Could you give me the rundown? Is it something like adding buttons?
RDNA
Yes its same, but have you ever replaced front rotors on ford van the rotors have bearings inside that you slip through the spindle and washer than tighten the large nut and a cotter pin goes throu the nut so it never gets loose, its a messy job because you have to pack grease in the bearings. Now picture cutting a channel completely around the top and bottom of piston and fitting the bearing.
Chris
If you read the blog in the past the Torrington bearings were used for spring gun tuning.
Gunfun
I do remember now, yep I couldn’t remember their name, thanks.
RDNA
It is like the Torrington bearing used in automatic transmissions between the clutch packs to take up the foreword and rearward thrust between the drums in use. In an air gun it would be to allow the winding up and unwinding of the spring to be riding an a radial type flat washer style bearing with a bunch of small flat roller bearings that would reduce the friction between the ends of the spring on their seats. They are nut cheap and would most likely not stand up to the impact that as spring in a gun goes thru when it id fired and the sudden slamming of the piston at the end of the chamber and you would have to have a hardened washer on either side of the Torrington bearings at each end of the spring so the spring would not destroy the bearings.
it would reduce the friction but is not worth the cost for mass production that a tight fitting guide can accomplish on its own.
BD
buldawg
BB said he used them in the past. And they are very strong bearings. they are designed to take rotational loads as well as compression loading.
We have them under rotating tables that weigh 200 pounds or more. The table lift’s about a 1/2 inch then comes down on the bearing. there is one on top and one on the bottom that is about 12” in diameter with a 4” hole in the center for a shaft.
That bearing controls how the table sets down that has the chucks that hold the part. We hold ab out a .002″ tolerance on the parts we produce on over all length. And that machine will see millions of cycles before that Torington bearing has to be replaced.
I’m thinking that the Torington bearing I’m talking about would survive in a spring gun.
Gunfun
You have to think at the size of the ones you use on your equipment at work as compared to the small size required for use in a spring gun and unless the spring ends have been polished very smooth and fiat there would have to be hardened washer on either side of the Torrington bearing or the spring end would tear the roller up much like a slipper clutch on a RC plane or car where you have ball bearing captured in a plastic cage with hardened washer on either side with spring tension applied to limit the slip between the washers and balls,
BD
buldawg
That just may be true. The hardened washer.
I have never used them in a spring gun. I had the conversation with BB before about the Torrington bearings with my Diana 54 Air King. That’s when he mentioned that he used them before but didn’t know that was the name of them.
So I can’t say if they would be good or not because I haven’t tried them in a air gun. I haven’t tried. Have you? But I do know there primary purpose is to take downward rotational mass on the bearings.
buldawg
3rd picture down is what I’m talking about. Thrust bearings.
http://www.daltonbearing.com/suppliers/Torrington.aspx
The ones we have at work have the flat washer attached that they are talking about.
Gunfun
That’s why I said they would work if the spring was ground very smooth on a grinding table or you would have to use two hardened washer for the bearing to ride on either side of the bearing otherwise the sharp ends of the spring would gall the rollers very quickly and it wopuild either lock up or the spring ends wopuild catch and pull one of the rollor out of the cage.
Think about the ones you use at work as they have two very flat surfaces that they are captured between so that they roll very easily across the surface as they can support tremendous loads but the surfaces that they roll on have to be smooth.
BD
buldawg read my response to RBest.
Have a spring retainer that has a nub axle towards the back end into the bearing keeping center, keeping the weight on the inner n outer rings…
Its really nothing like adding buttons. Buttons are installed to take away clearance between the piston outside diameter and the inside diameter of the compression tube. The HW80 was (and may still be) notable for this: as much as .030″ “play” between the piston and the wall. This makes the piston tip slightly when the gun is cocked and can eventually cause uneven wear of the piston and chamber walls.
A radial needle bearing like Torrington or INA does work, BUT some have been known to fracture their needles under the slamming they were NEVER designed to take. I’ve taken apart two guns who had needle failure and the galling and scraping they cause inside the action is brutal, especially if the shooter is unaware a needle or two have failed..and continues to shoot until the noises inside the gun cannot be ignored. Polished hardened steel washers or bearing bronze washers actually handle more punishment, and you can’t tell the diffference as long as the springs coil ends are deburred and polished too. Then dab a little moly paste on the spring ends and washers.
RBest
I don’t know if you looked at the link I provided about the Torrington bearings.
If you go to the 3rd picture down and click on it describes some options.
We use the ones that are sealed with a washer basically with the needle bearings inside. There is no way that the bearings can come out. There is like s outer hard steel race that hold the washers and bearings in place.
I have smacked them with a 10 lbs hammer and they never came apart.
Now the open exsposed needles are another story. But they are still pretty strong. And we do use them on the ends of springs. We surface grind the spring flat on the ends and if you bend the last coil on each to touch another coil after you surface grind there is Basie a zero gap on the spring ends.
My opinion but I disagree. I believe the regular ones would even be good to use.
And why would the spring slam anyway. Doesn’t the piston head stop on a cushion of air at the transfer port when it makes compression before the pellet fires.
The bearings in the guns I spoke of had the bearings sandwiched between two ground washers supplied by INA. They were not sealed bearings.
Russell
Who or what is INA?
My mind always wants to come up with the wrong thing with initials.
Gunfun
INA is a bearing manufacture like Timken is and they make the same stuff but INA is a cheaper bearing when it come to comparing Timken and Ina as Harley used Timken bearing on the left side crank shaft bearing to control crank walking back and forth in the cases until 2004 when they could not reach a price agreement with Timken on what they wanted to, pay for the bearings so they went to Ina and changed from a tapered bearing like a cars wheel front wheel bearings to a flat roller Ina bearing that we had all kind of noise issues with the Ina bearings until they got the tolerances tightened up to not allow the crank to hop up and down in the cases.
It the old saying if it aint broke don’t fix it as Harleys have had the Timken bearing on the left side of the cranks since the 30s and they worked for 70 years without any major failure other than neglect of their owners.
BD
buldawg
Thanks, I haven’t heard of that brand so was not quite sure of what the letters meant.
Gunfun
yes as Russ says they are a big company like Timken but are mainly metric sizes and I had not heard of them until Harley went to their design roller bearing for the left side crank shaft bearings because Timken would not sell to Harley at the price Harley wanted to pay. So they went with INA and we had a lot of issues until the engineers got the tolerances tight enough to keep the crank from moving all over the place.
It is still not as durable of a design as the Timken is and had worked in Harleys for 70 years without any real failures, but now they do not last for ever like the Timkins did and they are getting replaced at 80 to 100 thousand mile intervals and most of the time it destroys the left side case so it is not only a new bearing and crankshaft but a case also. The price of progress is not always cheaper.
BD
A big bearing manufacturer. Especiallyin metric bearings.
Thanks Russel.
Russell,
I recently purchased a new Slavia 634 with plastic stock. The barrel has side-to-side play at barrel pivot. Tightening the pivot bolt did not fix the problem. Do you know where I can buy shims to fix this?
Appreciate your help,
RB
I used to make and sell die cut shims for these guns. The material was .004″ blue tempered steel shim stock. Two of these per gun would take up .008″ between the breech forks..which was perfect. Any thicker and you run into issues. I have no plans at present to buy another roll of this material, as demand is microscopically low.
Russell,
Thanks for the information on the material you used. I’ll look for something similar.
RB
RB,
I am surprised that no one has recommended McMaster Carr, so I will. I have already researched their catalog and they have all kinds of shim washers in both inch and metric sizes in several types of material including spring steel. All you need to know is the ID, OD and thickness that you need.
Bugbuster
Bugbuster,
Thanks for the tip. I looked at McMaster’s website, and I think their shims will work.
Appreciate the help,
RB
RB,
Glad to help, McMaster Carr and MSC is my go to place for hardware, if they don,t have it, it doesn’t exist. If you ordered your shims yesterday, you will probably have them in the mail today!
Bugbuster
How about abs skateboard bearings? Made for every direction slamming, size is about right, and unless they are cheap Chinese for a toy skateboard, you’ll never break one, you’d be at it for a good while with a claw hammer to do so.
Chris
We talked about Torrington bearings in the past. We use them alot at work with things that rotate. They are a flat styled washer type bearing that has what they call needle bearings. They are normally for things that rotate.
It would help with rotational torque of the spring and maybe help cancel the sideways movement of the gun. It could help to tame the vibration of the spring I’m guessing.
And since this is a higher end gun if it would of had the Torrington bearings i would not of been surprised.
That is interesting how it engage s in the center of the piston, probably really conducive to maintaining those beautiful chamber walls. So the cocking hook passes through the spring guide and engages behind it and the endcap/trigger unit, or the spring runs all the way back- the trigger unit stays floating over it? In other words… where is the sear dropping in in relation to the spring guide?
RDNA,
The rear spring guide is a tube that the piston rod enters and engages the sear behind the rear spring guide. This is a typical design for most sproingers. It also prevents most sproingers from being converted to a gas spring. Those that actually engage the piston itself can usually be converted. I did such to my Gamo CFX, but ended up regretting such as it turned it into a magnum air rifle. I had to have PA convert it back.
Maybe when the engineers were building the prototype the final unit worked flawlessly, and production forgot to grease the spring.
Chris
No.
You know as well as I do that most spring guns have detonation from the factory. I’m sure they greased it.
And BB did say that he saw moly deposits.
Hello BB and Fellow Airgunners
Thank you BB, for this first detailed look inside the FWB Sport. I suppose we can now assume a less then tight spring guide to be the culprit causing the vibration described in previous blogs. This is the first years model of Feinwerkbau’s brand new spring piston break barrel airgun. As with most first years models, there is apt to be a gremlin causing a bit of havoc somewhere in the action.
But, it is the attention to detail, and super fine finish of the various parts that has me gushing over my keyboard. I have done enough work with a metal lathe, and milling machine, to appreciate the amount of work and dedication needed to produce the stellar detail shown, and described in todays blog. I suppose there will still be disagreement concerning the lofty price of $900.00. However, you will always get what you pay for, and this gun shows us what is capable when true craftsmen decide to build the worlds best spring piston break barrel airgun. Tomorrow’s blog should be a good one. Thanks BB, for once again going the extra mile to show us this beautiful airgun.
Titus
TG
You have done the Machining thing. Cool.
Did you use the equipment by trade or hobby. Hmm maybe that’s not the right question. Most people that do the machine shop stuff by trade usually always use it towards a hobby. It just happens. 🙂
Gunfun1
I did a bit of machining for an archery co. near Vancouver BC called Checkmate Bows. They were a small business of only 4 regular employees, and I made small stuff like levers and wheels for the then new compound bows. Nothing to difficult, but it sure gave me an appreciation of what a skilled craftsman would be able to accomplish using the same tools.
Was it business, or hobby? I suppose I was leaning more to the hobby side, as I saved up my hours, and traded them for archery equipment. I can’t ever remember receiving a paycheque. I was young and single then, and looked at the whole thing as gaining knowledge, experience, and almost free archery equipment. Ahh, the carefree years of our youth.
Ciao
Titus
TG
That sounds like that would of been a nice place to work and you was making stuff for bows. Even more cool.
This is probably a silly question. But do they still make bows and are they still in biusness?
Gunfun1
There are no silly questions, remember? lol I can’t say for certain whether Checkmate is still in business or not. I had to stop shooting around 1988, due to the tendons in my shoulders starting to shred. The last I heard, about 1990, they got out of the target archery side, and focused their efforts on making hunting bows. In my day, Hoyt and Yamaha were the big players in the recurve target market. Today I see a co. in Korea arguably makes the best recurves. As with airguns, it all comes down to preference, and whatever suits your needs best.
Ciao
Titus
TG
So you shot bow and arrow then got into airguns after your shoulder problems?
Exactly.. before I started tuning years ago, I was a master machine rebuilder and machinist. A machine shop was my playground..LOL
RBest
Yep I have been a machinist for over 30 years now and love it.
Definitely had some interesting things to make over time. And for sure glad I stayed in the machinist trade.
THE Russ Best?
kevin
Hi Kev…yes, tis I.
Hope all is well Russ. Good to see you adding to the dialogue. I’m sure after this many years you’ve lost count of the number of guns and even models you’ve been inside to tune for clients.
kevin
It’s a party!
TG
I agree that they have paid a lot of attention to detail and machined surface in this gun but it just seem counterproductive to pay such close attention to the fit of all the other parts but the spring guide ,it is like they just forgot about it at some point in the design and assembly process.
BD
Titus,
The Sport is very well-made. I know people will say that at $900 it should be, and they are right. The devil is in the details, and these tolerances are besmirching a wonderful air rifle.
More to come tomorrow.
B.B.
That is what I meant in a previous section of this review when I mentioned that those at Feinwerkbau who understood things such as the spring guide tolerance had long ago retired. My hope is that they will not assume the stereotypical German attitude and be willing to listen and correct these issues. If so, it could go back on the list.
BB
That oil you mentioned leaking from an old panhead is just Harleys way of marking its territory, like dogs and cats do so other bikers no to stay away.
Actually it is from an automatic chain oiler system that they had that had a screw you could turn to increase or decrease the amount of oil that dripped on the chain during riding and when you shut it off the excess oil left in the small feed pipe to the chain would drip out on the ground. This is before the advent of oring sealed for life chains that we have now.
So the buzz culprit is a loose guide to spring fit and I agree an tighter guide should have been made or a delrin sleeve made to slide down over the guide to help reduce the metal to metal contact between the guide and spring.
Such an easy fix that should have not been overlooked in the design of this quality gun. it shows in all the other parts that they did indeed built a very high quality gun that for another 50 cents could have been made much quieter and smoother.
BD
buldawg
I always remembered my buddy that builds the Harley bar hoppers saying. “You don’t want to ride behind that one”
Chain oilers. Who would of thought.
I wonder how many of them still function on them.
Gunfun
Those went away in the 66 model year when the generator shovel came out and it all depended how the oiler was adjusted as you could turn the screw where it would only drip once every 20 mile or drip every 20 feet it all depended if the owner even knew tit was there. They used the engine oil that was pumped into the primary by the engine oil pump and it also sucked that same oil back, out of the primary and transfer a small part of it to the chain oilier. What I never liked about the system was it was pumping engine oil into, the primary to lubricate the chain and clutch and then sucking it back out and into the oil tank so any clutch material that wore off the plates was being recycled back thru the engine bearings and lifters as the only filter was a coarse mesh fiber filter that set in the top of the oil tank that the return oil was just drained down thru so it was very crude at best in capturing any amount of clutch material that made it way to the oil yank and filter.
The oiler was very reliable as did you ever see an old Harley that did not have a spot of oil behind the left side of the bike behind the primary. They rarely ever quite working,
BD
buldawg
I guess they had it figured out so it didn’t mess with engine oil pressure. I think mine would of been turned off.
You know as well as I do how much oil should be on a chain. Especially talking dirt bikes.
What do they say “No oil is no good but to much oil gets you no where”
The right balance is always the trick.
And that to much oil thing must come from the slippery ride they had if they were oiling that chain to much on that Harley and not going no where.
Gunfun
Yea the ones that had the oiler set to oily over heavy did get some slip and slide action while riding and especially on wet roads. I my self turned the oiler off and did the oiling my self when needed so to keep the rear wheel and back of you pants leg dry and not having the tell tale oil streak up the back of your left leg.
BND
buldawg
Or maybe that streak from the oil was another bikers Tattoo. 😉
Gunfdun
yea it kept the jeans soft and supple and work even better on leather pants to.
BD
Gunfun
Harley are a dry sump system and the crank shafts and rods all run on roller bearings so they don’t require any real pressure just flow of oils to lubricate in fact if the pressure is to high it will cause the roller to skate on the crank and rod shafts and cause galling because the roller stops turning due the high pressures
Harley uses at must 30 psi when cold and when at operating temps it is normal, for the pressure to be as low as ten psi but there is a ton of flow just no real pressure.
BD
BD,
An automatic chain oiler! Ha! That’s the first time I have heard that.
No, it leaked down the dry clutch rod and out the pressed metal case. I have also heard it said that Harley was using a total loss oil system back then. If you didn’t see oil under the bike you knew it was time to add a gallon. 😉 (I used to own one)
B.B.
BB
The total loss oil system was back in the 30s and back ,by the tine the pan heads and knuckle heads came out they had gone away from the total loss system as yes those bikes had a road draft tube as well as a leaky primary and engine cases that leaked everywhere.
The knuckle heads and pan heads were the only ones with an automatic chain oiler and it set rigjht above the chain in behind the primary and dripped on the chain right before it went over the front sprocket and there was a screw that you could turn that regulated the amount of oil it dripped much like the orifice screw on an marauder rifle metering air screw in the transfer port.
The introduction of the generator Shovel head (I think I was wrong on the date as I believe it was 61 not 66 ) did away with the chain oiler that I know for sure.
BD
BB
I did some research and I stand corrected as the Harley chain oiler system was in place all the way up until the introduction of the Evolution engine in 1984 as most all Harleys from the 30s till the mid 80s used a chain oiler that was fed from the primary oil return system that used the engine oil to lubricate what they called a dry clutch that was actually a clutch in the primary that only got minimal oil splashed on it by the rotating primary chain and was the oil was sucked back out by the scavenge side of the oil pump and returned to the oil tank to be recycled thru the system again.
BD
My Brother’sXS 650 has a similar chain lubrication system that keeps him from wearing his jacket. He sent me 1/2 dozen brand new T shirts he wore instead with black spots everywhere on the back I’ll have to see if it also is adjustable and get a good chain for it so he doesn’t suffer the road-rash I did just in case he ever goes down on it.
Reb
You are right as many of the older bike had oilers since the early chains had no orings to seal the grease in like todays chains and that is how the manufactures decide to maintain the lubing of the chains.
BD
Oh and now that I can really see it that trigger is beautiful.
RDNA
Tell me if my memory is failing or not. Doesn’t the Hatsan 95 have the same type of bolt sinch for the pivot on the break barrel as the Sport BB is reviewing.
Or maybe I’m confusing that with another break barrel gun.
It isn’t slotted, flanged,.. but it is the same with an outer nut and a center retention screw.
RDNA
Thanks. I thought it was the Hatsan that was similar.
It past my bedtime guys so I will see you in the am .
till then be safe and stay warm,
BD
BB
One question. Is that a metric Crescent wrench you have there. Wait a minute is that even a Crescent brand wrench?
🙂
BB,
I noticed that this piston is beveled slightly at both ends. If this air rifle is kept properly lubricated, I do not think buttons will really be necessary. The reason my BSA was galled inside is that it had no lubrication and the piston had a sharp edge. The cocking link shoved the piston up against the tube and the sharp edge would dig in. After smoothing out the galling, I beveled the piston ends so there would be no more sharp edge to dig in.
My BSA could probably benefit from a button job, but I think I would hesitate introducing something inside this air rifle that may come loose and possibly damage the seal unless the tolerances there are real bad.
BB,
Oh, by the way. A POX ON YOU! The machine work inside this air rifle is incredible. I had written this one off my short list, now I may have to pencil it back on.
This tells me what I want to know. The inside of this gun is so much alien science as far as I’m concerned. My one question is about a description of Feinwerkbau products that has stuck in my head. Describing the summit of gun engineering, someone wrote about the “jeweled perfection of the Feinwerkbau trigger.” Any sign of that? I guess there is. But I have to add that the buzzing behavior looks especially bad by contrast.
Matt61
Matt,
In my opinion, there is no “jeweled perfection of the Feinwerkbau trigger.” any more than there is the “sumptuous opulence of the Chevrolet Impala.” Both are workaday items in their respective classes. The FWB trigger is smooth, crisp and light, but it certainly is no Rekord or Air Arms trigger.
B.B.
Ha ha. Only a gun writer could take down another gun writer like this. Your choice of the Chevy Impala is interesting. Was that at random or because the Chevy Impala has undergone some kind of resurgence and was voted best consumer buy or something like that recently. Even so, I guess no one has associated that model with opulence.
Actually, I believe the original reference was referring to the Feinwerkbau target triggers. Are they really inferior to the Reckord or Air Arms triggers which I believe were mostly sporting triggers?
Matt61
No, they are not. I’ve owned several FWB SSP 10m guns and find their triggers (especially the 603) to be second to none except potentially the Anshutz because the Anschutz has overtravel adjustment and the FWB does not. I’ve owned and tuned both the AA and the Rekord triggers as well and frankly, the new RWS TO-6 is every bit the AA which I consider to be better than the Rekord; none of them come close to the FWB, Anschutz, Walther or Steyer match triggers (I’ve shot them all).
-Scot
Scot Heath?
kevin
Hi Kevin, still kickin’!
Scot,
Glad to hear it!
Where did the summer go? Been thinking about you and your wonderful family. We need to get together again to shoot and fish at my place.
I’m taking my new dog bird hunting next week so had to dust off the citori. That made me think of you. Hope you’re still shooting your shotguns on a regular basis.
Be well.
kevin
Matt,
Uh — of course I thought about the Impala in the, what did you say? 😉
As far as the trigger goes, my remarks were about the Sport trigger, since that is what we are discussing here. The FWB target triggers are on a whole different level and are world class in all aspects.
B.B.
I always enjoy the disassembly and tune blogs, Tom. I do a lube tune on every spring gun I buy. You should provide links for how to build or buy a compressor jig for those who want to learn how. Also, I think it would help to have a photo of how the clicking link attaches to the shoe on the piston and also exactly where that retaining pin is on the trigger assembly. I didn’t see it in the photo.
It looks like the machined slots in the cylinder and piston have been thoroughly deburred at the factory. Can you confirm this on the inside edges of the cylinder slot? This is frequently overlooked and the cause of many cut piston seal edges during factory assembly.
And finally, if you’re so inclined, you can try cutting a section from a soda can and rolling it into a round tube to fit over the rear spring guide as a shim to tighten the fit to the spring. I learned this tip from another reader here on this forum and implemented it on one if my guns. It’s a little time consuming, but worked.
It’s too bad Feinwerkbau didn’t add some sort of polymer bushing on the rear end of the piston like on the tx 200. It doesn’t seem like that much trouble to implement. Kind of like an o ring groove with a square delrin split ring.
Feinwerk,
I put instructions for building a mainspring compressor back in the Spring gun tune series.
/blog/2006/07/spring-gun-tuning-part-3mainspring-compressor-continued/
Yes, I said this gun is completely deburred. I looked everywhere
That polymer bushing you mention in the TX is a type of button. I did address that.
As for the soda can thing, I don’t own this rifle. If I did I would be doing all those things to tune it.
B.B.
Feinwerk,
I am probably the one who recommended using metal from a soda can to make a sleeve for the factory guide; good to hear that it worked for you. It does sound junky but it has worked on a number of low-powered airguns. I tried it on a whim since it was cheap (free) and I figured that the softer aluminum would not damage the steel parts. For cheap airguns where no aftermarket parts are available, or a new guide would cost as much as the gun itself, I think it’s a reasonable solution.
I just made such a shim this weekend for a Slavia 622. It shot OK but the spring buzz was the right pitch to give me a headache after an hour of shooting. Since I only paid $25 for the 622 making a new guide was a non-starter. It is now much more pleasant to shoot – no vibration or ringing.
Paul in Liberty County
Howdy Paul,
I can’t remember for sure now which rifle I did that too, but it’s a good technique and I thank you for posting it.
Hi Paul,
Did you glue on the soda can shim? I have a Slavia 618 that buzzes like bee on steroids. Would like to give it that treatment.
Ton,
No glue. What I did was to cut a rectangular piece of a can that is about as long as the spring guide; a little shorter is OK. It needs to be wide enough to wrap around the guide with no overlap. A small gap is fine. Then make several cuts about 3/16″ long perpendicular to one end of the shim. Bend these out at 90 degrees. The idea is that once everything is in place the end of the spring will sit on these tabs and lock the sleeve in place. I also cut the upper corners of the shim at a 45 degree angle to reduce the chance that it will catch on the spring; don’t know if it helps or not.
I just used a small amount of moly on the factory guide – mostly so it is not dry metal – and then the normal moly on the shim and the end of the spring where it will seat on the tabs of the shim. I also put a small amount of moly on the rest of the spring and on the piston where it contacts the cylinder walls.
Let me know if you need any more details or a picture if necessary.
Paul in Liberty County
Thanks Paul,
Your explanation was very clear. Will definitely try it.
B.B.
Great blog. Looking forward to the next part tomorrow.
Keep up the good work. It always put a bit of sunshine in my day.
Pete
Tom, We haven’t been in contact for some time. We “sparred ” over the RWS 350. I am also the one who’s wife bought me one of the last of 3 copies of your book for X-Mass and you signed your real name as well as your alias. I have lost your e-mail address and would like to reconnect again. My email address is Greatscott298@hotmail.com. I hope you and your family is well and I look forward to hearing from you. Thank You, Scott Herlihy
Interesting look at the inside of a new FWB Sport.
Since the weather warmed up to around 23 degrees here yesterday we shot Erik’s new Webley Rebel at a measured 30 yards (think numb fingers). Here’s the story and the target:
http://www.network54.com/Forum/79537/thread/1416201388/My+take+on+the+Webley+Rebel+.22+cal..
kevin
Looks like Erik got a good one. Nice Groups.
BB,
Don’t you have something better than a metal lathe; a friend named Otho who is a machinist and has a lathe? I suspect that the rifle is already back together but if it’s not, please let Otho make you a proper spring guide. Heck, he needs something to do when it’s to cold to shoot.
I enjoyed the disassembly blog today.
David Enoch
BB
Awesome blog! “The piston seal is the parachute style, and its free to rotate freely on the piston. It may not be as tight as it could be in the compression chamber, but only in a top tune would exchange it.”
The Cardew brothers indicated that, if a piston dropped into a vertical cylinder fell to the bottom under its own weight, then the seal-to-cylinder fit was about right. Any thoughts about that?
John,
In their day (1970s) that may have worked. In my experience, the tighter the better.
B.B.
BB – Curious… If instead an oil, would using some sort of grease have worked? The grease might get “flung” out of the coils onto the inside of the stock, but it would not drip.
Herb,
Sorry. I don’t follow you. I used grease.
B.B.
In Part 5 you noted that you used “gear oil” onto the spring of the Feinwerkbau. I was wondering if you had rubbed some grease into the spring if that would have lubed the spring without disassembly, and not have the oil running out of the rifle when it was stored but down.
Herb,
I see. Well, the tackiness and viscosity of these greases will prevent their spreading around. So disassembly is necessary.
B.B.
So why the two different bearing washers on the block? it’s a symmetrical load, why have two different part numbers?
When you open an LGV, or even a TX, you can see the thought that has gone into it
This is beautifully made, Feinwerkbau don’t know how to make a rough edge, but I’m afraid it’s yesterdays dinner, beautifully made but no forwards thinking, Delrin spring guides and proper lubrication would have cost pennies at production.
Kills me to say it, I love FWB but no,
Delrin spring guides. I know what you are getting at, but you know there would be a thread somewhere, “I opened up my $900 FWB and its mostly plastic inside!!!!”. I bet a little heat shrink tubing on the guides and possibly something to sleeve the spring are all that’s needed. Tar alone may do it. Just like a Chinese clunk, I bet it responds well to any kindness, plus all the quality is there.
I can only hope that FWB are looking at this, because if this rifle hit’s UK shores and is still twangy it’ll be eviscerated in the press and within the community
It’s like buying a Bentley and finding it no more refined than a budget car, there’s only so much solid engineering can be applauded if it isn’t applied to the purpose of the item
A few Torx bolts and a splaying barrel bolt, a Walther LGV beater does not make
I’m aware I’m harsh about this rifle, but it’s Feinwerkbau for goodness sakes, not BAM or Gamo
BB,
I actually think it makes sense that FWB assumes this rifle will most often go directly to a tuner. Hard to imagine someone passionate enough to drop that kind of money on a springer being happy with a factory tune no matter how good. The Diana approach of leaving things a little tight and rough so the user breaks it in doesn’t seem to work at the FWB price point!
My Diana 24 is pretty nice! I’ve had Beeman AR’s from Germany dated back to early 70’s. I’ve wanted to build upon my collection to a TOP of the LINE for a long time!! Reading and being quite for years! Now after reading this blog and tuning in on the comments!! I’m sure! I’m still looking for the right one’s a little longer! Thank you B.B. and all reply’s for education provided! PS I owned a panhead also!