by Tom Gaylord
Writing as B.B. Pelletier

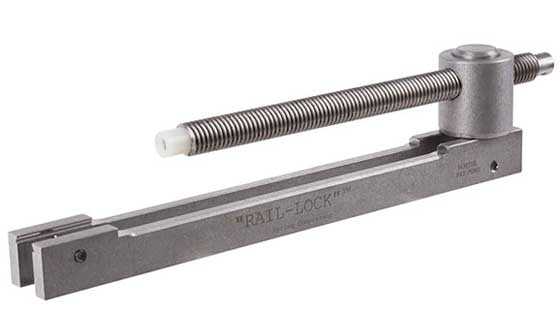
The Air Venturil Rail Lock spring compressor is compact.
This report covers:
- Attaches to scope rail
- Enter the R8!
- R8 out of the stock
- Remove the Rekord trigger
- Unscrew the end cap
- Install the mainspring compressor
- Removing the end cap
- One last photo
- Assembly
- Evaluation so far
Today I start testing the new Air Venturi Rail Lock spring compressor. Many of you have expressed an interest in this tool, and I want to test it as broadly as possible, because all airguns are not made the same.
Attaches to scope rail
This compressor attaches to the scope rail on your airgun. It will work on both pistols and rifles — as long as there is a scope rail to attach to. It attaches to both 11mm dovetails and Weaver/Picatinney dovetails. The rails have to be close enough to the rear of the spring tube to allow the compressor to work, but that will become clear when you see the pictures.
Enter the R8!
I told you I bought a Beeman R8 from the Pyramyd AIR table at the Findlay airgun show. I had planned to start testing the compressor on my Beeman R1, but the R8 has a threaded end cap just like the R1, and I have a special reason for wanting to look inside this rifle, so why not get a twofer?
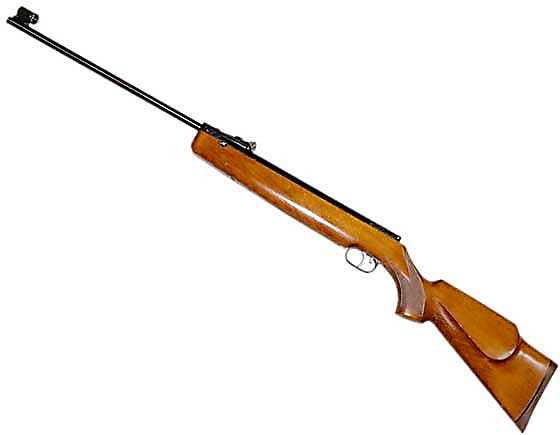
Beeman R8. It looks like a baby R1.
The R8 is based on the old HW50S that is now obsolete. The current HW50S is a different spring rifle, though the size, power and many other characteristics remain the same.
You will notice no stock screws are showing on the side of the forearm. That’s because it has just a single screw located on the bottom of the forearm.
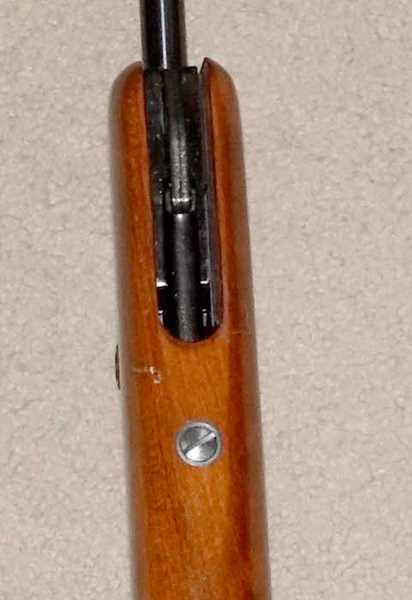
The R8 has just one forearm screw.
R8 out of the stock
Take out two triggerguard screws and one forearm screw and the barreled action comes out of the stock. Before the mainspring compressor can be attached, there is still some work to do. The unitized Rekord trigger has to come out.
Remove the Rekord trigger
Two pins must be punched out of the end cap. The trigger drops free and the safety and safety spring are also removed.

To remove the Rekord trigger, drift the two pins (arrows) out from left to right. The trigger will then come free.
Once the trigger was out there was no longer any doubt that the R8 has been at least lube-tuned in the past. Let me show you how I know.
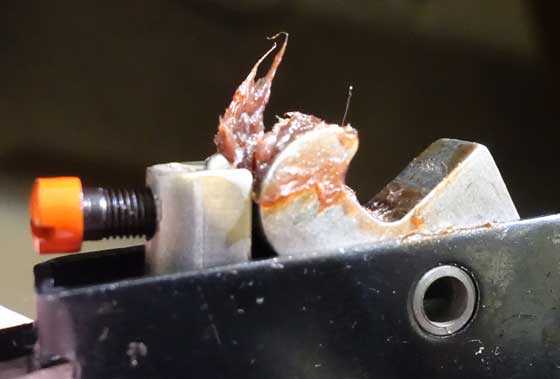
Doesn’t take a rocket scientist to know this gun has been lubed outside the factory!
Weihrauch never put that much grease near the trigger. The orange screw is also not standard. And this is not Weihrauch grease. It’s tackier and thicker, though not as thick as black tar.
Unscrew the end cap
The reason I chose the R8 is because of its threaded end cap. I thought that would be an interesting test of the Rail Lock Compressor, because the cap must turn while under pressure from the compressor. The white nylon tip of the compressor does not turn, and I wanted to find out how the R8 end cap would affect that. So first I unscrewed the end cap until only a few threads held it to the spring tube.
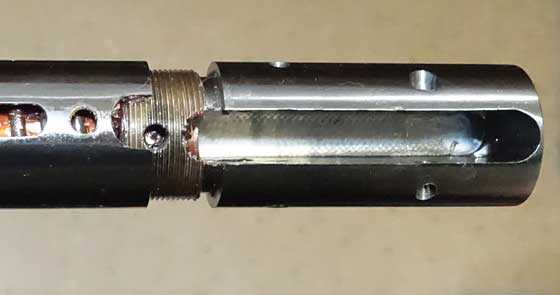
The end cap is unscrewed until just a few threads hold it.
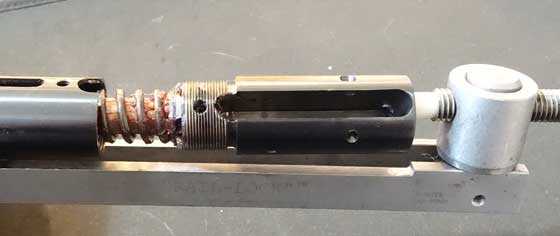
Install the mainspring compressor
Now the mainspring compressor was installed. Let’s review the parts of this tool.
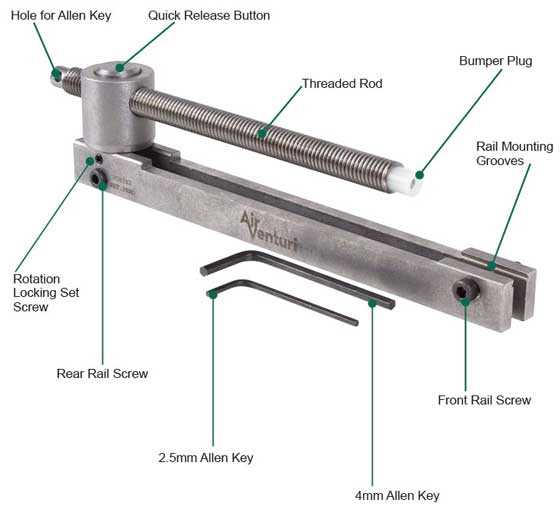
I found it best to lay the spring tube in a sandbag rest so I could hold the compressor with both hands. The rail mounting grooves on the compressor are short and have to be guided into the grooves on the spring tube.
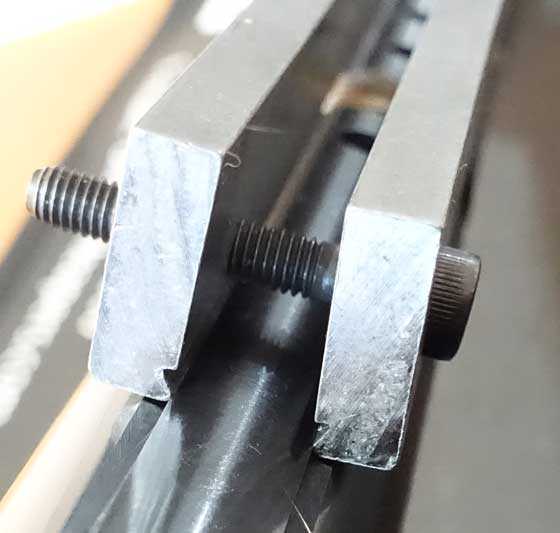
The compressor grooves fit the scope grooves on the spring tube. Just tighten the one screw and you’re done!
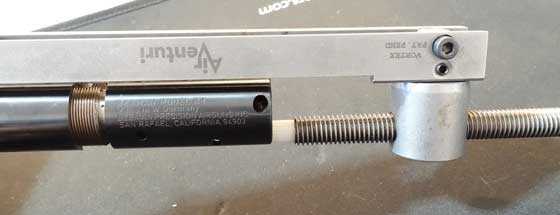
Once the compressor is attached, push the quick-release button and slide the threaded rod until the white nylon bushing touches the end cap.
Removing the end cap
With the compressor attached, it was an easy matter to unscrew the end cap until the compressor stopped it from turning, then unscrew the compressor screw a little, then unscrew the end cap, then the compressor screw and so on. This was what I wanted to test. Would this work? Yes, it works very well. Sometimes the threaded rod “walks” around the end cap a little and you know it has to be loosened a little more, but it never slips off the end cap.
Would the end cap pop off its last screw thread when it got there? Apparently I did it perfectly because I never saw or felt anything. The end cap was just free of the spring tube and still firmly retained by the threaded rod. The R8 mainspring is pushing against the end cap with 40-60 lbs. of force at this point. Let’s look at how much preload is on that spring.
The R8 mainspring is fully relaxed at this point. So, there is about 1.5-inches of preload on the mainspring. That’s what sticks out of the spring tube, added to the length of the end cap threads.
One last photo
I’m not going to finish disassembling the R8 at this time. I want to test it as it is, then maybe retune it for you in the future. I know a better grease for the powerplant, and I should not have to use as much as the last guy did. How much did he use? Let’s see.
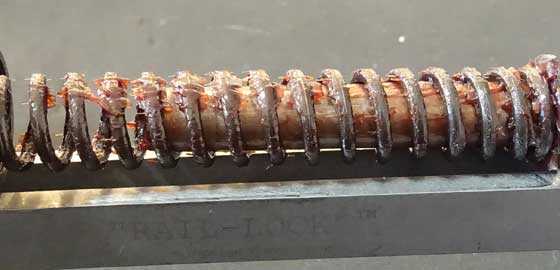
That’s a lot of grease! I can reduce this with better grease and still get the same smoothness (I’ll tell you about that on Monday). Perhaps I’ll pick up some velocity.
Assembly
I know that you are curious how well the compressor works with the rifle going back together, so of course I did that, as well. This is where the manuals often tell you to “assemble in reverse order,” but you want to know if there are any surprises. So I did it. I won’t lie — getting those fine end cap threads to start in the spring tube was a challenge. But as I played with the compressor I saw that it wasn’t going to let the cap slip away, so I concentrated on aligning the end cap with the spring tube.
As I screwed the end cap, I also tightened the compressor’s threaded rod and when the threads caught, I could feel it. The trick is the alignment of the end cap. Once the threads caught I continued turning the end cap until there were 5-6 threads engaged, then I remove the compressor and screwed the end cap all the way in.
Evaluation so far
I found the Air Venturi Rail Lock Compressor easy to use. It worked very well, leaving both of my hands free to do other things if I needed them. Installation took a couple trials, but now that I know how to do it, this compressor will be quick to install. And there is a knack to learn for assembly, but that’s going to be specific to each type of airgun you work on. This will end up being a very large series!


B.B. Pelletier,
So all that grips the rail is about 2″ of rail mount on side? Will this be sufficient on more oversprung rifles?
Siraniko
Siraniko,
This was developed for gas spring rifles whose springs are far more preloaded than this. Yes, it will hold.
B.B.
B.B.,
Interesting. I am not sure I like the nylon end cap, not slipping on the threaded rod. Or, maybe it does and I misunderstood. I took it as the nylon cap turns with the rod. The alignment to the spring tube looked like a recipe for things to flying, but apparently not. I am glad it worked. Just looking at the TX200 with a fully rounded end cap,.. I wonder how this would ever work.
What is the purpose of the “Rotation Locking Set Screw” ?
Chris
Chris,
The nylon tip does not rotate independently of the threaded rod. I’m not entirely sure of what the locking screw’s purpose it yet. I left is loose until the nylon tip was aligned. As I get more experience with this unit, I will tell you more.
B.B.
BB,
I too am interested in how well it works on air rifles that do not have flat end caps.
RR,
Me, too. And those that have no cap at all. We shall see.
B.B.
B.B.
Nice report! Thank you.
Now I know what I want for Christmas….
-Y
PS- R 8 seems like the forgotten Beeman. How is it different from the current HW 50S? Is it 26mm tube? Rekord trigger?
Yogi,
Rekord trigger, yes. The tube is 25mm, I believe. That was the diameter of the old HW50.
B.B.
B.B.
Would it not be very easy to cross thread a threaded end cap? You have to fight 40-60 lbs of force while turning the end cap parallel to the receiver. Maybe it is easier that it sounds???
-Yogi
Yogi,
No, you are right — it is very easy to cross thread the end cap. That’s why a compressor is so necessary. It probably too me 10 minutes of fiddling before I got it right, but that is similar to what happens with other spring compressors. This one may have taken longer because I was not used to using it this time, but I feel it will go faster the next time.
B.B.
So why do manufactures use threaded end caps? Are they easier to produce?
-Y
Yogi,
Just the opposite. They are very difficult to peroduce. But they are easier to assemble/disassemble with minimal tools.
This design dates back to ther early 1950s, when Weihrauch came out with the HW35. They continued it up until the HW95. Beeman R9. They now use a non-threaded plug for most of their caps, but the HW80 still had threads.
Beeman used to make a big deal of this in their advertising. It was called “tap the cap.”
B.B.
From the photo it looks like the 1.5 inches of preload was close to being as much as the compressor can handle. Was there more room on the rails for you to mount it further back if you expected a longer preload?
Jim,
No, the compressor can handle a lot more than that. The photo shows only how it was adjusted for this rifle. I did that to show detail, because a wider angle would make everything smaller.
B.B.
That’s good to hear, thank you. I’m also curious what the rear rail screw is for. Is that cylindrical metal piece that holds the threaded rod adjustable at all?
Jim,
It swivels side to side. The locking screw holds it in one place.
B.B.
I was really asking about the rail screw located below the rotational set screw, BB. Sorry if the question was confusing.
Jim,
Oh, that screw is just to keep the two halves of the compressor rail aligned — front and back.
I like what I see of the spring compressor so far.
And yes that is alot of grease on the spring.
And BB do you have current chrony numbers on the gun?
GF1,
That’s coming. The report begins on Monday.
B.B.
BB
Yep saw that about Monday.
Was just wondering what it shoots at now and what pellet.
I guess I can wait till Monday. 🙂
Ok can’t help it. Got to brag on my oldest daughter a bit. The 19 year old.
We got the Daisy 74’s out and doing some can shoot’n. One can and just shoot and get hits. Cans at About 25 yards. Where wopping the heck out of it. The oldest daughter goes hey dad you just knocked it out of the way right when I pulled the trigger! I smiled and said yep I know. That’s the name of the game.
But here’s the brag’n part. She was shooting dandelions while I was filling the bb resivoir in the 74 I was shooting. She goes dad watch. I’ll be darn she shot 4 off one right after another. It was only about 12 yards. But standing unsupported. Don’t think I can call it beginner’s luck. Maybe some luck. But she usually does give ole dad a run for his money.
Noth’n like shooting on a 80 degree sunshiny evening with the daughter. And she even asked me if we could shoot the 74’s. As she says the ones that you can shoot over and over and takes forever before you have to refill.
Anyway I’m done now. Back to shoot’n. 🙂
Ok more brag’n.
Throwing a empty plastic gallon milk jug up in the air. About I guess 15 yards out. She has got one hit every throw I have done. Sometimes two hits before it hits the ground. And yes as fast as she’s able to pull the trigger.
And yes blue jeans, flannel long sleeve shirt and shooting glasses. Probably not as safe as we could be. But gaurentee you more safe than I was when we shot as a kid. And yes my dad got on me about it. But you know how that goes when we got in the woods out of sight.
Anyway a fun shoot’n evening.
GF1,
That’s some good shooting!
B.B.
BB
She actually has been doing alot more shooting with me since she graduated high school last year. So for sure alot more practicing.
But on the other hand I guess we are kind of cheating when we throw the gallon milk jug up. We are throwing it out straight in front of us and as high as we can get it to go. So she was making most of her hits at the top off the jugs arch. Kind of where it hangs in the air before it starts comming down.
She still needs more practice when the jug is coming from a side direction in front of her but she does make those hits. Oh and that is open sight shooting. No time to look through a scope even with the gun ready at your shoulder. It’s more of a point and shoot type aim. And I don’t know why I’m telling you that. I know you know that already. 🙂
GF12,
Yes. She has discovered the principles of instinct shooting on her own. The most famous movie example of instinct shooting was in “Winchester 73” when Jimmy Stewart shot and hit a coin thrown into the air. Herb Parsons the trick shooter was on the set and actually made the shot several times for the cameras.
B.B.
BB
Well that’s pretty cool. I wonder if there’s any other movies he did.
Did he ever write a book on his shooting? Do you know of any books on instinct shooting or trick shooting?
I would like to get it for both of my daughter’s actually. They like to read and are becoming even more interested in shooting.
GF1,
Look online. There are several videos of his trick shooting. Also at least one video that includes silent footage of Ed McGivern.
B.B.
BB
Ok thanks. I will do that.
BB
I just searched both of the guys you mentioned. Looks like Ed was more of a pistol shooter and Herb was more a rifle shooter.
I did bookmark both whole searches on both of them. Alot of interesting reading and videos on the search. That will keep me and the daughters occupied for a while.
Don’t know why I didn’t search up that kind of shooting already. But thanks again for the two guys name’s.
GF1,
Until very recently, McGivern held the world’s record for the fastest 5 shots ever fired. Jerry Michalek has now broken that record.
You should read McGivern’s book, “Fast and Fancy — the book of revolver shooting.” He had to invent the timers that recorded his speed, because until him, nobody had come close to being that fast.
B.B.
BB
Cool stuff. Yes I will get the book and read it. Love that stuff.
That grease looks an awful lot like wheel bearing grease.
.Cobalt,
I thought that the orange screw was interesting. I am not sure what it does, not being familiar with the trigger mechanism. Interesting non the less.
Cobalt327,
Could be, I guess. No fibers in it.
B.B.
Really enjoying this review and looking forward to seeing how it works on other types of springers. The threaded rod seems awfully high up and I wonder how it would go on something like HW95 but I’m sure it has been thought through. If it works it is a really elegant solution and I’ll be getting one even though I tend to try and work with low power springers.
Swampy,
I talked to Tom Gore, the inventor, last night. He said it works great on the 95/R9.
B.B.
Hi Chris,
No idea either- maybe one day I’ll own something with a Rekord trigger in it. Hope so, anyway!
Took a quick look online and it’s called the sear engagement screw.
I wouldn’t touch one of these with a bargepole, especially on a Weihrauch, I can see lots of damaged guns in the future if people are going to attempt to use them, they may work with some, but I’d rather see a spring fly across the shop than a rifle with wrecked rails.
BB
How do you know when the Front Rail Screw is tight enough when disassembling a screw on end cap gun, since you don’t actually have the spring tension on the clamp until the end cap is completely unthreaded? A misguess on the low side could cause the compressor to go flying at that point, couldn’t it ? If I understand your past descriptions of using a compressor on a pin locked end cap, one is required to overcome the spring tension in the beginning just to remove the pin and if the compressor holds there it should hold throughout the screw’s travel since the spring tension gets weaker from that point. Not so with the threaded cap.
BB also what are the rails made of ?
Halfstep,
It’s not as hard as it sounds. Just tighten it snug and it holds. It’s made of steel.
B.B.
B.B.,
Thanks for the review. I have been in process of re-springing/tuning my HW35. No problem removing the spring without a compressor but not the case when I installed the new JM spring. I couldn’t get it in . Just not as strong as I used to be I guess, plus the new JM spring was more than an inch longer than the old Venom spring that has been sitting in there for about 25 years. I no longer have my home made compressor from 30 years ago but luckily I had already ordered this spring compressor based on this review, just didn’t think I would need it for THIS rifle. Anyway the compressor worked quite well and like you, I spent 10-15 minutes going back and forth tightening/loosening the compressor, and tightening the receiver cap. Then it went in like a charm. I think I now understand why the nylon tip does not rotate freely. If it did, it would make it much easier to strip/cross-thread the end cap or receiver, as you could keep cranking down the tension. With the current design when you stop being able to keep rotating the end cap you simply must back off the compressor a little and try again. At least that’s how I take it, and I am very happy with the final result! The rifle shoots like a dream now, something it did not do before.