by Tom Gaylord
Writing as B.B. Pelletier
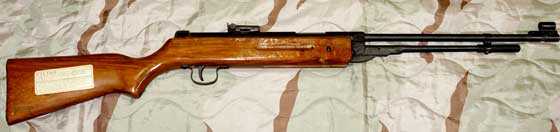
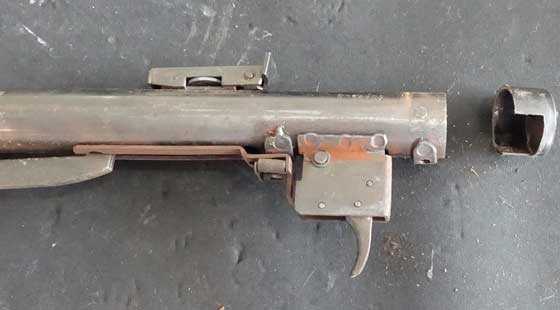
The B3 underlever from China.
This report covers:
- Remove the stock
- Anti-beartrap
- The piston and sliding compression chamber
- Removing the mainspring
- Removing the anti-beartrap device
- Compression chamber and piston out
- Cleaning
- Assembly
- The trigger
- Lubrication
- Does it work?
- Next
- Summary
Today I take the Chinese B3 underlever rifle apart and we see inside. This will be a good one.
Remove the stock
The first step is to remove the stock. That’s two forearm screws and one in the triggerguard. Once out, I could see this rifle is very rusty. It’s so rusty that it will take many hours to clean. I don’t have that kind of time so I’m going to clean only what needs to be cleaned.

With the action out of the stock you can see rust everywhere! Notice the flat bar in front of the trigger housing. That’s the anti-beartrap.
Anti-beartrap
The rifle has an anti-beartrap that’s designed to prevent the gun from firing unless the underlever is fully forward. This one is very simple, but it does have to be removed before the gun can be fully disassembled.
The parts are held to the gun by a plate that contains two small coiled springs. They make the mechanism work when the underlever is returned to the stowed position. One screw holds the plate to the spring tube.
The anti-beartrap mechanism is held to the spring tube by a plate with one screw.
Here is a different view. Sorry for the blur.
The piston and sliding compression chamber
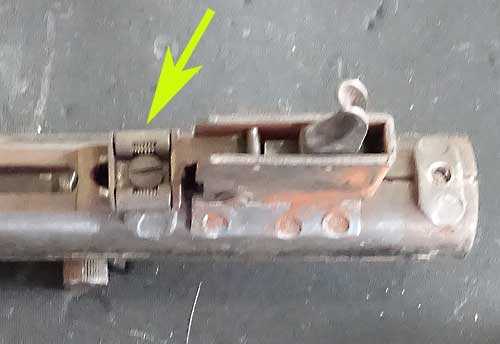
Both the piston and sliding compression chamber are held in the spring tube by a single cross pin. The design of this rifle was starting to look familiar at this point.
That cross pin passes through both sides of the spring tube and also the end of the spring guide, which is the silver inner circle. This is what holds the action together.
Removing the mainspring
The spring guide is under a lot of tension from the mainspring, so the action has to be installed in a mainspring compressor for this disassembly. Since the B3 I’m working on has no dovetails for a scope, I can only use a Sun Optics mainspring compressor for this job. Mine is the much older B-Square design that Sun Optics upgraded.
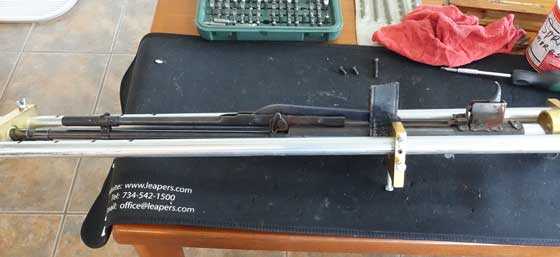
The B3 barreled action is in the mainspring compressor.
There has to be a way to bear on the end of the spring guide without bearing on the spring tube. I found a 13/16ths socket that did the job well.
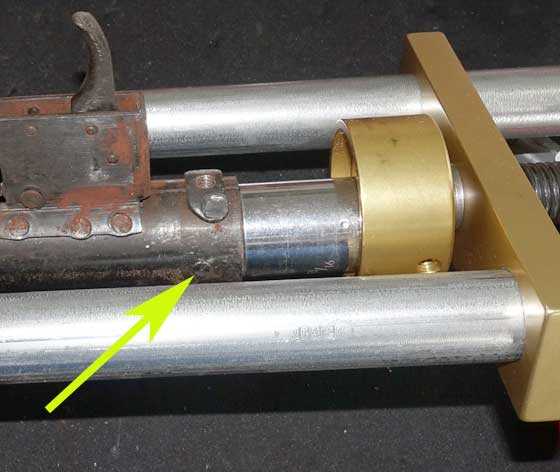
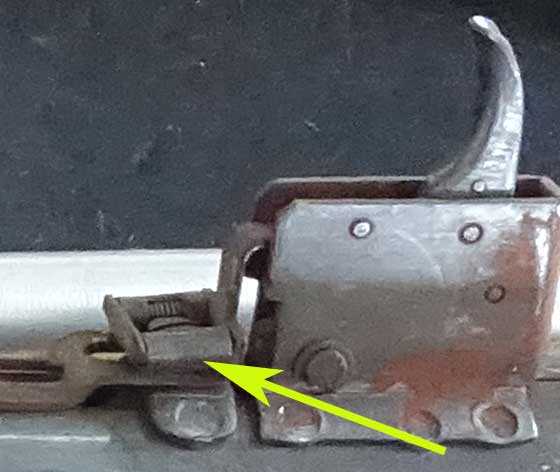
This detail view shows the socket that’s pushing on the end of the spring guide. The object is to relieve tension on the guide so the cross pin (arrow) can be removed. The compressor’s cup that holds the socket turns freely on a bearing, so alignment is not important.
Once there was pressure on the spring guide I tapped the cross pin and knocked it out of the spring tube instantly. All I had to do then was back off on the mainspring compressor and the mainspring relaxed.
The mainspring is completely relaxed. This B3 spring has almost 2 inches of preload!
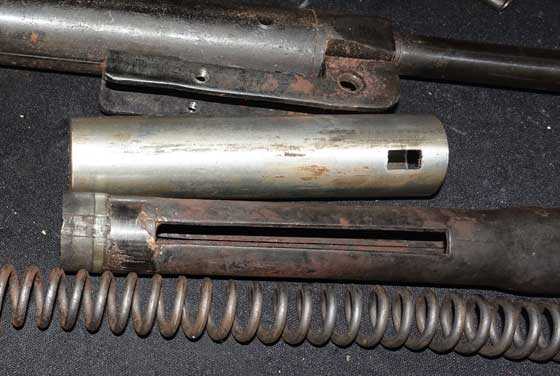
Let’s look at the parts that have come out of the gun so far. There is the cross pin that held the spring guide in the spring tube, the spring guide itself and the mainspring.
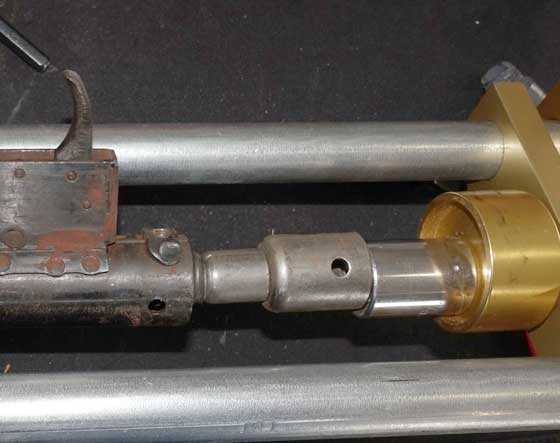
The spring guide is two parts, with a sliding guide that fits on the base of the spring. It does not go inside the spring, but is rounded on the end to center the spring.
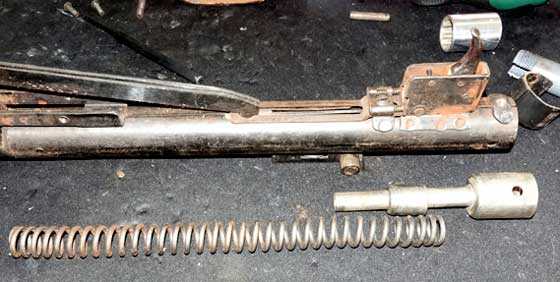
The mainspring and spring guide are out of the gun. The spring guide is comprised of two parts — a rod to guide the spring and a sliding bushing that centers it on the rod.
The mainspring is relatively straight and seems to be in fine condition. It doesn’t need replacement.
Removing the anti-beartrap device
Next I want to remove the piston and sliding compression chamber, but before I get to them the anti-beartrap device has to be removed. Unscrew the single screw and lift the plate and its springs off the spring tube.
Before the piston and compression chamber come out the anti-beartrap device has to be removed.
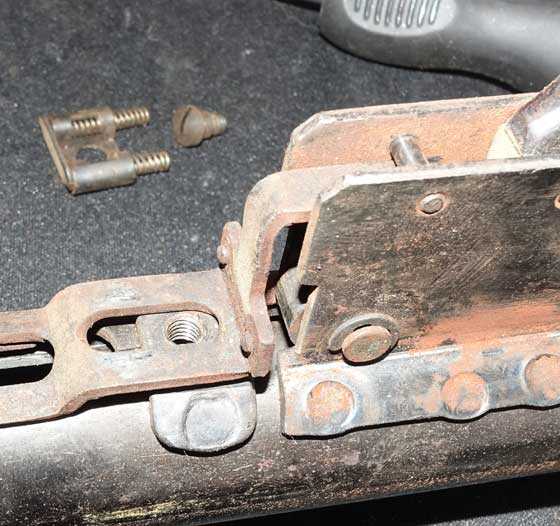
The anti-beartrap plate and springs are removed. This is what pushes the blocking bar into the trigger assembly until the underlever is returned to the stowed position.
Now the underlever can be disconnected from the action. The cocking link is attached to it, and, once the lever is free of the gun, the cocking link can be disengaged from the sliding compression chamber.
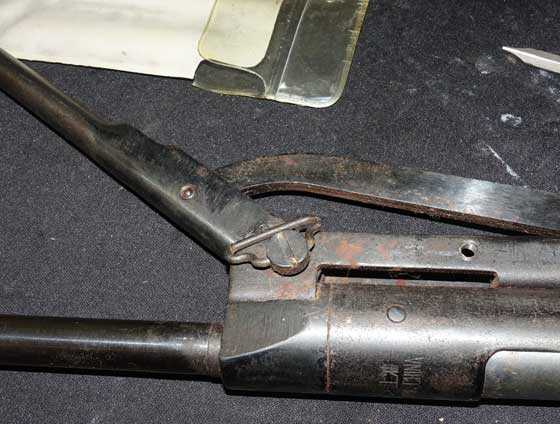
That one screw with the sling swivel attached is what holds the underlever to the rifle. Remove it and the underlever comes free of the rifle — allowing you to disengage the cocking link from the sliding compression chamber.
Compression chamber and piston out
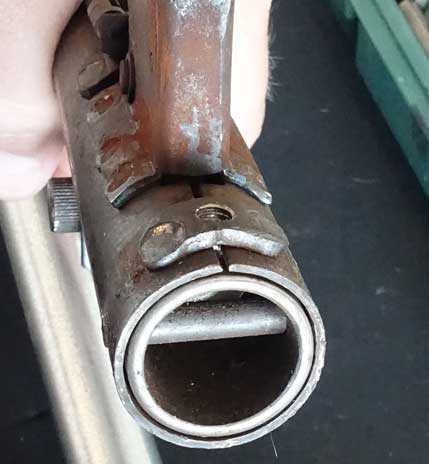
Once the cocking link is disengaged from the sliding compression chamber, push out both the compression chamber and piston. In this rifle that was hard. The rust made everything tight and sticky. Lubrication will make a big difference here!
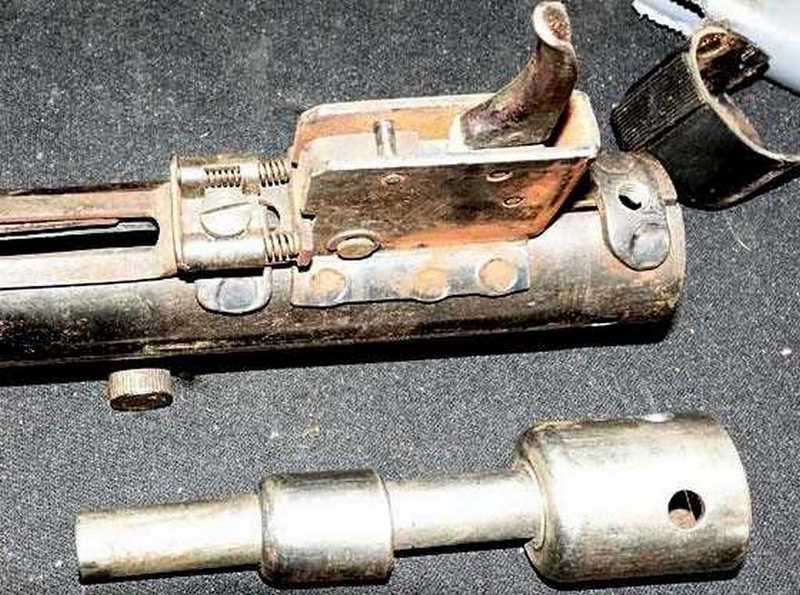
Once the two parts were out of the rifle it was possible to examine both closely. The piston is made of sheet steel, rolled and welded into a cylinder. It was covered with rust. The compression chamber seems to be made of stainless steel, or at least a steel that has a high chromium content. It appears to be formed or machined because there are no welds visible. There was a small amount of surface rust on the patch that’s exposed when the chamber is forward, but the rest of the chamber was rust free inside and out.
The sliding compression chamber is relatively rust free. The piston, on the other hand, is rusted all over.
Cleaning
I said earlier that there is no way I have the time to clean all the parts as well as I should. So I concentrated on those that mattered. The piston was covered with rust, so I sanded it all over with 240-grit sandpaper and then coated it with Crosman Pellgunoil oil to stop it from rusting further.
The piston seal seems to be made from leather and is in pretty good shape. That surprised me because this rifle looks like it never got a bit of attention. I coated it liberally with Crosman Pellgunoil.
I sanded the little rust from the outside of the compression chamber. The inside was clean and, believe it or not, very smooth. After cleaning off the rust I oiled the outside of the chamber.
Assembly
Now it was time to assemble the B3. The piston slid inside the compression chamber with the cocking slots in both aligned, then the compression chamber was put back inside the spring tube. Alignment is achieved when the compression chamber fits over the breech.
The trigger
I haven’t mentioned the trigger up to this point. Many articles recommend disassembling it to get the chamber out of the gun and again to install it. I found that wasn’t necessary, but I did have to remove the rear pin so I could pull the sear out of the chamber’s way both for disassembly and again for assembly. And that was when I figured out that the B3 is copied from the BSA Super Meteor! The welded sheet metal piston and the trigger gave it away. You can see what I am referring to in my 9-part report on the Super Meteor. The trigger is shown in Part 2.
The cocking link was then connected to the compression chamber, remembering to slide the anti-beartrap bar over the link. Then the underlever was secured to the spring tube and the anti-beartrap plate and springs was reattached to the spring tube.
Lubrication
I greased the mainspring with Tune in a Tube grease, then slid it back inside the piston. Remembering from past jobs that it doesn’t take much Tune in a Tube, I used less than I would have. Each coil was greased inside and out with very little extra remaining on the spring.
Both parts of the spring guide were greased, then the guide was positioned inside the mainspring. Now the gun was installed in the mainspring compressor and the socket was positioned to push on the base of the spring guide. It took some care, but the guide when in the first time and the cross pin was put in its place to lock the action.
Put the plastic end cap back on the spring tube and then drop the barreled action into the stock and tighten the screws. The B3 is back together. The whole job as described here took 90 minutes, including pictures, cleaning and lubrication.
Does it work?
I cocked and fired the gun several times after assembly — to ensure everything was working as it should. This minor “tune” has transformed the behavior of this B3. It went from a noisy rough-feeling rifle to a quite one that shoots without vibration. There is still a jolt when the gun fires, but it’s reduced from before.
The trigger was already feeling good before I did anything. I did not really lubricate the trigger parts, but my hands were greasy so they picked up something from just that.
Next
I need to retest the velocity, for a before/after comparison. After that I want to shoot it for accuracy again.
Summary
This is a job anyone can do, but it does take the right tools. You’ll need some kind of mainspring compressor, a screwdriver set, a pin punch set and a plastic hammer. I think a small tactical flashlight is handy for inspection purposes.
Is it “worth it?” Yes, if your goal is to see the inside of a B3, it is worth it. Also if your B3 is powerful and accurate like this one, this work will make it so much better. Remember, I only cleaned the bare essentials in what I did. 95 percent of the dirt and rust still remain. However, removing them will probably not give you any more power. Peace of mind, perhaps, but not f.p.s.


B.B.,
Thank you for the tear down of this B3. That is a very dry air rifle from the pictures. Wasn’t it worth lubricating with some molybdenum grease? Not to mention at least a wipe down of the surface with a rag of Ballistol? Then again this is a low powered air rifle, so thinking about it lithium grease should be just fine. I don’t expect the accuracy to change but with the better firing behavior one can be hopeful.
Siraniko
Siraniko,
The Ballistol was certainly something I should have used, but I do think moly would be overkill.
B.B.
BB
Thanks for the look inside one of these guns. The manufacturing techniques and standards from this era in China is very interesting to me. My first impression upon seeing your photos was that those spot welds look awful. Though the process was eventually replaced with a crimping technique, for the first 20 years that I worked in major appliance manufacturing everything was spot welded together, so I have seen good and bad and I know good welds do not crater in like these have. Doesn’t mean they don’t work, just not what I’m used to seeing. It really stood out.
I noticed that the cocking link is attached to the underlever via a punched rivet. How would that connection be made on a gun that originated in Europe? What would a US or European maker do differently that would prevent all the rust if, in fact, it would be absent on their guns made during this same time period. It seems like it was mostly where it doesn’t matter. They went with the high chrome steel in an area that would cause a major failure if it rusted, so were the Chinese just that tuned in to knowing just what’s required to function reliably and set that as their standard, maybe because that’s all they were capable of doing at that time?
My daughter uses a quote from someone, whose name escapes me, when she’s letting me of the hook for some of the parenting mistakes I made as a very young father. She says ” You did the best you could do at the time. When you learned better,you did better.” I know it wasn’t, but it sounds like it could have been Confucius.
Half
Halstep,
That is a wonderful saying. I will add it to my repertoire.
Please thank your daughter for me.
B.B.
BB,
Yeah, it’s come to mean a lot to me because of the context under which I first heard it.
Wm.Schooley gives the actual quote and credit below.
Half
Halfstep:
Sounds like a mod on the Maya Angelou quote
“I did then what I knew how to do. Now that I know better, I do better.”
https://www.goodreads.com/quotes/9821-i-did-then-what-i-knew-how-to-do-now
William Schooley
Wm.Schooley,
That’s it exactly! I remember now. Once I’ve slept a few days, who knows?
Thanks,Half
The BSA definitely didn’t have as much preload as the B3, but the heritage can be seen…
B.B.,
Thank you for the peak inside. 90 minutes seems very good. I would have had a hard time letting the rust go, but I understand the time constraints. Even though you say the trigger is fine, I bet that it could have used some TLC as well. Very interesting.
Chris
BB,
It is always cool to see inside, most especially since I will not likely have one of these living here.
I was amused when you coated the piston with Pellgunoil. When I first started airgunning as a kid, that was my rust preventative! My guns would get a wipe-down with it before storing. One of the best things I’ve learned from this blog is about Ballistrol, which has worked better and seems to prevent rust longer than the Pellgunoil did. But of course Pellgunoil remains a must for all my CO2 guns.
HS,
I only thought about Ballistol after the gun was assembled. I should have used it.
B.B.
B.B.
Talking about Ballistol…
I have been using Ballistol in place of 3in1 (light) Machine Oil for a couple of years now and noticed that it “gels” a little bit and becomes a “greasy” film. I guess that there is a component that evaporates off, an interesting and useful characteristic.
I do something similar when I want to get an oil or grease lubricant into an inaccessible location by using Naphtha as a thinner/carrier. This works well on triggers and such.
I used to clean mechanical wrist watches by flooding/flushing the mechanism with Naphtha and then lubricate by flooding the mechanism with a drop of light oil thinned with a teaspoon of Naphtha. The Naphtha would evaporate leaving an extremely thin coating of oil on the parts.
Happy Friday!
Hank
Hank,.
Wow! What a tip!
Where do you get Naptha? When I worked making tin cans while in college we kept a 55-gallon drum of it to wash the can-making machinery, but I don’t think I have seen it for sale since then.
B.B.
BB,
https://www.amazon.com/Klean-Strip-VM-P-Naphtha/dp/B001G9TGQI
RR,
Thank you.
B.B.
BB,
I think lighter fluid for a Zippo type lighter is Naptha.
Half
B.B.
Naphtha is also known as “White gas” or “Camp fuel” and is available from most sporting goods stores. Coleman sells it in 1 gallon cans.
I also use Naphtha for cleaning/de-greasing/removing fingerprint oils prior to gluing and painting because it doesn’t leave a residue. I keep some handy in a ketchup bottle.
Normal precautions… Very flammable stuff (and relatively low odor). Use in a ventilated area and take care in disposing of any rags.
Hank
Hank,
Thank you for that. Now I know where to get some locally.
B.B.
B.B., RE: “Naptha”
Believe it or not, you’ve used it before, especially if you’ve been in the military, or ever had a mother or a wife,
Your wife and/or mother cleaned those grease drips on your shirt with “Spot Remover” while you recharged your Fort Hood Grad engraved Zippo with Ronsonal, back when you still smoked.
Remember that?
You can buy conveniently packaged amounts in equally convenient plastic bottles suitable for small parts such as Rollei 35 or pre-war Leica camera shutters, or even fine trigger mechanisms in high (or low) end rifles:):):)
Your local 7-11 will carry it, calling it “Lighter Fluid.””
Yup, really, it’s just that…but very handy nonetheless,
3in1 is a very volatile “penetrating” item occasionally useful for freeing up,say, rusty hinges and the like but gives little if any protection against demon rust.
Never sleeps, you know,,,
David,
Thank you for all of that!
B.B.
B. B.
Thanks for the comeback, it’s appreciated.
—Other uses for Naptha includes de-KrazyGluing certain types of overruns from both the poor project itself and the handyperson as well. (A little-known historical footnote is that the phrase “Separation Anxiety” did not exist before the first practical joker glued his lab partner to a toilet seat. Vinegar works better anyway, but in any case, work fast.)
—Be very cautious where any form of alcohol as a degreaser is used as any over-the-counter version has a significant percentage of water. Once the alcohol evaporates you’re left with your sparkley-clean Rolex sitting in a just-the-right-size puddle.
Rolex watches don’t like that so much.
—For a real oddity, Naptha works very well for cleaning sticky-finger-child residue off conventional photographs. Pay special attention to the word “conventional” here as this means lab printed from film, tested on an image you don’t much care about and with a high probability of failure on an image printed on an ink-jet,
And do this very promptly, no waiting for next week, or even tomorrow, and don’t use alcohol for this trick as the water component will make your 4×6 glossy look pretty sad.
Really
—And, no smoking.
Hank,
Great tip! I have some graphite lubricant that works on the same principle. I wonder how 91% isopropyl alcohol will do, especially with moly grease? I use it to clean parts before I blue or aluminum black them. This could also be a good way to coat springs.
RR,
When I worked at GE we lubricated agitator shafts and bushings with moly. They mixed 5 gallon buckets of a moly paste to make a watery fluid with Trichloroethelene,III. Don’t use that though, it is considered a pretty serious carcinogen these days. They then sloshed mesh containers filled with the parts around in it. After removing and airing dry a layer of moly was left behind. Alcohol may work as well.
Spray-On used to make an aerosol that had moly suspended in a solvent. It would evaporate and leave the moly behind as a dry film as I remember it.
Half
Halfstep
Trichlor is some potent stuff. We use to use it to remove Loctite off bolt heads and such when someone got messy applying it on some of the military contracts we had. Back in 82 when I started in the machine shop trade 90% of our work was military then faded over to automotive eventually.
Halfstep
Also forgot to say. When biulding the RC airplanes we use CA glue in thin, meadium and thick.
To get the meadium and thick to cure quickly I used what they called accelerator. It was trichlor mixed with I’m not sure what. But it was in a pump spray type bottle that sprayed a fine mist. Made the thicker stuff cure in a blink of a eye.
Halfstep
Read at the bottom about my new gun mod I’m getting ready to do.
Half,
I used to work at GE until my job went to some guy named Peggy in Bangalore, India.
RR,
Try the alcohol and see how it works.
I have always defaulted to using Naphtha. Being petroleum based, seems to work best with the greases and oils that I have tried.
Curious, what product do you use to blacken aluminum? I was going to leave the 101 shiny but I might just finish up the metal.
Hank
Hank,
Birchwood Casey makes a product called Aluminum Black. I have used it and it works well, but it isn’t shiny like the paint Crosman used.
B.B.
Thanks B.B.!
Hank,
What he said. I have used it before to refinish the front sight on a FWB 300. It leaves a nice matte finish. I plan on blacking the aluminum parts this weekend. I glass beaded all the metal parts to remove all the paint. It should make for a good finish.
They also make the blueing solution I am using on the steel parts. I have blued the barrel and reservoir so far and they have a nice matte finish.
Thanks RR,
Sounds like your 101 is getting the royal treatment! 🙂
I am debating what finish (if any) I put on mine. The local hardware store has a brand of spray-paint that is very durable so that is an option. The rifle was mostly bare metal when it was given to me so blued or painted it would not look “right”.
Do you have your own glass-beading/sandblasting setup? Would be convenient to be able to do that as I am doing more metal-working these days. Making an anvil out of a hunk of railway track at the moment.
Cheers!
Hank
Hank,
I have access to a full blown machine shop at work.
Years ago I used to rebuild old Mossberg scopes. I would bead blast all the old paint off of the brass and use this stuff.
https://www.brownells.com/gunsmith-tools-supplies/metal-prep-coloring/paint-finishes/air-cure-aerosol-paints/aluma-hyde-ii-prod1117.aspx
If the blacking does not work out well, I will either have it anodized or use this stuff again.
RR,
… “access to a full blown machine shop at work” NICE!! I had that privilege at a few places that I worked.
Thanks for the link to Brownells – they have all kinds of good stuff!
Looking forward to seeing pictures of your refurbished 101!
Hank
Hank,
I have been taking pictures along the way. I am really going to try and do a blog on it.
RR,
You got me thinkin’ about suspended moly so I did some checking. The Sprayon product I referred to is still being made, so I looked up its MSDS and found this;
SECTION 3. COMPOSITION/INFORMATION ON INGREDIENTS
SUBSTANCE/MIXTURE: MIXTURE
OTHER MEANS OF IDENTIFICATION: NOT AVAILABLE.
CAS NUMBER/OTHER IDENTIFIERS:
INGREDIENT NAME % BY WEIGHT CAS NUMBER
ACETONE 30.0 67-64-1
BUTANE 27.4 106-97-8
2-PROPANOL 21.6 67-63-0
PROPANE 12.6 74-98-6
HEPTANE, BRANCHED, CYCLIC, 2.9 426260-76-6
LINEAR
MED. ALIPHATIC HYDROCARBON 1.4 64742-88-7
SOLVENT
HEPTANE 1.3 142-82-5
TOLUENE 0.1 108-88-3
THERE ARE NO ADDITIONAL INGREDIENTS PRESENT WHICH, WITHIN THE CURRENT
KNOWLEDGE OF THE SUPPLIER AND IN THE CONCENTRATIONS APPLICABLE, ARE
CLASSIFIED AS HAZARDOUS TO HEALTH OR THE ENVIRONMENT AND HENCE REQUIRE
REPORTING IN THIS SECTION.
OCCUPATIONAL EXPOSURE LIMITS, IF AVAILABLE, ARE LISTED IN SECTION 8.
It looks to me as if acetone is what it is suspended in. The ad copy for the product touts it as being resistant to alcohol and a couple of other solvents so I don’t think your alcohol idea will work, based on that. However, finger nail polish remover should work.
Half
Half,
Ugh.
Hank
This all just reminded me about some talk on the blog a while back about not to use WD-40 because it eventually turned into greasy film.
And that is exactly why I use it in certian places. And mostly the liquid type and not the spray type.
A couple drops down each side of the trigger blade while holding a gun upside down helps to make a smooth trigger.
Oh and I do use 3 in 1 oil too. Both brand oils also work nice on hinge points on break barrels, underlever and multi-pumps linkages. Those are places that I like a film of oil to remain.
GF1,
The other thing with WD-40 is that it mixes with water. That can be good and bad.
I am thinking of ordering a Dragonfly today just don’t know which caliber to get. From the velocity data it seems the valve may be on the small side for .22 caliber. The barrel is a good length for .177 and probably matches the valve. That is leading me toward .177 even though I like .22 caliber better in general.
Don
Don,
I have a .177 Dragonfly enroute for the blog.
B.B.
B.B.,
I just put in my order for a .177 Dragonfly. I will be looking forward to your review.
I was trying to wait for your review I figured it was coming but could not wait. It has too many characteristics I have been looking for. I was hoping Crosman would come out with one. If the Dragonfly shows enough quality it will give the Crosman 392 some serious competition. The Crosman 312 is still my favorite multi-pump. It is just made better and pumps easier than the 392.
Thanks,
Don
Benji-Don
I see you already replied and ordered a .177. caliber.
Good choice I believe.
Don ,
I ordered it as soon as I saw it out.
I will use your comments to start the report.
B.B.
Benji-Don
I have been going back and forth about the calibers also on that gun.
I think it’s going to depend on what caliber for what your going to use the gun for and what distance.
I was thinking .177 for the flatter trajectory for plinking, target practice and pest birds out to about 50 yards. And probably squirrel out to about 30 yards.
The .22 won’t have that flat trajectory so it my be a little more difficult for pesting at different distances and plinking at that. Plus the velocity is lower. So the energy might not be enough for bigger pests like squirrel and such. That would mean the .22 might be a 25 yard pesting gun for squirrel and 40 for birds. But if you were just using it for a couple set distances target practicing it would probably be the caliber to get.
So my thinking is the .177 gun might be the all around gun.
Thanks for the support on the .177. The Dragonfly has too much going for it not to give it a try. I don’t believe it will ever be able to handle .25 caliber even though looking at the picture the gun is set up for it.
Vana gave me some volume numbers for the 101 valve and I have some for the 13xx, 397 and 312. I still need to dig out my vector mechanics book so I can include the pump effort in my multi-pump spreadsheet. That will tell us quite a bit about the Dragonfly right off the bat. I like a small long pump tube and large valve in a multi-pump. They are not all day rapid fire plinkers. More like a shot every few minutes anyway so for me higher pressure and a few more pumps to get there are my preference. That is the one thing I see may be a limit on the Dragonfly. I will know soon enough.
Don
Oh and include hunting on the multi-pumps. So far all the PCP multi-shot multi-pumps look awkward and heavy for hunting. I would rather have a light balanced PCP and carry a small bottle if needed. The Maximus would be my go to gun for squirrels after my rimfire .22. Even though I don’t have a Maximus I have handled one and like the fit. It has plenty of shots for all day Hunting and great accuracy in a light gun. For pesting a large fill bottle would last all day for most situations.
Back to tilling the garden.
Don
Benji-Don
I think the dragon fly will be nice pumper.
Definitely waiting to see what you and BB have to say about it.
Benji-Don
Read at the bottom about my new gun mod I’m getting ready to do.
GF1,
WD-40 is good for steel but I have had bad experiences with brass and white-metal.
I used WD-40 on a couple of door locks and destroyed them – evidently the “penetrates rust and frees parts” feature works too well on some metals.
The joke about reason it is called WD-40 is that formulations WD through WD-39 didn’t work 🙂
Hank
Hank
I use the WD-40 on steel and plastic. Haven’t ever tryed on anything else come to think about it. But haven’t had any issues when I used on those I mentioned.
The only thing I have found WD-40 good for is to remove tar from a car’s paint. It smells good and won’t hurt the finish. It’s lubricating properties are very poor though. And it does not perform well as a rust preventative either. After it’s been on a surface for a while it turns into a sticky waxy film which is nasty and difficult to remove. If you use it to lube a squeaky door hinge, it seems to quiet the squeak temporarily and then a week later the squeak is back again.
We used trichloroethylene in our shop to clean parts back in the 1970s and 1980s. We had five gallon buckets of the stuff by our machines and we would dip the parts into the bucket and then blow them off with an air hose. Then it was discovered that trichloroethylene was absorbed through the skin and accumulated in the liver and caused cancer. The company then stopped using it, but many were exposed to it for over twenty years.
Geo
That’s why ilike to use WD-40 on the parts I mentioned. The waxy stuff.
Geo,
We used it in automated degreasing operations at GE. Steam coils would heat the stuff up and monorail conveyors would carry racks of parts though the tanks to take off the oils and coolants used to machine the parts, as prep for painting or plating. Any time we had to make repairs to something inside the tank portion it would require draining and airing for a certain length of time and even after that we were required to wear a Scott air pack. The stuff vaporized so readily that a spill of just a few ounces would displace all the available breathing air in a room-sized chamber.
Because we had thousands and thousands of gallons of it around at any one time, we maintenance men used it to wash up in, sometimes 4 or 5 times a shift, because it would remove stuff from your skin that you would have to let wear off. After a really greasy nasty job we would put on clean work clothes and soak the dirty ones in Trichlo for 20 minutes then drape them over the back of a 36″ pedestal fan to dry. In 5 more minutes you had yourself a dry cleaned set of uniforms.
The old formulation of Tap Magic was just Trichloroethelene,III with tallow added to hid the smell for a few minutes. That stuff will gawd the heck out of aluminum, by the way.
Fun times. Modern factory workers are growin’ up sissies! 😉
Half
Halfstep
Times definitely have changed from when I started 34 years ago in the machine shop trade.
No more open buckets of solvent at each machine. Only closed cleaning tank in the whole shop.
All the machines are tied into to big what they call mist collectors. Which are really (smoke) collectors from the cutting tools. We have 21 machines right now that have 12 cutting stations that all work at the same time. Multiply that by 21 and that equals alot of smoke.
In the old days for probably the first 15 years we didn’t have any mist collectors on any machine. Can you imagine all that smoke. As the day you could see the cloud of smoke up on the ceiling getting closer to your head as the night went by.
So yep definitely not like it use to be. Oh and back then we had real air nozxles to blow the parts off with. Now days they got holes drilled in the sides to release the air if you put it right up to your skin. Needless to say they don’t work very good now days.
It is what it is.
WD-40 contains linseed oil, yes, the stuff that you can paint with, diluted with a light mineral oil and Stoddard solvent. When it dries, you have a very thin film of congealed linseed oil wherever you applied it. It is not a good lubricant. 3-in-1 is just as bad. You can use WD-40 as a rust preventative in a pinch by applying a very light coating to exterior metal surfaces with a gun cleaning patch or piece of shop towel, but be careful not to get it inside of anything. There are much better rust preventatives available.
For a quality lubricant for sliding parts, I prefer to use Mobil Vactra #2 way oil ISO VG 68 or a similar weight or next step lighter (ISO 46) R&O hydraulic oil. A light film of Lubriplate also works on sliding parts. Use sewing machine oil where you need a lighter weight oil (ISO VG 22).
Dpasek
Also alot has to do with what you are trying to lubricate. I have worked in the machine shop world for about 35 years as a maintenance/tech. We use all kinds of lubricants for different things.
Anyway thanks for the info.
Dpasek,
I agree with your assessment of WD-40 completely. I found years ago that it was a very poor lubricant, which only lasted a short time. I also found it to be a very poor rust preventative. I sprayed it on my table saw and within a short time rust would appear. I now use CRC SP-400 industrial rust preventative. That protects the table saw from rusting for months. When I want to use the saw the CRC comes off easily with mineral spirits.
For lubing things, it depends on what I am lubing. I use CRC silicone spray on things I don’t want to collect dirt and CRC lithium grease spray for some things.
Now, for my airguns, I use Balistol spray. I read about a fellow’s gun collection that was submerged in water following Katrina. He had used Balistol on his guns and when they removed them there was no rust on any of them. The Balistol had protected them. So now I use Balistol on a cloth and wipe all my weapons down with it. It’s also a pretty good lubricant.
Geo
Hey, noticed the entire blog was showing today with no “Read More” button (or comments) at the bottom. I had to click the comments link at the top. Same thing for the week’s previous blogs. Something changed or is my iPad acting up this morning?
HiveSeeker,
Your iPad is fine, I saw the same thing on my desk-top computer.
Hank
Hiveseeker
My phone is doing the same.
I noticed the same thing. Had to go back to the top and click on comments before I could read them.
Everyone,
I have asked Pyramyd AIR about the comments. They may be doing something.
B.B.
Everyone,
I just heard from Pyramyd AIR and they are working on it. Apparently this wasn’t planned.
B.B.
Mr. Gaylord:
If you don’t mind letting your readers know, how many hours have you spent so far on this B3 project?
For some one like me who’s not into repairing old air rifles, it seems that it would be much more cost effective to send a rifle to a competent airgunsmith for this type of work. I say this because according to the Bureau of Labor Statistics, the average American worker got paid $24.57 per hour in 2017. And in your home state of Texas, the average hourly earnings of all employees was $22.45 in Feb 2018. At some point in time, it seems that it’s just going to be less expensive for someone else to do the work. Or just get a new air rifle.
Secondarily, knowing what an estimated cost to repair might be will helps in determining a fair price if I decide to get an old B3 air gun tomorrow at Findley Toys that Shoot show. (assuming one’s offered for sale)
Respectfully,
William Schooley
William,
Without a doubt this is a labor of love for me. But since I then get to share it with tens of thousands of readers over many years of time, it’s well worth it.
Airgun tuners seldom get paid the average wage. A few are lucky to pull down $15 an hour and I would guess the average is below $10. So, you have to love what you are doing.
B.B.
Mr. Gaylord:
You are so so right.
Like the sage said “Do what you love and you’ll never work a day in your life.
WS
William,
I think that the average wage from the Bureau of Labor Statistics is biased extremely high. When all the exorbitantly high salaries are included in the average, the number is bogus. I think a very small percentage of working people earn $24.57 per hour. It is certainly not the average American worker’s wage. There are a few professional people, and athletes, that make big money. But the vast majority of the working class are making much less than $50k a year.
I really enjoy reading about your teardowns and how you work your way around mechanical obstacles. This blog post might help me in fixing a B3-1 that froze up on me years ago. Right now however, I’m steeling myself to rip into a Hakim I just acquired. Its in great cosmetic shape but shoots very weak. Broken piston seal maybe? Bad breech seal? Or a weakened mainspring? Or needs a lube job? I took your tip from your blog on the Hakim and found a source for the similar Diana piston seal. But where can I source the breech seal and mainspring?
Lioniii,
Breech seal??? The Hakim has a loading tap. I don’t think there is anything beyond the close fit of that tap. I have had dozens of these apart and I’ve never noticed a seal other than the close fit of the tap.
Now the mainspring could be a small problem. I’m sure someone has something that will work, but I don;’t know where to send you to look for it. This guy has lots of parts and may be able to help:
B.B.
BB and all,
I think we are going to be seeing some pretty awesome new air rifles coming out of the UK here real soon.
http://sterlingarmaments.com/
https://www.youtube.com/watch?v=dCM3k_pZAbE
One of them looks awful familiar.
RR,
Oh, my! It sure does!
How is yours, by the way? 🙂
B.B.
BB,
Doing fine. I have not had a chance to change the piston ring yet. When I do, I will do an update.
Bb,
TO just assumed. It had a breech seal of some sort. Thanks for the tip! I’ll check out that JG guy.
B.B.,
The Comments RSS is only showing (very) recent comments. I made a couple 1-2 hours ago and they showed, but now they are gone (from the Comments RSS). The oldest comment is 14 minutes old the last time I looked.
Just some FYI for ya’ and we all appreciate it when you forward the issues to P.A.. I know you have nothing to do with up-cropping issues.
Chris
Chris,
I sent your comment to IT.
B.B.
Chris,
I just counted the comments and all of them are showing \up.
Pyramyd AIR cares about this blog very much! It is at the top of all the shooting sports blogs and they want it to run as well and smoothly as possible.
B.B.
B.B.,
Your comment sounds a bit “curt”,.. if that is the right word? I just rechecked and the last comment is 27 minutes old. Usually, there is multiple days worth. Thank you for your efforts and reply. (I will assume that it is something on my end.) Most likely,.. it will all be “magically” back to normal in the AM,… as is often the case when things go a bit Wonky. (credit to Sean the Aussie for that one) 😉
Chris
Chris,
It’s not on your end. I am seeing the same as you. Right now I see five comments only using the comments RSS feed with the last one being today at 3:39 PM. I’m sure Pyramyd is working to fix it.
Geo,
What is this RSS feed that you guys sometimes refer to? I see direct responses to my comments in my email and I find every other new comment by periodically scanning down the comments on the blog that interests me. Sometimes I do this for several blogs in a day. It is sometimes hard to follow the thread of some comments. Is there a more efficient method that I’m not utilizing?
Half
Halfstep,
See Siraniko’s comment at bottom. I use Internet Explorer on Yahoo and it shows up on the upper right side of the page as Siraniko noted.
I use it so that I do not have to go back through all the comments on a blog. If there is 10 new posts,.. (but) are all scattered throughout the blog,… the RSS will have them shown in order of time posted.
It is also good to see comments that are happening on another blog from another day. If someone comments on a blog that is 10 years old, it will show right up with the rest,.. in time order. And, you can click on a comment on the RSS and it will take you directly there.
I do not stay signed in on my mail, but they show up like you say.
It is a real time saver! In fact, most times the RSS is the only thing I have pulled up. If there is any activity on any portion of the blog, it will show up right there. If you step away, you will need to refresh the page like most things.
My comment was in regards to the limited number of posts shown. Usually there is several days, weeks? worth but currently it is just showing 5 or so and the oldest ones are getting rolled off. If I go to bed at 9, then in the morning I just roll back to 9 from the night before and I can see all the posts that were made overnight. Like I said, a real time saver.
Hope some of that helps to answer your question.
Chris and Siraniko,
Thanks for explaining that.
I had to download one for Chrome but a YouTube tutorial made it a cinch. I am only seeing 5 comments at this time myself.
Half
Halfstep,
No problem. Glad you got it working. I wish that someone had explained it to me. I think that you will find that you will use it near 100% of the time like I do. While only a guess, I will bet that is what B.B. does too. I used to do as you did for a long time and really kicked myself in the butt for not getting on board with it sooner. As it currently, I will have to revert back to my old ways of doing things, at least for an overnight catchup.
Since most people use Windows, it could have something to do with that new, big update that they have in the works?
Nope, comments issue is not related to the Windows 10 spring update. I am running Windows 7 and I see the same five comments as you. Thought that it might be fixed by today, but no. Guess we’ll just have to get by until it’s fixed. Unfortunately, we won’t be seeing any of the comments posted on a previous blog right now 🙁
Halfstep,
Sorry, have not been on the blog site much today yet. I see Chris replied to your question already. You do not need anything extra in order to use the comments RSS feed on the blog site. If you go to the very top of the blog you will see on the right side of the page a list of items. The seventh item down is “Comments RSS”. Just click on that and another page will open with all comments posted within the past two weeks in order by most recent.
My procedure is to right click on a comment to open it in a new tab while leaving the “comments RSS” tab open. I read the comment in the blog and maybe one or two right below that one. If you left click on the blue Date and Time it will be marked as read. Then I close the tab which then goes back to the other open tab. I right click on the next “blue” comment to open that in a new tab, etc. By using this process you won’t miss any comments made in any of the blogs, current or past. When you click on Date & Time and then go back to the tab with the comments, the ones you clicked on will be red and the ones not read will be blue.
Like Chris, I will sometimes just leave the comments RSS page open on my computer. Then occasionally I will walk over and refresh the page to see any new comments that have been posted. And yes, you will get an email notification, but only if someone makes a reply to you specifically.
Now if the IT guys can just get the comments RSS feed working correctly again 🙂
Geo
Thanks so much. I’m working on a knife project right now, but later I will take a look. Sounds easy to do and very convenient.
Half
Geo,
I removed the RSS reader thingy that I added to chrome earlier today. Now when I click the ” Comments RSS” here I got a long simple text of GunFun’s comment on different hammer bounce mods for Marauders and thats all. It looks like something typed in Notepad.
Half
Half,
I don’t use Google Chrome so you may have to install an extension for the RSS feed to work with that browser. I use Firefox and did not have to install anything for the RSS feed to work. We are still only seeing the last five comments posted.
It appears that Chrome stopped supporting RSS feeds without installing an extension.
https://chrome.google.com/webstore/detail/rss-subscription-extensio/nlbjncdgjeocebhnmkbbbdekmmmcbfjd?hl=en
Not sure what you removed but you definitely require an extension with Chrome.
Geo,
It was an extension. I’ll put it back.
Half
Figure I would post this real quick. Got a new project on the way. Calling it my SuperFire.
Going to get another Huma regulator that fits the Maximus/Discovery and put it in a WildFire.
But here’s the Super part of the of the SuperFire. Well or maybe the Fire part.
I’m also ordering a .177 caliber Maximus barrel. Going to cut the breech end of the barrel off up past the transfer port hole in the barrel then put a new lead in chamfer on it. Then cut the groove for the plastic peice that holds the barrel in place by the magazine clip.
It should slip right into the barrel housing. If not I’ll open up the diameter on the muzzle end of the housing that is basically the front sight. The barrel will probably stick out past that about 3 or so inches but will be no different than a AirForce Condor or Talon with the long barrels on them that stick out past the frame or shroud of the gun.
I think those mods should make for a accurate fast shooting gun that can operate on Co2 pressure with no extra modding to the valve or springs.
I think I will actually do this to a 1077 I got a week or so ago and put the WildFire air resivoir tube with the regulator in the 1077 just cause it is set up for Co2 pressure and new. I believe it should be a good accurate gun that gets good shot count and a good velocity.
I didn’t word that right on my last paragraph.
I (already) have the WildFire air resivoir tube in the 1077 for about a week now. And of course the the WildFire stock on it because of the air gauge.
No regulator yet and been filling to 1500 psi and shooting down to 900 psi with 36 shots or 3 clips in the magazine. And the gun is getting 795 fps with the 7.8 grain Daisy wadcutters. And that’s no mods inside the gun.
No problems yet. Shooting great and absalutly no leak down. But I have not went up above be 1500 psi. That will happen when the regulator goes in and the Maximus barrel gets done.
GF1,
That is one Frankengun I would be interested in hearing about. Sounds ambitious, but it also sounds doable and cool. Please report back when you get into it.
It’s too windy here today to do any shooting but I’m working outside on a knife project. I’m reshaping an Old Hickery Butcher knife into a Kephart style bushcraft knife. Then i’m going to mod a Kabar sheath to hold it. Can’t do the gringing in the house so today was a perfect opportunity to work outside.
Half
Half,
I think it was you a couple of days ago that wanted to know about filling the WildFire with a pump. My knee went out from the working the clutch on the tractor so I did some plinking.
I shot the WildFire from 1500 psi down to 900 psi. with 36 shots. I think that is the same as Gunfun is getting. I shot (H&N barracuda Green lead free pellets 6.48 gr.) at three cans one at 20 yards one at 17 yards and one at 15 yards. I was sitting resting my elbow on the shooting bench. Went 36 for 36 on the cans. Ok enough of that. Here is the refill data using a Benjamin pump.
It took 3 pumps to match the gun pressure of 900 psi.
..psi…2…psi……..pumps
..900…..1000………..4
1000…..1100………..8
1100…..1200………12
1200…..1300………17
1300…..1400………21
1400……1500……..25
1500……1600……..29
I ended up at 1600 before I remembered I was only filling to 1500 I will see how that goes. The pumping was not any effort at all at those low pressures. So 25 pumps and 3 to match 900 psi or 28 pumps from 900 to 1500 psi. My Gun gauge and my pump gauge matched real well, that was a first with those small gauges. The gun gauge matches my tank gauge also so the psi readings should be good.
With a 1500 psi fill my Wildfire is working good and is accurate. I still have a bitter taste in my mouth though from all it put me through.
Don
Benji-Don
The bitter taste only last for a little bit once you figure out what taste you like.
Yep 1500 psi sounds like the right taste to me.
And I’m going to set my regulator at around 1000 psi when I do up my SuperFire. So everything after the regulator will only see 1000 psi. I think the gun will work real good in many ways when I get it done.
GF1,
I just realized that I needed less than one pump per shot with the wildfire and the hand pump. So 28 pumps for 36 shots, that is efficient. Also pumping to 1500 psi is no effort at all. That is better than a single stroke.
Don
Benji-Don
Yep and my China compressor fills mine from 900 to 1500 psi in like 30 seconds from the time I hit the start and stop button.
I shot this new 1077 on Co2 for about 3 cartridges before I put the WildFire air tube in it. It was getting 48 good shots out of a cartridge. Plus the gun slowed up when rapid firing and that’s even with the high 70’s temperatures we have been getting. And the velocity on the Co2 was significantly lower than it is now on HPA. So you can imagine how fast I would go through Co2 cartridges. The HOA is definitely better.
So I got a real good filling about regulating it and the Maximus barrel. Yes it’s going to turn the 1077 into a $200+ gun. But I think it will be worth it. And it should last just as long as a 1077 does on Co2 with the lower regulated working pressure. I’m actually kind of excited to make it happen.
Don,
It was me and thank you. By my calculations that works out to less than .8 pumps per shot. That’s a real good return on effort. Now have you modded your gun in any way or are you getting that with everything stock?
Half
Half,
My gun is stock with a few replaced parts and non stock O-rings. Those numbers should be similar to a right out of the box gun. I did polish the valve seat. It also seems to match Gunfun’s WildFire.
Don
Benji-Don,
As I remember it Gunfun1 removed some parts and snipped some coils off of his trigger return spring to get his performance. Maybe those mods didn’t add as much performance as he thought.
If you haven’t looked into it yet, I encourage you to do a YouTube search for 1077 detent mod. It gave me about 40% more shots on my 1077s and Wildfires. I know you don’t want you risk making your Wildfire leak again, but maybe you could give it a shot on a 1077. The O-ring is a cheap part and gives a meaningful improvement.
Half
Halfstep
Mostly what the mods did was give a easier and faster trigger pull on my WildFire.
And my modded WildFire does use less air than the 1077 I have with the WildFire air tube in it now.
Half,
Thanks, I will check tha out.
Halfstep
Should be a pretty straight forward change over after the barrel work is done.
GF1,
Those changes should make a good repeater out of the WildFire/1077 platform. I will be interested in the results. I plan on giving the Dragonfly a good workout when it arives. It has a long way to go to beat my 1322 i have set up with the Maximus barrel. I will do some head to head testing. My WildFire is still working fine at 1500 psi with the scope on it. I will be putting the dot sight back on it next, I like it better than a scope on the WildFire.
The next three weeks are going to be buisy. The small olive orchard and garden will be giving me chores till i get things planted and the irrigation system set up. The rest of today will be discing and leveling the dry areas.
Don
Benji-Don
Yep like my dot sight on my 1077/WildFire.
Benji-Don
Well I did some more looking into the Maximus barrel swap in the 1077/WildFire.
It’s going to take a bit more work than I thought. As usual of course. But the Maximus barrel will need turned down to the same diameter of the 1077 barrel back at the breech end and about 3 inches long. When you take the mag out you will see what I mean.
So not to bad. Just one more step to do to the Maximus barrel that I didn’t see.
And I was out shooting the 1077 with the WildFire HPA air tube and the WildFire on Co2 which has the 1077 tube in it now. The HPA 1077 just way out performs the WildFire on Co2.
Shooting side by side I can definitely tell the difference between the two power sources.
GF1,
Just almost finished some chores. I figured you would need to turn down the barrel at the breech for a ways as long as you have access to a lathe that is not too big a deal. Got to love those Maximus barrels. They are not choked so you can work from both ends. You need to cot the breech anyway though.
As soon as I can be sure of getting a new process Marauder barrel in .22 I want to give one a try.
Don
Benji-Don
No problem with the lathe.
And I thought about either end. Maybe the muzzle end would be the way to go. But the crown chamfer would not be big enough. It looks like the 1077/WildFire barrel has a 60° lead in chamfer on the breech end of it’s barrel. So that would need done on either end which is no big deal. Then the other end cut and recrowned.
And how you going to know when you get a new process .22 Marauder barrel? Do you know what to look for when you look at the barrel?
GF1,
I have no idea how to know if i get the new process barrel. That is why I have not ordered one. I would think the new barrel would have a new part number. Also it could have a mark so Crosman can tell them apart.
Don
Benji-Don
I’m thinking they will use up all their old barrels first before they put the new barrels into production.
And from what I know how production goes there will be no identifying marks to know what’s what. That’s another step in the process they probably won’t do. It’s a easy thing to do. But still one more thing that takes time. And also probably paper work for traceability.
It would be simpler to just run out the old stock supply and then start using the new barrels.
Oh and ordered the Huma regulator today to get the SuperFire on it’s way. Going to order the Maximus barrel tomorrow.
To All,
Can anybody give me an idea on what is the longest pre load they have encountered? I’m gathering parts for a spring compressor and the part I have gives me about 4 to 5 inches allowance. Would that be enough? Thanks in advance for the replies.
Siraniko
Siraniko
5 inches in a Hatsan springer.
Gunfun1,
Thanks! Seems I had underestimated the amount thinking that three (3″) inches would be the longest. I suppose you got that measurement from your Webley Tomahawk? The crankhandle and screw from a hospital bed frame gives me about 5 or 6 inches of travel which should be capable of unforeseen scenarios.
Siraniko
Siraniko
The Tomahawk belongs to RidgeRunner if I remember right.
I had two different Hatsan springers. I don’t remember which one’s right now. But the one that had 5 inches was a .25 caliber. So they had it preloaded pretty heavy thinking it would help performance with the .25 caliber. And of course they were wrong. It was stupid rediculous to cock and it killed you everytime you shot it.
The other Hatsan was a .177 caliber. It wasn’t preloaded as bad as the .25 caliber. It only had about 3 inches. It wasn’t a good shooter either.
But I did cut the springs to about a 1/4″ preload and they were real nice shooting after that.
Siraniko,
I have seen 5 inches in an HW77K.
B.B.
B.B.,
5 inches?! That is a whole lot of preload for a rifle that seems to perform best at 12fpe from what I have read. Thanks very much for the info!
Siraniko
Siraniko,
It was a tuned gun that I got used. It was closer to 15 foot pounds.
B.B.
Halfstep,
RSS means Real Simple Syndication. This allows you to read every comment that comes into all the articles. If you are using the Firefox browser it’s just as simple as clicking the blue Comments RSS on the right hand side of the screen. If you are using Chrome you will have to look for an RSS aggregator to access this service.
Siraniko
Tom, side topic. I have been collecting some notes from years ago (The Airgun Letter days) and found the information about my P1 mainspring disassembly tool, trigger set screw modification, and more recently, the pellet trap. I was honored to see that you included a write up of my mainspring removal tool in your multi-part article about the P1 last year. In addition, it was great to see all of the positive comments from your readers as well. In checking my shop, I found the clamp with the modified pressure pad as well as the clear heavy walled tubing. Did I send you a series of picture or video about using the tool. Seems like so long ago…
Jim,
Welcome to the blog.
I think you must have sent me pictures of using the P1 disassembly tool, but I don’t remember clearly. I have kept that copy of The Airgun Letter and refer to it every time I take one apart.
Thanks,
B.B.
Interesting stuff as always. BB I hope you had a tetanus shot 🙂
Something I found interesting on hammer bounce:
https://www.facebook.com/search/top/?q=joe%20brancato%20the%20airgun%20scientist
Sorry, you have to look on that page to find the hammer bounce article. I could not figure out how to link more direct.
Idaho
Yep no good.
The only way that will work is if you copy and paste the whole article from Facebook. And I personally don’t like Facebook. I usually by pass anything from Facebook. But since you post all the time is the only reason I tryed to open it.
Joe B. Usually has some interesting info so it would be nice to see what you found.
Maybe someone here can post what you wanted to show.
Here’s the article. I thought the Marauder shooters would find it interesting.
What is Hammer Bounce? What are the negative issues / symptoms? How to eliminate it?
Hammer bounce is when the hammer strikes the valve of an airgun multiple times, resulting in wasted air, and a louder report.
For example, did you ever notice a stock Marauder makes a “PPPphhhtttt” or “Bbraaaattt” sound when it fires? (Kind of like making a raspberry sound with your lips). It isn’t a sharp “Crack”. That raspberry sound is the result of multiple hammer strikes against the valve (called “Hammer Bounce”). After the first time the hammer strikes the valve, the pellet leaves the barrel.
Any additional hammer strikes (bouncing) results in the following:
A) Wasted of air (and hence reduction of shots)
B) Louder report.
We did some intensive investigating on a Marauder and the results were amazing. (Below is a graph of just one of many tests we performed. Our criteria was simple. We considered “usable shots” as those that were within 20 F/S of the max velocity of the “Sweet Spot”. These shots were considered to result in a good, consistent group at most ranges.
PCP Airgun: Stock .25 cal Marauder
Pellet: JSB .25 cal x 25.39 grain
Shot count = 22 = Vmax to V(max-20) = number of shots between Max velocity, until 20 F/S less than max (see graph)
Velocity (stock, not adjusted) = 790 F/S
Power output per shot = 35.2 FPE
Total available power = 774 FPE = 22 shots x 35.2 FPE/Shot
Report/”Quiet-icity” = Meh, sounds like a “Raspberry”. Definite Hammer Bounce
PCP Airgun: .25 cal Marauder with HDD installed.
Pellet: JSB .25 cal x 25.39 grain
Shot count = 33 = Vmax to V(max-20) = number of shots between Max velocity, until 20 F/S less than max (see graph)
Velocity (stock, not adjusted) = 840 F/S (this is where it just happened to result in a typical install)
Power output per shot = 39.8 FPE
Total available power increased by 70%! = 1313 FPE = 33 shots x 39.8 FPE/Shot
Report/”Quiet-icity” = MUCH QUIETER! No more “Raspberry” sound, more like a “pop” or “crack” resulting from a single hammer hit.
Conclusion:
After we modified the Marauder with the HDD, we got the following results (see graph below)
1) Shot Count increased from 22 shots to 33 shots. That’s a 50% increase in shot count!
2) Power INCREASED 15.7% from 25.4 FPE, 29.4 FPE
3) Shot Report / “Quiet-icity” MUCH quieter resulting from much less air was being released each shot (hammer wasn’t bouncing on the valve) I always enjoy watching people as they hear the “Before” and “After” results.
4) Power Increase. It should be noted that we could have adjusted the power up and down as wished. We set up the Marauder as we would normally. The power increase in this test gun was from following the directions to install the HDD. Power could also have been changed if wished, back to what the rifle originally shot stock (790 F/S) resulting in even more shots. The point to be made is Shot Count rose 50% AND we could still adjust the Marauder for 15.7% more power.
For more reviews, “geeky” information, etc. on airguns, please either watch the Airgun Scientist on Youtube at https://tinyurl.com/AirGunScientist-com or visit us on FaceBook at https://www.facebook.com/AirgunScientist/
We also have a chat group where you can ask questions, post pictures, etc. at https://www.facebook.com/groups/pcpairgunners/
Please tell your friends and share this page so others may benefit.
Take care, and GOD bless
Joe <
Idaho
There are a few different versions of the anti-bounce mod.
I had a heavily modified double air resivoir .25 caliber Marauder that was making up at 70 fpe. I used the simple o-ring mod that consisted of about 3 o-rings in front of the striker.
I can say yes it works. It’s like a regulator on the exhaust side of the valve instead of the intake side of the valve.
That’s why I did it to that Marauder. I needed all the help I could get with air use. I was lucky to get 10 consistent usable shots per fill with that gun. After the double resivoir I was getting around 17 usable shots. After the o-ring anti-bounce mod I was around 23 shots per fill. So back to the original shot count. But now with 30 more fpe than factory. 40+30=70fpe.
And yes the anti-bounce devices definitely make more consistent usable shots.
GF
I figured it would be old hat for you. With the improved air efficiency, it seems like a no brainer mod as long as it is reliable.
Idaho
I would say it’s strongly related to how your Wolverine works.
Different technique. But same results.
The Toys that Shoot Airgun Show was held today in Findlay, Ohio. Here’s some pics from the show.
http://anotherairgunblog.blogspot.com/2018/04/13th-annual-toys-that-shoot-airgun-show.html
Derrick,
Fine job with the pics! Thank you for sharing. Given 500$, I would not even know where to begin shopping. 😉
Derrick,
Thank you for those pictures! It looks like the Findlay show was a success!
B.B.
Derrick
Way to much cool stuff.
Looks like only one 300 that I recall.
That’s the problem with shows and as we called them with thold cars. (Swap meets).
I never ever have enough money.
Here’s some info I gathered today after I posted earlier about the fill time with my China pump and the 1077 WildFire conversion.
This time around I used a app for my Android phone. When I gave the info earlier I was counting off the time. So not very accurate. The app is called “Simple Stopwatch” and it is at that. It has start, stop and reset. Simple but effective as I say.
But here’s some fill times for the pcp guns I have now. And I didn’t do the QB79 because it takes to many shots to empty the bottle with the regulated Air Venturi HPA bottle before I could refill it. It will have to come later. Or just base it off the Gauntlet. It will work out close to the same.
Hpa 1077/WildFire…17 seconds…900-1500 psi
Gauntlet….1 minute 30 seconds…1300-3000 psi
Maximus…1 minute…900-3000 psi
Condor SS…1 minute…30 seconds…1700-2500 psi
And notice I listed them in smallest air resivoir to biggest.
Whoops messed up.
The Maximus should of been before the Gauntlet.
Anybody ever owned one of these. Found it when we was opening some boxes tonight from when we moved about 3 or so years ago. It was in a box marked bedroom extras.??? Now I’m going what and the heck did we label that box like that for.
It’s not my old Benjamin pistol I called my snake gun when I was a kid. But it is a one I had some time back. I had to be in my late 20’s when I bought it.
It still pumps very strong. The pump seal still is soft as well as the bolt o-ring. I’m going to shoot it tommorow and see what happens.
Now to find my old Benjamin .22 pump pistol I called my snake gun as well as my old 760 wood stock, pump handle with steel receiver and rifled barrel. They are suppose to be out at my brother’s house. I have to see the next time I’m there.
GF1,
That is a beauty. It seems to have some Crosman characteristis, if the barrel is soldered to the pump tube then it may be benjamin/sheridan. In any case if you want to sell it let me know.
I ben watching for a old benjamin pistol with the tootsie roll pump handle also.
Benji-Don
When I bought it. It was called a Benjamin.
Tell me. Is it soldered?
Yep
Benji-Don
If “yep” meant Benjamin ok.
If it meant soldered. How did they do it. With a propane torch and swedged the solder at the front sight and breech?
Yep, Benjamin,
I would love to see how they solder the barrel breech and sight to the pump tube. I have tried by hand with propane, map gas, and oxy acetylene, I have had some success but none looked good.
It must be one of the last Benjamin pistoles!
Don
Benji-Don
I’m sure there is a technique to the soldering.
And you asked above about selling it. Saying no real quick. I had this gun for a long time and don’t know why.
Well thinking more I do know why. It would pop into my face throughout time and I just pick it up and look at it. Then I say to myself. Just put it back where you found it. So that’s how it kind of surved staying with me. No real sentimental value. It’s just that I have it and it’s old and I like it.
But now I’m going to shoot it like it was meant to do. Just like it was made for back then.
And man its definitely got the hard pump happening still. Reminds me of my old Benji 392 I had as a kid. A good ole solid gun. And the cocking knob is still smooth as can be.
It’s really making me want to get a new 392. I have debated getting one again. I think I will now after holding this gun again. What more can I say.
Benji-Don,
Without ever seeing one it would be hard for me to say, but sheet solder and induction heating may have been the technique.
Half
Halfstep
Without searching that sounds like a thin peice of solder that’s like aluminum foil is inserted inbetween the two metals then heated up.
That would be a easier way to control the process I would think yhan wire solder.
GF1,
You got it! It’s a technique they used at GE. Sometimes with lead/tin solder but, more commonly, with silver solder. It all gets clamped in a fixture and heated together by inductance. The solder melts and everything cools and you end up with a very uniform solder joint.
Half
Halfstep
Also known as swedging.
That’s more or less what happens when soldering copper joints.
The solder gets sucked into where the heat is.
Benji-Don
Just looked at the picture closer.
At the muzzle end it says Benjamin Sheridan.
Oh and yep Benjamin before Crosman bought Benjamin they both resembled each other. I thought too.
GF1,
I went to the crosman site for user manuals. It is a Benjamin model 237. They have the parts diagram in the manual.
Did not think you would be selling but had to try.
Don
Benji-Don
On the gun it says H9A.
And you said it’s called a model 237.
I just looked at the 237 and that’s a .22 caliber. So that’s not it cause it’s .177 caliber.
GF1,
Maybe, but 232 is .22 caliber and 237 is .177 caliber. Read the description. I will check in tomorrow my lights are getting dim. The H9A sounds familiar though.
Benji-Don
Both numbers say .22 caliber.
Hmm another mystery gun?
GF1,
I spent quite a bit of time off and on this AM looking it up. The Blue Book did not mention it specifically. Sheridan/Benjamin/Crosman kind of played it fast and loose on stampings/#’s/models for awhile it seems. I did find this:
https://www.youtube.com/watch?v=SJZNgBJjkfI
So the H9A was made in .177 also.
E-bay turned up 2 and Baker Air Guns appears to have had one for sale. It was an H9 I do believe. I do not know the difference between a H9 and a H9A.
At any rate, nice pistol. I would really be interested to know it’s full history and identification and where it fits into the Benjamin/Sheridan lineage.
GF1,
Also, this link has quite a bit of discussion on the H9A series.
https://www.gatewaytoairguns.org/GTA/index.php?topic=128642.0
Chris
Thanks for taking the time to gather all that info.
I’m getting ready to go out and shoot it in a minute. Was wanting to chrony it but it’s colder out today and it’s misting rain. I guess I could chrony it out in the garage. Will have to see. But I did shoot it with a JSB 10.34 a couple times into a 2×4 with the muzzle about 3 inches away. The back of the pellet was in the wood about a 1/8″ deep. So with other guns that usually ends up at around 650 fps when I chrony. If that is what it chronys I say that would be respectful power for that gun.
And I want to see how accurate it actually is. I don’t really remember what I used this pistol for. Plinking I would say more than likely.
GF1,
The Blue Book had models that looked identical. (*= pictured)
H17 ’91-99 *
HB17 New ’99 *
Mod. 237 ’85 only
Mod. 247 ’80-’92
HB22 New ’99 (.22) *
Mod. 242 ’86-’92 (.22) *
These were all under the Benjamin section. The Crosman section had nothing shown like what you have. Note: The Gateway blog had it listed as a HE17 also, but that showed up in neither the Benjamin or Crosman section. Sheridan pistols were all .20 cal., if not mistaken, and showed none like yours.
From the info. available, yours seems to be a bit of an oddity. Always a good thing! 😉
Chris
Stamped on the gun it also says after Benjamin/Sheridan it gives part of the address it was manufactured at I suppose. “E Bloomfield NY USA 14443.
Someone probably knows when they were being made there.
And yep cool gun. And this gun looks like it just came out of the box. Bluing all still good, no rust or Knicks on the metal or wood.
Hmm you don’t hear that often anymore.
“Metal and Wood”
🙂
GF1,
Per the Blue Book,….
In ’77, Benjamin bought Sheridian in Racine Wisconsin and moved production there from ’86-’94. In ’91 they started to merge the Benjamin and Sheridan and the pistol models shifted to the Sheridan design and were marketed as Benjamin/Sheridan. (not word for word) The N.Y address seems to be prior and after.
The pictured Mod. 242 list at $100 @ 100% condition. Add 10% for wood grips and 5% for box and instruction sheet. The HB22 says to add 10% for a Wisconsin address and list at $130 in 100% condition.
That one on E-Bay had a 150 bid that did not meet reserve and had a buy now of 300.
Get ya’ a Blue Book! That goes for the rest of ya’ too! 😉
Chris
That sounds right on the time frame. Probably bought it late 80’s to early 90’s.
And yes I should get a blue book just because.
GF1,
If you do,.. I will warn you ahead of time,…. you will see and want more air guns than you ever knew you wanted!
Chris
I knew there was a reason I don’t have a blue book yet. 😉
And I already got that problem even without having a blue book. Just imagine if what will happen if I get one.
I better win the lottery fast. 🙂
Benji-Don
Go to the bottom.
GF1,
Benjamin model numbers end with the caliber. A 237 has to be .177. The same gun in .22 is a 232.
The barrel soldering is done on a massive wave soldering machine that is probably the only one of its kind in existence.
B.B.
BB
Yep knew that about the last digit. But the model number is what I was wondering about. It’s stamped H9A Benjamin/Sheridan on the gun. So wasn’t sure about the model number. Most guns have the model number stamped on the guns.
Anyway just glad I found it again. Going to keep it out and shoot it now.
And wonder if they even use that soldering machine anymore. I bet not. Wouldn’t that be a cool peice of equipment to get a hold of.
GF1,
They still use the machine to make 392s and 397s. It’s about 20 feet long and includes a circular station that’s about 12 feet wide and 12 feet tall. Kinda tight for a garage! 🙂
B.B.
BB
Oh yeah. What was I thinking. Forgot about the 392 and 397.
And those dimensions you gave pretty well describes the production machines we have.
Search “Hydromat Epic machines”. You’ll see what I mean.
BB
Forgot to say after you search it click on the image page. Or even video’s. There are some cool video’s of them operating. Most machines have 2 and 3 axis cutting stations on the machines now days.
BB
Here check this out. This is what through me.
This is from Crosman. See how it says “Pnuematic .22 Pellet Pistol – Wood Grips” for the 237 info.
The .22 caliber is a misprint. It should say .177 caliber.
Here look.
Model Number 237
Name / Description Pneumatic .22 Pellet Pistol – Wood Grips
Dates of Manufacture 1986-1988
Parts Availability Parts not available through Crosman.
Owner’s Manual B237-OM.pdf
Parts Diagram Not Available
GF1,
Yep, that’s a human error.
B.B.
BB
Yep figured that out after I looked up both the 232 and 237 on the Crosman site today.
GF1,
Here is the manual it covers both .177 and .22
https://support.crosman.com/hc/en-us/article_attachments/201590790/B237-OM.pdf
Just shot it.
Looks like I had it sighted at 25 yards with 7 pumps. Well that’s using the JSB 10.34’s. Back when I bought it I’m sure I wash using Crosman pellets. And I’m sure wadcutters. I’m betting I was using this pistol in and around the barn on the farm getting sparrows and mice.
And I just looked down the barrel from the muzzle end with a bright light at the breech end. The rifling is sharp and shiny spotless inside. Oh and it’s steel not brass. It does have a brass peice at the breech end that just goes past the transfer port and turns to steel. And I’m 100% sure of this. I thought they were brass from the breech to the muzzle. From the way it looks I didn’t shoot this gun much at all.
I’m going to try to shoot some group’s at 15 yards first and see what happens. Then I’ll try some at 25 yards.
Well here is a 10 shot group at 15 yards. Then another 10 shot group at 25 yards.
I was wresting the pump handle on the bag with the trigger gaurd against the bag. And the trigger breaks very clean. It’s slot like the 1322/77 and 2240 triggers. But lighter. And I’m sure it’s factory still I wasn’t into modding them back then. I just shot them.
And here is 15 yards and the wind is right to left at about 4 mph. This gun is more accurate than I am especially with open sights from what I’m seeing.
This is s .500″ group.
Same conditions at 25 yards. It’s about a 1-1/2″ group.
Looks like the pistols worth is going up!
Benji-Don
Not really worried about worth.
I’m just happy it’s still pumping and shooting strong.
GF1,
I admittedly do not keep up on air pistol accuracy,.. but for 15 and 25 yards I would say that is exceptional!!!!,… especially since you said it was tuff with the open sights.
Chris
Yep I think so too. The sights are pretty easy to see actually. And no dovetail so no scope mounting on this one. Which is ok. I’m still forcing myself to keep on top of open sight shooting.
GF1
That will hit a tomato paste or Vienna Sausage can every time! That’s a great shooter you’ve got there.
Half
Halfstep
I’m liking it. Glad I found it again. I shot it pretty much yesterday. Definitely a fun solid little gun.
B.B.,
With GF1’s recent “find”,.. and the seemingly lack of any/much info.,… I have a question:
** Just how much of what is “out there” is represented in the Blue Book? **
Being from the more common names of Crosman/Sheridan/Benjamin,.. I would have thought that a H9A would have shown up somewhere.
Chris
Chris
I know BB knows more about this than me. But I bet there are more guns that slip under the radar.
And now thinking about it. Who did write the blue book? And do they have updated versions as time goes.
That would be hard to do to keep up it all.
Either way I’m glad you found the info for me. Good detective work. 😉
GF1,
For what is,.. or not,… out there,… the Blue Book crew does ONE HECK of an exceptional job! Yes,… they update from the oldest to the newest. Get ya’ one already and get ya’ a 499 too while you are putting your order in!!! 😉
Chris
What I’m getting at is how often do they update the blue book with the latest and greatest.
Once a year, every 6 months? Maybe every 5 years?
I’m sure they are pretty accurate. But like you. I wonder how many are missing. And how long does it take for them to add the new finds to a updated book.
GF1,
(Mr. B.B. himself would be the one to answer that question). He is featured several times throughout the book quite prominently if I do recall correctly. My guess is it every 1-2 years but I have nothing to base that on other than my time here. Heck,… if they don’t do at least one a year they are going to have an impossible time keeping up with all the new releases.
Chris
Sounds like a on going job to me.
GF1,
The Blue Book is written by many authors, with Robert Beeman and John Allen being the principals. I even write for it.
The current edition is the 12th.
B.B.
BB
Who has the responsibility of updating it?
In other words who gets the ball rolling to update for the next edition?
How does it all come together?
GF1,
As for any type of timeline,… I came on board in late ’14 and my 11th edition is copyright ’14. I got it in early ’15 if I recall. If I recall, they were out of stock last year (’17) and the 12th just came out. So that is around 3-4 years. Mine is 736 pages and so is the new one. (That is a bit puzzling) The price on P.A. is $35 for the 12th and is still an absolute steal.
Chris
Yep kind of strange with the same amount of pages.
But I still need to get one.
GF1,
Steve Fjestad, the owner of Blue Book Publications make the decision based on sales and how much the airgun scene has changed. We are overdue for another issue.
B.B.
BB
Thanks for the info.
Benji-Don
If you look at that manual you just posted for the 232 and 237 the parts digram shows what I’m pretty sure to be a molded plastic pistol grip. And with checkering.
My gun has wood grips and no checkering.
The 237 is similar to the H9A I have but I believe not the same gun.
I just noticed it says optional American walnut grips. So I guess it is a 237.
GF1,
I wish I could remember what I knew about the H9A I think it is tied to the 347/342 rifles. The 237 looks the same but may have something different inside.
Don
Benji-Don
Now you got me questioning if I had a 392 as a kid.
Maybe I had a 342???
GF1,
See below I replied to myself.
I bet it was a 342 they transitioned from the 312 (solid pins) to the 392 (roll pins). I think the 392 came out in 1995.
Benji-Don
It had to be a 342 then that I had. I had that gun in around 71 or 72.
It has optional walnut grips listed in the specifications.
Benji-Don
We was posting at the same time. But yep saw that.
Kenny Kormendy at myairgunreviews just posted a test of pellet weights from 15 different manufacturers. Some were pretty close to the stated weight and some were off quite a bit. His process is to place 10 pellets on the scale and then divide by 10 to get the average weight. Just some FYI.
Geo
In the end what does it matter. Other than reparability from tin to tin.
So basically log those weights and purchaseore pellets and see if they compare.
But one thing is missing. The shooting results. That’s what would make the difference on the next tin if the test was done again.
GF,
I agree, it probably does not make a lot of difference in performance. It will make a little difference if one it calculating the FPE, but not sure how much. I think the test was to show that the pellet weights shown on the tin by some manufacturers are not very accurate. It did show that JSB pellets were on the money, and we know already how consistent they are in size. They do appear to be the primo pellets and maybe that’s the reason they work so well in many airguns.
Geo
Yep on the weight. But also fit of the pellet, skirt thickness and more. So it all matters in one way or another.
I use to sort pellets and that was multiple different brands and such. I ended up finding out the JSB pellets were the most consistent shooting right out of the tin. There was other brands that were close right out of the tin like the H&N pellets.
It all boils down to you got to try them in each gun you own and see how they perform. One pellet that works in one gun might not work in other guns.
Totally agree 🙂
Geo
Yep.
“Also if your B3 is powerful and accurate like this one, this work will make it so much better.”
If this B3 is powerful and accurate then I am rich and handsome!
cool 🙂 as you might noticed B3’s spring has about 36 rounds or whatever they call it but B2 got a 32 rounded one
don’t know what was the point but I guess B3 is more powerful
http://www.airrifle-china.com/products_detail/productId=33.html