by Tom Gaylord
Writing as B.B. Pelletier
Today’s report is Part 5 of reader Vana’s excellent report on stock making. This one was delayed because of the SHOT Show, followed by my need to catch up on reports followed by my forgetting I had it — and Part 6 that’s still to come.
If you’d like to write a guest post for this blog, please email me.
And now, over to you, Hank.

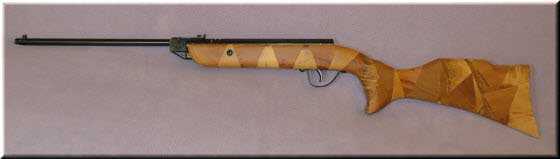
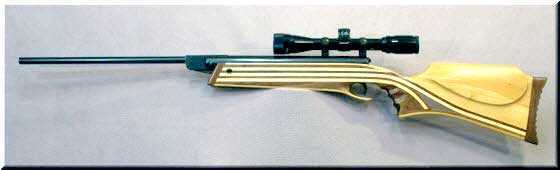
This is my original 55 year old Slavia 618 in its new “firewood” stock. I made this one in a “camo” style, using cherry and maple blocks in a random arrangement of the pieces.
This report covers:
- Preparing for finishing
- Cabinet Scrapers (aka Card Scrapers)
- Sandpaper and sanding
- Steel wool
- Preparing the surface
- Smoothing the wood
- Fancy it up
- Checkering
- Stippling
- Carving
- Accent pieces
- Accessories
- Summary
Preparing for finishing
In this part I will discuss the hand-tools that I use to finish the stock and how I use them. The stock, having been shaped with rasps, files and coarse sandpaper, will have scratches, bumps and flats that need to be smoothed out before I can even think about applying a finish. Electric sanders are useful time savers but you can easily get by without them. In truth, I like sanding, and find the quiet time I spend working on the wood relaxing.
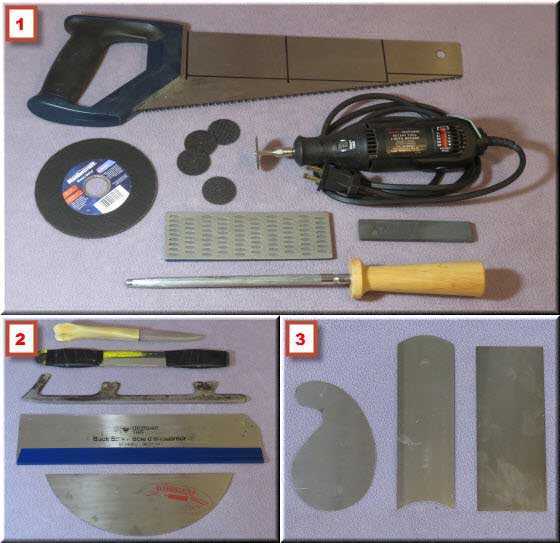
#1 shows the material (an old saw) and the tools I use to make my scraper.
#2 a knife and some improvised scrapers are tools that I use for making boats, bows and stocks.
#3 is a commercial scraper set with shapes that work well for a variety of applications.
Cabinet Scrapers (aka Card Scrapers)
Scrapers are excellent for quickly smoothing/shaping rough surfaces in preparation for finishing. A scraper is a flat piece of steel that has a small razor-sharp burr burnished along its edge. Dragging a scraper over the wood will remove fine shavings in a controlled manner. With a bit of practice, very smooth finishes can be achieved with the scraper alone.
Scrapers are available in a variety of shapes to suit the flat, convex or concave surfaces to be shaped. For rifle stocks, a rectangular one 3-4 inches wide and 2-4 inches high is good for most of the work.
I custom make my scrapers by cutting them from an old hand-saw blade with a Dremel tool or an angle-grinder, squaring up the edge with a wet-stone and burnishing on a burr. The smooth shank of a “butcher’s steel” (a hardened steel rod used for aligning the edge on a knife) just above the handle makes an ideal burnishing tool. The shank of a twist-drill mounted in a dowel can be also be used for burnishing or, in a pinch, even the shaft of a screwdriver. Since making a scraper is quick and easy I always have a sharp scraper in the exact shape I want. For detailed videos on how to shape, sharpen and use these effective tools, google “cabinet scraper”.
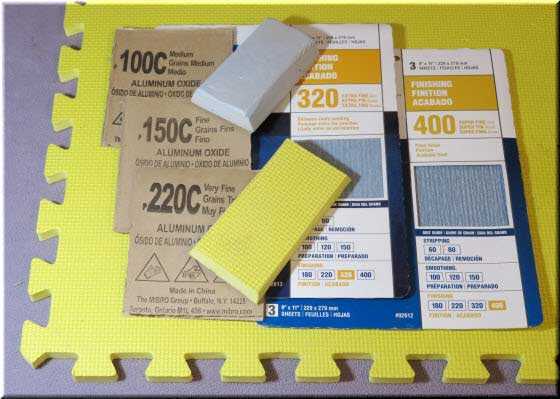
Here is the stuff I use for smoothing and finishing my stocks. The chamfer on the sides of the sanding blocks makes it easier to hold the sandpaper in place which allows a more relaxed grip and avoids hand fatigue.
Sandpaper and sanding
Sandpaper is fairly straightforward stuff; it works by abrading what it is rubbed against. You start with coarse grit (which leaves deep scratches) and work your way through the different grades (which leave smaller and smaller scratches) until you reach the finish that you want.
Choosing the right grit of sand paper is a compromise between having fewer large cutting edges or many smaller edges to remove the wood. The amount of wood to be removed and the hardness of the wood determine which grit I select.
With softer woods I use fairly coarse sandpaper and a light touch to get a nice finish. Hardwoods show scratches easily so I prefer finer sandpaper, again with a light touch, to remove them.
I emphasize a “light touch” because sandpaper (like all edged tools) cuts best when it is not forced. Being heavy-handed will just break off the grit, dulling it and clogging the cutting edges — neither will cut well. I listen to the sandpaper and feel it cutting. When it gets clogged I’ll knock the dust out and continue, if it stops cutting get a fresh piece — working with dull sandpaper is a waste of time and effort.
To avoid humps and hollows that are very noticeable on a smooth, glossy surface, I use a sanding block. For a block, I used a piece of blue foam (the rigid insulation panels made from extruded polystyrene that is used on the construction sites) cut an inch narrower than a quarter sheet of sandpaper and chamfered so that the top is ½” narrower than the bottom surface. I find that the chamfer makes it easier to hold the sandpaper in place.
A piece of wood can be used as a sanding block, as can the high-density flexible foam used in those lock-together floor tiles. I used the blue foam because it is light and won’t leave a dent if I bump the stock with it. The high-density foam works well and is more durable than the blue foam but I find it a bit thin to hold comfortably. I plan on laminating two thickness of the yellow foam together with a flexible adhesive and cutting out a couple of sanding blocks with the tables aw.
Steel wool
Steel wool is essentially a wad of fine sharp-edged wire. It is available from Grade #3 – very coarse, to #0000 (aka “steel fur”) which is very fine. For stocks I use the Grade #00 and #0000. These finer grades of steel wool don’t leave scratches the way sandpaper does.
Steel wool cuts by slicing and scraping which makes it ideal for removing fine bits of grain that sandpaper leaves and for removing the shine from a coat of varnish in preparation for the next coat. Steel wool works best when it is not compacted so I will frequently fluff it up to remove the dust and expose fresh cutting edges.
Where sandpaper will flatten humps and bumps, steel wool will conform to the contours closely. Typically I will use sandpaper and/or a scraper to flatten the surface and steel wool to polish it.
Preparing the surface
Wood, being an unrefined natural material, frequently has knots, resin pockets, drying checks and even insect holes. A perfect piece of wood would have a straight grain and be free of all of these “features” — it would also be boring (no figure) and very expensive. While a poor piece of wood should be avoided, typical boards will have minor imperfections that are easy to correct.
Knots are considerably harder than the rest of the wood and will require special attention such as using a sharp file instead of a rasp or fresh fine grit sandpaper when working that area. Small knots are rarely a problem and larger loose ones can be locked in place with CA glue (i.e. superglue).
Cracks and voids need to be well cleaned before filling. I like to prime deep cracks with thin CA glue to stabilize them. There is a variety of stainable wood fillers available and a bit of research will help in selecting one. I often make my own filler by packing the void with sawdust and adding a drop of CA glue. This works well but it takes a bit of experimenting to get the color correct, an alternative is to add a contrasting color — I have used old (dry) coffee grounds to fill knots and the patch looks like it belongs there.
Smoothing the wood
With the stock shaped it is time to remove the tooling marks and prepare the surface for the finish. The smoother and glossier the final surface is the more it will show any scratches beneath it. I use a combination of scraping and sanding to get where I want to be.
Sanding removes roughness. Trying to smooth a rough or deeply scratched surface with a grit that’s too fine will take forever. The fastest way to a smooth surface is to work from coarse to fine grit without skipping a grit size.
The coarser grits remove soft material well, with minimal clogging and doesn’t scratch deeply into the surface if used gently. For softwoods I’ll start off with 100 grit sandpaper and work my way up to 220 grit.
In hardwoods the sharp grains of the sandpaper don’t cut as deep as they do in softwoods, so having more cutting edges (finer grit) will remove material better than coarser grits. For hardwoods I’ll start at 150 grit and step up through the papers to 400 grit.
During rasping, scraping and sanding fine wood fibers will be pressed down and trapped. Applying a finish to the wood will raise these fiber “whiskers” and roughen the surface. To prevent this from happening I blot the wood surface with a damp (not wet) cloth to raise the whiskers and dry with a heat gun or hair-dryer. When dry I go over the whole stock with #0000 steel wool to slice the raised fibers off. You may have to do this a couple of times before it stops feeling “furry”.
Fancy it up
There are lots of ways to personalize a stock and what I choose to do will depend on how the stock will be used, the type and figure of the wood and how much time I want to invest. The first decision is whether the work is to be functional — like checkering for a better grip — or decorative, like some relief carving on the butt. To my mind, a stock with a lot of figure to the grain needs little embellishment, where a plain stock would benefit from it. Like I said, this is a personal thing so feel free to express yourself!
Please keep in mind that softwood will not hold fine details as well as hardwood but it is possible to fortify the wood with thin CA glue. I practice on scrap to see if I like the way it looks.
The wood I chose for my stocks usually has a lot of character so I will usually forgo any decoration and rely on form, contrasts and grain patterns to show it off. That’s my style but still, there is always room for embellishments.
Most of the commercially made stocks have their details pressed into the wood or laser cut. For our custom stocks we also have a couple of options to choose from.

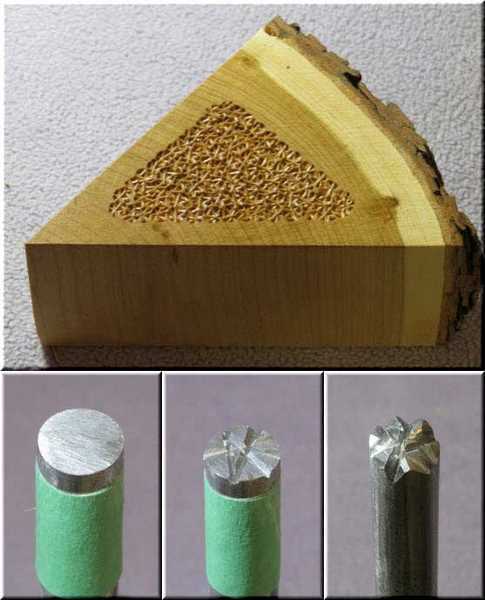
I was curious how the relatively soft cherry end-grain would take checkering so I did a (very) fast test using the No. 1, 2, & 3 cutters. Ignoring where I messed up a couple of lines, the diamonds look ok.
Checkering
Checkering can be functional and decorative; it is a traditional thing and I like that. The checkering tool is like a set of files configured in an array so that they will cut parallel lines in wood. Cutting intersecting patterns of lines will form the checkering “diamonds”. The tools themselves are reasonably priced and not difficult to learn to use though it does take some practice to get a feel for how they work. Tools are available in a variety of pitches, my set cuts 18 lines-per-inch (LPI) which I feel is a good compromise in-between too coarse and too fine. For those who are interested, here is a link to a video that gives a good overview of the checkering tools and how they are used. that gives a good overview of the checkering tools and how they are used.
Stippling
Stippling is the process of hammering a pattern into wood (or melting one into plastic) to create a textured surface. A whole range of stippling tools in different sizes, shapes and patterns are commercially available. A quick google of “stippling tools” will show dozens of percussion punches and stippling tips that attach to a soldering iron.
I like stippling with a punch that both cuts and compresses the pattern into the wood as it leaves a crisper texture. A large punch prints a noticeable pattern that is difficult to disguise; I find that distracts from the effect I like, so I use a small punch (3/16 inch diameter) and rotate it after each strike. Rotating the punch confuses the pattern and makes the whole stippled area appear to be homogenous.
I made my stippling punch from a large nail and shaped the sharp-edged teeth with a needle file. You can also make one from a suitable bolt or an old screwdriver shaft.
Carving
Carving is a whole other world to explore. Borders, initials, animals and complete scenes are all possibilities. I have done a bit of relief carving on stocks and plan to do more. It’s definitely a way to personalize a stock if you are so inclined. Softwood stocks take well to wood-burning so that is an option if working with construction materials like fir or spruce.
Here is my FWB 124 wearing a maple and walnut stock. I was experimenting with contrasts but didn’t expect the walnut to darken as much as it did. The walnut accents on the forend, grip and butt help to visually tie things together but I need to replace part of the maple cheek-piece with a chunk of walnut to tone it down.
Accent pieces
Contrasting pieces of wood are a simple way of adding highlights to a stock – just glue them in place and shape them as you go. The end of the forend, the bottom of the grip and the butt of the stock are all suitable locations. I find that it’s best to be subtle and not overdo the contrast thing, as it can detract from the stock as a whole.
I have made a couple of stocks where I used pallet wood with big, ugly, knots in it. Strategically located, the wild swirling grain around the knot and the contrasting colors looked awesome when finished. In hindsight, I think that is how thumbhole stocks were invented.
Accessories
If you intend to mount a bipod or add sling swivels you should keep that in mind when designing the stock. Be sure that the mounting areas are large enough, are at the correct angle and have sufficient wood to hold the mounting hardware. Wherever possible/practical I like to embed a threaded metal insert and use a machine screw to mount my accessories. In very thin areas it is sometimes best to mount a stud (a machine screw glued into the stock) for attaching the accessory.
For powerful springers (aka sproingers) or any rifle that has heavy or sharp recoil it is often a good idea to add a pillar and screw cups to help secure the receiver to the stock. Pillars are closely fitted metal tubes that are threaded and/or glued into the stock and so that more force can be applied to the mounting bolt. Screw cups are designed to spread the compression force of tightening the screws over a larger area to protect the wood.
Summary
At this point all that remains is to give the stock a thorough vacuuming to clean out the pores of the wood. Now we are finally ready for the final part — the finishing.


Hank,
Again a very clear and concise explanation on preparing the wood surface. Thank you very much for this series of articles. I have used an old type chalkboard eraser as a sanding block. Never thought of using a piece of foam as a sanding block though. I have used a blunted 3 inch nail for stippling. I had not realized that you can make one with a different kind of pattern. Might give that a try someday.
Siraniko
PS: Section Checkering first paragraph last sentence: “For those who are interested, (For those who are interested, [double entry]) here is a link to a video that gives a good overview of the checkering tools and how they are used. that gives a good overview of the checkering tools and how they are used.
Siraniko,
Got it. Thanks,
B.B.
B.B.,
Unless you haven’t actually gotten ROUND TUIT…the extra: “that gives a good overview of the checkering tools and how they are used.” is still hanging on!
shootski
shootski,
Don’t know what you refer to. I watcher the Larry Potterfield video.
B.B.
B.B.,
Siraniko’s above suggested correction in CHECKERING seems to not have taken. The extra partial sentence repeat still hangs on at the end. I even reloaded the page again just to be certain it wasn’t from an Internet Server Cache!
shootski
shootski,
If you are referring to the double “For those who are interested” it’s gone. I can’t see it anymore.
Is there something else?
B.B.,
Yes. It is gone now.
Did you see my post on the http://www.big45metalcleaner.com
I’m going to order some and give it a try.
Thanks!
shootski
shootski,
How ’bout you try some and tell me what you think? I just bought some Krytox for an upcoming test and I’d like to hold off for awhile.
B.B.
B.B.,
That’s the plan on the 45!
I use Krytox on my bicycle chains (among other things)and it works really well keeping the chain clean and doubling the chain life.
shootski
Siraniko,
Glad that you are enjoying this series!
These are methods that I use and that work for me, lots of other ways of doing things. Hope that readers that do woodworking will chime in with their methods and suggestions.
Cheers!
Hank
Vana2,
Have you tried the HOT sand in a cloth bag technique to shade parts of the wood’s surface? My dad was a Tischlerei Apprentice (until he got kicked out and went to music conservatory!) he taught me how to do that when I was trying to match pieces of wood from two different wrecked automobile dashboards to come up with one service able one. I only needed to match the shade but he taught me how to feather edges, do delicate burns and sharp edged lines using metal stencils with the little HOT bags of sand.
shootski
shootski,
The hot sand bag technique is new to me but I will look into it as I can see that it would have some good applications for me.
I have used the Shou Sugi Ban technique on a number of stocks with some very nice results. I debated including it in this series but it is not compatible with glued joints (the heat causes them to separate) os I left it out. The “Inspire Woodcraft” channel on You-tube has a nice series of videos on Shou Sugi Ban.
Hank
Vana,
Super report! Love the idea of the foam backer for sandpaper and the scraper’s edge.
With the cut back of shop class in school, these skills might be lost.
-Y
Yogi,
These are little tricks that I have learned over the years by sharing ideas with others who have similar interests.
Shop class may be history but it is amazing what you can find on the WEB!
Hank
Hank,
Another excellent installment. Little tips like using coarser grits for softer woods and the opposite for harder woods seems contrary to what most people would think. The use(s) of steel wool was interesting as well. The scrapers are interesting too. I have seen heat guns and scraper’s to remove paint and other finishes by softening the finish.
I find a parallel to air gunning in general in that,… at the beginning,…. you think (air gun + pellets = done). Only to find yourself a few years later with enough stuff, bobbles and accessory’s to fill small room,… not to mention any custom, homemade stuff. 🙂
Looking forwards to the last report.
Good Day to you and to all,……. Chris
Chris,
My father has a european upbringing where the things he was taught are more detailed/demanding than they are here in north america. He taught me to observe – look, question; see and analyze when I was very young.
He always said: The tools and materials teach you if you watch and listen closely. Lot of truth in that.
…I always do what my Rice Crispies tell me to LOL!
Hank
Vana 2,
Absolutely Hank!
Your woodwork skill SNAPS, CRACKLES and POPS!
Your Guest Blog content and wordsmithing continues to make it super easy to comprehend.
Spot On! BRAVO!!!
shootski
Thanks shootski!!
Hank
Hank,
Awesome! I have learned so much in your class. I guess for the final exam we are going to have to build a stock?
What you have done with your horizontal laminations is incredible. I have never seen such before, likely because of the additional mental and physical effort involved. The only real issue I have with them is I would be afraid to take such out as I would fear dinging or scratching it.
RR,
Darn!! Is my college professor background showing that badly??? Sorry ’bout that!
… but since you mention it, making your own stock would be a good “exam”!
The horizontal laminations are not difficult to do as long as you have a solid base to work on – mine is a 2 x 12 x 36 inch piece of spruce.
You need to steam and pre-bend the laminations to dampen the power in the strip before gluing it in place or it will fight you. To give you an idea of the kind of power you would be dealing with, three 1/8 inch thick, 2 inch wide strips of maple 6 feet long would be a good base for an 80 pound bow!!
Yeah, know what you mean about dings and scratches. The stuff I make is for everyday use, careful as I might be, inevitably, it gets some marks. Used to bother me, now I think of them as “medals” for performance in the field. Doesn’t that long to refinish the wood if needed.
Hank
Hank,
Over the years I have reshaped and refinished several stocks. Most all of the time they have ended up with a shiny finish. I have a Webley/Hatsan that has a dull finish on the walnut that looks like there is none. I do hope you explain how to accomplish this in your next installment.
RR,
A “dull” finish is usually oil or wax based and penetrates into the wood, the shiny finishes (mostly) sit on top of the wood. A hand-rubbed linseed oil finish is awesome to see but it takes weeks to do.
The “camo” firewood stock I did for this series is finished with a furniture wax that leaves a nice matt finish in one step and 20 minutes..
You can take the shine off of a gloss polyurethane by buffing it with a fine abrasive called “rotten stone” for a very nice, durable finish. I talk about it in the next part.
Hank
Hank,
Thank you for doing a great job in introducing us to stock making. Are there wood species that we should stay away from, because they are likely to crack, warp or otherwise misbehave over time? I really like working with Teak and wonder what you think of Teak as gun stock material. Since Teak is so oily, it’s hard to glue together, so let’s assume the chunk of Teak to be used is big enough to make the stock and requires no gluing.
A second question is about structural repairs and reinforcement. My fore end of my stock broke at the pistol grip and I glued it back together, but the repair needs reinforcement either with a long 1/4″ screw, or with one or two hardwood dowels glued in. Which type of reinforcement do you think is better?
Thanks again Hank!
Will,
Most woods will misbehave if they are not properly dried or worked while they are still green. That being said, some woods have a lot of (natural) internal stress that can be released as you carve away the material that is holding in in balance. My favorite sling-shot wood (buckthorn – similar to osage) is very bad for that and I have to “anneal” the wood before working it to minimize the checks.
There is a construction wood sold as “spruce” that has a beautiful salmon colored grain with a lot of figure to it but it should be avoided because it is VERY highly stressed. I tried using some to make a canoe and the strips I cut twisted into spirals!!
Teak is a nice wood to work as the grain is usually fine and simple – no surprises. I have no experience in glueing it but you might have some success if you degrease the surface with alcohol.
Since you have already glued the stock together, I would recommend drilling pilot holes and using long screws to reinforce the joint. You could make a new stock Will LOL!
Hank
Will,
FWB 300 series stocks are famous for breaking at the wrist. Feinwerkbau started installing wooden dowels through the wrist, but I have still had them break. An Idea I have had was to drill a hole from inside through the dowel and into the butt section at a different angle than the dowel and epoxy in a stainless steel rod the diameter of the hole.
Hank’s idea of using the long screw would work better as it would “pull” the wood pieces together.
Hank
Nice.
And I know what I’m going to do when I retire. Start trying to make some wood stocks for my synthetic stock guns I have.
My dad made a couple guitars before he retired. But once he retired he made close to a dozen guitars.
I’m thinking once I retire I’ll still never have enough time to do what I want.
GF1,
You are right – I’m retired for 18 months now and find that I still have more projects than time to do them LOL!
Hank,
The maple and walnut stock on your FWB 124 is gorgeous!
This series has been very informative; while I have not made any stocks, I have repaired and restored a bunch
(mostly walnut stocks on old single-shot shotguns, like the Cooey model 84…I’m sure you’ve seen those =>).
I wish I had been able to read this blog before I had done the work; I could have saved myself a bunch of time!
I really like the section on scrapers, and, as Yogi already mentioned, the idea of the foam back for sandpaper.
Keep up the great work!
Cheers,
dave
P.S. Below is a pic of my personal, and much beloved, 20 gauge Cooey model 84 (which I bought when I found out it was the precursor to the first gun I ever had, a Winchester model 37A). It is finished with Tung Oil, an item with which I am sure you are thoroughly familiar, but for any who are not, here is a nice primer on it:
https://www.canadianwoodworking.com/get-more/tung-oil-debunking-myths
Dave,
“much beloved” is an apt description for a Cooey model 84 – my first “center-fire” was a model 84 in 12 ga. Got more game with that than all my other shotguns combined.
Sold my 84 to get a Winchester pump and always missed it. ’bout 20 years ago I stumbled on to a Cooey model 840 12 ga with a 3 inch chamber – it was in rough condition but I pounced on it anyway! Shoots and patterns well so its due to be camouflaged and refinished for turkey hunting this spring.
Cheers,
Hank
“I stumbled on to a Cooey model 840 12 ga with a 3 inch chamber”
Awesome, Hank! I’m happy for you; those Cooeys are really cool. =>
Dave,
I have never been too good with a shotgun. I blame it on being left eye dominant and shooting right handed. After shooting a pump shotgun for a few years as a kid I went to a single shot for quite some time. It definitely improved my shooting skills, knowing I had to make the one shot count. If I still did much hunting with a shotgun I would try to learn to shoot it left handed.
That is a nice looking Cooey. My favorite shotgun has always been the Winchester model 1897. It fits me perfect. The Browning model A-5 also fits me well.
Don
Don,
A skeet shooter once told me that, if you were left-eye dominant, it was easier to learn to shoot left-handed than to try and change your dominant eye (i.e. because you can’t do it =>).
I was fortunate to be right-eye dominant and right-handed, because to switch everything to the left (for me anyway) would be tricky. I have trouble even writing left handed, and that’s something where you can take your time. If I had to shoot skeet that way?…I might become a danger to all around me!
As to the 1897, I think they just look so cool; I’ve never owned one…yet…emphasis on yet. =>
99% of my hunting was with singles-shots; my first gun was the Winchester 37A 20 gauge, and my second was the Sheridan C-model. As you said, one shot makes you make sure it counts!
take care & God bless,
dave
Hank,
Your report came out great as usual, thanks for sharing your knowledge. Based on your first reports I made a stock and pump handle for my Crosman 1377. I will give myself a C- on the stock. It works good and is very solidly attached to the gun. It lacks in aesthetics though. Your wood work is amazing.
I am still working on what I call my 13XX to get the accuracy where I want it to be. Other than the pump tube and grip frame there are not much original parts left on the gun. It is now .22 caliber and can exceed 600 fps. 600 fps with Crosman premiers 14.3 gr. was my goal. The one thing I still need is a metal barrel band/pump pivot bracket for the gun. I hate to spend $50 + dollars on a metal barrel band, they should be a $5 part.
So far though it is not as accurate as the one I gave to my friend. My best group so far was 9 out of 10 shots in about 0.6 inches at 35 yards but that is not typical. Typical is around 1 inch + at 35 yards. It is the easiest pumping 13XX I have ever shot. Up to five pumps it feels like it is not even pumping air.
Don
Don,
That’s pretty cool in my book.
My 1322 only puts out 470 fps with 14.66 g pellets for just over 7 fpe.
What mods did you put in to get the power that high?
Thanks,
take care,
dave
Hank,
It now has a 26 inch Maximus barrel, it is no longer a pistole.
Dave,
I will put together a write up on what I have done. It is nothing special or much different than what has been done by others. I don’t think it is worth a blog. I will post it when I have put the write up together. Most of the velocity increase comes from a longer barrel, it’s a 26 inch Maximus barrel. The rest comes from more valve volume and a larger transfer port. Somehow my reply to Hank went to you. probably user error!
Here is a picture.
Don
Oh wow, Don! No wonder you were able to get that velocity…it looks pretty sweet! =>
Hi Don,
Thanks for the compliment! I say that there is always room for improvement and the next one will be better! …which is my way of saying that I don’t need much of an excuse to get into the workshop. LOL!!
I am planing an all maple firewood stock for my Maximus (now that I can cut wider pieces) but that will have to be after the laminated skeleton stock for the FWB 300. There have been several “hints” that I should do a guest blog on that one.
I am intrigued with your 13XX project – any chance that you would do a guest blog on it? I’m sure that I’m not the only one curious about what you are up to.
Could you describe or send me a picture of the metal barrel band/pump pivot bracket that you are talking about. Maybe it is something I can cobble together for you.
… not as accurate as the one you gave away, sounds like a fish-story Don LOL! Still, if I could manage 1 inch at 35 yards with a pistol I would be dancing in the shooting lane – pistols are not my thing, I’d be lucky to hit a pop can at 25 yards.
Cheers,
Hank
My reply showed up above to Dave.
Great blog, Hank. What really impressed me is you revealing that you make your own tools when needed.
Fred formerly of the DPRoNJ now happily in GA
Glad you liked the blog Fred! One more to go in this series.
I’ve always enjoyed making my own tools. Guess that is a hobby unto itself.
At the moment I’m setting up a small blacksmith forge to make my own wood carving chisels and gouges. Have it mostly done, just looking for some refractory materials so I can finish tuning the two burners I made. Should be good to go by the time the weathers warms up enough to work outside.
Hank
Hank,
Is that “code talk” that a guest blog on (hammer forged barrels) is down the road in a few years? 😉
“Well Chris,…… I have never actually thought along those lines,…. but it does sound interesting”. Yeah,… right. 🙂
Chris
Chris,
Don’t forget about damascus steel barrels eh! All kinds of fun in those!
…actually, my son wants us to make a couple of kantanas and some throwing hatchets first.
H
Hank,
Ahhhh!,…. another passion. Knives are something else I can go off the deep end if I allowed myself. Yes, the Damascus is beautiful. Lots of work too. You had better good at hammer swinging with both hands so as that you do not get a right only Popeye arm. 😉
Keep us posted as things progress (with fine pics, of course) as you get further along with it.
Chris
Hank,
Thanks for another fascinating report. You have an amazing skill.
Hey Bob,
Hope I can encourage you to do a stock of your own design.
Hank
B.B. and Readership,
Giles has a new UTube review on a prototype FX Doppler RADAR Bluetooth Chronograph for Airguns and bow’s ONLY!
It appears to be as accurate as the Lab RADAR (according to Giles) but can’t track the high velocity rounds of a PB Rifle nor does he show any downrange velocity capabilities. No price quoted so far but he Alice’s to it being spendy.
shootski