by Tom Gaylord
Writing as B.B. Pelletier

Michael’s Winchester 427 is a Diana model 27 by another name. The rifle pictured is my Hy Score 807/Diana 27.
Part 1
Part 2
Part 3
Part 4
Part 5
This report covers:
- Assembling the ball bearing cages
- Two cages — inner and outer
- The real sear
- Trigger assembly
- Finish the assembly
- Trigger adjustment
- Test the rifle
- Summary
And I’m going to pick it up right where we left off on Friday. A reminder that I am in Las Vegas at the SHOT Show today and will not be able to respond to comments as easily as normal. Let’s get started.
Assembling the ball bearing cages
We have come to the most daunting part of the assembly — assembling the trigger unit. You have to put a swarm of loose parts into the spring tube under tension from both the mainspring and the trigger spring. First, put the lubricated spring guide into the rear of the mainspring. I forgot to do that the first time through and I assembled the rifle without the guide. Got the rifle all buttoned up and said those famous last words, “I hope I never have to do THAT again!” Then my eyes fell on the guide sitting on the table. It was smiling at me, and I’m pretty sure I heard God laugh a little!
I then had to disassemble the rifle again to this same place. Okay, enough whining, let’s get on with it! This is the point at which the parts of the trigger go together. Hang with me — there are a lot of them and several tricks are needed to get them into the rifle. Let’s look at the parts.
Two cages — inner and outer
The trigger has two cages — an inner black one and an outer silver one. Someone commented on the amazing precision that the parts of this trigger were built to when I showed how it works in Part 2. But the truth is the tolerances between the parts don’t have to be that close. The three ball bearings take care of that.
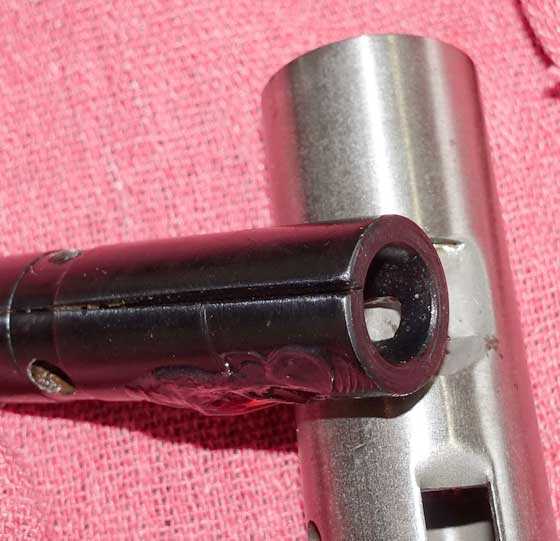
Here is the inner black ball-bearing cage. As you can see, is just a thick piece of steel that’s been rolled into a cylinder. Notice the uneven join line in the seam. Not a lot of precision here — just enough to make it work!
To get the ball bearings to stay inside the black cage and not fall out during assembly, smear a lot of TIAT into each of their holes before pushing them in. It works perfectly!
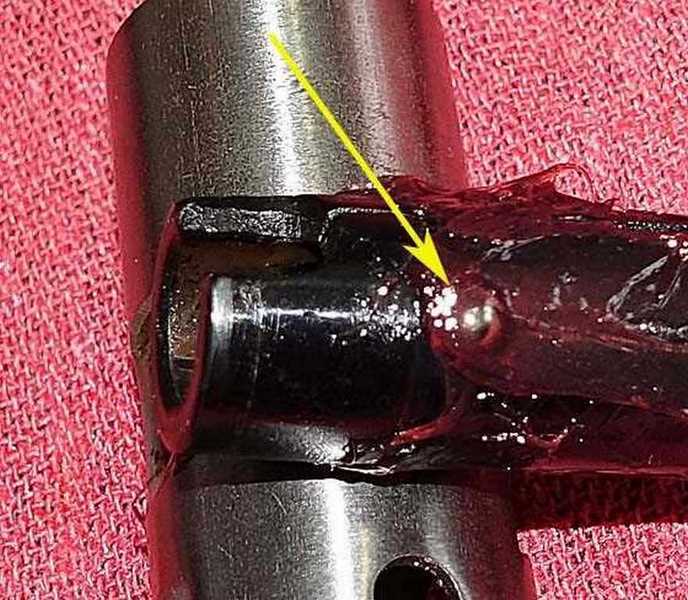
Here you see one ball bearing (arrow) has been pushed into its hole that is filled with TIAT grease. That grease is so tacky that the ball will not fall out during assembly, yet it will operate smoothly forever after.
Now, let’s look at how the two cages go together. The black inner cage slips inside the silver outer cage. When the piston rod comes back, it passes through the inner cage. The knob on the end of the piston rod pushes the balls up out of its way.
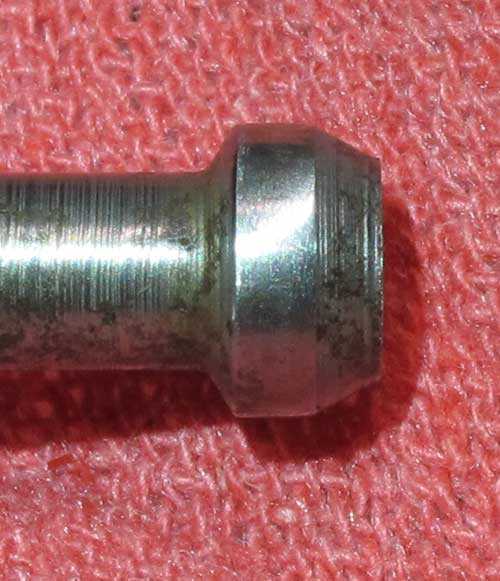
You can see in this picture how the piston rod end pushes the three balls out of its way when the gun is cocked. The silver cage on the outside presses the balls against the backside of the piston until the trigger releases it.
The real sear
The silver outer cage is what holds the three ball bearings against the piston knob once the gun is cocked. It is the real sear of this rifle’s trigger. The powerful mainspring is pushing on the piston but the three balls are resting against the back side of the piston rod knob, holding it still. But, when the trigger hooks release the silver cage, it is pushed forward by the trigger spring, releasing the balls and the piston is suddenly free to move. Let’s look at the part that is the real sear for this trigger.
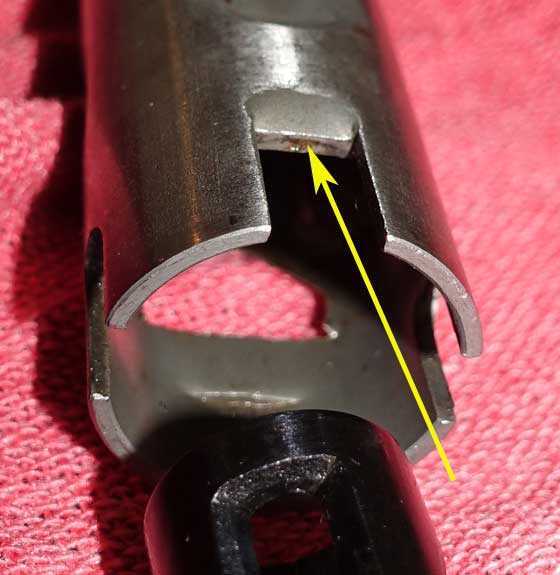
That “step” (arrow) on the silver cage is where one side of the trigger spring presses. You can even see the semicircle left by the spring on the step. The hooks that I told you are on the trigger mechanism keep the silver cage from moving, but when the trigger blade pulls them away, the trigger spring pushes the silver cage away from the black cage, releasing the three ball bearings that then release the piston.
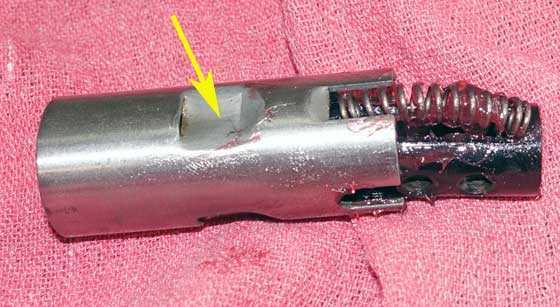
Here you can see the two cages with the trigger spring that pushes them apart. When these parts are inside the spring tube, the trigger spring is not bowed up in the center like this because there is no room for it to be. See that indent in the silver cage (arrow)? There are three of them around the cage. They form the base that pushes against the bottom of the spring guide, and the short ramp you see on the right of the indent is what pushes against the three ball bearings that are trying to pop out of the inner cage. This is how the Diana trigger works!
Trigger assembly
The balls go in the inner cage, then the two cages go together. The silver cage is also what pushes against the spring guide inside the rifle. The last thing to put in the assembly is the trigger spring. The trigger spring in Michael’s rifle is very strong so it doesn’t want to stay in place. It wants to push the two cages completely apart, but I have a trick for that.
Now the entire rifle is put in the mainspring compressor, with one end of the compressor pushing against the rear of the trigger assembly (the black inner cage) and the muzzle of the barrel pushing against the other end of the compressor. And, here is my trick for installing the strong trigger spring. As tension from the compressor builds against the black inner cage, the two cages start to slide together. At this point the trigger must be pulled to allow the silver cage to go deeper into the spring tube. I stick a pin through the trigger mechanism (after it has been pulled) to block the trigger blade in place so I don’t have to hold it while I’m doing all this other stuff. If you don’t, you’ll need four hands to put this rifle together.
Now I install the trigger spring, mounting it to contact the step in the silver outer cage. Then I use a screwdriver inserted into the coils on the other end of the trigger spring to compress the spring back to connect with the step on the inner cage. Look at the picture that shows this better.
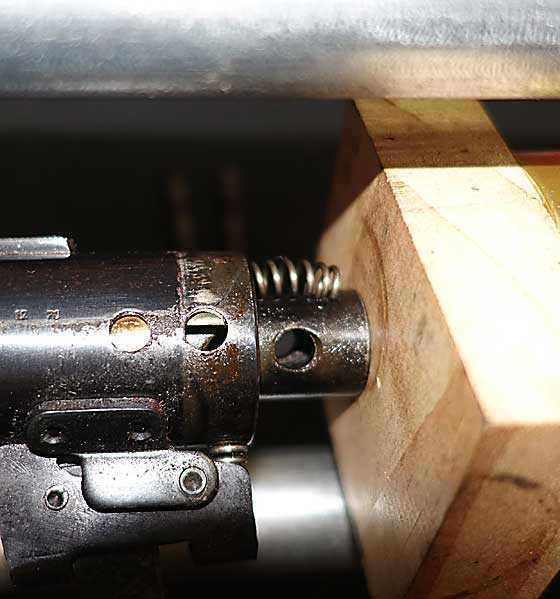
In this photo I have wound the compressor in just enough that the spring tube is now pushing down on the trigger spring, holding it in place. I had to go just a little farther than the text describes to take this picture or the trigger spring would have popped out of place. This really shows how the spring tube holds all those loose pieces together, once they are inside!
Finish the assembly
Keep winding the screw on the mainspring compressor and the parts will slowly go into the spring tube. The black inner cage will stick out a little when the gun is completely together. What you are looking for is the holes in the inner black cage aligning with the holes in the spring tube. When they do you can insert the two crosspins that hold the action together. The rear pin is slightly fatter and also slightly shorter than the front pin, so it will not go in the front spring tube hole. The pins slip in easily once the holes are aligned. Then put the metal end cap back on the spring tube and the action is assembled.
Now the barreled action can be installed in the stock and the job is complete. I have more to say, but before I get to that, let’s adjust the trigger.
Trigger adjustment
The Diana ball-bearing trigger can be adjusted to a very fine release. Because of how it is designed, you will always have a long first stage pull and there will be significant resistance in the trigger blade. But there is a definite stop at stage two when everything is right.
Here are simple instructions for adjusting the vintage Diana 25/27/35/50 ball-bearing triggers that have two screws. The front screw is just a lock screw. Loosen it, and then turn the rear screw in as far as it will go (that’s clockwise). Then, turn it back out two full turns and try cocking the rifle. Be careful not to let go of the barrel, because some guns may be adjusted to the razor’s edge this way. If yours is and you need a little more sear engagement, try turning the screw out just another quarter turn until the sear holds well. When you get it adjusted where you want it, tighten the front screw and the job is done. You’ll have a long first stage followed by a definite stop and a crisp stage-two break when the gun fires. You have to experience one of these triggers adjusted correctly to know how nice they are.
What can’t be controlled is the length of the first stage. It has to be long, if you want that crisp second-stage release. I don’t mind that one bit, though it is different than the trigger on any other airgun I can think of.
Michael’s trigger was adjusted pretty well when I first tried it, but I felt it could be just that little bit better. I adjusted it following the directions above and discovered that his trigger wants the adjustment screw less than one full turn out from all the way in.
When I finished the first stage has a resistance of one pound 13 ounces. Stage two breaks at one pound 15 ounces. That’s correct — stage two is a two-ounce trigger pull! This is not untypical. But it is a good job, if I do say so myself.
Test the rifle
Of course the first thing to do after assembly is to try to cock the rifle and shoot it. I did that and was rewarded by a loud bang with smoke coming out of the barrel. Of course, the leather piston seal has excess oil and it needs to be shot out. That will be my next duty, followed by a velocity test, followed by an accuracy test.
I can tell right now that I used exactly enough TIAT. The rifle now shoots dead calm, and with the trigger breaking so well, it is a delight to shoot. Well, after all, it is a Diana 27!
Summary
This overhaul has been an interesting foray into the world of the Diana 27. This rebuild is better than the one I did on my own 27 more than two decades ago, because Tune in an Tube did not exist back then. I used white Lithium grease. And I couldn’t get the leather seal off my piston, so it still has the factory piston seal from the 1970s.
Michael’s rifle still has some flaws I will not be able to correct, like it’s missing one of the two rear sight screws that holds it tight to the barrel and it’s missing the rubber bumper for the butt.
I have ordered a locking screw for the pivot bolt from Chambers and it should be here shortly after I return from SHOT. And, as long as I was doing that I bought a new synthetic breech seal that the Winchester 427 had. My leather seal isn’t that pretty, though it does seem to work quite well.
I may have to use a different rear sight to get Michael’s rifle through the accuracy test. We shall see. This has been a fascinating trip down memory lane for me, as I hope it has been for all of you.

B.B.
Answer next week if it suits you better…..
If this trigger is so good, why is it still not used? I’m afraid that I might run into the same when I help rebuild a buddies gun. This Diana was given to him in the 80’s and he says it was old even then.
-Y
Yogi,
Progress. The newer triggers have fewer parts and are easier to assemble, making production easier and cheaper. There is a very good chance that your friend’s Diana has this trigger assembly.
Yogi,
And your friend’s Diana may not have this trigger. This wasn’t the only trigger Diana put on airguns after WWII.
B.B.
B.B.,
You and I like the same sort of trigger: a light, long first stage followed by a crisp, light second stage.
I installed a new trigger-guard-side screw from T.W. Chambers for the trigger adjustment, but it, like the original, never affected the ability to adjust the adjustment screw. Is that mystery still hanging around?
Thanks very much once again,
Michael
BB,
Awesome little rifle! Once again we thank you for the view behind the curtain.
Michael,
If you get tired of it living with you, I may be able to find a room for her at RRHFWA. 😉
RidgeRunner,
I will borrow a page from B.B.’s book. You will have to wait for my estate sale for this one.
I will treasure this air rifle. It already means a lot to me fior all of the blood, sweat and tears B.B. has put into it. I think of it as a work born out of his love for air guns. That makes it very special to me.
Michael
Michael,
LOL! I understand. I have quite a few like this that will likely end up in my grandson’s hands one day.
BB,
Please do not forget to go by the Gamo booth and find out if the new “horizontal” magazine assembly can be retrofitted to the “old” Maxxim.
RR,
I will go to the Gamo booth, but I have to tell you — in 21 years of going to SHOT I have only been helped at the Gamo booth two times. They tend to avoid contact with me.
B.B.
BB,
LOL! That’s your own doing. If you did not give your honest opinion and allowed yourself to be “bought off” they would have runners out looking for you.
Maybe they should give you another try. From what I have been hearing Gamo has come a long way from where they used to be. No, they are not Weihrauch, but I have even considered owning a Swarm Maxxim.
B.B.,
Is that why you have a beard? So they can’t recognize you immediately?
Siraniko
PS Section Assembling the ball bearing cages. Second paragraph, First sentence: I the (then) had to disassemble the rifle again to this same place.
Siraniko,
Got it. Thanks!
No, the beard is because, with nothing on top, my face sort of disappears in pictures and videos. I thought if I can’t grow it up there I might as well grow it where I can.
It’s just an experiment.
B.B.
Going to give that straight razor a good workout next time 🙂
BB
I’m sure you will get to see Air Venturi’s new M1 Carbine BB rifle. They seem to be jumping into airsoft to steel BB conversions with both feet. It looks a lot like the King Arms airsoft version only with a plastic type imitation wood. Probably at a lower price though?
Wish they would use ‘water’ based paint for all that warning print. 😉
Plastics are getting to look pretty good these days but they lose out some when it comes to imitating real wood. Perhaps I’ll get lucky and be able to swap the two stocks.
I thought I was going to seriously cut back on getting new airguns and start thinning out the herd but it looks like trying to accomplish that in the “Golden Age of Airguns” is going to be very difficult. I will probably wind up receiving a new airgun posthumously one day.
Bob M,
I understand. It is very difficult to not enlarge RidgeRunner’s Home For Wayward Airguns. There are so many new and wonderful airguns on the market these days. What helps me is I keep wimbling and end up not buying anything. I end up pulling out some of my “old” airguns and having a great time with them.
However, with my son-in-law starting to get into airguns and my grandson learning about them it becomes more difficult to not pick up some more for them. 😉
RR
Sig is coming out with a MCX Virtus PCP and Air Venturi has hooked up with Springfield Armory for even more replicas …..Perhaps someone will start renting them out to us for a lot less $
Bob M,
The Virtus looks to be interesting.
RR
Think the Virtus a modified MCX. I already put a bottle on mine but this one seems to have eliminated the need for an 88gr CO2 adapter or something for a shorter length of pull and the longer RIS changes the whole thing. Too bad they have to keep the FPS relatively modest. Cant be too much higher than its intended CO2 operation.
Now I see there will be a more traditional looking DPMS. The Bushmaster MPW from Crosman.
Bob M,
The limiting factor for power is the belt. It is made of plastic and like the SMG22 does not seal tight enough. You have blow back around the belt section which acts as the chamber.
To have a truly powerful PCP the belt links will need to be strong and seal better.
Nice looking toy by the way.
RR,
A spring loaded brass breech (in back of the mag.) and a spring loaded barrel (in front of the mag.) might work. Not good though if the mag. is trigger advanced (overcoming 2 spring loads) to advance the belt. Just some thoughts,…………..
Now, if both were to force closed upon/while firing and release after the shot,…. well then,…
Chris
Chris,
Keep at it. You might figure it out.
Bob,
I have already put in my request. I told you this was happening last year at the SHOT Show, and now it’s almost here.
B.B.
Bob,
The warning print is a sore point with me to.
I wish that they would stop defacing guns with all that crap – its totally useless – the gun is going to be used properly or misused whether the print is there or not. It is redundant as well because it is all in the manual anyway.
I wounder how the “safety police” would like to have the warnings and cautions for their fancy car engraved into their windshield. I’ll bet dollars to donuts that they never open their can manual to read the warnings.
Happy Monday!
Hank
Hank,
I agree with you, but the only time this ever matters is in court, where the manufacturer has no friends. A jury of people who are not airgunners can be made to believe a company isn’t responsible unless they spell it out on the product. It sounds absurd until you see it happen. Then, unfortunately, the lawyers are right.
B.B.
B.B.
I hear what you are saying and not only does the legal process sound absurd, it IS absurd.
I feel that the Judges should take control and dismiss cases where the product was not used in a proper and accepted manner. – like the guy who “scratched” the inside of his nose with a power drill, ripped his face open (too bad he missed his brain) and sued the manufacturer because they didn’t say NOT to do that. What the heck!!!
Guess that “common sense” goes out the window when there is an opportunity to get rich quick by abusing a product and suing the manufacturer. Think that the lawyers are at the root of this problem.
Maybe if they put laws in place that would allow the manufactures to counter sue to recover legal costs (and punitive damages) it would cut down on litigation and save everybody time and money.
The manufactures go through the effort of putting cautions, instructions and warnings in the product manuals. It’s not their fault if the purchaser does not read, heed and understand what has been provided. Ultimately, it is the purchasers’ responsibility to be sure they know what they are doing as they alone are responsible for their own actions. The courts should recognize that.
Sorry to react so strongly on this. I get annoyed when people hold others responsible for their own stupidity.
Enjoy the show B.B. – looking forward to your reports and pictures!
Hank
Hank,
Agree 100%. It’s like the person who bought coffee at McDonald’s drive through and subsequently spilled in their lap. Then they sued McDonalds and won in court. How ridiculous is that? Common sense is no longer common. Don’t get me started on the way people drive…idiots everywhere!
Geo
Geo,
Sorry to have stirred you up! LOL!
Bet the same person who sued McDonalds for serving hot coffee would have complained loudly if her coffee was cold.
Yes, lets NOT start about idiot drivers.
Have a good one eh!
Hank
Hank,
I’m sure they would have complained if their coffee was not hot too. Maybe they could sue to that also.
You were speaking about the cold temps in you location in Canada. It was pretty cold here in southwest Michigan last night too…-18º F. That’s 18º below 0º! Burrrrrrr
Geo
Geo,
We are in the middle of a cold-snap here as well.
With wind-chill temperatures down around -30 F my granddaughter’s school was closed yesterday and again today. Supposed to “warm” (a relative term) up tomorrow.
Got some special cold-weather mix (its got molasses and other stuff in it) for the deer and putting out more than I normally would to help keep them warm.
Hank
We had actual temps down to -27º Sunday night. All the schools in surrounding counties were closed due to the cold temps. Today we have a heat wave…with highs in the low 20s. Supposed to warm up a little later in the week to mid-30s. Tomorrow the forecast is for freezing rain. I hate that!
I too have been putting feed out for the deer. I buy shelled corn at our local Tractor Supply for $6 for 50# bag. I do have to ration it though. The deer will consume the whole 50# in just a couple of nights. So now I put out about 1/2 of a small bucket into three piles. They will fight each other otherwise. I got a trail camera for Christmas and have set it out about 20′ from the corn piles. One night it captured 10 deer all at one time, not including the two bucks. We have one huge 8-pt buck come in and one smaller 4-pt buck. I set the trail camera to video and it’s a lot of fun watching them on my computer. Sometimes they sneak in and eat all the corn before we can catch a glimpse of them. Then sometimes they come in early like 2:30 AM or 6:00 AM so the trail cam catches them then. Having a lot of fun watching the deer this fall and winter. We’ve lived in this home for 34 years and we’ve never seen very many deer. That is, until I put some of that shelled corn out in October. They started coming in that very night to eat. We’ve been putting it out every since. Sometimes I skip a day two but have tried to keep them coming.
Geo
The ubiquitous warning labels are common because sense among a lot of people is, unfortunately, uncommon. Dumbassery is seemingly universal, and those practicing the art don’t want to be responsible for it. That’s where the lawyers enter in on both sides of the actions and issues.
Don’t go blaming the government as if it sits around all day just trying to think these things up. As a former civil servant, I can tell you that the last thing public employees want to do is make MORE work for themselves! For everything that is mandated on the public, as a matter of promoting public safety, more work falls on the civil servants to enforce, measure and monitor.
There is probably no end nor solution for this. As the country comedian, Ron White, puts it so well: “You cain’t fix stupid!” Unfortunately, there is no dearth of stupid among us.
LFranke,
Yup, You can’t fix stupid.
We can only hope that they remove themselves from the gene pool without hurting anybody else in the process.
Hank
Bob,
The fake wood plastic furniture on Gletcher’s two models of the Mosin Nagant is indistinguishable from real wood from three feet away, and it is smooth and heavy in the hand. I like it just fine.
If that is the type of plastic we will see, then I will be quite happy. That said, it will probably be like the plastic on Umarex latest lever action. Does anyone here have one of those? If so, is it real-looking and heavy/solid-feeling?
Michael
Michael,
I have one of the Legends Cowboy Lever Action rifle. The faux-wood plastic stock looks very good, but it is not as heavy as the Mosin Nagant rifle. Sadly, the stock is mostly hollow because the CO2 chamber is in the stock. I would gladly pay extra for a real wood stock on the Cowboy Lever Action.
The current edition of Airgun Hobbyist reports that the Springfield Armory M1 CO2 rifles will be available in two models: one with a plastic faux-wood stock and another with a real wood stock. My guess is that the M1 plastic stock will be heavier and more solid like that on the Mosin Nagant because the CO2 will likely be in the metal magazine and not in the stock.
Charles, (I remember correctly, I hope.)
Thank you for that information. I should have thought of the CO2 mechanism. I knew about that but forgot. I have two of the older 12 gram X 2 powered Walther Lever Action air rifles. They have hollowed out walnut stocks. There is so much metal and wood in those that they are quite heavy and solid, but someone familiar with real lever action carbines might feel the balance is off.
I do hope the CO2 is in the magazine and not the buttstock. I also hope the announced plan to offer it in both plastic and wood stock versions pans out. Some things do, but some things do not. Also, some things pan out in Europe but not in North America, such as the worn finish Schofield, the Duke Stagecoach model lever action rifle, the Gletcher blowback Makarov (with its crisp light trigger), and, apparently, short-barrelled versions of the Schofield and Webley MK VI.
Thanks again for the information.
Michael
Actually, the sling cutout in the buttstock pretty much assures that the CO2 cart goes in the magazine. That also makes business sense, as they can sell extra magazines.
The plastic I see in the photos (but we know things like that can change) looks good ad like the Mosion Nagant plastic. And the one in the photos was made in Taiwan (but we know things like that can change, too), which is usually quite good, quality-control-wise.
Michael
Yep, my name is Charles, and your memory is good.
Don’t let my comment about the hollow stock be overly negative. The Cowboy Lever Action has a lot of good features and quality nonetheless. The stock may be hollow to allow for the CO2 chamber, but it feels strong and sturdy. The action, barrel, and lever are full metal just as on the Walther Lever Action. The lever action is easy to work and feels sturdy. By that I mean the lever is not flimsy and doesn’t feel like it might rip off the rifle if you are too fast with the lever. The cartridges load easily enough for me. I don’t think my thumb is overly large, but anyone with larger hands and thumbs in particular might have some difficulty pushing the cartridges in through the loading port. The use of the BB cartridges and the ejection mechanism is probably the second best selling point for this rifle.
I said second best regarding the cartridges and ejection mechanism because the number one best selling point for this rifle is its accuracy. For an open sight BB rifle, the accuracy is far better than I expected. These past two weekends I was shooting 10 shot groups at 10 meters (33 feet) from a bench rest and consistently getting groups of 1″ to 1.25″ in size with Umarex, Black Diamond, Daisy Premium, and Avanti BBs. Copperhead BBs didn’t perform nearly as well, or else I had more variability in my aim than I thought. Copperhead BBs produced a 10 shot group of 2 7/8″ with 7 of 10 shots in a 1 1/16″ group. The best two groups I got were with Marksman BBs (10 shots, 3/4″) and Firepower Gold BBs (10 shots 1 1/16″ with 9 of 10 within 1/2″). Firepower Gold BBs from Palco Sports don’t appear to be available anymore.
If you like lever action rifles, you will like this one even with the plastic stock. However you might want to wait awhile. Umarex needs to work out some quality control issues at the factory. The CO2 chamber holds 2 x 12 g CO2. On my rifle, one of the piercing pins is not protruding into the chamber and is failing to pierce one of the CO2 cartridges. I have to send it back for repair or replacement.
If you haven’t been to Hard Air Magazine yet today, you should go there. Hard Air Magazine has three articles about Shot Show 2019 product announcements. In addition to the Springfield Armory M1 at the range today, there are also replicas of Springfield Armory XD pistols, the Sig Sauer MCX Virtus PCP, and a Sig P365 replica.
Charles,
That is incredible accuracy! And good shooting, of course. :^) That is every bit as good as the Gletcher full length Mosin Nagant, which has already become almost legendary for its accuracy. I wonder if they are made in the same factory.
CO2 cartridges vary a millimeter or two, sometimes more, in length. If you have a micrometer, you can sort out especially long ones for your rifle. That might do the trick.
Michael
No, longer CO2 cartridges won’t do it. I already inserted a 0.177 caliber cleaning rod into the CO2 chamber to check the piercing pin. The cleaning rod moved cleanly over the pin with encountering any contact with the pin. That pin is not sticking up at all.
Charles,
I had the same thing happen to me with a brand new Hechler & Koch USP blowback. It would not pierce even long Powerlets, which I regularly sort for length as I also have a few CO2 guns that can’t operate with carts that are not short enough for them. So I returned it. I didn’t exchange it as by that time I had already decided to purchase something different, which I eventually did, from Pyramyd AIR.
That is the best thing of myriad great things about Pyramyd AIR. They are the absolute best when it comes to returns. That is the very reason I will choose them over anyone else for a particular purchase, even if it costs me slightly more. I go elsewhere only if Pyramyd AIR does not carry it.
Michael
Michael
The co2 is in the mag and it should be a solid piece of heavy steel. A deeply cut straight slot plug may be carried over too. Now my airsoft version is entirely shinny blued steel, more or less like an original. This one appears to be a dull finish but it may only be for clear pics.
Bob M
Regarding warning labels and other such nonsense – nonsense to people who possess common sense, but who are not common…heard a rumor the government will soon require a warning label be affixed to the bottoms of newborns: “Government Warning: Birth will eventually result in death.”
One of these days, just for fun, might replace all the “Government Warning” labels on the spirit bottles at home to read: “Government Warning: Beware of The Government.”
BB— I have just seen Pyramyd airs ad re the new BB M1 carbine . The rear sight is not fully adjustable, windage only. I would like to know if it can be removed and replaced with a G.I. rear sight. Dust devils are not accurate enough in my BB guns. I have done enough damage with my Gletcher 1944. Can you find out when the pellet version will be on the market ? Thank you, Ed
Ed,
I’ll look.
B.B.
Ed
The rear sight on the M1 should be removable. Pop off a snap ring, spacer, and unscrew the adjuster to remove the fixed in place peep sight and two screws are exposed that attach it to the receiver. Anyone’s guess if its directly replaceable with a real on at this point but it looks possible with some modification if not.
OMG !
When I reassembled the M1 rear sight for the pic above I noticed 4 detents on the right side of the sight and a hole in the inside of the knurled adjusting knob and wondered if these parts were from a real M1 but they never used a spring loaded pin?
After it was all together I noticed it was all very loose and almost useless as a sight and it hit me … Crap… I just lost a spring loaded detent pin assembly !
Don’t know how I got so lucky but I found it in my carpet and it is a very teensy tiny spring and the pin was still installed. About the size of pencil lead. WATCH OUT FOR IT if you ever go there.
Bob M
Bob,
You were very lucky to find it, I have it on good authority that carpet has the ability to transport tiny parts to another dimension, the thicker the carpet the greater the power.
You must have found it just before transport took place.
Mike
Mike
I reversed gravity with a magnet. But you are right, time is of the essence. Needless to say I also lost the itty bitty ‘C’ clip on the second install but recovered it the same way. The last try went fine on a white kitchen counter top. Sometimes we never learn.
Bob M
Bob,
Glad you saved it, those C clips are the worst, followed by tiny springs they can fly quite a distance. Best safety is a clear plastic bag, for the work you just did a gallon storage bag might work well, slice out the bottom and put it around the action, that way the bits are at least nearby or better still in the bag.
I lost a trigger spring not too long ago, did I use the bag? NO.. we never learn, or think it will be ok.
Mike
Mike, great idea!
Plastic and labels
I noticed that a lot of airsoft stuff is void of warning print. Perhaps the red tip they use compensates. Not to mention the low power or at least low impact they have. The real wood / metal airsoft M1 Carbine and gas operated lever action I have are void of unsightly print.
If the gun has a quirk that absolutely needs pointing out, like it fires bb’s backwards through the hammer opening perhaps a little warning may be necessary, but you can’t stop stupid with words.
If this new BB version of the M1 Carbine is basically the same one I have you will not be disappointed with it’s looks. Especially the real wood and if the so called plastic version is as solid as the Mosin Nagant, you will be happy too. They reached perfection with imitation wood on that one as well as the fore mentioned airsoft western lever action but the hollow stock on the lever action gives it away. Funny thing is there is nothing in that stock so they could have filled it with foam.
The tubular magazine under the barrel fills with green gas in front and airsoft BBs through the loading gate.
Looks like it’s just a simple matter of what kind of plastic and how thick it is. You simply can’t tell that the DPMS is plastic and not metal without an extreme examination.
The part I don’t care for is when they use plastic in place of wood when they replicate an old existing firearm. No doubt, plastic can be made to look better than wood but if you are going to replicate thick heavy metal parts as in an original, go all the way so you really can’t tell the difference between it and the real one with wood.
The Mosin Nagant is just a little ‘ too nice ‘ compared to my wood stocked airsoft K98. It looks, and feels real.
And by the way, that wood stocked M1 Carbine even came with a sanding block to distress it if you wanted to. Try that with plastic !
Bob M
The rear sight is the problem? On mine, the pointy front sight was the one that gave me fits. Even with glasses, I could never really get a clear definition on exactly where that point ended.
BB—–Thank you. BobM —-Thank you. The original M1 has a dovetail slot for the rear sight. The BB version does not have a slot ( thanks for your picture.). If it is possible to cut or file a dovetail slot in the sight base, it would probably void the warranty. I would try to find another way to adjust the sight for elevation. ——-Vfblovesnancy—That is what is wrong with the front sight on the Diana Mauser 98K. ——–Ed
Ed
You might get away with some limited shimming under the sight if the 2 screws are long enough?
One last point, M1 carbine.
If it turns out this new M1 Carbine BB air rifle with the plastic stock has a mat flat black finish instead of the blued realistic finish with a real wood stock on the airsoft version don’t feel too bad. I paid over a hundred dollars more for it.
Bob M
Bob,
No real M1 Carbine was blued, except for presentation guns. The metal parts on the guns are finished matte gray or green with a phosphate finish. This new gun should be matte.
B.B.
BB
All right, I have to agree with you.
I tend to use the term blued loosely for any dark shinny finish. It’s a lot easier than describing the look as a well worn, oil polished, thinned out dark parkerized finish.
But evidently the final look depends on the manufacturer and process used. All USGI M1’s were parkerized but some commercial ones were shinny black and even stainless. Perhaps not blued but a lot of the bolts and small parts were and made things a little confusing. the green finish was thought to be the reaction to cosmaline wrapping.
The parkerizing went from light gray to charcoal black and early Winchester ones used the blue Dulite finish.
So BB, enlarge that picture of the rear sight area on the new airsoft M1 carbine. What would you call the finish on the receiver ?
Just learned that repeated applications of tung oil over time was the cause of the shinny finish on most rifles.
Bob M
All Disassembled!
I learned long ago to use a large see through plastic bag (Ziplock) perhaps a two gallon or occasionally a garment bag for the really large projects. It functions a bit like a chemical/biohazard/radioactive material containment box. I’m certain I could build one from some acrilic sheet but the bags are perfect for in the field repairs since they easily roll up into a backpack! I place the assembly to be disassembled into the bag on my workbench or on a boulder, the ground/snow or park bench and find it retains most of the tiny parts, springs, detent pins and ball.
HTH,
shootski
Shootski
Thanks for the heads up info. This will always take less time to set up than spent looking for parts in an aggravated mood.
Shootski,
Bio-hazard and radioactive disassembly,.. in the field no less,.. ehh? My, you do lead an exciting life! 😉
Chris
Chris USA,
Blessed with the Touch, ice water in the Veins and NO brains…a long, long time ago….
Now it is just broken airguns and PBs!
shootski