by Tom Gaylord
Writing as B.B. Pelletier

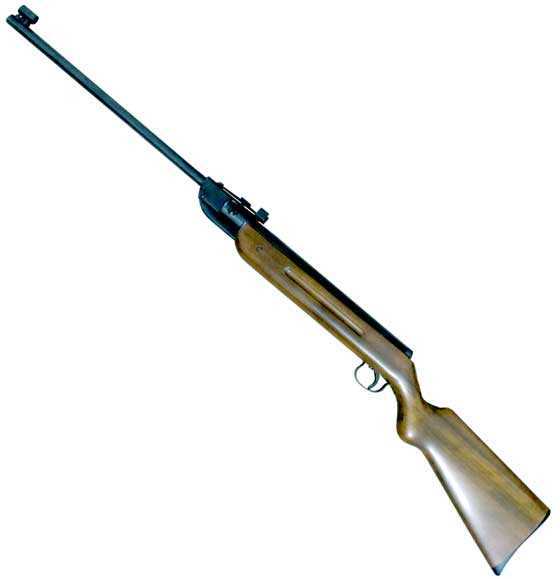
Diana 35 pellet rifle.
This report covers:
- Older 35
- What was the 35?
- Soup-up
- The spring isn’t the thing
- Back to the Diana 35
- This Diana 35
- Trigger
- What to do?
- Summary
Today begins a long report on the Diana 35 air rifle. If you just found this blog, here is how we came to this point. Several months ago I tuned a Winchester model 427 (really a Diana 27) breakbarrel air rifle for reader Michael. That 9-part report is pretty thorough and worth a read. At the end I told everyone that Michael’s rifle is now the smoothest spring-piston air rifle I have ever experienced and I thought it would be nice to acquire the larger Diana 35 and tune it for smoothness. That would give me an adult-sized breakbarrel that was as perfect as can be — or at least I think so.
One of our readers, Carel from the Netherlands, contacted me, telling me he had a nice Diana 35 he would sell me and after a short conversation I bought it. I also bought his Diana 26 that I had never heard of and a Diana 27S that I also never heard of. I have already reviewed the Diana 26 and the 27S is still to come. But this Diana 35 is the gun that I really wanted to examine and tune.
Older 35
Carel’s Diana turned out to be a lot older than the one that I once owned. It has a finger groove along both sides of the thinner rounded forearm instead of checkering on a thicker squared-off forearm. That’s the European influence, rather than the more westernized forearm that came later. If you own a Blue Book, this rifle is something like the rifle that’s shown in the book, with one major difference. The rear sight on this rifle is unlike any I have ever seen. I’m going to show you several pictures rather than try to describe it — except to say there are no plastic parts anywhere on this sight. It is 100 percent steel!
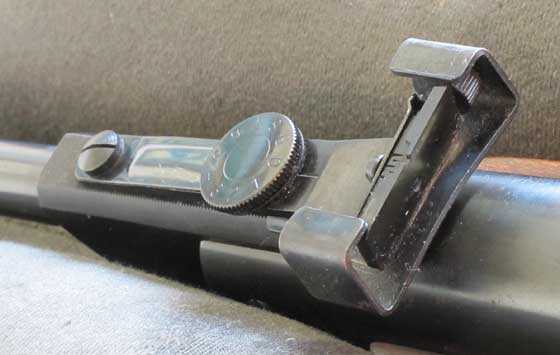
The rear sight on this Diana 35 is one I have never seen before. The notch is protected by steel ears.

Looking down on the top of the rear sight you can see how different it is. The elevation wheel is polished and blued steel!
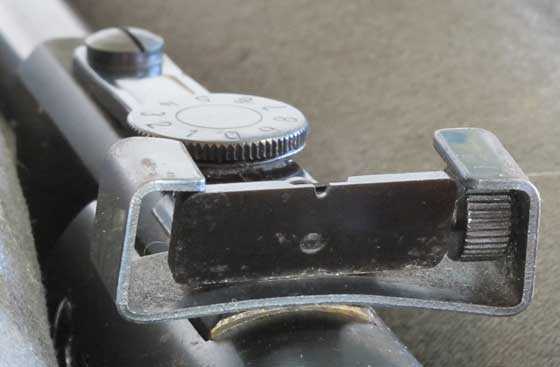
And this is what it looks like from the shooter’s perspective.
The front sight is a hooded post that’s fixed. The post is tapered, but it fits into the rear notch well, and, because the notch is so small, it should prove easy to sight well. We shall see!
What was the 35?
The Diana 35 was the older brother of the Diana 27. It was produced from 1953 through 1964, when it was revised into a modernized version that lasted through 1987. So, that’s 1953-1964 for the first run, of which there are several variations and 1965-1987 for the rifle that most Americans will know. It was supposed to be larger, heavier and more powerful than the model 27. It is both larger and heavier without a doubt, but the power, while greater, isn’t that much greater. It’s not enough to justify the difference in size and weight — at least in my opinion. And the additional cocking effort is a real put-off.
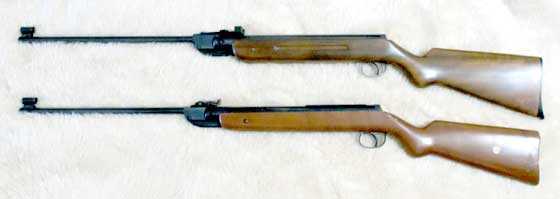
The Diana 35 (top) isn’t much longer than the Diana 27, but the thicker stock makes it feel larger.
Soup-up
Back in the 1970s when the 35 was being made the “velocity wars” were just getting started and airgunners around the world were starting to learn how to modify their guns for more speed. Everybody “knew” that adding a more powerful mainspring was the way to increase velocity and we all suffered through a learning curve that lasted several decades. Feinwerkbau taught us all that a long piston stroke was the best way to get higher velocity, but that didn’t stop each of us from learning the lesson the hard way.
I was one of the ones who learned and I did so with the Diana 35. But I was late to the party, because experienced airgunsmiths already knew about longer piston strokes and the Diana 34 was silently revolutionizing the world of breakbarrels. Meanwhile, I was building a rifle that cocked like the bow of Hercules, yet didn’t increase in velocity.
The spring isn’t the thing
I will cut to the chase and tell you that I once owned another air rifle that was based on the Beeman R1, yet was 25 percent larger and heavier, yet did not increase the velocity one iota! I wrote about it in a report titled, Steel Dreams. That rifle taught me a lot about airgun power and where it comes from. I now know that it isn’t just the mainspring or the diameter of the piston.
Back to the Diana 35
Now let’s get back to the Diana 35. The 35 never delivered the power we expected it to, but the Diana 34 that followed it (1984-present) was everything the 35 wasn’t. It had the power, though at first it was quite raw and uncivilized. Over the years Diana has refined the powerplant until today the 34 is quite refined.
But I already own a 34, and it’s a very nice one that I have tuned quite well. I don’t want another gun like that. What I want is a vintage 35 that’s as sweet to shoot as a Diana 27, though in a slightly bigger package.
This Diana 35
This rifle is 43.5-inches long overall, with a barrel that’s just under 19 inches. the pull measures 13.5 inches, which is identical to the pull of a Diana 27. The stock is thicker than a Diana 27 stock, though this particular rifle has a stock that’s thinner than the stock Diana switched to in the 1980s. The buttplate is black plastic with horizontal ridges to prevent slippage. It works — sort of — though a soft rubber butt plate would be better until it hardened over time.
This rifle weighs 6 lbs. 15 oz. That’s about a pound more than the 27. It’s still a lightweight air rifle by today’s standards, but not so light that it feels insubstantial.
The rifle is nearly 100 percent wood and steel. Excluding the buttplate, I don’t think there is another piece of synthetic on the outside of the gun.
Trigger
The trigger is the classic ball-bearing trigger. On a 35 the trigger has one additional spring guide that I will show you when the time comes, but other than that the parts are quite similar, if not all interchangeable (most are) — due to the difference in the spring tube diameters between the 27 and 35.
What to do?
So I now have the rifle. It came to me with a breech seal that’s in need of replacement. Carel told me all about it before I bought the rifle and, knowing that T.W. Chambers carries the parts I need, I ordered them.
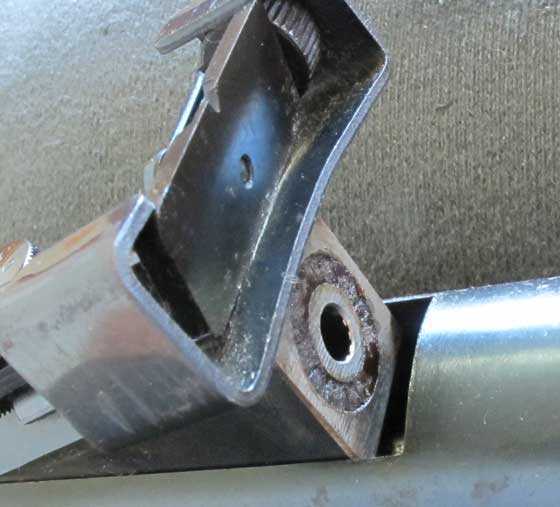
This leather breech seal is shot!
I have shown uncharacteristic restraint by not firing a single shot from the rifle until that breech seal is replaced. I now have the new synthetic breech seal I need, plus a new mainspring. It should put 7-grain .177 pellets out at around 650 f.p.s., if everything is in order. If not, I will strip it and replace the mainspring but only lubricate it sparingly. That way we can see what a new Diana 35 should shoot like before I get into tuning it the way I want. That assumes the piston seal is okay, which we won’t know until we look at it.
I won’t overwhelm you with back-to-back reports on this rifle like I did with Michael’s Diana 27 or the RWS Diana 45 I tuned a couple years ago. Not everyone is as enamored with these vintage breakbarrels as I am, so there will be other old airguns mixed in to keep everyone happy. But I wanted to get this rifle started, now that the parts are on hand.
Summary
We are about to embark on another journey to tune yet another vintage Diana spring-piston air rifle. Yippie!


BB
It looks to me like that rear sight can be flipped over or something and used as a peep sight also.
Do you see the little hole down under the notch?
Look at the picture that shows the breech seal.
Nope never mind. I looked at some of the other pictures and I believe that is a lock down screw for the windage adjustment.
GF1,
That hole is the back of the hole that the screw threads into to hold the plate with the notch to the body of the sight. It isn’t a peep hole.
B.B.
BB
Yep that’s what I seen after I checked out more views of the rear sight.
Always like to see the insides of (any) air gun!
On the breech seal,…….. I had quite a crazy idea out the blue,….. Follow me here,…..
It is possible to stack/mound water in a glass due to “stiction” or surface tension of the water. What if the same principle could be applied with a thin epoxy or resin? That way the seal area recess could be filled and create a slightly “mounded” seal. Self leveling epoxy/resin comes to mind, but I have never used the product. Even simple polyurethane like you would use on wood may work.
Crazy? Maybe. I just thought that I would toss it out there at any rate. While not rubber or leather,… I think that it would be an option and given the right material,… could create a very durable seal.
Good Day to one and all,…….. Chris
Chris,
If the epoxy was pliable enough to work as a breech seal it might work, but all epoxy I know of dries hard. It might be possible with the right material, as you say, but I don’t know what that material is. And the o-ring is so simple to install!
B.B.
B.B.,
True, with O-rings. I see you fight with leather seals, where I thought that this may be an option. Even dried, “hard” poly can still be dented and scratched, so it is still a bit malleable. Should be interesting to hear other comments from the reader’s great brain trust that we all enjoy. I am always amazed at the varied backgrounds, experiences and knowledge of the readers. Technical knowledge especially.
Chris
Chris
Read my reply to BB about your seal idea. Which by the way I think would be doable.
Check out some of things I mentioned.
BB
There was a clear 15 minute epoxy that we would use when building the RC air planes. It dryed sort of flexible.
And to add to Chris’s idea. What if you made one using the glue from a hot glue gun.
And something else I have thought about in the past is use one of those rubber sealing washers from a garden hose.
GF1,
Both good ideas. Hot glue is perfect (hardness), but a bit hard to be super precise in application. I think that there is fast setting and slow setting types though.
Ability to flow and self level would be key. The amount of “mound” desired would be critical, so needle-like application/precision would be very helpful. Depending on the surface tension, the mound could be made quite minimal, to quite proud.
Chris
Guys,
I once had to build a small power splitter for the Navy (one coaxial line input with three waveguide outputs, and from input to all output had to be the same phase length). Once I got it working, I poured some epoxy inside the “black box” to hold all my parts in place. Sadly, I did NOT read the directions; the stuff clearly said to watch out for heating when it cured. It got REALLY hot! And when I re-tested my three channels, they were no longer matched; and my boss was…really ticked off. #_# So, for the next go around, I ordered some “rubberized epoxy,” a white resin with a blue hardener. It worked fantastic! And it dried with the consistency of a Superball (anybody remember those things?=>), though perhaps not quite as hard. Anyway, if you used a syringe to put that in the groove of the breech of a rifle like this I believe it would work well as a seal.
Well, now you’re thinking, “Great Dave, so what was that epoxy you used?” Sorry, but that was 35 years ago! And I’m having trouble remembering what I did last week! =)~
Have a blessed weekend all,
dave
Dave,
That’s great! And where was that fountain of youth again?
B.B.
“And where was that fountain of youth again?”
That’s one more thing I forgot, LOL! =>
Dave
I remember something like the epoxy you described too. It also was years ago. If I remember right this stuff was to seal holes in punctured gas tanks.
Yes, Gunfun; I’ve been trying to find it on Google, but the company may be out of business; but you’d think (since it worked so well and there are still such needs) someone else would be making a similar product! It was NOT this stuff: https://rubberizeit.com/ , even though that shows up all the time when I search for “rubberized epoxy.” Back when I found it the first time I had to leave through all the product brochures we had on hand…no Google to search back then, hahaha! =)~
Dave
Yep I remember thinking through the pages.
Matter of fact we do still have supply catalogs at work that are easy 5 inches thick. Does anyone remember what using the index means. 🙂
“Does anyone remember what using the index means”
Not if they’re under 40 years old! =>
Dave
Probably true.
🙂
Chris
All we need to do now is test it.
Who’s got a break barrel to use as a guinea pig? 🙂
Gunfun and all of you,
I would use a 3 D printer and flexibel filament. Would take about half an hour to set up and print a seal like that.
That said, it is much more fun to set up a gun barrel totally level and pour in the liquid into it until has a nice rounded surface. It is done here in cafes with small glasses of gin. So we can ask a really experienced innkeeper to do the job.
Regards,
August.
August
I thought of the 3D printing too. But was thinking more of a simple quick fix with normal household products that we all have mentioned.
And I should mention too before I forget. The epoxy’s like JB weld and that 15 minute epoxy as well as hot glue. They all can be shaped before they set up by dipping your finger in water then smooth it or shape it how you like. Its really easier than you think. Kind of like potters making clay jars.
And come to think about it caulk and silicone can be formed the same by using your finger and even thumb dipped in water to shape it. I have done it often on all of the above.
GF1,
Well,…. I know of at least one break barrel that needs what appears to be a leather seal. (subtle hint there B.B.) 😉
In the interest of air gunning advancement,…… I say give the slow setting glue gun sticks a try. If it does not work,…. it would most likely pull right out in one piece. No worse than digging out that old leather seal.
The “poured” suggestions have been interesting.
Chris
Chris
Done know what to do to let the seal release out of the barrel breech.
Spray a little WD-40 or silicone spray in the spot were the breech seal will go. Then do the hot glue or epoxy.
It should come right out if needed for whatever reason if the spray is used first.
Gunfun1, et al.
I thought of another couple of possibilities: Shoe Goo and Flex Seal.
LMo
Larry
Yep Shoe Goo. Forgot about that stuff.
And I don’t think I know what Flex Seal is. Or maybe I do and just don’t recall right now.
But kind of interesting all the suggestions for seal material today.
And going to go another route. Kind of based off of that rubber garden hose washer I mentioned above.
How about use a air compressor hose or even automotive heater hoses or such. Cut it off whatever thickness you want. And you can put a piece of sand paper on a hard surface and sand the piece that was cut off to get how much it is above the breech.
Maybe all these things we are all suggesting might be temporary fixes just to keep a gun shooting till the new seal arrives. Maybe they will last.
I think this was a good subject Chris started.
GF1,
You must not watch much TV. There is like 6 variations of the stuff. Drill a hole in plastic bucket (full of water) and slap some tape on it. Spray it on. Paint it on. Etc..
Cut the bottom out of a boat out and replace it with window screen. Paint it with Flex Seal and you are off to the boat races.
;),………. Chris
Larry,
Good ideas, but have never used either,… so I do not know how they act in their raw form.
B.B. has always appreciated the “old” while at the same time embracing the “new”. So,… hopefully some contemplation is under some consideration to the idea/concept.
I would never see the concept replacing easy to replace/buy O-rings. Leather breech seals of the “oldies” might be a another ball game all together.
Chris
Chris
Yep now I remember what Flex Seal is.
Just needed my remember’r refreshed. 🙂
GF1,
Been there,… done that,… forgot that! 😉
Chris
Chris
What was we talking about?
😉
The edit feature for “boo-boo’s” is sooooooooooooo nice!!! Used it multiple times already today.
B.B.,
That is a great photo of the 35 an 27 together. I find that look of the buttstock with straight level comb all the way back very appealing. Every time I see a photo of a modern 34, which has a similar profile in the back, I’m tempted to get one.
As for my Winchester 427/Diana 27 (“The Gaylord” :^) you tuned to perfection and mention above, the other afternoon I took it out to my backyard to plink at a tomato juice can at roughly 35 feet. It is still shoots as smooth as glass. It would be wonderful if you could get this 35 to be that smooth, or at least in the same neighborhood of smoothness, given its power level.
The Gaylord is so quiet that every time one of those .22 Air Arms pellets hits the tomato juice can, there is this satisfying “smack” with no powerplant noise at all to interfere.
Michael
Michael,
I hope that rifle never changes its performance in your lifetime. What a sweetie! 🙂
B.B.
B.B.,
My wife commented about it a couple weeks ago, “You must really like that one by the back door. You shoot it a lot more than the others.” :^) I almost forgot about that, but she doesn’t often comment on my air guns, unless one has exceptionally nice wood.
Michael
Michael,
Ahh — a woman of refined tastes!
B.B.
Mr. Gaylord:
Could you please explain in one of the continuing postings on the review of the Diana 35 what the pattern or reasoning that’s behind how Diana air rifle models are numbered?
How is it that a Diana 35 is “the older brother of the Diana 27”? Shouldn’t a model 27 be older than a model 35?
Thank you.
Respectfully submitted,
William Schooley
William,
Thanks for thinking that I know the rationale behind the model numbers. I used to think it was piston stroke in millimeters, but that breaks down with the Diana 60-series rifles.
I’l try to figure it out.
B.B.
It may be more accurate to say the 35 is the “bigger” brother of the 27.
For the most part, there is no logic whatsoever in Diana model numbers! You will hurt your head trying to make sense of them.
Designations are often “recycled” for completely different guns (“model 10” is both a pre-war tinplate kid’s rifle, and a post-war full-race match pistol). And the same name often changes drastically in design (“model 27” was always a medium-sized rifle, but there are four completely different guns with that name spanning about 80 years).
For what it’s worth, the first model 27 appeared before WW1, while the first model 35 appeared in the mid-1930’s. The post-war versions of both guns are quite different from the pre-war ones, and are mechanically nearly identical save for the piston diameter.
All that being said…the post-war recoilless match rifle names actually may be inspired by dates, though Diana was infamous for being slow to bring new designs to the market. The model 60 came out in 1963, the model 65 in 1968, the model 66 in 1974, and the model 75 in 1977!
Mike,
And sometime this year Diana will be bringing out a model 30 ball-shooting galley gun that’s made to shoot common BBs instead of precision balls. So the entanglement continues.
And the model 30 is also a pre-war bolt-action pellet gun!
B.B.
MDriskill,
So this 35 which is a bigger brother is only slightly dimensionally bigger than the 27? You mentioned the piston diameter, but by how much? From the picture above it seems the stroke was also increased also by a little.
Siraniko
I have an 80’s-vintage 27 apart at the moment. The piston is 25mm in diameter. The receiver tube is about 28mm in diameter, and measures 274mm in length, from the front trigger assembly pin to the standing breech face.
Also have a 35 of similar age. Receiver is 31mm in diameter, so I’m guessing a 28mm piston. Receiver length is the same 274mm. It’s overall receiver is a tiny bit longer due to the breech forks and how the rear cap fits, but piston stroke is the same.
Mike,
I hope I will remember to measure the piston diameter of the 35 when I tear it down. Then we’ll know!
B.B.
MDriskill,
So the 27 by my calculations has about 33.6 cc of stroke volume while the 35 has about 42.2cc. Which is about 25% more. Wonder if the all these assumptions are correct?
Siraniko
Both guns have a piston travel of about 75mm. By my math – and assuming I guess right on the 35’s piston diameter – that makes the displacement of the model 27 about 37cc, and of the model 35 about 46cc.
The displacement is the area of the piston face (its radius squared times pi), times the stroke length.
B.B.,
I like the family picture showing the Diana 27 and 35 together. When you come back to this rifle could you please also show the 34 alongside the 35? That would probably show what visible changes were done to achieve the much sought after velocity at that time.
Those protective “ears” don’t seem to be removable. Are they spot welded into the rear sight assembly?
Siraniko
Siraniko,
I can picture the 34 and 35 together but I don’t think it will show much. Maybe the cocking stroke can be shown?
I don’t think the ears are spot welded on. They are a separate plate beneath the rear sight leaf, but the method of attachment has me stumped at present.
B.B.
Just a guess, but the “ears” on the rear sight may not be intended as a permanent component (hard to see how one uses the windage knob with them in place). They may simply be a piece intended to protect the sight during shipping. This is a touch you often see on pre-war guns – a friend of mine has a minty pre-war model 35 which has a similar cap over its relatively fragile beaded post front sight post.
A wonderful collector’s touch! Bits like this tend to get quickly lost when guns are new.
Mike,
Wow, that’s interesting! I have looked at the ears and see that they are a plate that’s under the rear sight leaf. I think in the next part I will disassemble the sight so we can look at it.
I have tried to adjust the rear sight’s windage and it is indeed difficult to do. I think you may be right!
Thanks,
B.B.
I would say it’s to protect the adjusting knob.
Maybe it’s intended to be left in place after sight in for a way to protect the sight in. Or just remove if you like adjusting for windage all the time when you shoot.
I myself like sighting in and leaving alone. Then doing the windage and holdovers as needed.
BB,
It’s great to see you tackling another classic Diana! The model 35 is surely one of the best-loved air rifles of all time…one of “those” rifles of which zillions were made, but few appear on the used market.
Leave it to Carel to come up with an unusual example! The finger-groove stock and steel leaf rear sight are characteristic of pre-64 model 35’s (though I’ve never seen a rear sight exactly like that one!) but the tunnel front sight and stamped-metal trigger blade are more like the later variants.
As you mentioned, the basic diff between the 27 and 35 is the receiver diameter, which in the old days was how they made more power. The two have the same piston stroke, which allows them to share quite a few parts (the old HW 35 and 50 had the same relationship).
Got another update with my modded TR5.
First off it bugs me when a gun ain’t performing like I think it could. So I spent yesterday trying a few simple things. And of course after that I shot all the different .177 pellets I have. About 8 or so tins of different brands and shapes. And to note the Daisy wadcutters keep winning at 20 yards with the JSB 10.34’s coming in second. The best I got last time out before the things I did yesterday was 1-3/4″ average with one group of 1-1/2 inches.
And I wanted to say this and was hoping I would get different results. I put the factory barrel back in after the things I did yesterday and still not as good as the Crosman 1377 barrel. Then took the factory barrel back out and put the Crosman barrel back in. I didn’t want to try the factory barrel because I was afraid the gun wouldn’t come back and shoot good when I put the Crosman barrel back in. But the gun came right back to what I was getting yesterday which I’m happy with.
And I should mention the Optima scope is off the gun and has the Tasco red dot on it when I shot the 1-3/4″ groups before yesterday’s things I done. And it still has the Tasco red dot.
We’ll here’s what I did yesterday to the gun. And this is with the Crosman barrel.
First I tryed moving the muzzle brake sleeve back. So now the front of the barrel is exsposed. You can see the barrel now and how it’s stepped down in the front. I thought maybe air turbulence inside that sleeve was upsetting the pellet when it left the barrel. After that I was getting a little better than the 1-3/4″ group and I mean only a little better. About a 1/16″ better.
Next thing I did was I moved the adjustable butt stock in to the shortest legnth of pull adjustment it has. Before I had it out at the longest legnth of pull. At the longest legnth of pull the butt stock wiggles all over the place. With it set at the shortest setting now the butt stock is pretty tight. This is where the gun picked up. I started getting a little bigger than 1-1/2″ groups. And this is all 10 shot groups I have been shooting with yesterday’s testing.
And this is the last thing I done to the gun.
I have some old red wheel bearing grease that I have used on other spring guns in the past and it had helped them. The grease is medium thick and if you put it between your finger and thumb and pull them apart it’s tacky and leaves strings that eventually pull apart the farther your thumb and finger come away from each other.
Well that did the trick. But I think probably the combination of things needed to be done. I don’t think the grease would of done it without moving the butt stock or the muzzle brake.
And I’ll post the target from today that I shot just to confirm what I was getting yesterday. The gun will now consistently shoot this size group. Oh and I should note. That yesterday was pretty well dead calm wind as well as this morning.
The JSB 10.34 is now clearly the winner. The Daisy’s won’t do no better than a 1-3/4″ for some reason. And now the second best pellet is the JSB RS 7.33 grain pellets which are shooting a bit over a 1-1/4 inches.
Here it is. The JSB 10.34’s are getting consistent 1-1/8″ groups. How’s that for 2 different weight pellet being close in performance. And to note all the other pellets I tested we’re up at 2″ and over. The best the factory barrel did was 2-1/4″ with the Daisy wadcutters and 2-1/2″ with JSB 10.34″s all other pellets was terrible with the factory TR5 barrel.
But here’s a picture of the target. And also I went back to resting the gun directly on the bag and using a light hold with the trigger hand and my fore hand finger on top of the receiver right behind the barrel with a light down pressure.
And I’ll post another picture of how the gun looks now with the sleeve back more on the barrel and the butt stock set at the short legnth of pull.
Here’s the gun with the sleeve forward and butt stock adjusted for the longest legnth of pull and the Optima scope. That was before the things I did yesterday. Best groups was 1-3/4″ with Daisy wadcutters.
Here is with the sleeve slid back (you can see the step down at the front of the barrel now) and the butt stock set for shortest legnth of pull. And of course the grease and the Tasco red dot. This how it looks now. It’s now shooting the 1-1/8″ groups.
And I know a 1-1/8″ still ain’t great for 20 yards but it’s way better than it was doing.
Hopefully BB will do some lubing when he tests his TR5 the next time out. I believe he mentioned Tune in a tube. And I know he mentioned putting on a dot sight. But BB also check out the butt stock on yours adjusted all the way in and all the way out. Maybe yours don’t have a lot of play in it.
Anyway back to shooting. 🙂
GF1,
LOL! You have most definitely joined the cult. Don’t stop now though. It will be interesting to see where this goes.
RR
Look at the last picture. It looks so much like a pistol with a butt stock added and a little longer barrel.
The gun handles so we’ll it’s not funny. I couldn’t stand that it wasn’t quite where I wanted it grouping wise.
I’ll say this right now if it was a semi-auto pcp or a rimfire it would be one of my most favorite guns. It’s so easy to shoulder it ain’t funny. Matter of fact I like shooting the gun standing free hand better than bench resting it.
All I can say is right now mine is a very good plinker. And from the way the gun is still hitting I don’t believe the grease slowed it up any. And the gun now just makes a slight bump when it’s shot. Very similar to shooting a .22 short in a light rimfire gun. Very controllable now.
It’s getting close to how my HW30s feels when shooting. It just needs to be a little better grouping and it would be right with the HW30s.
GF1,
I have no doubt of this air rifle’s virtues. It would indeed be an awesome little plinker. Like the IZH 60/61, there will be those who will defend to the death there choice of such. “It’s a Jeep thing.”
I myself was sorely tempted years ago by the IZH 60/61. The concept of the bullpup sproinger intrigues me. I think the design has something to offer and deserves further serious exploration. I would really like to have a Gem or Britannia here at RRHFWA.
RR
I wish I would of got a Izzy 6061. I was thinking about different air guns at that time.
And I really wish I had one now after all that I hear about them. Oh well. Maybe not a new one. But maybe a used one. Who knows how the stars will shine.
But at least I’m happy with my TR5 now. And really the biggest change was the barrel and the lube. All the other stuff really didn’t cost anything. And to think about it I already had the 1377 barrel. Which did cost me something at one time.
Hopefully BB comes up with some magic with his TR5. And I know Edw has gave it a good shot at getting up to par. Haven’t heard from Michael with his either. Maybe his is working out for the type of shooting he does. I guess we will see sooner or later.
Oh and almost ordered another TR5 today (a green one this time). But held off. I ordered another one of those fixed power 4 magnification $49 UTG scopes for my TR5. I have one of them scopes on my Savage 93 .22 rimfire and it’s working out nice in close at 15 yards all the way out to a hundred yards. I think it’s the low magnification that’s keeping it sharp. But I want to get a good scope on the TR5 instead of that Optima scope and I want the dots on the reticle for some hold over and under references. I was actually hitting some feral cans today out at 50 yards with my TR5 now. But was kind of hard getting the hold over held right for the shot. I was holding the red dot at the 12:00 position with the target at the 6:00 position roughly. At least now the guns doing it with the latest found accuracy it’s getting.
Anyway enough rambling. Off to shooting again.
RR
Oh and forgot. Been wanting to get one to try but they either been out of stock or I remember after I make my order.
But finally remembered to order one of them Rocket launcher feral can launchers.
/product/rocket-shot-target?a=5946
Going to give my semi-auto Bullmaster a workout, well and the 1077’s and WildFire. And heck probably even the Daisy 74’s. We’ll might not be good shooting the 74 at it. But could use a pellet gun to shoot the paddle to launch it while someone else is ready to hit the flying can with the 74.
If it ends up working nice I might get a few more Rocket can launchers.
And I just did a search on the Daisy 74 and it’s listed as not available. Which is a shame. It’s a semi-auto bb shooter and gets easy up to 300 shots on a 12 gram Co2 cartridge. And it was only like 40 bucks.
Man another fun gun gone. Glad I got a couple of them.
/product/daisy-74-co2-bb-gun?m=3380
GF1,
I was thinking of different airguns then also. Instead of an Izzy rifle I bought an Edge. No regrets.
Like the Izzys, you are only going to get so much out of the TR5, not unless you go WAAAY overboard. Now if it was a single shot I might be tempted to get one.
I do agree that right now probably the best thing you could do is give up on the rambling and do some shooting. Might just join you.
RR
And I did just that. 😉
Just wanted to say Happy Mothers day, found this interesting take on youtube, it speaks.
https://www.youtube.com/watch?v=ZTGo33H07bA
Enjoy,
Happy Mothers day
Mike
Mike In Atl,
Thanks! I enjoyed the song. 🙂
Siraniko
Siraniko,
A Nice Mothers Day statement.
And an excellent theft of Paul’s 50 ways to leave your lover. https://www.youtube.com/watch?v=ABXtWqmArUU
Mike
Is there anywhere in the world a video describing how to disassemble a Diana 35? 🙂
xseven,
Welcome to the blog.
I don’t know of such a video, but are you aware that I describe it in this blog? Go to this report and use the links at the top for a report on how the rifle is disassembled.
/blog/2019/06/diana-35-part-6/
Then go here for a step-by-step report on disassembling the Diana 27 (Winchester 427), which is almost identical to the 35.
/blog/2019/02/tuning-michaels-winchester-427-part-9/
B.B.
Thank you! I’ve read all the pages already … but i am inquiring to help the grandfather of my friend … and he is better with “moving pictures” rather than just pictures … 🙂
Tech question: can the gun take stronger spring? Any real benefits?
https://www.waffencenter-gotha.de/shop/Ersatzteile/Luftdruckwaffen/HERSTELLER-MODELL/DIANA/DIANA-Luftgewehre/Diana-35/Elastomerkolbendichtung-Befestigungsschraube-DIANA-35::2946.html – replacement piston seal
https://www.waffencenter-gotha.de/shop/Ersatzteile/Luftdruckwaffen/HERSTELLER-MODELL/DIANA/DIANA-Luftgewehre/Diana-35/Schraubenfeder-Kolbenfeder-Stark-Export-ca-17-Joule-DIANA-35::1870.html 17 Joule spring
https://www.waffencenter-gotha.de/shop/Ersatzteile/Luftdruckwaffen/HERSTELLER-MODELL/DIANA/DIANA-Luftgewehre/Diana-35/Schraubenfeder-Kolbenfeder-Standard-F-bis-7-5-Joule-DIANA-35::1935.html 7.5 Joule spring
Edit: the links are not recognized properly … the end part is needed (.html)
Xseven,
Welcome to the blog.
None of your links are live because they are all incomplete.
Also, why put a heavier spring into the rifle? The power will not increase. Th3 swept volume is too small.
B.B.
Xseven,
Gunfun1 actually cut a spring several times and the fps never dropped. Most springers have too much spring already. There may be a case where a stronger spring may work better (more fps),… but it is more the rarity. A stronger spring can cause other problems,.. even if does offer more fps. For one,… it can become very hold sensitive and can “slap” you more.
Vortek has stronger spring kits,…. in which they will tell you will only raise the fps a little,… if at all. Their gimmick is the plastic sleeves that dampen spring vibration. It does work. I had a TX200 in which I put an HO kit in. It was smoother and the fps increased only a little.
Best wishes,……. Chris
http://www.shorturl.at/gxBTX 17 Joule
http://www.shorturl.at/lvPVX 7.5 Joule
http://www.shorturl.at/jqAHI piston seal replacement
The difference in speed indicated on the site is quite substantial. Is it just marketing? (The site is in German language but Chrome is good at translating)
Would a heavier pellet benefit from a stronger spring or there will be no difference?
Xseven,
I do not know if a new spring would do anything. Fps and fpe and pellet weight are all relative to each other.
If anything is broken (spring) or worn out (seal),…. anything will be better. You won’t know what you need until you have it torn down.
Chris
PS,…. come to/post on the most current blog. More people will see your post. Off current topic comments are fine. More people will see your posts and maybe able to offer some answers to your questions.
Xseven,
Once again your links are incorrect.
I can’t comment on what I can’t see, but 17 joules is 12.5 foot-pounds. That is about the maximum the HW35 is capable of. The 7.5 joules is a weakened German version.
What I am saying is they are not getting more power, just all the power the 35 can deliver. This is no big deal because tuners have been doing the same thing for 30 years.
The HW35 is such a pleasant rifle that I don’t see any advantage to tuning it as fast as it can go. It just makes it harder to cock. That is a personal opinion, of course.
B.B.